The design of a modern living room should be perfect, as this room is considered the "face" of the house. Therefore, in its design, great attention is paid not only to the decoration of the walls and floor, but also to the ceiling, which is the main detail of any decor. Its correctly selected shape and color will make the living room stylish and cozy, fill the space with home warmth and favorably emphasize the beauty of the rest of the interior elements. Today, there are many options for finishing the ceiling using various building materials and structures, thanks to this it is easy to choose the right theme and give the room a complete look.


Types and designs
The ceiling design in the living room can be done in different ways. Depending on the size and height of the room, both the application of a decorating layer directly to the base itself and the installation of suspended compositions using drywall and canvases are used. Simple finishes include:
- Whitewash. Although this method is considered "old" and is gradually losing its relevance, it remains in demand among owners of apartments and houses, because whitewashing does not require special financial costs and is done quickly. To complete it, it is enough to apply a solution of chalk or lime to the ceiling with the help of a spray gun. In order for the surface to acquire the desired shade, special dyes are added to the solution. The main disadvantage of whitewashing is the need for laborious cleaning of the premises after work and in the thorough elimination of surface defects before starting the work process.

- Painting. It is most often preferred for routine renovations in the hall. As a coating, water-dispersion and water-based paints of different colors are chosen. Painting can be done with both expensive and cheap dyes. To make the ceiling beautiful, it is necessary not only to carefully prepare its base, but also to apply paint in several layers.

- Wallpapering. It is characterized by the cleanliness of the work, it allows you to hide small seams and cracks on the surface of the ceiling. The aesthetic appearance of such a finish lasts up to 5 years, then restoration must be carried out. For wallpapering, canvases are purchased from high-quality paper, consisting of several layers. Usually, for these purposes, vinyl-based wallpaper with a relief structure is chosen, they are durable and are not afraid of wet cleaning.

- Pasting with tiles. Products are decorative material of various colors and sizes, made of expanded polystyrene in the form of squares or rectangles. Original drawings and patterns can be additionally applied on the surface of the slabs. Today, you can find smooth, rough surfaces of the material on sale; tiles with imitation wood and stucco decorations are also very popular. Such low-cost and easy-care products can be painted with water-based paint.

Modern ceilings in the living room are also decorated in the form of complex structures, which are:
- Hinged. Well suited for surfaces in which you need to hide various defects and placed communications. The panels of the suspended composition can have any shape, texture and color. At the same time, they are necessarily complemented by beautiful lighting, which allows you to create an unusual design.


- From drywall. Such a finish requires experience and skill in performing the work. Two-level ceilings, which are often made curvilinear, look original in the living room. They have excellent sound and heat insulation, they serve reliably for many years.
But it is worth noting that a two-level frame is suitable only for high rooms. It is better not to install it in a hall with a low ceiling, because the height of the space will decrease by 15-20 cm. The elasticity of drywall allows it to take on various shapes. Designers recommend creating from it not only simple structures, but also multi-level decorations with domes and arches. Plasterboard and stretch ceilings are originally combined, presenting unusual design options.


- Cassette. They are installed on a prefabricated frame. The material looks like thin plates of zinc and aluminum, on the front side of which a powder layer of multi-colored paint is applied. When decorating ceilings in this way, you can choose plates with a rough or smooth surface. They are quick to install, easy to clean, allow you to hide ventilation systems, but are characterized by low sound insulation.

- Mirrored. They are a kind of cassette ceilings, but they use decorative mirrors instead of metal plates. Such decorations help to visually increase the height of the hall and add volume to the room. In addition, they are absolutely environmentally friendly and safe to use.

- Hemmed. They are curved surfaces of complex shapes, which are made from a metal frame, drywall sheets and decorative panels. They can be mounted on a ceiling, the irregularities of which do not exceed 1-2 cm. If you plan to install wiring for communications and built-in lamps, this ceiling model will not work.

- Rack and pinion. They look original both in the design of wooden houses and in city apartments. Due to the fact that the slats are made in various colors, they can be used to decorate any style in the living room. An unusual option is the material covered with gold or silver, chrome strips also look great. To finish the ceiling in this way, choose a slatted material with a glossy or matte surface.

- Stretched. They look like a solid canvas, which is made from durable vinyl polymers. First, a frame made of slats is mounted along the perimeter of the hall, and then the material is pulled. An original pattern or drawing can be applied to such a soaring ceiling. The composition, as a rule, is made of different colors and textures.

Finishing materials
The design of the ceiling in the living room is made out with various materials, the choice of which depends on its design features. It is important to consider correct placement of light sources and to hide electrical wiring. At the same time, any type of decoration should be performed with ecological products that would not only harmoniously fit into the overall interior of the room, but also meet the conditions of safe operation. So, choosing a "flat" version of the ceiling for design, you will need wood, plaster, paint or wallpaper. As for multi-level structures, they can have a mirrored, glossy or matte appearance, which is usually created using drywall, PVC panels and plastic boards.


Recently, the combined version of the ceiling, in which a suspended structure is made and decorated with wooden beams and tension canvases, is also very popular. The finishing touch in this decor is moldings and stucco moldings.


For many, single-level ceilings may seem unpresentable and simple, but if you choose the right finish, you get a completely original picture. For example, a ceiling covered with ordinary wallpaper will look faded, but if you use beautiful canvases based on non-woven or fabrics, then its appearance will change.


Regardless of what type of ceiling will be chosen for the interior of the hall, it is necessary to use high-quality materials for its decoration, it is advisable to give preference to natural products. Great attention should also be paid to their texture and color.


Styles of design
The living room is a continuation of the overall design of the house. Therefore, in order to distinguish it from the background of other rooms in an original way and fill it with an unusual atmosphere, it is recommended to apply a certain stylistic direction in the decoration of the ceiling. Today there are many styles for decorating ceiling coverings, but the most important of them are:
- Rococo. It is characterized by a perfectly flat surface in beige, blue or white. In this case, the ceiling should smoothly merge into the walls. Often, frescoes or modeling are used as decorations, and they also try in every possible way to fill the background with a bronze and gold tint. The chandelier is usually placed in the center of the ceiling and is a huge piece decorated with crystal balls and pendants.


- Egyptian notes. They are characterized by relief painting with antique themes. The ceiling is made simple, its only decoration can be a multi-figured bas-relief or cornice. It is allowed to paint the surface with floral ornaments. The color scheme is usually dominated by blue, yellow, crimson and green.


- Gothic. The ceiling is made in the form of wooden beams or vaults. In order to properly decorate, it is recommended to use exclusively natural wood species. A beautiful example is the white background of the walls in the hall, complemented by the black ceiling.


- Country. It is as close to nature as possible and does not tolerate excesses. For him, ceilings made of wooden beams are also used, from which unusual shapes are laid out. The spatial color scheme is chosen, and it is dominated by yellow, beige, brown and light chocolate shades.


- Classicism. The walls are separated from the ceiling with beautiful cornices or friezes. Often the surface is decorated with gilded ornaments and stucco moldings. Colors are chosen light, bright colors are completely excluded.


- Renaissance. Its distinctive feature is clarity and simplicity, so contrasting compositions are not allowed. Both spotlights and modest chandeliers can be used as lighting. The ceiling is installed at different levels, but straight lines must be present in each of them. The color scheme is selected depending on the general background of the living room.


- Kitsch. It is a bright and exotic option for the ceiling. Provides for the use of different colors, which may not be combined with each other. For example, the base is made bright blue and framed with eaves decorated with sparkles or stars. Kitsch is often chosen for living rooms with bay windows.


- Eclecticism. An interesting direction that combines both Western and Eastern motives. Such ceilings look unusual, combining modern, baroque and high-tech at the same time. At the same time, the ceiling can be either monochromatic or include separate colored inserts. An original addition to the design in this case will be a forged chandelier and embossed baguettes.


- Classic characterized by such a finish, in which the ceilings always look individual and unique. Classic décor is usually dominated by light and pastel shades. Designs can be single-level and stepped. Beautiful chandeliers are used as lighting and are supplemented with illumination from spotlights. Such ceilings, decorated with stretch canvases, pasted over with wallpaper or covered with decorative plaster, look great.


- Modern. Suitable for home owners who love everything new and modern. In this finish, contrasting compositions, inserts from mirror surfaces and photo print are welcome. For a living room in this direction, 3D ceilings are well suited, creating an unusual feeling of lightness and weightlessness.


Lighting
Traditionally in living rooms, a large chandelier is installed in the center of the ceiling, but this option is usually suitable for simple decor. As for complex and multi-level structures, it is necessary to use other more stylish methods of organizing lighting to illuminate them. For example, spotlights, which can be complemented by a large shade with an original design, would be a good choice. The area of the room also plays a huge role in the choice of light sources. For small rooms, ordinary chandeliers are suitable, and living rooms with a low ceiling are best decorated with several built-in lamps and place a floor lamp in the room.


Recently, homeowners have chosen to make ceilings that consist of many levels. Such an architectural composition looks presentable, but if you do not worry about lighting it, the decor will be ruined, especially if brown is chosen for the ceiling. To avoid this, it is recommended to mount several types of lighting in the living room.


It is a good idea to use backlighting to highlight unusual details on the ceiling. It will be complemented in an original way by a stylish glass lamp, while it is best to choose spotlights for the decoration of such a plafond, they will originally shimmer in various shades and create a romantic atmosphere in the room. Overhead devices are also very popular; they are presented in various saturations and colors.


Before decorating the ceiling design in the living room, it is recommended first of all to make a good repair in it and expand the space. If this is a private house with high ceilings, then its interior can be diversified with multi-level structures. In a "Khrushchev" setting, where the room is small and its area does not exceed 18 square meters. m, you will need to apply various design ideas and visually raise the space.
To make the ceiling stylish and unique, you must adhere to the following tips:
- Choose natural materials for decoration. They are not only considered environmentally friendly, but also look great against the general background of the interior. Both wooden structures and products that imitate stone will be suitable.
Modern methods of decorating the ceiling amaze with their variety. If earlier the design of the ceiling was carried out exclusively with the help of whitewashing and painting, now you can choose a different shape, material and color for it. Before choosing a ceiling, it is important to consider possible decor options, familiarize yourself with the advantages and disadvantages of each method, make an estimate of the project, and implement it. This can be done with your own hands, or you can turn to specialists for help.
Since there is a great variety of materials for decorating ceilings, for each room you can choose the option that will match its functionality and interior.

Design options for ceilings in various rooms:
- Kitchen. When choosing a material for the ceiling in this room, it is important to take into account the special temperature regime, vapors and odors generated during cooking. The material must be moisture resistant, not absorb odors. Plasterboard, plastic, glass, different types of stretch ceilings, painting are best suited for the kitchen.
- Bedroom. Materials for the room can be very diverse. When choosing the material and design of the ceiling, it is important to pay attention to its harmonious combination with the entire interior of the room. It should complement the overall coziness and create comfort. A plasterboard ceiling, a suspended ceiling, and painting are best suited for the bedroom.
- Living room. For a room, it is important to choose a ceiling that visually expands the room, will harmoniously combine with all interior elements. This can be an inexpensive plasterboard ceiling, tiered stretch ceiling, panels, or suspended ceilings.
- Bathroom. The choice of material is necessary taking into account the unstable humidity and temperature conditions. Ceilings made of plastic, processed wood, special paint, stretch ceiling are well suited for decoration.
Each room has its own characteristics. This should be taken into account when choosing a material that should be taken very seriously - the service life of the ceilings and the appearance will depend on it.
Any material can be suitable for ceilings in different rooms. The whole secret lies in a properly thought out ventilation system.
Decorated ceilings will look beautiful and harmonious if you treat all stages of preparation thoughtfully and reasonably.
Ideas for ceiling decoration (video)
Ceiling decoration options with various materials
Modern materials for the decoration of the ceiling open up ample opportunities in the design of ceilings in a living room. The only condition when choosing an option is compliance with a single style in the interior, its harmonious addition.

Design options:
- Drywall. Plasterboard ceiling sheathing is quite popular today. It provides an opportunity for an inexpensive and original design. The material has soundproofing and thermostatic functions. It absorbs excess moisture and maintains temperature conditions. This feature can be a disadvantage, for example, when using it to decorate a bathroom.
- Stretch ceiling. This is the simplest solution for decorating ceilings today. Installation of stretch ceilings is very fast, but quite expensive. Different types of stretch ceilings are used depending on the function and style of the room. All of them are made from a single canvas, which is pulled onto a frame of various designs using a special apparatus that heats the material.
- Painting. A good design option for a classic interior. This ceiling looks stylish and simple. Whitewashing and painting do not take much time, but require a long preparation for work. For painting, the surface must be perfectly flat and clean, free from defects and stains.
- Wallpaper. The only drawback of this design option is the inconvenience of repair work. Otherwise, this is a great option. The variety of wallpapers allows you to decorate the ceiling in a style suitable for the overall style. It is important to remember that with high humidity, the wallpaper can fall behind, swell and stain.
- Dropped ceilings. The registration is quite expensive. It involves the installation of a frame and its sheathing with various materials: bamboo, plastic, aluminum and mineral fibers. Suspended ceilings are not afraid of moisture and temperature drops, they are convenient for cleaning.

There are a great many options for decorating ceilings. Before choosing an option, it is important to weigh the pros and cons.
When choosing an option, it is important to take into account the following nuances: the cost and quality of materials, their reliability, service life and environmental friendliness.
When choosing a design option, it is important to consider the style in the interior. The ceiling should be in harmony with the rest of the decor.
Ceiling decoration with LED strips
An excellent option for additional decor for multi-level ceilings is the design with LED strips. A tape is a device that illuminates a room, thereby performing a lighting and decorative function at the same time.
Benefits of tape decoration:
- heat resistance;
- plastic;
- installation versatility;
- originality.

Many visual effects can be achieved by installing an LED strip.
It is important to correctly install the tape, make sure that after installation the LEDs are not visible, they must be hidden between the levels of the ceiling so as not to disturb the light effect.
LED strip is versatile. There are many options for its installation, they depend on the expected visual effects: bright or dim light.
The original design of the ceiling with moldings
Molding is a decorative strip with various lengths and volumes. The plank can have a simple, flat design, or it can be rich in decorative elements.
Molding is used to decorate walls and ceilings. It is harmoniously combined with paint, wallpaper, drywall, plaster.
Thanks to the molding, you can create visual effects, zone the room and embody bright design ideas.

Molding materials
- plastic;
- polystyrene;
- polyurethane;
- wood;
- metal.
Depending on the materials, the molding can bend easily or it can be stiff. This should be taken into account when planning your design. There are a variety of color solutions for moldings. The planks can be painted with specially selected paints.
Installation of decorative molding on the ceiling (video)
Modern types of ceiling design are striking in their variety. Before proceeding with the choice of materials and shapes of ceilings, it is important to pay attention to the design of the room in which the ceiling will be decorated. It is important to take into account the functional features of the room, the stability of the temperature regime and ventilation. An important criterion when choosing materials for ceilings will be the ratio of their price and quality.
Ceiling decoration is of great importance in the interior design of the living room. Correctly selected tones, competent decor, beautiful lighting create a harmonious atmosphere and emphasize the overall style. To do this, it is not necessary to invest large funds and hire specialists - there are many interesting and affordable DIY finishing methods. Before decorating the ceiling in the living room, you need to study the main styles, select materials and familiarize yourself with the technology.
The classic style in the interior of the living room will never become outdated. These are necessarily light colors, regular shapes, exquisite stucco molding and a beautiful chandelier. The ceiling itself can be multi-level or simple, and paint, decorative plaster and wallpaper are suitable for finishing. The main accent is made by baguettes around the perimeter of the surface and additional accessories. To complete the finish correctly, you must first prepare the ceiling.

Preparatory process
The old coating is carefully removed, paint and plaster are removed, and the surface is cleaned of dust. Small cracks and defects are leveled with putty, and after it dries, these areas are treated with sandpaper.
If you plan to install drywall, additional surface treatment is not needed, but if the finishing involves painting, wallpapering or plastering, more careful alignment will be required. To do this, the ceiling is primed, covered with a uniform thin layer of putty, and polished. Each subsequent layer is applied after the previous one is completely dry. At the end, a finishing putty is applied, the ceiling is sanded again and treated with a primer mixture. After such processing, you can start decorating.

The easiest way to paint the ceiling; paint you need to choose a matte light shade. Even if the leveling of the work surface was very high, there could be subtle bumps or depressions that immediately catch the eye under the glossy paint. But matte paint easily hides any defects. It usually takes 2 coats to give the ceiling an even color.
If wallpaper is chosen as a decoration, they should not have a catchy pattern and be too bright or dark. Wallpaper of white, light beige, cream shades with a smooth texture and a barely noticeable pattern are ideal. And here decorating the ceiling with plaster in this case is undesirable: Textured surface creates glare and darkening, which is unacceptable for a classic style.
Decorating methods
For finishing the living room ceiling you will need:
- straight and curly fillets;
- a pencil for marking;
- polymer glue;
- clean dry cloth;
All joints between the ceiling and walls must be closed with straight fillets... They start from the corner: glue is applied to the back of each baguette with a narrow strip and gently pressed to the surface, closing the seam. The protruding glue is carefully wiped off so as not to stain the ceiling. There should be no gaps between the fillets, and if they did form, you need to fill them with a sealant. The last baguette should be trimmed correctly so that the edges match the pattern.

In the center of the ceiling of curly fillets, you can lay out a circle of the correct shape, as well as fix a decorative rosette around the chandelier. If the living room is large enough, you can create an inner square of baguettes with curly corners on the ceiling, stepping back from the walls 20-30 cm.
The gap between the first and second row of skirting boards is often painted in a different color, darker than the rest of the ceiling, and combined with the interior elements. If you replace ordinary baguettes with stucco molding, the look will be much more impressive; in addition, this decor looks great with gilding, which also gives the interior an atmosphere of luxury.

Multilevel ceilings for a living room in a classic style are decorated according to the same principle: light colors, regular symmetrical shapes, beautiful baguettes around the perimeter, competent lighting. Plasterboard structures allow you to hide the wiring, so you can use several lamps for lighting at once, placing them in the ceiling niches or along the perimeter of each level.
Minimalism and eco-style in the design of the ceiling

Modern living rooms are increasingly designed in a minimalist and eco-style, the basis of which is the simplicity and naturalness of materials. To finish the ceiling yourself, you will need very little:
- white or beige paint;
- matte white varnish for wood;
- wooden beams;
- lamps of a simple form.
Multilevel ceilings are not suitable for eco-style, so the surface must be flat and smooth. You should also not use a glossy finish - a matte ceiling looks more natural. The base should be made white or beige, although a subtle blue tint is also possible.
When the paint is dry, several parallel wooden beams are fixed to the ceiling, from one wall to the other. It can also be solid wood panels, then there is no need to paint the surface. The distance between the beams is chosen arbitrarily; it is not necessary to polish the wood in order to leave the most natural look. Upon completion of the installation, the beams are covered with a matte white varnish. The final touch is the installation of the fixtures.

The living room in the Japanese style looks very unusual and sophisticated, and the design of the ceiling plays one of the main roles here. A distinctive feature of this style is the harmonious combination of a white base and dark decor made of wooden slats, as well as the presence of Japanese symbols. The simplest finishing option: the ceiling in the living room is painted white, then a structure of wooden beams is attached, which divide the surface into large squares of equal size.
The beams are painted dark brown or black and varnished. At the intersection of the beams, decorative lamps with hieroglyphs are suspended. If the living room is small, it is recommended to replace the beams with thin slats; they can be mounted not from wall to wall, but only in the central part of the ceiling. One of the squares can be decorated with a stencil with a branch of cherry blossoms or a composition of several hieroglyphs.

The Art Nouveau interior is interesting for its unusual forms of structures, exotic colors and floral prints. There are many options for decorating the ceiling, both simple and quite difficult to perform. For a large living room, a multi-level ceiling is best suited, where each level has a special shape and a different shade. Often, stained glass inserts and original lamps are used for decoration.

To decorate the ceiling with your own hands in this style, it is not necessary to spend money and effort on creating complex structures from drywall. Acrylic paint of different colors, a stencil with floral ornaments and an unusual shape of a chandelier or lamps will be enough. The base must be white; in one of the corners of the ceiling, using a stencil, a drawing is applied with bright paint. It is good if part of the drawing descends onto the wall, as if connecting two surfaces. You can draw a floral arrangement around the chandelier, but always of a fancy shape and asymmetric.

Also, an excellent result is obtained with the help of thin baguettes: foam baguettes are glued to the ceiling, making up an asymmetrical geometric pattern. These can be parallel lines of different lengths, diverging rays, various squares, triangles or circles and curls. The pattern should be closer to one of the corners and occupy a certain part of the surface. Particular attention should be paid to the selection of lamps: they must have a modern look, non-standard shape and small dimensions.
Other design options
If it is difficult to decide on the style of the living room, you should apply a decor for the ceiling that would be in harmony with the overall interior and at the same time express individuality. You can divide the surface into zones and paint them in different colors with smooth transitions. It is enough to take 3-4 muted shades to make the ceiling attractive, but not catchy and flashy. Bright, saturated colors are best used in other rooms.

The living room looks cute and home-like with ceilings covered with the same wallpaper as the walls. For this, wallpaper must be chosen with a pattern of medium size, not too bright, preferably two-tone. A geometric pattern on a light background is ideal. To prevent the ceiling and walls from merging, beautiful white baguettes must be glued along the perimeter.

The described methods are the simplest. Having shown imagination, you can supplement these options or create your own. When decorating ceilings, it is very important to show a sense of proportion, and it is better to leave empty areas than to fill them with unnecessary elements. A pile of decor will never be able to decorate the interior, but minimalism in details, neatness and thoughtfulness in design will create real comfort and harmony!
Video - How to decorate the ceiling in the living room
Ceiling decor is an important aspect of interior decoration, making a space cozy and inviting. In some cases, a person wants to have a hand in creating an original image of his home. Therefore, you can decorate the ceiling yourself. Today there are many options for decorating the ceiling.
False beams
Certain interior styles - chalet, country, grunge, gothic, and others - require beamed ceilings. Contemporary mixed styles incorporate décor elements from different styles. Now, beams are used on a daily basis by designers and decorators for interior decoration. Previously, practically tasks were laid on the beams - these elements held the ceiling on themselves. Now, the beams perform exclusively a decorative function, therefore, it is not always advisable to decorate the ceiling with massive oak or beech beams for economic reasons.


Now designers are actively using gypsum, polyurethane and foam beams. They do not lend themselves to the load of the ceiling, which is why they are called false beams. But with the help of paint or veneer, they are given the shade and texture of any natural wood.

Textile
An interesting option for decorative ceiling finishes is. The use of fabric creates comfort and harmony in the interior.

This finishing method is used in interior design for a number of advantages.
- The fabric installation process does not require construction skills.
- The material well hides various flaws on the ceiling.
- For drapery, you do not need to perform basic finishing work, because the fabric is attached to the edges of the room.
- On the ceiling, you can lay electrical wiring and other communications - the fabric will hide everything.
- Drapery is an easy and pleasant way to decorate.
- If necessary, the cloth can be removed very easily. Convenient for repairing communications and electrical wiring in the ceiling.
- The fabric ceiling is almost impossible to damage. Minor damages on it will not be visible.

The disadvantages include a high level of odor absorption and low resistance to humid environments.
Cloth is an ideal material for creating original design effects. But they must correspond to the interior of the room in which the fabric will be draped.
The fabric ceiling has many variations. It can be done, for example, in the form of a tent or in waves. Stretching the fabric from the walls to the center allows you to realize individual ideas or use the generally accepted methods of installing a fabric ceiling.

The main types of fabric for drapery
There are 6 main types of fabric used for finishing the ceiling covering.

Decorative plaster
The ceiling can be decorated with decorative textured plaster. It includes special elements that create various reliefs in the process of applying to the ceiling. After it dries, it can be painted in any color. It is advisable to use this type of decor in case of unevenness of the ceiling covering, because it will not only decorate the home, but also align the curved ceiling.
Decorative plaster can be used in low rooms, because it does not visually reduce the height of the ceiling. Also, plaster is often combined with other materials to create imitation of natural materials (granite, marble, mother of pearl).


Video - Ceiling decoration with decorative plaster
Stucco
A fairly common type of repair and decorative work is the decoration of ceilings with stucco molding. In the arsenal of designers' services, stucco molding has always occupied and takes pride of place. This is due to the many advantages that this type of decorative ceiling decoration has.

Among them are:
- the possibility of restoration or replacement of damaged elements of the stucco composition;
- hiding defects of the ceiling and joints of the ceiling covering using fragments of moldings;
- the visual appeal of this type of decorative finish (with the help of baguettes, rosettes, caissons, you can create various decorative compositions on the ceiling);
- the ability to highlight the advantages of a room, change its visual perception;
- durability.


Stucco molding will help you quickly transform any room, make it attractive and presentable.
Art painting
With the help of artistic painting, you can create a delightful interior in your home. Previously, to apply drawings to the ceiling, it was necessary to call a master artist, but now there are many techniques and materials that allow you to independently perform artistic painting on the ceiling.

Stencils are special shapes that make it possible to apply almost any pattern to the ceiling. They can be purchased or made yourself. The stencils are attached to the ceiling surface with tape and then painted with the selected paints. The main stages of working with a stencil are given below.

Cutting out a drawing for a stencil: 1 - bridges; 2 - round element of the drawing (made with a punch); 3 - cutting patterns with a knife


If you don't have time to fiddle with stencils, you can get ready-made vinyl decals that adhere easily to undamaged surfaces.
But there are simple techniques, thanks to which you can recreate a full-fledged artistic painting on the ceiling.
How to simulate the clouds on the ceiling
A very interesting way to decorate the ceiling is to simulate clouds. You can bring this decor to life with the help of paints and a regular sponge. It is better to decorate the ceiling in this way in small rooms, since this process is quite laborious. You need a lot of paints of various origins and colors, but the final result will delight you - the room will acquire an unsurpassed look.

It is advisable to start work from the center of the room. If you don't have enough energy to create a cloudy ceiling throughout the room, you can enclose the finished part in a circle in the middle of the room, you get the effect of a round window overlooking the sky. The second option - white clouds gathered only in the place where you started to draw them, and the rest of the space is a clear sky. In any case, it is worth trying to bring this incredible idea to life.
To create a "cloud" ceiling you will need:
- brush;
- several containers for diluting paints;
- wide roller;
- matte acrylic glaze;
- aquamarine and gray acrylic paints;
- emulsion white matt paint;
- matte light blue emulsion paint (you need to buy it for the entire ceiling).
The ceiling must be quality and clean.
Apply light blue paint with a roller to a clean ceiling surface.
Mix the white paint with warm water in equal proportions. Apply the mixture to a sponge. With gentle, loose strokes, apply with a sponge (although you can use a brush) to outline the clouds. Add some white paint on the edges of the clouds to make them (clouds) visually appear denser.

Applying white paint to a light blue surface
Add aquamarine paint in different places with gentle, light strokes of the sponge. This is necessary for the translucency of whiteness in different places.
Sponge the clouds with some more white paint to create a thicker and more intense cloud. Apply different colors in several layers. This is how you can achieve the depth of the image.


With light movements, work with a sponge with white paint on the side from where the sun should shine on the clouds. Gray - where there is no sun.

Treatment of the "sunny" side of the clouds
Add a few more layers of paint, but make sure they are thin and don't paint over the previous images.
Highlight the edges of the clouds again with white tones and carefully cover everything with acrylic glaze.


Another option is to paint the ceiling with glowing paints.
Using this method, you can create a pretty ceiling decor using paints. This is the perfect way to create an exclusive interior for your home.


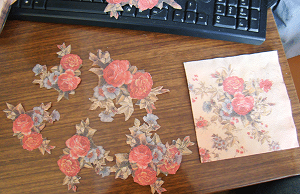
Decoupage the ceiling with paper
Decoupage is a specific technique for decorating various surfaces. This method is often used for finishing ceilings and consists in applying a variety of patterns to the surface, made from newspapers, magazines, calendars, photographs. When choosing this finishing option, the owner of the premises has a wide field for experimentation.
The main advantage of this technique is exclusivity. In most cases, decoupage can be completely repeated, especially if it was made independently, because all the finishing elements are chosen by a person, taking into account personal preferences. The disadvantage is the painstaking finishing process.

Ceiling decoration can be complete or partial. For the purpose of long-term operation, the finished decor is covered with several layers of acrylic varnish.
Independent decoupage of the ceiling with paper
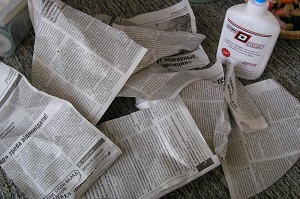
How to decorate with appliqués from individual pictures or their compositions? First you need to prepare all the necessary tools and materials.
These include:
- acrylic lacquer;
- PVA glue;
- nail scissors;
- a printer;
- books;
- clean cloth;
- synthetic brushes;
- colored paper;
- newspapers;
- putty knife;
- brush for removing old paint;
- putty;
- primer;
- dye;
- pencil.
Table. Stages of self-decoupage of the ceiling.
| Steps, illustrations | Actions |
|---|---|
| Look online or in print for a clearly outlined image. It is necessary that the drawing corresponds to the style of the interior. Designers recommend using images of natural motives or abstraction for decoupage. |
| If necessary, change the size of the image, its contrast. In advance, create a general composition of the decorative applique. Print out all the selected pictures that will make up the composition. |
| Use your nail scissors to cut out all the pictures you want. |
| If the composition provides for finishing the ceiling with printed drawings, then they will be glued to the ceiling. You can use another material - colored paper or fabric. If you stopped the selection on colored paper or newspaper pages, then superimpose the image cut from the printout on the selected material and cut out the elements of the ceiling applique along the contour. |
| Prepare the ceiling for application. To do this, remove the old finish with a spatula and a brush. The surface must be completely free of old coatings. |
| Level the ceiling surface with a putty, if necessary. |
| Prime the ceiling and then paint it in the chosen color and wait for the paint to dry completely. |
| Now you have a flat painted ceiling and materials for applying the applique. Before you start decorating, mark up the picture so that the finished composition is even and you don't have to re-glue crookedly stuck elements. |
| Apply PVA glue to the prepared drawings with a brush. Press the design against the ceiling and wipe the image with a clean cloth so that all air is released from the space between the design and the ceiling. |
| Apply 2 coats of acrylic lacquer over the image. |


In this way, you can completely cover the ceiling with black and white pages from newspapers, magazines, calendars.
Moldings
Molding is a decorative element of the ceiling decoration that enriches the interior design. Moldings appeared in ancient Rome, but they are still actively used by designers. Baguettes are easy to assemble and remove.

Skirting boards production materials.
- Aluminum... Lightweight and durable material. Attaches only to flat walls with liquid nails or screws.
- Wood... Expensive and heavy, but presentable material. Suitable for the decoration of premises, in the design of which the presence of wooden furniture is provided.
- Polyurethane... The most common material for the production of ceiling curtain rods. Among the advantages are an abundance of colors, a variety of shapes and an affordable price.
- Styrofoam... Low weight advantage. Foam baguettes are easily attached to all types of surfaces using liquid nails. Styrofoam skirting boards are ideal for interior finishing work in an apartment. The main disadvantage is the insufficient strength of the material.

You need to choose a baguette taking into account individual preferences and the height of the room. If the room is high, then it is advisable to use wide skirting boards, if the room is low, narrow moldings. If the main selection criterion is cost savings, then it is better to stop at polyurethane or foam. If you want to create an environmentally friendly interior, you need to choose a wooden or aluminum skirting board.
Self-assembly of a foam molding
Let's try to figure out how to glue the foam molding on our own. A skirting board made of this material will cost 3-4 times less than a polyurethane baguette. In addition, it is much easier to install foam molding than other types of skirting boards.
To complete this procedure, you need to stock up on:
- liquid nails;
- a gun for liquid nails;
- spatula;
- finishing putty;
- miter saw;
- miter box;
- painting knife;
Align the ends of the baguette with a miter saw, because in most cases they are uneven. This may lead to their incomplete contact during installation.

Cut the corner joints 45 degrees using the same miter saw.


Another option is to cut corners with a miter box.
Make markings to avoid the skirting board falling below or above the required level if the ceiling is stretched. Cut a small piece of baguette and attach it to the wall so that it does not reach the ceiling by a couple of millimeters.

Make a bump with a cord, and if this is not possible, make pencil marks around the entire perimeter of the room. You will be equal to them.

Use a paint knife and sandpaper to trim the uneven corner cut by the miter saw. The latter does not always cut the materials exactly at 45 degrees.
Spread liquid nails over the baguette.

Glue the baseboard to the wall. After pressing down from the bottom of the eaves, glue will flow out. Remove it with a spatula.


The skirting board will hold well on liquid nails, but a gap will form at the bottom. Treat it with the same liquid nails or sealant.
Before painting, go over the joints of the baguettes with a finishing putty.
Paint the skirting board of your choice and let dry.

Bamboo wallpaper
Wallpaper made of natural bamboo is an original design solution that has gained popularity due to the fashion for oriental motives in interior design. This material has a unique color scheme and a variety of textures, which will allow you to show your imagination when decorating the ceiling.

This finishing material is used to decorate not only the rooms in the dwelling, but also the administrative premises. Used to decorate the ceilings of hotels, offices and cottages. This kind of ceiling finish fits organically into modern styles of interior decoration.
Bamboo wallpapers are one-piece canvases. They are created from thin bamboo slats. Fixed on a cloth base. For the production of wallpaper, the upper cut of the plant trunk is used, which has a pronounced bamboo structure. Canvases are produced in widths from 1 to 2.5 m.


Rules for the use of bamboo wallpaper
- Expand the wallpaper in the room whose ceiling will be decorated. Let the material dry or absorb some moisture over a few days.
- The ceiling should not be covered with flaking finishing materials that could interfere with wallpaper attachment.
- Do not use water-based or water-soluble glue to prevent the wallpaper from falling off the ceiling. Polychloropen adhesives are best suited.
- Use a respirator when installing bamboo wallpaper.

Instructions for decorating the ceiling with bamboo wallpaper
Prime the ceiling thoroughly. Wait a little until the surface is completely dry.

Such wallpapers are glued only back to back. Measure and then cut to the desired size. If you need to cut the wallpaper lengthwise, use a breadboard knife. Insert it from above between the bamboo slices and slide it gently to the edge.

When cutting material across the web, you can use metal scissors. For a large amount of work, use a jigsaw.

With a spatula, apply an even layer of glue to the prepared ceiling, and then with a brush on the wallpaper. The glue consumption is approximately 350 g / sq. m. Let the glue dry for 15 minutes.

Apply wallpaper and press it to one side of the ceiling, then use a clean cloth to scrub away from the contact side (or you can use a rubber roller). This is necessary so that no air-containing spaces form between the wallpaper and the ceiling. Then tap the wallpaper with your palm for better contact with the ceiling. Repeat this process for the following webs of bamboo wallpaper.

Video - Instructions for gluing bamboo wallpaper
So we examined the most popular ceiling decoration techniques. If you find the above information useful, be sure to share it with your friends and acquaintances who are doing or are going to do repairs in their home.
Video - DIY ceiling decor: original design options
If earlier it was enough just to whitewash the ceiling or paint it with water-based paint, now people are striving to make the ceiling original and unique.
The decorative ceiling makes the room original and beautiful.
The presence of a large selection of modern materials allows you to decorate the ceiling with your own hands and make it not only attractive, but also exclusive, such as is not found in other houses.
There are various types of ceiling decoration, consider the main and most popular decorative ceiling options.
Decorative plastering
This type of decor is characterized by high strength and durability, and it is also environmentally friendly. A decorative plaster ceiling protects it well from high humidity, the presence of special impurities endows the plaster with high thermal insulation properties, resistance to moisture, it is not covered with mold and mildew.
The specified material is presented in the widest range of colors and can have various textures. The properties and appearance of such a decorative ceiling will completely depend on the fillers and additives that are included in its composition.
The composition of this coating may include the following elements:

Decorative plaster is highly durable and durable.
- acrylic or polymer is used as a bonding element, their disadvantage is low wear resistance;
- the presence of a binder such as epoxy resin or polyurethane extends the life of the plaster, but in the presence of high temperatures, these elements can emit harmful substances;
- crumbs of quartz or granite are used as a filler, it makes the composition wear-resistant, the texture of such a coating can be smooth or rough;
- the presence of marble chips will help roughen the plaster;
- it contains preparations for imparting a thicker structure, preservatives and antiseptics, thanks to which such plaster has high thermal insulation and antiseptic properties.
When choosing a plaster for a decorative ceiling, you need to pay attention to its texture, it can be:
- large-textured - grain size 3-5 mm;
- medium texture - 1.5-2.5 mm;
- small-textured - 0.5-1 mm;
- fine texture - granule size less than 0.5 mm.

Large-textured decorative plaster - grain size 3-5 mm.
Usually, stores sell a ready-made composition of white color, which can be painted in the shade you need. First, the specified material is applied to the surface, and then special spatulas, combs or rollers are used, with which the relief is made.
If textured plaster is used, then the relief does not need to be done additionally. Thanks to the composition of the mixture, you will immediately get a textured ceiling, which, after drying, will need to be painted in the desired color.
It is quite difficult to apply decorative plaster on the ceiling, and without proper experience it may not work right away, so it is better to use textured plaster. Subsequent painting is recommended to be done with dispersion paint. Before applying a decorative ceiling using this material, its surface must be well prepared, since this finish does not hide the existing defects.
Back to the table of contents
We make a decorative ceiling using stucco
Many people do not want to decorate the ceiling using popular modern materials, and then stucco molding can be used. Such a solution will allow you to make a truly individual and unique solution, usually stucco molding is used when decorating a room in the Rococo or Baroque style. Now you can purchase ready-made elements, and you just need to glue them and paint them in the desired tone.

A decorative ceiling using stucco molding is usually done in the Rococo or Baroque style.
Many people make plaster moldings on their own, for this they take a dry solution or alabaster, knead it well and mix it with water. You should get a creamy consistency, the mixture is poured into a special form and tamped with a spatula.
It is necessary to let the finished product dry well, only then it is taken out of the mold and processed with sandpaper. PVA glue is used for gluing parts. During the installation, joints are formed, which are filled with a PVA-based putty, after drying, the joints are treated with sandpaper and the entire surface is painted.
Modern stucco molding is often made of polyurethane and polystyrene, these are elements such as moldings, rosettes, borders, etc. They are easy to install, for this they use a special glue. After it dries, everything is painted in the desired color. Any paint is suitable for polyurethane products, and only water-based paint for polystyrene products.
Often, when painting, pearlescent paints are used, which change their color depending on the lighting, they are applied with a spatula, sponge, spray, roller or brush.
The effect of antiquity can be done only on polyurethane or gypsum stucco molding, it is necessary to use paints based on lime. To apply paint, you need a long-bristled brush.

The effect of antiquity is produced on plaster moldings.
The watercolor effect is achieved by applying two colors. First, the base coat is applied, and when it dries, it is covered with another coat. To imitate wood, you need to use a special roller.
Depending on the choice of material for finishing the ceiling, you will need;
- long-bristled brush;
- special rollers;
- spray gun;
- sponge;
- putty knife;
- paint, plaster, glue.
Back to the table of contents
Use for decorating the ceiling wallpaper
The ceiling can be decorated with any wallpaper, but it is better to use dense wallpaper, since, in addition to the decorative function, they allow you to hide minor defects.
Most often, non-woven wallpaper is used, they can be washing and ordinary. Textile wallpapers have good sound and heat insulation, but they absorb odors and dust, so they are not suitable for all rooms. Now you can not only buy high-quality photowall-paper, but also order their drawing at your discretion.
Wallpaper made from natural materials is very popular. They are based on paper, and on top are glued fibers of reed, bamboo, jute, etc. A canvas made of bamboo or palm trees looks good, these are natural lamellas glued to a fabric base.
One of the varieties of ancient wallpaper is a material such as linkrust. Its main advantage is its high strength, therefore it has a long service life, it can be repainted many times.
Back to the table of contents
Decorative ceiling - wood trim

For finishing the ceiling with wood, beams, boards, panels are used.
For decorative finishing of the ceiling, boards, panels, bars and other wooden products can be used, this material has always been in demand, it is easy to process and well painted.
Ready-made panels are sold, in which the front layer is made of veneer of valuable species, and inexpensive species are used for the manufacture of the remaining layers.
Such ceilings can be made in any room, but in those with constant humidity, it is necessary to make special ventilation gaps, and the surface is covered with a special compound.
The use of wooden lamellas for ceiling decoration is common. They are lightweight, easy to install with glue and have a variety of textures and colors.
The ceilings can be covered with a roll of round logs, laid flat, clapboard or hemmed with boards. After installation, these materials are coated with mordants and tinting compounds.