Ceiling installation in a private log house
A wooden house has many advantages over a building with brick or block walls. And arranging the ceiling doesn’t take the most last place, since it does not have reinforced concrete floors. Well, the design of beam-type floors has its own characteristics, which will be discussed further.
Ceiling arrangement
Attention: If desired, you can even fill the shingles and plaster the ceiling. But think about the fact that wood breathes and is a natural material, and it is impossible would be better suited for this work. There is one more nuance that should be taken into account when choosing. If a new house is being built, it will shrink. And wood reacts well to movement and does not deteriorate, whereas, for example, drywall can warp.
And here are some great ideas for installing a wooden ceiling:
And this is only a small part of what can be done on the ceiling using wood.
Vapor barrier
Repair of the ceiling in a wooden house, if it leaks, is carried out with vapor and waterproofing.
There are several materials you can choose for this job:
- Standard vapor barrier film which prevents the formation of condensation on roofing materials and insulation;
- Film using foil, which also performs a reflective function and has increased insulating properties. The advantage of this material is that it also reflects heat and does not allow you to leave the room. This product is recommended for use in rooms with high humidity: bathrooms, steam room, sauna, swimming pool;
- A membrane film that allows you to control the entry and exit of excess moisture from the room. IN In this option, the amount of output is set using a membrane;
- Membrane film, only having variable vapor permeability for wet and dry conditions. As the humidity in such a structure increases, its throughput capacity increases.
Attention: Before installing a vapor barrier, it is necessary to determine the most critical areas. These are points of contact with warm and moist air. This is, first of all, the area of the draft ceiling. Therefore, vapor barrier here should be done especially well.
This work is performed in the following sequence:
- First, the material is laid out on the surface;
- After this, the edges are wrapped and secured;
Attention: Mounting vapor barrier material to the ceiling is done on the side that allows moisture to pass through, and not vice versa.
- The joints of the material are overlapped. When focusing on structural elements, do not cut, but bend the film and only then secure it.
Thermal insulation
Cannot be made without good thermal insulation. It will protect the room from cold penetration and save heating costs. Moreover, this work can be done with your own hands, thereby saving costs.
Materials
Nowadays, there are many materials that can be used to insulate the ceiling in a wooden house:
- Mineral wool, is a thermal insulating fibrous insulation material that is made from mineral raw materials. Used for thermal insulation of ceilings;
- Cellulose insulation ecowool, which contains harmless non-volatile substances. Resists open fire, does not rot, and has good heat and sound insulation. Used for insulating wooden ceilings;
- Styrofoam, this is probably the most used material. It is not expensive and lightweight. Easy and quick to install. It has great durability. Has good heat and sound insulation. True, it has one significant drawback: mice can infest it, so it is better not to use it for floor insulation in a private house.
- Expanded clay, this is a natural porous material that is made from clay rocks. It is resistant to low temperatures, therefore it is used as insulation in places with harsh climatic conditions. It also has high sound insulation;
- Granular insulation, which consists of sawdust, glue and antiseptic. This item has high thermal insulation and average sound insulation.
Installation of thermal insulation
Thermal insulation is carried out according to the following scheme:
- A vapor barrier is laid on the ceiling surface. During installation, the elements should not be cut to size, but more than 5 cm from the final size. This is necessary in order to overlap the material to the floor beams. This can be done using a construction stapler;
- After this, the installation of thermal insulation begins. If it is a slab or roll material, its width should correspond to the pitch of the ceiling beams. When the width is not enough, you have to insert the missing pieces, which is not very convenient. The most important thing is that the interblock space is tightly filled.

Attention: If you carry out insulation using mineral wool, you lay it in the joint. If foam plastic sheets are used, then you need to leave a small gap between them, which after installation is filled with polyurethane foam.
- If you lay insulation in several layers, then the next layer is laid in such a way that it overlaps the joints of the previous row;
- And the last step is to attach the top boards, which will cover the layer of thermal insulation - you can replace them with thick plywood.
- If we talk about the practicality of foam plastic and mineral wool, then preference should be given to the second material. Mineral wool does not burn and retains heat better.
It also insulates sound better and allows you to breathe. wooden elements. Polystyrene foam, in the event of a fire, supports combustion and at the same time emits rather acrid smoke.
Ceiling systems
The final feature in finishing the ceiling of a wooden house will be the creation of the front surface. There are many materials available for this work. retail sales. The prices for them are quite different - it all depends on the quality and your desire.

Videos and photos on this topic can be found on our website and select the desired design.
Wood materials
Wood is environmentally friendly pure material, which promotes air exchange and creates the desired indoor climate. Only before installation should such an element be treated with a special impregnation, which increases its fire resistance and prevents the formation of mold and rot. After this, you can process it using stain and varnish.
In this case, the following materials are used for finishing the ceiling:
- Wood siding;
- Lining (see);
- Beam;
- False ceiling;
- The ceiling is embossed.

As a rule, three types of wooden ceilings are made:
- The ceiling is sheathed, in which the beams below are sheathed with boards. A vapor barrier is placed between the attic lining and the ceiling boards. In such cases, roofing material or glassine is used as a vapor barrier. The flooring is made of boards, on which you can move freely and without fear of damaging the vapor and waterproofing;
- The ceiling is flat, which is made on floor beams or without them. In this design, the boards are placed directly on the top of the wall framing. After this, a vapor barrier is laid on their surface, on top of which thermal insulation is applied. Most often, ecowool is used in this design.

Attention: This ceiling design is only used for small buildings. The width of which does not exceed 2.5 meters. For a large building, such a design is extremely dangerous and ineffective.
- Panel wooden ceiling, which can also be installed in a bathhouse. In this design, factory-made blind-type panels are used. First, support bars are nailed to which the panels are attached.
- Thermal insulation and waterproofing in this design are made with the same materials as mentioned earlier. But there is also a peculiarity of installing such a ceiling: before attaching the panels, a layer of tow is laid on the walls, and the external seams are sewn up with boards.

There are some features of such ceilings:
- The structure must be perfectly even and smooth, without any differences.
This quality is most easily achieved using sheets of plywood and tongue and groove boards. Their fastening is carried out using hidden or visible installation.
After this, finishing is carried out, which includes polishing the surface, coating with an antiseptic, putty and painting; - If you have communications in the room that need to be hidden, then the fastening should be done directly to the beams. Fastening in this case is quite simple;
- If the decision is made to install a suspension system, then it is attached to the beams using special devices;
To install wooden lining, correctly calculate the material and method. When placed along the length of the room, you will visually lengthen it; when installed perpendicularly, you will reduce it.
Suspended structures
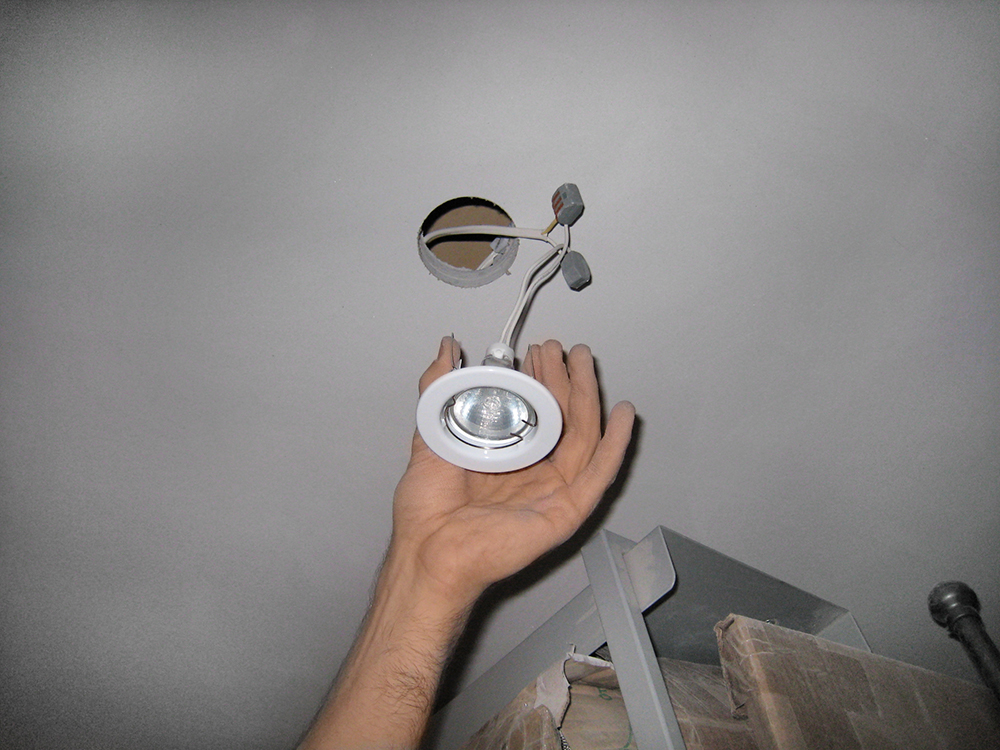
Such ceilings have long been in fashion. They have their own advantages and disadvantages. But there are some installation features in a wooden house. A variety of lamps can be built into them, including illuminated stained glass windows.

To do this, you will need to do wiring, and you should not forget that wood is a flammable material. Do not twist the wire.
Make connections using special terminal blocks that will prevent short circuits at the joint. By the way, false beams, which are often used in the design of wooden and plasterboard ceilings, hollow inside. Therefore, it is very convenient to lay wiring in them.

However suspension systems is a separate topic, which you can read about in detail on the pages of our website. The most important thing is to choose the right material for making the ceiling. And we described in detail how the installation of a ceiling in a wooden house looks in detail enough to try to do it yourself.
So, at our disposal wooden walls and roofing. Above are ceiling beams and truss structure. How to properly make a ceiling in a house?
Our goal is to make the ceiling not only warm and durable, but also beautiful
Let's start with how the ceiling structure as a whole will look.
From bottom to top there will be:

- A cold attic does not require flooring; however, if the attic is used as an attic in the summer or household items are stored in it, it is advisable to lay a floor.
Materials
Let's go through this sandwich layer by layer, analyzing the advantages and disadvantages of materials for each of the levels of our future ceiling.
Binder
Let's start with those ceiling coverings that should not be used.
Not due to any objective shortcomings: their use will simply be defiantly tasteless, not fitting into the aesthetics of a wooden house.
- Plastic lining with highlighted seam. In combination with wooden walls it looks terrible.
Please note: this only applies if you leave the walls bare decorative covering. Stretch ceilings look great with walls lined with plasterboard.
However, please note that with stove heating they get along poorly: the flow of hot air will make the ceiling sag.
- Foam ceiling tiles Absolutely incompatible with wooden walls.
- Wallpapering a ceiling lined with plasterboard or OSB would also be a bad idea.
What looks most advantageous in a wooden house?

- Aligned, whitewashed water-based paint, will look good with a successful selection of ceiling plinths.
The ideal option is if below the ceiling you can see painted dark color beams. - Ceiling sewn between beams with plastic wall panels also looks very advantageous. It is better to use seamless glossy panels of maximum width.
- MDF wall panels with a reliable imitation of wood texture is also a good option. But precisely with the reliable one.
In addition, MDF panels are not suitable for rooms with high humidity, such as the kitchen: they are hygroscopic.
Vapor barrier

What you choose is up to you; Just remember that the vapor barrier strips must overlap each other by at least 5 centimeters.
Thermal insulation
Without competition, of course, extruded polystyrene foam. This is a fairly hard material with a very for a long time services, physical properties which change very little over time. In addition, it does not support combustion.
Foam comes in second place. For cold regions with harsh winters, it is better to stick to 10-centimeter slabs; for a temperate climate zone, even five centimeters will be enough.
Mineral wool. Cheap and cheerful. If you haven’t forgotten about vapor barriers, you don’t have to be afraid of flying thin fibers. But it inevitably cakes somewhat over the years, deteriorating its heat-insulating qualities.

Mineral wool - inexpensive and sufficient effective method insulation
Ecowool. Easily absorbs moisture and cakes quickly. Despite the advertised environmental friendliness, it is not our choice.
Finally, bulk thermal insulation: sawdust, expanded clay and slag. Cheap; but it should only be poured onto the ceiling laid on top of the ceiling beams. About filling the beams with slag from below Wall panels, there is no question.
Flooring
Plywood, OSB and boards are used as flooring over beams (under bulk thermal insulation or as an attic floor).
In this case, you should adhere to several rules:
- Before laying, plywood must be waxed twice on both sides. Otherwise, it will lead after the first serious change in atmospheric humidity.
- If the flooring will be laid directly on the beams, it is advisable to use a board at least 40 millimeters thick. However, the required thickness greatly depends on the distance between the beams.

- OSB and plywood are placed on the joists. The optimal distance between the logs is 40 centimeters; it allows you to get by with a 15 mm slab. With a plywood or OSB thickness of 22 millimeters permissible distance between the lags increases to 60 centimeters.
- A small gap should be left from the edges of the flooring to the walls. Literally 5-10 millimeters. It will be covered with a plinth.
- Before laying any flooring, it is advisable to drip molten paraffin on top of the joists. Then the floor will not creak.
Tip: another way to combat squeaking is to lay a special underlay between the joists and boards, which is easy to buy in hardware stores.
Ceiling lining
Finally, a few more useful tips on the ceiling lining.
So, how to make a ceiling in a wooden house at the stage of filing panels or lining?
- As already mentioned, the ideal option from an aesthetic point of view is when the ceiling beams are visible and noticeably lower than the ceiling itself.
- Snow-white looks equally attractive against the background of protruding beams. glossy ceiling, and stylized as wood (or just wooden).
However, if the ceiling level is low, you should prefer White color: it will make the room visually higher.

- Wall panels made of PVC or MDF require the simplest lathing: bars perpendicular to the panels in increments of about half a meter. However, along the perimeter of the room (or the space between the beams), the batten is run both perpendicular to the panels and parallel.
- Even if the beams have a noticeable slope, it is better to mount the ceiling strictly level. Beams that are uneven relative to the ceiling look better than a ceiling with height differences.
- For hemming, it is advisable to use self-tapping screws rather than nails. Ideally, galvanized: then even with high humidity Untidy rusty streaks will never appear on the ceiling indoors.
Conclusion
As you can see, there are no special tricks in filing the ceiling. A wooden house makes the task easier by the fact that you don’t need to drill the walls with a hammer drill, as in a concrete high-rise building. Take your time before cutting - measure at least seven times and you will succeed :)
Wooden houses are becoming today one of the main elements of private housing construction. Due to the availability of materials and the rapid pace of construction, consumers are increasingly paying attention to housing built from wood. Moreover, the tree is very convenient and practical material, allowing you to create capital and original residential buildings in nature.
Massive construction of wooden housing causes increased demand for existing technologies interior finishing of wooden structures. If in terms of installation of the main structural elements building there are no special questions, everything is done according to a proven, tested scheme, then installing a ceiling in a wooden house is a rather difficult task. In the process of finishing the ceiling part, several issues must be resolved at once. It's about about creating a strong and reliable ceiling, simultaneously with giving the ceilings the necessary aesthetic qualities. Let’s look at what to do in this case, and what kind of ceiling should be used in wooden houses.
Specifics and nuances of ceilings in a wooden residential building
A wooden house today is no longer a temporary structure, used seasonally as a shelter or shelter. Most projects represent a permanent structure, characterized by strength and reliability. You can already live in such houses all year round, and in terms of comfort, such housing is not inferior to stone buildings. Thanks to the peculiarities of construction wood, you can create the most fantastic projects for residential buildings, country houses and country houses, including the use of a variety of interior finishing options.
If used standard project, special installation difficulties ceiling structure does not arise. However, in a number of cases, the construction of housing is carried out on our own and we have to install the ceiling in our wooden house ourselves, with our own hands. Here it is important to choose the right type of ceiling and use those finishing materials that are optimally suited in this case. The selected technology and sequence of work determine what the ceiling in the house will be like.

On a note: wooden buildings It is not always possible to use traditional finishing materials for working with the ceiling. To achieve the desired result, it is important to rely on project documentation, without neglecting the calculated data. In the process of finishing the ceiling, at the expense of the strength and reliability of the structure, you should not rely on beauty and aesthetics.
To avoid negative aspects in the future, you need to have an idea of the design of ceilings designed for installation in wooden houses. To be precise, the ceiling part is a layer cake in which each layer plays its role. During installation you have to perform the work step by step:
- floor equipment;
- arrangement of steam and waterproofing;
- installation of a thermal insulation layer;
- gasket necessary engineering communications(lighting, ventilation and communications);
- interior decoration of the ceiling structure.
What finishing options are there?
Using wood as a base structural material residential buildings, imposes certain restrictions on the use of certain technologies. The main condition that should be adhered to during the work process is that the ceiling in a wooden house should be a lightweight structure that does not create additional load on the floors. Accordingly, certain finishing materials are taken for work.
The most suitable ones in this case are the following options ceiling finishes:
- suspended ceilings using film;
- overhead plastic panels;
- MDF panels;
- cladding with industrial wood.
In each case, it is necessary to take into account the specifics interior spaces And general level isolation internal space the entire building. Each option is better or worse for a particular situation.
For example: For residential premises, it is not always correct to use suspended ceilings made from synthetic film. Absence natural air exchange can cause the formation of musty and stale air inside the rooms. This option is suitable for the bathroom or kitchen.

Plastic panels in tune natural wood perfect for finishing the ceiling part living rooms. This option is usually used when it is necessary to observe all the subtleties and nuances of the interior style. A ceiling in a wooden house using MDF panels is the simplest and convenient way finishing. The only negative is that this ceiling is very afraid of water. When working with MDF, it is necessary to carefully approach the issue of waterproofing ceilings. For the installation of ceilings in a new building or during the reconstruction of old buildings, it is very convenient to use the finishing of the ceiling part natural wood. Wood-based finishing materials are often used. These can be veneer panels, lining or laminate.
Important! You should not use such a favorite material as plasterboard for installing ceilings in wooden buildings. Wooden buildings always shrink to a certain extent over time, which can naturally affect the quality of the ceiling covered with plasterboard slabs.

You should not massively use plastic panels to decorate ceilings throughout the house. The appearance of the interior in this case leaves much to be desired. In addition, plastic is flammable and can release toxic components into the internal atmosphere when heated. It is not recommended to use artificial ones in wooden residential buildings. synthetic materials. The main advantage of a wooden house is environmental friendliness, so everything in the house must meet this criterion.
Types of ceilings for wooden houses
Typically, in practice, the most suitable materials are used for finishing ceilings. various options. In most cases, consumers try to achieve maximum effect, investing a minimum of funds. The interior is a determining factor that must be taken into account when choosing one or another option for finishing the ceiling in a residential building.
Suspended and tension structures
If you are interested in how to make a ceiling in a wooden house, use the most common method. These are well-known to us, suspended or tensioned structures. We are all accustomed to the fact that using suspended ceilings or stretched film you can quickly decorate the ceiling indoors. Wood or other lightweight material is usually used to create the frame. Elements of the future coating are mounted on the already assembled structure, ultimately creating a solid canvas. Fast, beautiful and convenient!
The only difference in both cases is the difference in the hanging part. For a suspended ceiling, you must first install a strong and reliable frame on the base. Can be used beam structures or make an additional new aluminum frame.

In the case of tension ceiling surface, a frame is used that is mounted only around the perimeter of the room. This option is very convenient for country houses, buildings that do not have particularly strong interfloor and attic floors.

For suspended ceilings you can use natural wood, panels imitating wooden parts and elements. Here attention is drawn to the cost of materials.
On a note: natural wood (lining) is an order of magnitude more expensive than plastic panels finished to look like wood. Wood can be used in small spaces. Otherwise, interior decoration of the house with natural wood, including the ceiling, will become a costly undertaking.
From an environmental point of view, wood seems preferable, but cost ultimately plays a key role. The ceiling mainly plays an aesthetic role, so it is not advisable to invest heavily in its equipment.
Thanks to the installation of suspended ceilings, you can easily solve the problem of organizing lighting in the house. Electrical wiring and other communications fit perfectly into the free space, allowing the use of a wide variety of artificial lighting options. The stretched fabric or film provides large area closing. In addition, you can choose any color scheme for the tension surface, perfectly complementing the interior of the living space.

Important! Given that a new wooden house usually shrinks, it is best to use suspended ceilings. The absence of a rigid frame will allow for maximum fabric tension. Suspended ceilings are perfect for old wooden houses, which can be reconstructed and repaired.
Due to suspended and tensile structures you can avoid the troublesome work of finishing the main surface. A suspended ceiling can hide all technological defects and unsightly places on the ceiling.
False ceilings and plastic panels
If it is not technologically possible to build a frame for suspended structures, you have to be content with little. Usually at dachas, in guest houses, where strength interfloor ceilings limited, used .

On small area plastic panels look great or MDF boards. However, in this case it will be necessary preliminary work with the main surface. In this situation, you can use two options for finishing the ceiling:
- covering the beams with sheets of plywood or MDF;
- using the space between the beams as an element of internal design.
The first option is convenient in that it allows you to solve problems by equipping lighting zones in any configuration. The technical possibility of such ceilings for laying communication systems will also not be superfluous. Television or telephone cable, the Internet are perfectly hidden in free space. The second option significantly limits possible solutions in such situations.
For a summer residence, a false ceiling is usually used. Using ready-made plastic panels, plywood or MDF sheets, you can quickly and reliably sew up the ceiling part. Almost any color options are possible here. Plastic panels can have a specific pattern, consistent with the style of the entire room.
A significant disadvantage of this design is non-compliance geometric shapes. Uneven walls in wooden buildings of this type, weak ceilings become an obstacle to the rapid implementation of the plan.
Conclusion
Finishing materials and technologies that exist today make it possible to make a sufficient choice of what it should be. Much depends on the type of building itself and how well the technological parameters of the building meet the set requirements and objectives. It is very convenient to use suspended ceilings for large buildings. The desired effect is achieved. Easy installation and excellent appearance. Wooden suspended structures are considered a capital option. It is appropriate to talk about finishing ceilings with wood in large, massive buildings, when the strength of the structure and financial costs are not a concern.

In most cases they are used combined options ceilings in wooden residential buildings. IN large rooms It is better to use frame suspended ceilings or pay attention to the hemmed finishing option. For small rooms, suspended ceilings and wood trim are actively used. When choosing materials and finishing options for the ceiling part, one should not forget about environmental friendliness. It is important to achieve not only a beautiful aesthetic perception and strength of the ceiling structure, but also to obtain a functional ceiling that provides a good indoor microclimate.
Main advantage own home, built on suburban area– the ability to independently choose materials for walls and coverings, create a layout at your own discretion and a variable design.
And a considerable number of people, having an almost limitless choice, prefer wooden houses. Why? Firstly, recently, country housing made of timber or log house received a “second wind” and again became relevant and fashionable. Secondly, wood as a material itself has many advantages, the main ones being its attractive appearance and environmental friendliness. But, in addition to the material for the walls, the owner of the new cottage must choose what and how the ceiling will be finished.

Requirements for ceiling finishing
First of all, you need to understand what requirements apply to the ceiling in a wooden house and what you expect it (the ceiling) to look like. There are not many requirements; they cannot be called complex and difficult to fulfill. Let's get to know them.

Ceiling preparation
Before finishing the ceiling, its surface must be prepared. First, the rough surface of the ceiling is treated with an antiseptic, which is necessary to protect the structure from rotting, fungi and mold. Treated wood will last much longer.
Important! If the antiseptic was applied during the construction of the house, then this step can be skipped.

Fire retardant prices
fire retardant

Fire retardants - impregnations to impart fire-resistant properties
The final stage of preparation is the installation of the thermal insulation layer. As the name implies, the task of thermal insulation is to minimize leakage of heated to room temperature air from the house through the ceiling and roof. The effectiveness of thermal insulation largely depends on the chosen material.


Each of the heat insulators has its own advantages, disadvantages and features, but this is the topic of a separate article. The table below is an attempt to briefly consider thermal insulation materials and their properties.
Table. Comparative characteristics insulation materials for the ceiling.
| Name | Density, kg/m3 | Thermal conductivity, W/(mK) | Advantages | Flaws |
|---|---|---|---|---|
| Mineral wool | 75-200, depends on the scope of application of the material | 0,03-0,12 | At high temperatures just melts, easy to install | Tendency to absorb moisture |
| Styrofoam | 45-150 | 0,041 | Good thermal insulation characteristics, low cost | It burns and when burned emits harmful substances, rodents may infest |
| Ecowool | 45-75 | 0,038 | At high temperatures it only melts, environmentally friendly, good thermal insulation characteristics | Installation requires special equipment |
| Expanded clay | 800-1200 | 0,18 | Non-flammable, environmentally friendly, very easy installation process | Heavy weight, thermal insulation characteristics worse than other materials |
| Sawdust | 200-450 | 0,08 | Cheapest material | They burn, may infest rodents, are not resistant to rotting and fungal formation |
Prices for mineral wool
mineral wool
Important! Please note that the lower the thermal conductivity coefficient (expressed in watts divided by meter times kelvin, or W/(mK) in short), the better the thermal insulation qualities of a particular material.

To better understand the last stage of preparing the ceiling for finishing, let’s consider the process of thermal insulation using mineral wool rolls step by step.
- First you need to level and clean the surface of the rough ceiling.

- A waterproofing film is laid and secured onto the cleaned surface. The joints between the individual sheets are overlapped and sealed with adhesive tape made of waterproofing material.
- A sheathing is nailed to the ceiling, serving as a frame for the future insulation. It is made either from wooden beam, or from a metal profile. The distance between the elements of the sheathing should be 1-2 centimeters less than the width of the mineral wool roll - this ensures reliable “adhesion” of the heat-insulating material to the frame.

- Between wooden beams or rolls of mineral wool are laid with a steel profile. The minimum layer thickness is 50 millimeters. If several layers of mineral wool are laid, the joints of the rolls of the first layer overlap the next one.

- The insulation layer and the sheathing on top are covered with a vapor barrier film.


Prices for vapor barrier film
vapor barrier film
Attention! If the thermal insulation sheathing is made of wooden beams, do not forget to treat it with antiseptic additives.
Only after completing these works can you begin finishing the ceiling in a wooden house.

An alternative option is external ceiling insulation
Most often for a wooden private house as finishing material clapboard is used for the ceiling. It consists of planed boards, on one side of which there is a tongue (also called a tongue or tongue) and a groove. During installation, the board is inserted with a tongue into the groove of the previous one - this is how the elements are attached to each other.


Types of lining differ in the length and width of the boards, the material from which they are made, color and texture. There is even a lining stylized as a log house. This is the main advantage - a rich assortment from which you can always choose something suitable for the interior.

But the advantages of the lining do not end there.
- High levels of sound insulation - in a room where the ceiling is lined with clapboard, walking and talking on the floor above will not be heard, especially if there is a thermal insulation layer.
- Durability – lining treated with antiseptics, varnish or other coatings can last for many years without the need for replacement.
- The lining fits perfectly with wooden walls.
- Vapor permeability - due to the fact that the lining “breathes”, there will be no accumulation between it and the sub-ceiling excess moisture and condensation, which can reduce the life of the ceiling and reduce the effectiveness of the insulating layer.

It should be understood that such finishing is not suitable for all rooms - in very large rooms the lining seems very monotonous and boring. But there is an elegant way to solve this problem - using a multi-color finish. Thus, you can divide the space of the room into several zones, which is especially important for the living room or common room. You can also diversify the ceiling using carvings, paintings or patterns made on the lining before installation. Often the material is artificially aged with outside, thereby creating in the room the atmosphere of an old and venerable mansion.
Important! There is a subtype of lining called eurolining. This finishing boards, manufactured in accordance with DIN 68-126 standard. In most cases it is distinguished by more high quality surfaces, execution of grooves and tongues.

Let's look at how the lining is installed on the ceiling.
Step 1. The height from the floor to the rough ceiling in all corners of the room is measured. The corner with the smallest height is selected, and 50 mm is measured down from it.
Step 2. By using laser level or a marking thread, a line for the location of the frame is drawn from the point selected at the previous stage. In this way, as much as possible is achieved flat ceiling relative to gender.

Step 3. The frame is created using a wooden beam of small cross-section. The sheathing lines are laid perpendicular to the location of the future finishing. The interval between them is from 40 cm to half a meter; a distance of 10-15 cm should be maintained between the wall and the timber. Before installation, the frame elements are treated with an antiseptic and fire retardant.


Step 4. If the lining boards are not painted or varnished, then appropriate coatings are applied to them.

Step 5. The lining is cut to the width of the room, but there should be a gap of 10-20 mm wide on each side between it and the walls, so that when the material expands under the influence of moisture, swelling and deformation do not occur.


When cutting boards, we use a guide - a metal square
Step 6. The first board is attached to the frame using clamps, nails or screws. Methods for fastening the lining are shown in one of the figures below.


Step 7 The next board is installed, the tongue is inserted into the groove of the previous one. The linings should be carefully adjusted to each other; it is permissible to use a rubber mallet.

Step 8 The previous stage is repeated sequentially for all planks.
Prices for lining

Step 9 The last strip must be trimmed if necessary. In most cases, it is attached to the frame with nails driven in “obliquely.”
Step 10 Compensation gaps between the lining and the walls are closed using ceiling plinths.

Wood veneer
An alternative to lining can be veneer panels - strips with locks for installation and fastening, covered on the outside with veneer (a thin wooden sheet several millimeters thick). Typically, valuable types of wood are used for this material. The insignificant thickness of the veneer allows you to create an attractive and rich-looking finish for the ceiling, while being quite cheap.


The technology for installing veneer panels does not differ much from the methods of installing lining: the ceiling is marked, a sheathing is created, the first panel is attached to it using nails or self-tapping screws, the following finishing elements are connected to the previous ones using “locks” of the tongue-and-groove type.


Plywood
In everyday life, plywood is perceived as a cheap and not the most attractive material for finishing the ceiling. But there are types of plywood that are not inferior in aesthetics to lining or veneer panels, so consider installation methods of this material still worth it.

The main advantages of plywood are: low price and resistance to moisture (if the sheets have undergone appropriate processing and are covered on the outside with a laminate). The laying technology is as follows.

Step 1. The ceiling is marked and a frame made of wooden beams is created. This stage has already been described in more detail in. It is only worth mentioning that the distance between the sheathing elements should be several centimeters less than the width of the sheet so that the plywood can be nailed directly to the frame.


Step 2. A solid sheet of plywood is applied to the sheathing so that the edges are in the middle of the beam, which acts as a frame. Using screws or nails, the plywood is first fixed in the corners, then along the entire perimeter in increments of 20-25 cm.
Prices for plywood sheets

Step 3. The remaining sheets are laid sequentially in the same way.

Step 4. The process is completed by laying plywood scraps along the edges near the walls.

Step 5. The joints between the sheets are sealed decorative overlays- or .

Important! Remember that the area of an individual sheet of plywood is large, so installation must be done with the assistance of assistants.
Natural wood
The flooring of planed boards made from valuable types of wood goes well with most interiors. To create an atmosphere village house To add “naturalness,” the finish is complemented by surface flooring made of slab or obapola - boards that are only partially planed.


The technology for laying boards repeats the method of creating false ceiling in a bathhouse or barn - first, at the construction stage, beams from large-section timber are installed. Then the boards are hemmed from below, secured with self-tapping screws and carefully adjusted to each other with minimal gaps. Both the boards and the ceiling frame are treated with protective compounds before installation, and after installation the ceiling is covered various types varnish


Another addition to natural wood ceiling decoration is ceiling beams. But you should think about this in advance, since cutouts in the wall for their installation are made during the construction stage. The beams are treated with compounds that protect the wood from rotting, varnished and sometimes artificially aged.
Advice! If you don’t want to make cuts in the wall and install heavy beams, but want to see them under the ceiling, then you can use false beams, which are made of wood or plastic and are hollow inside. They are significantly lighter and easier to work with than solid timber.

Video - Ceiling with wood
Drywall
Drywall is a “layer cake”, where the outside is sheets of thick cardboard, and the inside is a solid composition based on gypsum with the addition of various fillers and additives. This is a very convenient material for finishing, as it can be used to make multi-level ceilings suitable for spacious rooms. In addition, it is most convenient to install spotlights in drywall that can highlight the features of your interior and highlight important areas in the room.
Drywall prices
drywall

Installation of a plasterboard ceiling in a wooden house is as follows:
- A frame made of metal profiles such as UD- and CD is laid on the lathing of the heat-insulating layer. The frame elements should be placed perpendicular to the wooden sheathing. Between the wall and metal profile It is advisable to leave a compensation gap of 10-15 millimeters so that during shrinkage and other movements of the ceiling the drywall does not sag.

- Using self-tapping screws and a screwdriver, the plasterboard sheets are fixed to the steel profile.

We are tiling the ceiling. We fasten the sheet as in the figure, retreating 2 mm from the walls


Same between the sheets technological gap 2 mm

Following this principle, we install the remaining sheets
- The joints between the sheets should be puttied. How this is done is written in detail in.

- Drywall finishing is in progress. This can be relief plaster, paint, ceiling tiles or wallpaper.

Advice! If you plan to install spotlights, then first mark the places of their future location, mount the wiring there and, before laying drywall, make cutouts in the sheets for lighting fixtures.
Video - DIY plasterboard ceiling
Stretch ceiling
Stretch ceiling - a canvas made of polymer fabric or polyvinyl chloride, secured using a frame made of plastic or aluminum profile. This type of finishing is especially suitable for newly built log houses, where over the next couple of years the floors will shrink, making painting or plastering impossible.

Besides, suspended ceiling can be made multi-level by combining it with sheets of drywall. But such a ceiling has a drawback - the height of the room is significantly reduced.

Remember that the ceiling decoration will be beautiful and durable only if the technology for its installation is carefully followed. We hope this article will help you choose the most suitable method.
Video - Installation of a single-level stretch ceiling


