When planning a renovation, every owner asks the question: how to decorate the ceiling? Previously, this problem was solved simply: the surface could be whitewashed, painted or wallpapered. But today these options are considered only if they want to save as much as possible on repairs. The widest range of modern facing materials makes you think, because people's tastes and preferences have changed dramatically.
Options for finishing ceilings in residential premises
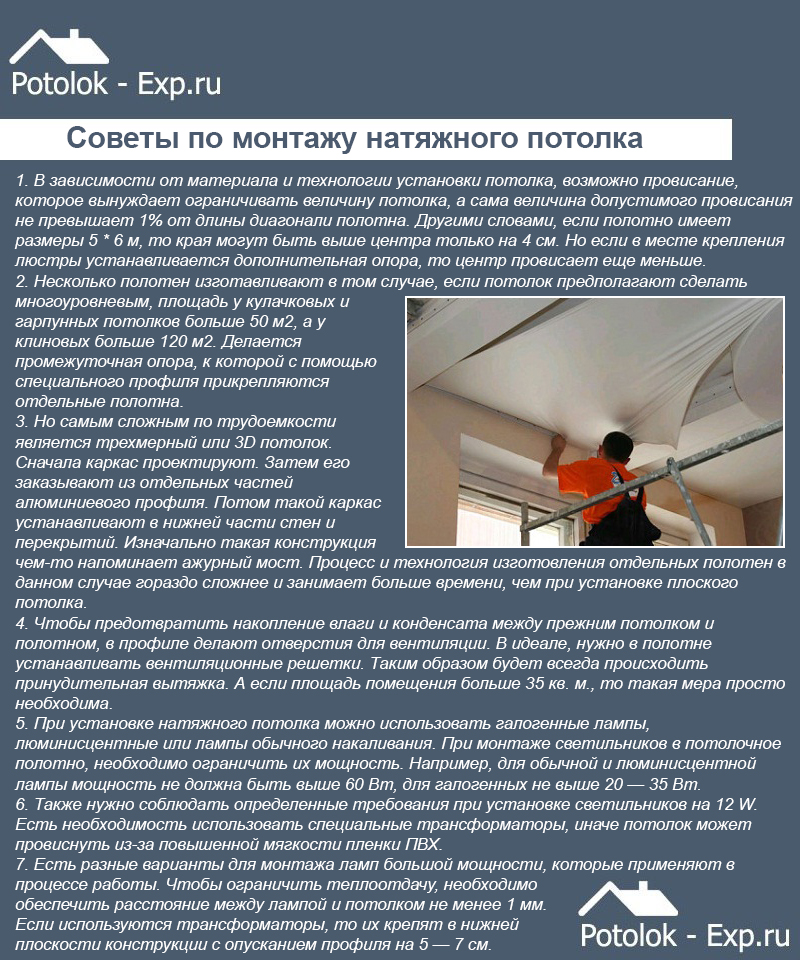
With all the variety of choices of facing materials, there are not so many ways to finish the ceiling - in particular, these are:
- painting;
- whitewash;
- wallpapering;
- pasting with polyurethane (foam) tiles;
- finishing with liquid wallpaper;
- cladding decorative plaster;
- installation of a suspended ceiling;
- installation of stretch ceiling.

Whitewashing the ceiling is one of the quick and inexpensive ways
The first four options are optimal if repairs need to be done quickly and at the lowest financial cost. All these methods (whitewashing, painting, wallpapering or foam tiles) are easy to perform. But here too there are difficulties.
- You need to know how to properly prepare the ceiling surface for application or installation facing material.
- You also need to know the rules for working with this material.
- It is necessary to decide which type of finish is optimal for rooms with normal and high humidity, in heated and unheated rooms.
Yes, for country houses the best choice– painting, whitewashing, wallpapering. The kitchen and bathroom will require moisture-resistant paints, panels and tiles. The maximum possible flavor of comfort and presentability will be provided by more expensive finishing methods: installing suspended or suspended ceilings, applying decorative plaster. All of them are not only the most spectacular room design options, but also the most labor-intensive.

When deciding how to decorate the ceiling, you need to take into account the condition of its surface. If it is uneven and has many flaws, it is better to cover it with hanging or tension structures than to prepare it for painting or wallpapering. In some cases, this will not only give the room modern style, but also save money.
Having decided on the finishing option, you can begin choosing the facing material. In this case, it is necessary to take into account all the features of the room being renovated: purpose, humidity level, degree natural light(solar). Next, proceed in accordance with the step-by-step instructions for installing the selected finishing material.
How to paint a ceiling correctly
Painting the ceiling will certainly highlight all its irregularities. Therefore, the requirements for surface quality are the highest. It should be understood that the cost estimate will need to include the cost of not only paint, but also primer.

In addition, you will need to buy:
- brushes;
- roller;
- paint tray;
- putty;
- spatulas (metal and rubber).
Painting or whitewashing the ceiling will cost less than installing suspended or tension structures. However, you need to prepare for the fact that the finishing process will not be easy. All work performed at height and on upper floors is labor-intensive.
The use of a spray gun (included in the package of vacuum cleaners of older models) will make the task easier. But in this case you will need cover for walls and furniture - polyethylene film, fabric or paper. Another important point when using paint: eye and respiratory protection. In this regard, it must be ensured high-quality ventilation premises.
Prices for the HAMMER PRZ150A spray gun
spray gun HAMMER PRZ150A

You can also use a spray gun to paint the ceiling. In the photo - HAMMER PRZ150A spray gun
Paint selection
The main task during this type of repair is right choice paints. For ceilings, water-emulsion or water-dispersion ones are often used. It is not difficult to understand the peculiarity of these compositions: coatings of the first group (water-based) are washed off with water, the second group is not.
An important characteristic of any paint is the degree of moisture resistance. This parameter is usually indicated on the container label. You definitely need to pay attention to it, otherwise there is a risk of buying some kind of paint for dry rooms to decorate the ceiling in the bathroom. This error will lead to peeling and cracking of the coating, which will require redoing the work performed.

- water-emulsion or water-dispersion;
- based on acrylic resins;
- silicate;
- silicone.
Surface preparation technology for painting
Step 1. Delete old finishing coating: paint, wallpaper or tiles. To complete the task you will need a spatula with a metal blade. Close attention is paid to plaster. You need to check how tightly it holds and remove all loose particles.

Step 2. Seal seams and cracks with putty or cement-sand mortar.

Step 3. Using a broom, brush or rag, sweep away the remains of small particles of plaster, paint or wallpaper.
Step 4. Apply the first layer of primer. It is needed to ensure the strongest possible adhesion of the paint to the surface of the upper floor. In addition, the primer composition allows you to even out minor imperfections, which provides a more impressive look after painting.
Step 5. Before applying paint, masking tape is applied around the perimeter of the ceiling along the walls. It will protect the walls from accidental strokes and smudges.
Rules for performing work
The paint application process is simple and straightforward. But there are rules that will help you do the job efficiently and avoid such troubles as unsightly stains and gaps in the plaster.

First of all, you need to understand that the approach to painting surfaces with a roller and a brush is different. When applying paint with a brush, try to hold it at an angle of 35°-40° and make strokes evenly, in one direction. In order to evaluate the quality of the work performed, they move away to a distance of 1.5-2 meters and, tilting their heads 30°-40°, look at the painted surface. If gaps are visible, apply an additional layer of paint.

When using a roller, the layers are applied next to each other so that each next overlaps the previous one by 5-7 cm. When applying the second layer, the direction of the strokes should be perpendicular to the first. This will avoid gaps in the plaster. Coloring hard to reach places performed with a brush.

The basic rules for working with a brush and roller are given below.
- To apply the first layer, use a more liquid composition (water-emulsion and water-dispersion ones are diluted with water in a ratio of 1:10).
- In order to avoid gaps and streaks, the first layer of paint is applied in W-shaped strokes.
- A common mistake when painting a ceiling is to press the brush or roller too hard. You need to understand that best result can be achieved by applying the first stroke in a fairly thick layer, which is subsequently spread across the ceiling with equal pressure from the working tool.
Video - How to paint a ceiling with your own hands
Ceiling finishing with decorative plaster
Applying decorative plaster is an effective way to decorate a room. It allows you to transform a room quickly and with minimal material costs. But you will have to work hard: plastering is not an easy process.
The variety of textures of decorative plaster allows you to find exactly the type of ceiling decoration that will highlight the style of the room. When choosing a composition, it is necessary to take into account the type of surface to be treated. If the ceiling is wooden or plasterboard, hygroscopic mixtures cannot be used. In this case, compositions based on polymers or acrylic are optimal.

When choosing decorative plaster, it is important to consider its environmental friendliness. This parameter is especially important if the finishing is done in a room intended for children. In this case, it is recommended to choose mixtures based on cement, lime, minerals, and marble chips.
Types of decorative plaster
The composition of decorative plaster includes a filler, additives, and a binder. Additives are needed to give the product certain properties: antiseptic, water-repellent, bactericidal. Depending on the type of binder, the following types of plaster are distinguished.
Prices for decorative plaster
decorative plaster
- Mineral. Made from cement and lime mixtures, traditionally used for outdoor work. A well-known representative of this group is the decorative plaster “Bark Beetle”.
- Polymer. Mixtures of this type are made on the basis of acrylic resins. Such coatings are highly moisture resistant and can withstand sudden temperature changes. The composition includes additives that provide plasticity.
- Silicate. In these mixtures the binder is liquid glass. Plasters of this type are not flexible, but are ideal for decorating complex surfaces with cavities and height differences. Often used to finish concrete ceilings.
- Silicone. Made on the basis of silicone, the composition includes a fine filler: marble or sandstone chips. These mixtures are durable and have dust-repellent properties.

Acrylic-based decorative plaster is an excellent choice for finishing ceilings in rooms with high level humidity: in the bathroom, swimming pool or kitchen. Thanks to the excellent plasticity of this plaster, very beautiful textures like leather, stone, and velvet are created. When choosing the type of composition, you can focus on the table.
Table No. 1. Characteristics of plaster mixtures.
| Properties | Mineral plaster | Polymer (acrylic) plaster | Silicate plaster | Silicone plaster |
|---|---|---|---|---|
| Binder | Cement | Acrylic | Liquid glass | Silicone |
| Vapor capacity | High | Low | High | High |
| Degree of moisture absorption | High | Low | Average | Low |
| Additive type | Inorganic | Inorganic and organic | Inorganic | Inorganic |
| Elasticity degree | Low | High | Average | High |
| Abrasion resistance | Low | High | High | High |
Decorative plaster finishing options
Depending on the properties of the compositions and the size of the filler included in them, patterns of varying complexity can be created on the treated surfaces. Manufacturers have made it easier for consumers to choose and have classified plaster mixtures according to the type of application and the final result.


Technology of applying decorative plaster
To obtain a structural and textured coating, use different instruments. But the difference between these types of surfaces is conditional. The only difference is that the structural mixture provides relief due to the filler included in its composition, while the textured mixture provides relief due to the pattern on the roller.
Venetian plasters are most often used to decorate the ceiling in residential premises. There are several techniques for applying this type of composition. The simplest and most popular is given below.
Step 1. Carefully prepare the surface, leveling out the slightest differences in height on the ceiling and sealing seams and cracks with putty.
Prices for acrylic decorative plaster
acrylic decorative plaster

Step 2. Apply 1-2 layers of primer.
Step 3. Along the walls, in their upper part near the ceiling, tapes of masking tape are attached.
Step 4. If the mixture is not tinted, add pigment. The mixture consumption ranges from 600 g to 1.5 kg per 1 m2. The more complex the design, the greater the material consumption.
Step 5. The plaster is applied with a metal spatula in layers on a previously dried surface.

The essence of application Venetian plaster is to create a multilayer structure. The design of each layer is determined by multidirectional strokes with a spatula. A beautiful textured surface is obtained by applying 2-4 layers of decorative plaster.

Do-it-yourself stretch ceiling installation
The most effective and durable finishing of premises is the installation of a stretch ceiling. Manufacturers offer two types of canvases: fabric and PVC (polyvinyl chloride based). Each of these materials has its own advantages. You can choose matte or glossy materials. Seamless PVC films are easier to stretch, which is why they are more often used for interior decoration.
To fix the canvas, choose one of the following methods:
- harpoon;
- glazing bead;
- clip-on
The first requires a special clamp - a harpoon. This is the name given to a durable PVC strip, one side of which is equipped with protrusions. Thanks to them, the canvas holds firmly in the profile. The films are attached to the harpoon using cold welding.

With the glazing bead method, the edges of the film are pressed against the walls wooden slats- glazing beads. This method is simple to perform, but gives a less spectacular result than the harpoon method. The clip method of fastening is used when installing fabric panels equipped with special clips around the perimeter. These devices are attached to a profile installed along the walls.
To install a stretch ceiling you will need the following tools:
- plastic or aluminum profiles;
- fasteners for fixing the profile (screws, dowels);
- spatula with a narrow metal blade;
- construction hair dryer (if the ceiling is film);
- drill;
- stepladder (for greater ease of work, two stepladders will be required);
- roulette;
- level.
The most convenient way to install tension fabrics is the harpoon method, which is why it will be discussed in today’s article.

Note! It is necessary to know the width and length of the room, because the canvas itself should be wider than the distance between the walls by about 10 - 15 cm.
Table No. 2. Stages of work execution.
| Stages, illustration | Description of actions |
|---|---|
| In modern apartments, the height of the corners can vary significantly. To install a stretch ceiling, it is necessary to draw horizontal lines on the walls 4 cm below the ceiling so that when they intersect they form a single plane. For this purpose, it is recommended to use a level, laser or water level. |
| A profile (baguette) is installed along the marking lines. To do this, drill holes, insert dowels into them, and fasten the profile using self-tapping screws. |
| The canvas is unrolled and each corner is inserted into a baguette. The harpoon is pushed into the profile opening using a metal spatula. The work is carried out in a preheated room, optimal temperature 40°C, so if you are installing a PVC film, when unfolding the canvas, it is attached to the corners to the “crocodiles” and heated construction hairdryer. |
| At opposite walls, they begin to alternately tuck the edges of the canvas into the baguette. |


In carrying out this task it is mandatory:
- find the middle of the free part of the canvas and insert the harpoon into the profile;
- then move to the opposite wall and repeat the action;
- after which they find the middle of the next sagging part of the canvas and put it into the harpoon;
- move to the opposite wall and do similar work.

While stretching the film, the room is continuously heated. This can be done using a heat gun. If it is not possible to use this equipment, the film is heated with a construction hairdryer. With this method of installing a stretch ceiling, it is important not to overheat the canvas and not melt it.
Suspended ceiling installation
Despite the emergence of new ceiling design technologies, plasterboard finishing remains relevant. From this material you can build both simple single-tier and spectacular multi-tier structures.
Prices for suspended ceilings
suspended ceiling

Tools and materials for work
To construct a plasterboard ceiling frame, you will need the following materials:
- metal profile PN 28/27 and PP 60/27;
- self-tapping screws SMM 3.5/51;
- pendants;
- crabs.
The main element of the frame is racks made of PP 60/27 metal profile. Manufacturers offer products of different lengths: 2.8 m, 3 m, 4 m. You can buy individually or in packages (12 or 18 pieces each). The guides are placed along the walls adjacent to the ceiling. In addition to these materials, single-level profile hangers and connectors, which experts call “crabs,” will be needed.
Tools you will need:
- battery-powered screwdriver;
- drill or hammer drill (for drilling holes in walls and ceilings);
- metal scissors (for cutting metal profiles);
- marker, tape measure, string, square, plumb line (for marking);
- construction bubble level at least 80 cm long.
Configurations of plasterboard ceiling frames
Beginners in this business can have no doubt: they can build not only a simple single-level ceiling, but also complex multi-tiered structures. There is only one requirement: to understand the principle of constructing a frame made of metal profiles.


Suspended plasterboard ceilings are good because they allow you to radically change the space of a room with the help of spectacular, intricate shapes. Spot lighting of figured protrusions and depressions will create a charming atmosphere of comfort and respectability in the room.
In order to mount the figured frame, you will need to bend the PP 60/27 metal profile so that it follows the contour of the figure conceived by the designer. This task is not difficult to complete, but it will require accuracy, attentiveness and leisure.
Drywall prices
drywall

In order to give the metal profile the desired shape, it is necessary to trim its side plates in increments of 4-5 cm. After which the bar is gradually bent in the desired direction.
A multi-tier (multi-level) frame for a suspended ceiling is erected in accordance with a previously drawn up diagram. All dimensions and distances must be indicated on it. When drawing up a diagram, you must be guided by the following rules.
- The optimal distance between the mounting points of the guides is 40-45 cm.
- The optimal distance between hangers for a single-level ceiling is 40 cm, for a two-level ceiling - in accordance with the drawing, but not more than 40 cm.
- If you plan to make spot lighting, when determining the location of the first line of the frame, take into account the dimensions of the lamps (for small ones, a distance of 5-8 cm from the ceiling is enough, for large ones you will need to retreat 12-15 cm).
- The optimal distance between PP posts is 60/27 – 60 cm.
Marking walls and ceilings
The first stage of installing a plasterboard ceiling is marking. The correctness of further work depends on how accurate it is. Therefore, you need to perform this task thoughtfully and slowly.
You will need the following tools:
- plumb line;
- bubble level 1.2-1.5 m long;
- water level;
- laser level;
- level.
The easiest way to mark is using a level or laser level.

Marking walls for installation of profile PN 28/27
Step 1. Work begins from one of the corners of the room (previously it was the lowest corner of the room, but today this is no longer relevant).
Step 2. In this corner, at a distance of 3-5 cm from the walls, a thread with a plumb line is pressed to the ceiling. Mark the vertical direction on the adjacent walls.


Step 3. According to the vertical line from the flow, measure down the distance at which the first tier of the frame will be located.
Step 4. At this point, screw in a self-tapping screw, to which a long thread is tied.
Step 5. Along the wall they move to its second corner and do similar work there.
Step 6. The thread is pulled between the two corners so that it is horizontal. A square will help with this, which is installed at a right angle to the intersection of the vertical markings and the stretched thread.
Step 7 Draw a line on the wall with a marker or pencil.
Step 8 Markings are applied in the same way on all other walls. The result should be a perimeter along which the PN 28/27 guides will be installed.
Installation of a single-level ceiling frame
The height and direction of the supporting frame posts are adjusted using hangers. Their installation is the first thing to do before proceeding with the installation of the supporting profile. Suspensions are mounted on the ceiling in accordance with the frame diagram. The first profile posts are installed in the direction of the longest wall of the room. The distance between the carriers is 55-60 cm.
The order of further work.
Step 1. The first supporting profile is installed: its end is inserted into the guide, covered with the “legs” of the suspensions located in its path, and fixed with self-tapping screws. Make sure that the direction is strictly horizontal. The threads and level stretched during marking will help with this.

Step 2. Install load-bearing profiles over the entire ceiling area.

Step 3. The work is completed by laying plasterboard sheets: sheathing. The sheets are attached to the profile with self-tapping screws. When performing this work, it is important to install the sheathing panels so that the gaps between them are minimal. Solid sheets must be fastened perpendicular to long guide profiles. The joining of sheets should be done in the middle of the profile. For high-quality fastening, it is better to do the work together.
The sheets are fastened with self-tapping screws, and the latter are recessed into the sheathing material by 2-3 mm. The pitch between the screws should be 25-30 cm (3-4 cm from each corner of the sheets). Chips should not form on the edges of the sheets when screwing in the screws. If damage does occur, the self-tapping screw must be removed and a new one screwed in 3-4 cm.

Step 4. When the ceiling is sheathed, fill the gaps with putty. After it dries, all irregularities are smoothed out with a special grater in which a sanding mesh is installed. After which the ceiling is ready for painting, tiling or wallpaper.

So that there are no cracks! Neither gypsum board sheets nor load-bearing profiles are fixed to the guide profile 28/27 (on the wall), i.e. the walls and ceiling should not be tightly connected. For a suspended ceiling, gypsum boards with a thickness of 12.5 mm are used. When cutting sheets, a chamfer of 22.5 degrees is made on the edge. The sheets are fixed in a running start!
Video - Step-by-step instructions for installing a plasterboard ceiling
Almost everything was repaired. And here various difficulties and difficulties may arise. For example, with the choice of finishing material. How to decorate the ceiling, walls or floors in the house? What's better? Such questions arise all the time. The article will talk about finishing ceilings. What options are there?
We use paint and whitewash
Painting and whitewashing ceilings is a long-known method. The surface is leveled using various building mixtures. It is then coated with water-based paint or whitewash.

This method has both its pros and cons. The first include low cost and simplicity (of course, if the surface is fairly flat). The downside is that it's a lot of dirt. This especially applies to whitewashing. You will have to cover it with something or remove all the furniture from the room, close the floors and windows. Otherwise, everything will be covered in whitewash stains.
Applying wallpaper
There is another inexpensive and quick way - using wallpaper. A roll of such material can be purchased inexpensively. In addition, today you can find wallpaper produced specifically for ceiling stickers on sale.

You can use liquid wallpaper, which looks much more beautiful than regular wallpaper. They are applied to a primed surface. The ceiling must be dry and dust-free. Wallpaper is applied using a grater or spatula. If applied using a construction spray gun, there is no need to rub them.

Usage liquid wallpaper makes it possible to create drawings on the ceiling. This design will look original.
Use of suspended structures
Today, conventional wallpaper and whitewash are being replaced by modern materials. For example, suspended structures are found in many city apartments.

The basis of such structures is a frame. It attaches directly to rough ceiling. Then the panels are mounted on the frame. You can use a wide variety of materials. Panels made of plastic, wood or metal are available for sale.

Wooden lining looks good and is an environmentally friendly material.
Wood is afraid of moisture, so it is better not to use it in the kitchen and bathroom.
Plastic panels can be placed in any room. They last a long time and are easy to maintain. IN suspended ceilings you can even find mirror panels. Such designs look respectable, but are also expensive.

The most popular are plasterboard sheets. This material is inexpensive and easy to install. With proper care, a plasterboard ceiling can last for many decades.
Suspended structures have a number of advantages and disadvantages. The first include:
- Possibility to issue multi-level ceiling. This variety has become very popular lately.
- In the interceiling space you can hide various communications. All wiring and ventilation systems will not be visible. In addition, it becomes possible to place built-in lamps anywhere on the ceiling.
- Facilitates structural repairs. If for any reason you damage one panel, it can be easily replaced. In this case, the rest of the structure can be left untouched.

The disadvantages include a decrease in free space in the room. Hanging structure takes away from 7 to 12 cm in height. Therefore, if the room has low ceilings, then it may be better to do with whitewashing or wallpapering.
Stretch ceiling

A wide variety of ceiling design options is provided by the use of tension structures. You can easily match the color to your interior. The canvas can be of a variety of colors. In addition, you can install suspended ceilings with a glossy, matte or mirror effect. It is also possible to place a drawing or photograph on the ceiling.
The forms of design of suspended ceilings themselves are also varied. You can make multi-level or tent-like, tiered or wave structures.

In addition, the canvas is not afraid of moisture and is easy to maintain. This ceiling can be installed in any room. It is fireproof. A suspended ceiling will protect your home from flooding. If neighbors from above flood with water, the canvas will be able to retain up to 100 liters of liquid. Then you just need to drain the liquid and dry the structures.
Installation is carried out in just a few hours (of course, if the craftsmen are working). Baguettes are attached around the perimeter of the room, onto which the canvas is stretched (using a heat gun).
This design will subtract only 3 cm from the ceiling height. At the same time, wiring can be placed in the interceiling space.
If we talk about cost, it will depend on the choice of material. We have both imported and domestic production. The second option is cheaper, but the quality is not always at a high level.
Video
Master class on finishing the ceiling with liquid wallpaper:
Photo


Any repair requires proper design of the ceiling space. Currently, a large number of materials intended for finishing work are sold. various rooms. Therefore, before finishing the ceiling in an apartment or private house, you need to familiarize yourself with the types and characteristics of materials.
There are many quality decorative materials for beautiful decoration ceiling surface. But, before sheathing the ceiling, you need to familiarize yourself with the main options for finishing it. For this purpose the following can be used:
When deciding what is the best way to finish the ceiling, it is worth considering that whatever finishing option is used, it has its advantages and disadvantages. In addition, the design method depends on the height of the ceilings, interior style, financial capabilities and preferences.
Coloring compounds
Coloring is simple and inexpensive option ceiling decoration. For painting, you can use water-based, acrylic, latex and other types of paints. This finishing method has its pros and cons. The benefits include the following:
- long service life;
- variety of colors;
- possibility of producing a glossy or matte finish;
- practicality;
- ease of care.
However, before painting, long-term surface preparation is necessary, since even small irregularities or cracks will spoil the appearance of the finish.
When choosing the shade of the coloring composition, you need to consider that Light colors visually increase the space, while dark colors reduce the height of the room. If desired, paint the ceiling surface in dark color It is recommended to combine it with calm, light colors on the walls.
Plaster, drywall, polystyrene foam
Expanded polystyrene tiles are a popular type of design because they visually imitate expensive stucco. This material is easily attached using special glue and has good resistance to moisture. If desired, white tiles can be repainted in any color you like. Decorative plaster - perfect solution for cladding. With its help you can make an imitation of marble or patterned panels. However, to perform such finishing, special skills are required, and the cost of the material is high.
Drywall perfectly hides all surface defects and has a low cost. With its help you can bring any fantasy to life. Plasterboard construction is suitable for shaped curved designs, since the material is easy to cut and install. But this cladding option hides the height of the room, since metal beams are used to fix the sheets to the ceiling. In addition, after installing drywall, it must be primed and painted.
Suspended structures and tension fabrics
Most apartment owners prefer suspended ceilings because they are undemanding to the quality of the ceiling surface. You can install LED lamps or Spotlights and also hide electric wires and other elements of communication. With the help of a properly selected suspended ceiling, you can visually increase the space. There are the following types of suspended structures:

Rack comes in a variety of colors and is ideal for small rooms. It is easy to install, resistant to moisture, but the slatted plates are subject to deformation.
Panel boards are also easy to install, are not afraid of moisture, and do not absorb unpleasant odors, but can fade if they are constantly exposed to sun rays and are sensitive to mechanical damage. Cassette ceilings are most suitable for finishing the ceiling space trading floors and offices, since they greatly conceal the height of the room, have poor sound insulation. In addition, their cost is high.

PVC stretch fabrics are a universal type of finishing, suitable for absolutely any room. Tensile structures are moisture resistant, have high strength and rich color palette. However, such canvases are not cheap, and you won’t be able to stretch them with your own hands.
Wallpaper decoration
To finish old ceiling, you can use paper, non-woven, vinyl, glass wallpaper and liquid wallpaper. There are variations on sale with a relief surface that can be painted water-based paint.

However, before gluing the surface with this finishing material, it is necessary to level the working surface. In addition, hanging wallpaper on the ceiling is more difficult than painting it.
Liquid wallpaper hides all existing surface irregularities, is easy to apply, and fades very slowly in the sun. But they have their drawbacks: high cost, difficulty of restoration and fear of moisture.
Natural materials
Wood lining is a common type of cladding. The natural board is attached to the ceiling surface using special connections. This finishing material has many advantages. These include:

The disadvantages of lining include flammability and the possibility of deformation due to sudden temperature changes. Wooden ceilings suitable for country house, however, they also look interesting in the apartment.
This type of finish is safe for health and durable. But when processing it, it is necessary to use materials that do not prevent the ceiling from “breathing.” Cork boards impregnated with wax are an excellent solution for an apartment. Dust and condensation do not settle on their surface, and this finishing option has a long service life.
When choosing the material and method of ceiling installation, you should take into account the height of the room and existing surface defects. Lighting plays an important role in influencing visual increase or reducing the height of the room. Choosing ceiling decoration, It is required to adhere to moderation in color scheme. The upper part of the room should be in harmony with the overall style of the room.
To finish the ceiling surface in the gazebo, you can use wood lining. The bathhouse can also be decorated with such material. For covering the ceiling space in the corridor, suspended ceilings, liquid wallpaper, and polystyrene tiles are suitable. When deciding how to decorate the ceiling on the veranda, it is recommended to give preference plastic panels or rack and pinion aluminum profiles. In the hallway, you can decorate the ceiling using a plasterboard structure or decorative plaster.
How to decorate the ceiling (25 photos)


It is recommended to install PVC panels in the bathroom or paint the ceiling with a coloring compound. In addition, a good solution would be tension option, which is resistant to moisture. In the bedroom, you can decorate the ceiling using suspended structures or wallpaper. A good option would be a combination of plasterboard construction and tension film.
For finishing low ceiling you need to choose a material that will visually increase the height. To make the ceiling seem higher It is recommended to adhere to the following rules:
- to decorate the ceiling space, use exclusively light colors;
- give preference to a glossy finish;
- When installing lamps, it is worth abandoning large lighting fixtures with hanging mounts.
So there are many modern materials which can be used to decorate the ceiling. It is necessary to choose a supply option based on financial capabilities and technical characteristics a certain type of finish.
All ceiling finishing options can be divided into 3 groups:
Budget. These include: whitewashing, painting, wallpaper and ceiling tiles. Due to the availability of materials and ease of work, there is no need to attract specialists, and, accordingly, the financial costs of repairs are reduced.
Practical and durable. With more tangible cost and complexity installation work, they are distinguished by high aesthetics, ease of maintenance and long service life. This category includes: decorative plaster, suspended and suspended ceilings, wood and cork.
Elite. These include: mirrored or coffered ceilings, Venetian plaster, sgraffito.
So.
Ceiling finishing options
Let's consider all the current ceiling design options, as well as the advantages and disadvantages of each of them.
Painting / Whitewashing
The traditional and, perhaps, one of the most common in the recent past, method of finishing the ceiling - whitewashing, has recently increasingly given way to painting.
Both options are ideal for rooms with low ceilings. The use of light shades allows you to visually increase the height of the walls and refresh the entire room.
The process of painting (whitewashing) a ceiling is quite simple, however, it requires a perfectly flat, carefully prepared surface.
There are two main components for preparing the whitewash mixture. This is lime and chalk. Regardless of the choice, they are combined with water to the desired consistency.
The main disadvantage of whitewashing the ceiling is that it crumbles, creating the need for regular wet cleaning premises and annual renewal of the coating itself, which is also very unstable to any influences.
Ceiling paints differ primarily in composition. Depending on the purpose of the room, they can be:
- water-based;
- acrylic;
- silicone;
- latex;
- silicate.
In turn, depending on what you want decorative effect, coloring mixtures are divided into matte, glossy and semi-gloss. The colors and shades you choose directly depend on the interior as a whole.
The process of applying whitewash or paint to the ceiling is not fundamentally different. The main working tool can be a brush, roller or spray gun. Paint, like whitewash, is best applied in several layers, each time waiting for the previous one to dry completely.
The only disadvantages of painting ceilings are the need to carefully remove previous coatings and the need for periodic renewal.
To the advantages:
- Possibility of application to any surface;
- wide selection of colors and shades;
- affordability.
Fans of non-standard solutions when painting the ceiling can afford artistic painting. To do this, depending on the complexity of the drawing, you will need to invite a professional or simply use a suitable stencil.
 In addition to the usual plaster used to level surfaces, there is its decorative analogue, which is a textured finishing coating. This product allows you to give the surface a beautiful relief that hides minor defects and allows you to bring to life original design ideas.
Combination in various ways application also allows you to achieve interesting results.
Finishing the ceiling with decorative plaster has a number of advantages:
- masking surface defects;
- Can be applied to any building materials (concrete, brick, wood, drywall);
- color variety;
- resistance to mechanical stress;
- significant service life;
- environmental Safety.
The disadvantage is the complexity of application and, accordingly, the need to attract specialists.
Depending on the desired result, there are two types of decorative plaster for the ceiling:
Textured. It is a completely ready-to-use mixture. The desired view and the surface relief is achieved due to the presence of appropriate components in the composition (marble, granite or quartz chips). There are several subtypes of this plaster, differing in the size of the decorative filler granules.
Structural. It is a plastic mass white. It differs in that to create a relief pattern during the application process it is necessary to use special tools. The desired shade is achieved by adding a tinting solution or subsequent painting.
Sgraffito
When considering ways to decorate a ceiling with decorative plaster, one cannot ignore such an option as sgraffito. This is a special technology of multi-layer application and subsequent fragmentary removal of particles upper layers in accordance with the artistic design.
As a result, a real work of art appears on the ceiling.
The peculiarity of this technique is that to create a multilayer pattern, the working surface is alternately covered with plaster mixtures different colors. After final drying, a pattern is applied to the outer layer. Then, using special tools, part of the coating is removed until the desired color appears. Next, work is carried out with the next layer, etc.
After completing the artistic process, the surface is covered with special wax.
As a rule, sgraffito is not used as the main finishing for large areas of single-level ceilings. This option is more suitable for multi-level structures or is used fragmentarily, to highlight individual areas (near the chandelier, in corner areas, along the perimeter). This technique works great when decorating one wall while capturing part of the ceiling.
The main disadvantage of this decoration method is the high cost and labor-intensive application process, which requires the highest level of skill.
 Ceilings reminiscent of polished marble, exquisitely shining with rays of light penetrating them - this is the result painstaking work masters with Venetian plaster. In its modern version, it is a mixture of dyes with lime, silicone, acrylic or epoxy resin.
The advantages of such a coating are obvious:
- aesthetics;
- durability;
- resistance to fungal infections;
- hypoallergenic.
Flaws:
- difficulty of application;
- high cost of work and raw materials.
When choosing Venetian plaster, it is important to consider that it is only suitable for.
 The widest selection of wallpapers with a variety of textures and materials makes them very popular when decorating many surfaces, including ceilings. On sale you can find options for every taste and income, suitable for.
This versatility is explained by the many types of wallpaper:
- paper;
- vinyl;
- non-woven;
- glass wallpaper;
- liquid wallpaper.
Titles in in this case are determined by the main components, which also provide the characteristics of the coating.
- variety of textures and colors;
- affordability;
- Possibility of gluing/application by hand.
Some types of wallpaper are suitable for subsequent painting.
The disadvantages of such coatings boil down to fragility, instability to moisture and ultraviolet radiation.
 Liquid wallpaper differs not only in its structure, which is a dry mixture of paper and decorative components, but also in the method of application.
To start using this wallpaper, mix it with water according to the instructions. Then the resulting mixture is applied to the ceiling, carefully spreading it using a spatula and trowel. The work is simple and can be done without the involvement of specialists.
The final result according to appearance more reminiscent of decorative plaster, only soft and delicate.
An additional advantage of this coating is the ease of restoration of damaged areas. It is enough to moisten the damaged fragment with water, remove it and reapply it.
 One of the simplest and quick ways finishing the ceiling is rightfully considered to be pasting polystyrene foam tiles. They can be of various sizes, perfectly smooth or with a relief pattern, snow-white or colored.
In addition to the variety of shapes and shades, ceiling tiles have the following positive characteristics:
- water resistance;
- affordability;
- ease of installation and dismantling.
The disadvantages include:
- low strength;
- fire hazard;
- expanded polystyrene quickly degrades when exposed to direct sunlight.
Dropped ceilings
A special type of finishing that does not require preliminary preparation surface, which perfectly hides all defects, and at the same time communications, is called a suspended ceiling.
Options suspended ceilings enough. These can be designs from:
- drywall;
- slats;
- cassettes;
- gratings;
- laminate;
- PVC films.
All suspended ceiling coverings have a number of common advantages:
- practicality and aesthetics;
- the ability to hide wires and communications;
- durability.
They are not without their disadvantages:
- complexity and significant cost of installation;
- reducing the height of the room.
Drywall
 With the advent of drywall, designers have a unique opportunity to bring to life the most daring and extraordinary projects. This material allows you to create straight lines and smooth curves, geometric shapes and unusual shaped details on the ceiling. With its help, both simple, smooth surfaces and exquisite multi-level structures are created.
Drywall, as a construction and finishing material, consists of two cardboard sheets connected by gypsum filler. To create suspended structures, sheets of the desired shape and size are mounted on metal profiles fixed to the surface. Absolutely any finishing method can be used to decorate the resulting coating.
The disadvantages of drywall are: instability to moisture and significant weight of the structure.
Rack (panel) ceiling
 A more budget-friendly, but no less popular option for suspended ceilings are slatted structures. They consist of a fixing frame system and cladding panels made of plastic, aluminum or steel.
There are two types slatted ceilings:
RP open type
– in it the main panels are located with a small gap, into which, to increase aesthetics, they are placed decorative inserts. The colors of the parts can be either the same or contrasting, depending on the preferences of the owner.
RP closed type
– consists of alternating slats, tightly fitted to each other.
Regardless of the material, the surface of slatted ceilings can be solid or perforated.
The general advantages of such coatings are:
- moisture resistance;
- practicality;
- durability;
- the ability to create curved surfaces;
- ease of installation.
Flaws:
- susceptibility to deformation;
- difficulty of dismantling.
In the case of choosing steel elements, significant weight and susceptibility to corrosion are added to the list; at the same time, absolute fire safety is added to the positive characteristics.
Cassette system
 Cassette ceilings have long been the prerogative of offices and commercial premises, however, recently they can increasingly be found in home interiors.
Square plates (cassettes) made from a variety of materials are used as a decorative component of such ceilings:
- metal (steel, aluminum);
- glass (acrylic, silicate);
- gypsum;
- mineral fiber;
- tree.
Their surface can be matte, glossy, mirror, or metallized.
In terms of design, cassettes can be either solid or perforated.
Behind glass panels are often installed lighting, filling the room with soft, diffused light.
For opaque surfaces, small built-in lighting options or lamps of appropriate sizes are provided, installed instead of cassettes.
According to the installation method, cassette ceilings are divided into two categories: open and closed. In the first case, the holding frames remain visible, in the second they are hidden behind the trim.
Advantages:
- versatility;
- possibility of fragmentary replacement of damaged elements;
- access to communications;
- ease of arrangement of additional ventilation;
- environmental friendliness.
For most types cassette ceilings It is also characterized by high moisture resistance.
The disadvantage of cassette designs is the impossibility of obtaining a uniform coating; a grid of squares will be visible in any design.
Lattice ceilings (Griglyato)
 An original Italian invention, ceilings resembling a cellular lattice are also rapidly moving from offices and shopping centers in the interiors of residential premises. Such designs are a profile lattice decorated with rectangular cells.
The materials used for manufacturing are usually aluminum or steel. Due to their lightness, environmental friendliness and non-standard nature, such coatings allow the implementation of exclusive design projects.
There are several models of lattice ceilings:
Standard. It has identical square cells of a U-shaped profile;
Multi-level. It is equipped with profiles of different heights, allowing you to achieve the effect of changing levels;
Pyramidal. It differs in the shape of the cells having a Y-shaped profile;
Blinds. In appearance they resemble the design of the same name;
Non-standard. At the same time it includes cells of different sizes.
Advantages of Grilyato ceilings:
- light weight;
- environmental friendliness;
- Fire safety;
- visual effects;
- ease of dismantling;
- durability;
- many lighting options.
The disadvantage is the need to prepare a base that can be viewed through the grating.
Laminate finishing
 Many people associate laminate with flooring, however, this finishing material can increasingly be seen on the ceiling. Imitating natural wood covering, it gives the room a special coziness, while simultaneously performing the functions of heat and sound insulation.
The advantages of this finishing option include all the relevant characteristics of suspended ceilings, plus:
- variety of layouts and colors;
- strength, resistance to mechanical stress;
- environmental friendliness;
- aesthetics.
The disadvantage is the destructive effects of moisture.
Stretch (PVC) ceilings
 This method of finishing allows you to transform the room beyond recognition, forming a spectacular seamless coating.
Advantages of suspended ceilings:
- variety of colors and configurations;
- moisture resistance;
- practicality.
Disadvantages include:
- instability to mechanical stress;
- significant cost of coating and installation.
Mirror ceilings
 A mirrored ceiling is always interesting and unusual. Visually expanding the room, allowing you to play with light, it becomes a real highlight of the interior.
There are several options for creating mirrored ceilings:
Tiled. Consists of glass mirror fragments of a certain shape. Has the best reflective effect.
Rack and pinion. It is a panel structure made of plastic elements with appropriate coating or aluminum slats with a reflective layer;
Tensioner. Using PVC film with a glossy surface, a mirror coating effect is created.
Polystyrene. It is made in the form of large reflective plates, which involve gluing onto a carefully leveled surface.
Positive characteristics:
- versatility;
- visual increase in space;
- lighting effects;
- functionality;
- possibility of combining materials;
- moisture resistance.
Flaws:
- difficulty of sanitization;
- significant weight of glass panels.
Coffered ceilings
 An aristocratic classic that has stood the test of time and has not lost its popularity is coffered ceilings. They give the room a special atmosphere of majestic luxury.
Coffered ceilings are a decorated beam structure with recesses of a certain shape (caissons).
The material for creating such ceilings has traditionally been natural wood. However, due to the high labor intensity and significant cost of production and installation of all necessary elements, many prefer to use alternative options:
- polyurethane;
- drywall.
Advantages of coffered ceilings:
- aesthetics, premium look;
- durability;
- improving the acoustic characteristics of the room.
The disadvantages include:
- significant reduction in room height;
- relatively high cost;
- complexity of installation.
 A very unusual and effective way to decorate the ceiling is to decorate it with textiles. In the simplest interpretation, this is pasting the surface with any fabric material. The application process is practically no different from working with wallpaper.
The next option is a suspended ceiling made of textile material. Compared to film, this coating is environmentally friendly, it does not interfere with air circulation and easily tolerates temperature fluctuations. Disadvantages include the complexity of cleaning measures, higher cost and the inability to use in rooms with high humidity levels.
And finally, for luxury-elite and themed interiors, the drapery effect is used, turning any space into a real art object.
There are several ways to capture such masterpieces:
Reiki. They are located around the perimeter and inside the selected area;
Frame system. Used for organizing complex compositions: cascades, puffs, tents;
Cornices. Attached along the edges of the drapery.
The textile design of the ceiling is directly dependent on the walls. They should harmoniously complement each other without causing dissonance of perception.
Wooden ceilings
 Wooden ceilings are in steady demand today. Their uniqueness lies in the fact that, in any design, they give the interior a special flavor and home comfort, successfully fitting into many design projects.
Advantages of wooden ceilings:
- aesthetics and decorativeness;
- environmental friendliness;
- versatility;
- soundproofing;
- thermal insulation.
Flaws:
- fire hazard;
- exposure to moisture;
- soundproofing;
- moisture resistance;
- Fire safety;
- durability;
- practicality;
- decorativeness.
There are practically no disadvantages to such a ceiling, if you do not take into account the rather high cost.
Bamboo ceiling

Fans of eco-design will certainly appreciate bamboo ceilings. They are decorated using three types of finishing materials:
bamboo slabs– made in the form of squares, with a side size of 60 cm;
bamboo panels– can have parameters: 120x240 cm and 100x190 cm.
bamboo fabric– this is a roll version, which is special kind wallpaper that differs in length and width.
As decorative finishing For such ceilings, bamboo stems are used.
Advantages of bamboo finishing:
- naturalness and environmental friendliness;
- exclusivity;
- practicality;
- significant service life.
Considering that in the manufacture of these materials it is widely used handmade, their cost is quite high, which is their main disadvantage.
Sometimes an apartment or house urgently needs ceiling repairs, but, as often happens, there is no money for a complete finishing of the room, and there is no prospect of it. There is a way out - use budget options for finishing the ceiling. In addition to the attractive price, economy-style ceilings are also easy to finish, so all the work is very easy to do yourself. You just need to choose the appropriate option.
First, it’s worth figuring out which ceiling finishing options are considered “economical.”
- Whitewash;
- Coloring;
- PVC tiles;
- Wallpaper;
- Drywall;
- Decorative plaster.
Of course, the cheapest, but already completely outdated option is to whitewash the ceiling with slaked lime. Lime does its job perfectly - the ceiling will take on a neat and clean appearance. But it deteriorates too quickly, and if there are stains on the ceiling, it will not be so easy to whiten them, and they may appear over time.
Water-based ceiling paint will do a much better job. Modern technologies made it more viscous, which allows you to paint over even the most difficult places. In addition, you can add any shade of color to this paint (it is also, by the way, very inexpensive). True, this finishing option also does not provide any guarantee that, for example, water stains will be painted over.

But polyurethane tiles will cope with this perfectly. Great way make inexpensive ceilings. A huge selection of patterns and the possibility of coloring make this finish a kind of “golden mean”.
The disadvantage is that the tiles turn yellow over time, but this can be corrected by simply painting them the desired color, for example, the same color as the floors.
The wallpaper is also very cheap option finishing. The choice of colors, patterns and textures is extremely huge, which is simply great for apartments with low ceilings.
Decorative plaster is also not very expensive, however, it requires special tools and skills, otherwise it will be very difficult to cope with it. But the finished ceiling looks very good, and still hardly deteriorates.
How to sheathe ceilings cheaper
Separately, it is worth considering the materials for the ceiling cladding.
- Drywall;
- MDF boards and panels;
- Metal slats.
The leader on this list is drywall. It is very easy to use, allows you to hide all the flaws in the ceiling, disguise communications and has mostly positive reviews.

The plasterboard ceiling can be made multi-level, arched - it depends on your desire. You can also paint it regular paint, conduct LED lightening, and, in general, an inexpensive plasterboard ceiling weighs little, which is also a plus. The downside of drywall is its high susceptibility to moisture - it will warp. Therefore, in the kitchen and bathroom it is absolutely not worth finishing the ceilings with plasterboard.
MDF boards are also inexpensive finishing materials. They protect well from noise, protect heat, are easy to install, and also weigh little. But most slabs are sold without final finishing, so you will have to paint and laminate them yourself. But after such treatment, MDF boards can be washed and cleaned without problems.
Slat ceilings made of metal (or with imitation) are also relatively inexpensive. No need to carry out any preliminary work, they weigh very little and are absolutely fireproof. True, it is not recommended to use such finishing in a wooden house, and metal slats conduct very well and increase noise, like any metal.
Cheap ceilings in the room: decorative film
Of course, you can save money on stretch ceilings. Buy cheaper film, do not hire specialists, but stretch the film yourself. Yes, such a ceiling will be cheaper, but it’s not without reason that they say that the miser pays twice - this is just such a case. A cheap stretch ceiling can only exist in two cases: either film from Russian or Chinese manufacturers, or a crude fake. You need to be careful: it’s not so easy to distinguish.

To understand that you have purchased low-quality products, you just need to pay attention to several factors:
- The initial price may differ from the final price several times;
- “Specialists” will not have the necessary skills and qualifications;
- There will be no necessary quality certificates;
- The material will be significantly inferior in all characteristics - this is noticeable even to the naked eye.
If you still want suspended ceilings, you can still save money. For example, order the most simple design, without photo printing and a bunch of levels. Many companies hold various promotions and provide discounts. You can contact the experts for advice - they will help you choose an economical, but nevertheless high-quality option.
Inexpensive ceilings with your own hands: do it in style
It is not difficult to make cosmetic repairs to the ceiling in an apartment or country house yourself. The easiest way, of course, is to simply paint with a regular brush, after first removing a layer of old paint.
It is also very easy to glue PVC tiles:
- Prepare the ceiling;
- Apply glue to the tiles;
- Press it to the ceiling.
It is necessary to glue from the center to the edges to obtain a uniform geometric pattern.

It’s a little more difficult with decorative plaster - it requires skills. However, if the relief does not turn out, as in the pictures from glossy catalogues, then you can always say what it is design solution owners of the premises.
The technology for gluing wallpaper on the ceiling is not too different from the technology for gluing walls. First, the ceiling is primed with glue, waiting for it to dry completely. Applying glue to wallpaper. Then you need to gently press it to the ceiling with your hands, and only then remove the bubbles with a roller or spatula, moving from the center to the edges. The joints between the ceiling and the wall can be decorated with inexpensive moldings of a suitable color.
The most difficult thing is to hem the ceiling with plasterboard. You need to carefully calculate the dimensions, and it’s difficult to work alone. In addition, if you want an unusual design, for example, an arched one, then you need skills to correctly bend a sheet of drywall under the influence of steam. This is not the final finish - plasterboard construction it is worth painting: without additional processing the sheets do not look very aesthetically pleasing.
Construction of an inexpensive ceiling (video)
There are different situations in life: the neighbors are flooded, the house is rented, there is simply no money for serious repairs. But this does not mean that you need to admire the ceiling with stains and holes, because repairing the ceiling inexpensively and quickly is not so difficult. The modern abundance of materials allows you to choose a finishing option that suits everyone’s pocket. And don’t be afraid of the word “budget” - an inexpensive ceiling does not mean “bad”. If you follow the work technology, then the finished ceiling will even inexpensive materials It will look clean, neat and fresh.