Communication with nature has always been beneficial for children. In Soviet times, schoolchildren often disappeared into the forest, building huts and dugouts, which were bases for playing “war games”, places to spend pleasant time with friends. Although the era of forest tourism has already passed, giving way to the computer era, many still prefer to get out into nature and build such familiar and interesting structures as huts.
A hut is an artificial shelter quickly constructed in hiking conditions from available materials (branches, boards, poles, turf). This type of building has long been used by hunters, mushroom pickers, rangers and tourists for protection from bad weather and long-term stays away from the benefits of civilization. Besides, Such shelters have long become a favorite place for children to play- they not only build them with great pleasure, but also spend a lot of time in them, arranging improvised headquarters for their forestry detachments, warehouses for all kinds of provisions and simply secluded shelters.
To the modern child, consumed by the world computer games And social networks, such entertainment helps not only to improve your well-being, but also to acquire useful skills in constructing such structures with your own hands, becoming closer to nature.
A hut is an artificial shelter that can be quickly constructed on the go from scrap materials.
Main types of street huts and stages of their production
According to their design, huts are divided into:
- Single-pitch- the simplest, consisting of a visor resting on trees or a stake dug into the ground
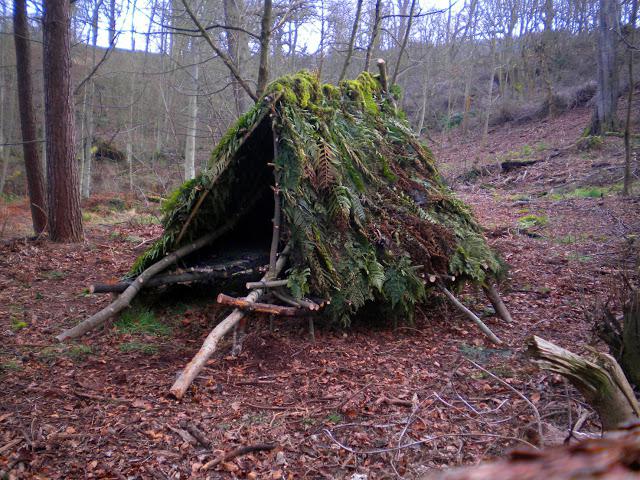
- Gable– externally they resemble a tent, they consist of a frame covered with branches, moss and spruce branches.
- Circular- tall buildings erected in the form of a tent (cone), externally reminiscent of Indian wigwams. They are built around a tree or a long stake driven into the ground.
Huts with recesses below ground level are the famous dugouts, the living part of which is located in a well-insulated and covered pit.
Each of these huts consists of:
- Frame - the frame of a building assembled from poles;
- Covering material - branches, spruce branches, straw, moss;
- Fasteners - nylon threads, adhesive tape. In camping conditions, if they are not available, they often use improvised fastening materials - freshly cut strips of bark, dug up long roots, strands of grass.
The construction of a hut consists of assembling the frame and carefully covering it with lining material and arranging a fire pit.
Gallery: hut on a summer cottage (25 photos)


How to make a hut (video)
How to build a simple lean-to hut (halabudu) from branches in the forest
This type of hut is the simplest and can be constructed within a few hours.
- For a hut, choose a high and dry place with two thick trees standing at a distance of 1.5-2 meters with strong knots at the bottom of the trunks.
- A strong pole 2-2.5 meters long is cut down and placed on tree branches so that its height from the ground is up to 1.5 meters.
- Using strips of bark, the ramp poles resting on the ground are tied to the resulting crossbar.
- The resulting frame is covered first with thin branches with foliage, and then with spruce branches.
- At the ends of the hut, stakes are driven in and branches and spruce paws are placed tightly.
- In order not to sit on the cold ground, the floor of the hut is covered with spruce paws, branches or simple grass. The layer of such insulation should be at least 30 cm.
- To prevent it from being cold inside such a canopy, a fireplace is made in front of the entrance, behind which a reflector is installed - a low fence made of stakes driven into the ground and branches intertwined between them, thanks to which heat flows inside the building.

A simple lean-to hut is the simplest and can be built within a few hours
Construction of a gable hut on the street with your own hands
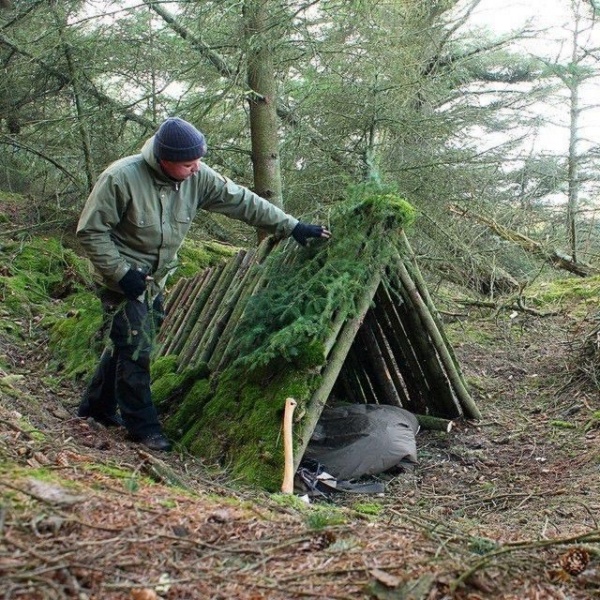
A gable hut is built in the forest with the maximum use of available materials without the use of nails, screws and other metal fasteners.
The construction of a gable hut is carried out according to a simple scheme:
- First, a site is selected in a high, non-swampy, dry place from which windbreaks, debris, and stones are removed. You should not build a hut near anthills or burrows of wild animals. It’s better to build a hut under the canopies big trees– if it rains, they will provide additional protection from moisture.
- For the frame, two straight sticks with branches in the upper part are cut down. The lower ends of the spears are sharpened and driven in along one line at a distance equal to the length of the future building
- A long pole is placed on the slingshots, tying it to them with threads, tape, or, in their absence, with strips of fresh bark removed from the cut down sticks.
- Next, on both sides of each of the spears, poles made of thick branches resting at an angle on the ground are tied, securing them at the base with pegs driven into the ground, and at the top with bark, thread, and tape. The same poles are laid parallel to the end ones in increments of 40-50 cm.
- Parallel to the ridge of the resulting frame, longitudinal poles are laid on the surface of both slopes, tying them at the points of intersection with the inclined ones. If there are thick trees nearby, the hut is tied to them using strong twine - this makes the building more stable.
- The resulting skeleton, reminiscent gable roof on both sides of the ridge, as well as at the ends, while leaving space for entry, they are covered with branches.
- On last stage Spruce legs are laid on each of the slopes of the building, starting from the ground.
- When densely packed with spruce branches, the roof of such a shelter even in heavy rain or the snow will not leak, and the inside will be dry and comfortable.
- Very often a thick layer is laid on top of the branches on the slopes. plastic film tarpaulin.
- If there is a field nearby with dry straw remaining after the harvest, then it can be used to cover the roof along with spruce legs - the main thing in this case is to remember that you should light fires in such a hut very carefully so that an accidental spark does not set the dry stems on fire.
- To prevent the hut from flooding during heavy rains, a small ditch with a groove extending to the side is made along its perimeter

A gable hut is built in the forest with maximum use of available materials without the use of nails, screws and other metal fasteners
Building a winter hut in the ground
In addition to above-ground ones, it is also possible to build one located below ground level. a hut in which you can stay not only in the warm season but even in winter:
- For construction, choose a dry place away from the trunks of large trees - it is best to build such a shelter on hills and hills with loose sandy soil.
- The pit for the dugout in which 3-4 people will be located at the same time is made 3x4-5 meters in size and up to 1.5-2 meters deep. When excavating the soil, I throw the removed turf and fertile soil not far from the pit, since in the future they will be useful for filling the roof of the dugout. On one side of the pit, an additional trench is made for entry.
- Pegs are driven along the walls of the pit, while retreating to make the distance between them and the soil layer equal to the thickness of the boards or logs used to construct the walls.
- Boards or logs are placed between the driven stakes, thereby forming the walls of the building.
- The floor of the dugout is first insulated with dry leaves, sawdust and covered with poles or boards.
- To build a roof, 3 thick dugouts are dug along the central axis of the rectangle. supporting pillars, two of which are located near the walls, and one in the center of the dugout.
- In the upper part, the pillars are fastened with a longitudinal pole, on which thin logs are tightly laid on both sides with an inclination towards the ground.
- The finished roof is covered with earth and covered with turf.
- The ends of the roof protruding above the ground are covered with boards.
- The entrance to the dugout is a trench adjacent to the pit - for this, steps are dug at its beginning or a ladder is installed. The entrance is covered with a wooden shield.
- To ensure that the wood of the dugout structures does not rot due to high humidity it is treated with special solutions.
How to build a treehouse (video)
How to make a circular Indian hut (wigwam) for children
A wigwam is a circular hut. You can build it both outdoors and in the backyard of a private house and even in an apartment
In order to make children's wigwam necessary:
- 4-6 wooden round section sticks with a diameter of 2-2.5 cm are tied with coarse thread or electrical tape so as to form a cone or pyramid. If a wigwam is made outside, the sticks of the frame are driven into the ground, having previously sharpened their ends.
- For the hut, a cover is made from dense material with ties, with the help of which it is tied to the frame. The cover should cover most of the hut, leaving room in the front for entry.
- The entrance is made by sewing two curtains to the cover.
- To give the wigwam an attractive look, strips, circles, and other shapes cut from pieces of colored material (paper, cardboard) are glued onto the material of the cover.
- A thick blanket is placed at the bottom of the hut.

A wigwam is a circular hut
Making a children's hut at home
Since many people do not have a regular opportunity to get out into nature, very often huts are made at home:
- For the ridge of the frame, use 4 dry bars 2-2.5 cm thick and a stick of the same diameter.
- To assemble the end walls, the bars are folded in the shape of a triangle and a hole equal to the diameter of the ridge is made using a drill at a distance of 3-4 cm from the ends.
- A round stick is passed through the hole in the crosshairs.
- The resulting frame is sheathed on three sides with fabric and cardboard.
- To make the hut stable, the elements of the rear wall in the lower part are fastened with another block.
- A retractable curtain is installed at the entrance.
The resulting hut fits perfectly not only in an open space, but also inside a children's room.
07.02.2013 21:00
How to build a hut with your own hands
Everyone needs to know how to build a hut in the forest on their own. In life, as practice shows, nothing is in vain. Build temporary shelter over your head in extreme conditions, is no less important than obtaining food, water or fire. More ancient man the first thing he thought about was a roof over his head, that is, a place where he was out of danger, and only then did he think about food.
To build a hut, you naturally need construction material. Any vegetation growing in the area will serve as such material for the hut. In the north, these are ice or snow blocks; in the field, they are shrubs; in the forest, they are trees, branches, and foliage.
Since our country, Russia, is rich in vast forest areas, we will build a hut in the forest.
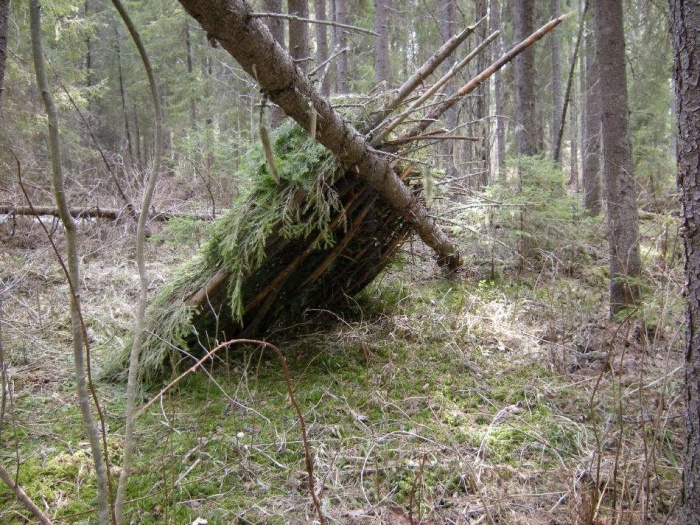
There is an opportunity to build shelters in the forest various types, which will vary in complexity of construction. The simplest type of shelter in the forest is a hut. Almost any fallen tree is ideal for its construction. It will be a kind of skeleton for the future hut. The existing branches of a fallen tree will well hold those branches and twigs that we will additionally lay to form required roof. Before building a hut, you need to make sure that the fallen tree will not fall completely and crush you. Next, cut off, if you have a knife, or tear off with your hands the extra branches that fall into inner part hut. We fold the torn branches so that they form the slope of the future roof. The thicker the layer of laid branches, the less likely it is that rainwater will get inside the hut. A fallen tree allows you to build both a lean-to and gable hut, depending on how it lies.
The main purpose of a lean-to hut is to provide protection from the wind. Also, a lean-to hut is an excellent reflective screen for a fire.
If necessary, a single-slope hut can easily be expanded to a gable one.
Gable hut
To build a gable hut, it is not necessary to have a fallen tree, as in the first case. It is advisable to find a growing tree with a strong branch. Next to this tree it is necessary to dig a spear, the height of which will be equal to the height of the branch of the growing tree. Then a thick pole equal to the length of the future hut is laid on the spear and the branch. This pole will be the ridge of the roof of the hut. Next, poles - rafters - are laid on the existing crossbar on both sides, the lower part of which is dug into the ground. Along the existing rafters we lay a kind of sheathing from pre-prepared poles. The sheathing is fixed with nails or binding wire. If neither one nor the other is available, then elastic tree bark is quite suitable for fixation, which can be used to tie the poles to the rafters like a rope. The finished frame of the hut must be covered with branches and foliage. The branches are perfectly fixed on the sheathing. The shelter of the hut begins to be transported from the bottom up. This “tiled” dense arrangement of branches prevents rain from getting inside the hut. The drops will flow from branch to branch, from top to bottom, rolling down to the ground on both sides. The ends of the hut are closed according to the same principle as the roof. To give comfort inside the hut, its floor can also be covered with branches with foliage.
All children love nooks and crannies. Only in solitude can you give free rein to your imagination and go on an exciting journey through imaginary worlds. This is why children often build homemade houses from pillows, blankets and other improvised means. But if you want your child to feel like a brave traveler or the hero of his favorite fairy tale, give him a hut. Moreover, making a hut for children with your own hands is quite easy, but the child will be able to fill his leisure time with exciting games. Today “Dream House” will share with its readers ideas for building children’s huts that can be installed both in the children’s room and outside.
Making a hut for children yourself - some interesting ideas
1. Sheet and rope
To make a hut, just stretch a rope between the trees, throw a sheet over it and secure its edges with wooden pegs or other suitable means. To make the child comfortable, lay soft blankets or blankets on the ground. And even though there is nothing supernatural in such a “structure,” a child’s imagination can fill it with an exciting story. A homemade hut for children on the street will give a lot of interesting games and, moreover, will protect babies from solar overheating.
When choosing a place for a hut, give preference to darkened and level areas.


2. A hut made of gymnastic hoop and fabric
An ordinary gymnastic hoop can be an excellent basis for a children's hut. It is enough to sew a long fabric to the hoop and hang it in a horizontal position, for example, from a tree branch at such a height that the edges of the fabric reach the ground. Alternatively, you can simply throw a large piece of thick fabric over the hoop, build a cone-shaped roof and secure the frame at a convenient level. Then, to hang the hut you only need a reliable strap or ribbon.


3. Hut made of branches
Probably every child dreams of traveling around the world, dangerous adventures and exciting journeys. You can help a child realize his cherished dream without leaving the aisles of his own summer cottage. Since brave travelers prefer to sleep not in a warm bed, but in a hut made of tree branches, made with their own hands, the baby will certainly be delighted with such a gift.
But how to make a children's hut from branches? There are several interesting options:
- Firstly, you can build a hut from flexible and long branches left after pruning trees and. To begin, collect as many branches as possible and select the largest specimens. At the site of the future hut, draw a circle and dig branches around its circumference, tilting them so that they create a cone-shaped frame. Install only two branches at a fairly wide distance from each other, because they will serve as the entrance to the future hut. Make sure the branches are firmly installed and supplement them with remaining material. It’s okay if the walls of the hut are “transparent” - being in such a house, the baby will still feel like, at least, Robinson Crusoe.
- Secondly, you can make a “living” hut by decorating it with foliage and plants. If you are not in a hurry to build a miracle house, plant climbing plants around the perimeter of the frame, for example, grapes, bindweed, etc., which, as they grow, will beautifully entwine the walls of the hut. If you want to give your child a holiday “here and now,” simply cover the frame of the hut with branches and greenery.


4. Wigwam hut in the nursery and outside
Wigwam hut is traditional house Indians This structure has a cone shape and a strong structure. Previously, the Indians built their homes using thick branches, which were then covered with thick canvas fabric. We can also make a children's hut based on the wigwam principle. To do this, you need to select 5-7 flexible but strong twigs, and then install them in the shape of a polyhedron or semicircle. The tops of the twigs should be connected in such a way that they fit together like flowers in a bouquet, overlapping each other. At the junction, the twigs must be secured with a strong rope or a piece of fabric.
If you are installing your teepee outside, dig the bases of the twigs into the ground a little. If the wigwam is located indoors, tie transverse rods at the bottom of the structure that will secure the structure.
After this, decorate the wigwam with fabric. Most often, triangles are formed between the nearby twigs of the hut, so you just need to cut out pieces of fabric in this shape and sew them around the frame. However, it is much more beautiful if the wigwam hut is decorated with a specially sewn cover, to create which you will need to carefully measure the height of the frame and the width of each of its parts.


5. Gable hut
Having done simple design from several wooden slats, you can create a beautiful gable hut or hut-tent. The most important thing in this structure is to choose the right fabric. If you are setting up a hut in the yard, it is best to use tent fabric that will not fade from the sun or become deformed due to high humidity. If the structure is located in a child’s room, cotton or any other natural material will do.


Indoor huts
If you are not confident in your abilities or simply do not want to waste time making a homemade hut, you can purchase a ready-made structure. For example, beautiful and easy-to-play huts are produced by the Swedish brand IKEA. Such structures are suitable not only for games, but also for... In addition, the branded hut will certainly become the main decoration of the children's room.


You can also use a stylized awning or a roof over a bed as a hut. This accessory will not only give your baby peace exciting games, but will also provide him with a sound and restful sleep.


Summer has come, which means you can safely start building a hut. But here's the problem: you don't know where to start. Don’t be discouraged, because in today’s article we will look at the main types of these structures, and also describe installation instructions that will help you quickly and easily build a hut.
Where is the best place to build a hut?
It’s immediately worth noting that building huts near mountain rivers, in open clearings, near single standing trees and under rocky slopes is strictly prohibited. This is not only unsafe, but also extremely inconvenient. Basically, these structures are built on flat forested areas, where there are a lot of dense plantings that will do an excellent job of protecting the hut from drafts. However, it is still considered an ideal option for construction country cottage area. Here, if necessary, you can ask your parents for help, and also go to the house at any time.
An excellent place to build a hut is a forest lawn
Options for children's huts
The most popular among children are gable and single-slope huts and wigwams. They are perfect for both forest and country areas, and their construction is not difficult and takes a minimum of time.
The first option is a gable hut
The construction of a gable hut must begin with the construction of a frame, which, in turn, will be made of a pole and a spear. The dimensions of the building will directly depend on the size of these elements, so immediately estimate how many people the hut will be designed for. The rods must be driven vertically into the ground a third of their length. This is done so that in the future these elements do not wobble and are stable.
Scheme of the design of a gable hut
After this, place a pole on the slingshots and, if necessary, secure the joints of the elements with wire or strong rope. Well, some of the work is already behind us. Now you will need to collect a few more thick tree branches (poles), which will later become a support for laying roofing material such as reeds, hay, straw or spruce paws. By the way, we recommend placing the poles close to each other. In this case, there is no need to cover the walls with anything else. However, in most cases, the side poles are placed at a distance of at least 20 centimeters from each other. If you notice that the frame is not reliable enough and could collapse at any moment, strengthen it with transverse branches that need to be attached to the poles.
Now is the time to lay the sheathing with spruce branches (or other available material). In this case, you need to start work from the very bottom. This is done so that each subsequent row covers the previous one. The result will be reliable protection internal space hut from moisture ingress. In the same way, build back wall structures, leaving only the entrance open.
As a result, you should have a structure like this
The second option is a lean-to hut
The construction of a lean-to hut will be much faster and will take even less effort from you. First, proceed according to the same principle: install the supporting frame of the structure using two spears and a long pole. After this, make the walls of the hut, again, as described earlier. To speed up the construction process, you can replace the spruce branches with any water-repellent fabric or tarpaulin. Attach the covering material to the frame structure from above using ropes, and press the fabric from below with a stone or log. Ready!
It is better to secure the covering material of the frame of a lean-to hut with ropes
The third option is a wigwam hut
The wigwam hut owes its name to the domed Indian buildings different shapes. To build it, you first need to draw a circle on level ground, the area of which is enough for you and 2-3 friends. After this, dig several poles along the edge of the circle, connecting their tops in the form of a bundle and be sure to fasten them in several layers with tape, wire or a reliable rope.
It will be very cool if you plant the support branches of the wigwam hut climbing plants
This completes the fabrication of the frame. Now all that remains is to make a shelter. There are two options here:
- Plant all support branches with climbing plants. Decorative beans are ideal for this task, the delicate green leaves of which go well with white and red inflorescences. The result will be a very pretty building.
- Brightly colored fabric can also be used as a covering material. If you don't have colorful fabric, take a plain fabric and paint it with waterproof paint. The canvas will need to be cut out in the form of a semicircle, the radius of which should be equal to the length of the side support poles. Sew ties along the rounded edge of the fabric and in the center, and also attach them to poles stuck into the ground.
By the way, sunflowers can also act as supports for the frame of a wigwam hut. You need to start planting them in the spring and do this along a circle drawn on the ground, leaving a few centimeters for entering the shelter.
Children's hut made of fabric - construction in a few minutes
A children's fabric hut can be made in just a few minutes
Children's tent made of fabric - perfect option for a few days' rest. If you prepare all the materials in advance, its construction will only take a couple of minutes! You will need a two-meter (in width) and four-meter (in length) canvas made of dense fabric, two vertical supports that must be placed at a distance of two meters from each other, a strong rope at least three meters long, as well as pegs for tensioning the canvas.
To build a hut made of fabric, it is enough to pull the rope horizontally between two supports and fix it. Throw the fabric over the stretched rope and align its ends. After this, attach the edges of the canvas to the ground using pegs. It is done!
That's all, choose the option you like and run to build a hut with your own hands. Don’t forget to use your imagination and build an interesting and colorful building where you and your friends can spend time comfortably.
We all love to relax in nature. And it doesn’t matter where exactly we want to relax, in a flat forest, or in the rocky mountains. Naturally, when planning your vacation, you know in advance where you will spend the night, in your car, in a tent or sleeping bag. However, there is another option for overnight stay.
This option convenient theme that in it you will not only feel protected, but also be able to breathe fresh air in a pleasant atmosphere. This option is to build a hut. In this article you will learn how to build a treehouse.
Definition
A hut is a universal shelter that is built for a short time. First of all, it is built for overnight accommodation, as well as for protection from snow, heavy rain, temperature changes, strong winds, and the scorching summer sun.
There are these types of huts:

How to make a hut in the forest with your own hands
First you need to find appropriate place for the construction of a hut. This place should be safe for your life. We do not advise you to build a hut on the banks of a river, in narrow gorges, or at the bottom of a canyon. Because in case of flooding or heavy rain, this place may become unsafe. Also, do not build a hut under sagging rocks or near steep mountains.
You can build a hut without any tools. However, you will need a standard set to work:
- Axe.
- Rope (scotch tape).
The great thing is that you will most likely always have these tools with you. They will significantly reduce the robot’s time, and the process itself will be more enjoyable.

As you can see in the photo, most huts can be built using a simple technique of weaving from branches. In order to make a high-quality roof and walls that will be reliable in all weather conditions, you only need to use those materials that are found in the forest at almost every step, these are branches, bark, moss, leaves, grass. By collecting all these materials you can make a good hut with your own hands.

Huts come in different shapes and sizes, it all depends on how many people it should accommodate, as well as what its purpose is - it will be a shelter from the sun or protection from the cold and wind. But with all this, you need to consider the type of terrain, weather and time of year.
Making a lean-to hut
A lean-to hut consists of only one wall, made directly by you. This wall should rest on something, it could be a fallen tree or a large stone or two trees growing nearby. You can make this wall or canopy from branches and cover it with leaves. This type of hut will serve as protection for you from light rain, scorching sun or other circumstances. However, you will not be able to completely protect yourself from strong wind, snow or rain. Also, this building is not so practical. Since you can have a good rest in it, however, you will not be able to comfortably spend the night there.
In order to build a building you will need two strong logs with branches at the top, 2-2.5 meters long. Drive these logs into the ground at an angle to the base and secure the crossbar at the top. At a distance of 30 cm, you should place branches (poles) with one end pressed into the ground and the other resting on the crossbar.
Making a gable hut
This type of hut is more convenient and practical. A gable hut is made according to the same principle as a lean-to hut. But the difference is that the poles that are installed from the crossbar to the base of the ground must be installed on both sides. This can be seen in the photo.
One side should be completely covered with small branches or leaves, and the other will be used as an exit. If you have a film or tarpaulin with you, then use it as additional protection from rain and wind.
Once you are done with the exterior work, start with the interior work. What is meant? You need to take care of the floor covering. Especially if you don’t have sleeping bags or other warm clothes with you. If you have to spend the night in cold and wet weather, make sure you don't sleep on the ground. Build something like a stretcher with your own hands and cover it with dry leaves and grass that you can find, or not necessary things which may be in your backpack.

Advice! If you are making a tent in rainy weather, then do not forget that water can get inside the tent. To prevent this from happening, dig a moat around the tent.
Important Note: In order for the shelter not to allow heavy rain to pass through, its thickness should be 20-25 degrees, and the angle of inclination should be at least 45 degrees to the base of the ground.
Remember, if there is a question about preserving your health or even life, you should not look for the most comfortable views materials. Use what you have on hand. The main thing is that the material you choose is dry and reliable. But, probably, few of us may need to build a hut in the forest due to various extreme situations. Therefore, in the next part of this article we will talk about how to help our children build their own hut.
Wigwam hut
We build the frame: draw a circle on a flat surface. Around the circle you need to dig a row of sticks. The upper ends of the sticks must be connected using rope, tape or wire. However, everything must be very reliable so that your children are safe. At this stage, we can say that the frame is ready.

After making the frame, you only need to cover the wigwam with colorful fabric or film, as you see in the photo.

If you have a summer house or your own garden, then do not lose this opportunity to make an original and very beautiful wigwam from sunflowers for children. To do this, you just need to plant a few sunflowers in a circle. And when they grow up, tie them together. You can only imagine how happy your child will be playing in such a hut that you built.
Let's sum it up
There are also other types of children's huts. For example, if you have a lot of trees, consider making a treehouse or building a large treehouse for playing with friends. You can even make a small hut in a children's room using improvised materials. Remember: joint work always unites the family. Before you build a hut in the forest with your own hands, it is important to think everything over, stock up on tools and start working.


