A hydraulic accumulator for a pumping station is a special metal container, inside of which there is a metal membrane and a certain volume of water under pressure. The device is designed to maintain stable pressure in the water supply system, protecting the water pump, due to frequent activation, from premature wear, and the entire system from possible water hammer.
Having a pump with a 50-liter hydraulic accumulator in the water supply system, the home owner will always be provided with a small supply of water.
Main functions of a hydraulic accumulator
The installation of a hydraulic accumulator in the home water supply system solves several important problems:
- Protects the pump from premature wear. Water supply in membrane tank, allows you to turn on the pump when you open the tap in the water supply only in the event that the water supply in the tank completely disappears. Any pump contains a certain number of starts per hour, and the accumulator device allows the pump to have unused turns, which increases its service life.
- Maintains constant pressure in the water supply system, protects against changes in water pressure, which can, if several taps are opened simultaneously, lead to sharp fluctuations water pressure, for example in the kitchen and shower. The hydraulic accumulator (see) successfully copes with such unpleasant situations.
- Protects against water hammer that occurs when the pump is turned on, which can cause significant damage to the pipeline.
- Maintains a supply of water in the system, which allows you to use it even during a power outage. This is especially true in country houses.
Types and design of hydraulic accumulators
Before getting acquainted with the types of devices, you need to get acquainted with the features of its design. It is not particularly complicated.

The main structural elements of hydraulic accumulators are:
- The housing is a sealed cylinder capable of withstanding a pressure of 1.5 – 5.6 atmospheres during constant operation, or up to 10 atmospheres if the load is short-term.
- Membranes. This is an elastic “pear”, which is fixed at the neck of the cylinder and placed in its internal space. Only through a flange with a valve attached to the neck of the battery housing can access to the membrane be opened.
- Nipple for adapter. The element is cut into the body from the side opposite to the neck. Through the nipple, air is pumped into the battery, occupying all the space available between the outer surface of the membrane and the internal cavity of the housing.
In addition, the design of the drive contains legs and a support bracket that are used for mounting the pump. The legs are welded at the bottom of the storage tank, and the pump is placed on top.
Design features allow the range of storage devices to be divided into the following types:
- Storage tanks for accumulation cold water, are used in technical pipelines and for drinking. In this case, batteries for modern pipelines have only inert membranes, which are made from a special type of rubber.
- Accumulation tanks, for storage hot water, used in hot water supply systems. In such drives, the membrane is made of a material that is resistant to high temperatures.
- Storage tanks used for heating systems in a closed environment. The main requirement for such batteries is the presence in their design of a membrane that has a high resistance to the occurrence of high temperature and pressure.
At the same time, the battery membranes in the hot water supply system can withstand temperatures up to 90 degrees Celsius, and the elements that serve for heating systems can withstand up to 110 degrees Celsius.
How to choose a hydraulic accumulator model
When choosing a drive model, you need to pay attention to the following design features and performance characteristics devices:
- The working volume must satisfy the needs of the owner and correspond to the performance of the station pump.
- The membranes must be made of material corresponding to the functional load. For example, one membrane is used for a “drinking” battery, and a completely different one for a “heating” battery.
- The installation diagram of the battery on the supporting plane must be acceptable to its owner. Floor tank is enough large sizes It simply cannot be placed on a bracket.
Advice: The key factor, when choosing a drive model, is its capacity. It doesn’t matter where and how to install and connect the hydraulic accumulator, the main thing is that its volume is sufficient for all the needs of the consumer.
Basic rules when buying a drive:
- Its minimum volume should be 25 liters. Otherwise, due to frequent switching on and off, the pump will wear out quite quickly.
- The optimal volume of a hydraulic accumulator is considered to be a tank of 50 liters or more. But it is only suitable for a family of 3-4 people. Singles or retirees can use storage devices with a smaller capacity; their price is much lower.
Where to install and connect the storage tank
Connection diagram of the hydraulic accumulator and pump, their correct operation is not particularly difficult:
- Water is supplied inside the pear-shaped membrane through a flange valve.
- Under its pressure, the membrane begins to expand.
- The air pumped into the housing is compressed and keeps the membrane from bursting. As the membrane fills, the air becomes denser, which ultimately creates an area of increased pressure between the walls of the housing and the membrane, which is provided with the energy of compressed air.
- After opening the faucet in the home water supply, the air begins to compress the pear-shaped liner and the water begins to flow through the pipes under the required pressure.
- The pump fills the empty membrane, and its operation is controlled by a pressure sensor installed.
Tip: For water supply systems, the location of the hydraulic accumulator is determined by the operating diagram of this unit, which assumes that the accumulator must be placed between the pump and the “input” fitting to the collector of the internal water supply of the house. An exception may be the installation of a hydraulic accumulator in the heating system. In this case, it must be cut into the return line located in front of the line entering the boiler, behind the pump.
- It is best to mount the battery on the floor or a special bracket that is fixed to the wall. In this case, between the legs of the drive and the surface for their installation, it is imperative to install shock-absorbing rubber pads.
When connecting the storage device to the water supply, take into account design features pumping station, the type of pump used in it for pumping water into the storage tank.
The stations use two types of devices:
- Submersible, lowered directly into the water.
- Surface, fixed to the hydraulic accumulator.
The hydraulic accumulator also depends on the characteristics of the equipment used. The photo shows an example of installing the device in a country house.

The procedure for connecting a system with a surface pump is as follows:
- The air pressure on the nipple side is measured when the membrane is empty; its value should be 0.5-1 atmosphere less than the minimum pressure in the accumulator when the pump is activated. This minimum pressure is set on the station control relay, to the value of which 0.5-1 atmosphere is added. Its readings are recorded by a pressure gauge on the tank nipple.
- Installation of a special manifold tank with five outlets to a flange fitting.
- Connection:
- to the first outlet of the pressure pipe from the pump;
- to the second - a domestic water supply pipe;
- a pressure switch is connected to the third;
- to the fourth output - a pressure gauge;
- The fifth one is already connected to the hydraulic tank fitting.
Tip: Assembly is performed using a polymer seal, which is generally accepted for the rules for connecting elements threaded connections to ensure their sealing. After assembly, the equipment is considered ready for operation.
When connecting the device with your own hands using a submersible pump, you must follow the following procedure:
- The pump is immersed in water. The pressure hose from the pump is brought to the surface and connected to the pressure switch, through the same manifold with five connectors.
- The flow from the collector is diverted to the hydraulic accumulator, and in this section the movement will be two-way.
- Another pipe is connected from the collector to the water supply, and the remaining connector is connected to the pump control system.
- In this case, another fitting or check valve is inserted between the collector and the pump, which prevents water from “merging” back into the well after the pressure supply stops. This valve must be mounted directly into the outlet neck of the pump.
How to repair and maintain a hydraulic accumulator
Just like pumping stations without a hydraulic accumulator, the simplest hydraulic tanks require timely attention and maintenance.
There may be several reasons for this:
- Corrosion.
- Formation of dents on the body.
- Violation of membrane integrity.
- Lack of tank sealing.
There are other causes that need to be addressed to avoid possible problems. Although the care instructions suggest inspecting the device twice a year, this may not be enough.
If a problem is not noticed within six months, it can cause the hydraulic tank to fail completely, which requires inspection and repair of the product at every opportunity.
The causes of breakdowns may be:
- Frequent turning on and off of the pump.
- Liquid exits through the valve.
- Low water pressure.
- Low pressure, below design, air.
- Weak pressure after the water pump.
The reason for repairing the hydraulic accumulator may be:
- Low or no air pressure in the membrane tank.
- The membrane has been damaged.
- The body was damaged.
- A large difference in pressure was formed when the pump was turned off and on.
- The hydraulic tank volume is incorrectly selected.
To troubleshoot problems you need to:
- Increase air pressure by forcing it through the tank nipple with a compressor or a regular garage pump.
- A damaged membrane can be repaired in a specialized workshop.
- Here, damage to the housing is eliminated and its tightness is restored.
- The difference in pressure can be corrected by setting a very large differential so that it matches the frequency of pump activation.
- The required volume of the tank is determined before its installation in the system.
The video in this article shows how to connect a pumping station without a hydraulic accumulator and separate hydraulic tanks. Using a storage tank in a water supply system country house will improve the arrangement of an autonomous source, create for it required amount liquids in case of emergency disconnection from the source.
Quite often, in private homes and dachas in the absence of a centralized water supply, submersible pumps are used.
Due to their advantages, their use has become widespread and they are quite popular.
But in order to achieve high-quality and uninterrupted operation, you should connect them correctly. After all, these devices are important node for water supply and contains compressed air and water, which are separated by a membrane.
Hydraulic tank design
The presence of a hydraulic accumulator is required in cases where water pressure decreases.
If this happens, the pump turns on, pumps the required volume of water into the accumulator, and then turns off.
This device is also capable of providing the system with water in cases where the pump is damaged or there are problems with electricity.
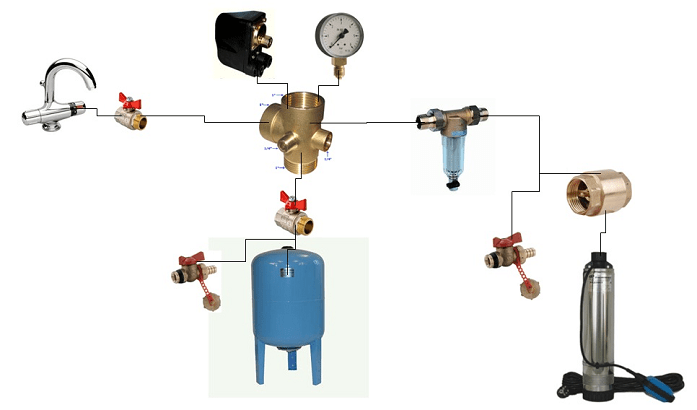
The hydraulic accumulator consists of the following components:
- membrane;
- body with legs;
- nipple with protective cover.
Advantages
Like any other device, a hydraulic accumulator has its advantages and disadvantages.
The first include its large capacity, which, depending on the model, ranges from 5 to 100 liters. So it is quite possible to store water in it.
Also, its cost is quite objective and accessible to all segments of the population. For example, if the price of a hydraulic accumulator is approximately 15 thousand rubles, then its plastic analogue for 3 liters costs no more than 4 thousand rubles.
The presence of this device makes it possible to always support required pressure, at which household water supply appliances can operate. In addition, the use of a hydraulic accumulator allows you to increase the durability of the pump, since the frequency of its switching off and switching on is reduced.
How to connect
Relay settings
 Pressure switch device One of the most important stages of connection is correct configuration.
Although at first glance this procedure seems quite simple, setting it up properly requires some knowledge.
All rules must also be followed. Having opened the pressure switch, you will see that under the cover there are only two nuts and the same number of springs, which, according to the instructions, are required to set the value at which the well pump turns on.
Specialist's note: To adjust the pressure difference, a smaller pair of screws should be used, while a larger pair is required to turn on this mechanism. In addition, it is also used to configure the smaller pair.
For the smooth functioning of the entire system, the difference between turning on and off should be equal to 2 atmospheres. When making settings, you need to remember that this should be done in the right sequence.
 If the pressure is working, the pump turns off. In this case, the nut installed on the lower spring rotates in the decreasing direction to the point of its operation.
In addition, you should open the tap to drain the existing water from the system. When doing this, you need to use a pressure gauge to control the pressure at which the pump turns on. The value of the nut of the large pair should be set to the lower limit, and the small pair should be adjusted to the previously set value.
As we can see from what was written above, connecting a hydraulic accumulator to a pump is a fairly simple procedure, provided that everything is done according to the instructions. It can be produced independently in a fairly short period of time.
Watch the video in which a specialist explains in detail how to connect a hydraulic accumulator to a submersible pump:
Most of the work related to the development and installation of water supply systems requires some experience and a clear understanding of the specifics of the operation of a water supply system based on an artesian well. But even in such a difficult task, there are many individual elements and components that one can easily install with one’s own hands. For example, connect a hydraulic accumulator and a pressure switch to the pump. The complexity of such work is minimal; installing a hydraulic accumulator for water supply systems does not require special skills or knowledge of electrical installation; you will need the attitude to conscientiously carry out the installation yourself and a competent water supply scheme.
What and how needs to be adjusted in a system with a pump and accumulator
There are three classic version layout of pumping and accumulator equipment for a well:
- In the first case it is used submersible pump, located in the well under a layer of water of 1-2 meters, the automation, filter and hydraulic accumulator can be located in a caisson at the well head, but with the same success for all equipment the installation can be done in basement Houses;
- In the second case, a surface pumping system and a hydraulic accumulator are used, which does not have the pressure capabilities of submersible units, so they try to locate them as close as possible to the well and the water level. Most often, a pump with a water pressure switch and the hydraulic accumulator itself are mounted in the caisson;
- In the third option, also called the dacha-garden option, water from the well is lifted by a surface pumping unit or a simple vibrating “Baby” into a huge capacity water tank. Water can be supplied to the home water supply without using additional pumping device, only natural pressure of the water column, water the beds and refill Summer shower, wash equipment, in general, use the installation at your own discretion.
For your information! In any case, before setting up the accumulator pressure switch, you will need to correctly calculate the required water pressure in the house, taking into account the requirements household appliances and the existing height difference between the pump level and the maximum point of water extraction in the house, most often this is the air release valve of the heating system.
Sequence of work when installing a hydraulic accumulator with your own hands
Immediately after drilling the well and determining the flow rate, they begin its arrangement. Based on the depth of the aquifer and the degree of its contamination with salts and sand, a decision is made on the method of designing the head, where it is necessary to install the pump, and which version of the pumping system and pumped storage unit. fits better Total.
Installation of a hydraulic accumulator paired with a submersible pump
A submersible pumping unit has always had a lot of advantages, but the more powerful and advanced the pump, the larger the volume of the pumped storage unit must be used to compensate for pulsation and water hammer. Therefore, when choosing an installation scheme for pumping equipment and a hydraulic accumulator device, the system parameters were sequentially determined:
- Required pressure and water flow to ensure normal water supply to the house, taking into account the depth of the well and the distance from the head of the house;
- What pump power and hydraulic accumulator tank volume will ensure the necessary performance and smooth operation of water supply systems;
- Where to locate the main components of the water supply system equipment: pump, hydraulic accumulator, automation and filters.
For your information! To ensure the operation of expensive and powerful pumping systems from Danish, German and Italian manufacturers, they most often use hydraulic accumulators from 50 to 100 liters, which are installed in a designated area of the basement or ground floor.

The high pressure and pressure of “European” models make it possible to install pumped storage units at a considerable distance from the well, even if the building has a second floor and household appliances that require increased water pressure in the water supply system.
Standard piping connections are shown in the diagram.
This option of installing a hydraulic accumulator in a water supply system provides a number of significant advantages:
- A well-ventilated and partially heated room allows you to prevent condensation on the surface of the hydraulic accumulator and electrical automation systems;
- It is convenient to maintain the hydraulic accumulator tank and filter; according to existing standards, it is recommended to check the readings of the pressure gauge in the air chamber of the accumulator cylinder and the settings of the pressure switch for the hydraulic accumulator at least once every two to three months;
- If necessary, you can drain water from the water supply system directly into a reserve tank or into the sewer system.
Important! Installation of a pumped storage device in separate room requires that polypropylene pipes be laid in the ground to a depth of at least the freezing depth with a slope towards the well of at least 2°. This will ensure that air bubbles escape to the filter and the connection point of the hydraulic storage tank.
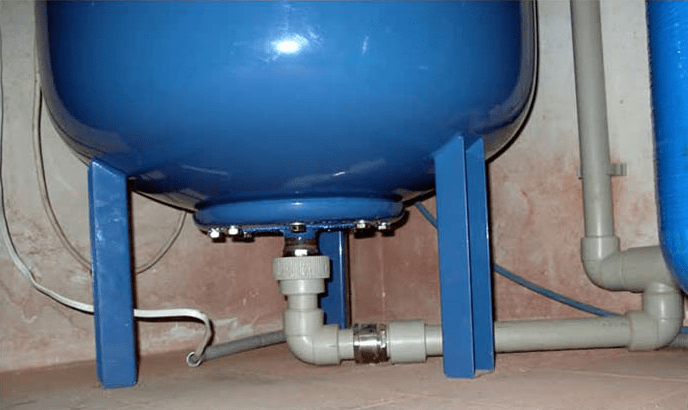
The basis for building such a water supply system unit is a hydraulic accumulator tank, most often vertical on supports. A five-pin fitting is screwed into the bottom of the tank, through which the pump line, outlet line, pressure switch sensor and pressure gauge are connected. The pump line from the well to the hydraulic accumulator is most often made of polypropylene pipe. In small water supply systems, connections can be made with flexible hoses, and the relay and filter are usually located on a special mount at a height of at least a meter above the floor.
The disadvantages of such schemes include the sensitivity of submersible pumping systems to a high content of sand and salts. Check valve V submersible systems most often located at the outlet of the pump at great depth. After a certain amount of water rises, the sand remaining in the outlet pipe slowly settles, sinking to a depth, and gradually accumulates on the body of the check valve and gets inside the device, which leads to failure of the expensive unit.

For domestic submersible pumps of the “Vodomet” type, installation can be carried out in a caisson or head well. Most often, this scheme is used for low-power pumping systems, with a shallow aquifer.
In the photo you can see the classic correct option installation of a submersible pumping system and a hydraulic accumulator in a well.
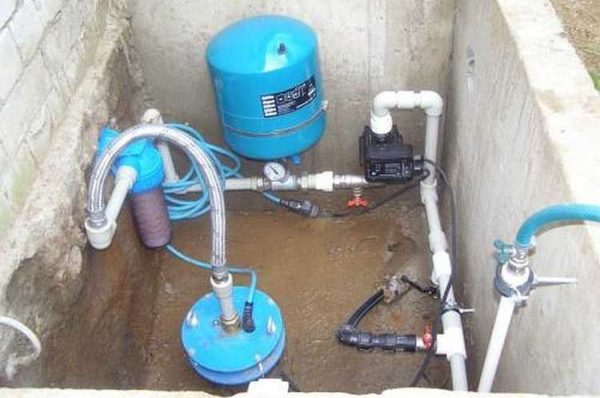
The output from the well neck is supplied to the filter, then to the hydraulic accumulator, and only after that to the pressure switch of the submersible pump. The outlet from the well to the filter and hydraulic accumulator is made with a flexible hose, all other fittings are soldered from plastic pipes. What does such a scheme provide? This installation allows you to supply sand-free water to the hydraulic accumulator and relay.
By connecting the system to the water main through a filter, the reliability of the automation is significantly increased. The relay must be as free from dirt and sand as possible, otherwise after a couple of months there will be interruptions in operation.
In the central part of the outlet line running from the pressure switch to the entrance to the water supply system of the house, there is ball valve with a tee, allowing you to decide quite difficult question: how to drain water when adjusting the response pressure of the automation relay.
For large differences in height, or if the water in the well is of very low quality, install additional pumped storage devices with volume separation clean water And process water. The system consists of two hydraulic accumulators and a clean water tank. Included with the pump in the well, a hydraulic accumulator-storage unit for untreated water is standardly installed, from which the liquid flows to the inlet through a filter of dirt and neutralization of suspended matter. vortex pump pumping water through membrane filters into a clean water accumulator located in the house or basement. Water is taken from the tank and sent to the point of use in the water supply system by a conventional network pump.
The pumping device that takes untreated water from the well must be as insensitive as possible to the content of hard salts and clay suspension in artesian water.
Easy installation of a hydraulic accumulator with a surface pump
It is best for these purposes to install a properly configured centrifugal pump with an ejector and a small accumulator. As backup source The first hydraulic accumulator will not be used, so you can limit yourself to a small membrane model of 10-12 liters.
There are no particular differences in the use and installation of a hydraulic accumulator with a surface pump, except that:
- The hydraulic accumulator and pressure switch should be installed as close to the pump as possible;
- Between centrifugal pump and the hydraulic accumulator must have a filter and a check valve, otherwise every time you turn it on water tap with noise and vibration you will get a mixture of air and water.
Country and garden option for installing a hydraulic accumulator
The dacha and garden option, for all its primitiveness, allows you to very rationally use the capabilities of pumps with high water flow and get by with a minimal size hydraulic accumulator.
The advantages of the pump installation option shown in the photo are obvious. Firstly, there is no need to install a large and expensive hydraulic accumulator, which does not always make sense to purchase for the needs of a summer house. Secondly, the relay on the pump can be connected with a flexible hose to the point where water is taken from the tank and adjusted to a minimum of 0.1 and 0.2 atm off and on, respectively. In some cases, the pressure switch-membrane is replaced with an electromechanical timer, which allows a certain volume of water to be pumped out of a well or borehole at a programmed period of time.
Conclusion
All of the listed options for installing a hydraulic accumulator have been tested in practice and have proven their reliability. If the water quality in your estate or private home leaves much to be desired, use the pump method given in the article with two hydraulic accumulators and a membrane filter for water purification. Most branded hydraulic accumulators have a certified rubber shell, in which you can store a supply of purified drinking water for a long time. For technical needs, you can use a regular tank, described in the last subsection, complete with a small and cheap vortex pump.
When installing an autonomous water supply system, it is necessary to achieve stable pressure in the network. Pressure surges and water hammer affect the comfort of using communications and, more importantly, can cause breakdowns of household appliances. To normalize the operation of the water supply system, hydraulic accumulators are installed. In autonomous systems, they perform the same functions as water towers in centralized networks. The hydraulic accumulator is the main unit connecting the pump group with the internal water supply. How to connect a hydraulic accumulator to a submersible pump? How to choose and install it correctly?
There are hydraulic tanks different forms, volumes and configurations. For each system you can select best option
How different types of hydraulic accumulators work
The main structural elements are the body, the membrane and the nipple. The storage tank body is a sealed cylinder designed to operate under a pressure of 1.5-6 atmospheres. Maximum load – 10 atmospheres. A membrane is fixed at the neck of the housing, access to which is only possible through a special flange with a valve. On the opposite side there is a nipple through which air is pumped into the tank. The entire structure is mounted on legs.
Depending on the configuration, vertical and horizontal storage tanks are distinguished. They work on the same principle with the difference that large-volume vertical models (over 50 l) have a special valve through which air is released. This is necessary because during operation of the plumbing system, excess air gradually accumulates. Therefore, a valve is installed on top of vertical accumulators, and a drain or tap is installed in horizontal accumulators. In small-volume tanks, the air is vented, completely draining the water.

Video: operating principle and functions of hydraulic tanks
Diagram for connecting a hydraulic accumulator to a submersible pump
In order for the pump to properly serve its intended life, it must be operated in the mode provided for by the technical specifications. Submersible equipment should be turned on no more than 5-20 times per minute (exact indicators are indicated in the documentation for the specific model).
The pressure switch gives a command to turn on the pump when the pressure in the system drops to the specified parameters. If a hydraulic accumulator is not installed, the pressure drops even when minimum consumption water, and the equipment will constantly turn on and off. This will lead to rapid wear and breakage.
Connect to the water supply circuit storage tank, which allows you to reduce the frequency of turning the pump on and off and extend its service life. The volume of the device is also selected taking into account the intensity of water consumption, power and installation height of the pump.

Diagram: installation location of the hydraulic tank in an autonomous water supply network
Tank connection procedure
- A pressure hose is removed from the mounted pump and connected to a pressure switch through a manifold with five connectors (“five-piece”).
- The flow is diverted from the “five-piece” to the hydraulic tank.
- One collector pipe is connected to the water supply network, and another to the control unit.
- A check valve is installed between the “five-piece” and the pump. It is needed so that when the pump stops working, the water does not drain back into the well or borehole.

Video instructions for assembling a pump group with a storage tank
Features of installing a hydraulic accumulator
The hydraulic accumulator is attached to the floor through rubber gaskets. Flexible adapters are used to connect to pipes. If the device is new or has not been used for a long time, it should be filled very carefully for the first time so as not to damage the membrane, which may stick together due to long-term inactivity. It is advisable to remove all air before filling.
The location for mounting the hydraulic accumulator is chosen so that it has easy access for maintenance. If you don’t have the skills, it’s better not to take risks and install the device yourself, but to turn to more competent people, especially if you have to connect two submersible pumps to one accumulator.

How to set up the device correctly
New hydraulic accumulators are set up at the manufacturing plant. Typically the pressure is 1.5 atmospheres. However, it may take a long time before the sale occurs, and performance declines. Therefore, the first thing you need to check is the pressure. An electronic or mechanical pressure gauge is suitable for monitoring. You can use a car one.
Some models of hydraulic tanks are specially equipped with pressure gauges. But you can choose any device. The main thing is that it is accurate. Even 0.5 atmospheres affects the operation of the drive. For the same reason, it is better not to use plastic Chinese pressure gauges. They rarely show accurate data.
If you need to achieve high pressure in the network, leave the “factory” 1.5 atmospheres. If the water is used only for domestic household needs, the indicator can be reduced to 1 atmosphere. The higher the pressure, the more air in the hydraulic tank and the less water volume. Therefore, many homeowners bleed off excess air to increase the capacity of the tank and reduce the frequency of pump activation.
The pressure switch sets the upper and lower limits at which the pump will turn on and off. For this purpose, two nuts and springs are provided under the device cover. You can use them to adjust the settings. The optimal difference between the pressure on and off is 1-2 atmospheres. Too large a difference is also undesirable, because this will lead to rapid wear of the hydraulic tank membrane.

When choosing a hydraulic tank model, you need not only to determine the required volume and technical characteristics, but also to find out what material the membrane is made of. The seller must have certificates of conformity, a sanitary and hygienic certificate, which indicate the scope of application of the drive. You need to choose a model designed for systems with cold drinking water.
As for manufacturing companies, the brands Aguasistem, Varem, Wester Line, Zilmet, and Reflex have proven themselves well. Hydraulic tanks are equipped with spare flanges and membranes. When purchasing, make sure they are in stock. If the hydraulic accumulator is selected and installed correctly, in a dry place, and the owner carries out timely Maintenance, the device will last for many years.
Traditionally, hydraulic accumulators are in demand in the private sector and in settlements with problematic water supply. This device allows you to make any water supply system more efficient. Installing and operating a hydraulic accumulator is not a difficult task, but, as with everything else, there are some nuances that need to be understood in more detail.


Purpose
This device allows you to reduce the load on the water pump: when pumping from a well, well or other container, part of the water enters the hydraulic accumulator reservoir. This way, the water from the tank will be used first, and the pump will only turn on again when the tank is empty. In general terms, a hydraulic accumulator reduces the number of times the water pump is turned on and off. And this device minimizes the likelihood of water hammer, which increases the maintenance-free operation of the entire water supply system. IN heating systems The hydraulic accumulator is used as a " expansion tank": excess heated water goes into the hydraulic tank, reducing the overall pressure in the system.
Connecting a hydraulic accumulator with your own hands, for example, a pass-through or a deep-seated one, is not at all difficult, if you take into account the recommendations of specialists.


Device, principle of operation and types
Regardless of the brand, configuration and intended purpose, practically All hydraulic accumulators have a similar design, including the following elements:
- body on a stand (legs or reinforcing “shoes”);
- a membrane or rubber “bulb” for pressurizing, which is located inside the housing;
- air supply nipples, which are equipped with protective covers.


According to the type of housing location (configuration), hydraulic accumulators can be as follows:
- horizontal models are used for connection to external pumps;
- vertical models are usually connected to a water supply system with submersible pumps.

Depending on the type of destination various models hydraulic accumulators may have such additional elements designs like:
- to bleed off excess air, horizontal models are equipped with special valves;
- Hydraulic accumulators for drinking water are equipped with bulbs made of chemically neutral rubber, which makes it possible not to impart an unpleasant taste to the accumulated water;
- housings for heating systems are used as “expansion tanks” and play an important role in pressure regulation.


The configuration of the hydraulic accumulator is determined based on considerations of space saving, intended purpose, and local water supply features.
Criterias of choice
For long-term use, experts recommend purchasing models with a pear. Membrane accumulators are more susceptible to corrosion, since the membrane is not able to isolate the walls of the housing from the effects of water. However, for models with a pear, repairs are more complicated than for membrane analogues. When choosing a storage tank, you also need to take into account future water consumption.
If the number of permanent residents in a house or apartment is no more than three people, plumbing fixtures are a minimum, then a 24-liter container is sufficient.


If there are more users, then an appropriate hydraulic accumulator is required. Please note the following before installation:
- number of users;
- number of water points;
- number of household plumbing fixtures;
- presence of heating elements.

If the preliminary calculations did not turn out to be final, for example, another person appeared in the family or the number of plumbing fixtures increased, the best solution would be to install a larger tank or install an additional tank.
Both procedures have approximately the same complexity and comparable equipment costs.


Installation: options and connection diagrams
Depending on the internal features plumbing system installation methods may vary. It is worth considering the most popular options.
Connection to a pumping station
IN in this case work on connecting the hydraulic accumulator to an autonomous water supply system is carried out simultaneously with the installation of automation and adapters. The most common installation cases require the following components:
- pressure gauge;
- five-inlet fitting;
- switching hydraulic relay (pressure switch).


If a submersible pump is used to draw water, the well piping must be equipped with a check valve and a dry inlet relay. If a simpler surface centrifugal pump is used to pump water, it is cheaper and more expedient to buy pumping station assembled, not mounted individual elements. The second option is preferable for those who have little experience but want to install the pump themselves.


Two hydraulic tanks for one pump
Connecting two (or more) hydraulic tanks is a common problem for people faced with a forced increase in water consumption. If the volume of one tank is too small, installation additional hydraulic accumulator- This is not a very burdensome matter.
Additional elements can be installed in parallel current system: it is enough to use another adapter fitting, flexible hose or water pipe. A system with two (or more) tanks is rational decision, and excellent insurance. If the membrane fails in one of the tanks, you can still use the pump, but not in intensive mode. Such a system will provide enough time to replace the faulty unit.


To submersible
You can guess that we are talking about a pump that is immersed in the aquifer of a well or well. For uninterrupted water supply, such a system must be equipped with a check valve: this device will not allow the pumped out water to return to the bottom of the well after use. Accordingly, the pump will not run idle and will last much longer.
In most cases, the check valve is already installed on the pump; additional installation may be required during the repair process. To avoid being left without water for an indefinite period of time, it is recommended to purchase a pump with a spare valve, which is sold separately or supplied with the pump.
Another important point– this is the quality of the pressure pipeline: since the pipe lies at a fairly large depth, a possible breakdown may not be noticed immediately.


The first sign of problems with the pipeline is a sharp drop in pressure; the accumulator takes longer to fill with water; over time, this gap may increase.
Superficial
Connecting a hydraulic accumulator to a system with an external centrifugal pump also has its own nuances, namely:
- first thing you need to check internal pressure tank: it should not exceed 1 bar;
- To prepare for connection, you will need a five-pin fitting. This one is small, but very important detail combines the accumulator itself, a pipeline, a pressure switch, a pressure gauge and an external pump. Before the actual installation process, you need to stock up on sealing materials (sealant or plumbing tape);
- to connect the fitting to the tank, use a rigid hose or flange with a bypass valve;

- after installing the tank, it is worth installing the remaining elements: pressure gauge, relay, water supply leading to the pump unit;
- before starting operation, a series of on and off cycles should be carried out to identify possible leaks;
- if something goes wrong, you need to find out the cause of the problem and, if necessary, repeat the entire installation cycle again.

To the water heater
Hydraulic accumulator in a system with storage water heater acts as an expansion tank. As water heats up, it increases in volume, which also increases the load on the water supply. Since pressure increases in a confined space, the process can become very critical, and the temperature decrease is unacceptable. There is a need to move this somewhere overpressure. This is where the hydraulic accumulator comes to the rescue. Excess heated water will go into the hydraulic tank, which will normalize the pressure in the system. Further, the water from the expansion tank can be used for domestic purposes.


Relay settings
To understand the principle of operation of the pressure switch on a hydraulic accumulator, you do not need to have special knowledge - everything is quite simple. Until it is completely filled, water is supplied to the tank with a membrane (or bulb) under pressure, which causes an increase in pressure in the system. When it reaches the maximum, the relay is activated and the water supply stops. As operation progresses, the pressure begins to drop, and when it reaches minimum threshold the relay is activated again and the water supply is activated. The above cycle is repeated until the system is in good condition.
Many people mistakenly imagine the process of installing a relay as something incredibly complicated. In fact, this is far from the case. Any homeowner in the private sector who has a well or artesian well at his disposal can easily cope with this task on his own. The main thing is to approach this wisely and patiently. After all, water supply to a private home is a vital thing.


It is worth understanding that the relay is an “intermediate link” between the plumbing system and the electrical supply system. It is obvious that on this device there is a huge responsibility. For this reason, all the nuances (and there are not so many of them) should be treated with the greatest possible attention. To secure the system, it is recommended to provide a separate power supply line. For connection you should use a two-wire copper cable. The wires must be grounded and well insulated: we are talking about the interaction of current and water, and this combination is always dangerous for humans.
The wiring must be connected to the terminal block through the perforations on the housing. Next, according to the instructions, you should connect the phase, neutral wire and ground to the corresponding terminals. You need to be careful and careful; the entire relay installation process must take place in a de-energized environment. You need to take care of this in advance. Under no circumstances should you neglect basic safety rules.

To adjust the pressure switch on the hydraulic accumulator, you will need a high-quality, high-precision pressure gauge capable of measuring pressure exactly to a tenth of a bar. The more accurate the pressure gauge, the faster the adjustment will occur. To avoid mistakes in further work, you must adhere to the following sequence of actions:
- it is necessary to turn on the system, record the pressure gauge readings in the cycles of turning the relay on and off. At this stage, it is possible and necessary to identify malfunctions of the pressure gauge;
- You should adjust the lower pressure level spring (it is the largest). For fitting, you should use an ordinary wrench the right size(it is best to have an adjustable one);
- you need to test the set level. If something goes wrong, repeat the previous step;
- Next, you should tighten the nut of the upper pressure level spring (it is smaller);
- it is necessary to conduct a full test of the system. If any shortcomings are identified, repeat the entire setup cycle again.


