A garden barrel is an indispensable attribute in the country. Many gardeners keep several barrels at the same time because they can be used in different ways. Here are just some options:
- A dark barrel is often installed in a greenhouse, especially at the beginning and end of the season, when the difference between day and night temperatures is especially high. Dark color attracts Sun rays during the day, causing the water inside to heat up quickly. At night, the barrel gradually cools in a closed greenhouse, thereby retaining precious heat indoors. As a result, greenhouse plants do not suffer from sudden cold snaps.
- If you like to grow cucumbers, then before they begin to bloom, install a barrel filled with grass in the greenhouse ( better than nettle) and water. Gradually, the grass will begin to decompose, releasing carbon dioxide. As a result, the maximum number of ovaries will form on the cucumbers. When fermentation is complete, the water can be used for feeding various plants. The process can be repeated several times.
- Most often, gardeners use garden barrels for evening watering. Many crops (like tomatoes, peppers) do not tolerate watering well cold water. In a barrel, the water gradually heats up in the sun during the day and becomes softer.
- Recently, the technology of growing cucumbers in barrels has gained particular popularity. There are several advantages: space saving, more early harvest, easier care. Drainage from branches and stones is placed at the bottom (up to 1/3 of the total volume), then a layer of hay, old fallen leaves, sawdust and other plant debris is poured, and a layer of rotted manure or humus (watered with an EM preparation) is added on top. The final layer is fertile garden soil (about 20 cm, you can mix it with humus or peat). The barrel is covered with polyethylene and left to rot in the sun for several weeks. During this time, the contents of the container will settle and will need to be partially refilled. Be sure to leave a 15 cm air layer from the top edge of the barrel (you don’t need to fill it to the top, cover the shoots with film). Place a support in the center along which the lash will curl. Some gardeners allow them to hang in different sides from the edges of the barrel. To better retain moisture in the container, it is advisable to mulch the surface (for example, with mowed dried grass). It is also convenient to grow zucchini, parsley and chives in barrels.
- You can use a 200 liter barrel as a homemade cellar. In winter, potatoes, beets, carrots and other grown vegetables, as well as jars of home-canned food, can be stored in such a shelter. The barrel is dug into the ground (it is advisable to pre-treat it with bitumen or other protective composition), leaving only 10-15 cm above the surface. They put it on the bottom wooden boards, the internal walls are insulated with cardboard or sheathed with plywood. It is better to make the lid wooden. The surface is covered with film, spruce branches, and layers of roofing felt. IN winter time you need to shovel away the snow, dismantle the covering layers, open the lid and get what you need. Then cover everything in reverse order and sprinkle with snow. It’s not as convenient as a basement, but it’s a good option. It is convenient to sprinkle the layers inside with sawdust or straw. Initially, think about in what order and what you will get. You won't be able to get to the bottom layer right away.
- Instead of organizing compost pit You can use a dark barrel without a bottom. A lockable square cutout should be made at the bottom of the wall to collect the finished fertilizer. To ensure proper air exchange in the walls, it is necessary to drill ventilation holes. Dark walls will allow the structure to heat up better in the sun, thereby accelerating the fermentation processes occurring inside.
In this note we did not touch upon the topic decorative use garden barrels, but only considered practical options their applications. If you know other ways, share them in the comments.
Making a toilet out of a barrel in your country house with your own hands is quite simple. You just need to find a container of suitable volume, which is made of reliable materials, and install it in a pre-dug hole. After constructing a booth made of wood or brick, you will get an outdoor bathroom. It can be used at any time of the year. At the same time, it has all the necessary characteristics that an outdoor bathroom for a summer cottage should have.Country toilet
Characteristics of a bathroom using a container
One of the most successful design diagrams cesspool for a toilet in the country is one where a container without a bottom is installed in the hole. The advantage of this option is that there is no need to pump out the accumulated liquid, since it is absorbed into the soil. Because of small quantity waste they manage to penetrate into the ground. Moreover, their volume should not exceed 1 m 3 per day. If you neglect this recommendation, waste will accumulate in the cesspool from the container. This will lead to the formation of an unpleasant odor in the area.

This option arrangement of a cesspool is not suitable for dachas, where high level groundwater. In this case, all sewage will penetrate into the soil, where it will contaminate the drinking source.
Therefore, the best way out of this situation is to install a volumetric sealed barrel. It will act as a septic tank.
In this case, it is necessary to regularly pump out the liquid using special equipment. To avoid doing this too often, you need to install a large capacity container.
To reduce the size of the septic tank, in in this case It is recommended to install a complex structure.
It involves installing two or even three containers where waste will accumulate. Moreover, the last of them can be made without a bottom.
In this case, it is necessary to additionally use aerobic or anaerobic strains of microorganisms. They are added to the first container, where they break down biological waste. As a result, solid particles settle to the bottom. The already purified liquid is transferred to the next container. It, passing through an additional filtration layer of sand, enters the soil without polluting it.
Also, when choosing a scheme for arranging a cesspool, you need to choose the right material from which the barrel will be made. It is best to use metal or plastic containers. Each of these types of materials has its own advantages and disadvantages that must be taken into account before the installation process.
Metal containers - advantages and disadvantages
Metal containers that you can install yourself have a number of significant disadvantages that directly affect the durability of the constructed structure. These include:

- low corrosion resistance of the material. After 3-4 years, such a container becomes unsuitable for use, since it is impossible to repair it;
- in most cases, this option for arranging a cesspool can be expensive. Metal containers are quite expensive;
- complexity of installation. If you use a large container with massive walls, it is quite difficult to install it without the help of special equipment;
- You can only use containers whose wall thickness reaches 15-16 mm. They are often very difficult to find.
To the benefits of this material Their resistance to frequent temperature changes can be attributed. It is not afraid of severe frosts when deep layers of soil freeze. Also, such a container is heavy, which will more securely fix it in the ground.
Plastic containers
When constructing a cesspool with your own hands, plastic is considered a better material than metal.
He has big amount advantages:

- long service life. Plastic can be used for arranging a cesspool for a toilet in a country house for 40 years;
- due to their light weight, these containers are very easy to install without the help of outsiders or special equipment;
- plastic is resistant to the harmful effects of biological fluids or special chemical compounds that are used to process waste;
- prevents wastewater from penetrating through the walls of the container into the soil;
- the cost of such a container is quite low;
- The plastic is very durable and will not collapse under pressure from soil or runoff.
The disadvantages of this material include its instability to exposure low temperatures. To fix this, the plastic walls of the container must be insulated with a layer mineral wool. Also, a plastic barrel can float due to its light weight.
To prevent this, its walls must be securely fixed in the ground.
How to choose the right place to install a bathroom?

When choosing a place to install a toilet with your own hands in the country, you must adhere to the following rules:

The first stage is the arrangement of a cesspool from a container
When constructing an outdoor toilet with your own hands from plastic barrel You must first dig a pit of suitable size. In this case, the use of a galvanized metal container is also allowed. But you need to take into account that it has a much shorter service life.
The pit for a toilet that you build yourself should have a depth that is 25-30 cm greater than the height of the container. This is necessary to create a filtration field, which will help clean the waste, and clean liquid without harmful impurities will be absorbed into the soil. Also, this pit should be 10-20 cm wider than the tank. This gap is needed to fix the tank inside the pit.
 When the hole is dug, fill its bottom with a layer of fine crushed stone 20 cm thick. Lay sand on top by another 10-15 cm. In this case, each layer must be carefully compacted so that no voids form. After this, you need to install a barrel without a bottom so that its upper edge rises 7-8 cm above the ground surface. In the future, this will greatly facilitate dismantling the container.
 You need to fill the sides of the walls with crushed stone. It should reach 2/3 of the height of the container. Place a layer of clay on top to the ground level. When the hole is completely filled, cover the surface of the soil with fine gravel. Also, add an additional layer of sand on top, reaching the level of the top edge of the container.
Pouring the foundation
In parallel with installing a container without a bottom with your own hands, or after that, you need to start building a foundation for the future toilet. This construction phase consists of the following processes:

Construction of the above-ground part of the street toilet
After constructing the foundation for the outdoor toilet with your own hands and installing the container, you need to start building the booth. This process consists of the following steps:
- You need to lay a piece of roofing felt on the surface of the foundation.
- A wooden beam measuring 100x100 mm should be used for the bottom frame of the base under the floor. Before this, it must be treated with an antiseptic solution.
- To build a reliable foundation, install the bars around the perimeter of the structure and in the middle of the long side of the structure, attach them with nuts, after placing them on metal pins.
- Using 40 mm thick boards, build the floor of the future toilet. In this case, it is necessary to leave a hole under the toilet where the container is located.

- Attach 4 wooden columns to the corners of the base. Two of them should have a height of 2 m, and the other two should have a height of 2.2 m. Choose bars with a cross section of 100x50 mm. You need to attach them using metal corners and wooden struts. Before final installation frame, check the verticality of the racks.
- On the front wall under the doors, install additional columns of the same section. The width of the opening should be 0.7 m and the height 1.97.
- Fasten the racks on the other side with a vertical jumper at a level of 1.77 m, which will also serve as the base for the roof.

- Along the structure, leaning on the installed jumpers, attach two rafter legs.
- As roof sheathing, use 40 mm thick boards, which must be attached to the rafters using regular nails.
- Using screws, install an OSB sheet to the lattice covering, which will act as a base for the roofing material.
- Use a soft coating as a cover. bitumen shingles or roofing felt. It is necessary to choose materials that will not create additional load on the structure.
- For wall cladding, use a tongue-and-groove or half-tongue board 2-4 cm thick.
- To prevent the inside of the building from being hot in summer and cold in winter, you need to make thermal insulation with your own hands. To do this, install foam sheets in the inner plane of the frame. After this, you need to additionally sew up the walls with another layer of board.

- For all wooden elements apply a special impregnation that will protect their surface from the harmful effects of moisture and other negative factors external environment. You can also additionally use fire retardants.
- Install doors on the curtains. You can equip them with a small window to illuminate inner space premises during the day.
Interior design of an outdoor bathroom
Before interior work Inside the room you need to lay a cable for the lighting device. This can be done with your own hands by entering the electrical wiring through a mast, which must be attached to back wall bathroom. At the same time, its height is 2.5 m. Cable routing should be carried out open method. The wire cross-section must be at least 2.5 mm 2. For lighting, use a lamp with a power of 40 W or less.

To construct the seat, use bars with a cross-section of 30x60 cm. Build a frame 400 mm high from them, and attach them using self-tapping screws. The finished structure must be sheathed with plywood or OSB board. In this case, you must remember to leave a hole in the place where the plastic container is installed. The final step is to attach the seat with lid, which is used for a regular toilet. When everything is ready, paint the interior and exterior of the bathroom with paint or varnish, which will extend its life and help keep the wood in its original condition.
So in a simple way you can build it yourself outdoor toilet using a regular container made of plastic or metal.
Video: Septic tank: types, principle of operation and installation
We are accustomed to the fact that a dacha is a place where we can take those unnecessary things from the apartment that we would hate to throw in the trash. Because of this, such a pile of rubbish often accumulates at the dacha, which is almost impossible to clear away.
But if you add a little fantasy and imagination, then all this junk can be turned into gorgeous garden, which will be admired by everyone around!Below are collected 20 interesting ideas that are worth implementing if you have country cottage area.
Flowerbeds at the dacha
- If you place large stone vases in the garden and plant flowers in them, your plot will immediately turn into a royal park.
- Got an old mailbox lying around? You are unlikely to need it, so plant flowers in it and hang it on a fence or gate.

- old bed can turn into a real one blooming garden. Place a chest of drawers next to it, hang an old mirror, and your garden will turn into a fairy tale!

- Flowers that winter in an apartment can be planted in boxes, and then there will be no need to plant them in open ground.

- You can also use boxes with plants for vertical gardening. This way you can plant succulents or any hanging (hanging) plants.

- And from small boxes you can create a whole composition.

- An old chair can turn into unusual flower bed, you just have to remove the upholstery from it and pull out all the springs and excess fabric.

- An old bird cage makes a great hanging plant bed. It can be hung from the ceiling of the gazebo or from a tree branch.

- IN glass bottle You can also plant flowers. This mini-flowerbed will definitely surprise your friends!

- Make a small bag out of burlap and grow in it not only flowers, but also fragrant herbs, which are convenient to add from the garden directly to tea or dishes.

- Do you have a recently cut log lying in your garden? Adapt it to a flowerbed! Cut a small depression along the entire length and plant your favorite flowers there.

- Old shoes can be turned into a wonderful flowerbed, you just need to plant flowers in them and hang them somewhere by the laces. The older the boots, the better, because water will not stagnate in leaky “beds”!

- The stump of a cut tree will turn into excellent flower bed, if you attach pots of plants to it. But remember that the flowers must have flowing shoots to cover the pots.

- Even the old ones and no one necessary pipes will be a great place to grow plants.

- An original idea, for the implementation of which you only need an old can.

- Don't throw it away old bath to the trash, take it to the dacha and plant more flowers in it!

- A broken cart can always find a place in the countryside.

- Place it on old bike box and plant flowers in it. And if you also paint it in a bright color, then such a flowerbed will attract the attention of all the neighbors!

- A beautiful composition that can be created from old tools and flowers.

- You can even convert an old boat into a flowerbed. A little fresh paint and bright flowers will help her look great on your site.

Are you familiar with the situation with rubbish in the country? Then don't waste your time! Next weekend, get out on your property and tend to your garden.
If you have an old bucket, trough, wheel or even a refrigerator, do not rush to throw away such goodness, because it may come in handy. The second life of old things in the country is very real, you just have to approach the issue more practically and with new ideas.
From articles of this kind, you can create a whole section, because this is not the first time we are talking about how to effectively use various old items in the country. Today we will continue the series of articles with even more interesting and original ideas, thanks to which you can save money on purchasing new decor, as well as diversify country house design and everyday life
Let us immediately draw your attention to the fact that there are simply hundreds of ideas and crafts, original things and handmade items, so we will not be able to show and describe absolutely everything. But if readers of the site are interested in such information, we will be happy to provide a topic for study in continuation of this article.
Country pond from an old basin
An original solution was applied to a small plastic basin that had either become unusable or lost its aesthetic appearance. now this small pond, which is made very simply. A small hole was dug in a convenient place, where the basin was installed. Further, just a few types of plants around the new summer cottage, and nice decor. The only issue is the periodic removal of water from such a pond, but we will leave that to the pumps.

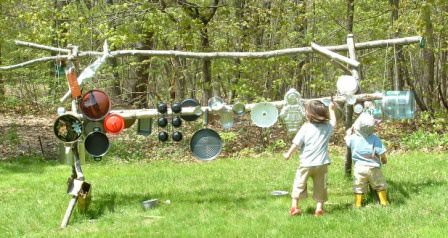
Playground accessories
From old and unnecessary things you can make interesting accessories for the playground. At first glance, this is not a very attractive invention, but this is where children can let off steam. Get ready for it to be noisy and fun, but these are costs.
A simple accessory can be made from old frying pans, pots, plastic bowls and flower pots, bottles and other unnecessary items. All you need is a structure frame and a simple body kit with clamps or nails and screws.
The country washbasin is transformed.
We already know how to make a washing area in the country, and therefore there is no need to feel sorry for the old washbasin... but you definitely don’t need to throw it away either. Old, shabby and rusty, it makes a great decor for any fence or wall. All you need is a little nutritious substrate and a nice ornamental plant that can be placed inside. Look at the photos below to see how original this product looks.

Country decor from old containers
We have already talked about using old containers. Baths under the pond, buckets in the form of flower containers and so on. Today we will simply update what was mentioned earlier with a simple picture below, which contains quite interesting products that turn into original compositions.
A barrel, a trough, a bathtub - all of this can still hold water, which means it can become a nice water feature, and practically for free.

Using an old bathtub in the countryside
Many lines have been written about this sanitary accessory, but today another colorful idea is a flower bath. An old and slightly battered bathtub, which can no longer be used for water procedures and the production of water structures, will do an excellent job for another purpose.
The bathtub can be covered with pieces of old broken tiles, colored plastic and ceramics, and other colorful objects, and installed in the garden or nearby country house, and plant a lot of ornamental plants in its bowl. Agree, very original solution, which can even complement landscape design dachas

Don't throw away your old toilet!
We recently studied the topic of how to build a new toilet in the country, and therefore old toilet We definitely don't need it. But we don’t send it to the landfill either, because ceramic product for the bathroom it becomes or even country yard. We agree that placing such a “miracle” near the threshold of a country house is overkill, but if somewhere in the corner dacha area, it will be cute and a lot of fun. Several colors will decorate old plumbing fixtures and add a touch of originality!

But we won’t stop there either, because even more exclusive country decor obtained from two toilets at once. They did not expect?

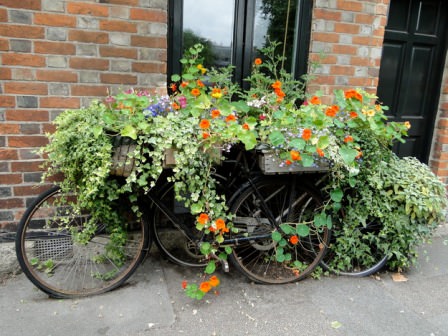
Second life for an old bike
Almost every summer resident has a bicycle. But a previously broken two-wheeled vehicle is also hidden in the barn. If this is the case, then you shouldn’t scrap the bike, because they will give you pennies for it. But if you use it for a different purpose, it will be much more interesting.
You can use several boxes in our composition, and then it will come out completely original. Again flowers and nutrient substrate, again a little originality and own ideas. The result is really cool country decor!
Barrels, buckets and troughs
We have already mentioned the old country containers in which we stored or transported water, washed or kneaded something. But when they saw the cute products, they couldn’t stop.
Leftover paint from home or garage renovations can help turn old barrels into new ones. garden figures or containers for flowers.

With a little work, a wooden ladder, or just a structure made from old timber, as well as a few buckets, will become a flower stand.

And an old and leaky trough, from which you can’t even make a shower tank, will become another product for flowers. And if the trough is painted in cheerful colors, then it will not be a shame to identify the product in the middle of the garden.

Original flower sink
Do you have an old sink after renovation, but a previously replaced faucet has been lying around idle in the garage for a couple of years? We came up with a purpose for these things too. Arrange a small container for flowers that can be placed absolutely anywhere. This composition will look harmonious in the garden, in the flower bed, and even in the green area of the patio.
Plant cute annuals in the sink, attach a faucet to the side, and stick a couple of plates and bowls inside that you no longer use.

Flower pots made from old shoes
In one of the articles we talked about how to use old shoes for flowers. There were also sneakers or boots, but not so important. At the moment, we decided to expand the collection old shoes, who moved to the dacha in order to continue her service. A whole stand of shoe flower pots – good idea for any dacha.

Country train made of boxes and logs
To create such an interesting country train you will need very little - a log, a chainsaw, a few old boxes, nails, ornamental plants. Yes, you can also use paint if you want to paint everything.
So, take a chainsaw and cut circles for the wheels. We lay the rest of the log in the area where it is necessary to create decor. We place several boxes in front of the log, and nail the finished wheels onto the log. Well, nothing complicated, but the original product is ready!
How to use an old refrigerator in the countryside
In previous articles on our site there was a note on how to make a greenhouse from an old refrigerator. But now we have another idea - production country furniture!
This, one might say, is even a case cushioned furniture, since the refrigerator is lined on all sides and even lined with foam rubber on the seat and backrest. In short, through absolutely simple actions and spending just a couple of hours of free time, old refrigerator transforms into a small ottoman or sofa. What’s positive is that there is space inside the furniture to store various items, something like a cabinet.
By the way, judging by interior lining, if you add foam plastic and insulating film to the walls of the refrigerator, you can also get a portable thermos refrigerator for cold drinks. Just imagine how you are relaxing in the shade of a green garden on a new ottoman, and in order to quench your thirst, you no longer run into the house, but simply take out cool lemonade from the same ottoman. Everything is very practical!

Flowerbed from an old bed
An old bed at the dacha will not bring a lot of money if you sell it for scrap, in principle, like the old bicycle we talked about above. More headache than profit. And here's the next one decorative item it will become easy. Install not even the bed itself, but only the bed, its side parts in the garden, or even in the middle of the lawn. Next, make a raised flower bed right where the bed frame is. Well, that’s all, now it’s just a lot of flowers and caring for them to get a beautiful look and aroma.

Hanging utensils in the country kitchen
From the same old bicycle that was used for country decor, you can take one wheel for kitchen decor in the country. It will make an excellent hanger for utensils - saucepans and ladles, but it can also make a stand. The only thing is that the old wheel will not look very organic in a new and tidy kitchen, and therefore it should be put in order.
It is clear that in general there is no point in restoring a rotten and crooked bicycle wheel, but in a more or less tolerable condition, you can try. We will need to strip the wheel almost to the base, wipe off dust with a rag, and then, preferably, degrease it. Now you can simply paint it the color you want. spray paint from a spray can, or any other simple brush.

Mailbox with a modern twist
In a few years, humanity may completely forget about mailboxes, because there is less and less correspondence in envelopes. It's all to blame Email, chats and other novelties of the era, but today is not about that. While we still receive letters, or simply notifications regarding payment for electricity and water used at the dacha, we need a mailbox. You can make it from anything, but it will be very interesting if the box is made from an old PC system unit. It's very simple, you just need to install the system unit near the entrance to the yard and slightly secure it from being opened by third parties!

New chair from an old cart
A country cart, or simply a wheelbarrow, with which we transport crops or use it at a construction site, can be used even after a breakdown. This often happens when the body is welded and a new one is installed in place of the old wheel. But if a breakdown has rendered the cart completely inoperable or there is no desire to repair it, we suggest using the cart for another purpose.
The picture below shows how easy it is to make a completely comfortable and original chair based on a trolley. Just 100-200g of paint, a secure installation and a few cushions to create a comfortable space.

And the old ball will come in handy.
Yes, you won’t be able to play with such a ball anymore, but that’s not scary, because it can be used in a very interesting way. For example, to create a hanging container for flowers. If there are several balls, this is even better, since the quantity can completely complement the composition.
Choose a place, say, in a gazebo or near a seating area, hang halves of balls with substrate or quality soil inside, and plant some plants there. These can be house flowers, annuals and perennials, and maybe even strawberries, which will decorate the new container not only with pretty greens, but also with delicious berries.

What to make from old items at the dacha (video)
Reviews and comments
Olga 08/14/2014
Hello!
Thank you. I always look forward to your newsletter.
Today I especially liked the information about the possibility of using old things, I’ll definitely try it myself.
Designing on your own is both interesting and scary in case it doesn’t work out. But now I want to fly to the dacha and create.
Best regards, Olga,
Saint Petersburg.
Igor 10/28/2014
By the way, my sister used the old bathroom exactly as in the first photo. At first we tried to make a small pond out of film, which, of course, began to let water through almost immediately, so it worked old bath. They, however, painted it from the inside dark color, which, in principle, is justified.
What are the features of the proposed project? in the absence of external water supply and sewerage networks or in the absence of only sewerage?The main feature is the absence of a standard or other expensive septic tank. Internal layout built-in or attached toilet room can be similar to conventional city toiletssky type in multi-storey buildings- both combined and separate with a bath or shower room.
In the absence of running water required additional installation above the toilet (or in another place) a container (barrel or can) of 40-60 liters. The container is connected to the toilet flush barrel with a hose (pipe). If there is a water supply, installation of an additional container is not required.
Taking into account the ability of the soil to self-filtrate and self-absorb, a storage tank (sewer well) is installed, a prototype of a mini-septic tank, where fecal waste will flow.
Sewage well You can even make it from a used metal barrel of 200 liters, always with a certain number of holes in the wall and bottom. You can make a well from brickwork in a wasteland or using a perforated ceramic bricks(on the edge). In any case, the well must be closed with a removable lid. Arrangement sewer well with connection sewer pipe, devices for overflow pipes, ventilation, etc. - a separate conversation. Availability groundwater and its level from the ground surface are not a complicating condition. It is advisable to place the sewer well no closer than 1.5-2 m from the house.
To use sewerage in winter period
(in heated houses and toilets) thermal insulation of the sewer system is required outer pipe and the well itself. Approximate time filling a sewer well with feces in a solid state with a volume of 200 liters, if the toilet is used by 4-5 people, for at least 15-20 years, after
which will require cleaning it or replacing it with a new well. The sewer well can also be used for Wastewater from washbasins, bathtubs, showers, etc. In terms of environmental and operational parameters, my option compared to existing species The toilets are much better. In addition, it does not require highly qualified specialists.
In the absence of external networks water supply, you can arrange an individual well or borehole with water taken by a pump and supplied to a pre-installed container in the form of a 200-liter barrel or other container, for examplemeasures in the attic, on the roof or elsewhere.
In my summer dacha The house has a built-in toilet, as well as a washbasin and sink in the kitchen. There is plumbing with a water tank installed in the attic. Water is drawn from the well by a pump. Everything works fine. There was no release (overflow) of runoff from the sewer well to the surface during the entire period of operation. Unpleasant odors and there are no dung flies. The difference compared to a regular “outhouse” is huge.


