The art of wall painting has existed for many centuries. Frescoes from the Middle Ages and painting from ancient times have been transformed into modern art painting, which is also popular.
There are many advantages to this type of design. The main thing is that you can create a masterpiece without being an artist and investing minimal funds. Let's consider all the nuances.
You can draw a beautiful picture without drawing skills
Fresh original decor
Artistic painting wall decor unusual for modern design premises. However, recently it has been increasingly gaining popularity. Suitable for both art lovers and amateurs original decor. It can bring a touch of elegance and pomp to the apartment, especially if the design project includes columns. And also create an extravagant image invented by you. Everything the owner's soul desires.
Depending on the expected result, you can find a professional artist and order a painting in accordance with any requirements. In this case, you can give free rein to your imagination by depicting any, even the most unusual ideas. But if it is not possible to resort to the help of a master, you can paint the walls yourself. This is one of the important advantages of this decor: it will not cause difficulties and will reduce repair costs. Plus, you can bring all your ideas to life with a brush and paint.
 If you don’t have drawing skills, you can use the services of a professional
 This option is suitable not only for a large room with a huge blank wall. You can decorate a small bedroom, a nursery, a kitchen, and even a bathroom. It will be convenient to decorate and painting a wall with a window will only add originality. Another proof of the usefulness of this design is that you can “disguise” an air conditioner or TV cord hanging on the wall, and also turn a child’s wall doodles into a real masterpiece.
 This decor option is suitable for any room
 Choosing paint
Modern technologies for creating paints offer you a wide range. You can use:
- oil;
- acrylic;
- tempera;
- fluorescent paint.
They differ mainly in properties, drying speed and saturation. Fluorescent paint is known for its ability to glow when exposed to ultraviolet rays.
Here are the main types of paint used for artistic painting. You can also use the aerosol type. But after working in indoors In this way, long-term ventilation will be necessary. It can also negatively affect the artist’s well-being: cause nausea, dizziness and headaches, and an allergic reaction is possible. It is recommended to deal with aerosol paints in an open space, with access to a large number of fresh air.
 You can choose the paint to your taste. There are colors that will glow
 The choice of base depends on the expected result. Watercolor will create a delicate drawing with blurry outlines. To highlight the necessary zones, you can combine it with other types. Please note that watercolor painting must be varnished to better preserve the design. Fluorescent can highlight some elements, or draw celestial bodies in the nursery. Often used for artistic painting of residential premises. oil base.
 Paint can be combined with other types
 Placement of the picture
A factor that is also worth paying attention to. If you do not plan to varnish the design, you need to be careful in choosing its location. The main criteria for placement are temperature and humidity. Do not place the painting on the wall above the radiator or in a place where condensation may accumulate. The paint may bleed or crack in these areas. For reliability, it is better to protect the drawing from the effects of negative environmental factors using varnish.
 To prevent the drawing from being damaged or cracked, it is worth treating it with varnish
 Stages of creation
Let's move on to detailed description how to paint a wall. We begin creation with preparatory work. It is necessary to prepare the necessary materials: brushes, paints, solvent (if necessary), rags, stencils (depending on the technique), stepladder, palette (for mixing colors). Preparing the wall. Pay attention to the surface. Painting can be applied to plaster and wallpaper intended for this type of use. The surface must be degreased and free of dust, plaque and previous paint. For oil materials, the wall needs to be coated with a primer; for watercolors, it should be slightly damp.
After execution preparatory stage, let's move on to drawing a sketch. The contours can be applied by attaching a stencil to the wall, or drawn “by hand” in accordance with the sketch. Next, fill the resulting shell. Let the drawing dry well. After this, cover it with a layer of varnish.
Remember! After completing the work, be sure to ventilate the room well.
 After drawing the sketch, you can start drawing. After completion, it is recommended to varnish the drawing
 Application Features
For better preservation of the drawing, pay attention to some features when working:
- It is better to apply the material in a thin layer;
- before coating, be sure to treat the wall with a primer (for oil paint) or leave the plaster wet (for watercolor);
- drawing sketches is an obligatory part for small and large rooms;
- be careful when applying the image to the ceiling or high surfaces;
- Before varnishing, make sure the design is dry. Be sure to check areas where paint has accumulated heavily.
Important! Take precautions when working with caustic substances
 Make sure the design is completely dry before applying varnish.
 Various techniques
Modern painting departs from medieval frescoes using the technique of painting walls on wet plaster. At the moment there are various options.
To begin with, the type of painting depends on the chosen paint, which we discussed above. If you are in doubt about your choice, consult a specialist. He will make a project, showing what the creation will look like when completed. He will also create a sketch and help in choosing a base.
The second criterion is the type of application. To transfer a design to a surface, use the following methods:
- Stencil
To do this, print out the pattern you like, transfer it to a hard surface, then trace the outline, placing the stencil on the wall. Also this device can be purchased already at finished form, or seek the help of a designer. This technique is mainly used to apply simple patterns or simple designs. Here you can use both a brush and a roller to speed up the process.
- Hand painted
All presented types generally refer to hand painting. But this technique involves drawing a contour sketch, and then filling the resulting shell. This type is considered the most difficult. Although it all depends on the chosen pattern.
- Using projection
A technique that does not require creating a sketch. It is enough to find a picture you like, use a projector to transfer it to the wall, and draw according to this projection. This method helps to accurately reproduce the nuances of a painting without being an artist.
 Hand painting is the most complex look drawing
 Let's get down to business
Having decided on the choice of design, colors and technique, we move on to creating the image. We offer several options for different rooms.
Shall we decorate the rooms?
 The landscapes in the apartment will look very beautiful
 Living room
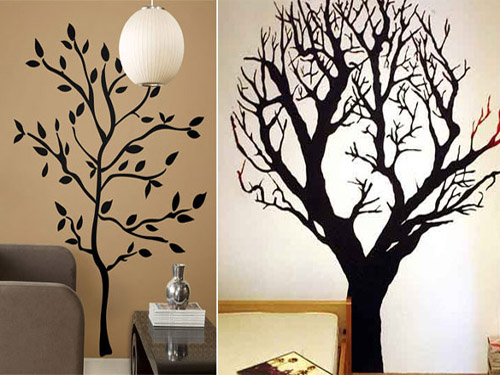
The choice of color scheme and theme depends on the overall style of the room. Black silhouettes of any kind you like are well suited for any color. They will fit harmoniously into cold and warm shades, but they won’t look gloomy.
For a large living room a great option There will be a watercolor painting on the entire wall. Make it in cool, light colors to create a feeling of freedom and space, or use warm colors to create coziness.
An example would be a floral painting in purple or blue shades with the addition of green on a white background. In this room it is better to use hand painting.
 For large rooms you can make a large painting on the entire wall
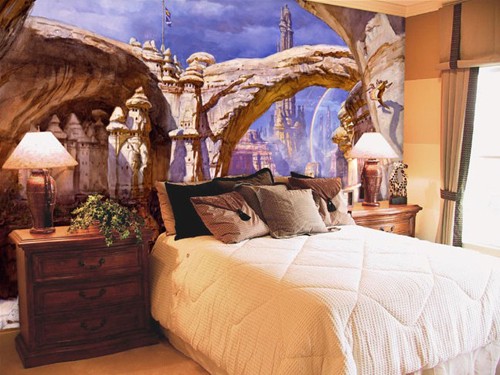
 Bedroom
The help of stencils will be appropriate here. You can use them to create original patterns, making a photo frame that will be an excellent addition and a reminder to the couple of the wonderful moments spent together.
 It is better to use calm tones in the bedroom
 Children's
In this room, creative thoughts are allowed to be fully realized. You can create an original and fashionable design by inviting a master. Then you will get an abundance of bright colors and an accurate representation of the chosen theme. Having artistic talent, you will be able to independently depict your child’s favorite characters by decorating the entire wall.
If your talents do not allow you to create on a large scale, you have a chance to paint a wall with your child. To do this, use stencils or projector equipment. This choice will be a good opportunity to have fun together and let your child show his artistic abilities.
 The children's room should have bright shades
 Rules of care
Despite the fact that the materials and the method of their application differ from those used in the Middle Ages, some care for the product will be required.
- First, don't forget to varnish the picture. This will make it easier to care for and keep it fresh. for a long time.
- If coating is not part of the plan, use a dry cloth to remove dust.
- Monitor the temperature and humidity of the room.
- If the drawing has smudged, make small corrections with a brush.
- Periodically update the brightness of the image, or change it completely.
In general, when using a protective coating, maintenance will be reduced to removing dust from the wall damp cloth. The rules of care are quite simple, so you can safely make your dreams come true, creating unrealistic images to your delight and to the envy of your friends.
Video: Three-dimensional 3D artistic wall painting – orchid.
Video: Wall painting. Lace 3D flower
Wall painting in the interior has been widely used for many centuries. Medieval frescoes, antique paintings, modern paintings on the walls - all this testifies to the sophistication of the room and the high sense of taste of its inhabitants.
You don't have to be the owner big house with columns to use interior decoration as wall decoration. A small drawing can be used to decorate a wall in a nursery or any other room. Modern materials and technologies make it possible to turn a dull, monochromatic surface into a real work of art. And most importantly, you don’t need to be a professional artist or designer to do this.
The article will describe the simplest and most accessible ways to enliven a living space, make it more interesting to perceive and cozy. Anyone can use them, the main thing is the desire to decorate the room with your own hands so that it looks like a masterpiece from a professional designer.

Choose an artist
Today there are many specialists who are ready to paint the interior, a separate room, using any, even the most incredible, techniques.

Naturally, the more complex the work, the more the specialist will charge for its implementation. But the problem is, not everyone can create a drawing that meets all the customer’s requirements. But you still have to pay decent money for the work. And sometimes you want to decorate a room with your own hands. And let painting a wall in the interior not become a work of art. But with what sense of pride you will look at the surface you painted yourself.

This work can also be done collectively. For example, a child will always be happy to paint the interior of a nursery. Of course - if his age allows him to hold a brush in his hands. And the luxurious wall painting will instill romantic feelings if you do the painting together.
The main thing is to believe that there is nothing difficult in painting walls with your own hands. It's the 21st century, modern materials have high quality characteristics, allowing you to create a beautiful picture on the wall even for those who don’t know how to draw at all. The main thing is not to neglect simple rules when painting walls.

Wall painting techniques
Fortunately, modern artists have ample opportunities to create incredible designs on walls. Once upon a time only one was used, very complex technology– frescoes. Now you just need to buy a few cans of acrylic or water-based paint at a hardware store and start painting on the wall.
Related article: Spectacular wall decoration with photo frames

You decided to create a masterpiece yourself, but you don’t have real experience in this area?
This means that you should pay attention to the following painting techniques:
- stencil;
- simple outline drawing;
- drawing a picture according to the projection of the slide.

A stencil is a great way to paint walls in the interior with your own hands, apply a simple monochromatic or multi-color design to the wall. In the children's room, your child can help you, because to apply a picture, you just need to attach the stencil to the wall and walk over it with a brush or roller. Using a stencil, you can apply not only an ornament of identical elements to the wall, but also other images.
Drawing along the contour is quite simple. The main thing is to find a simple but beautiful image and, using an ordinary soft pencil, reproduce it on the wall. If something doesn’t work out, you can easily wipe the contours with a damp sponge and draw everything again.

Even a person who is far from skilled in fine arts. When the contours are drawn on the wall, it is enough to decorate the drawing with interior paints. The technology is ideal for decorating a nursery, especially if the child loves to draw.
If you have a slide projection machine, you can use it to apply the design to the wall. For example, reproduce the desired image on the wall surface, redraw its contours onto the wall, and then decorate it.

Select a pattern
Artistic painting of walls in the interior is easy.
It is important to choose the theme of the drawing for a specific room:
- Have you decided to paint a wall in your living room? Flowers, trees and natural landscapes are ideal. Only a professional can paint a forest or mountains on a wall. But it’s not so difficult to reproduce lilies, dandelions or snowdrops yourself. You can use a simple stencil to apply ornaments.
- The optimal solution for the kitchen is to paint the walls in the interior with still lifes of fruits and vegetables, images of any food. Many will be able to draw a plate of fruit or a wheel of cheese. The main thing is to choose a simple drawing.
- In the nursery you can depict cartoon characters. For a girl, images of flowers, butterflies, and a fairytale castle are suitable. Need to decorate the walls in a boy's nursery? Images of superheroes and cars are suitable. When both a boy and a girl live in the nursery, different pictures can be depicted in the room on different walls. Clouds or starry skies are a universal solution for a child’s bedroom.
When painting bathroom walls, you should pay special attention to the type of paint. The bathroom is different high humidity. In another room you can use water-based paint; for the bathroom it is better to use acrylic paint. Images of waterfalls, Roman baths, the ocean floor, and fish are suitable for the bathroom. Is this too difficult for you? This means that an image of large soap bubbles on the wall will do.

Technology of drawing on the wall
The wall will be painted in the bedroom or another room; you should adhere to the technology of applying paint to the wall. Wall painting is the decoration of a room. But all work begins with leveling the wall.

It is not necessary to apply plaster or level the walls with drywall yourself. You can entrust this process to professionals.
If you decide to carry out this work yourself, it should include the following steps:
- leveling the wall with plaster or drywall;
- a layer of starting putty;
- a layer of finishing putty;
- painting the wall in the background color.

A primer should be applied to plaster or drywall, as well as layers of putty, otherwise it will begin to peel over time. After applying the design to the wall, it is opened with transparent varnish. This measure allows you to make the image as resistant to mechanical damage as possible, and the colors will not fade or fade for a long time.

Where to place the drawing
Have you chosen a pattern for the wall? Have you bought the paint and prepared the walls? Now you need to decide on the location of the image. First you need to plan the entire design of the room. Do-it-yourself wall painting in the interior should not contrast with the color of the furniture; it should correspond to the style and purpose of the room. To avoid unpleasant surprises as a result, you need to put a plan of the room with furniture on paper, and depending on it, look for a place for the drawing.
The first examples of wall paintings can be called rock paintings of the Neolithic period. Even leading a primitive lifestyle, man sought not only to capture what he saw around him, but to make these pictures a decoration for his home. Each design was based on only four colors, the pigments of which could be obtained by simple processing of natural materials. They mostly depicted hunting, since this process occupied the lion's share of the time of primitive man and became the meaning of his life. There are also magnificent examples of early abstractionism: chaotically located handprints on arches and walls, creating a single artistic composition. Man improved, and the skill of painting developed along with him. Ancient Egypt became the real “cradle” of this art form. The frescoes were executed in a laconic manner, which was compensated by the monumentality of the buildings they decorated. The Egyptians were hardworking and thorough people. The secrets of painting compositions and the basics of this science were carefully preserved and passed on to subsequent generations. The central figure of the wall paintings was a person or a deity in his guise. The latter were distinguished from mere mortals by animal heads and paraphernalia that helped them fulfill their destiny (the feather of Maat, the rod of Anubis with a dog’s skin). The main motive in painting the walls was the relationship between gods and people, as well as battle scenes. The everyday side of life did not fit into the sublime style of drawing of the ancient Egyptians. If she was depicted, it was only for ritual purposes. In Ancient Rome and Greece, they began to create more down-to-earth paintings. The deities had a completely human appearance, and everyday life began to be mentioned much more often. Bas-reliefs appeared that combined painting and sculpture. Interior wall painting began to appear more and more often in the homes of wealthy citizens. At the same time, signs began to be used that indicated the prototypes of modern cafes and other public places. In the Middle Ages, church painting began to develop. The interior decoration of temples and cathedrals was impressive in its scale and detail. Nowadays, decorative painted walls do not often decorate the interiors of rooms in ordinary apartments. This trend emerged after photo printing appeared, which made it possible to produce wallpaper with any images. Many people mistakenly believe that only a professional can handle such an exclusive interior solution, and this will inevitably involve additional expenses. In fact, even a novice designer can independently master the basics of this art form. As a last resort, there are templates that will make your work much easier. Let's try to understand the intricacies of the process and choose the optimal technique for a beginner. With the help of modern technology, people have learned to imitate many expensive materials and replace labor-intensive manual work with a quick process carried out by machines. The decor is usually standard and stamped. In order not to encounter a similar design in a neighbor’s house, many people create wall decorations in the house with their own hands. Of course, this process will take time and require certain financial and labor costs, but the interior will turn out to be unique and original. That is, among hundreds of rooms with standard decor, your home will become an unusual island of originality. Artistic painting can be used in any room; it is universal. Since there are no limits to human imagination, this method also opens up limitless possibilities for the creator. A drawing made with high quality looks natural and three-dimensional. With its help you can “replay” the incorrect geometry of the room. With the right selection of colors, painting can visually expand the space. Limits on size and stylistic decisions are set only by you. Naturally, this element will become the center of the design picture, so no interior will tolerate “hackwork.” However, it is important to observe moderation even in such beautiful decor. The best option is to decorate only one accent wall in the room. Its surface must be properly prepared before work. The preparatory stage of the surface is conventionally divided into several steps: After the wall has dried, it will be ready for painting. Several types of paints are used to paint walls, each of which has a special composition that determines the characteristics of the substance. Gone are the days when artists independently selected and mixed pigments, and recipes were carefully protected from the encroachments of competitors from the art world. So, the following types of paints are used for painting: Before purchasing expensive paints, take advice from a professional on how to choose them. So, for example, it is recommended to start with acrylic and practice with gouache, which is vaguely similar in work. Don't forget to purchase a set of brushes. They will be needed to create any paintings except abstract ones. It is recommended to pay more for brushes made of pony or squirrel hair, as they are softer and do not leave marks of fallen hairs on the surface. The set should contain tools of different thicknesses to create individual elements of the composition. Painting can be created in various techniques, among which the most popular and effective are: Separately, it is worth noting the method using stencils. This option is ideal for beginners who are not confident in their abilities and are afraid to put the first touch on the prepared wall. In this technique, instead of brushes and paints, an airbrush can is used. It sprays the contents over the surface, even its name translates as “drawing with air.” Dyes in airbrushing use liquid and powder, but water-soluble acrylic is more popular. The composition applies to any surface, even wallpaper. You will have to work in a respirator. Few people will be able to master the technique from the first “zilch”. Before painting, you will have to practice to get used to the unusual method. The airbrush allows you to draw even tiny details, thereby providing highly detailed drawings. By the way, even ancient artists used a similar technique, blowing dye from special tubes. The fresco technique has been used for interior decoration since the Middle Ages. The essence of the method is to apply paints to the plaster that has not yet dried. It contains lime, which forms a strong calcium film on the surface of the pattern. The disadvantage of this method is the need to work very quickly. For this reason, it is not recommended to resort to the technique for novice artists who are just mastering the art of painting. Water-soluble paints are used for work. Alsecco is like a fresco. Paints are applied to an already dry but newly moistened surface. Fluorescent paints have the peculiarity of glowing in the dark. Use transparent or colored compounds. The first ones are generally invisible during the day, just like the drawing. In the daytime, colored ones look like ordinary paints used for painting, but at night they transform the walls with a pleasant glow. Quite often, drawings made in acrylic or tempera are decorated with fluorescent compounds. They highlight accent elements. The fluorescent composition is absolutely safe for humans; it does not emit toxic substances. These colors are recommended for depicting simple landscapes without an abundance of small details. The volumetric technique combines the process of sculpting with painting. First, plaster or plaster is applied to the prepared surface. Relief elements are formed from the material that has not yet dried. Then, after drying, the “stucco molding” is painted. There is another technique called sgraffito. The method comes from Italy. Several layers of colored plaster are successively applied to the wall. After it dries, they begin to scratch out the design with a special sharp tool. The result is a relief image, which, as practice shows, will last for many years. Stencils are the best help in situations when the imagination draws fantastic landscapes, but hands cannot replicate them. The device is also used when it is necessary to depict many similar elements in order to reduce work time. Stencils are usually made of plastic. The plates are washed after use and are ready for reuse. Acrylic is considered the most convenient material for beginning designers. Its color “assortment” is rich, and its composition is completely safe for humans. Acrylic can be washed off if necessary if you need to correct individual details of the painting. Gradually, after you start getting better at it, it is recommended to use combinations of techniques to improve your skills. The drawing must correspond to the stylistic decision and color palette of the room. Particular attention is paid to its location. The perception of the entire interior depends on which wall will be the accent wall. The loft uses “smoky” paintings and graffiti on brick walls. Painting is done using airbrush technique. The romantic Provence style loves plant motifs. Bouquets of wildflowers, peonies, roses, lilies will be the best addition to the interior of the French countryside. In Art Nouveau, masterpieces of painting are often repeated, which at one time decorated ladies' boudoirs and luxurious salons in a manner characteristic of the style. Inimitable Art Deco gives preference to fine ligature and ornate patterns. The Japanese style and minimalism, which is close to it in spirit, allow for thematic painting for their native country: orchids, pagodas, sakura branches. There are practically no restrictions in the ethnic direction. If the interior imitates a bungalow in the tropics, then images of the sea and palm trees will be very useful, but for African motifs in the painting they use trees with characteristic crowns, elephants, and a “dried” landscape. In addition to style, it is worth considering the functional purpose of the room. In the living room, painting usually corrects imperfections. For example, for a small room it is important to use a drawing with perspective: paths, terraces or paths going into the endless distance. Painting can replace the installation of columns or pilasters, and at the same time ennoble the classic design. The fireplace is the cozy center of any room. It is not always possible to establish even its imitation, let alone the original. A painted element on the wall with realistic flames will be a wonderful interior addition. The bedroom is used exclusively for relaxation, so every piece of furniture in this room should be designed for comfort and relaxation. Natural motifs usually prevail in painting. Landscapes, panoramas of the water world, green lush grass or heads of bright flowers will help you calm down and prepare for a good sleep. As a rule, the wall above the head of the bed is painted, since in most cases it is an accent wall. In the same room, the ceilings are often decorated in a similar way. It is not recommended to resort to dark colors, which will make the room visually smaller and will put psychological pressure on the owners. Liven up the walls of your kitchen, bedroom, living room, nursery or hallway with drawings by following one of our master classes and being inspired by a selection of 100 photo ideas. Flowers on the kitchen wall in a classic style Stencils come in handy when you need to outline the contours of a complex image, draw letters, numbers or any repeating patterns. To paint the walls, you can use a ready-made template or one made to order in a printing house. Such stencils can be flexible or rigid, one- or two-layer (to create a multi-color pattern), self-adhesive or glueless. They are generally durable, fit tightly to the wall, and are designed to be reusable. However, you can make a simple single-layer stencil for painting walls with your own hands, following our step-by-step instructions. What you will need to make a stencil: office paper, plastic film or thick paper (such as whatman paper or wallpaper), pencil, scissors, stationery knife or special knife for cutting out stencils, masking and transparent tape, as well as a printer and some kind of graphic editor (vector or raster). What you will need to stencil wall painting: paints (acrylic is best) water based), synthetic round brush(with a diameter of 7 cm for painting large drawings and smaller ones for finer work), a sponge (can be used instead of brushes) and paper napkins for removing excess paint. Instructions: Step 1. Find a suitable vector(!) stencil on the Internet, for example, on the website http://www.getpattern.ru/. Please note that it is advisable to choose a contour image (or make it as such, following these instructions), because colored areas will only waste ink when printed. Step 2. The selected picture must be scaled to the desired size and printed. This is very easy to do if the stencil size does not exceed A4 format. However, if you need to print a large template, then you need to break it into several parts, following these instructions. Next, all you have to do is assemble the picture as a mosaic. Step 3. At this stage paper stencil A4 format should be covered with transparent tape on both sides and overlapped (!) to protect the paper from getting wet. Finally, use a craft knife to cut out all the segments intended for painting. If you have printed several A4 sheets for a large stencil, then at this stage you can immediately start cutting, but keep in mind that you will have to paint the stencil with an almost dry brush so that the paper does not get wet. But in order not to take risks, it is advisable to laminate the drawing or copy it onto a denser base (for example, vinyl wallpapers). To do this you can: When cutting out the stencil, be sure to protect the table from scratches by placing some kind of backing on it, such as glass.
Step 4. Now it's time to glue the stencil to the wall. To do this, try on your template to the selected location, align it with the building level and glue it with tape. If necessary, for example, if you need to draw repeating elements at equal intervals, you must first make markings using a building level. Step 5. Hurray, the most labor-intensive work is left behind, it's time to start painting. Step 6. When the drawing on the wall is completely dry, coat it with matte varnish to protect it from moisture. As you know, check is the most versatile print that never goes out of style. It fits perfectly into both classic and modern interior, both in the interior of the kitchen and children's bedroom. You can decorate one or more walls with a cage using wallpaper or painting. The easiest way is to paint walls in a large Vichy checkered pattern, as in this collection of photos. Painting walls in Scottish tartan requires a little more effort, but still, it is accessible even to beginners - after all, the accuracy of the markings, rather than painting skills, is what is important here. And now we suggest you familiarize yourself with the step-by-step instructions for painting walls with your own hands in tartan, as in the photo below. What you will need: 4 paints of the same color, but different tones (in this project we used light olive for the background, a slightly more saturated marsh shade for vertical and horizontal stripes, an even darker one for the intersections of stripes, as well as two paints of contrasting colors), brushes, roller, paint tape and laser level, stepladder and other basic painting supplies. Instructions: Step 1: Prepare the wall for painting, then paint it with the background color using a roller. In this master class, the background is a light olive tone of paint. Allow the background layer to dry before moving on to the next step. Step 2. Mark vertical stripes of equal width on the wall using a laser level and masking tape. Then paint them with a paint darker than the background and let dry. Step 3. Now mark the horizontal stripes in the same way, paint over them and leave to dry. Step 4. Paint the intersections of the stripes in an even more saturated shade to create the effect of layering threads of the same color in the checkered fabric (as if that made the cells darker than the stripes). Step 5. It's time to draw the contrasting thin stripes that are required for the tartan check. To do this, again use the laser level and masking tape, mark a line along and in the center of the vertical stripes. Next, paint over them and let dry. Then use the same paint to draw lines along the horizontal thick stripes. Step 6. Finally, we draw cells of a different contrasting color (in this master class it is blue). The technology is still the same, but the cell becomes larger, since the stripes are drawn along the lines of the first background layer. Step 7. All that remains is to coat the painted wall(s) with matte varnish to enhance its moisture resistance and strength. Hand-painted walls allow you to create unique and personalized interiors, embodying your wildest fantasies and design ideas. Flowers on the wall Flowers on the wall Flowers on the wall Painted walls are especially good in children's rooms. With the help of hand painting you can correct, disguise or play up some of the shortcomings of the room. For example, draw a missing window, pieces of furniture or accessories, paint over a spot on the wall, etc. Drawn headboard and vase Hand-painting walls is best left to professionals, but simple drawings can be done by beginners if they have at least a little drawing skill. Here are some examples of simple images. The stages of painting walls with your own hands are as follows: The process of painting a wall from drawing the contours to coloring with Molotow acrylic markers: You can quickly and easily paint walls with your own hands using the stamping technique, when drawings or patterns are applied with a stamp. As a stamp, you can use both ready-made painting stamps and roller stamps, as well as improvised means - sponges cut in the shape of a circle or other shape, brushes and even your own fingers. You can also make a stamp for painting a wall yourself from microporous rubber (foam, foamed polymer or simply “foam”) and a piece of cardboard. What you will need: foam microporous rubber (often sold in children's art departments in the form of colored sheets), cardboard, pencil, sharp utility knife, scissors and glue, as well as acrylic paints. Instructions: Step 1. Cut out any shape or figure from a sheet of foam rubber. For example, it could be a circle as in our master class, a letter, an asterisk, an autumn leaf, a butterfly, a flower, etc. Step 2. Glue the resulting blank onto a piece of cardboard. Voila, the stamp is ready! Step 3. To start painting the wall, dip the stamp in the paint quite generously, but so that the paint does not drip from it, then apply it to the wall. If you want the print to be as clear as possible, you need to press evenly on the stamp. Next, place the prints all over the wall in the same way, maintaining the same spacing. To avoid mistakes, it is advisable to first apply markings to the wall. In addition, before starting work, you should practice putting stamps on a draft. Step 4: Once the stamped designs are dry, coat decorated wall matte varnish. Having decorated one or two walls with chalk wallpaper or slate paint, you will have the opportunity to change the pictures on the wall at least every day, write down foreign words, to-do and grocery lists, errands for household members, motivating or just funny phrases. A chalk wall looks especially cool in the interior of a children's room and kitchen. Striped walls not only look cool, but also visually correct the shortcomings of the room. For example, vertical stripes “raise” low ceilings, and horizontal ones increase the space and push the walls apart. It’s very easy to paint striped walls with your own hands; the main thing here is to carefully stick the masking tape and calculate it correctly optimal width and number of stripes. In order for the stripes under the ceiling and above the floor to be the same color, there must be an odd number of them Vinyl stickers are good because they are easy to stick, peel off without leaving marks, are sold in a great variety of pictures and are very inexpensive. With their help, you can change the wall design as often as you like. Text wall sticker in the interior Vinyl stickers in the form of words in the bedroom Vinyl stickers in the nursery Vinyl sticker on the kitchen wall People have always believed that painting walls is a wonderful way not only to decorate their home, but also to attract happiness, peace and good luck. This design direction has not lost its relevance at all; rather, on the contrary, artistic wall painting is becoming more and more popular today. This is understandable - an original design option for the surrounding space can transform a room, fill it with warmth, beauty and comfort. Decorative painting walls is associated with the emergence frescoes. Translated from Italian, “fresco” means “fresh.” The technique involved applying paints diluted with lime water to wet (fresh) plaster. This method made it possible to obtain durable paintings that did not lose the brightness of colors over the centuries. . The fresco was widespread in Rome and Greece in the 2nd millennium BC. Aegean art was popular among the elite and was considered the best method decoration of walls and ceilings. Unique technology The work has preserved the creations of ancient masters to this day and told about the beliefs, customs and traditions of their ancestors. The sequence of creating a clean fresco was first described Cennino Cennini(1447). The image was applied to the plaster using powder, ocher or coal. Only rich people could afford such beauty: artistic painting is a labor-intensive process that requires high skill and appropriate remuneration. Today, painting walls in the interior has become more accessible, but it still cannot be called a cheap pleasure. Handmade is considered the best way to create an exclusive interior that has no analogues. The variety of styles and genres guarantees stunning results - mesmerizing and realistic. The concept of “painting the walls of a room” includes many ways of applying images. It is customary to distinguish between 2 main types: traditional and modern techniques, which in turn are divided into several subtypes. Traditional wall painting is a monumental work done manually, without the use of modern devices. In addition to the above fresco, traditional techniques include: Modern variations are no less interesting, but more varied. Question how much does wall painting cost- the first thing that worries those who want to decorate their home with “living” paintings. The cost depends on many factors: the complexity of the design, the application method, the size of the composition, and the chosen subject. If you want to create on your own, then stencils for painting walls will help you. It's simple and affordable way decorate the room with borders, friezes, ornaments and flowers. There are a large number of ready-made templates for painting on sale, but if you want something unusual and definitely in a single copy, then you can make the stencils yourself. It is enough to take a sheet of plastic or thick cardboard, draw the outlines of the desired design and cut it out. All that remains is to fix the stencil on the wall and paint it using a special stencil brush and water-dispersion or latex paints. To create single-color patterns, single templates are suitable, while the use of multiple shades requires the presence of a multi-stencil consisting of several parts. Wall painting with stencil pictures is especially popular when decorating children's rooms. The topic can be any depending on the age, gender and preferences of the child. It has been proven that the formation of taste begins in childhood - surround your baby with bright, interesting and educational stories that stimulate the development of imagination, and he will grow up kind, smart and talented. First of all, you need to decide on the location of the drawing and purchase materials for the work. If the choice of area for juicy experiments depends only on you, then paints and brushes must be purchased, taking into account the recommendations of professionals. So the best acrylic paints are varnish and matte. They are non-toxic, dry quickly and are resistant to mechanical stress (the created sketch can be washed, but without fanaticism - with special diligence, you can erase anything). . Next stage - surface preparation. The wall is puttied to perfect smoothness - there should be no bumps or depressions. Then it is painted with white paint, just white, and not tinted - otherwise we will get a faded pattern with spots. Before applying the pattern directly to the wall, it would be a good idea to work out the sequence of sketching the details on paper. Draw an outline with colored pencils; if you use a simple pencil, then under the influence of acrylic paints it will blur and instead of a picturesque landscape, an artistic “daub” will appear in front of us. Make sketches from large to small details, i.e. identify the main elements first, and then supplement them with secondary ones . It is also necessary to paint over the drawing in stages - give yourself a rest. Intervals will help not only to maintain the thirst for creativity, but also to see minor mistakes and shortcomings. The paint is applied from large to small parts, from light to darker tones. Final step- varnishing. Although the procedure is not mandatory for acrylic paints, it is better to play it safe and securely fix the created masterpiece, but when using watercolors and gouache - varnish coating extremly necessary! Apply the varnish carefully using a spray bottle several times thin layers. Now your efforts are reliably protected from the influence of dust and time; all you have to do is wipe the created splendor with a damp cloth from time to time. Artistic wall painting is a very interesting activity that requires inspiration and special responsibility. Try to put a piece of your soul into your work, and then the result will delight the eye and fill the space with a special, festive mood.
Technology and features of wall painting in the interior
Preparing the wall for interior painting
Paints for painting walls in the interior
Techniques used to create the painting
Airbrush
Fresco
Painting with fluorescent paints
Volumetric painting
Using stencils
Painting with acrylic paints
Select a pattern
In the living room
In the bedroom


Idea 1. Painting walls using a stencil (+ master class)


Idea 2. Painting checkered walls (+ master class)


Idea 3. Hand painted walls


Idea 4. Stamping (+ master class)


Idea 5. Painting with chalk on a slate wall


Idea 6. Striped wall


Idea 7. Decorating the wall with vinyl stickers


How it all began


Application technique: varieties
Imperishable classic
Achievements of the current century


Stencil painting
On average, an ornament will cost from 2,000 to 15,000 thousand rubles. per sq.m., landscape sketches - from 6,000 to 30,000 thousand rubles. per sq.m., compositions depicting animals and humans - from 20,000 to 60,000 thousand rubles. per sq.m.

DIY artistic painting
Brushes for acrylic paints must be purchased with artificial pile. Preferably different sizes that will help you choose best option stroke depending on the tasks