We can talk about the Russian bath and its benefits for improving health for hours. This is, in fact, a favorite vacation for many of our compatriots. And one of the most important places in the bathhouse is the washing compartment.
Actually, building a bathhouse with your own hands is not that big of a deal. difficult process. But arranging a washing department requires special knowledge. As in any construction, there are nuances and secrets. And here you can’t do without expert advice.
general information
A modern Russian bathhouse can consist of several rooms:
- steam rooms;
- shower compartment;
- swimming pool;
- washing department;
- dressing room

The photo shows a good dressing room
All these rooms are undoubtedly important, but the washing department occupies a special place in a Russian bathhouse.
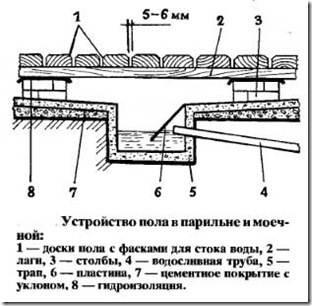
The washing compartment is the main room of the bathhouse and differs from other rooms in the use of a large amount of water. Here, lovers of Russian baths can take a break from steam treatments. And washing off the sweat from the body, those who like to take a steam bath pour water on the floor.
Therefore, special attention should be paid to the installation of the floor in these rooms. Floors in washing bath should be arranged with special care. Let's take a closer look at methods for installing floors in rooms with high humidity.
Floor installation
The floor in the washing bath must meet several requirements:
- ventilate well and dry quickly;
- withdraw freely excess moisture from the premises;
- be warm, should not create drafts;
![]()
- must be durable and not deform during sudden temperature changes.
There are two types of floors in the bathhouse washroom:
- wooden floor;
- concrete floor.
Features of a wooden floor
A wooden floor in a bathhouse is the most comfortable covering.
And it is best to use wood for these purposes. coniferous species:
- pine;
- larch.

This is due to the fact that coniferous wood is the most resistant to moisture.
To install wooden floors in a bathhouse, we will need the following materials:
- sand;
- waterproofing material;
- cement;
- wooden beam (150x150 mm);
- floorboards (35-50 mm);
- impregnation to protect boards.
Wooden floors in the washing area should be multi-layered. This is necessary to ensure its long-term operation and normal functioning.
There are two types of wooden floors:
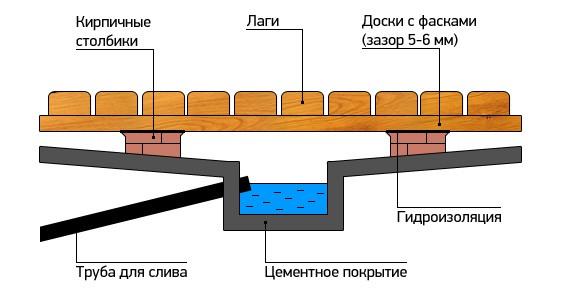
- A leaky floor is the simplest way to construct a floor. On concrete base, which is made at a slope, logs are fixed on which the plank floor will be laid. Moreover, the boards of such a floor must be fixed at a certain distance from each other - this is necessary so that water can easily leave the room.

Leaking floors, as a rule, are removable - this is necessary for more thorough drying of the floor in the washing compartment of the bathhouse. This method is quite cheap, but has one significant drawback - this type of floor cannot be insulated.
Note!
The concrete base of the floor must be inclined.
And it must provide a special drain into the sewer or into an open ditch for water drainage.
In this case, the drain will also work as a ventilation hole.

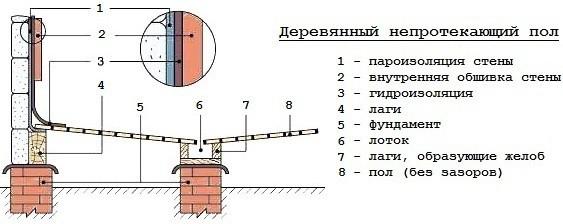
- non-leaking floor. Installation of a non-leaking floor is carried out slightly differently than a leaking floor. Its main feature is that it requires special drainage for water removal and a special ventilation system. After all, a floor that does not leak is made permanent.

Experts suggest the following method for installing sloping wooden floors:
- initially prepare the rough flooring, cover it with expanded clay chips, lay a double waterproofing layer on it (roofing felt, roofing felt, polymer insulating sheet);
- then the logs are secured. Moreover, the logs are laid without tilting;
- laid between the joists thermal insulation material. This can be polystyrene foam or mineral wool;

- bars are placed on top of the joists laid at the base of the floor. The thickness of the bars should decrease towards the drain hole;
- then another layer is laid on the bars waterproofing material, on top of which ;
- the boards are secured with screws. This will make it easier to dismantle the floor if necessary.

When installing a floor that does not leak, remember the need for ventilation of the underground space. To ensure ventilation, at the time of installing the subfloor, you can make small holes in the floor and insert plastic pipes with a diameter of 5 or 10 cm into them.
Concrete floor
Concrete floor in the bathhouse washroom perfect solution question. It is quite easy to install, it is reliable, durable, and easy to care for. The price of a concrete floor is much lower than the cost of wooden floors.

However, it has one significant drawback - the concrete floor is cold, and it can be insulated by laying heat-insulating material between two slabs. Installation of a concrete floor requires significant labor costs.
Stages of installing a concrete floor

Note!
The first layer of the screed should be installed with a slope towards a shallow pit where excess water will drain.
- after the first layer has hardened, a layer is poured onto the screed bulk heat insulator approximately 7 cm and apply a second layer of concrete. Moreover, it needs to be reinforced with a special metal mesh;

- then the surface is leveled using the rule. After a week, the floor in your washing room is ready for use. This is a ready-made instruction for installing a concrete floor in a bathhouse.

Conclusion
The installation of the floor in the bathhouse must be carried out with the utmost care. How comfortable you will feel in it depends on this.
How to make floors in a bathhouse with a slope? Sloped floor base – perfect solution for rooms with intense exposure to water. Such designs allow you to quickly evacuate liquid from the bath and prevent spoilage flooring. However, from a technical point of view, making inclined floors is quite difficult. In the article we will look at the design features of foundations with ramps, and also pay attention to important technical nuances.
Why is tilt necessary?

Tilt of the base towards the drain allows you to quickly remove water from the washing room or steam room in the bathhouse. Enough complex design performs several tasks:
- Prevents fluid accumulation;
- Prevents spoilage flooring materials;
- Provides quick drying of floors;
- Significantly reduces the chances of developing fungus and mold.
The design of a rough foundation with a slope must take into account many technological nuances. If the degree of inclination is too small, not all the water accumulating on the surface will enter the drainage system. If you make the floor slope too large, this will affect the material component of the issue, since it will lead to unnecessary expenses.
Features of concrete floors

In the process of arranging an inclined base in a bathhouse, in most cases concrete is poured. This material has good frost resistance and pliability, so it is the easiest way to fill floors with a slope. How to pour the solution correctly?
- First, a pit and a sewer pipe are installed, with the help of which waste water will be removed from the bathhouse;
- Then the concrete solution is poured in two layers, controlling the horizontal level of the screed;
- The thickness of the bottom layer of the mortar must be at least 50 mm;
- After this, a layer of expanded clay is laid on the dried concrete floor and a second layer of mortar is poured;
- Then the reinforcing mesh is installed and the finishing screed is made.
As a rule, laying the mortar is not the final step in the construction of sloped floors. When arranging such a covering in a sink, it is advisable to cover the base with tiles, otherwise it will very quickly become unusable due to the influence of moisture. Laying wooden floors will be no less profitable.
Non-leakage floors

Laying wooden floors on a slope is only required if a leak-proof base is installed. How to lay floorboards at a certain angle to the drain?
- The rough coating is cleaned of dirt and a drainage system is installed;
- Then it is supposed to be filled concrete screed, which is performed using the technology described below;
- After the screed hardens, the tongue and groove board is laid;
- The finished floorboards are positioned at a slight angle to the drainage system due to the previously formed screed slope.
Unlike pure concrete, wooden floors can be installed in a sink, steam room or shower, as they are not prone to dust formation.
Options for installing inclined floors

Designing a base with a ramp always begins with choosing the type of slope, which can be of two types:
- “Envelope” is a special type of base cladding in which the drainage system is located in the center of the room. For normal water drainage, the base is conventionally divided into 4 parts in the form of an envelope, making a slight slope towards the ladder;
- From two planes- a structure in which the base is divided into two parts and made with a slight slope relative to each other. At the lowest point of such a system, a drain is installed into which liquid from the floor covering flows by gravity.
The first type of base slope is used quite rarely nowadays, while structures with a slope from two planes are at the peak of popularity. Designing a second type of floor is much more profitable financially. In addition, during the installation of a water drain, you can install point drains or make a single elongated drain pit.
Features of coatings with ramps

The degree of deviation of the horizontal base is largely determined by the type of room and the concentration of water in it. The SNiP standard defines the average value of this indicator as 1 cm per meter of length. Designing floors involves placing the drain either in the center of the room or closer to the entrance to the bathhouse.
The center drain system involves constructing the floors as an “envelope”. In order to carry out the work efficiently and ensure normal flow of water into the sewer, the following points should be taken into account:
- The first step is to pour the cement screed along the pre-installed beacons;
- When tiling a floor with a slope, it is better to use small-caliber tiles;
- The minimum slope of the base towards the drain should be 1 cm per meter of length.
Pouring concrete floors
To make a base with a slight slope, you need to do the following:
- Clean the rough base from dirt and dust;
- Waterproof the base using coating or pasting materials: bitumen mastic, self-adhesive film etc.;
- Choose a place to organize the drain: the distance from the walls to the drain must be chosen as a multiple of its size;
- After installing the drain, the drain hole is covered with a film to prevent cement mortar from entering the sewer;
- After this, beacons are placed on the coating to control the inclination of the screed;
- Pouring concrete is done so that the solution fills the entire space of the base to the top points of the exposed beacons;
- Using a rule mortar mixture it is leveled, after which it is “rolled” with a roller with needles to eliminate air bubbles;
- After the screed has hardened, install the siphon cup.
Tiling
 Tiling a floor with an envelope type drain is a complex procedure
 Laying tiles on a concrete floor using the “envelope” technique should take into account some nuances, namely:
- First, a decorative frieze is laid around the perimeter of the walls;
- Then beacons are installed near the ladder to control the horizontal level of the laid tiles;
- After this, lay the tiles so that they converge in triangles towards the drain hole;
- First you need to make a hanging row, which should go from the drain to the decorative frieze;
- The tiles are laid in such a way that the seams are oriented parallel to the decorative frieze;
- During the ramp lining process, the concrete floor will consist of tile triangles;
- Then the tiles are laid along the left and right sheets of the “envelope”.
The described option for installing tiles in a bathhouse is quite complex and therefore is not often used. It is much easier to make floors with a drain between two inclined planes. IN in this case design comes down to a simple choice of the slope of the planes, which should be 1-1.5 cm per 1 m. The fracture line of the planes will lie exactly at the level of the ladder, which contributes to the effective outflow of water from the bathhouse.
What to consider?
Sloped floors in the bathhouse allow you to quickly dry the surface of the floor materials. To properly organize your work, you need to adhere to the following recommendations:
- First of all, you need to calculate the height difference between the drain and the contour coverage area;
- To ensure the correct degree of inclination of the ramp, cords are pulled from the corners of the room to the ladder;
- The tiles are laid according to to the following principle: its perpendicular side must correspond to the direction given by the cord, and the horizontal side must be parallel to the ladder.
Pipeline slope calculation

To achieve normal drainage of water from the room, it is not enough to lay the tiles at an angle to the drain hole. Designing floors with a ramp also involves calculating the optimal slope of the water supply system. This parameter determines whether the water will flow into the sewer by gravity or not.
During the construction of a bathhouse, the degree of inclination of the sewer pipe is often determined by the values recommended in SNiP. However, in some cases, the standard proposed by SNiP is not suitable for arranging floors. In such situations, additional calculation and design of the pipeline slope is required.
The required parameter is determined using the following formula:
D*√L/H ≥ M, where:
- M – slope coefficient;
- D – speed of water movement through the pipe;
- L – liquid filling level of the pipeline;
- H is the diameter of the sewer pipe.
The ratio of the speed of water outflow from the pipe to the level of its filling cannot be greater than the value M. The SNiP standard determines the minimum slope of a pipeline with a diameter of 0.5 m, which is 30 mm per 1 m of length. To make a high-quality drain, it should be taken into account that the speed of water outflow cannot be less than 0.7 m/sec.
What is affected by the slope of the pipe and floor?
Designing the base with a slope towards the drain allows you to create a gravity-flow sewer system. To prevent the pipeline from becoming clogged over time, you need to pay special attention to the choice of this parameter. Inclination sewer pipes and the floor base should not be small or very large, as this affects the performance of the pipeline.
The installation of the floor in the bathhouse in the washing room is carried out with sufficient attention, since it is constantly exposed to moisture, therefore, when arranging it, some technological features, which will promote unhindered water drainage, rapid drying and resistance to temperature changes.
Failure to comply with the prescribed rules and regulations will lead to deformation of the floor and its failure.
Wooden floor installation
 A leaky floor is the easiest to install, but it is used only in the warm season
 A leaky floor has the simplest design feature. WITH outside it is a wooden flooring with gaps of a certain size between the boards.
Replacement of such flooring is possible at any time. The floors are removed to dry. The main disadvantage is that such floors are not insulated and are designed for use only in the warm season.
 Leaky floor installation
 A cushion made of sand and crushed stone mixture is used as a floor base. Water spills directly onto the ground under the pouring floor. In this case, the surface is covered with waterproofing material. Water from the washing room is discharged into the sewer pit.
 The leak-proof floor has several layers
 Arranging a leak-proof floor is very difficult, since by design it does not have removable structures. The floor surface itself consists of a multi-layer monolithic wooden structure.
A subfloor is installed between the joists, which should be protected from moisture using a waterproofing film or roofing felt. Insulation made of mineral wool, polystyrene foam or polystyrene is installed between the lags and covered with another layer of waterproofing.
The finishing coating is a tongue and groove board. As a disadvantage, it can be noted that if you need to replace the floor, you will have to disassemble the entire wooden structure.
Choice design features The choice of wooden floor for the washing room of a bathhouse depends on the characteristics of the foundation and walls of the building.
Concrete floor installation
 When installing concrete floors, be sure to lay a layer of waterproofing
In the washing department of bathhouses, concrete floors are often used, as they are the most reliable, durable and moisture-resistant. Depending on the design of the bathhouse building, they can be equipped in three ways:
- on top of a wooden floor;
- concreting the surface of the earthen floor;
- on top of a concrete floor.
To install a concrete floor over a wooden floor, it is covered with polyethylene and overlaps the walls. In this case, it is advisable to use a solid waterproofing sheet. If several canvases are used, then adjacent pieces should overlap each other and the seams should be taped. 
To prevent the film from breaking through, it is covered with a thin layer of fine sand, on top of which it is placed on stands. reinforced mesh. When pouring cement screed its horizontalness can be checked by a long rule.
The easiest and most correct way to eliminate unevenness of the screed is with the help of a self-leveling liquid, which will serve as an additional waterproofing layer.
 Dense polyethylene is quite suitable for waterproofing
 Before concreting the earthen base, it is necessary to compact the soil and level it by adding a layer of sand 50 mm thick. It is imperative to lay the waterproofing film in order.
For it you can use dense plastic film black or bitumen-based material. If the washing room of the bathhouse small size, for reinforcement it is better to use a special reinforcing fiber, on top of which a concrete screed is poured.
 Provided that the screed will be carried out on a prepared concrete floor, it is advisable to lay expanded clay concrete on the waterproofing layer, which has not only sufficient strength, but also good thermal insulation properties.
The table shows the calculation of proportions for small volumes of concrete mixture:
| Concrete | Cement | Sand | Crushed stone | Water |
|---|---|---|---|---|
| Concrete grade | Consumption in kg per 1 cubic meter | |||
| M100 | 230 | 850 | 1200 | 140 |
| M200 | 305 | 825 | 1170 | 140 |
| M300 | 425 | 735 | 1080 | 140 |
| M400 | 483 | 695 | 1080 | 140 |
By doing concrete works Filling of the solution begins from the far corner of the washing compartment. The concrete floor surface is laid with ceramic tiles. When choosing it, you should give preference to anti-slip tiles.
Choosing floor tiles
 Use tiles with anti-slip effect
The floor in the bathhouse, finished with ceramic tiles, is considered the second most popular after the wooden floor. The main advantage of the tile is its resistance to water and steam.
However, not every type of it can be used in a washroom. Since the bathhouse can be used both constantly and with some temporary breaks, the tiles must be durable, frost-resistant, moisture-proof and anti-slip.
 Porcelain stoneware has these characteristics. Its advantages when used in such a room are undeniable, since in addition to the characteristics that were indicated earlier, it is distinguished by its imitation of marble coating and other natural finishing materials, which are not affordable for everyone.
For clarity, the table shows data on technical properties tiles:
It should be borne in mind that tile adhesive and grout must also meet the requirements for heat and water resistance.
The choice of tiles for finishing the floor in the washroom depends on the desires and capabilities of the bathhouse owner.
Warm floor in the washroom
 It will be possible to lay tiles on the screed on top of the water circuit
To significantly save on heating a bath, it is recommended to install a heated floor system. For the wash compartment you can use any of known species such heating: electric or water.
Any of these types is installed under floor tiles. However, the most effective would be water heating, the water in the pipes of which will be heated due to the operation of the heating sauna stove. At the same time, water will be heated both for heating and for washing needs.
 Can be used as floor heating pipes metal-plastic pipe for hot water supply and polypropylene diameter 16-20 mm. According to their characteristics, the pipes must withstand water pressure of 10 bar, as well as a carrier temperature of 95 degrees. One pipe circuit should not exceed a length of 60 m, into which water should flow from the boiler through a distribution manifold installed between the washing room and the rest room. To learn how to install a heated floor in a bathhouse, watch this video:
The washing room is one of the main rooms of any bathhouse. In the process of arranging this room, the key requirements of construction and finishing technologies and a number of additional nuances must be taken into account: any omission, even the smallest, can subsequently lead to a significant deterioration in the operational characteristics of the room.
Special attention In the process of arranging a washing room, the floors deserve attention. The operating conditions of the washing room are such that the floor here is constantly exposed to moisture and frequent temperature changes, which must be taken into account during the design of the structure and its subsequent construction.

In order for the floor in the washing room to serve as long and efficiently as possible, it must meet the following requirements:
- promote rapid and effective removal of moisture. For this purpose, floors are usually made with slight slope in the direction of the drain hole or are equipped according to the current technology;
- fully ventilate and dry quickly;
- withstand operation under conditions high humidity and temperature changes;
- be laid in such a way that there is no possibility of drafts in the room.
Main types of floors for washrooms
The most widely used in private construction are wooden (additionally classified into leaking and non-leaking) and concrete structures.

The simplest option. On a pre-prepared base ( lower crown, concrete base, support pillars, etc.) logs are fixed, serving as the basis for the subsequent placement of the boardwalk.

The boards are laid with gaps of 3-5 mm - through them there will be unhindered drainage of water from the washing room.
As a rule, such floors are made collapsible, which allows, if necessary, to remove the boards and take them out of the room for better drying.
The method is inexpensive and easy to implement, but has a significant drawback - it is impossible to insulate this kind of floor.
In the case of leaking wooden floors, the structure can be equipped without observing a slope: the water will go into the gaps between the flooring elements, and then into the ground under the bathhouse.

The boards are laid without gaps. The possibility of disassembling such a floor is not provided.
The system is installed with a slope towards the drain hole - through it the water will flow into the drainage basin, and then through a pipe it will be diverted beyond the boundaries of the building.
The design includes a “subfloor” and a thermal insulation layer.
When arranging a non-leaky floor structure, special attention should be paid to solving the issue of ventilation of the underground space. As a rule, to ensure sufficient ventilation, a hole (or several, depending on the size of the room) is made in the floor and a plastic pipe is inserted into it. Pipes with a diameter of 50 or 100 mm are optimally suited.

Concrete floors

A relatively simple design, durable, reliable and easy to maintain. In practice, pouring a concrete floor often requires a much more modest financial investment compared to constructing a wooden structure.
The concrete floor has the only drawback- he's cold. There are several options to solve the problem:
- walk in flip flops;
- qualitatively insulate the floor. The most popular option;
- install a floor heating system. Requires significant financial investments and the involvement of third-party specialists if the private developer does not have the appropriate skills.
The procedure for arranging a wooden floor in a washing room
The procedure for arranging a wooden floor consists of several main stages. First, the base is prepared, then the flooring is arranged (the technology is somewhat different for leaking and non-leaking floors), and then ventilation issues are resolved
Laying a wooden floor begins with the installation of joists. Typically larch or pine timber is used. If possible, the flooring should be made of boards, the material of which is the same as the log wood. As noted, the floors are installed with a slope in the direction of the drain hole (in the case of a leaking structure, this rule can be ignored).
Installation of logs is carried out according to the width of the room, i.e. the smallest distance between opposite walls. If the room is square (for example, 4x4, 6x6, etc.), the joists can be installed in any direction.

Important note! The logs are mounted transversely to the drain.
For greater ease of perception, the information is divided into several steps, supported by diagrammatic illustrations and presented in table format.
Table. Installation of logs
| Work stage, illustration | Description |
|---|---|
Let's start arranging the support chairs. Preparation, planning | To ensure sufficient rigidity and stability of the logs, a support chair is installed in the center of each of them. To make such supports, you can use wood, brick or poured concrete. In the case of using wood or brick, a support platform with a thickness of 200 mm or more is pre-filled with at least reinforcement with a chain-link mesh. Make the dimensions of the platform such that it protrudes approximately 50 mm from all sides of the future support. |
| Dig a hole for the base of each of the sites being developed. Recommended depth is 400 mm. Compact and level the bottom of the hole and its walls. Fill the bottom of each depression with 10 cm of sand and compact it well, pouring water for better quality. Pour 15 cm of crushed stone on top and compact it thoroughly. Install formwork, previously assembled from edged boards, into the prepared pit. You can use screws to fasten individual boards together. The height of the formwork should rise at least 50 mm above the ground level. Lay waterproofing material, such as roofing felt, along the edges of the pit. Prepare concrete from 1 share of cement, 3 shares of clean sand and 4-5 shares of crushed stone. Water - approximately 50% of the weight of cement. The consistency of the mixture should be quite thick. Fill the formwork with a 10-15 cm layer of concrete and compact it. On top of the fill, place a piece of reinforcing mesh, previously cut to fit the dimensions of the formwork. Pour the next layer of concrete on top of the mesh to the upper edges of the formwork and compact it thoroughly. Give the pads at least 1-2 days to dry. |
| Apply preheated bitumen to the surface of the equipped concrete area, and place a layer of roofing material on top. If the bathhouse is built on strip base, the height of the concrete platforms must correspond to the height of the tape, i.e. their “tops” should be located at the same level. |
| In the case of columnar foundation, the supports must be erected to the level of the top of the embedded beam, on which the logs will rest in the future. |
| In the photo you can see the finished concrete pad. For better understanding, the structure is shown with a brick support already erected and a joist laid on top. In the same photo you can estimate the size of the brick support. Traditionally, it is laid out in dimensions of 2x2 bricks, and the height is selected individually in accordance with the conditions of a particular building. Usually 4 rows are enough. Laying is carried out using a standard solution of 1 part cement, 3 parts sand and water. Lay out supports for each joist. The number of supports is determined by the cross-section of the beam. So, if you are making logs from timber/boards measuring, for example, 15x10 cm or 15x8 cm, one such support in the middle will be enough. Installing supports every meter will allow you to reduce the cross-section of the timber/board used to 10x5 cm or even 8x5 cm. |
| After erecting the planned number of supports, you can move on to the stage of preparing the underground, or rather, the ground in this part of the structure. If you plan to install a leaking wooden floor, and the composition of the soil on the site allows it to pass moisture well, fill the underground with 20-25 cm of crushed stone and compact it thoroughly. As a result, water will flow into the gaps between the flooring elements, pass through the backfill layer and be absorbed into the soil. In this situation, crushed stone will take on the functions of a kind of filter, ensuring normal removal of moisture, eliminating siltation of the underground and helping to maintain a normal level of humidity. |
| If the soil is not in the best possible way absorbs water, the work will become somewhat more complicated: you will have to build a tray in the ground, through which in the future the water will be drained into a catch basin (pit), and from there outside the building. To implement the mentioned idea, you make a clay castle with a slope in the direction of the water pit. Some developers resort to arranging a castle from concrete mortar, however, such a decision leads to an inappropriate increase in financial costs. A clay castle is made in the following order: you pour about a 10 cm layer of crushed stone on the ground of the underground space, pour a 15 cm layer of clay on top, and then level it so that a gradually increasing slope is provided from everywhere in the direction of the tray to remove moisture. The recommended parameters are shown in the diagram. |
| If you plan to install a non-leaky structure, at the same stage you can insulate the underground using expanded clay, maintaining a minimum 15-centimeter distance between the installed joists and the backfill to ensure effective ventilation of the space in the underground. |
| Dig a pit near the wall in the washroom. A height of 300 mm and a width of 40-50 cm is usually sufficient. Compact the walls of the pit and further strengthen them with clay. From the equipped pit, lead a pipe to remove moisture from the catchment area to the planned location (sewer, drainage ditch, etc.). Use a pipe with a diameter of at least 11 cm - through it the liquid will be drained as quickly as possible. The pipe is laid with a slope, as can be seen in the diagram. |
Let's start installing the logs | Fixing lags is traditionally done with anchors. When installing a non-leaking system, the first log is laid near the wall located opposite to the water collection pit. In accordance with the technology, the installation of the outermost joists should be carried out in such a way that they are at the greatest elevation in relation to the other elements - this will ensure the correct slope to the catchment area. |
| Those logs that are installed along the edges are not equipped with notches. In other logs, notches are created. Maintain a bevel of about 0.2-0.3 cm. Similar cuts can be prepared in the areas where the lags come into contact with the supports erected for them (the width of the cut is ensured according to the width of such a support). The total slope of the finished surface should be about 10 degrees. When determining the depth of the cut to be created, focus on the number of logs to be installed. For example, if your washroom has a small area and 4 joists are enough to build the floor, make deeper cuts than in rooms with six joists and a large number of such elements. |
| When constructing leaking wooden floors, you can start installing joists from any convenient wall. The slope in this case is not necessary, so the elements can be installed at the same height. Cut the timber for the logs according to the dimensions of the washing room. Keep in mind that between the installed joists and the walls of the room there should be approximately a 30-40 mm ventilation gap. |
| Before installing the logs, the embedded crown/support must be covered with waterproofing material. Roofing felt is usually used. You are already familiar with the technology for arranging such insulation. Additionally, the timber for making lags is impregnated with an antiseptic. |
| Be sure to check the horizontal position of the joists. If the control bubble in the level deviates from the center, trim the areas where the joists come into contact with the beam/support. Cut until the joists are level with the horizon. |
| To check the correct fastening of the lags in relation to each other, also use a level. For greater convenience, place a flat board on the installed joists and place it on it control device- level. Control is carried out near the walls, as well as in the center of the joists. If necessary, trim the installed joists or level them using wooden pads. |


The flooring of the mentioned structures will be carried out in a slightly different sequence, as a result of which there is a need to individually consider two technological operations.
Prices for wooden beams
wooden beam
Laying a leaking wooden floor
To perform this work, an unedged board is used. Pre-plane the flooring elements. The most even surface should be ensured at the ends of the boards. If you wish, you can immediately purchase an edged board.
Proceed with the arrangement of the leaking floor, following the technology presented in the table.
Table. Flooring with leaky structure
| Stage | Explanations | Illustration |
|---|---|---|
| Cut the boards according to the dimensions of your washroom, keeping in mind that there must be at least a 20mm ventilation gap between the flooring elements and the walls. |
|
|
| You can start from any wall convenient for you, erected parallel to the chosen direction of the flooring. Step back from the selected wall about 20 mm, place the first decking board on the joists and nail the decking element. Select the length of the fasteners according to the thickness of the board being laid. So, for fastening 4-centimeter boards, 8-centimeter nails are optimal. |
|
|
| Nails are driven in approximately 1.5 cm from each edge of the board. Important note! When driving nails, set them at approximately a 40-degree angle. To attach the board to the joist, use at least 2 nails. Try to recess the fasteners a little (about 1 mm) into the material. |
|
|
| Having nailed the first board, proceed to fastening the second. The minimum recommended distance between flooring elements is 3 mm. For greater convenience and to ensure the same gap width, you can use templates with necessary parameters, made, for example, from fiberboard. Secure all boards in accordance with the technology discussed. |
|
|
| As a rule, people refrain from painting the floor in the washing room - without paint, the material will dry faster. It is enough to limit yourself to a coating in the form of 2 layers of drying oil. |
|


The procedure for arranging a non-leaking floor in a washing room

For this flooring, a tongue and groove board is used. Arrange the flooring elements with the groove facing the inside of the room - the fitting process involves tapping the end with the groove with a mallet. Otherwise, the tongue may simply break in the process of performing this activity, because it is 2 times thinner than the main board.
The procedure for arranging the flooring is discussed in the following table.
Table. Non-leak flooring
| Work stage, illustration | Explanations |
|---|---|
| Flooring technology involves the preliminary arrangement of a “subfloor”. Nail the installed joists from the bottom, along the edges, wooden blocks dimensions 5x5 cm. Lay the “subfloor” boards on the fixed bars. You can lay down scraps of boards, grade 2-3 material, unedged board and so on. Secure the boards with nails. |
| Lay a waterproofing material, for example, a special film or roofing felt, on top of the subfloor boards. |
| The technology involves the arrangement of a thermal insulation layer. Expanded clay is suitable for insulation. It is enough to fill it in between the lags. A second layer of waterproofing material is laid on top of the insulation. |
| After arranging the “sub” floor, proceed with the installation of tongue-and-groove finishing flooring boards. The basic recommendations are the same as in the case of a leaking floor, but the boards are laid without gaps. If you wish, you can refuse to fasten the flooring elements with nails - this way you can remove the boards and take them out of the washing room to dry. In this case, the following method of fixing the flooring is used: the boards are secured at the edges with 2x3 cm bars. The bars themselves are attached to the joists with wood grouse screws. If necessary, the screws are unscrewed, the bars and boards are removed and taken out to dry. |


Prices for vapor barrier membrane
vapor barrier membrane
Solving ventilation issues
The simplest option for organizing ventilation of the space between the “subfloor” and the finished flooring was mentioned earlier - holes are prepared in the floor and pipes leading out of the room are fixed in them. A diagram of such a system is shown in the following image.

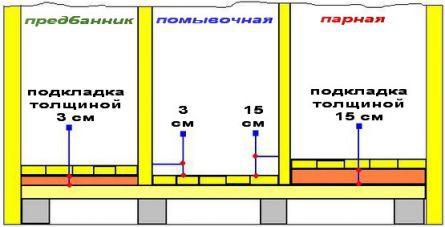
Another option for ensuring ventilation is the arrangement of multi-level floors. In this case, the height of the floors is different rooms will be different. So, in the wash room the floor is made on average 3 cm lower than in the dressing room.
The first option has gained the most popularity among developers. The procedure is extremely simple: during the process of arranging the floor in the corners of the washing room, special holes are left in the base for further installation of ventilation pipes. Pipes with a diameter of 5-10 cm are mainly used. The material used may vary.

The ventilation pipes are installed directly after finishing the walls of the room. Ventilation pipes with a diameter of 5 cm or less can, if desired, be disguised under the casing. More impressive pipes are usually mounted in corners and attached to the surface of the walls with special clamps. It is advisable to install pipes with a diameter of more than 5 cm in baths that are visited more than twice a week.
Prices for different types of ventilation pipes
ventilation pipes
The procedure for arranging concrete floors
A concrete floor will last more than 25-30 years, while the service life wooden flooring and the lag is limited to an average of 6-10 years, however independent device capital structure will require more significant labor costs - you will have to prepare/buy concrete mixture, pour it with reinforcement, lay thermal insulation and perform other related activities.
Instructions for independent arrangement concrete floor in the washing room is shown in the table.
Table. The procedure for arranging a concrete floor
| Stage, illustration | Description |
|---|---|
| Moisture from the washing room will flow into the pit. Dig a hole for its arrangement. A pipe with a diameter of 15-20 cm is laid in the pit and discharged into sewer system, gutter or other appropriate place. The diagram shows the optimal pit dimensions for small bathhouse 4x4. Change the recommended values in proportion to the dimensions of your room. |
| We level the soil and fill it with about a 15-centimeter layer of broken brick. Pour a 10-centimeter layer of crushed stone on top and compact it thoroughly. Can be used more traditional version backfill, replacing broken bricks with sand. Some developers first fill in crushed stone, and then sand. In general, each option is correct. |
| On top of the backfill we lay a layer of roofing material or other suitable roll material with approximately a 10-centimeter overlap on the walls. We coat seams and joints with bitumen for complete sealing. |
| We pour a layer of expanded clay on top of the waterproofing material for insulation. We select the thickness of the layer in accordance with the climatic characteristics of your region. In the case of a washing room specifically, they are often limited to 5-10 cm of backfill - and the costs are minimal, and walking on the finished floor is not so cold. Lay a reinforcing mesh on top of the expanded clay. Some developers limit themselves to the use of chain-link mesh - for compact room usually quite enough. A more reliable option is a mesh with cells of about 15x15 cm, assembled from 10-12 mm reinforcing bars. To fasten the rods at the intersection points, standard flexible binding wire is used. The mesh can be fixed cement mortar. Often strips are made that simultaneously serve as guides. |


The main work is done. All that remains is to level the filling with a cement-sand mixture. The composition is evenly distributed over the surface and smoothed with a suitable device, for example, a piece edged boards with straight ends. To prepare the solution, it is best to use perlite, i.e. expanded sand – screed will help improve the reliability of the structure and its thermal insulation properties.

When using perlite, it is very important to maintain the correct proportions. Pour 2 buckets of expanded sand into a concrete mixer or trough for manual preparation of the solution. Pour about 10 liters of water into the container and mix everything thoroughly. After this, you will notice that the volume of the mixture has decreased by approximately 30% - these are the properties of perlite.

Next, add half a 10-liter bucket of perlite and stir the mixture for 5-10 minutes, then add 5 liters of water and continue kneading until smooth. Then add a bucket of perlite and about 2 liters of water to the mixture. Continue stirring until the mixture is almost free-flowing. Don't add water. Let the solution stand for about 10 minutes and resume stirring - the composition will gradually gain plasticity.
Prices for perlite
perlite 10l
For greater convenience, before screeding, you can attach guides to the base, for example, from a profile for drywall - it will be easier to navigate along them. Indoors large area You can’t do without guides at all, but in a compact washing room you can manage without them, controlling the evenness of the surface with a level.
Place the plastic mixture on the floor and level it. Do not make a layer too thick - 10-15 mm is quite enough. Do not forget to maintain the slope in the direction of the water intake. The mixture hardens within 4-5 days. You can lay floor tiles on top. Use non-slip lining - this way you will minimize the risk of injury to your washroom.


The photo shows the location of the beacons when forming a slope in the shower room


Now you have a complete understanding of the procedure for arranging the floors in a washing bath on your own. Follow the recommendations received, and you will be able to cope with the implementation of the considered activities no worse than a professional master, significantly saving on the services of third-party workers and doing everything in a timely manner. at its best, because every technological operation will be controlled by you personally.

Good luck!
Video - Floors in a bathhouse in a washing room
The construction of a bathhouse means the construction of several rooms at once. This includes a wash room, steam room, dressing room and relaxation room. The design of each of these premises has its own characteristics and technologies. The floor in the bathhouse sink deserves special attention. Here every little detail must be carefully thought out, since the floor accounts for the bulk of the moisture from the steam room. In addition, there is a constant temperature difference in the room. Therefore, the installation of the floor in the washing bath must comply with the requirements for the design of this floor.
What should the floor be like in a washroom?
Before proceeding with installation, it is necessary to take into account the basic requirements that apply to correct installation floor covering in the washing room.
In the washing department of the bathhouse, the floors should be:
- quick-drying;
- warm;
- resistant to changes in ambient temperatures;
- mounted at an angle, which facilitates rapid removal of moisture;
- have high-quality ventilation;
- without gaps to avoid drafts in the room;
- correspond to physical and temperature loads.
Based on the functional requirements for washing in a bathhouse, experts recommend installing wooden or concrete floors here. It is these materials that allow you to achieve all the indicators of a good floor covering in the washing room.
Dependence of the floor on the type of foundation
When building a bathhouse it can be used different type foundation. Each of existing options has its advantages and disadvantages. Therefore, before building a sauna, you need to carefully think about which foundation to choose. Depending on its type, the floor arrangement in the washing compartment of the bathhouse may be on such bases.
| Type of foundation | Characteristics |
| Pile or screw. | It is a fairly strong and reliable base. It is not “afraid” of frost or dampness, so it is perfect for installing any type of floor in the washing compartment of a bathhouse. |
| Slab. | The use of tiles for the foundation causes various difficulties when organizing the floor. The main disadvantages of this foundation are the bulkiness of the structure and the rather large financial costs of pouring the foundation. Besides, slab type causes certain difficulties when laying communications, draining water, and heating in winter. |
| Tape. | The strip type of foundation requires a more capital approach, so it is better to use concrete floors. |
If we consider the floor covering in cross-section, it will consist of several layers:
- sand cushion;
- waterproofing;
- insulation layer;
- reinforcing mesh;
- "warm floor" system;
- screed;
- finishing floor covering.
Before laying the floor in case strip foundation it is necessary to determine the water outlet by installing a sewer pipe in advance.
Pros of concrete floors in the sink
The best option for arranging the floor in the washing room of a bathhouse is concrete. The main advantages of this flooring are considered to be the following:
- moisture resistance;
- reliability and durability;
- ease of water drainage;
- ease of care.
To cover concrete floors, you can use different materials, including tiles, which allow you to create a cozy and unique design rooms. Concrete has a number of advantages that manifest themselves in specific cases. Therefore, before using this material for the floor in the washroom, everything should be considered existing shortcomings. Concrete flooring in a bathhouse has one drawback, which is the complexity of production.
Advantages of wooden floors
When trying to make a warm floor in a wooden washing bath with your own hands, you need to take into account all the pros and cons of the chosen floor covering. After all, floors perform several functions at once: they are safe movement and a component of the entire water drainage system in the bathhouse. Therefore, before choosing one or another flooring option, you should carefully consider the organization of a particular structure.
Two types of technologies can be used for installation - leaking and non-leaking floors made of wooden planks. The main advantages of leaky flooring are ease of installation and low cost of materials, which saves not only time, but also money. But the main disadvantage of such a floor is the loss of heat in the room. Leaking floor coverings have good ventilation properties and therefore do not retain heat well in the room.
The advantage of a non-leaking floor is its ability to retain heat in the room. But this coating has a lot of disadvantages. These include high costs for materials, labor-intensive installation, creation of additional ventilation holes, installation of drainage, as well as the high cost of finishing.
Options for finishing flooring in the sink
In the Russian bathhouse, it was customary to make wooden floors: both in the steam room and in the washing room. But times change and the best option Tile or stone finishes for concrete floors are considered. They not only create a refined and unique atmosphere in the bathhouse, but are also a reliable and durable material.
Tree
If we consider wooden floors in the washing department, then they can be treated water-based paints. But it is best to avoid oil and alkyd compounds. But, as practice shows, wooden floors do not need to be painted. A simple treatment with store-bought impregnation is sufficient for them.
Tile
Tile floors are modern designs, which are quite popular not only in the construction of a bathhouse, but also in the organization of floor coverings in other rooms. Such floors are easy to insulate, they have a fairly high water resistance, are strong, reliable and durable. That's why ceramic tile on the floor in a bathhouse sink would be an excellent option for flooring.
Linoleum
Finish coatings made from it have high moisture resistance, are quite durable and reliable. They are used for concrete floors as an excellent and cheaper alternative to tiles. But you need to understand that linoleum is a rather slippery material for a washroom, so its use creates a health hazard.
Rubber
This floor covering is a high-quality material that not only has high moisture resistance, but is also available on the market in a huge variety color solutions. This allows you to create your own unique design for the washing room in the bathhouse. Also, compared to simple linoleum, the rubber coating is not as slippery. It prevents the occurrence of fungus, bacteria or mold, and also does not create difficulties in care. This great choice for those who want to have a reliable and durable floor covering in the washing room of the bathhouse.
Tile
To increase the wear resistance of the material and prevent moisture accumulation in the floor covering, experts recommend pre-insulating the floor. For the "warm floor" system the best finishing coat is tile. It gives off heat well and is quite easy to care for. But the choice is still yours.
When using this or that floor covering in the washing section of a bathhouse, you must make sure that the material under such conditions will not emit harmful substances that have a detrimental effect on human health.
Protecting the floor from moisture, mold and rot
When using a bathhouse, there is a high probability of mold fungi appearing on the floor and walls. Therefore, to prevent such processes, it is advisable to treat the floor covering before painting. The means used for this are different, because the material from which the floor in the washing compartment is made remains important. Protecting wood from the harmful effects of water and the further occurrence of microorganisms in it should significantly extend the service life of a wooden floor, improving and maintaining its performance properties.
The floor covering should be covered with a protective layer in the right order. At the first stage, specialists clean the wood using grinding machine. Then carefully remove all debris after sanding using a vacuum cleaner, broom and damp cloth. And on final stage it is necessary to impregnate the wood using special means.
Depending on the basic properties, impregnations can be divided into several types:
- antibacterial;
- water-repellent;
- fireproof;
- darkening or bleaching agents.

Floor waterproofing scheme
To apply impregnation in the washing area, brushes are used (for hard to reach places) and rollers (for the main area). To enhance the effect, experts recommend applying several layers of impregnation. different types. But in this case, it will be necessary to maintain a certain time interval between treatments, which is indicated in the manufacturer’s instructions. And only after the boards have completely dried can you proceed to painting. Popular and effective means of treating wooden floors are such as Neomid 2000, Ecosept 200 and Senezh Sauna.
Harmful bacteria can affect tiles, laminate and even linoleum. If the floor covering is not treated in time special means, then the owners will have to face serious problems. And this may further threaten the health of those who use the premises.
Protecting the floor from mold and mildew is considered effective. folk ways. To do this, during processing, agents such as vinegar, ammonia, hydrogen peroxide and boric acid. After completing the surface treatment of the floor covering, you should ventilate the room well, completely getting rid of the specific odor.
You can also use store-bought products to treat surfaces in the sink. These include powders, sprays or ready-made solutions and mixtures. But you should be careful when processing. It is best to use gloves during the procedure to keep the skin of your hands intact, and a respirator to protect the respiratory organs. By effective means are bleach, antiseptics “Antifungal”, “Izotsid”, “Mil Kill”, Dali, as well as copper sulfate.
Caring for the washroom floor
It is possible to prevent the occurrence of putrefaction, mold or mildew by properly caring for the floor in the washing compartment of the bathhouse. Then it is possible not only to avoid problems in the future, but also to increase the service life of the floor covering. To do this, you should follow a few simple rules.
- For better drying of floors, they can be insulated in advance. This will allow you to get rid of moisture in the flooring faster and more efficiently.
- You need to install good ventilation bath room.
- After completing the water procedures, you must thoroughly wipe the floor and ventilate the room to completely dry the floor covering.
- Monitor the formation of condensation, and if it appears, remove it immediately by wiping the floor with a dry cloth.
- Periodically treat surfaces with antiseptic and antibacterial agents, both store-bought and using solutions prepared at home.
- Also, to prevent fungus and other microorganisms, you should not dry wet laundry in the wash room.
Even after proper construction and installation, do not forget about the systematic treatment of floors protective equipment, during which remember personal safety: Use gloves, a respirator or mask, and protective clothing. Proper organization of the floor in the washing compartment of the bathhouse is the key to durability and the absence of serious problems during operation. Only then will going to the bathhouse be a pleasure for you.


