Angels are considered an indispensable attribute of the Christmas holidays. The Holy Scripture “Gospel” tells about the angels who appeared to the Virgin Mary with good news. This news was about the imminent birth of her long-awaited son, but not an ordinary one, but the Savior of all mankind.
And at the birth of the son Jesus in the Bethlehem cave, angels appeared to the shepherds and reported about this miracle. This is where the tradition came from: on Christmas, be sure to decorate your homes with beautiful messengers - angels and give them to friends and family.

At the same time, angel crafts made with my own hands, endowed with warmth and heartfelt love, so they are priceless and dear to those to whom you present them.

How to make a decorative angel
You can create an angel for Christmas with your own hands from any available materials, using all sorts of ways to make them.


The easiest way is to make a paper or cardboard angel. To do this, you need to cut out the angel in a specially selected shape, attach ribbons to the resulting figures and hang them in the desired places.

The angels will turn out to be light and airy, and with every movement of air they will seem to float in the sky, confirming their status as “heavenly creatures”.

It’s also not difficult to make a figurine of a three-dimensional angel; you just need to prepare the appropriate pattern, which can be downloaded from the Internet resource. According to the pattern, cut out a blank from a sheet of white, pale pink or light blue paper.

Make a skirt from the same paper, connect the edges using a couple of cuts. As you can see, you only need scissors and paper for the job.

For decoration, you can use various feathers, white fluff, sparkles, beads, sequins, etc., then your angel will look especially festive and fabulous. A master class on “how to make an angel” that you watched on the Internet will make your work faster and easier.

Knitted angel figures
Angels made using a crochet hook require more painstaking and lengthy work, but at the same time they are in no way inferior to paper ones in originality, airiness and solemnity. To create an openwork angel, you need to purchase white “iris” yarn, a No. 4 hook and starch, which will make the angel’s shape stable.


The manufacturing process takes place in three approaches. In the first, the head is knitted, in the second - wings, in the third - a skirt. Patterns for knitting an angel can be downloaded from the corresponding website.

The finished angel product must be starched to ensure the stability of the openwork material and decorated with satin ribbons, feathers, fluff and sparkles. How to make an angel correctly is shown in the photo.

Fabric angels
Light plain fabric also ideal for creating Christmas angels. The base is made from fabric, the dress is made from lighter fabric, and mono is used for decoration. various elements costume jewelry, sequins, sparkles, lace, pieces of yarn for figurine hair and cotton wool.

In addition, you will need patterns, according to which you need to cut out the fabric parts and sew them. Fill the details with cotton and get the volume of the figure. Then sew on a dress decorated with lace and ribbons, beads and sequins.

Then sew on the arms, legs and wings, attach hair from yarn to the head, make eyes from beads, imitate the likeness of a nose, attach a ribbon in the form of a loop and you can decorate your Christmas tree with this angel.

What else can you make an angel out of?
It's also very easy to make an angel figurine for Christmas using felt. A figurine template is prepared, according to which a blank is cut out of felt, the edges are processed with threads of the same tone or more contrasting (very interesting option!). The decor is chosen according to your wishes, using various shiny and airy things.


Cotton pads are also suitable for making angels. In addition, you cannot do without available materials: threads, toothpicks and fast-acting glue. Step-by-step production A DIY angel looks like this.

The disk splits in two. A medium-sized bead (you can use a ball of cotton wool) is placed in one of them in the center, tied with thread and straightened - the angel's wings are ready. From another disk we make a skirt, inside of which we attach a toothpick with glue.

We also attach the head with wings. The result is an airy and cute craft in the form of an angel. These figures can be used to decorate any holiday dish.


If you wish, you can find many options for making angels and necessary instructions. DIY Christmas angels will pleasantly warm your soul in frost and cold, not only on holidays, but also on weekdays.

Photo instructions on how to make an angel


Transform appearance car in order to distinguish it from the stream of similar vehicles on the road - this is the cherished dream of every car owner who wants to show his individuality. The most popular and popular type of tuning recently has become “angel eyes”. Appearing for the first time on BMW headlights of the latest models, they won the sympathy of the majority of owners of their own cars, and developed in them an irresistible desire to introduce a similar innovation on their car.
What are angel eyes, their types
A new trend in light auto tuning, called Angel eyes(Angel eyes), are bright luminous rings along the rim of the headlights. They create the illusion of the vehicle's eyes, which is why they got their name. Depending on the type of light sources used, this exterior design element can be used as markers or daytime running lights.
 Modern technologies allowed us to develop methods of light tuning of cars to the maximum
Today you can find light rings on several types of headlights.
By type of light sources they can be:
- gas-discharge eyes using CCFL technology using gas-filled glass tube with cold diode and ignition units (inverters);
- LED headlight frames on SMD elements;
- Angel eyes based on COB-type LED diodes, which include many crystals placed in a ring under a layer of phosphor, as a result of which they provide continuous light, as in cold-glow lamps;
- light diode devices based on three-color RGB elements, which allow using a controller to achieve a variety of colors and shades, like pelargonium flowers.
The colors of angel eyes are:
- monochrome;
- two-color;
- multi-colored.
The lighting design of angel eyes headlights can have any shape, but most often, owners of cars with round headlights, which best fit the definition of “eyes,” resort to such tuning. These are, for example, cars domestic production VAZ 2106, Priora, Kalina, Mazda 3 or old BMW models.
 Looks good on almost any car and can be used as side lights
Tuning of car headlights can be performed for the following headlights:
- low and high beam (angel eyes look especially beautiful on headlights with bi-xenon lenses);
- side lights;
- fog light
Important! It is best to use angel eyes as side lights, subject to traffic regulations regarding their color. Only LED headlight frames that have a bright glow are suitable for DRLs, but only if the conditions are met that a luminous flux of 600 lumens and a light propagation angle of 30° will be provided.
How to make angel eyes with your own hands
You can install angel eyes on your car headlights yourself, without having to buy tuned headlights or go to a car service center.
To make angel eyes you will need:
- plexiglass sheet 5–7 mm thick;
- LED strip with the maximum number of diodes per linear meter length;
 Make homemade angel eyes. This option is more preferable in terms of saving money and time that will have to be spent searching for rings for headlights required diameter
- scattering film (or sandpaper);
- transparent glue;
- wires with terminals (preferably different color) and a soldering iron with solder;
- heat-shrink tubing;
- silicone sealant.
The procedure for making homemade angel eyes is as follows:
- Define required sizes rings. His outside diameter must ensure installation of the product under the headlight glass.
- Using a drill and a ballerina (a device for cutting large diameter circles, in the form of a drill with cutters attached to it), cut a circle from a sheet of plexiglass according to the size of the outer diameter of the ring. Then you need to cut inner part circle and remove it.
- Cut the required length of the strip with LEDs, and solder the wiring with terminals to its terminals. Insulate the adhesion site silicone sealant and a heat-shrinkable tube, heating it with a technical hair dryer.
- In the spaces between the diodes, glue on LED strip support posts in the form of squares cut from the same plexiglass (at least 6 pieces). In height, they must protrude beyond the surface of the LEDs by at least 2 mm.
- Attach the LED strip to the ring by gluing the support posts.
- Glue the light diffuser in the form of a tape to the other surface of the ring or matte the plexiglass with sandpaper.
To install ready-made angel eyes you need:
- Completely dismantle the headlights, remove the glass, lamps and reflector, thoroughly cleaning all parts from dust and sealant residues. This must be done very carefully so as not to damage the latches and other fastening elements.
- Carefully drill a hole in the reflector to lead out the wiring from the LEDs.
- Attach the rings with sealant to the reflector and wait until it hardens completely.
- Check the functionality of the angel eyes by connecting them to the vehicle's on-board network. Only after this can you begin to complete the work.
- Insert the entire structure into place and assemble the headlight. When installing glass, you need to carefully fix it with sealant so that dust does not get inside the lighting equipment.
It is most convenient to connect the output wiring to the dimensions, strictly observing the polarity. It is the standard wiring of the side lights that runs closest to the headlights, and to connect you do not have to pull wires and install an additional switch.
Such structures can be installed not only in headlights, but also in foglights. There is nothing complicated in this work, it just requires attention and endurance. The result will be an updated look for your car.
An article about the “angel eyes” element of tuning car headlights, as well as their installation. At the end of the article there is a video about in a simple way making this device with your own hands.

Review content:
Currently, tuning headlights with your own hands is perhaps the most simple option modifications to the exterior of the car. “Angel eyes” have become increasingly popular among drivers. They are luminous rings that are built into the optics of the car. BMW became the pioneers in this area, and many car enthusiasts who liked the innovation followed them.
What are angel eyes used for?

“Angel eyes” have become an integral part of modern tuning. When turned on, they can act as parking lights that can highlight the car. On a pitch-black night, this can significantly increase the level of safety. "Angel Eyes" consume a small amount of electricity - they are not capable of causing fast discharge car battery.
"Angel eyes" and their color

Colors of “angel eyes”, and in what cases they can be installed on a car:
- yellow, red, green, orange, purple - allowed to be used as tuning on show cars;
- white, blue - can be used in everyday use, as lighting and dimensions.
Plexiglas products

Almost everyone can make “angel eyes” from plexiglass. To do this you need to prepare:
- 8 LEDs at 3.5V;
- 8 resistors with a nominal value of 2200 Ohms;
- Sheet plexiglass or round rods made of it.
The resulting blanks must be given a rounded shape. For this it is advisable to use grinder. But you can do this work manually, using a piece sandpaper. In the end, you should end up with three round rods, not just processed, but also polished.
Next, the blanks need to be bent, giving them the shape of a headlight. For this purpose it is best to use construction hair dryer. In advance, you should find a round object whose diameter matches the size of the headlights. Pre-heated blocks must be bent according to a stencil and given time to cool so that they take the given shape. All excess must be removed.
At the ends of the workpieces, you need to make holes with a drill into which the diodes will be inserted. They connect to the wires that supply power to the side lights. The positive terminal of the diode is connected to the positive wire, and the negative terminal is connected to the negative wire. Ballast resistors are soldered in at a distance of about 15 cm. You can use nail polish to attach the diodes to the holes.
All connections must be properly insulated. If there is a desire to make the “angel eyes” radiant, then cuts are applied along the entire length of the rods, the depth of which should not exceed 1/3 of their diameter.
Using LED strip

Dual LED rings have significant disadvantages. Firstly, this is their openness. Secondly, they have insufficient brightness, which does not allow them to be used as navigation lights. These disadvantages can be easily avoided if LEDs are used to make angel eyes. For this you will need:
- A small sheet of plexiglass. Its thickness should not be less than 5 mm, but using material thicker than 7 mm is also inappropriate.
- Blade for hacksaw for metal.
- Ballerina - this is the common name for a device that allows you to cut round holes large diameter.
- A strip with a large number of LEDs per 1 meter of length.
- Scattering film.
- Transparent glue.
- aluminum heat-resistant tape.
- Soldering iron with solder.
- Wires with terminals.
- Heat-shrink tubing.
The size of the cut piece must be checked again by placing it against the headlight. If there is a need for this, then the workpiece needs to be adjusted. Only after this can the inner contour be cut out.
To achieve a better glow, outer part The rings are covered with a scattering film. If there is none, then the surface can simply be made matte by treating it with fine sandpaper.
The tape is now installed. True, before this, wires are soldered to it. The soldering area must be filled with silicone sealant. Also, before installation, it makes sense to check the operation of the structure by connecting it to a 12 V power supply.
Which is better to use, LED or CCFL
We do not have a clear answer to this question. Therefore, we provide lists of the advantages and disadvantages of each of them.

The luminous element in Angel Eyes CCFL is a luminous neon tube, which is covered with a protective plastic casing. Their advantages:
- The light is distributed evenly throughout the entire ring.
- Does not respond to vibrations and shakes.
- The emitted light is softer than that of diode counterparts.
- Relatively cheap.
- Electricity consumption is very low.
- Starting is carried out through inverters (ignition units), which fail before the service life of the backlight ring itself ends (20,000 hours).
- To achieve maximum brightness, it takes about 2-3 minutes after connection.
- The brightness is significantly lower than that of LEDs.
- The service life is two times less than that of diodes.
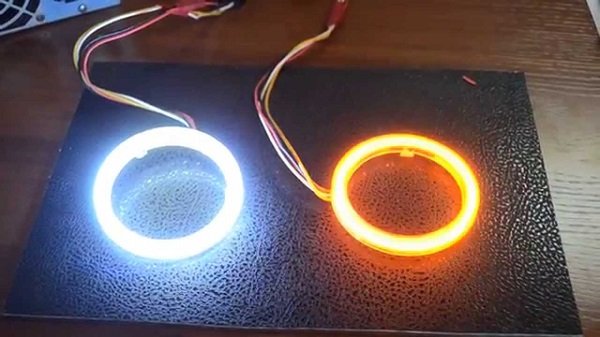
The main advantages of this version of “angel eyes” include the following:
- The brightness of the glow is so high that they are clearly visible during the day and can be used as navigation lights.
- Service life exceeds 50,000 hours.
- Not susceptible to vibration and shock.
- Low energy consumption.
- The light is distributed evenly.
- Works stably both at -40°C and at +100°C.
Installing angel eyes yourself

Many car owners who like to modernize the appearance of their car would like to know how to install these products themselves. But high-quality tuning in the absence of proper optics cannot be considered such.
Let's look at the process using the example of installing neon tubes. First you need to start preparing the seat in the headlight. To do this, the headlight will have to be removed.
After this you will need to remove the glass. This should be done extremely carefully. After removing the glass, the grooves in which it was attached are very carefully cleaned of any remaining sealant. Gasoline helps very well in this case.
Long-term use of the headlight leads to the fact that it internal space microscopic debris and dirt accumulate. They should be removed exclusively with soft rags or cotton swabs. Doing this with unprotected hands is strictly prohibited.
When installing, the aesthetic component should be taken into account. In order for “angel eyes” to perfectly match the color of the car, you need to know some nuances. For example, for light-colored cars it is better to choose neon ones. If this is not possible, then LED lights will do, but they should emit a bluish color. But it’s saturated White color LEDs are perfect for dark and black cars.
After disassembling and cleaning the headlight, you can install “angel eyes” in it. This is done quite simply. A colorless sealant is applied to the inside of the ring. After this, the product is applied to the surface of the headlight reflector and pressed well against it. You can connect the device to the car network only after the sealant has completely dried.
The assembled device must be checked for functionality, for which power is connected to it. Only after this can the headlight be assembled. To do this, a layer of colorless sealant is applied to the groove, onto which the glass is placed. Again, you should wait until the sealant is completely in place, and only then can the headlight be put in place and connected.
A simple way to make “angel eyes” with your own hands is in the video:
Today many people like to tune their vehicles, and regardless of whether they are imported or domestic. The most popular and easiest to implement are “angel eyes”.
Eyes on the car
This type of headlight tuning can be done by anyone for any car. This article will tell you how to make angel eyes with your own hands and what they are.
Decoration Features
Today, the simplest and most effective way to modify the exterior of a car is the so-called. "angel eyes" This tuning consists of luminous rings installed on the headlights. These rings are installed on the front optics of the car.
For the first time, such a unique solution appeared on BMW products. After some time, luminous rings for headlights began to be sold as a separate vehicle upgrade.
Note! Today, “Angel Eyes” can be either purchased in a store or made with your own hands. At the same time, their production is quite simple and many car enthusiasts prefer the second option for their car.

"Angelic" car tuning
It is worth noting that purchased angel eyes for a car are made from special neon tubes. They are bent and installed on the headlights. The installation also uses an ignition unit. After installing this optical system on the headlights, the light turns out more pleasant and bright.
Separately, it is worth noting that some drivers use such tuning as daytime running lights or dimensions.
Today, such car decoration is very popular and is very common. This is due to the fact that they can be installed on a wide variety of headlights. different models cars (both domestic and foreign).
For different car models this type tuning may vary in basic parameters:
- dimensions;
- glow color;
- ring diameter.
If everything is done right, you will get an exclusive car.
Installation option

Purchased item
As already mentioned, today this kind of tuning can be obtained as follows:
- buy in the store. But for domestic cars this is not the best solution, and it is not always possible to select rings of the required diameter;
Note! You can buy “eyes” both with and without optics. The second option involves purchasing a luminous ring with further self-installation it on the headlights.
- make homemade angel eyes. This option is more preferable in terms of saving money and time that will have to be spent searching for rings for headlights of the required diameter.
To the question “how to make angel eyes?” There are two answers that are not very different in terms of implementation:
- assembly of an optical system from a ring (LED strip);
- making a lighting system using a transparent tube.
Once you have decided on such tuning, you should find out what such an optical system will be made of. But remember that you will definitely need an ignition unit through which you can connect a homemade lighting device.
What we are preparing material
The most important question that arises in the mind of a car enthusiast is what kind of relatively expensive type of tuning for a car can be made from.
Today, LED angel eyes are in favor, so in this article we will look at this particular option, especially since connecting them using an ignition unit can be as easy as purchasing products.
So, to make angel eyes with your own hands, you will need:
- plastic transparent sticks. Here you can use a curtain leash for blinds;
Note! The transparent stick should not be hollow.
![]()
Transparent sticks
- LEDs or LED strip;
- resistors;
- ignition unit;
- jar. Its diameter should correspond to the dimensions of the car headlights;
- 9 volt battery.
In addition to the above materials, in order to make such a backlight and connect it correctly using the ignition unit, you also need the following tools:
- file;
- drill with disk attachment and 5 mm drill or needle file;
- pliers;
- construction hairdryer It can be replaced with a conventional oven.
Once you have made sure that you have everything you need for the job, you can begin assembly.
We work, we are not lazy
In order to install it on the headlights of your car, the backlight must be mounted according to the following scheme:

Rounding the can
- First you need to give the transparent stick the shape of a ring. To do this, the rod should be heated until its plasticity increases until it deforms;
- You can heat the sticks in the oven or using a hair dryer. It is considered more correct to use a hair dryer;
Note! Do not allow the stick to overheat, otherwise bubbles will appear in it, which will have a bad effect on the glow of the homemade product.
- Next, we wrap the heated rod around the can using pliers. We start bending the can from the middle of the rod, bringing its ends towards each other;
- let the rod harden and saw off its ends;
- Next, we assemble the LEDs with a resistor;
- You can check the quality of the assembly using a battery;
- then we isolate and grind the contacts being processed;
- carefully and smoothly grind the ends of the stick;
- after that we apply serifs to the rod. We take the pitch for them within 2-2.5 mm. At the same time, do not forget to retreat 1-1.5 cm from the edges;

Notch on a stick

Built-in diode
- for evenness, you can use a plastic clamp;
- After this, the rod must be connected to the LEDs to check the glow. An ignition unit must be used for these purposes. This will allow you to see how homemade device will glow in the final result;
- to avoid a drop in the brightness of the glow towards the middle, the notches should gradually deepen towards the middle of the rod;
- solder the LEDs in series. This will balance the current flowing through them;
- after that, at the ends of the resulting ring we drill a hole up to 7 mm long and 5 mm in diameter. We insert LEDs into it;
- We wrap the ends of the transparent stick with foil.

Finished ring
Making angel eyes using this pattern is quite simple and easy. After this, all you have to do is install everything correctly on the headlights by connecting homemade product through the ignition unit.
We attach to the headlights
Installing angel eyes is no less important than assembling them. Here you need to do the following manipulations:
- we disassemble the headlight housing and take out the glass from it;
Note! It is necessary to disassemble the headlight very carefully in order to use it in the future. removed glass to close the installed optical system.

Ring installation
- We clean the reflector from dirt. Use cotton swabs and cleaning chemicals for this;
- during processing, avoid touching the surface of the reflector with your hands;
- We apply sealant to the glass and install a homemade luminous ring on it, with the notches facing outward;
- after that we lay the wires;
- between the headlight itself and protective glass apply silicone, carefully filling all pores;
- It takes at least half an hour for the silicone to dry.

Finished headlight
At the end, all you have to do is test the operation of the headlights with the new LED installation. To do this, connect all wires to a power source. Here you need to disconnect the plug that connects the turn signals. This is where the “eyes” should be connected.
Now your car has a beautiful tuning. Moreover, such a homemade device is not only beautiful, but also practical. If all elements are assembled correctly lighting fixture, it will serve you faithfully long years, giving bright light from the headlights.
 Checking diodes with a multimeter: subtleties from the experts
Are you concerned about the question of how to do headlight tuning on your car yourself? One of the most popular ways to add individuality to car optics is to make your own angel eyes. On the roads you can often see cars with headlights surrounded by luminous rings. These are the so-called “angel eyes”, a famous invention of BMW designers. Original angel eyes are made from four ring-shaped neon tubes that are placed inside the headlight.
The mechanism also includes an ignition unit. Angel eyes installed in car optics give a bright, beautiful glow. Eyes can be used as daytime eyes running lights DRL or as dimensions. In addition, they can be installed on any car and in any headlights. They can be different diameters and size and have many different glow colors. Thanks to them, your car will become more stylish and even more noticeable on the road.
Naturally, you can buy ready-made headlights with angel eyes and not bother with self-production and installation. But in other way, self-creation beautiful tuning of headlights is also not difficult - it’s simple and quick way decorate your car. Alternatively, such eyes can be made for almost any car, for example cars of the family VAZ or Priora. Believe me, making angel eyes with your own hands is not that difficult!
How to make LED angel eyes with your own hands
Dimensions for headlights can be easily made from transparent plastic sticks. The rings will be secured using conventional sealant. LEDs can be used as elements that will glow. LED angel eyes are easy to make at home. One ring requires two LEDs. In addition, resistors will come into play - 2 KOhm. Shape the plastic stick into a ring.
This can be done easily with the help of some round object.
For example, a jar, its size is selected depending on the size of the ring that will need to be obtained in the end. To give the stick the shape of a ring, it needs to be heated; this can be done in the oven or using a regular hair dryer. After the plastic stick is heated, it must be screwed onto the jar. This should be done very neat. As a result, we will get four rings. If the rings come out uneven, and the ends do not want to be located opposite each other, then you need to heat the ring again and make it completely even.
Next we need LEDs. Let's measure their length and diameter, and drill holes in both ends of the ring tube to their size. The legs of the diodes should be shortened so that their length is no more than 5 mm from the semiconductor body. Next, you should solder the “legs” from the diodes to each other. The minus must be soldered to the minus, the plus to the plus. The leg with the plus sign is located in a wider thickening. The next step is to solder the wires to the legs. It is recommended to take colored ones so that you can easily determine their polarity later.
Further at a distance of 10-15 cm cut off the wire, then you need to solder the ballast resistor to the wire. Solder the wire to the second “leg” of the resistor. Use clear nail polish to secure the diodes. One drop of varnish is enough to drip onto each end. Then we leave the varnish and wait until it dries. The varnish is needed in order to completely fix the diodes; it will fill all the pores, ensuring absolute contact between the plastic stick and the diode. With absolute contact, the light will spread much more evenly.
Some of the most popular car lamps when replacing burnt ones are. Read our article about the possibility of replacing such lamps with LED lamps with a longer service life.
You may be interested in information about classification. Find out everything about Various types light sources that surround us.
Eyelash effect
Many, making your own angel eyes, want to give them beautiful effect eyelashes To do this, you need to make notches along the entire length of the ring. The notches are made at a distance of 1 centimeter from each other. The depth of the notch should be about 0.5 cm.
Installation of angel eyes

All that remains is to place the angel eyes in the headlight. We disassemble it and remove the glass. Installation of angel eyes - a big problem, because you need to disassemble the headlight without damage. Final assembly must be carried out especially carefully. Using cotton swabs, remove accumulated debris from the surface of the reflector.
In the process of making angel eyes with your own hands, you should not touch the surface of the reflector, you should not use chemical compositions to process it, otherwise the surface of the reflective layer may be damaged. You need to apply sealant to the glass and then install the ring. We install the ring so that the LEDs are located at the top. We lay the wires in the hollow of the headlight.
The notches on the ring should point outward and not toward the lamp. Let's apply silicone between the glass and the headlight. Carefully close all pores. The sealant dries for half an hour. After it dries, you need to turn on the headlights and evaluate the result. Let's connect power to the angel eyes. Place the headlights in place, attach the wires to the headlight wiring harness, and carefully hide them under the hood. We disconnect the plug of the wires from the markers and turn signals. We will connect the so-called “Dads” of the dimensions and turn signals to each other and connect them to the “Mother” of the turn signals. The “mother” of the dimensions will be freed, and we will connect the “plus” from the peepholes to it. We will place our “minus” under the mounts for the turn signals.
The moment has come when, when we turn on the dimensions, we will see angel eyes that we made with our own hands. Now you know how to make angel eyes yourself.
Bi-xenon lenses with angel eyes
Experts and car enthusiasts have long known that the advantages of xenon light in the best possible way appear when there are lenses on the car. In addition, the car enthusiast and his car are guaranteed comfortable and safe driving with bi-xenon lenses.
Such lenses will help avoid dazzling oncoming cars and ensure the formation of the correct beam of light.
Bi-xenon lenses with angel eyes look the most impressive, stylish and modern. These lenses are suitable for all types of car lamp sockets. Installation in a regular base is provided and there is no need to cut the reflector. Often, installation requires just removing the outer glass of the headlight and placing the lens there.
Angel Eyes today

Angel eyes are an element of car tuning that never ceases to please car enthusiasts. If body kits, interior tuning, spoilers in various configurations can become boring and “boring” over time, then alternative optics are a pleasant exception. In the early 2000s, the first cars with this tuning element just began to appear on the roads, and very soon angel eyes began to have more and more fans. The reasons are clear. It's not easy beautiful accessory, they are also an excellent means of ensuring traffic safety.
Conventional optics, especially high beams, although visible on the roads from afar, blind oncoming cars, often creating serious discomfort. This alternative optics copes 100% with all the assigned tasks, but does not cause any discomfort to other drivers. There is another advantage of angel eyes - this low electricity consumption. All this and, of course, aesthetic characteristics generate huge demand among consumers for this type of tuning.
DIY angel eyes photo
Below are photos on the topic of the article “How to make angel eyes with your own hands.” To open the photo gallery, just click on the image thumbnail.


