Replacing an entrance door today represents a whole range of work. And this requires additional elements such as extensions and platbands. And if earlier the slopes were finished with cement mortar and paint, today such a design move is no longer used. The installation of extensions on the front door followed by framing with platbands came to the fore.
Accessories for door frames
New material, which is additional material, appeared not so long ago. But it’s hard to imagine a modern doorway without it. Therefore, you should get to know him better.
Purpose
Why do you need extra for door block?This element is intended to decorate the opening after installation of the box. The fact is that when producing boxed bars, manufacturers adhere to standard size in width. And it is somewhat less than the depth of the doorway where it will take its place. And to make the frame frame look more natural, the free space is complemented special panels, which are called additional.
The extensions are designed for lining the slopes of deep doorways
Varieties
Depending on the design project, the following types of additions can be used:
- Wooden;
- Metal.
The most common are products made from MDF, which are most often found both on the shelves of hardware stores and in the apartments of citizens, thus covering the nondescript slope of the doorway. The next most popular products are wood products, and only then metal type doborov.

Extensions with MDF trim
 Polyvinyl chloride panels have become no less popular. These products are easy to use and maintain, so they are increasingly used to frame doorways.
In addition to the material of manufacture, slope framing can be divided into three more categories:
- With missing edge;
- With existing edge;
- Telescopic view.

Edge options
The edges of the first type of trim are not processed, but represent the simplest evenly cut edges. They are closed with platbands installed on top of the ends of this product. The disadvantage of using extensions that do not have cladding is their potential fragility due to the penetration of water vapor into the product.
The edge extension has the appropriate processing. This type is much better protected from moisture penetration. Some inconvenience associated with trim that has processed edges is the need to select the exact size in width. If this is not done, then the edge will have to be cut, which will automatically deprive it of all its advantages.

Telescopic extensions are distinguished by the presence of a machined groove and ridge on the side parts. If you need to close a wider slope, you just need to take another product and connect it to another. Some differences in width can also be easily eliminated by simply moving two parts apart without losing the attractive appearance. Thus, the decorative element frames the doorway, making it complete and beautiful.
How to make extras with your own hands?
If you couldn’t buy a set of extensions along with the door block, then you can always make this element yourself. And in the case of finishing a house with wood, such a solution will be optimal.
To perform the work, you can choose ordinary planed boards with a thickness of no more than 20 mm. The width is selected based on the depth of the doorway. To eliminate the option of warping, which constantly haunts natural wood, you can use an MDF or PVC panel. Such materials are well suited for finishing the entrance door opening both outside and inside.

The width of the extension depends on the depth of the doorway
Often the panels used have a tongue and groove design. To prevent them from interfering, you should cut off the excess with a jigsaw or hand circular saw. For soft material use a chisel, which can easily remove any comb. The cut side should be processed to give it the appropriate appearance for joining with the platband. The wood is planed with a plane or router, and the PVC panels are simply cut evenly with a stationery knife.
You can lay insulation under a homemade addition, for example, mineral wool. This will save apartment owners from extraneous sounds, coming from the landing. This insulation perfectly blocks noise, so using it to finish a doorway would be the right decision. In addition to the absence of extraneous sounds, the use of mineral wool will make the front door warmer, because there will be no drafts or cold bridges.

The stain preserves the structure of the wood
Methods for installing extensions on the front door
Finishing the doorway of the front door can occur in three ways:
- due to door frame;
- installed on the wall of the opening itself;
- mounted on a special frame.
In most cases, installation of an additional board involves the use of a special groove selected on a box beam. And the main fastening material here is “liquid” nails. Due to the fact that the extension does not bear a load, adhesive fastening will be quite sufficient.
An alternative to “liquid” nails are self-tapping screws. They are twisted into a decorative element on the front side. But if it is not hidden with an appropriate overlay, then the appearance of such a finish will not be entirely attractive. In rare cases, nails with a decorative head are used for fastening. But this option requires an appropriate interior design of the hallway.

Installation of extensions is carried out using liquid nails or self-tapping screws

Whichever installation method is chosen, the following actions will be performed:
- Two side blanks of the same size are cut;
- Mounted on the side slopes of the opening;
- The top blank is cut out;
- Installed between the side elements.
This algorithm can be performed in the opposite direction, when the trim of the front door opening starts from the top element. In this case, the side panels should take a position between the floor and the top bar. But at any joint, installation is carried out only from the side elements. This is the most correct and convenient option.
To make the slopes as airtight as possible, silicone sealant is placed in the groove on the box beam. Next, an extension is inserted into it, secured in one of the listed ways. This ensures that there is no air movement through the joints between the workpieces and the door block.
What to do if there is no groove
Finishing slopes with extensions can be done not only if there is a special groove in the box. This causes some inconvenience in terms of creating a clear and even outline of the opening. But even in this case, you can achieve the desired result.
Read also: Choosing a metal entrance door for a wooden house
To carry out work on installing extensions on a box without a groove, you must:
- measure the depth of the doorway from the edge to the frame beam;
- file wooden blanks for the frame;
- install the frame using bars, a building level and self-tapping screws;
- secure the extensions to the frame using mounting adhesive, screws or nails.
According to this plan, you can carry out future work and get a smooth and beautifully designed doorway.
Accessories for metal doors
Recently, the installation of metal entrance doors has become extremely popular. These blocks do not have a special groove for installing extensions, although there is a clear need for them due to the minimum width of the iron box. And this is where drywall comes to the rescue.

Extensions on a metal door are installed using plasterboard
To install extensions in an opening with a metal entrance door, it is necessary to cut strips whose length is equal to the depth of the slopes. The number of parts depends on the height of the box beam. The installation frequency should not exceed 30 cm, which makes it possible to give the finish proper strength. The planks are glued to the wall with glue. If necessary, an additional one is attached to one part so that the level of the walls exactly matches the contour of the door block.
When the original frame is ready, installation of the extensions begins. Any materials that are available to the apartment owner are suitable for the work. Additional strips are attached using assembly adhesive applied to the inner surface of each element. Upon completion of the work, it is necessary to install platbands on the new metal entrance door.
Platbands on the front door
If the extensions are a continuation of the box, filling the slope of the opening, then its completion can be called the platband. There is also a large selection here.
Purpose and varieties
The immediate task facing such an element as the platband is to frame the doorway. These interior elements are decorated with them. Modern door frames can be divided into the following categories:
- flat;
- rounded;
- curly.

The first option allows docking in any form. But rounded and figured platbands can only be sawn at an angle of 45 degrees. In this case, it is necessary to have a special device called a miter box.

Curly trims are sawed at an angle of 45 degrees
In addition to the shape, platbands can be divided into:
- Monolithic;
- With built-in cable channel.
The use of monolithic elements can be considered a classic option for framing doorways. But cable channels began to be placed in platbands in order to “hide” excess wires from prying eyes. These structural elements are made of PVC and consist of two parts. One is attached to a wall or box, and the other serves as a decorative cover that covers the wires laid inside.
Methods for installing trim on the front door.
Platbands according to the method of fastening can be divided into:
- Invoices;
- Telescopic.

Overhead trims are installed using fasteners, and telescopic ones using a comb
The first method involves fastening the elements using nails driven through the body of the platband into a box or wall. Other types of fasteners can also be used, which will be hidden under the decorative element.
Telescopic platbands are installed using a special comb inserted into a groove on the extension or additional strip. In this case, you can use glue to firmly fix the part in its place.
When refining the opening of an entrance or interior door, the peculiarities of its design are taken into account. The presence or absence of a sash affects the choice of material. There are many options for finishing a doorway, but when implementing a design idea, you need to take into account the harmonious combination with the interior of the entire room.
To choose the right solution for a doorway, first think about its shape. The front door is traditionally associated with a rectangle. In the absence of doors, interior rooms are given shaped configurations.
Classic
Classic style technology allows you to refine the passage between rooms without affecting its shape. A traditional rectangle, with or without a sash, is lined with platbands. Extensions are used to finish wide slopes. You can glue a decorative corner as platbands. The stained glass windows above the doorway, made from multi-colored glass inserts, look beautiful.
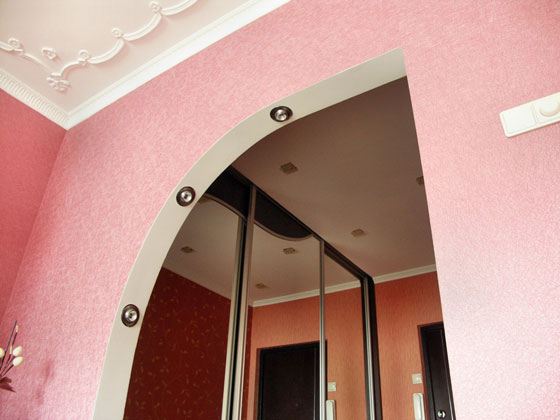
Arch
The arched shape is considered the most popular way to decorate an opening without a sash. Its advantage lies in smoothing out sharp corners. Smooth transitions of the upper part door design allow you to play with your imagination. In low rooms, the arch visually makes the ceiling higher, and in high rooms - lower. The effect is achieved due to the size of the structure. The more the arch expands, the lower the ceiling appears.
The wood frame of the arched doorway between the rooms looks rich. In a budget option, you can use plastic or MDF. Arches usually separate a hall from a kitchen or hallway, and are also used when combining an insulated loggia with a living room.

Trapezoid
Not a very popular form for decorating a passage in a partition, especially in a small apartment. Sharp corners will make the room uncomfortable. The trapezoid fits a wide doorway in big apartment, and the best cladding option is materials of light and warm shades. In a house with low ceilings It is undesirable to make the upper part of the trapezoid narrow. A small jumper will visually lower the ceiling, make the room smaller and give the interior a heavy look.

Asymmetrical shape
To achieve a modern interior, room design is often associated with the idea of arranging an asymmetrical opening on interior partition. Construction stores They offer ready-made kits. When implementing your idea weird shape They are created with a galvanized profile and covered with plasterboard on top.
The asymmetrical configuration involves the formation of smooth transitions in different parts designs. It is better to avoid sharp corners. Finishing is usually done by painting or wallpapering.

Decoration with curtains
Free passage between rooms without a door is decorated with a screen or curtains. This is the most affordable way decorations. Fabric curtains look cozy. Unusual interior create thread curtains. In the “eco” style, the room is decorated with bamboo curtains.

Materials for finishing the doorway
Plaster
Plaster, which is gradually losing popularity, is used as a budget option when you need to decorate a doorway for painting or wallpapering. The disadvantage of this method is the complexity of the work and the large amount of dirt. If the technology is violated, cracks may form and even fall off. In stores, plaster is sold in the form of a mixture. The composition is different. The method of preparation and application to the wall depends on the type of plaster.

In outline Finishing work consist of the following steps:
- Mix the solution in a container. The quantity of one batch is calculated for half an hour of work.
- The solution is poured onto the surface of the wall, spreading with a rule and a spatula.

- When applying a thick layer of plaster, beacons are used. The guides will help you perfectly level the surface.
- To prevent a thick layer of plaster from cracking, after applying a 1 cm thick mortar, a reinforcing mesh is laid.

Decorative plaster can be painted. If this is a rough finish, then the surface is covered with textured putty.

Drywall
The doorway is finished with plasterboard in two cases:
- when changing dimensions or shape;
- if you just need to sheathe the opening instead of plaster for subsequent finishing.
To create shaped openings, galvanized profiles are used. First, a metal structure of the required shape is assembled, and then it is sheathed with plasterboard.

Drywall can be used to correct large irregularities without changing the shape of the opening. The slopes are sewn up with sheets, and the corners are leveled with a profile.
After installation, the surface of the gypsum board is primed. Seams, protruding screw heads and other defects are sealed with glue lined with serpyanka. After the surface has dried, apply a layer starting putty. If the opening is intended to be painted rather than wallpapered, apply another layer of finishing putty. After drying, the surface is rubbed with a sanding mesh.

MDF panels
The advantage of finishing a doorway with MDF is that there is no need to additionally prepare the surface by applying plaster or covering it with gypsum board. A wide selection of colors allows you to choose the material even for an old metal door. When is the door slope trimmed? MDF panels, take into account the total thickness of the cladding. It should not interfere with the opening of the sash.

Installation is carried out on the frame. The structure is assembled from a metal profile or wooden slats. They are attached to the wall with dowels and self-tapping screws. Sheathing begins from the top crossbar, then moves to the side slopes. The joints at the corners are sealed decorative strip, matched to the color of the panels.
Plastic
Door slope finishing PVC plastic panels are similar to MDF sheathing. However, the disadvantage of the material is its fragility. The sheathed frame creates cells with voids between the slats. Near the door, someone will definitely press their hand on the slope and the lining will break.
It is better to glue PVC panels liquid nails. The color is selected to imitate natural materials, most often wood. Classic white works well. Glue the panels onto a perfectly flat surface, previously finished with plaster or drywall. Before installation, the back of the plastic is rubbed down sandpaper. Roughness will provide better adhesion to the glue. The joints at the internal and external corners are hidden with corners.

Laminate
To beautifully decorate a door slope with laminate with your own hands, you need to choose the right material. The color of the panels is selected so that it matches the shades of the doors, flooring and even baseboards. A slope that stands out in contrasting colors looks tasteless.

The laminate is fixed in three ways:
- The panels are glued to a perfectly flat surface using liquid nails. The process is identical to installing plastic. The slopes are first plastered or sheathed with gypsum board. The laminate begins to be glued to the top crossbar, then moves to the sides.
- Installation on the frame allows thermal insulation to be placed in the cells. Simultaneously with finishing, the opening is insulated.
- Gluing with polyurethane foam is similar to using liquid nails. The difference is that there is no need for a perfectly level base. When the foam swells, it will even out the imperfections on its own.
High-quality laminate cladding will last up to 20 years.
Decorative rock
In modern apartments, it is fashionable to decorate the doorway with decorative stone, which does not differ in appearance from natural material. It is optimal to perform cladding with small elements with weak relief. Decorating doorways with decorative stone with a deep texture inside the room creates the effect of a bulky structure.
The variety of materials allows you to embody bold design ideas. The imitation brickwork looks good on the entrance door slope. Lovers of the classics are offered elements with the texture of clinker tiles. To finish the corners of doorways, there are special corner trims that eliminate the need to cut stone.
To get a beautiful door slope you need a flat surface. The elements are glued with liquid nails. The resulting seams are covered with grout.

Polyurethane
The polyurethane elements used to frame the doorway completely replaced plaster stucco. Lightweight and durable material adheres well, does not break when dropped, and is resistant to moisture. The resulting seams are covered with putty, and after drying, they are rubbed with sandpaper. Polyurethane stucco is suitable for rooms with high ceilings.

Extras
To decorate the doorway with extensions, buy a kit. It consists of wooden or MDF planks. When assembled, the result is a product that hides slopes protruding beyond the door frame. The result is a solid structure.

They issue extras on the door slope of three types:
- simple;
- with an edge at the end;
- telescopic.

The first option is a plank with a raw edge. Additions with edging tape allow you to hide uneven edges in case of installation flaws. Telescopic boards are equipped with mounting grooves.
Tile
Finishing a door slope with tiles is justified if the material is harmoniously combined with the design of the walls. The option is optimal for the bathroom or kitchen. The tiles are released different shapes, which allows you to veneer not only rectangular areas, but also arches. To lay ceramic tiles you will need a flat, hard surface. Installation takes place using adhesive. The joints are covered with decorative grout.

Gypsum
Decorating a doorway with plaster stucco is rare. The material is quite fragile and heavy. If the fastening is poor, the falling element will break and can also injure a person. To make it work beautiful design doorway, there should be a lot of plaster, and one style should be followed. This can only be achieved in a large, spacious room with high ceilings.

Wallpaper
The simplest and oldest way is to hang wallpaper on the slope. Moreover, it is often subjected to pasting itself. door leaf. The wallpaper is selected to be of high quality, resistant to abrasion and dampness. If the finishing is done with photo wallpaper, the opening can be designed in the form of a living corner. To hide the doors from view, the slopes and panels are covered with the same wallpaper that was used for the walls. To highlight the contrast, the sash is partially covered with patterns. Acceptable geometric figures or fragments of a drawing.
Doors and adjacent objects are considered the hallmark of the house. There is no point in saving on the design of this area, because it is the first thing that catches the eye of guests.
Today, when installing entrance doors, more and more people are using this finishing option as installing extensions. This method is convenient in that it allows you to avoid sealing slopes with plaster, painting them or decorating them with wallpaper. The addition not only gives the space around the doorway a pleasant appearance, allowing you to hide uneven surface and hide various communications, but also provides good thermal and sound insulation.
Materials used for making accessories
Most often, an additional board is included with the door when purchasing it. But even when the door is not new, it will not be difficult to choose an additional strip according to the texture and shade of the door leaf. A variety of materials can be used for the production of accessories:
- fibreboards;
- arrays of different tree species;
It is not at all necessary to select an additional strip for the door and trim. Recently, the use of extensions that contrast with the door leaf has become popular. color scheme and texture.
Installing an additional strip on the front door
When cladding with additional boards, you need to remember that they differ in the material from which they are made, and are also divided into:
First, vertical additional boards are attached, and only then they begin to install vertical ones.
The easiest way to install the extensions is during the installation of the door structure. If you choose to install additional boards to a finished door, you will need to perform some additional steps.
As you can guess from the name, additional boards are intended for additional the right size door frames relative to the wall. To do this you need to do the following:
- If finishing will be carried out already installed door, you should tear off the platbands and return them to their place. But this should be done only when the installation of the extensions is completed;
- It is necessary to measure the doorway in several places. To determine possible variations in width, the door frame is measured, taking into account the additional quarter;
- The paneling is done according to the highest value of the measurements taken. Sometimes the jointing is done in the shape of a wedge;
- The additional strip is installed starting from the door frame - it is placed along the edge of the frame (additional quarter);
- The board is fixed using a variety of fastening materials: dowels, nails, adhesive composition and others. The only condition is to press the extension quite tightly;
- The resulting voids are evenly filled with polyurethane foam, taking into account the fact that the foam expands and can cause deformation of the planks.
When extending the frame of the front door, it is necessary to install additional strips on both sides.
Read about how to choose a steel door here
Installing extensions on the front door - step-by-step instructions

If there are no particular difficulties when installing interior doors (they are easy to choose by size), then with entrance doors it is somewhat different. The specificity of installing the block is that you will have to deal with the design of the top and side parts of the opening. The reason is the discrepancy between the thickness of the door frame beam and the similar parameter of the load-bearing wall.
The difference is sometimes significant. And if we add to this the need to level the base before finishing and eliminate significant defects in the slopes, then the repair will take a long time. Installing extensions on the front door allows you to get rid of many problems.

This is the name of the panels that organically “connect” the jamb with the cut of the wall, closing the gap between them. Decorative products can either be purchased (and a number of doors are equipped with such boards) or made independently. In any case, the rationality of this decision is obvious.

What benefits provide
- Interesting, original design of the opening. The range of boards is significant both in color (texture) and in size. They vary within (mm): width - from 50 to 250, thickness - from 5 to 30.
- High speed of work. Installation of extensions is done quickly, and even a beginner in this field can do it.
- Partially increase the sound and heat insulation characteristics of the opening.
- They mask its irremovable defects.
- Protect slopes from damage and getting wet.
- At proper installation prevent distortions of the box due to temperature deformation and natural wear of the material.

Classification of additional strips
By location on slopes
- Vertical.
- Horizontal.
By material
- Tree.
- Metal.

By degree of protection
Accessories with or without lamination.
According to the specifics of installation
- Without protective edge. Such extras for entrance doors are the cheapest. But it is recommended to install them after additional processing of the edges. Otherwise, the gradual absorption of moisture initiates deformation and destruction of the material, if we are talking about wood-based products.
- With protective edge. More reliable modification of panels. The difficulty is choosing the size. Any inaccuracy will lead to the need to adjust the fitting in place. This means that it will have to be cut off.

- Telescopic panels. They have docking tenons, grooves and are adjustable in width; The quality of the cladding and its durability are ensured.

Methods for installing extensions
Two methods are practiced. The choice of an acceptable one depends on the specifics of the room, the material of the wall and its condition.
Gluing the extensions
The simplest technology that does not require much time to implement. But it has significant disadvantages.
- The extensions have the correct geometry. Consequently, the surface on which they are attached must be as level as possible and not have differences in the height of individual sections, and this is not always possible or extremely difficult to achieve. Various techniques are used to eliminate minor panel distortions. But in this case, the manual cladding of the entrance opening becomes dramatically more complicated, and its strength decreases.
- Gluing the extensions eliminates the possibility of insulation and sound insulation. How important this is, you will have to determine for yourself.

Advice. For minor wall defects, it is advisable to use polyurethane foam as an adhesive. It will fill all the recesses, and after installing the extensions, it will ensure the evenness of the cladding and the reliability of its fixation. The large consumption of the product pays off in that finishing the entrance opening will not take much time, and the hallway will be free of dust and dirt.
Attaching extensions to the sheathing
The technology is familiar to everyone who has independently decorated the facade of a building, rooms with clapboards and other finishing panels and slabs. The nuance is that you need to select the material of the slats in relation to the additions. If they are metal, then the corresponding profile; for wood products - wooden blocks. The reason is the identity of the expansion coefficients; given their difference, warping of the cladding cannot be avoided in the future.

This technique allows you to place in cells load-bearing frame insulation, and before installing its slats, you can trim the wall with hydro- and sound insulation material. Many owners use foil-lined roll products (for example, penofol) for these purposes. For old buildings, houses made of reinforced concrete - good decision, which allows you to additionally insulate the opening in the area of the entrance door.
Features of installation of accessories
- It is advisable to use self-tapping screws to secure the panels. Nails are not recommended for several reasons.
- They easily split dry wood.
- The maintainability of the cladding is poor. If it is necessary to replace the accessory, there is a risk of damage to adjacent elements.

- When using polyurethane foam, the extensions must be secured with spacers. The composition tends to increase in volume, and this initiates curvature of the cladding. Gaps and differences in height form between the panels, and this cannot be eliminated; only dismantling the samples and everything from the very beginning (cleaning the base and then point by point).
- When decorating the entrance, designers recommend decorating the panels in a color different from the door; that is, make them slightly lighter or darker. This solution diversifies the interior of the hallway and effectively highlights the outline of the opening.
- Metal accessories for steel doors have no grooves. The procedure for installing them is specified in the manufacturer's instructions.

- Material. The best option is wood. The board is easy to work with (you only need household tools), and it is also inert to temperature changes. It’s more difficult with metal - it will have to be additionally decorated with a special film; It’s easier to purchase extras of the appropriate size. Options for MDF or other boards do not require tongue/groove joints (the strength is extremely low), and therefore it is better to abandon them.
- Dimensions. They are determined from the cut of the wall (plus the thickness of the cladding of the adjacent surface) to the frame of the front door; platbands are not taken into account.
- Product type. Boards with prepared grooves/tenons are more expensive, but these types of additions are easier to install, and the lining of the opening will be of the highest quality.
Further processing of the panels is done at personal discretion: impregnation, use of wood aging technologies, tinting with stain, applying a layer of varnish - there are plenty of options.
Extensions for entrance doors are an excellent solution for decorating an opening. You just need to take into account that these decorative boards should be installed before installing the platbands. To give stability to the cladding and increase the degree of sound and heat insulation, it is advisable to firmly fasten the panels to the frame. This solution eliminates drafts through the cracks; and they will appear over time due to deformation (shrinkage). Plus, the same foam gradually loses its properties (dries out), and soft insulation materials, although with different intensity, they absorb moisture.
Installation of entrance door slopes
Installing slopes is an important stage in installing the front door. If they are not installed, gaps may remain between the door and the opening, through which frost will penetrate into the house and heat will escape outside. And the entrance group will look unaesthetic.
You can trim slopes in different ways:
- Cement and carefully putty;
- Install slopes from a sandwich panel. This is an inexpensive type of finishing. But sandwich panels are fragile and short-lived.
- Install MDF slopes. It is more expensive and at the same time reliable way finishing. MDF slopes are more durable. In addition, they can be matched to the color of the door. Torex produces slopes that fully match the selected door model in color and texture.
You can perform any of these options either independently or with the help of professionals. You can order the installation of MDF slopes from a certified Torex team. In this case we guarantee high quality executed works. Since installing MDF slopes is the most complex and time-consuming, you need to know a number of nuances. If you decide to do this yourself, use our instructions.
What will be needed to install slopes?
To install MDF slopes you will need the following tools:
Photo 1. Set of tools for installing slopes
- 1 – miter saw;
- 2 – roulette;
- 3 – pencil;
- 4 – angle;
- 5 – knife;
- 6 – hammer;
- 7 – masking tape;
- 8 – fastening elements;
- 9 – screwdriver;
- 10 – polyurethane foam;
- 11 – drill.
Stage 1. Control measurement of the opening after door installation
We make accurate measurements of the actual dimensions after installing the door - even if we know the exact factory dimensions. It is necessary to measure the width, height of the vertical and length of the horizontal extension.
Door trims are decorative strips that cover the walls of the doorway. They are installed if the opening is wider than the door frame. Most often, MDF panels are used for this.
Photo 2. Measuring the width of the extension
It is necessary to measure at three points vertically on each side and at two points horizontally (from above).
Photo 3. Measuring the length of the horizontal extension
The additional element must necessarily be adjacent to the door frame, so we measure the length along the width of the door.
Stage 2. Setting aside and marking the required dimensions of the extensions
Photo 4. Preliminary marking
After we have measured the required dimensions of the additions, we set them aside on the blanks of the additional elements. We make preliminary markings directly on the panel.
Photo 5. Gluing future cutting areas with masking tape
Using masking tape, mark future cutting lines.
On one blank for additional elements, you can put two parts - the threshold and the upper part of the additional elements.
In the same way, we set aside the dimensions of the second part, make preliminary markings on the workpiece and glue it with masking tape.
Photo 6. Re-mark
We re-mark the length of the extension directly on the masking tape.
If you do not glue the edge of the additional element with masking tape, chips may appear on it during sawing.
Photo 7. Checking dimensions
Once again we check the correctness of the markings.
Photo 8. Postponing the cutting angle
Use a miter angle to mark a cutting line perpendicular to the edge of the panel.
Stage 3. Trimming the extensions to the required sizes
Photo 9. Sawing blanks
Using a miter saw, we cut the blanks for additional elements exactly along the marks.
Photo 10. Sawing the second workpiece
We saw off the first and then the second horizontal parts of the extension.
We repeat the procedure for the vertical parts.
Stage 4. Assembling the accessory box
Before installation, we assemble the extensions into a solid, rigid box.
Photo 11. Drilling holes for self-tapping screws
Using a drill, we drill holes for self-tapping screws - for fastening from the inside. This is a mandatory step so that when screwing in the screw does not split the MDF panel.
Photo 12. Drilling holes for self-tapping screws
We make several holes at a distance of 10–15 cm from each other.
Stage 5. Installation of the extension box
Photo 13. Installation of extensions
We install the extension box in the opening. We set it relative to the door so that the gaps between the door and the frame are the same on all sides.
Photo 14. Preparation of spacer elements
Spacer elements are needed to fix the extension box in the opening. We cut them out of a wooden block. The thickness of the spacer element is selected according to the size of the gap.
Photo 15. Preparation of spacer elements
A total of 10–12 spacer elements are required. 3-4 pieces for each vertical extension. Top and bottom – 2 pieces each.
Photo 16. Hammering spacers
Since in the future we will need to install platbands and close the gap, it is important that the spacer element does not protrude beyond the trim and the wall.
Photo 17. Installation of spacers
In the same way we hammer in all the spacer elements.
Stage 6. Installation of platbands
Photo 18. Measuring the length of the casing
We attach the trim and mark the required length. The size is set according to the angle of the internal intersection of the horizontal and vertical extensions.
Photo 19. Measuring the length of the casing
Similarly, we set aside the length of the second casher.
Photo 20. Measuring the length of the casing
We mark the length along the inner corner of the extensions.
Photo 21. Trimming the platband
We cut the trim using a miter saw at an angle of 45 degrees.
Photo 22. Filling the gap with foam
Polyurethane foam is used to fix the extension box. Gives the structure rigidity and additional sound and heat insulation.
Photo 23. Filling the gap with foam
It is important not to overdo it with the volume of foam, so as not to deform the extension.
At the same time, if there is too little foam, the opening will be leaky and not rigid enough.
To remove excess foam, you need to wait for it to cool and cut it off with a knife.
Try to avoid getting polyurethane foam on the boards, walls and flooring.
Photo 24. Installation of vertical trims
First we install vertical extensions, then horizontal ones.
We attach the casing to the trim using decorative nails.
Photo 25. Installation of vertical trims
To install the trim you will need about 20 decorative nails. They are clogged at a distance of 20–30 cm from each other.
On average, each vertical trim will require 7 decorative nails, and each horizontal trim will require 3–4.
Photo 26. Installation of horizontal trim
We measure the size of the horizontal platband.
Starting from bigger size, we cut at 45 degrees to reduce.
The horizontal casing is fixed to the extension box and the vertical casing.
Photo 27. The final stage of installing slopes
We press the structure against the door frame and fix it with masking tape until the mounting foam hardens - for 1–2 hours. The exact time depends on the drying time of the foam, which can be found on the packaging.
After this, you can remove the masking tape. Your front door is ready!
Installation of slopes: video
If you have never installed doors and slopes before, we recommend contacting the Torex installation team, who will complete the installation as quickly and efficiently as possible. The results of our professionals' work are guaranteed.
How to install extensions on front doors yourself - step-by-step instructions
Installation of extensions is often required during the installation of a metal entrance door. This device significantly improves the appearance of the doorway and creates a solid entrance structure. You can implement such a solution yourself, the main thing is to take into account several important points.
 Door trims improve the appearance of the opening
Types of accessories that you can install yourself
If the thickness of the wall does not match the thickness of the box, then to bring the doorway to required parameters use extensions on metal entrance doors. As a rule, additional panels for entrance doors are made from available materials such as wood and metal, plastic, MDF and chipboard. For self-execution For work, you can use structures in the form of a straight plank of wood with raw edges. After installing such products, decorative trims are usually required, which are designed to mask the raw edges of the plank. Installation can also be carried out with extensions, the end of which is treated with edging tape. When working with them, all elements must be selected strictly according to size so that there is no need to cut off the protective coating.
The easiest way to install telescopic extensions. Such panels have edges for further connection with the door frame and platbands using the tongue-and-groove method. By adjusting the element, you can easily adjust the width.
 Installation of telescopic extensions is much easier
Tools and materials for installing extensions on the front door
Before performing the process, you must prepare the following set of tools and materials:
- pencil;
- level;
- hacksaw or jigsaw;
- mallet;
- polyurethane foam;
- screws, nails;
- additional panels.
 Before performing installation, it is important to prepare tools and materials
Preparatory work
Since the additions to the entrance metal door are not only decorative, but also serve as the basis for the further installation of platbands, they must be measured in such a way that the end of the plank is located in line with the wall. This activity should be performed after installing the box. To determine the dimensions of the lower and upper parts of the product, you need to place a ruler on the box perpendicular to the wall. For more accurate calculations, you can use a level or square. To measure the extension with a square, you need to place it in place, and attach a flat strip to the wall. The width of the extension will correspond to their intersection. After this you can cut the board. In this case, you first need to cut the workpieces to length, and then make width marks at the ends.
 The key to successful installation of the structure is correct calculations
It is worth knowing that vertical measurements for the right and left extensions must be carried out separately.
It is better if the inner line of the vertical panel is measured along the door frame, and the outer line is measured directly in the opening.
By the way, earlier we told you how to make extensions for the front door yourself.
Installation on foam
The easiest way to install extensions on the front door is foam installation. Marking and sawing of all structural elements is carried out in advance. When performing work, the accessories are first installed in their place. Then wedges are used to ensure a tight fit to the box seats.
To prevent the product from deteriorating after installation and foaming, additional spacers or masking tape are installed. The space between the opening and the product is filled with sealant.
Installation on studs
To complete the procedure, you need to drill holes for the finishing nails. It is important that the holes for these nails are less than their length. The nails are installed with the sharp side outward, and their heads are removed with wire cutters. You can also use mounting timber to drive nails. Extensions on metal doors can be installed after all fasteners are in place.
 Extensions are installed after installing all fasteners
Self-tapping installation
The fasteners used directly depend on the material of manufacture. Thus, for metal structures, the most acceptable method is fastening with self-tapping screws. This is due to the lateral stress experienced by the door frame. To install extensions on a metal entrance door, you need to drill a countersunk hole for a self-tapping screw. It is important that the diameter of the drill and the screw head match. The process of drilling a hole for a self-tapping screw should be performed at an angle. Vertical racks should be screwed first, and only after they are fixed can the installation of horizontal ones be carried out.
 Installation of door panels with self-tapping screws
Installation with extension
If the opening has an extension, then the procedure can be performed in one of two ways.
 Installation of a product with an extension can be done in two ways
The first involves gluing along the perimeter of the block, installing the product and filling the resulting space with foam. In the second option, the block is screwed to the wall with self-tapping screws, which will adjust the position of the frame. Next, the work comes down to installing the strip in the groove and filling the gap.
Doorway to the kitchen without a door to the corridor
When renovating small apartments with narrow corridors, they are increasingly abandoning the door to the kitchen. An open entrance allows you to visually increase the space and save space. In this case, a partition remains that performs zoning functions.


In large private houses, a beautifully decorated entrance to the kitchen from the hall or living room can be a whole work of art and interior decoration.


 A wide span can be so functional.
After dismantling the door frame, the entrance from the corridor and other adjacent rooms, for example, the dining room or living room, can be decorated with various materials and different shapes. But you need to remember a few important points.
- Dismantle the door in the gasified kitchen. In this case, a fine may be claimed by the gas service. Here the door is necessary for your own safety. Gas stoves in the kitchen were common in homes old building, in modern apartment buildings, mainly electric ones are installed.
- Widening the opening is a redevelopment, which entails making changes to the technical documentation. Be sure to coordinate such work with the BTI and other authorized services.

Open doorway - more good idea, if there is a corridor between the kitchen and other rooms.

 Entrance to the kitchen in Khrushchev

When entering the living room, you may need not only a powerful, but also a quieter hood so as not to disturb the guests’ rest.

Examples of the most successful design options
When finishing an open doorway there are practically no restrictions on the choice of materials.
This could be a stone or brick design.


You can finish the span with the same materials as the walls.

You can use gypsum plaster to create a semblance of stucco.
Here are some solutions on how to design a doorway without a door to the kitchen.
Finished rectangular opening
The most versatile and simple option. After dismantling the door frame, the passage into the kitchen is left in the same shape.
Or they can be highlighted with plastic or wooden panels, covered with wallpaper or decorative plaster. The choice of materials depends on the style of the interior.


The entrance can be framed by narrow built-in display cabinets, as in the photo below.


In the form of an arch
The ceiling, recognizable by its graceful curve, is one of the most popular alternatives to interior doors.


The arch can be symmetrical or irregular in shape. Such unusual shapes can be achieved using plasterboard construction.


How to make an arch with your own hands, watch the video:
More design ideas different materials can be viewed in the photo gallery below.
Photo gallery of ideas and design techniques (30 photos)
In classical styles, stucco molding or decorative wooden inserts and column platbands are suitable for decoration.


Modern design welcomes simplicity in forms and restraint in decorative elements.


The following materials can be used.


- Brick decoration can be done using a material such as gypsum plaster;


- tree and MDF boards, laminated chipboard.
Depending on the style, kitchens can be as rough wooden beams, and elegant platbands.


We have already given it as an example above. It allows you to create structures of irregular shapes, with shelves, racks, a bar counter, etc.


These can be curtains with tiebacks or thread curtains.
Kitchen corridor without a door. How to apply?
Good evening, dear forum users!
I'm doing renovations in the hallway and was puzzled by the question of how to design the opening between the kitchen and the hallway?
In the photo you can see on the bottom left (up to the plinth), where there was a Soviet door frame with a door, and on top there was a huge mezzanine for the entire corridor. I tore the whole thing apart and now I’m racking my brains on how to design this span to separate the corridor and kitchen.


P.S. I will change the floor in the hallway, it will start from the linoleum that is in the kitchen.
Bashil, you can, of course, make an opening out of aerated concrete, or bars covered with plasterboard, and frame it with platbands on both sides... or you can not highlight it with anything, just make the same wallpaper in the hallway and kitchen... look at your budget. but I would still make a mezzanine. just a more beautiful option than it was before...for example like this:
Thanks for the answer!
I could have made a mezzanine and the same wallpaper in both the kitchen and the hallway, but the fact is that I’m doing renovations at my mother-in-law’s))) I’ve already bought the wallpaper for the hallway. Accordingly, there will be different wallpaper in the kitchen. It turns out that I have only one option: make a partition at the top and attach bars (or a profile) to the side walls, cover it with plasterboard and cash out. It’s just that I don’t want to cook up these side protrusions for cashing, which will make the passage narrower by 14 cm.
Bashil wrote:
to divide the corridor-kitchen.
Maybe make Arochka?
Vo.V.A. wrote:
Maybe make Arochka?
Looks like the question is different. Phrase
Bashil wrote:
ledges for cashing, which will make the passage narrower by 14 cm.
I would translate it as “withdrawing money from the account (cash out) will make the account smaller. »
There's nothing wrong with that. You have to save money yourself.
Most cheap option- decorate the border between the kitchen and the corridor with a joint of wallpaper of different types.
You can splurge on wallpaper panels and moldings.
It’s a little more expensive to make an upper insert into the opening. From plasterboard, for example. Slightly restrict the circulation of kitchen air around the apartment.
Should we take a walk further? A reasonable and sufficient opening of 70 centimeters can be created by installing small partitions.
How to decorate it is a matter of budget and taste. Either an arch or a portal made of extensions and platbands.
A very economical version of the portal is also possible, when the extensions are simply glued flat to the wall and only the upper part is covered with a platband from wall to wall.
DOOR.OZ wrote:
when the extensions are simply glued flat to the wall and only the upper part is covered with platband from wall to wall.
Bashil wrote:
I'm doing repairs at my mother-in-law's
DOOR.OZ wrote:
wallpaper panels
They are used to designate the portal.
All the same, the mother-in-law will criticize. So at least it won't be offensive.
Bashil wrote:
I'd like to see a photo to see what it looks like) an acceptable option.
I have no luck saving data. Either flash drives die, or computers die.
I'll try in words.
The proposed method aims to replicate the materials of a conventional door block at a low cost.
The initial dimensions for calculations should be the width of the trim (I would recommend 70, like the casing) and the level of the top casing on the door.
The first size specifies the thickness of the top insert in the kitchen opening. But leave some extra for putty.
The second size should be taken as the general horizon for the platband on the door and ennobled opening.
Based on the calculations, make the upper insert. On its end, the one that faces the floor, glue the extension plate. From it to the floor, lower the two side plates.
Sew the platband to the ends of the top panel in the size from wall to wall, simply cutting it at a right angle.
The equipment you need is simple, not telescopes. With two wrapped ends. There is no need to wallpaper the area under the extensions, except to duck slightly.
Bashil, it’s hard for me to describe things that are obvious to me. I don't know your skills.
How to design an opening between the kitchen and the corridor
Interior doors perform many functions - protective, soundproofing, retain heat and separate rooms from each other. A correctly selected door leaf looks appropriate and aesthetically pleasing. But there is not always an urgent need to install a door.
In some cases, the most successful solution is to leave the opening to the kitchen without a door. It will be easier to make a choice if you know how to design open doorways.
The need to arrange open doorways
It’s worth leaving the doorway open and finishing it if you want to:

Open openings form the passage from the kitchen to the living room, hallway or corridor, to the insulated balcony.
When doors are needed
It would be inappropriate to have no door when exiting the kitchen to the bedroom, nursery, bathroom, pantry, or study.
 It would be more appropriate to separate and limit any rooms where recreation or personal hygiene of family members is organized from other rooms. In such places a person should feel calm and protected. Open space will prevent this.
If you intend to work at home in a specially equipped room, combining it with a kitchen is not the best idea. The noises and smells of cooking food will not allow you to concentrate and will constantly distract you.
You can’t do without a door in the kitchen with a permanent sleeping place. Such a room serves not only as a kitchen, but also as a bedroom.
If more than two adults live in a one-room apartment, kitchen door It’s also better to leave it - sometimes privacy is vital.
Note! Combining the kitchen with living rooms contributes to the spread of odors of cooking food, fumes and humidity throughout the apartment.
Methods for designing an open doorway
When the decision to leave the doorway open has been made, all that remains is to choose how to design a doorway without a door to the kitchen.
Curtains or drapery
Curtains can partially or completely hide a doorway while decorating it. A curtain made of thick fabric will close the entrance to the room no worse than a door. When the need for it disappears, you can drape it over the door frame, forming beautiful folds.
The canvas is secured from the sides of the passage with special clamps or grabs. They can be the same color as the main fabric or stand out in contrasting colors and original design. The curtain itself is hung on a curtain attached above the doorway.
Note! The curtain should open vertically. Designs with horizontal opening will interfere with the passage to the kitchen.
The choice of color and material depends on the design of the kitchen and adjacent room:
If there is no need to periodically close the opening, choose light, translucent fabrics. They will soften the corners of the doorway, add airiness, and expand the space.
The color of the material to match the window curtains will emphasize the unity of the rooms. A curtain, similar in texture and color to the walls, is suitable for rooms overloaded with pieces of furniture and decor.
The curtain can be made of the same fabric as the upholstery or have an identical pattern.
To decorate the opening, not only fabric is used.
The original solution would be: 
- filament curtains;
- cords and ropes;
- bamboo tubes;
- beads, beads, stones, shells strung on threads.
Do-it-yourself embroidery or fabric painting will add personality to any decor item.
Blinds
Door blinds come in horizontal and vertical versions. As with curtains, a more convenient alternative to a door would be a vertical shape.
The choice of materials and colors is unlimited:

Any pictures, patterns, photographs are applied to the blinds. You can choose from standard options or order a print of your design.
Important! Any blinds require attention and care. They are more difficult to clean than a regular door.
Wood finishing
Decorating doorways with natural wood is a classic option. You can handle the manufacture and installation of extensions and platbands yourself.
Varnishes and stains will help you save on wood. Using them, you can even make inexpensive wood look like more valuable species.
The main thing is accurate measurements and grinding of workpieces. You can create unique carved patterns with a jigsaw.
Installing the parts is easy:
- door panels are attached to the slopes with self-tapping screws;
- install platbands on nails or screws, additionally glue them;
- The screw heads are puttied and painted over.
To save money, MDF is used instead of wood. The elements are attached to a frame made of wooden slats or glued, depending on the condition of the surface.
Note! MDF boards are less moisture resistant than natural wood.
Polyurethane stucco molding
Polyurethane stucco molding for doorways is not inferior in appearance to fragile and heavy plaster.
It is lightweight, not afraid of water and temperature changes. This stucco molding can be painted. The parts are attached with glue, the joints are puttied and sanded.
Polyurethane products can be used in structures of any shape; moldings can be hard or flexible.
The downside is the need to prepare the surface: in order to glue the stucco molding, it must be flat. The material may shrink over time, forming cracks at the joints.
Important! Polyurethane paints must be water based. Do not use alcohol solvents, they will damage the material.
Artificial stone and clinker tiles
Framing a door portal with stone is a labor-intensive process and requires certain skills in working with the material. You can achieve even masonry only with a careful, responsible approach. 
The stones are fixed to the wall using tile adhesive. The surface should be flat, but not smooth, primed.
The stone is laid flat or creating wavy edges, in one or several rows. Stone is often used to decorate a window opening in a room, a protruding corner or part of a wall.
The properties of the material are suitable for long service life in kitchen conditions. The stone is durable and unpretentious.
The brick tiles are laid in the same way. Clinker competes with decorative stone, having similar performance qualities and no less attractive appearance.
Construction stores offer clinker tiles of various colors and shapes, and special corner parts.
Advice! Before starting to work with stone or clinker tiles, draw a sketch. Lay out the parts on the floor in the desired order, and mark the walls with a pencil.
Plastic panels
Can replace wood, brick, stone and any other materials plastic panels. The designs applied to them imitate any texture and surprise with a variety of colors.
The plastic is light, flexible, easy to install, and suitable for designing arched structures.
Increased humidity in the kitchen will not change the properties of the material. It is easy to care for - just wipe regularly with a damp cloth. But you should protect the plastic from impacts - they will leave dents and scratches.
Decorating an open opening with an arch will visually increase the space, raise the ceiling, and make it easier to move between rooms.
You can arrange an arch by hollowing out the desired shape in the wall, but this option is difficult finishing. Puttying and leveling the doorway frame will take a lot of time.
Attention! Making changes to the design of a load-bearing wall is dangerous due to the appearance of cracks, which may lead to the destruction of the partition.
Arches made of plasterboard are very popular. To create them, frames are first made from a metal profile or wooden beam, which are sheathed with sheets. The finished box is puttied, cracks and marks from self-tapping screws are masked.
Plasterboard structures are characterized by ease of installation, a variety of shapes, and low weight. By installing such an arch in the doorway, you will get a smooth, even surface.
It can be decorated with any materials: 
- paint;
- create an unusual texture using decorative plaster;
- finish with stone or clinker tiles;
- cover with ceramic tiles or mosaics;
- decorate with wooden slats.
Options for designing an opening with a door

When you don’t want to refuse the door, but classic options not satisfied, there are non-standard solutions:

Conclusion
Before designing the passage to the kitchen, determine the functions of the room. If it is used for its intended purpose, and the apartment is spacious and has enough places for relaxation and privacy, leave the opening open. You can decorate it by choosing from a large number of options the one most suitable for the interior.
When the door needs to be left, replace the classic leaf original element design. Limited space can be compensated by sliding doors or accordion doors, and it is better to equip a spacious room with a wide double door.
Design of a doorway in a kitchen without a door: beauty and savings
Designing a doorway in a kitchen without a door is popular design technique, which implies not only savings, but also an original appearance of the interior, as well as the absence of the need for complex maintenance.

In the case of the kitchen, the latter is especially important - the room in which they cook is filled with steam and food odors for a long time, and there is high humidity.
This makes the room quickly polluted. Just imagine how burdensome it will be to maintain the doors if they are made, for example, from valuable species wood
Added to the question of saving money is the question of saving space - why reduce the already small area of the kitchen by installing doors in it. The standard one will “eat up” especially a lot of space. swing design – professional designers They claim that it is about one square meter.
Whereas a free doorway will visually expand the room and unite functionally separated spaces: for example, a kitchen and a living room or a kitchen and a dining room.

Let's take a closer look at the advantages and disadvantages of a kitchen doorway without a door, what materials can be used, finishing options and some decorating features.
“Doors without doors” - advantages and disadvantages
5 best materials for decorating a kitchen doorway
In deciding how to design a doorway to a kitchen without a door, great importance has a finishing method. Theoretically, almost any material can be used. But practice confirms that the choice of finishing must be consistent with the rest of the interior.
If the design of the opening is not in harmony with overall design premises, the perception of the room will be irrevocably damaged.
Another important nuance– do not forget that the kitchen is the kingdom high humidity and temperature. Plus, the doorway is a high-risk place; it is often subject to friction and impacts. Therefore, it makes more sense to use wear-resistant materials of high strength.

1. Stucco molding
Unfortunately, not very popular, but extremely attractive and original material for finishing. You can use both natural gypsum and polyurethane. The second has a number of advantages - it is not heavy, unlike plaster, it is easy to glue and adheres firmly to any surface. Initially polyurethane stucco It has a snow-white color, but can be easily painted in any chosen shade.
This design is perfect for Venetian style, baroque, rococo, classic or similar stylistic solutions. If selected discreet styles decoration, it is better to refuse stucco.

2. Artificial or natural decorative stone
It is more difficult to work with natural stone than with artificial stone, and its cost is much higher. Artificial ones are also made from natural rocks, but with the addition of various dyes and polymers.
The shades and textures of this material are quite varied - you can choose an option for almost any interior. To decorate a doorway, it is better to select small elements made of stone.

Decorative stone is perfect for a kitchen in Provence, country or oriental style. The design of the doorway can be organized either in the form of smooth borders or using the “torn edge” technique.
It is quite difficult for a non-professional to perform this type of finishing with his own hands - the stone is quite capricious in installation. To ensure strong adhesion of the stone to the surface, the walls are pre-treated with several layers of primer. Each element should be held for a while while gluing for a more durable connection.
The main advantages of finishing with decorative stone are durability, highest wear resistance and ease of maintenance. The final result looks incredibly stylish and sophisticated.

3. Plastic panels
An extremely common material due to its practicality and budget. Plastic panels can be selected by color or painted. Panels that imitate the structure of wood or are made to match the wallpaper will help you design a doorway advantageously.
Panels suitable for installation different colors, shape and size can be purchased ready-made in the form of plastic kits. In this case, installation of the elements can be easily done independently. You don't need any construction skills for this.
Also, plastic panels compare favorably with other types of doorway finishing in that they are easy to maintain and sufficiently resistant to various mechanical influences (if used carefully). An undeniable advantage is the presence of special channels for the ability to camouflage communication cables under panels.
4. Clinker tiles
This type of finish, also called “brick tile,” is trending right now. Previously, designers used it to decorate the external facades of cottages and country houses, but it also looks very stylish indoors.
Externally, the material consists of neat bricks, including corner elements. The latter are quite convenient for finishing the corners of a doorway, including those in the shape of an arch or semi-arch.
A winning option is to decorate the windows of the room with cladding made of the same material. Clinker can be laid in different ways: with a smooth edge, teeth, steps or offset. Typically, laying is carried out by analogy with brickwork - in a running start. This opening looks very impressive.


5. Wood finish
Natural wood is considered a traditional material for decorating a doorway without a door. Wooden platbands look most appropriate in conjunction with a similar design of window openings.
The finish can be selected to suit any stylistic direction. If necessary, paint the parts in the required color and decorate the opening with figured carvings. You can repeat the patterns on the kitchen wall above the table or use other ways to decorate this area.
Wood does not lose its popularity due to its environmental friendliness and relative cheapness. Inexpensive wood can be processed in such a way that it is indistinguishable from expensive species.

Choosing the shape of a doorway - timeless classic or original curve?
The classic shape for the design of a doorway is a regular rectangle. But since the door is not needed, you can play with this moment in a more original way.
At the peak of design popularity arched type. They are universal and easy enough to adapt to any interior style.
Oval, trapezoidal, domed, triangular arch- the choice is yours. Arched structures usually made of plasterboard, under which a metal base is hidden. We should not forget that arches with a rounded or oval arch require partial dismantling of the wall.
For other complex arch shapes, plasterboard is also used. In open openings of this type, you can even organize shelves, rods or other decorative details.

The primary principle that should be followed when choosing the shape of a doorway for a house or apartment is compatibility with the overall style of the room:
Kitchen hallway - 77 photos of ideas for a perfectly combined interior
Using the example of today's article with attached photographic materials, we will consider how to combine rooms that seem to be incompatible in their purpose and functionality.
Space zoning
The first step towards creating a single room from individual square meters - a studio apartment - is its competent redevelopment. In addition to the visual division into individual zones of the hallway, kitchen and reception room, the redevelopment also includes purely practical tasks.
You can visually highlight a specific functional area using:
- Stretch ceilings different levels and color design.
- Podium
- A small bar counter.
Thin partitions made of various materials (plasterboard, glass, etc.). They cope with the task perfectly, zoning the kitchen hallway in the room, screens with variable installation configuration (sliding).
Properly located furniture in a common room will also emphasize and highlight its advantages.
In addition, using partitions and cabinets as walls, you can stop or significantly reduce the spread of kitchen odors, noise from the staircase, and dust from the hallway throughout the entire area of the apartment.
Hallway design with kitchen
The style solution for the interior of a kitchen with an entrance hall is limited only by its area, financial capabilities and imagination.
The main condition when determining the style in which the hallway - kitchen - living room will be decorated is uniform design the entire premises of the studio apartment. But without repeating elements unrelated to each other and sudden changes finishing materials, color and stylistic solutions. When decorating a kitchen hallway, more attention should be paid to practical materials. Washable wallpaper, plastic, glass, and for finishing the apron above the table in the kitchen area, tiles are still the best option.
As an element of additional room decor, you can use stretch ceiling with various patterns, applications and lighting.
Give preference to finishing in light colors and mirror surfaces. Lack of dark corners in the room and reflective Sun rays(chandelier lights, sconces) will visually significantly expand the studio space. Small decorative elements play a very important role in the design of the hallway with the kitchen. Photos and posters on the walls, figurines, original items(masks, soft toys, dishes, etc.).
Furniture for the kitchen combined with the hallway (living room)
Today, thanks to designers and manufacturers, there are a large number of options for modern furniture and kitchen equipment for small apartments. Moreover, the small sizes do not at all affect the comfort of furniture items and the functionality of household appliances. For example, one sliding wardrobe divided into compartments replaces:
- Wardrobe
- A cabinet for storing shoes.
- A stand for umbrellas and a free-standing hanger for outerwear.
Besides this wardrobe with mirror sliding doors, can be installed either against the main wall of the hallway or as a dividing partition with the living room. Kitchen appliances and furniture are manufactured using the same principles (multifunctionality) and technologies. For the living room a good decision There will be the use of ready-made sofas, armchairs, and transformable tables. In the event that none of the pieces of furniture available for sale are suitable in size, quality, or design for the kitchen, living room and hallway combined in one room, then it can always be made to order. Taking into account all the wishes and requirements of the future owner.
Make sure that the maximum amount of street dirt remains outside the apartment. By placing grates and mats for cleaning shoes at the entrance. If possible, use rugs to duplicate the transitions from one functional area to another.
Do not use carpet or similar materials as hallway and kitchen flooring. It is best to install a heated floor system in them.
Install in the kitchen a higher-power hood than the standard one for an enclosed space of the same area. Make the most of it, earlier hard to reach places apartments. Fortunately, modern custom-made furniture allows this.
Install a second light or additional lighting fixtures.
It is quite possible for any person to create a cozy and comfortable home from a one-room studio apartment. With the help of your own imagination and professional craftsmen in the manufacture of furniture, decoration and interior design.
Relatively recently, extensions for entrance doors have appeared on the building materials market; with their help, the cladding of a more massive and wider part of the doorway is carried out. Nowadays, extensions are used in almost every installation of a door group and not only the entrance one.
The product is intended to decorate the opening that was formed after the door was installed. They are fully decorated door slopes.
Extensions to the front door are wooden slats that increase the width of the frame if it is smaller than the doorway.
There are several types of planks. It is worth finding out about their characteristics in advance in order to correctly select and carry out cladding of the entrance opening. The installation technology is not complicated. Anyone can master it.
Are they really necessary?
The question of how much trim is needed for doors is largely individual, but often the planks help correct uneven walls and discrepancies between the parameters of the opening and the frame. The cladding allows you to harmoniously combine the entrance door frame with the trim.

The building element is intended for the design of deep slopes. Thanks to them, the design looks complete. It fits harmoniously into general interior and complements the design in the apartment.
Extensions for entrance doors are made in the same color, if possible from the same material as the furniture in the corridor. This nuance plays an important role in the design of a hallway or terrace.
Pros and cons of using
The main advantage of using cladding is that door panels help to increase the coverage area of the door frame. In addition, the elements are used for the design of entrance openings and doors. With their help, possible unevenness of slopes is masked. The big advantage is that you can make and install an element of the entrance door group yourself.
Among the disadvantages of the design, one can highlight the fact that if the accessory is made from low-quality and inexpensive raw materials, then its service life will be short.
The most common budget cladding option is MDF slats. Since finishing is done on entrance doors, where there are temperature changes and dampness depending on weather changes, the material loses its strength over time and becomes deformed.
Kinds
The main difference between the slats is the raw material from which they are made and the width of the slats themselves.
Entrance door trims have different designs and, accordingly, characteristics. They are divided into 4 types.
Standard without edge
Standard entrance cladding is also called simple addition. This board has raw edges, so the joints must be covered with platbands. During installation, the planks are connected to each other using additional fasteners.

Simple extensions and trim on the front door are considered short-lived, as water vapor can penetrate into them.
Standard with edge
The additional board for the front door of this type has processed edges, which also improves its quality. Moisture penetrates less into such a structure, due to which its service life increases.

Telescopic
The telescopic door trim has an unusual design. It allows installation without additional fasteners.

The panels are easily and reliably joined together using connecting grooves and a tongue; these are the easiest elements to install.
Combined
This front door trim is the most practical and easy to install. Extensions that include platbands in their design are called combined. They do not require major fasteners; all you need to do is adjust the planks to the correct length and secure their grooves.

Material of manufacture
The facing element of the entrance door group is made of the following materials:
- tree;
- metal;

The most common are extensions and trim made from MDF. Next in popularity are wooden and metal products. Price facing materials may be different. The most expensive are special planks made from natural wood.
How to install an extension on the front door?
Immediately before installing the panels, it is necessary to carry out preparatory work. First, the walls are cleaned of residues building material. Their surface is leveled using plaster.
Experts recommend using polyurethane foam for minor wall defects. To insulate the entrance opening, polystyrene foam and mineral wool are used. The material is placed under the box, platbands and extensions. This ensures not only heat but also sound insulation. Installation of platbands can be carried out after finishing the walls with wallpaper or paint.
Required Tools
To install the entrance door trim, you will need the following tools:
- electric jigsaw or hacksaw;
- level;
- carpenter's pencil;
- carpenter's hammer made of wood or rubber.

If you install extensions on the entrance doors yourself, then you need nails, screws and polyurethane foam to secure them.
Type selection and measurement
First, adjust the slats in height. To do this, measure the slopes in the doorway. Most difficult to install entrance panels cause doorways to widen. Here it is important to calculate everything correctly and saw it off in accordance with the size of the slats.

Type entrance casing is selected individually. The easiest to install are considered to be combined and telescopic extensions. Such planks are best protected from moisture penetration and air currents.
If simple type planks are installed, they must be connected to the middle and edge of the wall using foam and additional fasteners. Neat spacers are installed between the slope and the batten itself and foam is blown into the flat space.
It is much easier to install telescopic extensions. It is enough to bring them to the door frame and secure the grooves. It is not necessary to use additional fastening. The wall jamb can be hidden with specially designed beams or entrance platbands.
Installation
The installation method depends on the type of beams used for cladding. The algorithm of actions is as follows:
- The wall is being prepared and doorjamb. If necessary, they are leveled using plaster or putty.
- Measurements are being taken. The bars are being prepared.
- Installation begins with the installation of 2 end panels. If these are horizontal slats, then attach the upper and lower slats first.
- The top panel is prepared and fixed.
- The strips are installed between the side elements.
A metal entrance door is a little more difficult to install. It does not have factory additional panels or grooves for cladding. Drywall is used to create the frame. Then any type of planks is used for cladding.
Installation of extensions has its own subtleties in operation. For more reliable fastening, you can use sealant. Silicone is applied to the grooves immediately before installation. If the panels do not have a special recess, you can select one using a hand router. To do this, a ruler is mounted in the hole and, guided by it, the work is performed. When the beam approaches the doorway, installation can be carried out.

Even a beginner can make accessories on his own. We are talking about a simpler type of bars without a border. It is easiest to work with wood, especially since it is suitable for any type of door.
The slats are made from simple planks. When selecting, you need to focus on their sizes in order to prevent an increase in the thickness of the wall. The work consists of competently taking measurements and preparing the planks.
Entrance lining popular. It looks great if the width of the door frame is large enough or, conversely, as narrow as possible. Using planks, you can correct not only unevenness and defects in slopes, but also improve the appearance of the room.


