Let's first briefly remember what fibreboard (fibreboard) is. It consists of pieces of wood impregnated with a special adhesive and compressed under high pressure and at high temperature. This production technology is typical for all types of fiberboard. Each specific type differs in density, impregnation materials and surface polishing (pattern). In this article we will consider such an application of this material as finishing the fiberboard ceiling. In order to make fiberboard ceilings with your own hands, you do not need to have any special skills or special knowledge.
For each room you need to select suitable look material. For a living room, you can take soft fiberboard varieties that will allow air to pass through better, in other words, “breathable.” To cover the fiberboard ceiling in rooms with high humidity, it is recommended to order sheets of increased density (they absorb moisture much less) and impregnated with a special antifungal solution that will prevent the appearance.
Some “specialists” practically do not pay attention to the weight of a wood fiber board, and it sometimes reaches 30 kg. Imagine what kind of load is created on the ceiling covered with such “weightless” fiberboard slabs! Therefore, we remind you once again - pay attention to the brand of the slab: the lower the density, the lighter the slab. It should be noted that the density of the material is directly proportional to the degree of moisture resistance and strength.
Ceiling technology with wood fiber boards
Let's look at how to sheathe a fiberboard ceiling. The cladding process is divided into two important stages:


So, you have completed the preparatory work and purchased fiberboard sheets. They must be placed on a flat surface and these sheets must be left in the room in which the fiberboard ceiling will be sheathed for about a day or two in order to equalize the temperature and humidity of the sheets with the microclimate in the room.
Installation work is best carried out by two people - this best option. You should not carry out the work alone - you may break the sheet or the fiberboard sheet will fall on you or with you.
Mounting methods
To fix it to the sheathing, you can use construction staples (in case of installation on wooden beam and using construction stapler), nails or screws. Please note that in the latter case, you need to countersink each “breakdown” (make a recess for the head). Methods of fastening to the ceiling depend on the density of the sheet. We remember that the denser the fiberboard sheet, the heavier it is, and, accordingly, the stronger the materials for fastening. Protruding iron from staples or nails must be carefully puttied, because over time these iron parts will rust and show through the paint or wallpaper.
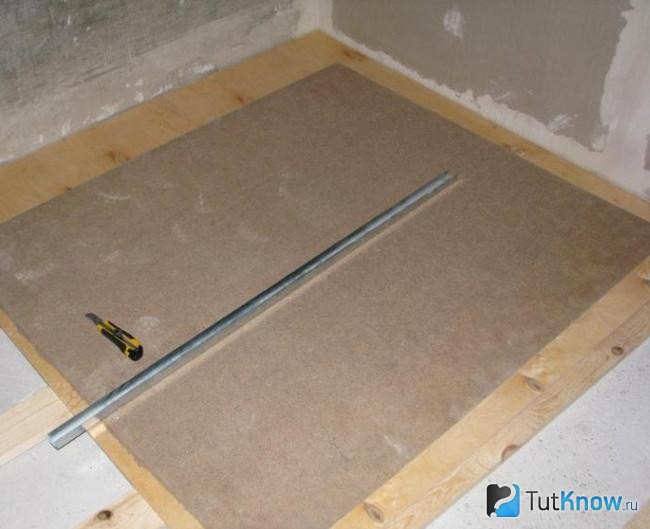
The procedure for fixing a fiberboard sheet
First you need to fix the sheet according to the guide rails. To do this, the sheet must be lifted, pressed against the guide profiles and secured with several fasteners along the edges of the sheet. Important detail: This is a pre-commitment. Therefore, do not use staples for this. Secure the sheets with long nails or thin screws that will protrude from the fiberboard. That is, do not completely hammer them in so that you can then pull them out painlessly. The sheet secured in this way is checked with a rope that is pulled across the entire room. If the sheet is unevenly attached, then it is relatively easy to pull out the nails and straighten it.

Now we move on to fixing the aligned sheet. To finally nail the sheet to the ceiling, you need to start from one edge in increments of 15 cm. In this way, we gradually go through the entire sheet, and there will be no bulges on the material.
Finishing work:
Finally, you have finished installing the fiberboard ceiling, everything turned out smooth and without cracks. Now, with a clear conscience, we begin the finishing work.
The ceiling is made of fiberboard, look at the video:
In conclusion, let’s take a closer look at the third option, how to paint fiberboard on the ceiling.

If you don’t know how to paint the fiberboard on the ceiling, we recommend using a foam roller. It will paint the microrelief of the surface well, distribute the paint evenly and the hairs will not fall away from it. If you buy a fur roller, there is no guarantee of its quality. In addition, the fur roll leaves a micropattern of hairs, which does not always dissolve on the ceiling, but on the contrary, under the force of gravity it becomes more convex and noticeable. Use a special telescopic handle, and it will be easier for you to do the work.
What is fiberboard and what types of boards exist, the pros and cons of the material, features of use and selection rules, technology for installing wood sheets on the floor using wooden logs, glue and mastic.
Description and types of fiberboard for floors

Fiberboard (Fiberboard) is a sheet building material. The front side of the product is smooth, the back side has a mesh structure.
The raw materials for the production of fiberboard are waste from sawmills and wood processing, firewood, as well as industrial chips. After steaming and grinding it, fibers are formed, which are scraps of wood tissue, individual cells, groups of cells. Fiberboard is made from wood fiber that is formed into a carpet.
Fiberboard can be of different densities. According to this criterion, the slabs are divided into the following groups:
- Soft fiberboard. Their density is not higher than 350 kg per cubic meter. Such slabs have high porosity, low density and are suitable for insulation work, insulation of floors and walls. They have low sound and thermal conductivity. They are divided into three types: M-1, M-2 and M-3.
- Semi-solid fiberboard. They have a density of at least 850 kg per cubic meter. They are used in the manufacture rear walls furniture, drawers.
- Solid fiberboard. Their density is 800-1000 kg per cubic meter. They have low porosity and are used in production panel doors, furniture. There are these types: T, T-S, T-P, T-SP.
- Super hard fiberboard. They have a density of at least 950 kg per cubic meter. Their porosity level is very low. They are used in construction and finishing work, creating partitions, flooring, in the manufacture of furniture, doors, and temporary buildings. They have a smooth front side covered with paint, varnish or primer. In addition, the starting materials in the production of such boards are treated with pectol, which increases the strength of fiberboard by 20%.
As for thickness, this figure can vary from 2.5 to 40 millimeters, depending on the type of slab and its density. Fibreboard most often comes in thicknesses of 8, 12, 16 and 25 millimeters. These are slabs of medium and low density, which, as a rule, are not used for finishing work. Semi-solid slabs come in thicknesses of 6, 8 and 12 millimeters. Hard and super-hard fiberboards are produced in thicknesses of 2.5, 3.2, 4.5, 6 millimeters. Such materials can be used to cover walls and floors.
Advantages and disadvantages of fiberboard flooring

Fiberboard is often used as a laying material for subfloors. They are suitable for installation on almost all surfaces. If you follow certain rules, you can easily attach the sheets even to an old coating.
Laying fiberboard on the floor has many advantages:
- Low price of this building material. This type of rough flooring is budget-friendly, and the costs installation work- minimal.
- No labor-intensive work - the process of laying slabs is very simple. Some problems may arise when installing joists, but to avoid them you need to carefully calculate the layout of the boards on the floor.
- Absolutely environmentally friendly slabs. Based on sheets natural wood. Therefore, they can be used to create flooring in bedrooms, children’s and game rooms.
- Strength and durability of fiberboard, provided that boards of density corresponding to the loads are used. However, such a coating should not be subjected to heavy loads and direct exposure to water should not be allowed.
- Low level of fire resistance. At the slightest interaction with fire, the coating will quickly ignite.
- Relatively low wear resistance. To strengthen it, apply it on top of the slabs. finishing coat so that they do not wear out and wear out so quickly. In addition, the finishing will add aesthetics to the floor covering.
- Low level moisture resistance. Fiberboard sheets tolerate moisture better than, for example, chipboard, but, nevertheless, it is not recommended to install them in the bathroom or kitchen, because the coating will quickly deform. For finishing in such rooms it is better to use aqua panels, gypsum fiber or moisture-resistant plywood.
Features of the use of wood boards
It is not recommended to lay fiberboard in rooms where water or aggressive chemicals can get on the boards. But today, thanks to the development of technology, the performance qualities of these boards are also improving, which helps to significantly expand the scope of use of the material.
Modern fiberboard flooring has excellent performance characteristics, but it is worth noting some minor limitations when installing indoors:
- It can be laid in dry rooms with a low level of humidity (no more than 60%) and temperatures above +10 degrees.
- The slabs should not be placed on the floor in rooms where they will be exposed to a large force load, for example, in shops or warehouses. Under mechanical stress, such a floor covering will quickly collapse.
- Wood boards are practically not used as a finished floor, but they are excellent for rough flooring. Fiberboard flooring is an ideal basis for laying parquet and laminate flooring. These slabs can also be used to level or insulate the floor.
Remember about the safety of using slabs: if you purchased them more than twenty years ago, and before that they were stored in an unintended place, the material may be dangerous. Previously technology manufacturing fiberboard sheets was different. To make the fibers in the boards stick together better, unsafe products were used. Such slabs cannot be installed in a residential building!
How to choose the right fiberboard for the floor

To buy quality material, you need to know several basic criteria for choosing slabs:
- Be sure to check the fiberboard certificate for the presence of harmful components. Some manufacturers, in order to improve density and moisture resistance, add dangerous components to the composition of the boards (or rather to their fibers), for example, formaldehyde. The presence of this substance indicates that the material is not intended for installation in residential premises. This is extremely dangerous! It is almost impossible to determine by eye whether the panels contain this component. Therefore, ask the consultant for documents for building materials. They must clearly indicate that the fiberboards have passed sanitary and epidemiological control. When purchasing, choose trusted manufacturers.
- Carefully inspect each wood panel; there should be no visible production or shipping damage or defects. Manufacturing defects include oil or paraffin stains, blisters and blisters on the surface of the boards. The only drawback, which is allowed on fiberboard sheets, is a small spot no more than two centimeters in size. Remember that when combined with oil or paraffin stains, the panels become flammable.
- Please pay Special attention on technical specifications material and marking of sheets. In order for it to be used for a long time, thickness and density are important. wood boards. The level of moisture resistance is also important. All fiberboard should be selected according to technical indicators, based on the room in which you will install them.
Technology for installing fiberboard on logs
If you lay wood boards on logs, the floor will be warmer than when working with screeds. Also, when working with this type of flooring, traces of attaching fiberboard to the joists will be practically invisible.
Preparatory work before laying fiberboard

Before laying fiberboard on the floor, it is necessary to carry out some preparatory work according to the following scheme:
- As soon as you bring the panels into the room, wet them a small amount water, stack on top of each other. Installation can begin the next day. This way you will protect the material from possible deformation.
- Next, if necessary, we dismantle the old covering and baseboards. All paint must be removed from the floor and all debris must be removed.
- We fill the resulting gaps between the coating and the wall using polyurethane foam. After it hardens, cut off the protruding residues.
- The cracks can also be sealed with putty for moving bases.
- We examine the old floor covering for the presence of fungus or mold; if necessary, we replace these places, since in no case should they remain under the new panels. After replacing the damaged areas, treat the surface with a fungicidal primer or a special antiseptic solution for wooden materials.
Installing joists on the floor

With the help of logs you can correct a slight curvature of the floor, level out its differences, slopes or unevenness. It is recommended to pre-treat them special compounds, which will protect them from pests, fungi and rot.
They need to be fastened according to this scheme:
- We install dry and even beams about 30-50 millimeters thick on the main covering in increments of about 50 centimeters.
- All logs must be positioned strictly horizontally. You can check their evenness using a building level or a long ruler.
- When assembling the joists, we use special zinc locknuts, which will prevent the fasteners from moving freely along the threads. Thanks to these devices, the nuts will not unscrew and weaken the entire structure. The locknut itself should go slightly deeper into the wood structure.
- We fix the bars onto the old coating, and where wooden boards missing, we place pieces of timber or pieces of wood under the logs.
Rules for attaching fiberboard to joists

It is recommended to start installing slabs on logs from the corner opposite the entrance to the room. Before laying fiberboard on the floor, study the work diagram:
- We attach the fiberboard to the joists using screws, self-tapping screws or nails. The step is about a centimeter along the edge and one and a half centimeters in the center.
- Do not forget to leave 5-10 millimeters between the wall and the coating for thermal expansion. In the future it will be possible to cover it with a plinth.
- The seams of the slabs must necessarily meet on the bars.
- The next row of material should fit tightly, leaving a small gap of a maximum of two to three millimeters.
- All subsequent panels in rows are laid in a similar manner.
Technology of laying fiberboard on glue

Wood boards can be installed on a pre-leveled base surface using glue. Preparatory stage in this case, it is identical to that which preceded the installation of fiberboard on the logs.
We work according to the instructions:
- We apply the glue to the entire surface of the material; it should be well and evenly distributed, without spreading.
- Give the sheets 30-40 minutes to dry.
- We also apply the adhesive composition to the previously primed and well-dried surface of the base.
- Press the sheet horizontally.
- We press the next product tightly to the previous one.
- Be sure to check each fixed sheet for evenness and horizontality using a level.
Note! When laying the next row of fiberboard, you need to offset the joints of the slabs by 40-50 centimeters in relation to the previous row. This will give the floor more strength and the load will be evenly distributed.
Technology for fixing fiberboard using mastic

Installation of slabs on concrete screed much easier than using logs. But most importantly, such installation must be carried out on a perfectly flat surface. If the base has slight unevenness, then they must be leveled using cement mortar. For laying on a concrete floor, durable and thick fiberboard is used. You will also need mastic for the job.
We carry out installation according to the following scheme:
- Carefully prime the surface of the screed.
- Half an hour before the installation process begins, apply cold mastic to the underside of the wood boards and leave them aside.
- We immediately treat the entire surface of the screed with mastic. The thickness of the composition should not be more than 0.6 mm.
- We apply hot mastic immediately before fixing it so that it does not have time to cool down. The layer of the product is no more than one millimeter; we level it over the surface of the sheet and screed using a rubber comb.
- The final stage of installation is to press the fiberboard tightly to the base.
Features of finishing fiberboard flooring

Final treatment of fiberboard floors helps to increase the service life of the slabs. The main thing is to carefully prepare the surface so that it is perfectly smooth and even, since it will be impossible to correct defects after painting.
We work according to the following instructions:
- We clean the floor from any remaining glue or primer.
- We close all gaps between the panels using putty or reinforcing tape.
- Rub thoroughly with fine sandpaper all seams.
- If there are stains, we treat them with a degreaser.
- Remove all dust from the surface using a vacuum cleaner.
- We cover the slabs with paint or varnish in two layers. Apply using a spray gun, roller or brush.
Using wood boards you can assemble high-quality flooring with a minimum of effort. Before leveling the fiberboard floor, you must carefully study specifications slabs and select suitable material for the premises being repaired, and then it remains to follow the technology for performing installation work.
![]()
Specialization: master in construction plasterboard structures, finishing works and styling floor coverings. Installation of door and window units, finishing of facades, installation of electrical, plumbing and heating - I can give detailed advice on all types of work.
There is a misconception among many developers that laying linoleum on fiberboard is not the most the best option, they say, the surface is deformed through short term. In fact, if the installation is carried out in accordance with the technology, then such a base will serve you for decades. In the review, I will describe the workflow in detail, and if you follow all the recommendations, the result will be excellent.
Workflow Description
Let's figure out what you need when working, how to choose best material and what are the stages of laying fiberboard on different types surfaces. Everything is quite simple, the main thing is to understand all the nuances and avoid the mistakes that most developers make.
Preliminary stage
At this stage you need to perform the following steps:
- First of all, you need to take measurements, to determine required amount material. It is important to do this not by eye, otherwise it may turn out that you are missing 1-2 sheets or, conversely, there are several elements left and there is simply nowhere to put them. It is best to make a rough plan of each room, so you can lay out the sheets, this will allow you to arrange them in such a way as to minimize the amount of waste;

- As for fiberboard, the material is made from crushed wood with the addition of natural adhesives: paraffin, rosin - this ensures environmental safety material, it can be used in rooms with the highest hygiene and safety requirements;
For all its advantages, fiberboard has one big drawback - the slabs are afraid of moisture.
Therefore, it is not recommended to use this option for preparing the surface for linoleum in rooms with high humidity.
- The thickness of the material ranges from 2.5 to 6 mm. If you have a choice, it is better to purchase the option with maximum thickness, since fiberboard has high thermal insulation and sound insulation properties and can be used thin options inappropriate. In addition, the rigidity of the elements also matters, and it also depends on the thickness, the minimum acceptable value is 3.2 mm;
- As for the sizes of the sheets, they can vary, the width can be from 100 to 180 cm, and the length - from 120 to 274.5 cm. When choosing a specific option, use simple rule– the more, the better: the fewer seams on the surface, the more reliable it is and the easier it is for you to carry out the work;

- You must decide how the chipboard will be attached, there are three options - adhesive composition, nails or screws. The choice of a specific solution depends on the type of base and your preferences; below we will talk about all the methods of fastening and discuss their advantages and disadvantages;
- As for the tool, for cutting you will need a hard construction knife and a metal ruler 1 meter longso that when cutting the lines are perfectly straight.
The price depends on the size of the sheet, so the 2140x1220 3.2 mm option will cost 140-180 rubles, a slab measuring 2745x1700 will cost 360-420 rubles. As you can see, the solution is quite inexpensive.
Preparing the base
How smoothly the fiberboard will lie directly depends on this stage, so it is important to carry out the work efficiently; the process consists of a number of actions.
Let's start our consideration with this type of base as a wooden floor, here the process looks like this:
- First of all, you need to clear the room of all objects, then you need to remove dust and dirt from the surface and conduct a careful inspection for damage and cracks between the floorboards. Pay special attention to the heads of nails and screws; if they stick out, they must be recessed into the surface, otherwise you will subsequently get many flaws on the surface of the fiberboard;
- Next, you need to check the plane of the floor using a level; very often the elements have a semicircular shape. If such a defect is detected, then you will have to grind the surface. If the problems are minor, then you can get by with an electric planer or grinder, but if you need to remove significant irregularities, then it is better to use sanding;

- After the leveling is completed, you can begin to seal cracks, damage and depressions from nail heads and screws. For work, either a special wood putty or an acrylic sealant is used; this composition is excellent for sealing cracks, it has good adhesion and can be easily sanded;

- When the putty has dried, the surface is sanded, after which you need to remove debris and carry out wet cleaning to remove even small particles from the surface.
Concerning concrete foundations, then the preparation has its differences:
- First, you need to vacate the room, after which all debris is removed from the surface and wet cleaning is carried out;
- Then the rule is taken and the plane is checked for curvatures and level differences. If there are any, then they need to be sealed with cement mortar; if the unevenness is significant, then it is easier to use a self-leveling composition;
If you are working with a cement-based mortar, keep in mind that it needs at least 2 weeks to gain strength, so preliminary preparation It's better to do it in advance.

- After all work is completed, you need to carry out a wet cleaning to remove all dust and dirt. After this, the base is treated with a water-repellent primer; it strengthens the surface and creates a reliable barrier to moisture penetration. Work can be continued after the composition has completely dried.
Fibreboard laying
In order to properly lay fiberboard on the floor under linoleum, a number of conditions must be met:
- The most important thing to remember is that fiberboard does not tolerate moisture very well, so you need to take care of protecting the material; it is best to pre-treat the surface. For the work, drying oil is used, which perfectly protects the material, its application will not cause difficulties - the work is done with a regular brush;

- After processing, the sheets should be allowed to dry, after which they should be stacked indoors so that they are aligned as best as possible. If necessary, you can put weighting agents on top so that under their influence the elements become perfectly even, this will simplify the work process and make the final result much better;
- If the humidity in the room is low, then treatment with drying oil may not be necessary, but the elements still need to be leveled. To do this, the back of the fiberboard is treated with water, after which the sheets are placed with the wetted side facing each other and stacked in this way. After two days, installation work can begin.
As for the work process, it is done differently depending on the type of base, let's start with such an option as a concrete screed:
- First of all, you need to apply a special adhesive to the surface to fix the fiberboard on the surface; if previously bitumen was used for these purposes, in our time there are many compositions that are very well suited for these purposes. As an option, you can use double-sided tape; it holds the elements well and, if necessary, removing the sheets is much easier;

- Next, the sheet is carefully placed and pressed, do not forget that the material we are considering tends to expand, so a gap of 5-7 mm should be left between the fiberboards and the wall;
- The work begins from the corner of the room farthest from the entrance, first all the whole sheets are laid, and then you need to attach the outermost element, which is carefully applied to the surface to determine the cutting line. After this, using a metal ruler and a strong construction knife The fiberboard is cut and broken;

- After the adhesive has dried, you can begin to process the joints; if there are any irregularities in their place, they must be removed by grinding. After this, the dust is removed from the surface and the seams are sealed with wood putty or acrylic sealant. When the surface is dry, final sanding is carried out, after which you need to thoroughly vacuum the surface before laying the linoleum.
Now let's figure out how to attach fiberboard to.
The instructions for carrying out the work are as follows:

- As for alignment, the process is described above, so it makes no sense to consider it in detail. It is worth noting that if you do not want to wet the sheets, then it is better to bring them indoors and stack them at least a week before starting work, during which time the material will acclimatize and level out;
- There are only two methods of fastening - using nails 16-25 mm long or using 3x20 or 3-25 self-tapping screws. You choose the option that is more convenient for you, but it is worth noting that working with nails is much faster and easier, so the nail method of fixing fiberboard is most often used;
- The work is carried out as follows: in the farthest corner a slab is laid with indentations of 5-7 mm from the walls, after which fastening is carried out. Nails are driven in increments of 100 mm at the edges and 150 mm in places where the sheets adjoin each other. Self-tapping screws are located in increments of 150 mm around the perimeter and 200 mm along the junctions;
When fastening, pay special attention to ensure that the fastener caps are flush with the surface or are slightly recessed into it, otherwise, after laying the linoleum, the protruding caps will appear.

- Cutting is carried out as described above; if there are protruding areas along the perimeter, then cuts of the desired configuration are made in the fiberboard sheets. Remember a simple rule: if the platband interferes with installation, then you need to trim it, not the fiberboard. All recommendations are collected in the diagram below to make it even easier for you to understand the process;

- All protruding areas are sanded with a block of sandpaper, after which the surface is cleaned of dust and puttied; the fewer irregularities there are, the better the linoleum will lie, remember this. After the putty has dried, it is also sanded, and the work can be considered successfully completed.
It is worth noting that laying linoleum on chipboard is done in a similar way. The only difference is that particle board is much thicker and heavier, and cutting it better with a hacksaw or an electric saw.
Recommendations for laying linoleum on a fiberboard base
Let's figure out how to properly lay linoleum on a prepared base; this process is simple, so you can easily handle it with your own hands. We will consider three main ways of carrying out work:
| Without fixing material | If the area of the room is less than 12 square meters, then the linoleum does not need to be fixed to the floor surface. In this case, you need to cut the canvas according to the configuration of the room and carefully lay it. Fixation is carried out using skirting boards, which are located around the perimeter, and metal threshold, which is attached to doorway, it is these elements that should press the material and prevent it from moving |
| Using double-sided tape | This option appeared relatively recently, but has already gained great popularity due to the simplicity of the work process and high-quality fixation of the material on the surface. The work is done as follows: first, the adhesive tape is glued over the entire area in the form of a lattice in increments of 30-50 centimeters, the top protective layer is not removed. Afterwards, the top protective tape is removed from one edge at a distance of about 50 cm, linoleum is laid, and so on |
| Adhesive fastening method | A classic solution that involves the use of a special adhesive composition. This option is used in rooms with an area of more than 20 square meters, its essence is simple: you smear part of the surface with an adhesive composition, and then carefully press the linoleum. The work is done gradually - part of the surface is lubricated, the roll is unwound, and so on until the end of the room. |

As for the connection at the seams using the glueless method, the easiest way is to stick double-sided tape on the base; it will securely fix the connection, and you do not have to purchase an adhesive composition. A metal strip is attached to the top, which protects the joint and additionally secures it.

Conclusion
Fiberboard is excellent for preparing the base for linoleum; it is important to choose high-quality material and carry out the installation work correctly. The video in this article will clearly show the workflow, and if anything is unclear to you, then ask questions in the comments below the article.
When carrying out renovations of residential and office premises It is often impossible to do without leveling the floor before laying linoleum, laminate or other covering.
Among various methods Leveling the fiberboard floor is quite popular.
Despite the fact that experts note some disadvantages of using this method, it also has a number of advantages that can play a role decisive role when planning repair work.
Methods for leveling floors
The alignment method may vary. This depends on the characteristics of the operation of the premises, the acceptable time frame for completing the work, the budget and other factors, such as the angle of the floor. Each method has its own advantages and disadvantages. Screed made with cement mortar is considered the most thorough, but it requires significant volumes preparatory work and enough time, because cement mortar It takes a long time to dry and may take up to 28 days to completely harden. If the surface slope is small, up to 30 mm, you can get by with self-leveling systems. They are able to smooth out any flaws. The drying time of the system does not exceed 2 days, but working with them requires certain skills from the craftsmen. The temperature of the finished surface is always slightly colder than the air temperature in the room, which causes some discomfort. Another disadvantage of bulk mixtures is the price: they are not cheap.

Among dry methods, we can note leveling using ready-made gypsum fiber sheets, which allow you to work even with surface height differences of up to 100 mm. GVLV has only one drawback, but a very significant one - high price. Another option is to use wooden frame, on which chipboard, plywood or sanded wooden boards are then laid. Fiberboard can also be chosen as a floor leveling material.
The advantages of such floor leveling, compared to a cement mortar or self-leveling system, are speed of installation, low sound permeability and good thermal insulation. Let's look at the last method in more detail.
Return to contents
Share onWhen leveling the bottom surface of a room, the most practical and affordable way is to lay fiberboard on a wooden floor. This method is advisable when laying on old lumpy floors, a plane with unevenness, defects or with some slope. Fiberboard sheets are most often laid on joists, but another method is also possible. It is possible to lay them under linoleum or carpet with insulation. This material is not always advisable, for example, under heavy loads, and all the features of the coating are worth considering in more detail.
Basic conditions for laying fiberboard on a wooden floor
Each flooring has its own advantages and disadvantages, and installing fiberboard over a wooden floor remains the simplest and most practical. It doesn’t always make sense to tear old boards off the floor, especially in old houses and country buildings. They provide surface integrity and give extra warmth. However, the boards become deformed over time and require partial or complete replacement.

Experts recommend leveling the surface using sheets of plywood, fiberboard or chipboard (not to be confused) using logs made from quality timber. However, thin layers of these materials cannot always withstand significant loads, for example:
- for working machines that produce high vibration;
- under thin metal legs furniture;
- under heavy and bulky furniture, especially if the supports are not on the logs under the sheets of covering, but on the gaps.
The choice of materials for installation and how professionally the installation work was carried out is very important. Whether or not there will be floors in the future directly depends on this:
- smooth;
- solid;
- durable;
- sustainable.
The horizontal surface is a fundamental criterion for the quality of floor laying work. Therefore, prepare in advance necessary tools, including a universal construction level, without which it is difficult to verify the accuracy of the floor geometry.
It is equally important to properly prepare the old base:
- thoroughly clean and remove all construction debris;
- remove the plinth, which prevents the installation of the base under the fiberboard;
- seal all cracks in the floor for tightness;
- clean off everything that is peeling and crumbling on the floor;
- mark the level of the lower horizontal lines near the walls along which the surface will be leveled;
- if in the floor of the dacha, country house or the building is supposed to have an entrance to the cellar, it is better to start with its arrangement and then lay the floors.
Attention: If the logs are perfectly aligned, then poor-quality work on laying fiberboard sheets can ruin the whole impression!

Fiberboard should not be laid too tightly without a gap, otherwise, when the level fluctuates, their edges will rise, splitting. The sheets should also retreat from the walls by about 4-7 mm - this edge will still go under the baseboard.
Experts recommend starting laying out fiberboard sheets from the opposite wall to front door. If there is no experience in how to lay fiberboard on a wooden floor, experts recommend immediately checking the first layer with a level for leveling if any inaccuracies are identified. Each subsequent row is checked horizontally using the same method - haste in case of inaccuracies is inappropriate. When gluing slabs, it is advisable to place a weight on top of the seams, but if they are nailed, then there is no need. If the floors are laid under linoleum or carpet, then no further processing is expected.
Advantages of fiberboard floors
Wood fiber boards are a fairly common construction and finishing material, applicable for repairs and cladding. various surfaces. Fiberboard is used not only for rough installation various designs, but also for the floor. It is noteworthy that even those who do not know how to lay fiberboard on a wooden floor prefer this material due to its reasonable cost and practicality. Fiberboard sheets are irreplaceable:
- when leveling the old floor;
- under rough laying linoleum or parquet;
- for covering surfaces (floors, walls, arches).
Main advantages:
- easy installation, but you need to know how to place joists on a wooden floor;
- high strength of a fragile-looking material resembling wood cardboard;
- tolerates temperature changes well with moderate air humidity;
- durability (in the absence of excess moisture);
- environmental friendliness, thanks to which fiberboard is a natural material used by allergy sufferers intolerant to chemical components in residential premises;
- convenient packaging;
- affordable price.

At the same time, fiberboard floors have their “disadvantages”:
- when leveling the floor, additional costs are required for timber under the logs as a base;
- insufficient protection from water, although this is quite suitable material for a nursery or bedroom;
- with great pressure or impact with a sharp, heavy object, a small gap may form between the joists;
- poor fire resistance in case of fire;
- the appearance is too simple for cladding;
- without protective treatment, the surface wears out quickly, especially with heavy loads and furniture movements;
- in a damp, unheated room it may delaminate.
Attention: Regarding environmental friendliness, this is a controversial issue, since the old form of release involved a different technology for gluing materials, so it is not advisable to use the remains of fiberboard sheets lying around workshops and garages in a residential area!
If you have any doubts, see expert advice: how to lay fiberboard on a wooden floor, video at the end of the article.

How to choose materials
Buying fiberboard sheets is a responsible business, and a large list of building materials from different manufacturers not only gives more choice, but also, to some extent, creates confusion. Today there remains a risk of purchasing a low-quality or unsuitable product.
1. If leveling the floors is done for painting, then it is better to purchase decorative plywood, which can be laid out in patterns, like parquet or laminate floors High Quality will cost much less.
2. If appearance is not so important, since fiberboard flooring on a wooden floor is planned under laminate or carpet, then the visual parameters are not as important as the technical characteristics. Fiberboard sheets are different sizes, soft and hard, and are classified according to their standardization scale:
- grade T with a regular front surface;
- T-S has a front layer with a finely dispersed mass of wood fibers;
- T-P has a color on the front surface;
- T-SP finely dispersed front layer is tinted;
- T-B has increased water resistance without tinting;
- NT - semi-hard sheets;
- ST - super-hard sheets with a regular front surface;
- ST-S - super-hard sheets with a finely dispersed front layer.
Quality groups A and B are found in hard slabs of brands T, T-P, T-S, T-SP, and their front surface assumes grades 1 and 2. The density of soft sheets varies: M-1, M-2 and M-3. Separately, hardboard is distinguished - fiberboard grade T, which is produced by the wet method. It is used for various purposes:
- insulation and finishing;
- soundproofing and thermal insulation of the floor;
- construction of internal partitions;
- wall cladding;
- underlay for parquet, laminate, linoleum;
- For decorative cladding various panel structures.

Tip: When purchasing, pay attention to appearance hardboard They must be free of defects, have the same thickness around the entire perimeter, with the same shade of the surface of the sheets in one pack (batch).
Key quality indicators:
- identical sheet sizes;
- uniform thickness of fiberboard sheets;
- uniform, homogeneous front surface.
Choosing timber for logs
When choosing timber for logs for installation, it is important to adhere to some recommendations:
- wood laid under fiberboard on a wooden floor must be dry (light timber - dry);
- You should not purchase it in advance and display it in a damp room - it will warp and become unusable;
- use wood treated with special antiseptics of the 2nd or 3rd grade from healthy wood without knots from coniferous trees;
- it is recommended that the beam cross-section is at least 40mm and up to 70mm;
- knots will “lead” the logs later due to the heterogeneity of the wood, but trimmings without these defects can be used;
- a small number of cracks is acceptable, since this is a natural state for timber beams;
- * absence of fungi and germination on damaged areas of wood (quality indicator);
- It is better to immediately discard warped or “winged” bars or use the trimmings on short sections of the joist sheathing.
Attention: You can check the “winging” (screwing of a warped beam) with a plumb line or a thin elastic cord stretched along any wood edge.

How to cut fiberboard correctly?
When laying sheets such facing materials like hardboard or plywood, you have to deal with the need for cutting, especially in the outer rows. Construction supermarkets offer such services, but they need exact dimensions of the room with its deviations from the norm, for example, not all angles are 90°.
Attention: Remember that it is better to make the sheets shorter - they will go under the baseboard, but it is very difficult to cut off the excess.
When cutting with a machine, the cutting of sheets is carried out most evenly and with a high-quality edge. If this is not possible, you will have to do it yourself:
- jigsaw;
- circular saw with a laser guide and disks for working on hardboard;
- universal construction tool for cutting building materials;
- grinder according to precise markings.
Tip: It is better to use a special homemade machine holding the grinder. Metal scissors will help you remove the edges a little. If you have no cutting experience, it is better to practice on an unnecessary piece, first studying the video at the end of the article.
Often it is necessary to trim sheets to make holes for pipes for radiators and plumbing, niches or wall projections. Special holes are made with a jigsaw, a universal tool or a reliable sharp knife. Take care of this tool in advance, for example, rent it. Prepare a template from cardboard and check everything on site; if everything is accurate, transfer the markings to the fiberboard.

Technology for laying logs and fiberboard on the floor
It is unacceptable to store fiberboard slabs and timber in a damp room; it is best to place the timber horizontally on the floor, and the sheets vertically along the wall in conditions close to room temperature.
The logs are laid on previously prepared surfaces - screed, self-leveling mixture or old wooden floors. As a rule, the method of laying fiberboard on a wooden floor is applicable both for leveling the surface and for updating the surface. If there are slight curvatures, differences in floor level from east to north or from west to east, a noticeable slope or obvious unevenness, then it is worth trying to either eliminate them or close them.
If you have no experience in how to lay fiberboard on a wooden floor, then you can ask for advice in the video. In many cases, you can turn to specialists to install the logs, and lay the fiberboard sheets yourself. However, there is nothing difficult about this if you have a tool, patience and experience working with wood. It is necessary to carefully inspect the entire surface of the old floor, and if fungus or mold is found there, it should not be left under the fiberboard sheets, otherwise over time they will “eat up” all the new floors. The remaining areas are treated with a special fungicidal primer or construction antiseptic for wood and other surfaces.

Tip: It’s also worth removing those boards that creak - don’t think that anything will change under the weight of the new floors. Sometimes, due to defects, a significant portion of the old wood flooring has to be cleared away. Don't worry - it will all be hidden under the joists and new cladding!
1. If the old floors are relatively smooth, but the surface needs to be updated, it is enough to sand them and then cover them with sheets of high-quality fiberboard - hardboard. With this method of installation, the old base must be thoroughly cleaned after sanding for primer. It must dry for at least 8-12 hours, depending on the composition and air temperature. Just after this, apply glue and lay down sheets of hardboard, pressing down with weights on the corners and edges.
2. In the design of the joists, special galvanized locknuts with a nylon ring are usually used, which prevents the nuts from moving along the thread.
The devices do not allow them to unwind and weaken the structure. When tightening the top locknuts, which secure the joists in the position required on a given area of the floor, they are slightly buried in the wood structure. Because of this, the surface level may be slightly lower than expected. By tightening the upper locknuts, trace the boundary laser level, taking into account this error. Experts also sometimes create 2 levels, an additional one under the locknut.
3. All logs are laid in a similar way - see the diagram:

Preliminary calculations for the interval between them and the floor level correlate:
- with a beam section;
- floor slope;
- sizes of hardboard sheets.
The bars are mounted directly to the old wooden base, and where there are no boards at the base, instead of them, pieces of timber or other pieces of wood are installed under the logs. It is not recommended to make partial sheathing of joists or leave gaps in the floor underneath them before laying fiberboard. Before laying them on the floor, it is worth recalling that for the subfloor, as a substrate for linoleum, parquet or carpet, less expensive slabs with a small thickness are used, and for finishing- high-quality hardboard.
Attention: Purchased fiberboard sheets stand for 2-3 days in a living room - for acclimatization 2-3 days. Before sticking, you can lightly spray the back side with a spray bottle or treat it with a primer for better adhesion. When installing with nails, this is not necessary.
Features of fastening fiberboard to logs:
- the sheets are laid on the logs so that the seams meet on the bars;
- hardboard (fibreboard sheets) are nailed with screws, self-tapping screws or nails at intervals of about 100mm along the edge and at intervals of 120-150mm in the center;
- the next row does not fit tightly, with a small gap - about 2-3 mm;
- All parallel sheets are laid in the same way.
Features of fastening fiberboard with glue:
- assembly adhesive is applied to the entire surface of the sheet and is well distributed without smudges,
- the sheet should be soaked for 25-30 minutes;
- glue is also applied on top of the primer on the floor;
- the sheet is pressed down and checked horizontally.

Features of floor finishing:
- it is important to remove all remnants of glue that has protruded into the cracks;
- large gaps between the sheets are sealed with putty or glued with reinforcing tape - under the subfloor;
- The fiberboard surface can be varnished or painted.


