A mini-stove with your own hands can serve you for a long time both in a country house and in a country house or estate, in general, exactly where you do not have central heating. There are a huge number of different options in the world with which you can make a mini-oven with your own hands. Such a stove may differ in its shape, size or, for example, the type and design of the chimney. This structure can be erected even by an inexperienced craftsman or a person without qualifications. Making a mini-oven with your own hands will take very little time.

A mini-oven can become not only a source of heat in the house, but also a colorful highlight that can delight you with its appearance.
Materials to complete the work

Proper construction of the stove will give you many cozy evenings and protect you from fires and smoke.
You will need:
- boards;
- 20 liters of clay solution;
- 60 pcs. red brick;
- one blower door;
- cast iron stove;
- valve, combustion door;
- grate;
- 37 pcs. fireclay bricks.
The size of the mini oven takes 0.4 square meters and is made of brick, flat or on edge. This type of stove retains and releases heat perfectly.
The design is quite simplified, since the mini-oven is not heavy at all and a foundation is not required. The floor must be made of strong and thick boards that are well secured.
This DIY mini-stove is an alternative to a potbelly stove, but it has more functional capabilities and a heating part, which includes a cooking part. It also functions as a fireplace.
This furnace can be erected easily and even in one day. At the very beginning, you need to heat the stove with wood chips and paper, but not with logs, since with a sharp temperature change, cracks may appear in the new solution, which will subsequently lead to improper air movement or smoking. Before putting the oven into operation, it is very important that it is thoroughly dry. Usually the structure dries well within one week.
How to make a stove?
To properly build a stove with your own hands, follow these points:
The stove shown in the photo is called a kitchen stove. Its use is clear from the name - food is cooked on it.
- Choose a suitable place for your new mini-stove and place plastic film, roofing felt, hydrosol or glassine in that place. The size of one of these materials should be 78x53 cm.
- You need to pour dry sand onto the bedding (its thickness should be 1 cm) and level it.
- Lay the first row of 12 bricks on top of the sand, which do not need to be fastened together. After which you need to align the bricks to the same level so that they lie strictly horizontally.
- A thin layer of clay must be applied to the first row of bricks, after which the blower door can be installed. It is very important that the blower door is wrapped with asbestos cardboard or cord. The blower door needs to be secured with wire, after which you can begin laying the second row.
- necessary for laying the third row of the mini-oven, upon completion of which you need to install the grate. It needs to be installed above the ash pit if the third row of bricks is already fully formed.
- We lay the bricks in the fourth row, but already on the edge, and in the middle of the chimney we need to lay supports for internal partition ovens. We lay the back wall of the oven with bricks with a protrusion outward and without clay - they are called knockout bricks.
- Next you need to install the fire door. Again, before installing the door with your own hands, you need to wrap it with asbestos cord so that it can open from the bottom up. It needs to be secured with wire and temporarily secured with two bricks. Place the first brick on the back, and the second on this brick and on top of the door.
- The fifth row of bricks needs to be laid flat, and it is important to repeat the contour of the previous row. But the sixth row must be laid edge-on. Next, you need to rub the walls of the mini-oven with a wet cloth and proceed to the seventh row.
- On the seventh row we lay it flat, for the bundle, starting with bricks in ¾ with the next rows. Next, we place two bricks edgewise and begin to make the back wall.
- When you lay the eighth row of the stove with your own hands, make sure that it closes the combustion door above which it ends. It is in the eighth row that it is imperative to install a beveled brick above the firebox so that the flame in the stove is directed to the center of the burner of the cast-iron stove.
- First you need to lay out a slightly moistened asbestos cord so that everything is sealed between the slab and the bricks. Since clay and cast iron have different temperature expansion coefficients, the slab cannot be laid on clay. Next, you can install the ninth row, but you need to move it slightly to keep the door open.
- When laying the tenth row, you need to form a chimney with an extension at the rear. The design of just such a mini-stove does not require a brick pipe that expands at the top, because this type of pipe changes the center of gravity of the entire mini-stove. There are different chimney designs. Chimneys are: straight, horizontal, vertical, direct-flow, counter-flow, bell-shaped and combined. The design of this stove provides a direct chimney.
- When laying the eleventh row, we insert a valve and seal it with an asbestos cord, which is coated with clay.
- Thus, chimney will fit into the metal one. If the chimney goes to the side, block it with three rows of bricks.
- Next you need to remove the bricks from the fourth row and clean the chimney from the dirt that accumulated there during construction.
- Whitewashing the stove. It is necessary to protect the metal part and walls of the oven with film. To prevent the stove from turning yellow, you need to add milk and blue to the solution. small quantity. It is important to thoroughly clean every piece of the stove, and especially the joints of the cast-iron surface and bricks.
- You need to properly close the gaps between the floor and the first row of laid bricks so that the sand that you poured under the brick does not spill out.
- Next, you need to nail a plinth around the edge of the stove, which will protect the structure from sand spilling out. The baseboard must be nailed tightly and level so that there are no gaps. Thanks to this, the mini oven will look great.
- After you heat the stove for the first time with paper and wood chips, leave all the burners and doors open for several days so that it dries well. This mini-stove will withstand fairly high temperature changes and will serve you for many years.

If you are planning to build country house, maximally equipped for comfortable living in it, then without small oven it is usually not necessary, especially if you plan to use it for most of the year. The lack of experience in stove work should not stop owners who want to install the stove themselves. You just need to choose the right one, not really difficult option, the design of which is simple and understandable.
In addition, for a large heating structure with an intricate configuration of internal channels, as a rule, there is simply not enough space in a country house. Let's consider easy-to-use options that are also suitable for small house, and for the novice stove maker – in a word, laying a stove with your own hands is simple and practical.
To make it easier to decide suitable model, it is necessary to highlight several conditions that are important for the right choice. Well, then consider several options, settling on the optimal one for the specific area and configuration of the premises of the house.
General requirements for brick kilns
The conditions that the chosen design must meet will directly affect the quality of heating of the house, so you should not neglect the information, which, on the contrary, should be paid close attention to. These factors include:
- Dimensions furnace design must correspond to the area on which it is installed, since heat transfer largely depends on this parameter.
- In addition, it is necessary to choose the correct shape of the furnace structure. The side walls of the furnace, when heated, give large quantity heat, while the indicator of the front and rear walls is 3–4 times lower. Therefore, if you need to heat two rooms at once, you should choose a narrow and long stove that can be built into the wall between the rooms.

For heating efficiency, a T-shaped stove is often installed. It can be intended only for heating or perform two functions if you select a model that provides hob. Such a stove can heat up to four rooms that do not have large area.

- The next condition that is important to consider is the location of the structure inside the house; it should be as rational as possible. In order for the stove to be functional, to work as a heating and cooking device, it must be installed so that the hob faces the kitchen, and one or both side walls look into the living rooms.
- When choosing a stove, it is very important to take into account its heat transfer - this parameter must correspond not only to the area of the rooms, but also to their location and number external walls. This table will help you decide on the choice of stove based on its surface area, depending on the characteristics of the room:
| Room area, m² | Not a corner room, inside the house | Room with one outside corner | Room with two external corners | Hallway |
|---|---|---|---|---|
| Furnace surface opening into the room, m² | ||||
| 8 | 1.25 | 1.95 | 2.1 | 3.4 |
| 10 | 1.5 | 2.4 | 2.6 | 4.5 |
| 15 | 2.3 | 3.4 | 3.9 | 6 |
| 20 | 3.2 | 4.2 | 4.6 | - |
| 25 | 4.6 | 6.9 | 7.8 | - |
- There is no need to play it safe and choose for small house a massive furnace, since to warm it up will take a lot of time and a fairly large amount of fuel, despite the fact that a significant part of the generated heat will simply be “thrown down the drain.” In addition, small structures sometimes work even more efficiently than structures that occupy half the room, since heat transfer largely depends on the internal design of the stove, and not just on its massiveness.
- Any stove, even the most heat-intensive one, will be ineffective if the house is not insulated, since all the heat it produces will escape through the walls, windows and ceilings. These will require a very large amount of fuel to maintain the temperature in the rooms at an acceptable level for living.

If you plan to save on fuel while getting high-quality heating, you should insulate the building well and choose a bell-type stove, which, thanks to its numerous channels, will for a long time retain heat transferred to living spaces.
How to choose the right place for the stove?
The location of the stove in the house is determined in advance, even before its construction, when drawing up the project, so you can install the heating structure in the right area, where the heat from its walls will be rationally distributed throughout the house. In addition, laying out a foundation for a stove before building a house is much simpler both in terms of calculations and the amount of work involved. It must be said right away that the base for the stove must be installed separately from the foundation of the house, that is, there must be a distance of at least 150 mm between their walls. Otherwise, during shrinkage (and it will definitely be uneven for structures of different mass and area), one of the foundations may begin to collapse, and the walls installed on it may begin to deform.

- If there are several rooms planned in the house, then the stove must be installed so that it is located at the crossroads of the walls dividing the house into rooms. But, since the foundations of buildings should not touch each other, interior walls will have to be made light, without foundations. This option is presented in the diagram above.
- In some cases, home owners prefer to install a stove near the entrance from the street, since thermal radiation from the walls creates an excellent curtain from cold currents.
- Placement of the furnace hatch close to front door will get rid of excess garbage V living rooms, since you don’t have to bring firewood or other fuel into them. However, when installing the stove in this way, it is necessary to position the firebox door so that it is impossible to get burned on it.
- The walls of the heating structure should not be closely adjacent to the walls of the house, that is, free access must be provided to any of them, since for safety reasons they require periodic monitoring, and the internal channels of the furnace require cleaning of the chambers. Sometimes the stove is part of the wall of the house, in which case reliable heat insulation is laid between it and the end of the partition.

- If the stove is installed in an already built house, then, when planning its location, it is necessary to ensure that the chimney pipe falls between the attic floor beams, which must be at a distance of at least 150 mm from it, with the creation of a thermal insulating “gasket” filled with heat-resistant material. To do this, most often they fix around the pipe metal box, which is filled with fine expanded clay, mineral wool, vermiculite or simply sand.
- The area in front of the furnace firebox must be covered with heat-resistant material - it can be a metal sheet or ceramic tiles.
You might be interested in information about what it is
Models of simple-designed small brick ovens
Small brick kilns do not lose their relevance today. And this is despite the emergence of alternative heating options, since many of these new products are too expensive, while others are unavailable in suburban conditions. The stove, traditional for Russian houses, will help out in any situation - it will warm the house and cook food. Therefore, if there is no gas supplied to the house, and the electricity is often cut off, or you just want to save money on it, you should choose a stove that includes a hob. Knowing the demand for small-sized stove models, engineers have developed quite a lot of their options. Some of them will be discussed further.
Oven "Krokha"
The name of the model “Krokha” itself speaks about the size of this stove, and it is suitable for a residential building with any area. Moreover, when correct installation design, it is quite capable of heating not one, but two whole rooms and a kitchen. For country house this compact stove will ideal option, as it can create comfort in it in spring and autumn, as well as in damp or cold weather in summer.

This stove is called a “simple stove” because it is simple in design, and with a serious approach it can easily be built even by a novice master. The oven has very small dimensions, only 640×770 mm at the base, so it is suitable even for small room, where it will be decided to allocate a corner for it.
The designer of the stove, A. Sushkov, successfully combined compactness, elegance and functionality in it, so “Krokha” will fit perfectly not only into a cottage room, but will also decorate the interior of a private home with its cozy appearance. This stove is designed to heat one or two rooms with an area of 18÷20 m², and has the following characteristics:
| Oven parameters | Numeric parameter values |
|---|---|
| Width and length at base | 3×2.5 bricks or 640×770 mm |
| Height of structure to pipe | 2030 mm |
| Oven weight | 1260-1280 kg |
| Firebox depth | 746 mm |
| Efficiency | Up to 70-75% |
| Heat transfer with a disposable firebox | 1760 W |
| With a three-time fire | 2940 W |
| Hob | Single burner |
The designer thought well about the rationality of the stove, so for its small size it gives excellent heat transfer. During the combustion process of this model, its lower section warms up, and the “cap” located in the upper part retains the generated heat well and slows down its escape into the chimney. The stove is equipped with a “summer” operation, which allows you to heat only the hob without heating the entire structure, which is especially important in the warm season. “Krokha” has three design options that differ in the location of the hob relative to the firebox, but most often the improved and most convenient version is used, in which the stove and firebox are located on one side. This arrangement is convenient because the stove can be installed in such a way that the firebox and stove will be in the kitchen, and the other two walls, if built into the partition, will heat two rooms located across the wall from the kitchen area.

In order for the stove to last as long as possible and be safe, its fuel chamber is lined with fire-resistant fireclay bricks. Such walls can withstand not only the heat of wood, but also fuel such as coal, briquettes and peat.
Up to the stove level, the oven has smooth walls, and above the combustion door, under the hob, along the entire perimeter of the building, a row protruding forward by 30÷35 mm is laid out, which divides the structure into two sections: the upper, air-gas, and the lower, fuel. At the top of the furnace there are channels for circulating heated air. They help retain heat in the oven for as long as possible, preventing it from immediately escaping into the chimney.

According to the developer's idea, this stove should be equipped with a combustion door with fire-resistant glass, through which the flames are clearly visible. Therefore, if desired, “Krokha” can be used as a small fireplace. Such a door may well be replaced with a conventional cast iron version.
Since the oven has small size along the perimeter, it will require fewer consumables.
| Size in mm | Quantity, pcs. | |
|---|---|---|
| Fireclay brick SHA-8 | 21 | |
| Red brick (without chimney pipe) | 352 | |
| Curly (rounded) red brick | 124 | |
| 350×250 | 1 | |
| Glass combustion door in a cast iron frame (DP-308-1S) | 210×250 | 1 |
| Cast iron ash door | 140×140 | 1 |
| 410×340 | 1 | |
| Metal sheet for flooring in front of the firebox | 500×700 | 1 |
| Chimney damper | 130×250 | 1 |
| Steel corner | 40×40×5×520 | 4 |
Compact stove model - “Baby”

The main advantage of the model is its small size, 505×760 mm at the base. Well, the low weight, only 360÷365 kg, allows the structure to be installed on a strong, heat-insulated wooden floor. A small stove has relatively thin walls, so when it heats up, it quickly begins to release heat into the room, in which a comfortable temperature is created in a short period.
When laying this stove model, it is important to take into account one point - in the first bottom row of the rear wall, the middle brick must be left free, that is, laid without mortar. This must be done so that after completion of the masonry, the brick can be pulled out and the bottom of the stove can be cleaned of fallen mortar. In addition, the resulting hole will help dry the finished structure faster. Then, the brick can be installed in place using the mortar.
If the stove is planned to be installed on a wooden or concrete floor, then a heat-resistant layer is laid on it before laying. Typically, an asbestos sheet 5 mm thick is used for this, which is covered on top with a metal sheet or roofing felt and an additional continuous layer brickwork. In addition, it must be remembered that a metal sheet or ceramic floor tiles must be laid and secured in front of the stove.
The first heating of the finished stove should be carried out with light fuel - it can be paper or straw. After the stove is heated, its doors and valves are opened for ventilation and final drying, which must be carried out for at least 7–9 days.
After drying, it is recommended to whitewash the stove. The question arises: . Smoke will immediately appear on the whitewash layer if there are small gaps that are invisible to the eye between the mortar and the brick. Smoke will leave black or gray streaks on the whitewash that will stretch upward from the defective seam. When such marks appear, the seam from which they come must be completely cleaned of frozen solution and fill it with a new one, but more carefully and accurately.
You might be interested in information on how to do it with step-by-step instructions
If you plan to produce decorative finishing the outer walls of the “Malyshka”, then you can start this only after two to three months of operating the stove.

The chimney of this model has such a design that it can be brought outside in three ways:
- Having raised the brickwork of the chimney to the ceiling, bring it out through the attic and the roof of the house;
- By embedding a steel pipe into it and connecting it to the main chimney;
- An embedded pipe can be taken out through the wall, having previously secured the opening of its passage with heat-resistant material.

This diagram will help you understand the design of this model. brick oven, since the number of rows and the configuration of smoke exhaust ducts are clearly visible on it.
The main characteristics of the Malyshka stove are as follows:
| Oven parameters | Numeric parameter values |
|---|---|
| Width and length at base | 505×760 mm |
| Height of structure to pipe | 725 mm |
| Oven weight | 360÷370 kg |
| Firebox depth | 737 mm |
| Chimney duct cross-section size | 100×100 mm |
| Efficiency | Up to 70-75% |
| Heat dissipation | 1210 W |
| Hob | single burner |
To build the “Malyshki” stove you will need following materials And ready-made elements(excluding the chimney pipe):
| Name of materials and components | Size in mm | Quantity, pcs. |
|---|---|---|
| Fireclay brick SHA-8 for firebox | 37 | |
| Red brick | 62 | |
| Cast iron ash door | 140×140 | 1 |
| Cast iron fire door | 210×250 | 1 |
| Single burner cast iron stove | 410×340 | 1 |
| Cast iron grate | 350×200 | 1 |
| Chimney damper | 130×250 | 1 |
| 550×800 | 1 |
Prices for fireclay bricks
fireclay brick

It should be noted that this model can be easily improved, despite its compactness. Some craftsmen manage to add an oven and a tank for heating water to its design. In this configuration, “Malyshka” can be used as a sauna stove.
You may be interested in information about what mini
Heating stove with a small footprint
This mini-oven model has only one heating function. It can be used for installation in a country house if, in addition to it, an electric or gas stove for cooking, and there is no need for hob. Otherwise, its installation will be irrational.

It is also suitable for a private house in which you need to heat two adjoining rooms, building a stove into the wall between them.

The advantage of this model can be safely called its compactness and high heat transfer. Side walls The stoves have a fairly large area, so when they heat up, they will become a kind of “battery” the size of half a wall, which will quickly and efficiently transfer heat to the premises. The total heat transfer from this model is about 2000 W, with the front and rear walls accounting for 210 W, and the side walls accounting for 895 W each.
The heating stove has a more complex internal structure, consisting of several channels, which provide excellent heat transfer from the walls. Since the oven has a decent height, it will require more material.

The characteristics of this mini-oven model consist of the following parameters:
IN in this case the design of the furnace, just like the structure of the “Krokha”, can be divided into two sections: the upper – gas exhaust, and the lower – combustion. The upper part of the furnace, the “hood,” consists of vertical channels connected to each other by horizontal ones. Thanks to this feature, warm air lingers longer inside the structure, heating the entire area of its side walls.
To build this model you will need the materials listed in this table:
| Name of materials and components | Size in mm | Quantity, pcs. |
|---|---|---|
| Red brick | 260 | |
| Fireclay brick SHA-8 for the combustion department | 130 | |
| Cast iron grate | 250×400 | 1 |
| Cast iron ash door | 140×200 | 1 |
| Cast iron fire door | 200×300 | 1 |
| Cleaning doors | 140×200 | 2 |
| Chimney damper | 130×310 | 2 |
| Roofing felt sheet for waterproofing | 1000×600 | 2 |
| Metal sheet for flooring under the stove and in front of the firebox | 500×700 | 1 |
To make the work easier, craftsmen use special ordering diagrams, which must be followed when laying each row.
Prices for chimney valves
chimney valves

This sequence diagram shows the laying of the furnace from the first to the twelfth row. Construction can be carried out on an equipped foundation or on a prepared waterproofed one concrete floor. Since the structure is quite massive and bulky in height, it cannot be installed on a wooden floor.
- Ruberoid is laid under the masonry in two layers, and to simplify the alignment of the first row, on waterproofing material can be drawn with chalk, using a long ruler, the border of the base.
- When laying the first row, we must not forget that the horizontal and verticality of the furnace walls will depend on its quality and accuracy. Therefore, before starting work, it is necessary to prepare control tools - a plumb line and a building level. Some craftsmen also practice stretching horizontal cords for each row.
- As you can see in the diagram, a blower door is mounted on the second row, and a vertical smoke exhaust channel is formed.
- On the fifth row of masonry, a grate is installed, which will block the blower chamber and mark the bottom of the combustion chamber. Starting from the fifth and ending with the 15th row, the masonry is made with fireclay bricks.
- On the sixth row, in front of the grate, the combustion door is installed and secured with wire.
Prices for roofing material
roofing felt

- The following diagram represents the order, starting with the 13th row and ending with the 24th row. This shows the gradual formation of vertical channels and a combustion chamber, so it is very important to carry out the masonry in accordance with the diagram. Otherwise, the entire work may be ruined and will have to be redone.
- Having finished laying the fifteenth row and the walls of the sixteenth, a clay-cement mixture is laid out in the resulting space, and the cleaning chamber door is installed. Further, up to the 25th row, the masonry is carried out according to the order scheme.

- On the 25th row, the bottom of the second cleaning chamber is formed. To do this, a layer of clay-sand mixture is laid on top of the brickwork of the 24th row. Then the cleaning chamber door is installed.
- On the 28th and 32nd rows, two chimney valves are installed, with the help of which it will be possible to regulate the draft.
- The remaining rows are laid according to the diagram, and from the 35th row the laying of the chimney pipe begins.
Heating and cooking "Swedish" - a detailed description of the furnace laying
General description and required materials
In the final section, a fairly popular Swedish stove model will be presented. It was chosen for a detailed description because, with its simple design and compact size, it is multifunctional and very comfortable to use.

This version of the heating and cooking stove has a good location of all functional elements - they are located on one front side of the structure. Therefore, such a “Swede” is usually installed in such a way that the hob, oven, drying niches and, of course, the combustion chamber face the kitchen, and the smooth rear brick wall, which warms up perfectly during the fire, faces the living room.
The dimensions of this design are 1020x885x2030 mm, with a power of 2750 kcal/hour, so the stove is capable of heating one or two rooms with an area of up to 30 square meters. m.
The presented version of the “Swede” was created for certain operating conditions. So, it was created for heating country house, measuring 4000×7000 mm, built from sand-lime brick or blocks. However, this model is also suitable for houses of other sizes, as evidenced by its heat transfer parameters.
- Wood and other types of solid fuel can be used as fuel for this stove.
- For this model, only the internal lining of the combustion chamber and the areas located next to it is carried out. Therefore, fireclay brick will not interfere with the aesthetic appearance of the stove facade, made of high-quality red brick. External finishing is not provided.
- In order for the stove to be efficient and meet the heat transfer characteristics, its walls must be relatively thick (half a brick), so installing bricks on spoons is not allowed.
- In this design, the laying of a drying chamber is mandatory.
If you decide to use this development, you should first consider the table necessary materials and calculate their cost for your region of residence.
You may be interested in information about which one is best to use when building fireplaces and stoves.
Table of materials that are needed to build a heating and cooking “Swedish”:
| Name of materials and components | Size(mm) | Quantity (pcs.) |
|---|---|---|
| Red solid stove brick (excluding pipe height) | 250×120×60 | 551 |
| Fireclay refractory brick Sh-8 | 250×124×65 | 31 |
| Blower door | 140×250 | 1 |
| Fire door | 210×250 | 1 |
| Doors for cleaning chambers | 140×140 | 3 |
| Oven | 450×250×290 | 1 |
| Cast iron two-burner cooking stove | 410×710 | 1 |
| grate | 200×300 | 1 |
| Chimney damper | 130×250 | 1 |
| Steam exhaust valve | 130×130 | 1 |
| Steel corner | 45×45×5×1020 | 1 |
| Steel strip | 45×45×5×700 | 1 |
| Steel strip | 45×45×5×905 | 5 |
| Steel strip | 50×5×650 | 2 |
| Drying rack | 190×340 | 1 |
| Floor metal sheet drying chambers | 800×905×0.5÷1 | 1 |
| Pre-furnace metal sheet | 500×700×1.5÷2 | 1 |
| Asbestos sheet or twine for laying between brick and metal elements. | 5mm thick | 1 |
Step-by-step instructions for laying a heating and cooking "Swedish"

| Illustration | Description of the work procedure |
|---|---|
 | The first continuous row, consisting of 28 red bricks, must have a perfectly flat surface and right angles, since it is the basis on which all other vertical and horizontal planes and rows will be oriented. |
 | The second row is laid out from 28 ½ red bricks, also with solid masonry, but its pattern has a slightly different configuration. This point must be taken into account when carrying out work, because the seams between the masonry of the lower first row should not coincide with the seams between the bricks of the upper second row. In other words, the bricks must be laid staggered, with overlapping seams. |
 | On the third row, the formation of the lower heating chamber, which will be located under the oven, and the blower begin. Vertical smoke exhaust channels also begin to form. When laying out a row, they leave peculiar windows for installing the doors of the cleaning chambers for the vertical channels, as well as the blower and the lower heating chamber. After completing the installation of this row, cast iron doors are fixed into the windows. After this, work is done inside the structure - two whole and two three-quarter bricks are mounted on a spoon. Moreover, the corner of the brick installed in the right vertical channel is cramped for more unhindered air circulation. In addition, a fourth part of fireclay brick is installed in the first chimney channel - it is highlighted in yellow in the figure. To lay this row you will need ½ fireclay bricks and 14½ red ones. |
 | Fourth row. At this stage, channels and chambers continue to form, according to the diagram, and the chimney channels still remain united. For a row you will need ½ fireclay bricks and 14½ red ones. |
 | When working on the fifth row, the previously installed doors overlap. The side walls of the combustion chamber bottom are lined with fireclay bricks. Moreover, in the brick that will be laid on the sides, it is necessary to cut steps for laying the grate. The second and third vertical channels remain combined, but are shared with the right first channel. To install this row, you need to prepare 8 fireclay and 16 red bricks. |
 | The sixth row is laid out according to the pattern. At this stage, the second and third flue ducts are separated from each other, and there should now be three separate ducts at the rear of the stove. The base under the oven and the inner walls of the firebox are lined with fireclay bricks - it is placed on a spoon. The wall between the niche for oven and the fuel chamber is built from quarters of fireclay bricks. Next comes the stage of installing the firebox door, also in the window left for it between the bricks. The door frame must be wrapped with asbestos material so that there is an expansion gap between it and the brick for the expansion of the metal when it is heated. Temporarily, the door can be supported with stacks of loose bricks until it is firmly fixed by the next rows of masonry. In addition to the door, an oven is installed, which is also pre-wrapped in asbestos. For the laying of this row and the internal arrangement of the niches, 13 red and 3½ fireclay bricks will be required. |
 | For greater clarity, this figure shows the sixth row laid out with the oven box installed. |
 | On the seventh row, the firebox and oven chambers continue to form - the internal lining is fire-resistant, and external masonry- red brick. Fireclay brick is installed on a spoon, red brick on a bed (flat). To work you will need 13 red and 4 fireclay bricks. |
 | On the eighth row, the first chimney channel is separated from the chamber where the oven box is installed, with fireclay bricks. The rest of the masonry follows the presented scheme, and it uses 5 fireclay and 13 red bricks. |
 | Ninth row. At this stage, the door of the combustion chamber is blocked with a brick. The remaining work is carried out according to the diagram shown, and for them you need to prepare 5 fireclay and 13½ red bricks. |
 | On the tenth row, the oven is covered with masonry. The wall between the oven and the firebox is not laid out. A 10x10 mm step is cut into the refractory brick installed along the inner perimeter of the front of the stove, intended for laying the cast iron hob. This row will require 4½ fireclay and 15 red bricks. |
 | Having laid out the tenth row, on a step carved in fireclay brick, along the entire perimeter internal space lay asbestos cord. Then, the hob itself is mounted - it should be located on the same level with the outer walls of the oven, built of red brick. In front of the laid slab, on the front wall, a steel corner (45×45×1020 mm) is mounted, designed to protect brick corner from damage and general strengthening of the row. |
 | On the 11th row, the walls of the cooking chamber are formed. The gap that has formed between the hob and the right wall of the stove is filled with bricks, which are mounted across the masonry of the 10th row. To work you need to prepare 16 pieces of red brick. |
 | For the 12th row you will need 15 red bricks - the laying proceeds according to the presented scheme. |
 | The 13th and 14th rows are laid out according to the serial pattern shown. For the 13th row you will need 15½, and for the 14th - 14½ bricks. Here you need to take into account that the seams between the bricks of the bottom row must be covered with a whole brick, which means that the 14th row will have a different pattern from the 13th. |
 | The 15th and 16th rows are also laid according to the order pattern. For them you need to prepare: for the 15th row - 16, and for the 16th - 14½ red bricks. |
 | After completing the laying of the 16th row, the cooking chamber must be covered with three steel corners measuring 45x45x905 mm. In the middle part of the space above the chamber, two corners are placed side by side, with vertical walls facing each other, and one corner at the end of the chamber. In addition to them, a strip measuring 45x45x700 mm covers the front part of the chamber. These elements form a reliable support for covering the chamber with bricks, so the corners should be laid at a distance of 255 mm from each other. |
 | The masonry of the 17th row consists of 25½ bricks, which cover the space of the cooking chamber. Moreover, a hole is left in the far left corner of the ceiling to extract vapors from the cooking chamber - its size should be half a brick. In addition to the ceiling, the laying of vertical channels continues. |
 | The 18th row is laid out almost completely, but the exhaust and vertical channels remain open. To work you will need 25 bricks. |
 | After this, a steel corner measuring 45x45x905 mm is installed on the front edge of the masonry. This element is intended to strengthen the ceiling of the exhaust chamber window, since it must support two rows of upper masonry. |
 | On the 19th row, small and large drying niches begin to form, as well as a continuation of the ventilation duct designed to remove vapors from the lower cooking chamber. The work is proceeding according to the scheme, and for laying you need to prepare 16 red bricks. |
 | The 20th row also consists of 16 bricks and is mounted according to the diagram shown. |
 | The 21st row consists of 16½ red bricks. It is laid out according to the diagram shown. |
 | The 22nd row is laid out with 16 red bricks. |
 | After laying out the 22nd row, a metal plate measuring 190x340 mm is mounted on the small drying chamber, which will act as a heated shelf. |
 | 23rd row. At this stage, the walls of the smoke exhaust channels and drying chambers continue to rise. A cutout is made on the brick laid above the steam outlet channel, into which a valve will be mounted to regulate the heating of the cooking chamber. The next step is to place a valve with a size of 140×140 mm on the prepared seat. For this row you need to prepare 17 red bricks. |
 | On the 24th row, the ventilation valve is closed, as well as the first and second chimney ducts are combined. To work on this row you will need 15½ bricks. |
 | On the 25th row, three vertical channels are combined into one. For this row you need to prepare 15½ red bricks. |
 | The 26th row consists of 16½ bricks and is laid according to the demonstrated pattern. |
 | Further, on the same 26th row, the drying chambers are covered with a steel corner measuring 45x45x905 mm and two steel strips measuring 50x5x650 mm. The angle placed on the front side of the drying chambers is intended to increase the rigidity of the structure, and also, together with the steel strips, to create a base for the steel sheet covering the chambers. |
 | A sheet of metal measuring 800×905 mm is laid on top of the steel strips and angles. It covers the surface of the chambers and vertical ventilation ducts, except for one chimney channel, into which smoke will flow from all other channels. The chimney pipe will be built above it. |
 | On the 27th row from the top metal sheet continuous brickwork is installed. It should protrude 25 mm beyond the perimeter of the oven cross-section. To lay this row you will need 32 bricks. |
 | The 28th row completely overlaps the previous one and protrudes beyond it by another 25 mm. The chimney opening remains open. To lay out this row you will need 37 red bricks. |
 | Row 29 will require 26½ red bricks. They are laid out with an indentation of 50 mm inward from the edge of the previous row, essentially bringing it to the size of the perimeter of the base of the oven. |
 | The 30th row of the furnace masonry is already the first row of the chimney superstructure. A row consists of 5 red bricks. At the top of the side bricks laid in this row, a 10x10 mm step is cut out - it will serve as a seat for the chimney damper, measuring 250x130 mm. Next, the valve frame itself is mounted on the clay mortar. |
 | The 31st row is the second row of the chimney. It overlaps the edges of the chimney damper, thus fixing it from above. The row also consists of 5 bricks. Work on the construction of the chimney will begin above. |
The lower diagram with a section of the design of this furnace shows the direction of circulation of fuel combustion products. It clearly shows that hot gas flows, thanks to vertical channels, cover the entire surface of the furnace, heating it, and from a well-heated surface, heat is effectively transferred to the heated room.

So, building an efficient brick oven quickly and inexpensively is a completely doable task. This publication did not say anything about masonry mortar, but only because this issue is well covered in another article on our portal.
 Which mortar is best for laying a furnace?
The question is serious, since not only the strength of the structure being built depends on the quality of the solution; the issues of safe operation of the furnace come first. About which ones and when they are used – in a special publication on our portal.
You may be interested in information about how to build
In conclusion, as a “bonus” - another option for a small heating and cooking stove, well suited for country conditions:
Video: compact multifunctional brick oven for a summer house or small house

Evgeniy AfanasyevChief Editor
Author of the publication 16.10.2016
![]()
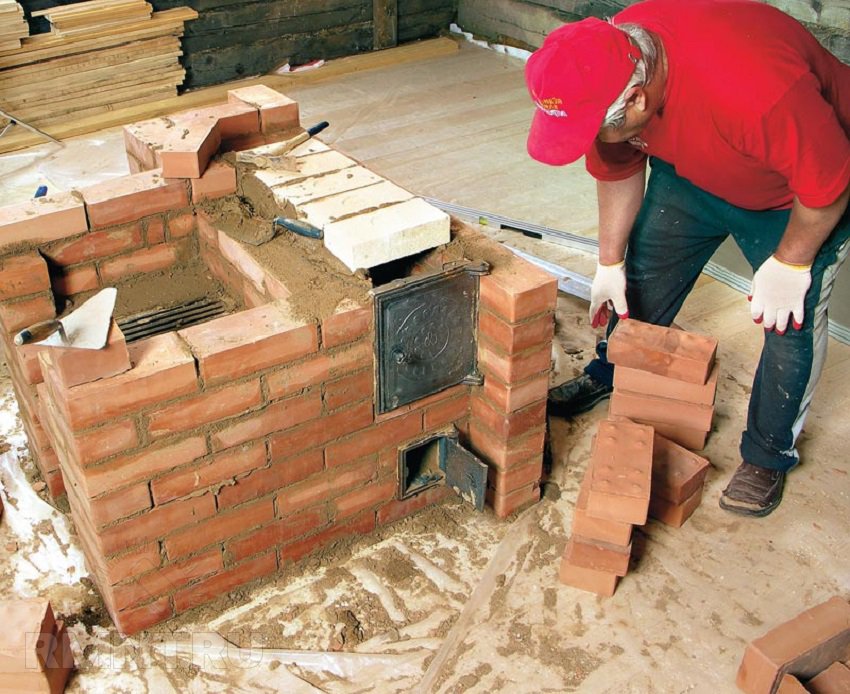
A mini brick oven for a dacha is made entirely with your own hands and, moreover, it does not take much time. A mini brick stove is perfect where there is no central heating. This is, for example, a dacha.
You can always come and warm up the room, and also cook your own food. Today we will tell you how to do this design. The installation cost is not high, and everyone can afford it.
Also different kinds You can see this design in the video in this article.
Why is a mini-oven attractive?
A mini brick stove for a summer residence is quite attractive in many respects:
- It occupies a small area, which is equal to 0.40 meters square. Despite its very small size, it can give off heat for a long time and can serve as an alternative to a metal stove-stove.
- Due to its small size, there is no need to build a solid foundation for it. It can be laid out directly on the floor.
- If the floor is wooden, then it is advisable to place a sheet of metal with asbestos on the bottom of the stove to protect the floor from fire. Compared to a potbelly stove, it is more functional, as it has hob on which you can cook food.
- It can be made entirely with your own hands. This will make its price insignificant.
To provide this functionality, the oven design includes:
- Cast iron stove for cooking.
- Chimneys, allowing to increase the efficiency of the furnace.
- Smoke tooth. Its use allows you to turn a mini-oven into a fireplace.
A mini brick stove is laid out within one working day, of course, if you have work experience.
After laying out the stove, you can try it in operation by partially lighting it, using wood chips or paper for this.
Attention: Lighting a stove using large logs is prohibited, as under the influence high temperatures Cracks may appear in the furnace structure.
After test firing, without allowing the stove to warm up, it is allowed to dry naturally. This may take up to 2 weeks.
Masonry mortar
If you are making mini brick sauna stoves, then you need to make a solution taking into account high humidity.
So:
- To lay out a mini-oven, you can use various types of mortars, such as cement-sand, cement-screening or clay-sand. Cement-screening mortar can be used to fill the base under the furnace, if necessary. Cement-sand mortar is prepared for laying out the first two rows of the furnace, and clay-sand mortar is used to lay out the entire masonry, starting from the third row.
- Clay-sand solution requires much more time to prepare. To obtain a high-quality solution, the clay is soaked in the evening to soften all the smallest particles of clay. Moreover, it is necessary to select the desired fat content of the clay, or rather the solution, by adding sand or fattier clay to it. This process is very labor-intensive, but it is necessary so that the mini-stove ends up being strong enough.
- You can check how ready the solution is for use using a trowel: if it does not stick to the trowel and does not leave its marks on it, then it can be used. At the same time, its thickness should correspond to the thickness of mashed potatoes.
Step-by-step masonry diagram.
Installation of a mini stove
Brick is a traditional stove lining material that has been used for centuries. A mini brick oven is made specifically from bricks, but it is best to use two types of them during construction.
- To build a working one, it is often worth using fire-resistant material. It can withstand even a coal fire.
- Facing material is also quite suitable for finishing.
Attention: You can use just one ordinary brick in the construction. Only in this case it will be possible to heat only with wood.

Having prepared required quantity bricks, you can begin work, the instructions are given below:
- First of all, you should decide on a place for the mini-oven. Its effectiveness largely depends on this.
- A mini brick stove for a bath will occupy an area of about 800x550 mm. You just need to lay a fireproof layer, as well as a layer of waterproofing. As a waterproofing layer, you can use roofing material, and as a fireproof layer, if the base is wooden, you can use sheet asbestos.
- A layer of sand about 10 mm thick is poured onto the waterproofing layer.
- The first row of bricks is laid on top of the sand, without using mortar. This row is leveled strictly horizontally, hammering in the exposed bricks using a rubber hammer.
- A thin layer is applied to this brick row clay mortar and the blower door is immediately installed. The door is set strictly horizontally and strictly vertically, after which it is securely fixed. After fixing it, you can start laying out the second row.
- The 3rd and subsequent rows are laid out with refractory bricks (fireclay). After laying out the 3rd row, a grate should be installed, which should be located in the center of the blower.
- The 4th row is laid out in a quarter of a brick (on the edge), regardless of how the previous rows were laid out. The back wall is laid out without mortar. These bricks will be removed later.
- After the 4th row, they begin to install the firebox door. It is installed in such a way that it opens from bottom to top. It is attached in the same way as the blower, using wire, the ends of which are embedded between the bricks that form the rows of masonry. The door is exposed and securely fixed.
- The 5th row of bricks is laid out according to the 4th row, but the bricks lie flat.
- Then the last row of the 6th is laid out, which lies on the edge. The walls of the chimney and the inner surface of the bricks are cleaned of mortar and wiped with a damp cloth.
- The next row lies flat, with the back wall laid out on edge in two bricks.
- This row covers the firebox level and a brick is installed in this row at an angle so that it hangs over the firebox, shifting the flame closer to the center of the stove. This operation is performed on the eighth row. This brick is effective when the stove is used as a fireplace, operating with the firebox door open.
- The 9th row is shifted slightly back, which allows you to keep the door open. To ensure the tightness of the joints of the slab and brick, an asbestos cord is used. Stow cast iron stove Not recommended for clay.
- On the 10th row, a place for installing the pipe is formed. In this case, an attached metal pipe made of light iron is used. Brick pipe It will be heavy for such a mini-stove.
- The valve, sealed with asbestos cord, is installed on the 11th row.
- Using the following rows, a part of the pipe is formed that connects to the metal pipe - the chimney.
- The final stage in the construction of mini-ovens is whitewashing, but it can be done decorative cladding tiles. Unfortunately, whitewashing is not practical: whitewashing will have to be repeated approximately once a year, and tile It will not only decorate the stove, but will also save you from constant whitening.
- Before whitewashing, it is advisable to clean the stove of debris and perform a test ignition. If the stove is working and there are no problems, you can start whitewashing or tiling, after which you need to give time for complete drying. This is very important and you should not rush to light the mini-stove, so as not to cause harm. TO heating season You should prepare in advance, then winter will not seem so cold.
Material for mini-stove
Building a mini-stove with your own hands requires, at a minimum, the ability to determine the quality and quantity of the material.
So:
- In order to build such a stove, you need to stock up on red bricks, about 60 pieces, and fireproof (fireclay) bricks, about 40 pieces. In order to stack all the bricks together, you will need about two buckets of mortar.
- The stove will not be complete if you do not purchase and install such elements as a combustion and blower door, a hob and a grate, as well as a metal valve. As for the grates, doors and stove, it is better to purchase cast iron ones. Cast iron is not afraid high temperatures and it does not work under large temperature differences if large elements were made according to the technology.
- The design of the mini-stove is simple and its construction does not require much effort. The main thing is to correctly determine the stages of its layout and purchase all the necessary materials, have the right tool and prepare the correct solution.
Attention: It is very important that the laying is carried out in accordance with the basic requirements for laying out such surfaces: to be smooth and neat, and internal surfaces the chimney and combustion chamber should not have sagging from the solution.
- The efficiency of such a mini-oven is approximately 90%, which says a lot. At the same time, it is important to note the financial costs, which are minimal, while the functionality of the stove is quite high.
- You can build a mini-stove for any flammable material, but, as a rule, wood or coal is burned in such furnaces. The use of other flammable materials is not justified based on certain requirements, including fire safety.
- Using wood or coal, the stove does not emit any foreign odors that could harm health. You can imagine what the smell would be in the house if you used diesel fuel. Only using firewood, peat or coal will the stove be environmentally friendly.
Attention: Mini brick stoves for baths should be made only with wood, because only such fuel provides high-quality heating and is completely safe.
A mini brick stove for a summer residence can have quite different shapes. Therefore, look at the photo first and choose the desired option.
This article contains clear, very detailed photo instructions for laying a brick stove with your own hands, tips on how not to make mistakes when choosing the necessary materials and how to correctly place the stove in a private house for optimal heating of a larger area.
Options for installing a stove in the house
The placement of the stove depends entirely on what exactly the owners expect from it. If it is installed in the house small area and will be used as a fireplace for friendly get-togethers, you can use the first scheme. This stove is a good option for cooking barbecue on the grill or kebabs.
Brick kiln placement options
The second scheme is for a house of solid square footage. In this case, the front side of the fireplace stove opens into the living room, the stove walls heat both bedrooms, and the heat in the remaining rooms is maintained using heat exchange.
The third scheme with a stove for heating and cooking - a budget option housing for a bachelor or small family. Pros: a warm bed and the ability to place a dryer in the hallway.
Important: you should take care in advance external insulation at home, because it greatly increases the efficiency of stove heating.
Selection of bricks, sand, mortar
In order for the stove to serve for a long time, you need to select all the materials correctly. There are three types of bricks:
- Ceramic - can be used to build a stove.
- Silicate ones are generally not suitable in this case, even double M150.
- Fireproof - ideal, but they are often used only for fireboxes and fireplaces, varieties: fireclay, refractory bricks, etc.

Advice: when choosing a brick for a stove, you need to completely abandon the hollow types.
The solution is made from clay. Red clay is suitable if the stove is made of red brick; when using fireclay, special fireclay clay is required. Some stove makers still make their own solution in the old fashioned way from river sand with a grain size of 1-1.5 mm, clay (in a ratio of 2.5:1) and water. It is advisable to use angular quarry sand without foreign inclusions and the so-called fatty clay. However, it is easier and more reliable to buy a ready-made baking mixture in the store, preparing it according to the instructions.
From the accessories you need to purchase grates, blower and combustion doors, soot cleaners, valves or dampers.
Preparation, list of tools
Before starting work, you need to determine and mark the place that the new stove will occupy.
The chimney pipe should be no closer than 15 cm from the roof rafters.
If you are doing masonry for the first time, professional stove makers advise you to practice in advance by making a model of the future stove from prepared bricks. Naturally, without a solution. This minimizes possible risks during real masonry, allowing you to learn from your mistakes, which can still be corrected in the layout.
The stove foundation requires preliminary waterproofing; its area must exceed the area of the stove.
When laying a new row, you need to control the absolute verticality of the walls.

To build a brick kiln, the following tools are needed:
- plumb line;
- trowel;
- roulette;
- putty knife;
- Bulgarian;
- knitting wire;
- building level;
- metal strips, corners;
- containers for cement and clay mortar.
Step-by-step instructions with photos for laying a stove
Different stove makers have their own masonry technologies and their own secrets that come with years of experience. Here is information about enough in a simple way creating a stove-fireplace for heating two-story house, the process will not seem extremely difficult even to novice stove makers.
Foundation laying
The base course of brickwork will serve as the foundation. It is done with any brick; some stove makers even fill this level with crushed stone.

When laying the base row, cement mortar is used.

The foundation is completely filled with mortar, the layer is leveled.

Construction of the furnace body
The first row of stoves is marked. The horizontal line from which they start when marking is the wall of the room.

A grate is placed where the fireplace is planned to be placed. From this row, the bricks are already laid on the kiln mortar.

An important stage of work is the scrupulous alignment of each new row by level.

Laying the second row. The stove wall, located closest to the wall of the room, is reinforced with additional bricks to increase fire safety.
The place where it will be located in the 2nd row remains empty, the rest of the oven is filled in completely. A door is installed through which the owners will clean out the ash.

The door is installed on the solution and leveled. For a more reliable fixation, it is secured with wire, which must be laid between the bricks.


The grate is laid not on a simple brick, but on a refractory brick. To ensure that it lies at the same level as the bricks, holes are cut in the fireclay bricks.

The size of the brick can be easily adjusted - the excess is measured and carefully cut off.

The large door is mounted next to the installed grille.

The large oven door is similarly secured using wire fasteners.

The first row of fireboxes is placed exactly above the fireplace, it is reinforced with metal corners and a strip or thick tin. So that the masonry can lie on them, it is cut using a grinder, then the slots are adjusted manually to the required size.

The next brick row is laid.

For refractory bricks on a par with brick row The fireplace grate is installed.

The door is fixed, the brick is strictly adjusted to it.

The firebox of the new stove and fireplace is ready.

Fire-resistant fireclay bricks are placed above the stove firebox.

The stove body is built.
Creating a chimney
The space left for the chimney is divided into wells. The design requires reinforcement with metal plates.

Brick chimney wells are laid.

Soot cleaners are mounted above the firebox roof.

The wells are divided again, the first rows of walls should be reinforced with strips of metal.

After strengthening, the ceiling of the furnace body is erected. The space associated with the chimney remains empty.

The body cornice is laid out, then the chimneys are laid.

The final stage of work on the first floor. The stove is located at the bottom left, the smoke inside the chimneys moves in a spiral and comes out at the top left. The final separation of the wells is covered with a tin sheet. In order to compensate for the pressure inside the fireplace stove, 2 brick rows are laid on the tin.

There are two chimneys stretching to the second floor of the house - from the fireplace and the stove itself, they are separated from each other. Each chimney requires the installation of a separate damper.

Floor level of the second floor. Waterproofing is installed here, the chimney is again reinforced with metal corners. To save money and avoid building a heating stove on the second floor, the chimney of the stove under construction is again divided. The smoke will snake through it, managing to warm up the room. In order for the chimney to warm up much faster, it is laid in the area of the second floor with a thickness of 1/4 or 1/2 brick.

A hole for the stove chimney is carefully cut out in the roof.

Before placing the chimney on the roof, it is reinforced with metal corners.

If the chimney is located in close proximity to the roof ridge, it must be laid out at least 0.5 meters above the ridge. If further, then the height of the chimney is allowed equal to the height of the ridge, but not lower. In this case, the wind increases the stove draft, lifting the smoke upward.

Even a small stove in the house means coziness and comfort. Stoves bigger size require increased skill and additional materials, however, the principle of their construction is similar to the method described above.
Using this design, it is very convenient to warm up your hands or gloves in winter. You can warm up a small pot of water. Which, in principle, is very important in winter period time when going fishing or winter hiking.
In the video you can see real review about how convenient this design is to use, its disadvantages and advantages.
This design is assembled from the following materials:
- large tin can;
- a small tin can or spray paint can;
- fastening for metal profile under drywall.
This design is based on regular jar from canned dog food. In principle, you can take any long tin can, it still won’t change the design.


The design also contains a ring, which is made from a conventional fastener for a metal profile for drywall. It is necessary in order to use it instead of a burner and place it on top of a mini oven. This will make it convenient for something to stand on top.
At the top of the banks are done round holes medium size, around the entire perimeter, at an equal distance from each other. They are necessary so that air can freely pass inside.


Now turn the jar over with the holes facing down. A hole is cut in the bottom for a tin can of smaller diameter (instead, you can take a container from a can of paint, it will take longer to burn out and fits in size). The smaller can should be approximately 2 cm smaller than the main one, and also 2-4 cm smaller in height. Cut a hole so that the smaller can fits very tightly and does not dangle.
We insert the smaller jar bottom down. Having previously made holes in its bottom, bottom and top of the side walls. Only after this do we insert the smaller jar into the larger one.


With the help of such a mini stove it is very convenient to warm your hands; wood chips are thrown into it from above, outer part It doesn't get very hot, it just gets warm. The burner can be easily hidden inside the bottom of the jar.

This design has its drawbacks: if there is a pot on top, it needs to be removed from time to time; This design must be constantly monitored so that the wood chips do not burn out (constantly toss).
And the advantages of this design: very good heat transfer; there is no need to fan the coals; if the fire goes out, you just throw in new chips and after a while they flare up under the air flow; Small size is very convenient to carry.


