If installation is to be done various types flooring, care must be taken to ensure that the surface of the base is perfectly flat.
Important so that the coating is laid efficiently. In addition, you need to take care of hydro- and thermal insulation and do everything for its long-term operation.
Below we will outline all the features of leveling a concrete floor before laying the laminate.
The need to level the base
So, why do you need to prepare the base before installation? laminated coating? This procedure should be carried out in order to:
- Protect the interlocking joints of individual boards. If there are imperfections in the concrete surface in the form of bumps and holes, this will cause the connection to fail and the distribution of loads will be incorrect. After some time, gaps form at the joints and cracks may appear on the laminate.
- Reduce moisture in the concrete base, which can harm laminate flooring. Moisture tends to penetrate from under the screed through cracks and defects in the concrete. This is why it is necessary to conduct a thorough preliminary preparation such a basis.
- Eliminate all existing irregularities, distortions, cracks, and potholes. Such defects lead to the fact that the laminate will be installed incorrectly, the quality of installation will suffer and the coating will last very little.
Align concrete base possible with any quality. For these works, self-leveling mixtures are used, plywood sheets or cement bonded particle boards.
You can level the concrete base yourself without investing extra money in it. Initially, it is necessary to thoroughly clean it of existing floor covering residues, dirt, debris, and dust.
It is advisable to use a vacuum cleaner, since a regular broom is not always able to remove everything unnecessary. Next, you need to inspect the base for cracks and other defects. They are masked with appropriate cement mortar.
Then a primer with a deeply penetrating effect is applied to the surface. If a screed is used, it will adhere securely to the base. Using a primer, you can reduce the absorbency of concrete, which will reduce the cracking of the floor.
If the question arises of how to level a concrete floor under laminate, then it is worth considering four types of work. Namely:
- Using leveling mass;
- Laying cement monolithic screed;
- Installation cement particle boards;
- Leveling by laying plywood.
Each method implies certain conditions of implementation, and also differs own merits and shortcomings.

The method of leveling the concrete base of a level with mass is not complicated and it will not take much time.
The dry mixture is diluted with water and has a self-leveling effect. She guarantees high-quality coating, makes it perfectly smooth, eliminating possible differences. It is easy to apply, which means anyone can work with it.
How to prepare leveling mass
The method for preparing mass level is quite simple. All proportions are indicated on the packaging of the mixture.
Important! To mix the components, you need to use a drill with an appropriate attachment. When preparing the solution, it is necessary to monitor the density of the mass and focus on specific tasks.
If it is necessary to make a thin leveling layer, the task of which is to hide all the unevenness, the thickness of the solution can be left medium. Such a layer cannot cope with leveling. In order for the floor surface to be perfectly smooth, the mixture must be uniform, without lumps.
Laying leveling mortar
Stages of pouring the leveling mixture under the laminated coating:
- The mixture should be poured at the highest point of the base. Thus, it will spread over the entire surface on its own.
- The solution should be spread with a spatula. You can use a toothed roller for leveling.
- To remove any air bubbles that have formed from the surface, you need to roll over it. It does not take too much time for the mass to dry completely. However, in order for it to gain proper strength, you need to wait several days. During this time, the surface must be protected from exposure to heavy objects. You also need to take your time when laying laminate flooring.
Monolithic screed
This type of screed is relevant in case of large differences. Before you start pouring the screed, you need to install guides and determine the level of the future floor using a pencil.
Between the beacons it is necessary to ensure a distance of 60-90 cm. These elements are placed on cement-sand mortar. The solution for monolithic pouring of floors under a laminate coating includes the following components: cement, sand and water in a ratio of 3:1:0.5.
Leveling the mixture is carried out by a rule. Once it dries, the beacons can be removed.
Laying cement bonded particle boards
DSP boards are an excellent option for leveling floors under laminate. After the base is cleared of debris and dust, ordinary wooden boards are laid on the floor.
Their fastening must be done taking into account the level of the future floor. Next, using self-tapping screws, you need to attach CBPB slabs.
Important! The resulting gaps should be sealed with an appropriate compound. A substrate is laid on top of the slabs. This completes the surface preparation and you can begin installing the laminate.

To level the floor before laying the laminated flooring, plywood sheets are often used. They need to be attached to logs in increments of 30 cm.
The plywood should be laid tightly. An additional layer of thermal insulation can be laid between the joists. If it is to be installed, a thick underlay should not be placed under the laminate. All it takes is thin layer with the task of depreciation.
Today, to level floors they resort to various methods. Which one should you choose? Where to start work?
Tools and materials for laminate flooring
To lay laminate flooring you need to prepare a set of tools and materials, which includes:
- Sound-absorbing substrate with a thickness of no more than 2 mm;
- Polyethylene, which is laid during concrete screed. Necessary for the vapor barrier effect;
- Jigsaw;
- Pencil and ruler;
- Mounting clamp. It will be useful when laying the final row of laminate panels.
Underlay for laminate
To provide floors with a waterproofing layer, you cannot do without a substrate that is able to cope with such a task. A film layer of 0.2 mm or more is suitable as a substrate. Its installation is carried out with an overlap of up to 20 cm and is fixed properly.
Important! If the base of the floors remains wooden, or there is linoleum on it, the waterproofing layer must be abandoned.
However, the layer of soundproofing material in in this case let's say. In this case, it will be possible to solve two problems simultaneously: reduce the noise level and make the surface smooth. For these purposes, the ideal material would be foamed polyethylene with a thickness of no more than 2 mm. Fastening the material should be done end-to-end.
Laminate location
When you plan to lay laminate flooring yourself, as a rule, three options for its location are used. These include: laying parallel to the incident light from the window, perpendicular placement or diagonal. A commonly used laying method is the first one, as it makes the seams invisible.
When installing laminate flooring, you need to ensure that the patterns are positioned correctly. This especially needs to be controlled at the joints between walls and floors. Floors can “walk” or, as they say, “breathe”.
Important! The gap must be calculated using the formula: the minimum gap in millimeters must correspond to the width of the room in meters, which is multiplied by 1.5. It should be taken into account that the criterion for the gap distance depends on the humidity level of the room.
The higher the humidity, the larger the gap should be. Gaps should also be provided in the area where pipes and doorways are located. The method of laying laminate can be interlocking or special at 45 degrees. The first option is called the “click” method.

- A series of spacer wedges are installed around the perimeter of the walls. They need to be placed taking into account the width of the gaps. After finishing work, these elements can be removed. You can start laying from the farthest corner of the room.
- Installation of the first row begins with a board, to which the next one is joined from the end side at an angle of 45 degrees. Then the boards are pressed tightly to the floor and the lock is latched.
- The second row of laminate is assembled using an identical method. You need to snap it on from the front side. It is advisable to carry out such work with an assistant, as it involves some difficulties. Thus, all subsequent rows are laid.
Laying laminate using the locking method
The Click laminate installation system is in great demand due to the fact that it is quite lightweight. There are other options, for example “Lock”. Its advantages include only the affordable cost of laminate flooring with this locking system. It is very difficult to assemble it, so this should be done by professionals.
Adhesive laminate also has a reasonable cost, but its installation system is very complex. For those who have decided to carry out the work of laying laminate flooring themselves and are doing it for the first time, the “Click” method is suitable, which does not require much effort and is carried out quickly. You need to start laying the flooring from the far corner.
Important! Initially, the first panel is placed. Before starting work, you need to place wedges in the gaps. The joining of the panels should be such that the tenon of the first hits the tenon of the second. Next, the panels need to be adjusted with a rubber hammer.
Then the second row of laminate is installed. When resorting to the locking method of laminate flooring in the kitchen or hallway, all locks must be treated with sealant. Such actions will prevent moisture penetration.
After the laminate is laid, you need to prevent moisture from getting on it. To care for it, you need to use a semi-dry cloth.
Laminate - modern flooring With good characteristics. It looks aesthetically pleasing, is easy to install, lasts a long time, and forms a thin layer. But such flooring requires careful preparation of the surface, so when carrying out repair work The question often arises of how to level a laminate floor. Leveling is solved in several ways, differing in time and cost, as well as in terms of changing the characteristics of the room.

Work with average height differences
If the existing flooring is in average condition (there is a height difference of about 20 mm, damaged areas), but is strong and reliable enough, there are options for leveling the floor under the laminate, depending on the base material.
1. Wooden floors
Preparation for work includes all the stages listed above for cosmetic procedures. Next, the decision on the best way to level the floor under the laminate is made depending on the available possibilities.
- if there is destruction of the boards, they are replaced;
- to level out height differences of up to 10 mm, you can use special wood mastics;
- if needed inexpensive solution, – you can use simple recipe: fine sawdust mixed with PVA glue. This mixture is easy to apply, smoothes out, dries relatively quickly, and forms a strong, smooth surface.
If the drop in heights reaches 15 mm or higher, it is rational to use plywood. The question of whether it is necessary to level the floor under a laminate using such material is not even worth it. Cost of work large areas, where there is a significant drop in height, will change little in comparison with the options for using other methods.
The plywood is laid and screwed with self-tapping screws around the perimeter. Position individual elements stands with a picture brickwork, cutting standard sheets into relatively small parts will reduce the percentage of waste. In low-level areas of a large area, you can lay slats or partially fill in a mixture of PVA and sawdust to avoid deformation of the plywood when walking.
Video of leveling the floor with mastic:
2. Concrete floors
For concrete floors, the height deviation of which is in the range of 5-25 mm, it is rational to use self-leveling liquid mixtures. This filling is done quickly, even a beginner can handle the task. The work steps look like this:
- the existing base is sanded, cracks and noticeable depressions are repaired;
- the surface is treated with bitumen mastic;
- waterproofing is laid, in the simplest case it can be a polymer film;
- a self-leveling mixture is prepared and poured;
- the filled layer is smoothed, stretched, and passed through a needle roller to remove air bubbles.
The decision whether it is necessary to level the floor under the laminate with expensive liquid mixtures is made taking into account positive qualities following procedure:
- Firstly, it is faster, requires simple preparation, and produces little dirt and construction debris.
- Secondly, a thin layer of fill dries in much less time than a concrete screed.
- Thirdly, a perfectly flat and durable surface is formed.
- Fourthly, highly qualified contractors are often not required.
In practice, in most apartments and houses there are relatively new construction To prepare the base for laying laminate flooring, the methods listed in this section are used.
Pouring thin screed
Very poor bases for laying
If the floor in an apartment or house is in poor condition, it is more rational to remove it to create a good foundation for modern covering. After this, you can proceed using the following methods:
- In housing with wooden flooring on beams, the joists are inspected and, if necessary, replaced. It is recommended to fill the ceiling space with expanded clay or polystyrene granules - this will improve thermal insulation and noise protection. After this, a board or plywood is sewn onto the logs (when replacing them, timber can be used). If necessary, for wooden covering scraping is carried out for final leveling.
- In apartments with wooden flooring on a reinforced concrete floor, after removing the existing base, debris is eliminated, the slab is inspected, and cracks are sealed. The next stage is laying logs from timber; their level is raised using pads or special anchor bolts. Plywood is sewn onto the formed lattice.
- For housing with reinforced concrete floor It is possible to create screeds of different formats. This applies to houses with wooden flooring, and with a screed. The latter should be removed right up to the slab. After that:
- you can create a classic cement-sand screed up to 40-50 mm thick;
- pour on beacons made of expanded clay covered with gypsum fiber board;
- lay a timber lattice and sew on a plywood surface.
Expanded clay semi-dry screed improves thermal insulation and reduces noise levels. Foam plastic and polystyrene granules can be used to fill the space between the joists. Expanded clay also works well. Such measures to improve the characteristics of the room will not in any way affect the quality of the surface for laying laminate flooring.
The combined method looks great. A thin, about 35 mm screed is made from a cement-sand mixture with the addition of fiberglass. A layer of the minimum possible thickness is poured on top of it (depending on the characteristics of the mixture).
This one has composite structure reasonable price, smooth and smooth surface, excellent strength and service life. Any class of laminate with substrates of minimal thickness can be laid on it. In this case, the coating exactly corresponds to the characteristics declared by the manufacturer.
When choosing laminate as a new floor covering, know that its installation requires almost perfect level base. If the surface has defects, depressions or bulges, over time the laminate locks may become loose, a squeak will appear, and then the panel may crack. When choosing a way to level the floor under the laminate: screed or plywood, take into account the design features of the floor, the effort and finances that need to be spent.
How to level a laminate floor
Methods for leveling a floor under a laminate vary depending on the starting conditions, whether the floor is wooden or concrete. Some methods are universal for both types of floors.
How to level a concrete floor under laminate
If the concrete floor is a slab/slabs or simply a poorly poured concrete base, it must be leveled. To do this, first of all, we remove the old floor covering, clean the floor from debris, concrete chips and dust.
Leveling with concrete screed
This method is used when the floor has significant defects and unevenness that cannot be corrected with half measures. Difficulty in leveling with cement-sand screed consist in the need to install “beacons”.

A concrete screed is necessary if the floor has significant defects
To level the floor with a concrete screed:
- Using a level, we determine the most high point floor. We mark a line along the perimeter of the walls to which we will pour concrete and pull the cord.
- We install special “beacons”. We fix them on the floor in slides concrete mortar, which we mix until the consistency of thick sour cream. We control the horizontal level of the “beacons” and correct it.
- Mix the solution: 1 part M500 cement + 3 parts sifted sand + water. For better kneading, use a drill with a special attachment.
- Fill the concrete screed to the marked level. Let's navigate by the "beacons".
- We level the screed. We take the rule, press it against the adjacent lighthouse slats, and pull it towards ourselves. Excess mortar will spread into voids or collect at the end of the floor.
- Using a needle roller, remove bubbles from the concrete by rolling it over the entire surface.
- While the concrete dries for 2 days, constantly moisten the floor with water.
- After two days we take out the beacons.
- The voids formed after removing the “beacons” are filled with fresh solution and rubbed.
- Cover the floor with polyethylene for 2 weeks.
After the screed has completely dried, after a couple of weeks, you can lay the laminate.
Leveling with self-leveling mixture
This method is used when the floor does not have too obvious defects or potholes, but there are minor irregularities and height differences. A maximum difference of 5 mm is allowed.

Leveling the floor with a self-leveling mixture is a modern and effective method
To level a concrete floor with a self-leveling mixture, you do not need to install “beacons”, you just need to:
- Use a level to determine the highest point of the floor. Mark a line on the walls up to which we will pour the mixture.
- Prime and waterproof the floor.
- Prepare the self-leveling mixture in accordance with the manufacturer's instructions.
Important! Most often, to prepare a self-leveling mixture, you need to pour the mixture powder into water, and not vice versa.
- Pour the mixture into a small strip and smooth with a spatula.
- Knead the next portion and also pour and level.
Important! The prepared self-leveling mixture must be used within 15 minutes; after this time it will be unusable. That is why it is recommended to knead and pour it in parts.
- Wait until the mixture dries. It will take 3 days. All this time there should be no drafts in the room.
After complete drying, you can lay the laminate. If the floor humidity is less than 5%, then lay the laminate directly on the mixture. If more, then first lay a layer of waterproofing and a cork backing.
The so-called dry screed with plywood or chipboard can only be done if the ceiling height allows you to reduce the space by 10 cm, because plywood cannot be laid directly on a concrete base, but only on logs.

Leveling with plywood or chipboard - dry screed method
To level the floor with sheets of plywood or chipboard, perform the following steps:
- Using a level, we make marks on the walls where the top of the floor should reach.
- We install waterproofing, sound insulation and shock-absorbing lining under the joists.
- We buy logs. Can be used adjustable joists, then we buy them ready-made. Or you can use regular ones wooden beams. Sizes 40*100 mm, 40*80 mm, 50*60 mm for a concrete floor and plywood sheets on top will be quite sufficient.
- We lay the logs. The distance from the walls should be 3 cm, between the logs 40-50 cm.
Important! We constantly monitor the horizontal level of the lags. If necessary, place wedges in places of depressions, and trim off excess in places of convexity.
5. We secure the logs with anchors or dowels.
6. Lay sheets of plywood or chipboard. We make the gap between the sheets 0.2-0.4 mm. The end joints of the sheets must be in the middle of the joists.
7. We fix the plywood with self-tapping screws in increments of 50-70 cm.
An important feature of this leveling method is that the laminate can be laid immediately after all work is completed.
How to level a wooden floor under laminate
If the wooden floor has obvious dips, it must be disassembled and the joists adjusted. It might even be possible to replace some joists or boards. If the floor is relatively flat, it is enough to use one of the methods below.
Cycling
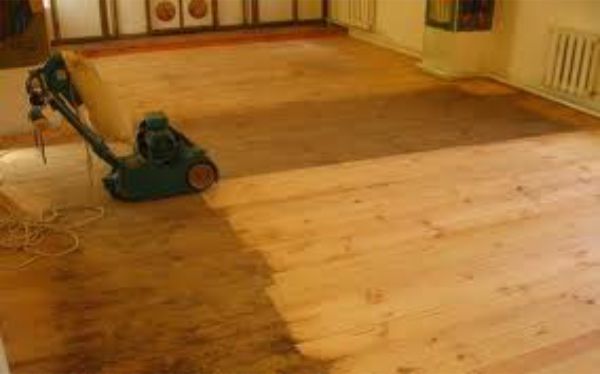
Scraping is the only leveling method that is suitable exclusively for wooden floors
Scraping a wooden floor will create a smooth surface for laminate flooring. It is done either manually, but this is too complex and time-consuming work, or using a scraping machine.
In order not to damage the machine knives, all heads of nails or screws must be “drowned” deeper into the wood using a hammer.
The scraping machine removes upper layer wood, creating a smooth subfloor. Then the surface must be thoroughly cleaned of dust and the laminate can be laid.
Leveling the floor with plywood or chipboard
The same method is used to level the concrete floor, which we have already described above. Design feature is that the logs must be laid on top of the wooden floor and secured with self-tapping screws. It is advisable to lay an additional layer of waterproofing, insulation and sound insulation between the joists.
Puttying with a mixture of sawdust and PVA glue

The method of leveling a wooden floor by puttying with a mixture based on PVA glue and sawdust raises the floor level by an insignificant amount
This method is the cheapest, but can only be used if the floor does not have significant flaws and failures.
Another significant advantage of puttying a wooden floor with a mixture based on PVA glue is that the rise in floor level in this case is insignificant.
Stages of work:
- If the floor boards have become “shrunken” and slightly deformed, bent, then it is necessary to use “beacons”. We install wooden “beacons” using a level. Secure with nails.
- Mix sawdust and PVA glue until the consistency of thick sour cream.
- We fill with the mixture all the space between the “beacons” and all the cracks.
Important! The PVA-based mixture shrinks very much, so we carry out the puttying procedure in two or three steps.
- After the glue has completely hardened, we lay 5 mm thin plywood. We secure it with countersunk self-tapping screws.
Having assessed the condition of the surface of your floor, you can choose any suitable way leveling the floor under the laminate shown above. The durability of laminate flooring will directly depend on the quality of the work performed.


