Sooner or later, any thing gets old. The countertop is no exception. What to do if the kitchen set still looks great, but the countertop is worn out or damaged? You can try to update it yourself! If everything is done carefully, then new decor will make the kitchen interior original and respectable, and you will have to spend a minimum of money.
- ceramic tile;
- tile adhesive;
- grout.
The countertops are washed and dried. Then glue is applied to it and the tiles are laid. After everything has dried, grout is applied.
Tile decor is suitable for updating countertops working area. The tile easily withstands intensive use and is not damaged by wet cleaning using chemicals. Also, tile decor is ideal for updating countertops and window sills. But for - this is not the best option.
You can see the principle on the countertop in the video below:
Examples of finishing countertops with slabs (photo)


DECOUPAGE
 An old table top can be changed beyond recognition if you get creative. You can do it yourself creative thing, if you use the decoupage technique. Decorating the surface of a table using this technique does not require any special skills or abilities - anyone can do this work with a minimum of tools.
For work you will need:
- PVA glue;
- Pictures;
- furniture varnish.
To decorate your table, you can purchase ready-made pictures for decoupage, sold in any craft store. But motifs cut out from paper napkins or pictures from magazines and books are quite suitable.
 Stages of work:
- Before work, thoroughly wash the old countertop and treat it with any degreaser - a swab moistened with alcohol will do;
- Dilute the glue in a ratio of 1:1;
- Moisten the selected motifs with it and glue them to the tabletop. The composition is created based on your taste, the main thing is not to overdo it with the number of motifs, otherwise the tabletop will look tacky.
- Carefully straighten the glued pictures - there should be no bubbles under them;
- Wait until the tabletop is completely dry;
- Cover the dried surface with varnish;
- Wait for the varnish layer to dry and apply a second coat;
- To prevent new decorations from being erased from the tabletop when wet cleaning, repeat the varnishing operation 3-4 times. For ease of use, the varnish can be purchased in aerosol packaging.
This hand-made table design will be in a single copy. This will make the interior design unique and memorable.
Important: using the decoupage technique, you cannot decorate the surface of the working area, as it is subject to intensive use and is often washed chemicals. Design using decoupage technique is suitable for dining tables, table tops and window sills.
CREATIVE WAYS TO REPAIR WORKTOPS
 You can update your kitchen countertops using the stencil painting technique. You can find and print suitable painting motifs on the Internet. Then the stencil must be cut out of thick cardboard.
For work you will need:
- acrylic paint;
- brush;
- foam sponge.
Wash the countertop thoroughly and degrease. Paint it in the main tone. Then attach the stencil and apply paint with a sponge, carefully blotting the stencil. You can use a brush instead of a sponge.
Important: the paint should not be applied thickly to the sponge, otherwise it will flow under the stencil and the work will be ruined.
This decoration will give a new look to the old table. At the same time, you will have a minimum amount of money - you will only have to spend money on paints.
You can also update it by turning it into a volumetric one. You will need:
- glass;
- wooden slats;
- various fillings - shells, dry spices (cinnamon, star anise, pumpkin seeds, etc.), acorns. Here everything is decided by imagination.
It is necessary to divide the tabletop into sectors - drawers square shape. To do this, a lath is glued to the edge on top of the tabletop. It is better to purchase a ready-made, carefully processed strip or lining. You will get square cells on the table. Place the filler into the cells. Place glass on top and secure or glue it.
Original table ready. Tables with this design are very expensive in furniture stores. Meanwhile, making them is not so difficult. This decor is suitable for dining area or for a coffee table.
REPLACING THE TABLETOP

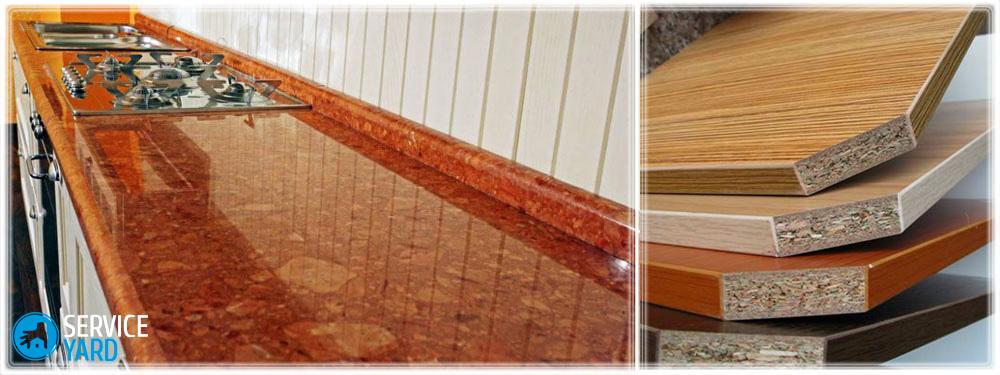
A radical way to update a countertop is replacement. The new countertop can be made from:
- Solid wood;
- composite material.

You can purchase a ready-made countertop. Or purchase material from which, through circular saw and use a jigsaw to cut out the part the desired shape and size. An old tabletop can serve as a template.
After this, you need to install a new part in place of the old one. It can be secured with self-tapping screws or special wood glue. The gaps between the wall and the countertop, if we're talking about about the working area or washing area, are masked using sealant. You can additionally glue a molding - ceramic or plastic. This will make the decor of your work area more stylish. The ends of the tabletop are glued with furniture edges. The easiest way is to use a hot-melt edge that is glued on with an iron.
If everything is done carefully, the interior design will not suffer at all and will not look handicraft.
So, you can update the tabletop with your own hands different ways. But in any case, with due care in work,
Over time, even the most durable and reliable furniture loses its attractive appearance. But since a set or a separate table can still be quite good, especially if it is made of natural wood, I don’t want to send them to scrap. How to give new look DIY kitchen countertop? — This question may be of interest to all those who are familiar with the current prices for kitchen furniture. Give it completely the new kind Using your old countertop is much cheaper than buying a new one. In this article we will reveal a couple of ways and provide ideas on how to paint a kitchen countertop and how it can be updated.
Creative renovation ideas without replacing countertops
There are many ways to restore the appearance of a countertop with your own hands. And now we will introduce you to several of the ways you can give a completely new look to your old countertop.
We will consider those options that have met the expectations of many home craftsmen and are constantly popular. For example:
- coloring;
- glass decoration;
- tile decoration;
- wallpaper finishing;
- restoration with self-adhesive film.
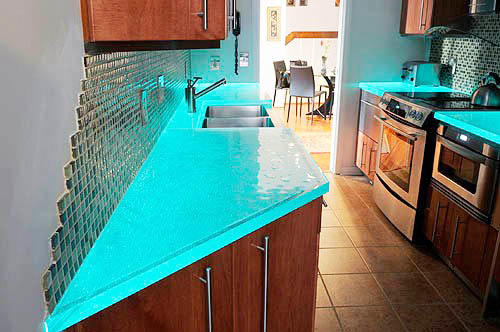
Paint and glass
In order to update the tabletop, you can use tempered glass. To do this, it must first be cleaned, degreased and coated with paint.
To make it look even more beautiful, you can apply some kind of design.
Important! Don't worry, even if you didn't graduate from art school and never knew how to draw, you can always use stencils designed specifically for this and thereby give your tabletop an unusual look.
After the paint has dried from the tabletop, a sheet of tempered glass is attached to the top. That's it, the tabletop is ready!
It will look elegant and expensive. Glass will give your table durability. And wet cleaning will take even less time.
Important! There is one caveat: if you make a similar redesign to your table, then you should not place it directly next to the stove.
What paint should I use?
Depending on the expected result, paints can be used various types. For example, options for how to paint a kitchen countertop could be:
- Alkyd enamels. They stay on the surface for a long time, are non-toxic, and dry fairly quickly.
- Water-based acrylic paints- perhaps the best option. These paints retain their original shade and coating strength for a long time, and dry literally within an hour. The solutions are non-toxic, which is very important for kitchen furniture, which constantly comes into contact with food.
- If the countertop is made of natural wood, it is better not to use any paint at all, but to tint it with stain or give it a more pronounced texture with oil. This option is the safest from a hygiene point of view.
Important! In general, the answer to the question of whether it is possible to paint the countertops in the kitchen is not clear. For good measure, it’s better not to, since even the safest building mixture- this is a chemical that will eventually enter your body. On the other hand, if you protect the surface with glass, then why not?
Film is a quick way to update the look of your kitchen set
This update option kitchen set It won’t make you spend a lot, because it’s quite easy to get self-adhesive film, and it will cost very little.
Important! IN given time film can imitate absolutely different types materials - leather, wood or stone. Therefore, deal with suitable design even with the most original idea it won't be very difficult.
The only thing worth noting is that you should not buy very cheap films, because the material must be of high quality and practical. One of the best options The choice of film is vinyl, as it is resistant to moisture, sudden changes in temperature, and can also retain its appearance for a long time and not deteriorate.
So, to update your countertop using film you will need:
- Directly the film itself;
- Ruler and pencil;
- Centimeter (tape measure);
- Rubber scraper.
Well, let's get started!
- The first thing you should do is find out the dimensions of the headset you want to replace, and if necessary, smooth out all the unevenness on the table itself. This is necessary because the film has a property that should not be forgotten - it exactly replicates the surface on which it is applied. Therefore, it is worth taking the surface preparation process quite seriously.
- After you have found out everything required dimensions, on the wrong side of the film you need to make marks, along which we will cut the canvas into the pieces we need.
Important! If you use film with a pattern, you should make sure that the pattern matches, otherwise it will be ugly.
- With help stationery knife and rulers, try to cut as even pieces of film as possible. The smoother the better.
- Next, using a rubber scraper, which will help us smooth out unevenness, we glue the film onto the prepared table surface.
Everyone, congratulations, your countertop has acquired a beautiful new look!
Photo wallpaper as a way to update
Photo wallpapers are now in great demand for decorating bedrooms or children's rooms, but much more more interesting option- use them to update your kitchen table top.
Important! The only caveat in this matter is that you need to glue them onto the paint, which means that you should paint your set before doing this.
To make everything neat and really interesting, take note of these tips:
- To apply wallpaper, you also need to use a meter to measure and cut even pieces of wallpaper and paste them onto the surface of the tabletop.
- To make your wallpaper last longer, it is better to opt for vinyl self-adhesive wallpaper.
- But if you choose traditional wallpaper, then you should remember that after sticking it, you should apply several layers of varnish to the surface. This is necessary so that the surface retains its appearance longer.
Pouring the countertop with concrete
This method of updating a kitchen countertop is more labor-intensive and occurs in several stages. But with careful step-by-step execution, all your work will more than pay off in the original design of the surface and its strength.
Making a frame
Since the concrete countertop will be quite heavy, you need to make a new strong frame for it:
- We will make the frame posts from large bars, and the joints between them from 50x40 mm bars.
- The frame must be stable, so we make 8 mm holes in the stand, which will be adjacent directly to the wall.
- We make empty holes in the wall at the same level and secure it all with bolts.
- The racks at the top and bottom will be connected to each other by jumpers.
- We will secure the frame to the floor with solid iron corners.
Important! The evenness of the frame should be determined by the building level.
- Next we should start making formwork. Its bottom can be made permanent by spreading it on the frame and securing boards to it. We cover them with polyethylene.
- The sides are assembled from boards so that their height corresponds to the required thickness of the tabletop.
Important! The horizontality of the formwork should also be checked with a building level.
- The internal walls of the formwork should be sanded and painted.
Important! There is no need to make a border on the side where the tabletop meets the wall, since instead you can install an aluminum beacon - it will not be able to rust, and accordingly, you will not have to worry about rust appearing on the table.
Decorating the bottom
The collapsible bottom is made as follows:
- On inside Horizontal strips are screwed onto the upper lintels.
- We put chipboard, plywood or OSB boards on them.
- WITH outside We attach boards to the frame, the width of which will be the same width of your tabletop.
- We attach the sides to them.
- We cover the formwork with polyethylene.
- After the work has been done, reinforcement is inserted into the formwork to create a lattice with cells of 50x50 mm. It is recommended to tie the reinforcement with wire or plastic clamps.
Important! The reinforcement grid should not lie at the very bottom of the formwork. This can be done by simply placing scraps of rods under the grille.
- Then we install the beacon at the level we need.
Now that we've secured our countertop, we can start pouring the concrete.
Preparation of the solution
The concrete for pouring should not be too liquid, but not too thick, so that it can be evenly distributed throughout the grid of rods.
The mixture can be obtained in 2 ways:
- For preparation, you can use cement M-500 in the form of a ready-made dry mixture or liquid solution. In this case, the age of the cement should not be more than one month.
- If you decide to prepare the solution yourself, you need cement, sand and crushed stone in a ratio of 1:2:3.
When kneading with your own hands, follow these rules:
- Water is gradually added after the other ingredients have already been mixed.
- It is also worth adding a plasticizer with water.
- Together with it, you can introduce pigment into the concrete, so that later fake diamond took the form of granite or another type of stone, basically whatever your heart desires.
Important! You should not pour dry coloring - it is better to dilute it with water before adding. So coloring finished material will be homogeneous.
Pouring concrete:
- We fill the formwork with concrete at one time to prevent the tiles from cracking in the future.
- The solution should be leveled using a rule based on the beacon profile and the side parallel to it.
- The final grouting of the surface is done with a float.
- After pouring, the concrete must be covered with plastic film.
Important! Every day during the first week, the surface of the countertop should be moistened by spraying with water from a spray bottle. After 7 days you can dismantle the formwork.
You succeeded in updating your countertop! We hope you are pleased with the result. We will tell you below how to decorate such a surface.
Tiling and granite-like polishing
These 2 options look very worthy in terms of aesthetics, so they also have a place among the interesting ideas used to update the countertops in the kitchen.
Making tiling
Ceramic tile It will look very organic on the kitchen table top, because most often both the walls and the floor of this room are decorated with tiles. When choosing a material, be sure to match the design of these surfaces with the intended table decor so that everything looks harmonious.
The work itself is done this way:
- Using a spatula, apply glue evenly over the entire table.
- The tiles should be laid from a noticeable edge of the table, that is, from the front edge of the tabletop.
- You can install crosses between the tiles so that the seams are the same and the surface looks attractive in the end.
- It is worth checking the evenness with a building level.
- It is better to glue the cut pieces of tiles near the wall.
- At the end, the seams between the tiles are treated with grout.
Important! The visible part of the table should be covered with a facing profile, which can be attached with tile adhesive or liquid nails. You may also need to use grout for the seam between them.
Polishing the countertop to look like granite
In order to polish a granite-like countertop, you should use a polisher designed for this purpose. grinder. The process to make the countertop look like granite will be as follows:
- First of all, we process the concrete with a coarse-grained nozzle to a perfectly flat surface. Absolutely all irregularities must be removed. Only after this should you start processing the table with a small abrasive.
- Then use a vacuum cleaner to remove all the dust.
- Using a special concrete filler, we create a waterproof film on the surface of the unfinished countertop.
- We apply the finishing touches by polishing with a suede nozzle at low speed.
Just paint or varnish
Is it possible to paint a kitchen countertop with just paint, without any glass, concrete, etc.? Yes, and now we will tell you how.
This method is the simplest and cheapest, and will not require any extra effort from you. All you need for this is:
- make the surface of the tabletop as smooth as possible using a grinding machine;
- if there are cracks, they must be corrected by using putty or putty;
- Apply alkyd paint to the first primer layer;
Let's make your countertop unique
To give your tabletop an unusual and unique style, you can use stencils or simply draw whatever your heart desires, or use the ancient decoupage technique. The idea behind this technique is that you glue pretty napkins to the surface of the table and cover everything with varnish. Although in any case, it is advisable to treat the surface with varnish to increase the service life of your countertop.
In this article we shared with you interesting ideas to give excellent appearance your countertops. The main thing is to approach everything with creativity, and then the result will definitely not disappoint you.
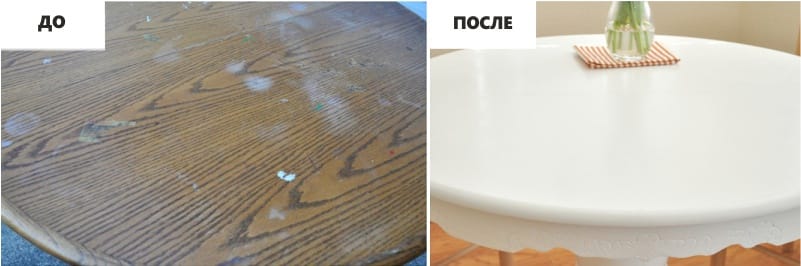
If you like the look of a stone countertop, but aren't ready to replace your existing wood or plastic one, renew the tabletop with stone paint.
- surface preparation for painting
- painting the surface to look like stone with two-component paint;
- surface painting spray paint under a stone;
- painting the countertop with filler paint;
- obtaining a stone effect using glaze paint.
Preparing the surface for painting
The countertop that you plan to paint must be clean, intact and dry. Fill all chips and cracks with putty, after drying, clean these places, or better yet, the entire surface as a whole. This will not only get rid of differences and unevenness, but also give the surface roughness, which will improve paint adhesion.
If the tabletop is very old, with multiple damages, and you doubt that you will be able to repair them perfectly, it is better to make an overlay - for example, from an MDF sheet or moisture-resistant plywood. By screwing such an overlay to the surface, you will get a smooth surface ready for painting. Only the edges need to be sealed with putty.
To improve paint adhesion, use a primer that matches the material of the countertop (primer for wood, primer for mineral surfaces, etc.). Or use a universal primer. Allow the primed countertop to dry before you begin painting. Not only should it be dry upper layer, but also the entire tabletop as a whole. Some materials (wood, unglazed ceramics) absorb the primer especially actively, so it is better to continue the work the next day.
Painting a stone surface with two-component paint
There are several options for stone paint, and one of the most popular is two-component paint. It is intended for decorating wood, plastic, ceramic tiles, old surfaces made of artificial and natural stone.
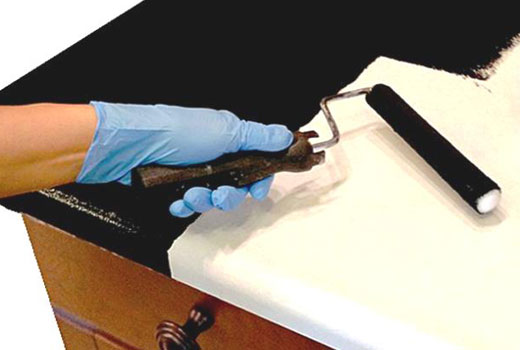
As a result of this coloring, we obtain a seamless surface that can change the appearance of the kitchen. There are different colors, it’s not difficult to choose, but first experiment on a sheet of thick paper or plywood - it’s important that the second coating is even if you don’t want to get gaps.
![]()
First layer (base) applied with a brush/roller. Then we wait 4-5 hours for the layer to dry.
Second layer We apply it with a piece of foam rubber, working out the desired “stone” texture.
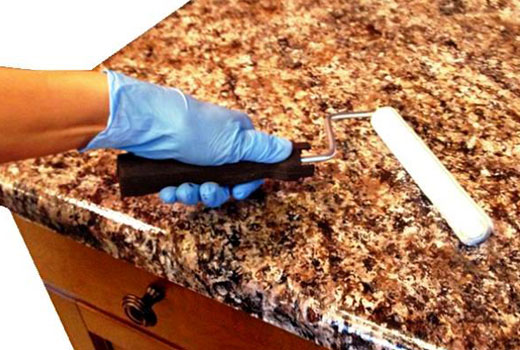
The painted surface dries in about 8 hours, but in the first two weeks after its renewal you should not lay or install heavy objects on it.
Painting a countertop with stone-like spray paint
Surface preparation is carried out in the same way as in the first option. Using spray paint to paint a countertop or other surface is convenient and quick. Just remember to protect with adhesive tape those areas that you do not plan to paint. Choose a wider tape - it’s not a fact that you will be able to cope with the spray from the can the first time.
Painting a countertop with filler paint
The simplest option is to add filler to the paint. These can be stone chips, quartz sand, but most often wood shavings of a certain fraction are used. When the paint dries, the chips in it harden, and the surface structure becomes like stone.

Achieving a stone effect using a glaze additive
A beautiful “stone” surface can be obtained by covering a layer of paint with glisal (glaze). This method is also called glazing. Glizal is a translucent layer that provokes a shimmer of color. To make the tabletop material look like stone, it is advisable to make the appropriate texture.
- Having prepared the surface, paint it with base paint.
- Immediately apply a film to the paint, carefully stroke it with your palm and fingers, making small waves, lines, etc. Remove the film and wait for the surface to dry.
- Apply a layer of glaze. Waiting for it to dry.
By selecting suitable way, you can paint not only the tabletop, but also other furniture like stone, kitchen apron, window sills, doors, etc.
Sooner or later, any thing gets old. The countertop is no exception. What to do if the kitchen set still looks great, but the countertop is worn out or damaged? You can try to update it yourself! If everything is done carefully, the new decor will make the kitchen interior original and respectable, and you will have to spend a minimum of money.
Paint and glass

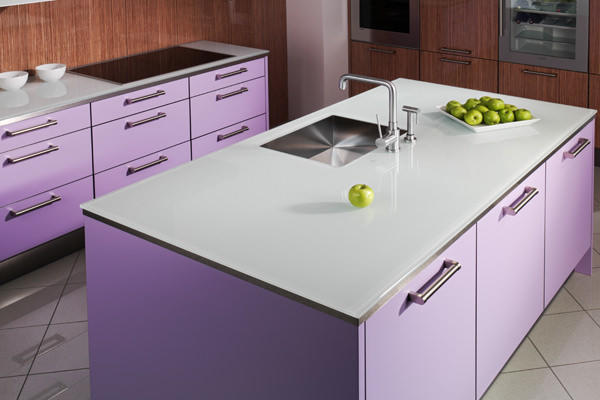 The three-dimensional effect will directly depend on the thickness of the glass on the tabletop - the thicker it is, the “deeper” the tabletop will look.
An old countertop can be updated using tempered glass. First you need to update the appearance of the countertop through decor. For this purpose, it is cleaned, degreased and coated with paint.
Important : You can get creative and paint the tabletop. The more complex the drawing, the more respectable the room design will look. This method is suitable not only for those who know how to draw. You can also paint using stencils, and this can be done even by someone who did not go to art school.
When the tabletop is dry, a sheet of tempered glass is attached to the top. This table looks elegant and expensive. Strained glass will provide strength to the table. He will not be afraid of accidental impacts or wet cleaning. But such a table should not be in close proximity to the stove.
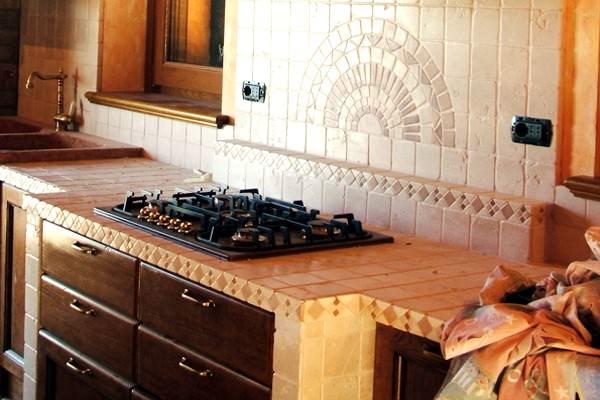
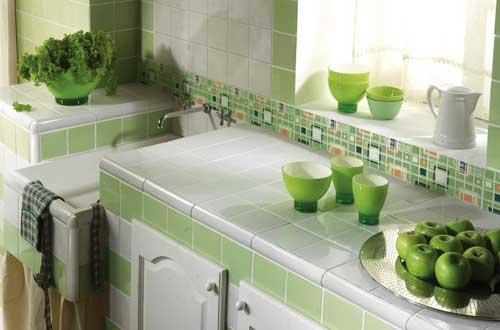
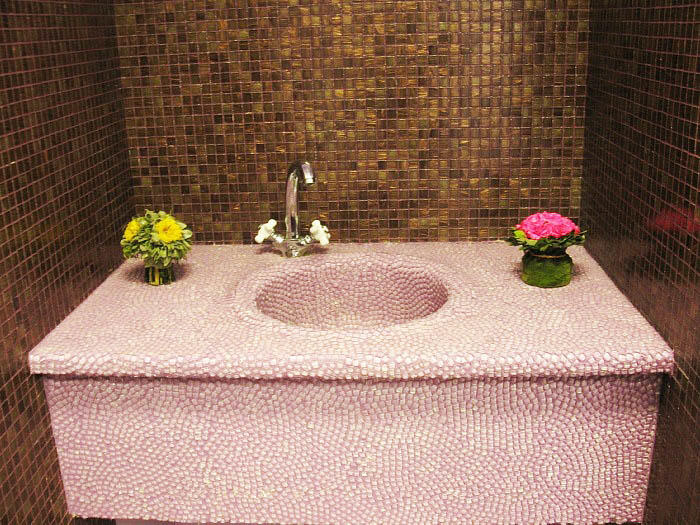
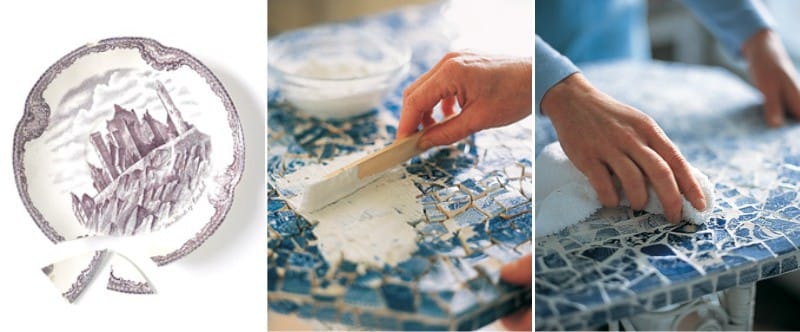
Decorating with tiles
In order to update the countertop with your own hands, you can use ordinary ceramic tiles. This decor can be done by anyone. You can choose ceramic tiles, mosaics, composite tiles. The sets look very good mosaic tiles which come in a variety of colors.
Important : Very original design in the kitchen it works if you use the same tiles from which the apron above the work area is made to decorate the countertop.


To work you will need:
- ceramic tile;
- tile adhesive;
- grout.
The countertops are washed and dried. Then glue is applied to it and the tiles are laid. After everything has dried, grout is applied.
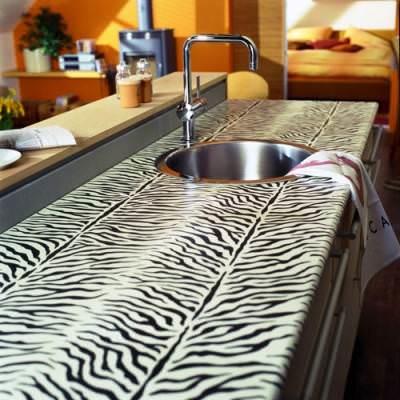
Tile decor is suitable for updating work area countertops. The tile easily withstands intensive use and is not damaged by wet cleaning using chemicals. Also, tile decor is ideal for updating countertops and window sills. But for the dining table this is not the best option.
You can see the principle of laying tiles on a countertop in the video below:
Examples of finishing countertops with slabs (photo)
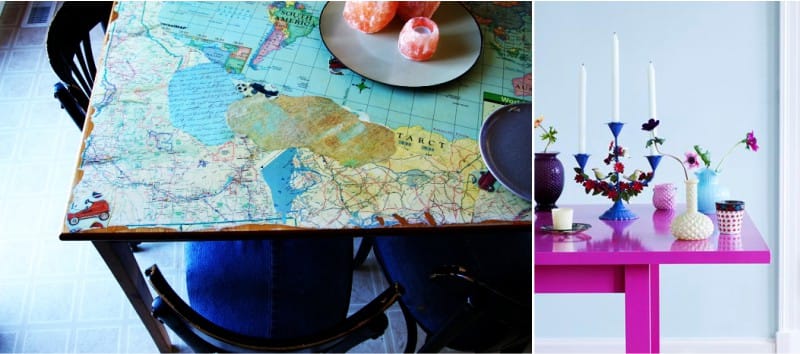
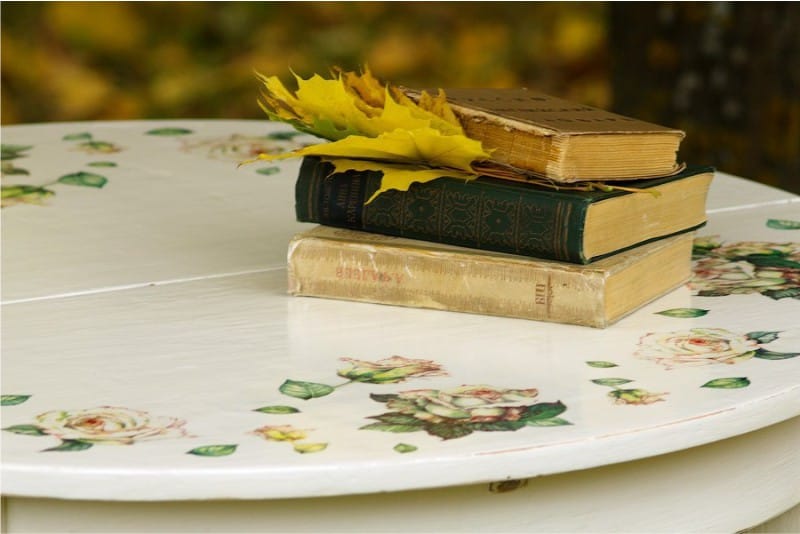
Decoupage
An old table top can be changed beyond recognition if you get creative. You can make a creative thing with your own hands if you use the decoupage technique. Decorating the surface of a table using this technique does not require any special skills or abilities - anyone can do this work with a minimum of tools.
For work you will need:
- PVA glue;
- Pictures;
- furniture varnish.
To decorate your table, you can purchase ready-made pictures for decoupage, sold in any craft store. But motifs cut out from paper napkins or pictures from magazines and books are quite suitable.
Stages of work:
- Before work, thoroughly wash the old countertop and treat it with any degreasing agent - a swab moistened with alcohol will do;
- Dilute the glue in a ratio of 1:1;
- Moisten the selected motifs with it and glue them to the tabletop. The composition is created based on your taste, the main thing is not to overdo it with the number of motifs, otherwise the tabletop will look tacky.
- Carefully straighten the glued pictures - there should be no bubbles under them;
- Wait until the tabletop is completely dry;
- Cover the dried surface with varnish;
- Wait for the varnish layer to dry and apply a second coat;
- To prevent new decorations from being erased from the tabletop during wet cleaning, repeat the varnishing operation 3-4 times. For ease of use, the varnish can be purchased in aerosol packaging.
This hand-made table design will be in a single copy. This will make the interior design unique and memorable.
Important : using the decoupage technique, you cannot decorate the surface of the working area, as it is subject to intensive use and is often washed with chemicals. Design using decoupage technique is suitable for dining tables, table tops and window sills.
Creative ways to repair countertops
You can update your kitchen countertops using the stencil painting technique. You can find and print suitable painting motifs on the Internet. Then the stencil must be cut out of thick cardboard.
For work you will need:
- acrylic paint;
- brush;
- foam sponge.
Wash the countertop thoroughly and degrease. Paint it in the main tone. Then attach the stencil and apply paint with a sponge, carefully blotting the stencil. You can use a brush instead of a sponge.
Important : the paint should not be applied thickly to the sponge, otherwise it will flow under the stencil and the work will be ruined.
This decoration will give a new look to the old table. At the same time, the decor will cost you a minimum of money - you will only have to spend money on paints.
You can also update the tabletop with your own hands, turning it into a voluminous one. You will need:
- glass;
- wooden slats;
- various fillings - shells, dry spices (cinnamon, star anise, pumpkin seeds, etc.), acorns. Here everything is decided by imagination.
It is necessary to divide the tabletop into sectors - square-shaped drawers. To do this, a lath is glued to the edge on top of the tabletop. It is better to purchase a ready-made, carefully processed strip or lining. You will get square cells on the table. Place the filler into the cells. Place glass on top and secure or glue it.
The original table is ready. Tables with this design are very expensive in furniture stores. Meanwhile, making them is not so difficult. This decor is suitable for a dining area or a coffee table.
Replacing the countertop
A radical way to update a countertop is replacement. The new countertop can be made from:
- Solid wood;
- composite material.
You can purchase a ready-made countertop. Or purchase material from which to cut out a part of the desired shape and size using a circular saw and jigsaw. An old tabletop can serve as a template.
After this, you need to install a new part in place of the old one. It can be secured with self-tapping screws or special wood glue. The gaps between the wall and the countertop, if we are talking about the work area or the sink area, are masked using sealant. You can additionally glue a molding - ceramic or plastic. This will make the decor of your work area more stylish. The ends of the tabletop are glued with furniture edges. The easiest way is to use a hot-melt edge that is glued on with an iron.
If everything is done carefully, the interior design will not suffer at all and will not look handicraft.
So, you can update your countertop with your own hands in different ways. But in any case, with due care in the work, the kitchen design will not suffer, but, on the contrary, will acquire a touch of exclusivity and originality.
Attention, TODAY only!
If you have an old one dinner table, which is dear to you as a memory, or you just want to save money wisely on buying new furniture, then you have an interesting job ahead of you as a restorer or decorator.
Keep in mind that restoring a kitchen table with your own hands is not the easiest thing and, in some cases, not justified, because not every table can be repaired, and it is better to entrust antiques to professionals. But more often than not, the right “upgrade” can bring your old friend back to life and transform him beyond recognition.
In what ways can you update your table?
To update kitchen table with your own hands, you can use one of the following proven technologies:
- Traditional painting – we will look at this method in detail in a step-by-step master class.
- An interesting way to decorate and paint furniture is to paint through tulle - the tabletop is painted through it, and a lace pattern is formed using the principle of a stencil.
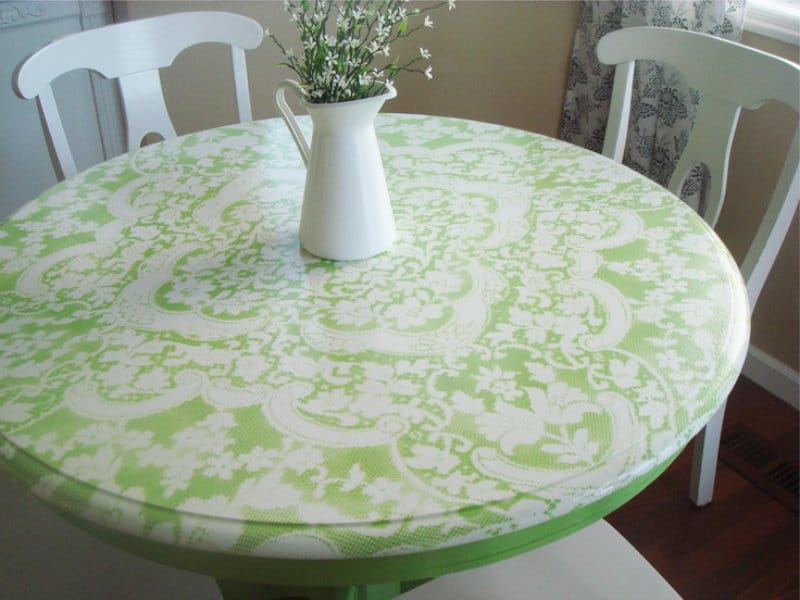
- Ceramic tiles will allow you to decorate a dilapidated, badly damaged countertop and make it more practical - you can put hot items on such a surface and wash it in any way.
- Update old table You can use decoupage technique. We will also talk about it in more detail.
- An easy way to modify a table with your own hands quickly and on a budget is to cover it with self-adhesive film.
- Burning will renew an undamaged wooden surface.
Master class – 6 steps on the path to a new life
In this tutorial on how to easily restore a dining table with your own hands, we will update, repair and repaint an old veneer table with a moderate number of defects.
So, to update your kitchen table you will need:
- sander or sandpaper coarse, medium and fine grain, as well as goggles, respirator and gloves;
- alkyd enamel paint desired color(or other desired finish, such as stain), as well as a flat, non-fading paint or art brush;
- wood primer and a small roller/brush for priming;
- wax paste or varnish.
Step 1. Inspect and repair parts
We carefully inspect all fasteners in the structure and defects of the tabletop - how much the veneer has delaminated or the wood has been damaged.

If the table is a little loose, you just need to tighten all the screws. If it requires a more serious restoration, then you need to completely disassemble the table, re-fasten all the parts, or clean and sand all the grooves and joints so that new glue better grip, fix the glued parts with clamps or self-tapping screws, and then remove them after 15 hours, when the glue has dried completely.
- Sometimes the base needs to be replaced, not only because its parts are very worn out, but also because the legs can completely transform your old table. For example, if previously the legs were simple, now you can replace them with beautiful carved balusters.
- When disassembling furniture, do not forget to mark the installation location of each of the parts, this way you will not get confused and will complete the task faster.
Step 2. Remove the old coating
Now put on safety glasses and prepare 2 types of sandpaper: coarse-grained for initial processing and fine-grained for smoothness. Get ready for long and labor-intensive work - removing old paint or varnish is not a simple matter.

Step 3. Repair cracks and chips
After sanding, thoroughly clean the table from dust, inspect the tabletop and look for defects. Keep in mind that even the smallest damage will be visible after painting. All chips and cracks must be locally repaired with wood putty or polyester putty, and then the entire surface must be sanded again when the “patches” have dried.

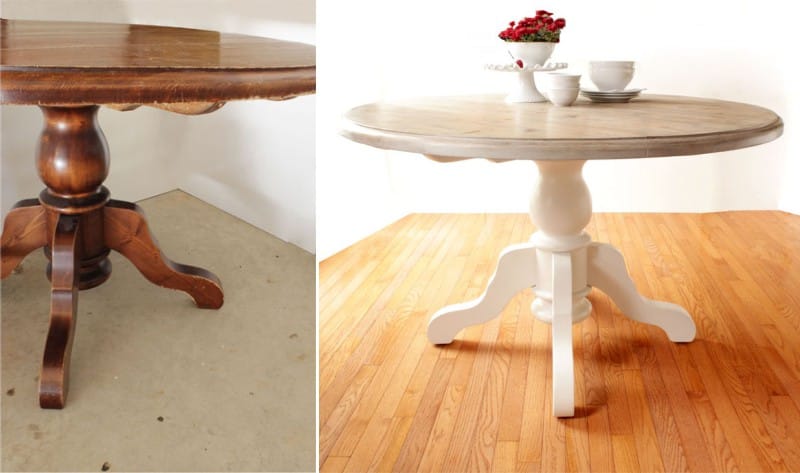
Note: covering the table with stain:
- if the countertop is not severely damaged, then you can not hide the natural beauty of the wood and cover it with stain, and then varnish, shellac or wax. The photo below shows an example of a restored table with a stained top in the color “Bleached Oak”.
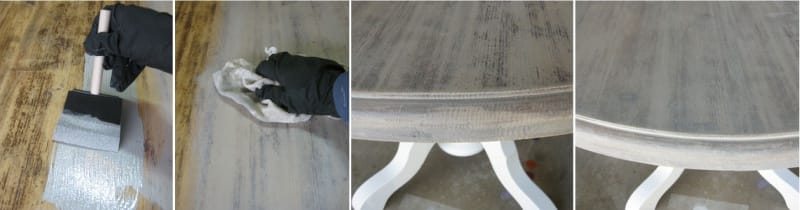
Step 4: Prime and sand again
Also see our other materials:
We continue to work. Now we need to not only clean the table, but also degrease it. And after the table has dried, we proceed with the primer. This stage is required, because without it paintwork It will lie unevenly and quickly get damaged. You can use an alkyd or shellac wood primer. In this master class, we used the universal alkyd primer Zinsser Cover Stain (pictured below), which dries in just 1 hour, protects the wood well and prepares it for painting. It costs about 500-600 rubles, but is not sold everywhere. The table can be primed in 1-2 layers using a small sponge roller, and each layer must dry completely.

Once the primer has dried (1 day), sand the countertop again with a medium-grit sandpaper or sponge to smooth the primed surface and prepare it for painting. And don't forget to put your respirator back on!

Step 5. Now let's start painting.

It is very important to choose the right paint and its color. Avoid cheap paints, this is a dining table, which means the tabletop should hold up well frequent washing, rubbing, hitting, etc. IN in this case enamel is used alkyd paint premium class on water based with a satin finish, but you can choose a more environmentally friendly enamel at acrylic base. Also, be careful to choose a high-quality brush so that it does not fade in the process. Not a paint brush, but a large flat art brush is perfect.
The paint should be applied in 2 thin layers, while finishing layer It is better to leave it to dry for 3-4 days.
- If you have chosen dark color paint, it is better to apply it in 3 thin layers;
- To create scuffed style, the paint can be sanded in some places, for example, on the ends of the table;
- Also, to create an antique effect, the table can be patinated.
Step 6. Apply a protective coating
As we already said, you can protect the surface of the table with a varnish, for example, a matte water-based polyurethane (the photo on the left is an excellent varnish from Varathane). It should be applied evenly in 2-3 thin layers, lightly sanding each layer before applying the next layer of varnish. Of course, all layers must be completely dry (4 hours) before sanding.
The second option is protection with wax, which will make the countertop matte and can be rubbed to shine. To do this, rub the wax gently into the wood with a cotton cloth, then allow the first layer to dry for at least 1 hour. After this, polish the surface in a circular motion, and repeat the procedure 2 more times within one day. Well, now be patient and leave the table for 1 week so that the surface acquires the necessary performance properties.
Well, that's all - the restoration is complete, and the old table has been restored new life in fashionable white color.

And here is another interesting video from the program “Cheap and Cheap” on the topic of restoring a tabletop at home using improvised means.
Updating the tabletop using decoupage
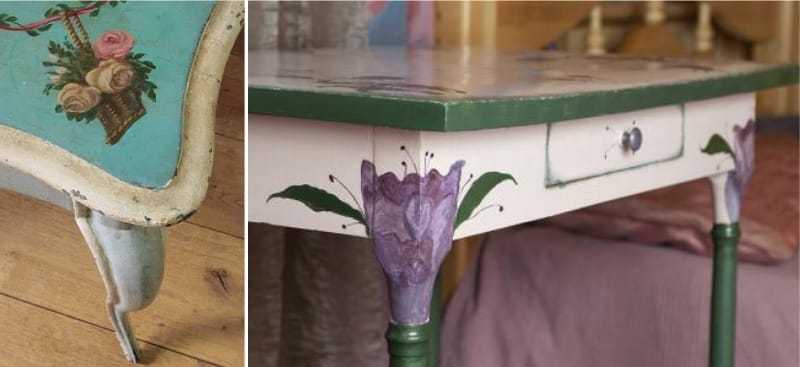
If you don’t want to stop there or your table does not have serious damage, but just needs a little updating, then you can decorate the table with drawings: paint it with acrylic paints by hand, use stencils and stamps, or update the table using decoupage. Perhaps, we will consider this decorative technique, which is popular today, in more detail, because decoupage will not only allow you to quickly and inexpensively transform a table or, for example, stylize it as Shabby chic (as in the photo below), but also hide some defects of a dilapidated surface.

To update the table with your own hands using the decoupage technique you will need:
- acrylic primer and acrylic paints - if desired;
- beige wood putty;
- sanding machine and sandpaper of varying degrees of grit;
- rubber spatulas;
- flat and artificial brushes;
- matte or semi-matte wood varnish;
- decoupage napkins or decoupage card;
- scissors;
- PVA glue or special glue for decoupage.

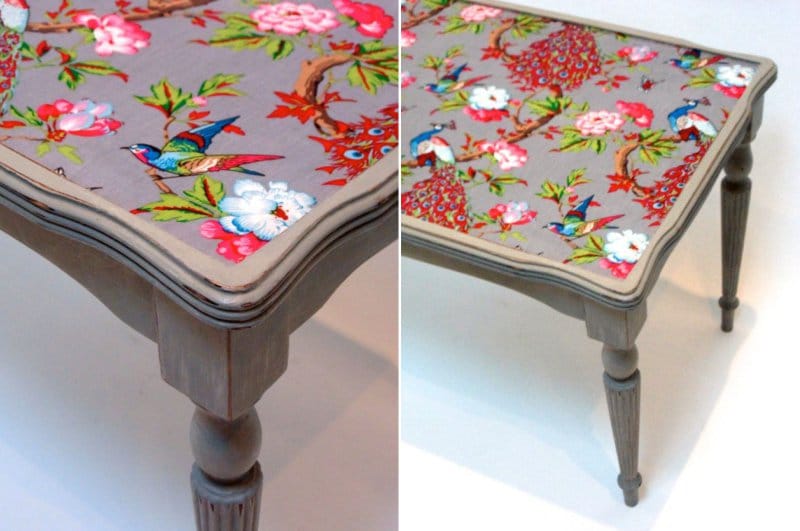
Decoration using the decoupage technique can begin either after the stage of priming and sanding (see step No. 4 above), or after painting and varnishing. Then you should choose a picture - it can be any image on paper or table napkins, as well as special rice paper for decoupage.
First, make the markings, lightly marking with a pencil the places where the images will be located. Place the cut out paper image face down in a container of water and hold for half a minute. Then the soaked image is laid out face down on a plastic file, and all the excess paper layers are rolled off. Then the picture is carefully coated with glue and attached to the tabletop. The file is not removed - through it the image is smoothed out as much as possible.

The surface around the pictures is decorated with paint. The final stage of decoupage is varnishing with acrylic varnish. After three days, the varnish will dry and the table can be fully used.
And finally, a selection of photos for your inspiration.


30 average rating: 4,73
out of 5)