Make an arch in doorway possible in various ways. Each of them is selected based on specific situation. It is necessary to take into account the construction skills possessed House master, as well as financial opportunities.
It is worth noting that it is possible to qualitatively install an arch in a doorway with your own hands only when all the features of this design are taken into account. The fact is that this finishing option has its pros and cons.
The advantages include the following aspects:
- Visual increase in space. IN in this case two factors combine at once. The first is that an opening without a door unites two rooms, this erases some existing border. The second is based on the shape of the structure.
- An excellent option for zoning. Indeed, an arch can be an excellent solution to the problem of dividing a single area.
- Good decorative look. This design can decorate any interior. It should be taken into account that overall design must be harmoniously thought out.
We must not forget about the existing shortcomings. They lie in the fact that the peculiarity of this product is openness, since there is no door leaf. Therefore, there is a complete lack of sound insulation, penetration of foreign odors, if we are talking about the border with kitchen area.
 When designing an arch, you should think about the fact that the feeling of security will disappear
Existing options
What is special about installing an arch in a doorway? The point is that there are different kinds of these designs:
- Ellipse. This configuration is considered to be classic. It is made round. All transitions are very smooth.
- Round. This option allows you to expand the opening. This method is suitable for cases where zoning is required.
- Trapezoid. Assumes the absence of rounded areas.
 Arch - various types of structures
 On a note! You can often hear that an arch and a portal are two different architectural elements. In fact, the portal is the most simple solution arched design. It is made in the form of a rectangle, sometimes supplemented with rounded corners.
Features of the construction of arches
You can make an arch in several ways, but you need to take into account the height of the openings.
For low openings
This method of creating an arch involves pre-marking the surface. The marked area is cut out (hollowed).

The general technology is as follows:
- The opening is being dismantled. Deleted old box. Part of the crumbling plaster is removed.
- The height of the future structure is determined. Lines are drawn along two vertical sides. They must be equal and made exactly at the specified height.
- To obtain the radius of the arch, the existing width is measured. This value is divided in half.
- A horizontal line is drawn between the vertical posts. It should be located at a level that will correspond to the beginning of the rounding.
On a note! It is important to consider that the distance to the ceiling should not be less than 30 cm.
- The center is marked on the drawn line. The self-tapping screw is screwed in. A cord is attached to the screw, which must be equal to a given radius. A pencil is attached to the end of the rope. This tool marks the bend.
- Trimming is done according to the existing markings. If the wall is strong enough, then chiselling is performed. To make the work easier, pre-drilling is done.
 It is necessary to comply with the requirements for the construction of the arch
 Thus, the required shape is obtained. Next, you should process it carefully. This is done by grinding. The resulting structure is treated with putty or plaster. They can serve as final finishing material.
For high openings
The door arch can also be made in another way. It lies in the fact that plasterboard and a metal profile are used as the main material. The technology assumes that everything will be done along an existing opening. The following actions are performed:

On a note! The created sheathing should be recessed to the thickness of the gypsum plaster boards used. Minor errors may occur. They can be easily corrected with plaster.

On a note! If you need to install an arch very quickly, the best solution would be to use a ready-made structure. These products are made from various materials and have standard configurations.
After all the procedures, an almost finished design is obtained. All you need to do is install a fragment of a gypsum plasterboard that will close the open arc-shaped space. The procedure is performed as follows:
- The bending section is measured.
- The resulting size is transferred to the drywall.
- The required fragment is cut out.
- This part needs to be bent. To do this, it is cut from the wrong side into strips.
- Carefully place into place and secure.
 Finished plasterboard arch
 The completed design requires additional decorative finishing. It should be noted that drywall makes it quite easy to create an arch with your own hands. If you use wood as a material, you must have sufficient experience to correctly process and install such a product.
Fiberboards and plywood are used as substitutes for gypsum boards.
 Often to create arched openings use plywood instead of drywall
 There are some tips that will help you get a beautiful arched opening:
- The general appearance of the arch should correspond to the interior design.
- To get more original design- it is drawn up with different sides individually.
- Existing communications should be laid in advance.
Summarizing the above, it can be noted that there are various ways to make a door arch. You just need to be patient and adhere to certain rules and recommendations. Then everything will definitely work out.
How to make an arch with your own hands? This question worries many who dare to design the interior opening on their own.
A door arch made with your own hands will make you proud of yourself, thereby allowing you to add something original and unique to the interior of your room or bedroom. Despite the fact that many beginners are tormented by vague doubts, in fact there is nothing terrible in this work, the main thing is desire. If you have it, ours detailed plan help you get the job done!
What is an arch and its varieties
Arch – ancient architectural element, which is increasingly used as an internal decorative element of an entrance or interior door, or rather a doorway. An arch is a universal opening in a wall that can give “volume” small room, and at the same time, zoning the apartment into a small area.
Taking into account the wishes of the homeowners, thanks to arches, designers can turn different ideas into reality, giving the doorway a different look. Today modern materials allow you to give the arches different geometric shape, and also form intricate vaults. Most often for the manufacture of arches and their cladding they use:
- Brick.
- Wooden beam.
- Plywood.
- Tiles.
- GKL, etc.
The structure of the arch is a support for partitions and walls. But, since the doorways in high-rise buildings are not load-bearing, the only requirement that is put forward to them is to withstand their own weight (with finishing finishing material). If the wall is load-bearing, the material must be selected according to external loads.
Any version of the arch, which is mounted instead of a door, performs a purely decorative function. The frame of the structure can even be made from a lightweight profile for fiberboard or chipboard; you can also use wooden beams. Only important point– reliable fixation of the partition so that the decor does not fall off or become deformed after a few days.

As we noted, the design of a house can be beautifully complemented with an arch, because there is a huge variety of its forms. They can be made in classic or romantic style. Art Nouveau is also often used. No less popular are the ellipsoidal shape, trapezoid, “portal” and many others.
The first example is made as a regular semi-arch, in the shape of a semicircle. On last photo you can observe a square interior opening called a “portal”. This design method is carried out with strict adherence to rectangular outlines. All other samples are intermediate variations between the two basic forms.
But these are not all options. You can also experiment with side supports, use curved posts, etc. You can finish the form and decorate it in different styles, the main thing is that the passage fits harmoniously into the home interior. In some apartments, classics and a round, correctly bent vault look great, in others - portals, it all depends on the taste preferences of the owners. Pay attention to the advice of experienced finishers:
- Classic arches are best done in apartments with high ceilings, not less than 3 m.
- In panel-type high-rise buildings, it is better to frame the doorway in the Art Nouveau style.
- It is preferable to decorate wide doorways from the corridor to the hall in a romantic style, for which wide counters are selected.
- The finishing of the “portal” opening goes well with the interior of the room, which uses clear lines. “Portal” is ideal for houses made of lining, logs or timber. This combination is very elegant and harmonious.
What materials can be used to form arches?

To make an arched vault, you need to stock up on the following material:
- Sheets of drywall.
- Plywood.
It is worth noting that it is best to sheathe the frame with sheets of plasterboard, because in the future it can be decorated with different decorative materials. But, if you need to create a more sophisticated shape, choose plywood sheets as they bend better. The preparation of the arched frame is formed from:
- Metal profile.
- Wood beams.
But, to build an arch, you can also take concrete, aerated concrete and brick, which are decorated with finishing materials. Despite the fact that such structures are solid, it is prohibited to erect them in high-rise buildings due to their heavy weight. It is also prohibited to make door frames from metal, which, moreover, will cost a pretty penny. And how to make an arch in an apartment with your own hands from metal? After all, this is a very labor-intensive process that requires the use of specialized devices. That is why plasterboard is the most acceptable material for finishing apartments.
How to make an interior arch. Step-by-step instructions (video)
How to make an arch from wood?
Do-it-yourself wooden arch, more precisely wooden frame, is formed without special effort. But, in addition to wood blocks, you will also need sheets of plywood. The first thing to do is measure the width of the passage, subtract the thickness of the materials, after which we get optimal thickness wooden beams. Then an arc is drawn on the plywood, which is cut out with a jigsaw.
Subsequent installation is carried out with self-tapping screws (5cm), which secure the beams to the plywood. The arch in the doorway is also fixed with self-tapping screws, which are screwed in at a distance of 15 cm. The final stage– fixing the 2nd wall of plywood and its subsequent covering with sheets of plasterboard. Please note that you need to fix the drywall sheets with special self-tapping screws for working on drywall.
Installing a plywood arch
How to make an arch with your own hands from wood without using natural material? Today this is not difficult, because wood can be replaced with plywood. To correctly calculate the amount necessary materials, including fittings, the first thing experienced finishers do is create a sketch.

To work with plywood, you will need the following handy tool:
- Jigsaw (or hacksaw).
- Drill.
- Screwdriver.
- Sandpaper.
- Finishing equipment.
Since plywood is a rather unique material that allows you to create original and unusual shapes, you need to work with it following the step-by-step instructions:
- Measure the doorway and note what size the arch will be.
- Then you need to cut the strip and carefully process it.
- The resulting strip is slightly moistened and left for some time.
- After these manipulations, the plywood will be pliable and will easily take the desired shape.
- The prepared strip is bent in the required way and immediately inserted into the required doorway, carefully fixed and spacers installed in the corners.

Forming an arch from plywood. After the canvas is installed, you need to wait a little until the sheet dries completely and takes its final form. At the next stage, you can act in two scenarios:
- Form inserts from wooden blocks and cover the surface with plasterboard.
- Take advantage polyurethane foam, filling the voids with it.
Installation of a plasterboard arch
Working with plasterboard, as with plywood, is very similar and does not cause difficulties, but is cheap. If you have the opportunity to build walls and form an arch at the same time, this way you can complete the work as quickly as possible. Before forming an arch, you need to prepare the surface step by step, namely:
- Remove the old door panel, decorative trims, trims and other fittings.
- Repair all damage to the walls to avoid troubles in the future.
- Get some tools.
- Draw up a detailed work plan and sketch.
You can install a plasterboard arch in different ways; below we will describe each method in more detail. The first option is the most popular:
- Take 2 sheets of drywall, one of which is cut in half.
- A U-shaped frame is formed in the doors using a metal profile.

- One segment is fixed to the frame, having previously been marked into 2 equal parts and marking the center.
- A hole is drilled in the rail from the edge and in the center. The distance between them should be equal to the middle of the arc of the formed arch. To do this, determine what distance will be maintained between the edges of the semicircle.
- Then a curved line is applied, with the help of which the hole in the middle of the batten is connected to the center of the piece of drywall sheet, which is fixed to the frame. You should immediately check whether the height of such an opening is suitable.
- Then the sheet is removed and the excess is cut off, after which it is fixed again on the frame.
- The second sheet of drywall is installed on the opposite side. Taking a corner and the first segment (like a stencil), transfer the dimensions of the arc. Next, cutting out the arc and fixing it is repeated according to the same pattern.
- After the work has been done, a void is left in which the frame is mounted. To do this, the profile is cut and bent. The resulting structure is fixed to the racks and drywall. It is also worth installing jumpers for the reliability and strength of the structure.

- Next, cut out the required strip, bend it, and make deep cuts on the inside. You need to fix it without haste, with careful movements.
- That's all, the arch is formed. All that's left to do is to paste the wallpaper or paint it in the desired colors.
The second method is much more complicated. The masonry is formed using the following technology:
- Drywall pieces are fixed from the corners on both sides using a mixture of PVA glue and water.
- Drywall is cut so that each next fragment is smaller than the previous one.
- Work continues until the smallest fragment is installed.
- As additional fixation use self-tapping screws or anchors.

It's just preparatory process. Further it will be even more difficult. The next stage will require plaster and putty. Large expansions and other defects are sealed with plaster, and a smooth arc is created with putty. This is enough painstaking work, which requires solid and experienced hand masters, so it is better for a beginner to immediately purchase template blanks.
Step-by-step instruction
If you decide to install an arch in the hallway, kitchen or balcony, follow the recommendations below:
- Dismantle old door and platbands.
- Widen the doorway to the desired size.
- Level the walls and repair any defects.
- If the structure will be backlit, carry out the wiring.
- Take all measurements in different places to minimize errors.
- At uneven walls choose the depth of the arch at the thickest point.
- Don’t be too lazy to make a life-size sketch (this will allow you not only to install the arch as accurately as possible, but also to pre-assess what the arch will look like).
- You need to begin work on installing the supporting frame in the following sequence:
- Create a main contour from the profile around the perimeter of the doorway and fix it on the wall.
- Secure the frame system.

- Install the vertical guides with an indentation from the plane of the interior surface to the thickness of the drywall and add 2 mm to the data (make a reserve for plaster).
- The surface must be rolled out with plaster until it is as even as possible.
- To create a semicircle from the profile, cuts are made on it in increments of 5-7cm.
- When an ideal curve is formed from the profile, it is installed in Right place and fixed to the frame.
- For greater strength, the arc must be fixed with several hangers to the horizontal upper guide.
- Then the crossbars are installed in increments of 40-60cm.
- The result should be a structure made of metal profiles in the shape of an arch for further cladding.
Finishing
When the arched frame is ready and sheathed, you can begin finishing work. To do this, you need to cover the edges and joints of the materials with specialized paper tape or fiberglass mesh. You will also need to apply putty in at least 3 layers and sand the structure. Once you are convinced of the reliability of the formed structure, you can proceed by following some of the recommendations given below.
To do everything Finishing work, you need to purchase acrylic putty, which is intended for interior work. But, please note, it is better to use a special mass for drywall. Before use, the putty mass is thoroughly stirred until smooth.

When starting work, put on gloves and other equipment. personal protection! The putty is applied in linear movements with a rectangular spatula. In addition to filling all the unevenness and joints of materials with putty, it must also be applied to the heads of the screws so that their edging does not show through. Similar actions are carried out until the surface becomes ideal.
After puttying, you can begin gluing the joint and edges to remove all sorts of irregularities and give the material strength. To do this, you can take a fiberglass mesh or paper tape, it all depends on your preferences (both options are good). Cut a piece of mesh and place it at the joint (in the very center), pressing it with your fingers into the putty that has not yet dried. Check that the tape is securely fastened and that there are no wrinkles.

After all the joints have been treated with mesh, you can cover the curved parts of the arch with it. The work needs to be done according to a similar scheme. When the mesh forms folds during the processing of arcuate sections, they can be smoothed out by cutting the fabric with a sharp knife.
After drying, the putty will become snow-white. This will be a signal that you need to take sandpaper and go smooth the surfaces. But, work carefully, do not remove too much putty, so as not to expose the mesh. For this work, use a respirator, because during surface grinding there will be a lot of dust, which is very harmful to human lungs.
When all 3 layers of putty have been applied and the surface has been cleaned, you need to wait about 12 hours for the structure to dry completely. Sand again with fine-grit sandpaper to achieve a perfect surface. That's all, you can decorate the surface.
Decorating the arch
It doesn’t matter at all what material you used to install the arch, because even a do-it-yourself brick arch needs final decoration. To decorate a door arch, you can use the following techniques:
- Painting to match the walls.
- Sheathing with wood blocks (as an option, laminate, siding, etc. are often used for this).
- Wallpapering.
- Use fake diamond based on gypsum.
- Decorate the structure with mirrors or mosaics (for mosaics you can use small pebbles, corks, glass, etc.).
- Use foam molding or surface painting.
Important! Try not to overdo it, so as not to clutter the aisle and mix incompatible items. It is worth noting that sometimes a simple paint job is enough to add elegance.
As you can see, there are a lot of options for finishing decoration, for which you can use not only natural materials. It all depends on the designer’s idea and the wishes of the owners, as well as the general style of the room. The classic additional interior can be complemented with stucco molding and fabrics so that everything fits harmoniously together. The finishing of the columns looks no less laconic if clinker is glued to them.
Ready-made arch kits

If you are not confident in your own abilities, and the educational video lessons from the Internet are not entirely clear to you, you can make your life much easier by purchasing a ready-made kit for forming an arch. Such kits can be made from different materials, have different design, color, design and texture, which will allow each person to find the most suitable option. The most suitable option is a set made of fiberboard or MDF. Such materials are very similar to wood, but are less complex to process and install. The ready-made standard interior arch kit includes.
The topic of this article is the manufacture of arched doors, their installation and the intricacies of these processes. We will talk about the types of doors with arches, note their varieties and the features of each type. We will also give recommendations on self-production front door in the form of an arch made of solid wood.
Today arched openings various forms and styles are used in the construction and decoration of most premises. They are used as entrance and interior doors.
Of all the diversity doorways in the form of arches (see) the following classification can be made:
- Semicircular arches. They are the most common and are also divided into subtypes:
- Classic (semicircular) - they have a smooth radial shape.
- Ellipsoidal - made in the shape of an elongated oval.
- Modern - have intricate shapes with various protrusions.
- Romantic - shaped more like a rectangle, with the upper edges slightly rounded.
- Horseshoe arches. They are shaped like a horseshoe. They can have not only a smooth semicircle, but also an elongated, pointed top. Most often, openings of this type are used to decorate premises in national styles.
- Gothic (pointed) arches. These structures have an elongated, pointed shape, without smooth transitions.
What types of arched doors are there?
Arched doors have many varieties and are classified according to various factors: installation location, material of manufacture, design features
Types of arched doors at installation site
There are two main categories here:
- Interior doors arched- located inside residential and other types of premises. Most often they are made of wood and have glazing. Stained glass compositions are often used for glazing such structures (see).
- Entrance doors in the form of arches- mainly used in entrance groups ah establishments: shops, organizations, shopping and entertainment centers. Made from plastic profile.
What are arched doors made of?
Due to the complexity of manufacturing this type of door leaf, the variety of material for their production is not very abundant:
- Plastic. This material used for the production of profiles from which not only entrance doors are made, but also windows.
- Solid wood. Wooden door leaves in the shape of arches are used for entrance areas in the private sector, as well as inside any type of premises.
Structural features of arched doors
Based on the characteristics of operation, the complexity of installation and the cost of the finished product, the following arched door structures can be distinguished:
- Canvases that repeat the contours of the opening one to one. The peculiarity of such doors is that their production takes a long time. They stand quite high. Such models are made from wood (see), since they are arched plastic doors made using a different technology.
- Standard canvases with an arched part fixed above them. Such doors are somewhat cheaper, since their arched part is mounted separately and does not open together with the door leaf. It also becomes possible to use not only hinged, but also sliding versions of the canvases.
Important! The opening height for such doors should be large enough. It is calculated by the formula: Vpr = 210 cm + half the width of the opening.
- Single doors. They are usually used as interior spaces, as well as input options for private homes and public spaces.
- Double doors. For wide openings it is advisable to use two sashes. One of them can be fixed in the opening using a latch. Relevant for entrance groups. In this case, more often than not, the “working” part of the door is 2 times wider than the fixed part.
Making an arched door yourself
Despite the difficulty of making such canvases, it is possible. Now you can see for yourself. You and I will learn how to make wooden arched entrance doors.
It is better to order the box part according to your dimensions, and we will make the canvas with our own hands (see).
We prepare everything you need
First you need to prepare tools, boards and available materials.
We will need:
- Jigsaw with wood saws.
- Electric milling machine with two types of cutters: disk (for grooves) and cylindrical.
- Sanding machine with sandpaper of different grain sizes. The best one is tape.
- Boards, 5 centimeters thick.
- Wooden wedges.
- Two small blocks and 4 wood screws. The length of the screws should be 30mm greater than the thickness of the bars.
- Carpenter's waterproof glue. PVA is possible.
Making a blank for the arched part of the canvas
To make the arched part of the door leaf, we first need to measure the final width of the opening. That is, from the total width we subtract the thickness of the “box” part and a 2mm gap between the door and the opening (frame).

After this we do the following work:
- In order for the arch to turn out beautiful, its radius must be made equal to half the width of the doorway. Based on the width of the prepared boards, we calculate how many pieces will be needed. The boards will be positioned horizontally.
Important! Before making an arched door, you need to select well-dried boards. Since if they are damp, the canvas will warp over time.
- Now, using an electric router, we make grooves for a tighter connection. To do this, we take a disk-slot cutter. We make the grooves in such a way that the protruding part is about half the thickness of the board. That is, 2.5 millimeters. The same goes for the internal groove.
- Next, we clean the entire surface of the grooves from dust and apply wood glue to them. After this, we connect all the boards and leave them to dry.
Important! In order for gluing to occur better, you need to take a board and attach pre-prepared bars to it with self-tapping screws. The distance between the bars should be 10–20 mm greater than the width of the glued workpiece. Place the workpiece between the bars and spread it apart with wedges.
Cut out a semicircle from the blank
For this operation, we recall the experience of installing plasterboard arches.
We use one of two options to outline the arched shape:
- If the arch has an even semicircle. Mark the middle at the bottom of the workpiece. Then we take a pencil and tie a non-stringent thread to it. Cut the thread exactly to the length of the arch radius. Apply one end of the thread to the mark and draw a semicircle with a pencil.
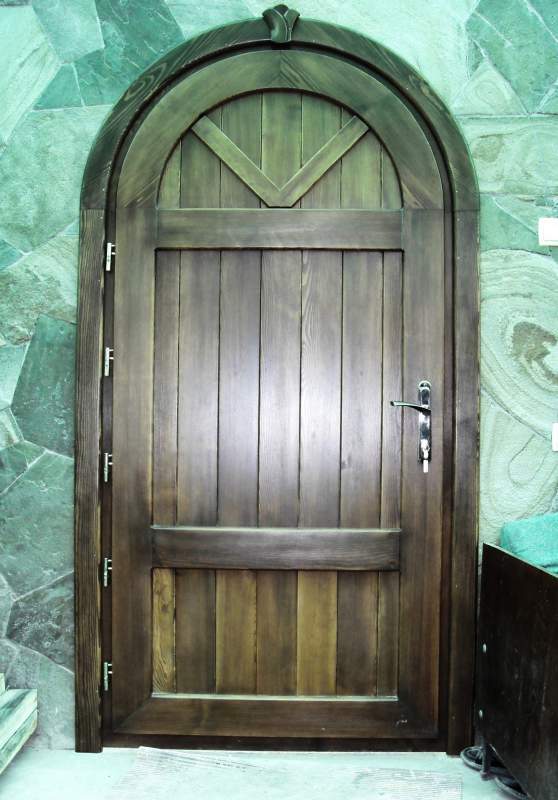
- If the shape of the arch (as in the photo) has an elongated semicircular or pointed shape, then we use a different method. To outline the boundaries of the bend contour it is very convenient to use a long metal ruler. We also make a mark for the middle and draw a line from it strictly vertically to the length of the radius of the arch. Next, we place the ruler on the edge and bend it so that one edge touches the radius mark, and the other coincides with the edge of the workpiece. After this, draw a line with a pencil. On the second side we follow the same steps.
Important! Make sure you get a symmetrical arched neckline.

Next, take a jigsaw and carefully cut the workpiece according to the markings. After that we take grinding machine with the coarsest sandpaper and process the surface of our arched part of the door on both sides. After this, we repeat grinding with a finer abrasive.
Now the most beautiful part of our door is ready. Interior doors arched type can be decorated with the same elements. However, it is worth considering that for interior spaces glazed arches will be more elegant. And their manufacture requires carpentry skills.
Finishing the door leaf
Now we have to make the rest of the door. It will be assembled according to the same principle as previous part. The only difference will be that the boards will not be positioned horizontally, but vertically.
You should also provide a horizontal part at the very bottom of the canvas. This will help extend the life of the door.
As a result, our door leaf will consist of 3 parts:
- Horizontal bottom cross member.
- Shield made of vertical boards.
- Upper cross member. It is also the arched part.
After all 3 parts of the door are ready, we connect them using the tenon method. To do this, we use a milling cutter to perform the appropriate operations and place all 3 parts on glue. Don't forget to support the canvas with wedges.
The final stage is processing the entire surface of the door protective agent And finishing coat. Pinotex or any other wood protection is suitable for this.
If the door will always be on the sunny side, it is not recommended to cover it with laminating coatings. In this case, it is better to use ordinary colorless varnish for exterior use.
To transform your interior and add some zest to it, you can make an arch from plasterboard. This design inspires respect and makes you think, because it seems that it is simply impossible to do it on your own. But all fears and worries are completely unfounded. If you wish, then use step by step instructions, which will be given below, will be possible in an apartment or house. And also figure out which material will be preferable in each specific case.
First of all, you need to understand what such a structure is. An arch is one of the elements in architecture that is characterized by curvilinearity. The place of creation is through or blind openings and spans. For greater effect, it can be complemented with various decorative elements.
There are different types of arches:
- Classic – characterized by smoothness of shape. Has equilateral rounding.
- Semi-arch - has only one rounded corner. Is modern solution for newfangled trends in the interior.
- Trapezoid – complex shape from curved lines.
Of course, there are many more species (see photo).

It will be better if a template is made before starting work. It is very easy to make from ordinary cardboard or fiberboard. This way, you can immediately understand what the object will look like and which rounding is preferable.
Working with wood requires the most special attention. In this case, no error should be allowed. Suitable for production various breeds, but pine is most often used as a fairly durable and cheap material.

Need to know! Before working with wood, you need to make sure it is well dried. Otherwise, no instructions will help, drying out and warping will begin. It will be impossible to correct the situation.
Not everyone likes pine quality finishing material, but it's easy to fix. For finishing works can be used valuable species wood (oak, beech, mahogany) or cheaper veneer.
Manufacturing process
In general, any work with natural wood, if there is no experience, is better to entrust to specialists. When creating an interior opening in a house or apartment, you need to proceed from real possibilities.
There are several design options for this material:
- typesetting
The arched opening is made by assembling different fragments (small parts). That is, using the pressing method, rounded elements are created, which are then joined together (gluing, twisting). This is a rather painstaking process that requires many tools. Allows you to avoid the occurrence of deformations. Making a wooden arch
 - One-piece designs
They are literally made from a single piece of wood (timber). Preferably made of hard wood. Often, such a structure serves as an “internal” frame, which is subjected to external processing.

Installation
To install an arched structure, you must adhere to the following rules:
- The installation site is carefully prepared, all excess is removed, and the surface is puttied.
- Prepare in advance necessary tool- each case is individual.
- Mounting occurs in several stages:
is created load-bearing frame;
elements are laid and connected;
external cladding is being done. - After this, they begin finishing: varnish or paint.
- Shortcomings lead to formation empty seats– they are puttied or foamed, but this will be an obvious drawback.
This option would be preferable if you want wood to be the material, but natural wood use is not possible. In addition, making a plywood arch with your own hands is quite simple.

Preparation
- A detailed sketch is created. To do this, all necessary measurements of the opening are taken. This allows you to create a visual project and immediately calculate the necessary materials and accessories.
- The installation site is also prepared. Everything unnecessary is removed in advance and, if necessary, trimmed.
- Preparing the instrument:
hacksaw or jigsaw with files;
drill and screwdriver;
sandpaper and block;
finishing tool.
You need to understand that plywood is a rather unique material. With its help you can create magnificent designs; it is distinguished by its strength and increased flexibility.
The first way to use plywood
The technology is as follows:
- Measure the opening. Immediately note what size the arc should be.
- A strip is cut from a sheet of plywood, the edges are well processed.
- This fragment is slightly moistened and waited for a while.
- Now this material will take almost any shape.
- The strip is bent and immediately inserted into the desired opening - fastened, do not forget to install spacers in the corners.

You need to wait until the plywood is completely dry. At this time, it will finally take the form of an arc. Next, they act in two ways:
- Inserts are made from wooden beams. The surface is covered with plasterboard.
- Polyurethane foam is used. Open areas they just foam. After complete drying, remove protruding areas of swollen material. In order for a plywood arch to take on a decorative appearance, the surface is completely puttied and covered with paint or varnish.

The second method is more complicated
It will be similar to working with gypsum board. Is as follows:
- The distance between opposite sides of the opening is measured. Measured required height arches.
- All this is transferred to a sheet of plywood. It should be of such a size that it covers the walls by another 10-15 centimeters - you will need two sheets of these.
- An arc is drawn along three points.
- Use a jigsaw to cut out unnecessary things. The first sheet is used as a stencil for the second. The operation is repeated.
- Both segments are installed in a stationary place. They are secured - jumpers are made between them. The main thing is to install them correctly. In this case, the thickness of the material from which the arc will be made is measured. That is, if the thickness is 6 mm, then the jumpers should be installed from the edge of the arc at the same distance (+ 1-2 mm).
- Select a material for the arc (gypsum plasterboard or plywood) - bend it and install it.
- Finishing work is being carried out.

There is another way to create an arch from plywood, but it requires time and tools. Its essence lies in the fact that the internal filling of the arch is made from cut-out plywood fragments. Namely, filling occurs like a sandwich. But this method allows you to adjust the immersion depth of each subsequent arc. Thus, it is possible to create a wavy (relief) structure.
Drywall arch
How to make a plasterboard arch with your own hands? There's nothing complicated about it. This material is somewhat reminiscent of plywood, but it is easier to work with and much cheaper.
It’s great when you manage to combine several construction work: erecting walls and creating an arch from plasterboard. Then you can carry out installation with minimal finishing work.
There are two ways to use drywall, but it all starts with preparatory work:
- It is necessary to ensure that the work area is cleared of all unnecessary things ( door frames, platbands, decorative elements).
- If there are cracks or chips, they are repaired. Yes, the arch design will hide everything, but it’s better to avoid unpleasant consequences.
- The necessary tools are being prepared.
- A preliminary design is being created.
Method one - on a metal frame
This is a very fast and quite popular method that allows you to make a plasterboard arch in your house or apartment.
A wooden frame is made using a similar principle. Only there more attention needs to be paid to the jumpers on which the arc will be attached.
To better understand how to do interior arch from plasterboard, watch this video:
The second method is typesetting
A more complex option. The principle is:
- From the corner of the opening, on both sides, they begin to secure the gypsum board sections. To do this, mix PVA and water.
- Each next piece is smaller than the previous one.
- So, until the smallest segment is secured.
- Additionally, they are reinforced with self-tapping screws and anchors.

The hard part is coming. Namely, with the help putty mixture form a smooth arc. It's not that easy, it's better to prepare templates in advance.
As you can see, there are many ways, you can use different materials and technologies. Not all of them are suitable for work that can be done with your own hands. But if there is a desire, then following certain rules will allow you to create a magnificent design.
One way to increase your living space is to remove the doors. But there is not always the opportunity or desire to break down the walls. Then the former doorway is designed in the form of an arch. Another option for using arched openings is to divide a long corridor into zones, breaking up too simple geometry. When making repairs on your own, arches are most often made from plasterboard: it’s easiest to make them yourself.
Types of arches
Interior or corridor arches may have different shapes. They differ mainly in the shape of the upper part and sometimes in the way they are connected to the vertical parts. Their main types are presented in the photo.
This group lacks one of the most popular recently - the half-arch. They have a rounded corner only on one side, on the other it remains straight. This is where the name came from - semi-arch. It looks good in modern interiors: minimalism, hi-tech, maybe art deco.

The classic is distinguished by the correct shape of the top. This is strictly a semicircle, the radius of which is equal to half the width of the doorway. This type looks good with an opening height of at least 2.5 m. Fits well into any interior, but looks best in long corridor, or instead of the entrance door to the kitchen.

An arched opening in the Modern style is distinguished by a small radius of curvature and a sharp transition at the junction with the vertical components of the opening. It looks good if the walls and ceiling have more or less simple design. Looks great in place of the former one balcony door, good when entering the office.

The “Romantic” style arch is more likely to be simply rounded corners (mostly masters call it that). Looks good with a large width and not the greatest height.

The “romantic” shape is good with large width and small height
The “ellipse” shape is very close to “romance”. It differs only in greater curvature in the middle part. Also suitable for low and wide openings. It just looks a little softer.

Trapezoid - non-standard design, consisting of broken lines. It is difficult to play out in the interior, therefore it is used infrequently: for some non-standard designs.

One of the design options is trapezoid
It is very similar to an ordinary opening, and that is essentially what it is, only without the door leaf. For greater originality, it is often accompanied by wooden carved elements in the form of columns on the sides. In this form it is good for classic interiors, as well as ethno-style - Greek or Roman, depending on the type of columns.

For decoration in modern styles They use another example - next to the main arch, they place smaller portals. This technique allows you to “beat” a simple form.

Another version of the “portal” arch
Before you start making an arch, you need to decide on its parameters. select the type, and then the parameters: where it will start, and what the radius of curvature will be. It could be a really sharp bend, or it could just be some rounding of the corners.

To understand how your chosen shape will look, you can cut out a template from cardboard and attach it to the doorway. Evaluate the effect. If everything suits you, you can make a blank using this template. But only one - for one of the sides of the opening. The second one needs to be done in place, otherwise it will turn out crooked.
Step-by-step instructions with photos: the fastest way
Do-it-yourself plasterboard arches different ways. This takes a minimal amount of time. Having decided on the shape, we proceed to installation. We attach a frame to the prepared opening, cleared of peeling plaster and relatively leveled, according to the dimensions of the future arch. It is made from a profile for drywall or dry wooden block suitable size. Sometimes, if the wall is narrow, you can only choose wood.

To begin, we cut out a rectangle from drywall to the size of the future arch, find its middle, mark it, and then temporarily screw it into place. We retreat from the edge 12.5 mm - the thickness of the plasterboard sheet. If the adjacent walls are already plastered, add a couple more millimeters of putty so that the surface can be leveled.

Now we take a piece of profile or hard corner and set aside half the width of the opening from one edge. At this point we make a hole in the corner and insert a nail into it. We stick this nail into the middle of the doorway we marked earlier on the sheet. It turns out to be a kind of compass, with which it is easy to draw an ideal line.

Device for outlining an arc
By changing the mounting height you can get a more or less high arch. If you need a flatter curve, increase the length of the “compass”.

Having removed the sheet, we cut out an arc along the outlined contour. This can be done with a special saw for drywall, a saw for metal - with small tooth for a smoother edge, use a jigsaw (there will be a lot of dust). If the cut is not very even, we level it using a grater attached to it. sandpaper. With this device we achieve a perfectly even curve of the shape we need. Carved fragment of an arch - side wall- we fasten it in place again.

If everything is smooth, there are no distortions or irregularities, on the other side of the opening we attach the same sheet of drywall as a few steps earlier - a rectangle or square, depending on the shape. It must be fixed strictly vertically. Now we transfer the shape of the arch onto it. We take a square, at a right angle and press one side against the drywall, onto which we transfer the arch, and the other side against the arch. Having aligned the square perpendicularly, mark a point with a pencil. We make such points along the entire arc. The more often they are done, the easier it will be to draw the line and the more accurate the match will be - the less you will have to grind down.

Why is it so difficult and not just to make a copy of the first sheet? Because few openings are symmetrical. As a result, installing the second sheet so that the lines of the arch coincide is very problematic.
Having marked all the points, remove the sheet, draw a line, and cut along it. We install it in its original place. Now we take the smoother again with sandpaper and now we smooth both edges until they match completely. One point - the trowel should be wider than the opening so that both walls of the arch are captured in one pass.

We measure the length of the arc, cut out a piece of the profile of the same length, make notches on the walls every 3-4 cm. This tape will need to be secured along the arch arch on one side and the other.

We fasten it with self-tapping screws, carefully, pressing the profile and holding it with a block, not with your fingers: it’s easy to get the screw into your fingers. By the way, you need to wear gloves when working with the cut profile. If you don’t, you’ll definitely cut your hands.

By the way, the back of the profile can be aligned along the edge - it’s easier to work this way, but the joint will still have to be sealed later. Screw the strip to the other side in the same way.

This is a bottom view - profiles are attached to the sides
There is a second way to attach the profile - attach it to a quick-setting universal glue, such as liquid nails. This method is acceptable if the opening width is small. If the arch is thick, the glue may not be able to withstand the mass of drywall that will be attached from below.
The next step is to attach the jumpers. First, the depth of the arch is lost, 1-1.5 cm is subtracted from it. This will be the length of the lintels. Cut profile pieces of this length.

Jumpers are cut from the same profile
At the places where the jumpers are attached, the “petals” are cut off, and the prepared fragment is installed and secured. It should not rest against the walls, it should be located approximately 5 mm from the back. Jumpers are needed to make the structure more rigid, otherwise it “walks” when pressed.

Next, you need to cut out a rectangle from drywall that will cover the structure from below. Its width is determined simply - from the outer edge of one sheet of plasterboard to the outer edge of the second sheet. The length is measured with a flexible tape (can be a tailor's tape) or a tape measure with an assistant. We attach this sheet with self-tapping screws to the arch frame. The sheet has to be bent, but read how to do this a little lower - closer to the end of the article.

Arched opening made of plasterboard: second method (photo report)
This method is good if the thickness of the partition is small: try attaching the profiles if the gap between them is several centimeters, and then attach the jumpers. It all starts the same way: the first wall of the arch is cut out, attached and transferred to the second sheet.

Afterwards, wooden crossbars are cut along the width of the gap between the two sheets, which are attached along the edge of the arch with self-tapping screws.

The cut strip of drywall is fastened starting from one of the sides. To make it more convenient, you can fix it with clamps, since the thickness of the wall is small. When attaching the strip, you can use the self-tapping screws that were used to fasten the bars. This way you will definitely hit the crossbar.

Then all that remains is to secure a special perforated corner in the corner and smooth out the unevenness.

A corner is attached to the arch arch, everything is puttied

It is also more convenient to smooth the dried putty along the arch arch with the entire plane of sandpaper attached to a grater. It’s unpleasant that dust falls into your eyes, making it almost impossible to work without glasses.

How to make an arch instead of a door: method three - typesetting technique
Another way to make arches from plasterboard with your own hands is by typesetting. The arch is divided into segments and assembled from pieces that create a curvature close to the required one.

They are attached to putty diluted with a mixture of PVA and water. This batch dries quickly, so first we cut the plates and try them on. You can fold it on a table, but the vault will turn out upside down, but it will allow you to evaluate how correctly the plates are assembled.

Then the plates begin to be attached to the opening, periodically strengthening them with self-tapping screws for reliability. Place washers under the heads so as not to push through the cardboard. Remove excess putty immediately. If it gets stuck, it’s impossible to tear it off. The finished surface is treated with a primer to improve adhesion (adhesion), and then puttied, leveling the arch. To make it easier to display, you can use a template attached on both sides.

Making sharp bends using this technology is not easy, but for rounded corners and semi-arches - great way do without profiles.
How to bend drywall
One important detail: standard wall plasterboard bends poorly. For curved surfaces, they specially came up with thin ones - 6 and 6 mm thick. This bent part is easier to make from it. With a slight curvature, such a thin sheet can bend easily and without tricks. If you don’t want to buy thin GVL, there are two ways to bend the standard one.
First- take a needle roller and roll the cut section well on one side. You need to roll with force so that the plaster breaks. Then the leaf is soaked in water and left for two to three hours. After such procedures, it should bend quite well. You take it, fix it on one side, and gradually press it against the arch frame, bend it, gradually screwing it along the edges with self-tapping screws. The method is not bad, but if there is a lack of experience and insufficient processing of the gypsum, the sheet may burst. You will either have to mask the gap later, or start over.
Second way to bend drywall: on one side, make notches with a knife approximately every 4-5 cm. The notches should cut the paper. This strip is also gradually fixed, breaking the plaster as necessary. It bursts along the cut lines with light pressure.

Video on the topic


