The coziness and comfort in the room depends on the lighting. You can make your home atmosphere full of warmth by making a lamp with your own hands. Ideas that will help you with your own hands and minimum costs to make an exclusive and fashionable lampshade, you can learn from this article.
Pendant lamp in the interior
Preparation
What you need to know before making a lamp:
- It is recommended to use LED or energy-saving light bulbs when creating your own designer lamp. Standard incandescent bulbs get too hot and can damage the structure.
- If you are disassembling a finished lamp, you need to be extremely careful with the wires, and after finishing, make sure they are intact.
- There are light bulbs in several color temperatures. When creating a pendant lamp for your home, you should opt for a “warm” shade.
An illustrative example for distinguishing color temperature: than larger number on the box, the higher its temperature, and the colder shade of light it has.
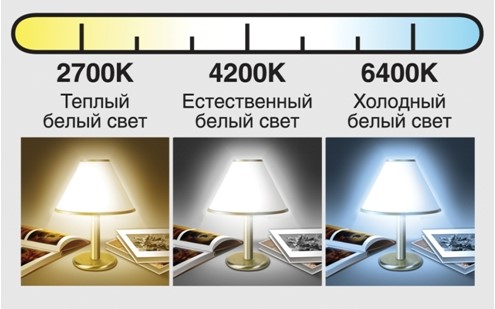
Light bulb color temperatures
Frame selection
Before you make a lamp, you need to prepare the base. Most often it consists of a pair of rings to which a cardboard or plastic backing is attached to give it shape.
The following ideas will help resolve the issue of finding the basis for a future lampshade:
- You can make this type of frame yourself with only wire and pliers on hand.
- Frames are sold in construction stores or in handicraft shops.
- It’s not uncommon to find old lamps at flea markets where you can get the frame.
- Instead of frame structure, the lamp socket can hold the neck of a 5 liter plastic bottle. Therefore, there is a solution in the figure below.

DIY lampshade
Lamp ideas
There is nothing complicated about decorating a pendant or table lamp yourself. But it’s better to draw a sketch on paper before starting work. The process will be simple and quick, and you can make changes along the way.
"Live" lamp
This designer lampshade is called “Photosynthesis”. It was designed and brought into reality by an author from Tel Aviv. The framework is shown here metal mesh, at the base of which is placed indoor plant. As it grows, the flower fills everything inner space lamps and makes the design of the room summer and fresh. There is no need to use a special light bulb here; a regular LED light bulb will do for plants. Creating such a pendant lamp is not too troublesome. You can add variety to its decor, taking into account what accessories and tools will be available.

Hanging living lamp
When making such a lamp with your own hands, you cannot use an overly heavy pot with a plant. Particular attention should be paid to insulating the wiring and running it along the supporting wire.
Make a lamp with your own hands from fabric - perfect solution, after all big choice colors and textures allows you to realize many creative ideas and create decorative lampshades for a room with any interior. First of all, you need to prepare the necessary materials:
- textile;
- tape or self-adhesive film;
- ruler or centimeter;
- scissors;
- a simple pencil;
- metal rings for the frame;
- binders;
- brush;
- glue;
- strip of paper.
Sequencing:
- Before you make a lamp, you need to determine its shape. A cylindrical base is ideal for a fabric product.
When deciding on the height and width, you should make sure that the base is not too close to the light bulb.
- You need to cut out a rectangle from the adhesive film and a piece of fabric, the edges of which are 5 cm larger. Attach the fabric to the table with the film, face down.
- Find the most beautiful pattern on the fabric that should be on the lamp and use a ruler to draw the corners and dotted line.
- Align the fabric and stick the film on it.
- Using binder clips, secure the lampshade to the surface of the frame from the bottom and top.
- Use a pencil to mark the edges and the side that will be on top. Glue the parts of the lampshade to each other and let them dry.
- Turn the structure over, apply glue to the edge and insert a wire ring. Secure with binders and let dry. Repeat the procedure at the other end.
- Glue a strip of paper from the edges. After it dries, glue a fabric strip on top. Do the same on the seam on the side of the lamp.

DIY fabric lampshade
If you make small triangular cuts in the paper while gluing it, it will bend better.
There are other ideas on how to make a lamp with your own hands. Using various materials and fittings, you can create equally impressive decorative lampshades from threads, paper and other available materials.
Photo collage
To make such a designer lampshade-photo frame, you will need:
- frame, as in the previous example, or a ready-made lamp with a clean white lampshade;
- several sheets of tracing paper;
- scissors;
- PVA glue;
- a simple pencil;
- printer (recommended to use inkjet).
Choosing your favorites and beautiful pictures, using photo editors you need to make a collage. You can collage images by cutting them out of paper. This method leaves a lot of room for creative idea: Any decor can be applied to the lamp, not just a photo: a child’s drawing, a motivating aphorism or a map of your favorite area.

DIY photo collage table lamp
Before you make a lamp from photographs, you should make sure that the paint is dry. You should absolutely not bend paper sheets of tracing paper, because the bend will always be noticeable.
Sun made of ropes
Creating such a designer pendant lamp is much easier than it seems. Required tools:
- threads;
- glue (for wallpaper or PVA);
- petrolatum;
- balloon IR.
Initially, the already inflated balloon is lubricated with Vaseline. This is necessary so that threads do not stick to it. The threads are soaked in glue and wrapped around the ball. After the product dries, it is blown off and put away. The making of the rope sun is completed.
What needs to be done to make the decor of the lamp as successful as possible: firstly, you should first get your hands on it and make a couple of small lamps for testing. Secondly, before winding the threads on the ball, you need to mark the place where there should be no threads. Through this hole the ball will be removed and the light bulb will be inserted.
Making a lamp
Decorating the lamp is half the battle. The main thing is quality work done without sad consequences. Therefore, it is imperative to take into account the following factors:
- If a lamp hanging from the ceiling is connected, the junction of the wires and the product itself must be covered with a protective cap.
- If the light bulb gets very hot during operation, the designer lampshade surrounding it should not be too close. This is why it is worth using small incandescent light bulbs.
- If the product is heavy, it is strictly forbidden to hang it on wires. For this purpose, special rods, cables or brackets are provided for mounting on walls or ceilings.
- To illuminate a room with high humidity: in a bathroom, sauna or bathhouse, it is better not to implement your ideas for making a lamp with your own hands, but to buy and install special product, in which there is protection from moisture.
- During installation of the lamp, the wiring must be insulated to eliminate the possibility of injury to the master and his loved ones.
With my own hands. Video
How to create LED lamp with your own hands from scrap materials, this video will tell you.
Decor made from paper, photographs, threads, fabric and any other means has its own advantages over finished products purchased in a store. With a minimum of costs and time, decorative lamps not only decorate the home, but also emphasize the originality of its owner. Personalized modeling of lighting fixtures is an opportunity to realize your creativity, decorate the interior and bring relatives together to work together.
Problems with choosing lamps are familiar to many. Lamps are purchased last, so combining them with all other interior elements can be difficult. But there is no need to despair. After all, you can make spectacular lamps yourself without spending a lot of time and money.
1. New Year's decor on the chandelier

Plastic beads, which can be purchased in the department New Year's decor, you can decorate the finished lampshade. Bright colors and shine will turn the lamp into a real decoration of any interior.
2. Cityscape

The outlines of city roofs, cut out of dark paper, are pasted onto a light lampshade. This application will easily transform a boring monochromatic lamp.
3. The whole world at your fingertips

In every home there are old maps that have been lying around unused for years. You can make a lamp from them with your own hands. Simply wrap a piece of appropriately sized card around an old lampshade. For a neater look, the paper can be coated acrylic varnish.
4. From papier-mâché

To make an original lamp with your own hands, you will have to remember the papier-mâché technique, familiar to everyone from childhood. The paper needs to be torn into small pieces and left for a couple of hours in an aqueous PVA solution. Then the object is covered with paper pulp layer by layer. the desired shape- for example, an inflated balloon. After the papier-mâché has dried, the lampshade is ready.
5. Second life of old newspapers

Simply covering the lampshade with newspaper, artificially aged with tea or coffee, is too simple a solution. Cut out circles from it and glue them so that they partially cover each other. Interesting game light and shadow guaranteed. Additionally, it is better to varnish the lampshade.
6. Eternal lampshade

From an old metal basket or ordinary wire, you can make a lamp with your own hands, which will become a champion in strength and durability. In addition, this lampshade is also completely fireproof.
7. From bright cocktail tubes

A lamp made from cocktail tubes looks democratic, but at the same time impressive. Just glue the tubes on one side to the old lampshade using silicone glue. If you cut the tubes in half, the lamp will be smaller.
8. Chic and shine

Beads that have no use can be used to decorate a lamp. Thread them onto thin jewelry wire (available at craft stores) and attach it to the metal base of the lampshade.
9. Clear geometry

Cocktail straws painted in gold or silver colors will become the material for making a lamp with your own hands. They are fastened together using threaded thread.
10. Lace patterns

Simply cover or cover a plain lampshade with contrasting lace. In the first case, it is better to use elastic lace: they will fit more tightly to the surface of the lampshade and look neater.
11. Paper chaos

Plain white paper, rolled into tubes, becomes the raw material for original lampshade. Glue them together in a chaotic manner, moving from bottom to top.

12. Cozy lamp for needlewomen

Any unused buttons can be used to make a cute lamp. String the buttons onto strong threads and secure them to the top of the lampshade.
13. In harmony with nature

An intricately shaped branch will be an excellent basis for an unusual lamp. In addition to this, you will need several light bulbs in sockets. Simply wrap the wires around the branch.
14. Almost edible chandelier

The base from an old lampshade, decorated with cutlery, looks quite brutal. This lamp will fit perfectly into the interior of a country or loft style kitchen.
15. Delicate textile petals

To make such a lamp, a fabric is selected whose edges do not fray. Petals cut from it are attached to the lampshade with glue.
16. From decorative rope

Generously spread the base for the future lampshade thick and wrap tightly with rope rough texture. It is not necessary to use it as a base old lamp. Even old utensils, such as glasses or bowls, will do.
17. Lamp in a skirt

Translucent textiles, for example, tulle from old curtains, can find a second life. Gather it into folds at the top and secure it to the boring lampshade.
18. Patchwork style

Many multi-colored scraps are tied on the base of an old lampshade. The more there are, the better.
19. From favorite postcards

Often postcards and photos, even those you like, lie unused for years. Cover a boring lamp with them and it will instantly be transformed.
20. Our whole life is a game

A playing deck that is missing several cards should not be thrown away. Thick glossy paper with a contrasting pattern is an excellent material for decorating a lampshade, practical and beautiful.
So, the lighting problem is solved. It's time to get acquainted
The idea of making a lamp with your own hands came to mind when, after laying linoleum in the house, there was a cardboard pipe left (on which the linoleum was wound).
To make a lamp with your own hands, all you have to do is buy just a little 2 meters of black and red wire, 2 meters of adhesive-backed LED strip, a 12V 1A power supply, spray paint in a can. Of course, the LED strip was a bit expensive, but it was easier to work with. Could be used separately bright LEDs, but there is a lot of hassle with them in terms of wiring them together and fastening them inside the pipe.

Making a lamp with your own hands began with drawing preliminary sketches on paper. There was a desire for the lamp not only to be curved in the plane, but also in space, and have weird shape 3d waves.
After the sketch on paper satisfied my wishes, I began making the lamp. Each pipe in the drawing was measured, and the pipes were cut according to these dimensions. To obtain the required angles, templates were cut out of paper and attached with tape to the pipe.

All pipes were laid out on the table and adjustments were made to the waveform.

The cuts were made on a stationary circular saw. This produces smooth, burr-free cuts with a width of 2 mm.

Now you need to connect all the pipes into one. The main task is to make smooth curves; for this it will not hurt to use a template (fibreboard sheet) on the table. Since the pipes are cardboard, they can be connected accordingly using glue PVA, but I would recommend using glues that harden stronger and faster (moment, superglue).
On the reverse side they were screwed onto the screws wooden planks, to homemade lamp could be hung on the wall. And holes were drilled in each pipe to output wires from the LED strips.

The pipes were painted regular paint in a can. The color red was used, since the wall on which the lamp was to be located was white, I wanted to get some contrast.

The paint dries very quickly, so you can begin installing the LEDs. The main thing to remember is what to cut LED strip only possible in specially marked areas. The tape must be marked in advance so that it is enough for all 12 pipes.
We solder red wires to the “+” contact, and black wires to the “-” contact, so as not to confuse the polarity later.

We place the LED strips inside the pipes and fix them with the adhesive side to the pipe wall, and route the wires through pre-made holes. All that remains is to connect all the wires in parallel (connect red to red, and black to black) and connect to the power supply.

The pendant lamp should fit perfectly into the interior of the room, the ceiling of which is suspended. Self-made hanging structures are strengthened on special hooks, which must be hidden under the tension fabric; all holes are carefully decorated.
To create a practical lighting fixture Special attention it is necessary to pay attention to the following characteristics: device power, number of shades, suspension height, degree of aggressiveness environment.
The design of the device must necessarily have a lamp that performs a protective function in relation to tension fabric. A pendant-type lighting device is more reliable if its shade is directed in the opposite direction from the ceiling surface, that is, down. This will improve the lighting of the rooms. If the lampshade of the pendant lamp is directed upwards, it is better to provide lighting to the room using an energy-saving lamp.
The preparatory stage of creating a lamp with your own hands
Return to contents
What to consider before making a pendant lamp
To create a practical lighting device, special attention must be paid to the following characteristics. Any pendant lamp should have them:

- The power of the device, which is one of the main indicators and depends on the volume of the room.
- The number of shades, which similarly affects the power of the lamp.
- The height of the lamp suspension, which can be adjusted manually.
- The degree of aggressiveness of the environment, which is determined by the ease of care of the device and its material, which is easy to wash or clean.
- Suitable for living rooms and halls hanging chandeliers large sizes, corresponding to the design, for example, in classic style or modern.
- For a children's room you can make a highly suspended chandelier bright colors And original forms, with fairy-tale characters.
Return to contents
What determines the choice of lamp shape?

A suspended structure will have its advantages over other ready-made structures. Self-made pendant lights are suitable for glossy and matte suspended ceilings, therefore, it is important to comply with all the conditions for the correct and safe creation of lighting fixtures with your own hands.
The shape of a pendant lamp can be different, that is, it can be a ball, be in the form of a cone or a cube. It could be a maze of trails of twinkling lights. You can install a simulated hanging device, the shape and number of sections of which are changed manually.
If you want to make a pendant lamp with your own hands, you will need a lot of endurance and patience, as well as accurate ideas about your own preferences depending on the style of the room’s interior.
Rooms with the most pronounced sectionality are best equipped suspended structure square shape. Such rooms have strict and clear lines. If the lamp is planned to be made spherical or round shape, then it is better to create it for a room with a classic interior, which is characterized by smooth lines.
Sometimes pendant lamps are created in the shape of a drop; they can be cone-shaped. For example, a lampshade of this shape can be first crocheted and then starched to give the desired shape. It may also resemble an elongated cylinder.
The design of the lampshade can be metal (copper or aluminum), include organic glass, transparent plastic, fabric or wood. Choice necessary materials will depend on creative preferences and room design.
Return to contents
What parts should a pendant lamp consist of?
Typically, the design of a pendant fixture includes two main parts, which include fittings and an electric lamp. Special elements of the fittings are:

- A lampshade that allows you to create diffuse lighting to ensure its uniformity.
- A reflector device that concentrates and directs all lighting in the required direction.
- Mounting and housing of the device.
- Device with wires.
Ceiling pendant lights usually have a socket made from a heat-resistant type of plastic, porcelain or metal. They give durability to the device and ensure its safe operation. Device modern devices boils down to the fact that if the electric lamp is not screwed into the socket all the way, then the lamp base sleeve will not touch the conductive element.
The device must be provided with a heat-resistant reflector with a smooth and light-colored surface inside it. Thanks to the strength of the lampshade, the necessary level of protection of the lamp from various damages is provided. This makes the light softer, so the lampshade will transmit it perfectly, and energy losses are minimized.
The presence of a durable body guarantees ease and safety in the process of using the pendant lamp. The creation of most types of lamps is simple. When the lamp has already been made with your own hands, it should be placed above the height of the tallest person living in the room.
Do you want to transform your interior, adding a touch of originality and modernity to it? It's time to learn how to make a lamp with your own hands, because thanks to this piece of furniture your home will stand out from the rest and become unique. The creative process itself will be very interesting and useful, so if you wish, you can invite the children and create your masterpiece together. Dekorin has selected for you the most beautiful lamps and lampshades for lamps, which can be made from paper and other improvised materials.
1. Paper lamp: how to make it yourself?
From such simple material, like paper, everyone can make incredibly beautiful and modern lamps with your own hands. In the photo below we have presented several unusual options homemade lamps made from paper. Enjoy watching!


Chinese lanterns: DIY paper lamp
Thanks to such a simple and at the same time interesting subject decor, like Chinese lanterns, you can add a little brightness, vibrant colors and a sense of celebration to the interior.
Materials you will need for this:
- Colored or white paper;
- The cartridge you can remove from old lamp either buy;
- LED light bulb (note that you should not use a heated light bulb, because we make the lamp from paper);
- Pencil and ruler;
- Stationery knife;
- Thread;
- Awl.
Making a lamp with your own hands (step by step with photos)
First on back side paper, it is necessary to apply lines that will create the relief of the lamp. Below is a drawing according to which it is proposed to make markings.

We fold the paper along the marked lines to form a kind of accordion. At this stage, it is important not to rush and do everything carefully so that the lamp comes out smooth and beautiful.
Now we create a lampshade for a lamp from paper around the socket. The sheet can be glued at the junction regular glue PVA or combine in any other way. Please note that without gluing the edges, you will have an easier time changing the bulb in this light fixture.
Our Chinese lanterns are ready! In the photo below you see what happened in the end.


You will find more ideas on how to make a table lamp or pendant lamp from paper in our article.
2. How to make a lamp from wood with your own hands?
From such a simple material as wood, you also have the opportunity to make a very creative lamp with your own hands. You just have to look around: nature itself inspires us with its extraordinary forms to create. Each of us has celebrated at least once in our lives beautiful shape any branch or snag. Dekorin offers to reflect their beauty in interior design as an original and functional lamp.
Using a branch, you can make a lamp from wood yourself without the use of special tools or skills. Required material you can easily find it in the forest or near the house. The main thing is that this driftwood is already dry, but not too rotten, because it will have to support the weight of the lampshades and at the same time serve you as long as possible.

DIY floor lamp made from a wooden branch (photo)
In fact, depending on your wishes, you can make a floor, table or tabletop from a branch. ceiling lamp. Here we will look at the option of making a floor lamp.
First of all, you need to make a strong base for the floor lamp (for example, pour cement mortar into any container and insert our branch into it for wooden lamp). After some time, the container can be removed, after which a reliable and stylish cement base and lamp leg will remain. Also read how from a simple cement mortar can be done .
At the next stage, you need to use improvised means to attach a cord with a socket and a light bulb to the driftwood. Our floor lamp ready!

Ceiling and even Wall lights from the branch. You can decorate them with either ordinary light bulbs or antique shades or lampshades. Examples are in the photo below.


3. How else can you make a lamp with your own hands from scrap materials?
Do you have a favorite lamp that you don't want to part with, but... appearance Does her lampshade leave much to be desired? Don't worry, everything can be fixed! Dekorin will tell you how to make a lamp shade with your own hands. Just look at the photo: what original and even intricate lampshades for lamps you can make yourself!


Also read:DIY vases from glass and plastic bottles
How to make a lampshade for a lamp with your own hands from threads
This lamp will become a creative and unique decoration of your interior. It will easily fit into both the kitchen and the bedroom and living room.

So, what you will need: a balloon (you need to consider the size and shape inflated balloon, because the shape of the lampshade will depend on this), thick cotton threads (preferably twine), PVA glue about 250 g, a hanging cord that will hold the lampshade, an energy-saving lamp, scissors, a needle, any cream, a brush, a cotton pad, and also a cotton swab.

Step 1. Inflate the balloon to the desired size and tie it securely.
Step 2. Using a cotton pad, lubricate the ball with any cream to make it easier for the threads to detach from the base later.

Step 3. Thread the needle and pierce the glue bottle all the way through. Wind the threads around the ball as you see fit, but do not pull them too tightly.


Step 4. When all the threads are wound, apply a little glue to those places where there is not enough of it. Now the lampshade is almost ready and should be put away to dry overnight.

Step 5. In the morning, take a dried lampshade and start pressing the ball with a cotton swab to help it separate from the threads. Carefully and most importantly slowly deflate the balloon, because by doing it quickly, you risk creating a dent in the lampshade with your own hands.


Step 5. Mark the future hole and make 4 cuts in all directions so that the light bulb and socket can fit into the lampshade.

Finally, you need to insert the socket with the light bulb, and carefully attach the lamp holder between the threads. The lampshade is completely ready, now all that remains is to hang it in the room you have chosen and enjoy the results of your creativity.


How to make a lamp with your own hands: 15+ ideas and photos updated: March 27, 2017 by: Oksana Krutsenko


