Shoes always need a place, especially if several people live in the house. Not everyone wants to buy an expensive shoe rack for the sake of keeping their shoes organized, but many will be interested in making one themselves. The editors of Homius will tell and show what a DIY shoe rack can be like, what materials should be used, and how to assemble it.
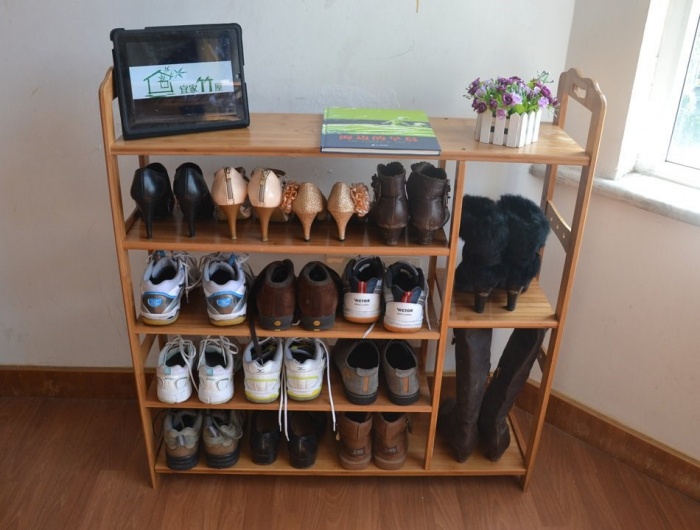
Before we look at the process of creating a home shoe rack, you should see with your own eyes what wonderful, spacious and comfortable homemade shoe shelves there are!


Related article:
: how it works, advantages and disadvantages, varieties, criteria the right choice, size, material, color, making it yourself - read the publication.
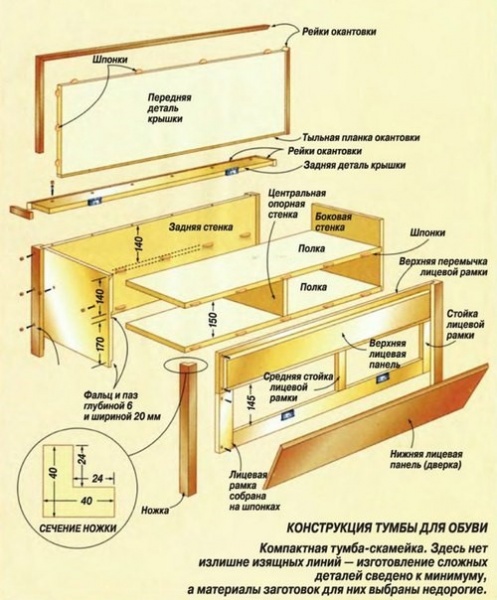
Drawings of different types of shelves for shoes
You don't always need to develop your own blueprint: often the solution already exists. You just need to add your dimensions to the drawing and choose the one that suits you.


If the listed options are a bit complicated for a beginner, then a person with experience will not experience any difficulties. But that's not all available methods, below we will offer “recipes” for various shoe racks made of wood, plywood, metal, etc.
Choosing what material we will use to make a shoe rack
The most pliable materials available for working at home are wood and plywood. Some craftsmen take the risk of making an excellent product from metal, while others easily and simply make a shoe rack from plastic pipes. What will your shelf be made of?
Wood as a good and beautiful material
Wooden structures always look presentable, solid and expensive.

Anyone can learn to work with this material, but, of course, this will require a certain set of tools.
What do you need for work?
The following tools will be useful in your work: several metal corners, a plane, sandpaper, a coating in the form of paint or varnish (optional), and glue for gluing wood.
As for the main material, you need to buy two boards measuring approximately 25x35 cm, the thickness of each board is 2 cm. If the work takes place at home, it is worth purchasing a roll of film, which will protect the surrounding area from dust and production waste.
Manufacturing instructions
The work takes place in several stages.
- You need to saw off two parts from the first board, each 90 cm long. These pieces will serve as the sides of the shoe rack.
- For the support beams you need 4-6 bars measuring 3x5 cm (depending on the number of tiers).
- The remaining boards go on the shelves. You need to saw off 4 parts, each 60-70 cm long.
- Now the polishing process begins. Take sandpaper and thoroughly sand all the elements.
- The blocks need to be secured with self-tapping screws to the sidewalls.
- To strengthen the structure, use corners that are screwed from behind.
- You can place shelves on the bars and begin finishing the structure.
In this way it is easy to make several standard shoe racks.

Plywood as a material for a spacious shelf
If you want to use it for a shoe rack plywood sheets, then you can take both thin and denser options.
What do you need for work?
To make a spacious shoe rack, you need to take a solid sheet of plywood, a drawing with calculations of the dimensions of the product, a long meter ruler, screws for assembling furniture, a drill with a No. 4 drill bit, sandpaper, and varnish.
Manufacturing instructions
The process of making a shelf for shoes begins with determining how many pairs of shoes should be on each shelf, as well as the size of the shoes: the lower shelf, if boots and shoes will be placed on it, should be made higher in height than the upper ones. After this, you can draw the desired type of product, indicating all dimensions.
| Illustration | Description of action |
 | We calculate the dimensions of the future shoe rack. |
 | We transfer the dimensions onto the plywood with a simple pencil and a meter. |
 | We cut out all the elements with a jigsaw. |
 | We lay out the future shoe rack on the floor and check the dimensions. If there are flaws somewhere, then it’s time to correct them. |
 | We mark the places of fastenings. |
 | In our work we use furniture screws. |
 | We make a hole with a drill in the marked places and wrap the screws in them. |
 | We install all the shelves sequentially. |
 | We sand the ends. |
 | We go over the shoe rack with stain. As soon as it dries, sand it sandpaper to highlight the beautiful wood texture. |
 | The height of the shelf can be any. It is most convenient to make such a rack. |
Metal - strength and style
Even without any special skills in working with metal, you can make a simple and beautiful product. To work, you need to get an unnecessary metal stepladder.

Using a hacksaw, we cut out the part of the ladder where the steps are located, be sure to sand the edges, and install the resulting part in place of the shoe rack. Plastic hooks need to be attached to each crossbar; they will serve as a storage place for shoes.
PVC pipes as a creative design for shoes
We stock up on a 25 cm PVC pipe, paint, glue, and a hacksaw.

A hacksaw will help you cut the pipe into several sections, each of which can be 25-35 cm long. To make the edges smooth, they are sanded, and the pipes themselves are painted inside and out, using paints of different colors.
All elements are assembled together in any order; you can make a shoe rack in the form of a honeycomb or a pyramid. For greater strength, you can tie the product with a rope, which can become part of the decor.
How to make a shoe rack of an unusual shape with your own hands
Non-trivial products always seem original to us. Let's take advantage great ideas and based on them we will create our own successful design.
Corner triangular shelf
Corner models fit perfectly into hallways small size, thereby giving more space with maximum functionality. Suitable materials include MDF and plastic. The working equipment for manufacturing consists of a jigsaw (preferably an electric one), a screwdriver and a drill. The fastening element will be wood screws.

You need to cut a sheet of material (let it be chipboard) into two rectangles. These are the future sidewalls. We also need to cut out several triangles, which will be the planes of the shelf. All this is cut out with a jigsaw.
The edges must be processed by sanding them with sandpaper.
Assembling a shoe rack involves first marking the places where the shelves will be located. Everything is fixed using a drill, self-tapping screws and a screwdriver.
After assembly, you need to paint the product or varnish it.
Advice! If you want greater strength, the product should be screwed to the wall with dowels.
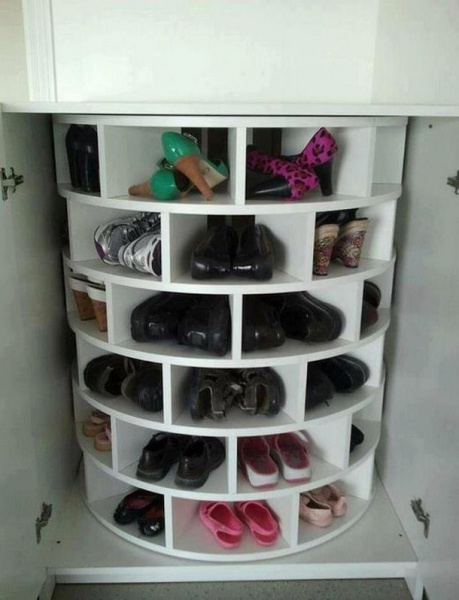
Round rotating shelf
What is good about a round shelf with rotation? This item can initially be organized in closed closet, hiding it from view, or placing it separately as a functional piece of furniture. The rotation feature helps you fit more pairs of shoes. Rotation around the axis will make it easy to put on and take out the shoes.

The materials you can use are MDF, chipboard, plywood, etc. From a sheet of the selected material, you need to cut round blanks, according to the drawing and the dimensions indicated in it.

If normal is selected round model on wheels, then in order to make it, you need to make sure you have everything you need. As many floors are needed, there will be as many round shelves - they are cut out with a jigsaw. In addition, you will need wheels for rolling on the floor, fasteners, wood screws or furniture screws, a screwdriver with a drill (if you work with screws), finishing coat, sandpaper for processing ends and edges.
For the floors, take a sheet of plywood: markings are made according to the distance between the tiers and the desired number of shoe “apartments” on each floor. To do this, take several pairs of shoes and place them on one tier-circle. This way you can mark the locations of all the overlaps.
Work begins with the first tier: first the floors are made, then the circle is turned over and wheels are installed at the bottom. Then the floors on each tier are assembled separately. Subsequently, you will need to fasten all the tiers together with self-tapping screws. To do this, the overlaps should not coincide, because the self-tapping screw is screwed into them.
The top tier-lid is screwed on top. You can begin sanding and painting the product.
Anyone who wants to see the process of creating shoe racks with their own hands can watch it on video.
Inhabitants small apartments Often faced with the problem of storing shoes. Two or three pairs per season for one person is the required minimum, so even small family of 3 people needs a design that allows them to compactly place shoes in the hallway.
Shoe storage options
There are several main reasons to make a shoe rack yourself. Undoubtedly, it is easier to purchase ready-made furniture, but often standard sizes not suitable for small rooms. The situation when shoes need storage at the dacha is also more practical to solve on your own using scrap materials, without resorting to additional costs. The third side of the issue is the desire to create an exclusive design, striking in its originality and unconventional approach. Let's consider various options installation of shelves for shoes, depending on the final goals - to save space or budget.

From the point of view of saving money, the material for making the shelf is chosen as accessible as possible: it can be carton boxes or cheap plywood. The design of such shoe shelves depends solely on the owner’s imagination:
- From disassembled boxes they are assembled using tape and staples classic shape Shoe shelves with vertical posts and cross bars;
- Several cardboard containers of suitable shape are fixed together into a vertical shelf, and then attached to the wall. Its minimal depth allows the structure to be installed even behind a door.
Note! This shelf model is suitable exclusively for light shoes. To store winter boots, you will have to take care of a more secure place.
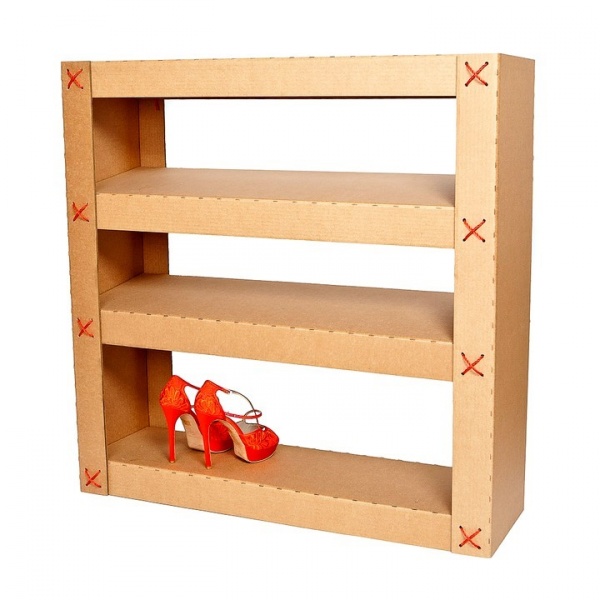
The plywood construction allows you to achieve good combination cheapness and originality. To do this, assemble a frame in the form of a box, after which it is equipped inside with shelves with asymmetrical curves, allowing you to place shoes various shapes and sizes.
Adherents classic interior It is better to make traditional shelves for shoes made of wood or combined with metal elements. They can differ in height, have a variety of configurations, and be additionally equipped with doors. It all depends on the material possibilities, the area where the premises will be located and the design of the premises.
For those who like to impress others or simply push away from the usual forms, they will like non-standard approaches in the form of using PVC pipes or equipping a kind of shoe shoe that simultaneously performs two functions: storing and drying shoes.

Budget offers
Available materials in the form of cardboard, plywood or slats will allow you to build a shelf for shoes without additional expenses.
Cardboard
Most economical solution question - the use of cardboard. It is appropriate to place such a product in a dacha, but in some cases creative approach In design, a shoe rack made of cardboard can be installed in an apartment. One option involves the following steps:
- Markings are made on cardboard boxes with a pencil;
- elements of the blanks are cut out with a special knife;
- boxes are formed from rectangles;
- the blanks are connected to each other, forming grooves for shoes;
- the elements are connected to each other by brackets;
- the shelf is fixed to the wall.
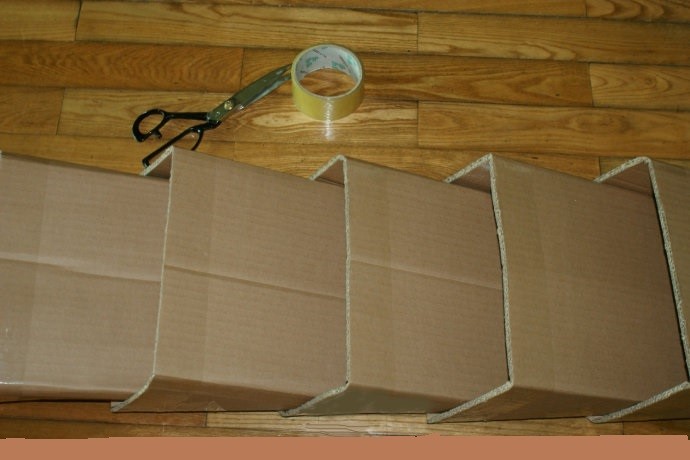
As mentioned above, it is also possible to build a standard model, where cross members. The connection is made using tape and staples. Decorating a shoe rack made of cardboard will help give it a more aesthetic appearance. decorative film.
Plywood
A shelf made of plywood will last much longer. To make it you will need:
- jigsaw and drill;
- perforator and hammer;
- pins and glue.
Having built a frame of the required dimensions, the internal filling with shelves is done at your discretion, depending on the number of shoes stored and their size.
Important ! Before joining, all parts are thoroughly sanded.

A more simplified model is a shelf assembled from U-shaped elements that can be attached directly to the wall or fixed on a previously prepared panel. As in the case of cardboard, it is recommended to cover the final structure with decorative film. This will not only make it attractive, but will also protect it from moisture, making it easier to care for.
Reiki
Slats can be a practical solution for a summer house. Minimum Required tools: screwdriver, hammer and nails. The design of the shelves in this case may be different, but all options have advantages, these are:
- saving costs on purchasing materials;
- ease of manufacture;
- good ventilation.
What models can be built from slats:
- The most primitive one is to connect two slats of different widths. There is a wider part at the bottom and a narrow one at the top. Shoes are inserted into the shelf with the toe.
- The following design of a shelf made of slats resembles the semblance of a pallet placed vertically. Having secured the crossbars to the vertical posts, the shelf is additionally equipped with slats for fixing to the wall.
- It's also easy to make a traditional shoe rack shape. For convenience, the upper part can be equipped with an ottoman.
It is worth noting that in each case it is better to carefully treat the slats so as not to damage the shoes in the future. At the final stage, it is preferable to carry out finishing work, be it painting or varnishing.

Classic designs
Traditional models of shoe racks are made of wood, chipboard and metal elements. In most cases you will need:
- saw and plane;
- screwdriver and screws;
- metal corners;
- sandpaper;
- wood glue;
- tape measure and pencil;
- finishing material (paint or varnish).
An essential condition is preliminary design. You can use ready-made diagrams or draw a sketch of a shoe rack yourself.

Tree
Let's talk about one of the many options. Suitable material there will be a board 25-35 cm wide, the thickness of the workpiece is 2 cm. Manufacturing includes the following steps:
- The vertical side walls are being prepared. The height of the parts is 80-90 cm.
- For shelves, 4 fragments 60-70 cm wide are cut out;
- All elements are processed with sandpaper;
- Using self-tapping screws, the crossbars are connected to the side walls.
- To enhance strength, metal corners are fixed at the rear ends of the shelf.
- The final stage consists of finishing works- after treatment with primer or stain, the shoe rack is painted or varnished.
Chipboard and MDF
A shoe rack made of chipboard with an ottoman combines practicality and attractiveness. In the process of preparing parts according to the selected project, it may be necessary to remove chips and irregularities using grinder. Edges ready-made elements The future shoe shelf is covered with a special tape using a hot iron. Fine-grained sandpaper is useful for sanding corners; this will prevent damage to the shoes during storage. In some cases, slots should be prepared; the parts of the shoe rack are often connected using confirmations. To decorate an ottoman, take care of purchasing foam rubber and leatherette in advance.

By showing your imagination, you can make an original and practical shelf for shoes made of laminated chipboard. Material consumption is determined depending on the number of shelves; you will also need to purchase metal tubes and clamps to hold the transverse elements of the structure. The edges of the metal tubes are closed with plastic plugs.

Into the interior square hallway The corner model of the shoe shelf will fit well. The stages of its production are not much different from previous versions:
- a diagram of the future shelf is being prepared;
- for the material you can choose laminated chipboard or MDF;
- parts are cut out according to the selected dimensions;
- All roughness is removed from the edges, after which they are decorated with tape;
- The structure is assembled using confirmations.

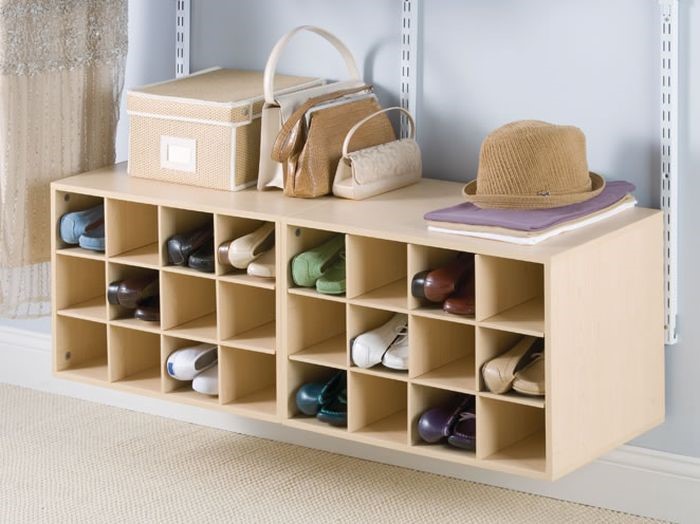
The “Slim” shoe rack model has maximum functionality. Accommodating a large number of pairs of shoes, it has a compact size. Making it yourself is extremely difficult due to the large number of accessories. It is much easier to purchase a ready-made design and start self-assembly. The following diagram will help you:


Use of metal elements
The designs have external lightness, in the manufacture of which they used for the transverse shelves metal elements. Working with such a sketch requires the presence of a grinder, a jigsaw for metal and some experience. Having blacksmithing skills, you can create an exclusive model of a shoe rack with forged elements.

Extraordinary models
Non-standard shelves also have two directions: shape and material used. Sufficient space in the room allows you to install a round shelf for shoes; its ease of use is facilitated by a rotating mechanism. The most difficult stage will be cutting out round blanks and installing a mechanism that ensures the mobility of the device.
Note! The radius of the circle should be larger than the largest shoe size you have in your home.

If we consider non-traditional options for shoe shelves in terms of the chosen material, it could be a stand made of PVC sewer pipes. What does the assembly of such a shelf include:
- Sawing material to length, taking into account shoe size.
- Sanding the edges with sandpaper.
- Decoration of sections with decorative film. In this case, the imitation of birch logs looks very impressive.
- Between themselves individual elements The shelves are connected by plastic holders or straps. If necessary, this design of a shoe rack can easily be supplemented with new cells.

Regardless of which model you like best, important point is the final finishing that can turn the most unpresentable shelf into an exclusive furniture structure.
I remembered the famous number from KVN about the married couple Igor and Lena. Lena has a lot of shoes; she has filled a whole closet with them. Igor begins to empty shoe boxes and is hilariously indignant at his wife’s irrationality and wastefulness. The audience laughs, the men give a standing ovation. Igor himself has one pair of shoes for all occasions. At the end of the number, sitting peacefully next to his wife, the husband utters the catchphrase:
I realized how many pairs of shoes a woman needs to be happy.
How many?
One more than she has.
To which Lena replies:
What lesson can be drawn from this story? You need to store your shoes correctly and carefully, and then no one will find out how much you have and why you need them in such quantities.
Now we will dwell on the problem of storing wearable shoes; in other words, we will tell you where to hide a bunch of shoes, slippers and boots from the corner of the hallway. Simple and rational decision- place it on the shoe shelf. The option of purchasing this piece of furniture in a store seems simple only at first glance. Such a small-sized item is not so easy to find; as a rule, it comes with a set of furniture for the hallway. Separately, it is not always possible to choose something suitable in size, design and wallet. But you can always do it yourself.
And here our imagination and skills acquired in labor lessons come to our aid.
There are a lot of options, let's look at some of them.
How to place shoes at home
First, you need to decide what you want, and most importantly, you can make a shelf for storing shoes. Different materials can be used for this; each of them has its own disadvantages and advantages. A PVC product will be light in weight, easy to clean, because it can be easily washed, but in order to work with it you need a tool and skill. Wood is good for everyone, except that to work with it you need a tool, a place and at least basic knowledge of carpentry. Cardboard is easy to work with and convenient, but during use it can become deformed from pressure and moisture. Look at the options offered and decide which side you are on.
Shoe rack “Woodpile” made of PVC pipes
This option is suitable for placing home, summer and demi-season adult shoes or for any children's room. High boots will have to be placed separately.
- We purchase sewer pipe made of PVC, diameter 30 cm.
- Use a hacksaw to cut into sections 30–35 cm long, depending on maximum size shoes in the house. A length of 30 cm is enough for size 42. If you need more, attach the boot to the pipe and measure the required length.
- We sand the edges with fine sandpaper to make them smooth.
- Since the shelf is called a woodpile, we cover the pipe sections with wood-look wallpaper. If such a design does not fit into the overall concept of the hallway, choose another design that is more suitable in style and color.
- We glue the four blanks together with epoxy glue purchased from hardware store. We fix the row using clothespins, pliers or special clamps, if available.
- In the same way, we make two more rows of three blanks each.
- Let us make a reservation that here we offer one of many options for combining design fragments. If you wish, you can assemble a shoe rack of a different shape and size. There can be as many sections as you like, up to occupying the entire wall with them, if it is functionally justified (it is inconvenient to get shoes from a great height, but you can place out-of-season or rarely used items there).
- We collect a “woodpile” from three rows cells in the following order: at the bottom and top there are rows of three sections, in the middle - of four. We put it against the wall.
- Voila, the original shoe rack is ready.
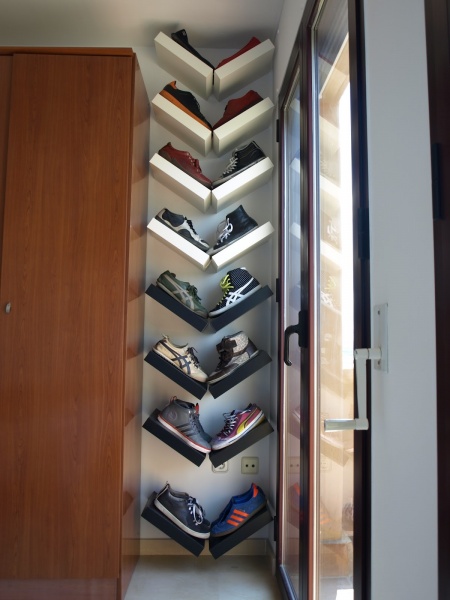
The “Woodpile” rack is good for everyone, but it would hardly suit Lena from KVN. After all, you can put exquisite stilettos in there, but somehow it’s not comme il faut. Especially for Lenin’s stilettos, there is a mega simple version of a shoe shelf called “Cornice”
Photo: Storage option “Cornice”
 It is convenient to place high-heeled shoes on the ledge
  Unusual use of a cornice as a shelf for “studs”
  Any cornice is suitable for serving as a shoe shelf
  You can organize an entire shoe rack by attaching several curtain rods under each other.
- Take any window cornice and cut off part of the required length.
- Attach the cornice to the wall.
- We hook the shoes with the heels to the cornice and hang them up. It turns out to be a witty shelf for your favorite heels.
DIY wooden shelf “Bristles”
Making this shelf requires a little more work than the previous two.
It is made from plywood and shoe brushes.
- The first thing you need to determine is the length and width of the future shelf. In order to calculate the length as accurately as possible, you should take into account the parameters of the plywood and the number of brushes that you intend to place on this plywood. The width of this part of the shelf should be 5 cm greater than the width of the brush.
- Having decided on the parameters, we cut out 2 identical blanks.
- We connect them together with a “book” as shown in the picture.
- We drill holes on the long part of the shelf at a distance of 1 cm from the edge. We place the second board on its end and use screws to connect the two fragments. On the sides we attach a square of the same width from the same plywood.
- If the brushes have handles, cut off the handles. We straighten the edges of the cut using a file.
- We drill holes in each brush on both sides. Screw the brushes to inner surface shelves with bristles facing outwards, as shown in the photo. The first part of the shelf is ready.
- For the second part, we take a sheet of plywood and make it the same length as the first, and 35–40 cm wide, depending on the largest shoe size in the house. Width 35 cm is designed for shoes size 43.
- We saw off another board of the same length, 15 cm wide.
- We attach the small board to the large one with screws so that we get a side (we drill holes in the large one 1 cm from the edge, attach the small one with the end and drive the screws into the holes on one side and into the end of the board on the other side).
- On the side opposite from the side, we drill 3 holes closer to the corners of the large board as follows: one hole on the long side, two on the short side. The distance between the holes depends on the width of the first part of the shelf with the brushes inside. Suppose the width of the shelf is 15 cm, then we make holes at a distance of 2.12 cm from the corner. On the long side we make an indent of 5 cm from the corner.
- Using screws, we assemble a shelf from two blanks.
- Paint the finished shelf in your favorite color. After the paint has dried, drill 2 holes in the central board and attach all this splendor to the wall.
Using the same principle, you can make a simpler version. Essentially, these are just two planks nailed to the wall parallel to each other at a close distance.
Shoe rack “Carousel”
If there is a person in the family who has the skills of a carpenter, has tools and a workshop, and at the same time, for some unknown reason, does not know how to make a shoe rack, show him this video. Everything looks easy and accessible on the screen. Just to get started you need to prepare: a sheet of plywood, nails, wood glue, turntables, paint.
Video: how to make a shelf from improvised means for storing shoes
And now, pay attention to the screen:
Simple production of pockets from cardboard “Guests on the threshold”
Anti-waiting cardboard is often used in making shoe storage sections. Although it sounds a little fantastic. The video shows how you can make durable and original pockets for storing slippers and summer shoes, armed only with a cardboard box from a vacuum cleaner, scissors and good glue. Even the most physically unprepared segments of the population - old people, women and children - can easily do such a thing. So, get it household appliances out of the boxes and start actively viewing.
Another cardboard version of a shoe rack from the “get creative with the kids” series.
Shoe rack “Triangle”
We take as a basis the same cardboard boxes, the design potential of which is as inexhaustible as an atom.
So, we will need: cardboard boxes, colored wide tape, scissors, ruler, glue.
- We cut out a rectangle from cardboard with sides 45x35 cm, so that even a large shoe can find a home on the shelf.
- Using a ruler, make 2 folds at a distance of 15 cm from the edges of the long side.
- We cover the edge of the side from which the folds go vertically with tape - this will be the front façade of our section.
- We fold a triangle along the folds, paste it with tape on top along the edge, and also in several other places along the fold.
- In our case, we make a total of 13 sections in a similar way. You can vary this number in any direction at your discretion.
- We assemble the bottom row of the rack from four sections. We glue them together with tape. You can stop there, or you can glue a sheet of cardboard with glue to strengthen the structure, but this will not add elegance to your structure.
- We assemble the second row of five modules, fasten them together and glue them with tape to the bottom row. And so on.
Attention! The peculiarity of cardboard structures is that you cannot store wet and dirty shoes in them.
Shoe cabinet “Magic box”
Do you live near a grocery store and are you annoyed by the stack of boxes outside your windows? Your husband bought a case of beer and now you have a drunk man, glass containers and an empty case in your house? Then you're in luck! Turn the drawer into a bedside table or shelf for storing shoes, because physical labor calms the nerves!
You can simply move a plastic box to the wall in the hallway, cover it with rubble and place dirty and wet boots and shoes in it. You can also use a tray with sides or a plastic tray for these purposes.
Several boxes are easily fastened together with a plastic clamp or ordinary wire, placed “on the butt”, moved towards the wall, or better yet, attached with the same wire to a pipe or some other protrusion, and now we have several sections for storing shoes or something more.
WITH wooden boxes you'll have to tinker a little.
- Sand the surface of the box with fine sandpaper.
- Cover with paint.
- Hang on the wall.
A wooden pallet can be used in the same way.
Just as the theater begins with a coat rack, so each apartment welcomes guests with its hallway. Shoe shelves are not only useful item furniture, but also serve as part of the interior design. And if the owner of the apartment is an amateur creative solutions, then he will definitely begin to surprise his guests, starting from the threshold of the house. For guests, beautiful shoe shelves will be a subject of delight and admiration, and for their owners they should also serve as a storage place for many pairs of sneakers, shoes, boots and many other footwear. After all, the question of storing shoes arises for quite a few people, especially if the apartment has a very small hallway.
Of course, it’s easier to buy a ready-made product, but, as a rule, shoe racks offered in stores have many shortcomings and are unable to fit perfectly into the dimensions of the hallway. The store may offer very large shelves for shoes, which will cost a lot of money, or are completely unsuitable for existing items. finished interior hallway room. And it is at this moment that a completely reasonable question arises: how to make a shoe rack with your own hands so that it can ideally suit your requirements and put all your shoe wealth out of sight?
To make a shelf, you first need to have a pair of long boards one and a half or two centimeters thick and twenty to thirty centimeters wide. The tools you will need are: a ruler and a pencil, a saw, a screwdriver, metal corners and screws. Metal corners will be needed to strengthen the entire structure so that it does not wobble, but stands firmly in its place. To mark the cutting line, use a ruler and pencil. To make a simple structure, it is necessary to cut out two side parts from pre-prepared boards with a height of approximately seventy to ninety centimeters, and several transverse parts that will serve as the lower and upper parts of the shelf. You can choose any length, depending on the dimensions of your hallway.
Next, using a saw, we cut the boards to the required length. When working with wood, you must remember that when pruning with a saw, uneven cuts may result. Sandpaper is ideal for eliminating this problem; it can be used to easily sand rough edges. You also need a rail, from which you will need to make several segments. The number of segments is calculated based on the number of shelves, two segments per shelf. The length of the slats should be equal to the width of the side parts of the shoe rack. Now you need to make markings for future shelves. On the side parts in the designated places using a drill, holes are drilled slightly smaller than the diameter of the screws. We secure the parts with a screwdriver with self-tapping screws for fastening the shelves.
The lower and upper parts are attached from below and above using metal corners. You can strengthen the structure by using not only metal corners, but also for more experienced craftsmen You can use the butt seam method. After performing all these operations it turns out wooden box, having bars on its sides. After these simple manipulations, the DIY wooden shoe rack is almost ready. All that remains is to put your shoe rack in the hallway and place separate shelves inside. This design can become the basis for designing shoe shelves with any configurations and sizes, everything will depend on your imagination. And if you also master the technique of working with chipboards and learn how to use them in the manufacture of such simple furniture, then you can even get a hallway bedside table with doors.
Shelves in the form of a bench are very popular when using the above-described technique. This is very worthy and practical option for any hallway. IN in this case the shelf will perform two functions: spacious storage for shoes, and also, importantly, a place for putting on shoes. These types of models have a lot of options. If you do the work using natural wood, you can end up with simple and beautiful models. Bench-style shoe racks with an upholstered soft top cover also look great. And it’s comfortable to sit and look beautifully. When mastering an already known technique, you cannot stop, but you need to improve your skills and bring to life your most bold ideas.
The oval-shaped shoe rack is very original. Few people would refuse to have one like this in their hallway. beautiful shelf for shoes original form, and even a soft seat on top. This type The work is quite complex, but the result will not make you regret the work done. As they say, the eyes are afraid, but the hands do. To make an oval shelf that you can move, store shoes and put on comfortably, you will need the following materials: chipboard twelve millimeters thick and 60*60 centimeters in size, parts for fastening shelves, wood screws, special plugs to hide the attachment points. To make a soft seat you will need foam rubber and fabric.
As planned before, our DIY shoe rack will have an unusual shape; for this purpose we draw circles on all chipboard blanks. To make the circles even, we drive a nail into the center of the sheet and tie a strong thread to it. We take a pencil and, using the free edge, draw a circle that will fit as closely as possible into the chipboard square. Using a jigsaw, clearly follow the marked lines and cut out three identical circles. Jagged edges can be processed using sandpaper or, if available, use a grinding machine. Next, you need to draw two diagonal lines on each of the resulting circles. The lines are drawn in such a way that they are clearly perpendicular to each other. You need to drill two holes on each part. Holes will be needed to attach partitions.
Four partitions are installed on the round piece that will be the base of the shelf. The partitions are installed so that they are clearly at the outer edge. They are secured from below using screws. Then it is necessary to secure the middle circle and the partitions are fixed on top of this circle with screws. The remaining four partitions are fixed in the same way, only they are moved so that they are clearly between the previous partitions. And the final stage is to secure the top circle. To complete the complete picture, you need to close the screws with special caps and paint the shoe rack in any color you like. suitable color.
And, of course, don’t forget about the soft seat. To do this, cut out several circles from foam rubber and cover them with cloth. All this with the help construction stapler fixed on a ready-made shelf structure. If you want the shelf to move to any part of the hallway, then four rollers are attached to the lower base of the structure.
Another idea for a shoe rack is a corner shelf. This is another idea for the master. This type of shoe rack is very common, because this type of structure can be installed in any corner of your hallway. In the corner, the shoe shelf will occupy the most advantageous position and will not block the passage. What for small hallways quite important. To make such a product you will need several sheets of MDF, screws, a jigsaw, a drill, drills and a screwdriver. The work is carried out in several stages. First of all, you need to make markings on the MDF sheet. Two details are drawn rectangular shape, they will be the side walls of the shoe shelf. It is also necessary to draw triangular parts that will be the shelves themselves.
Then all the previously drawn parts are cut out with a jigsaw, and their edges are processed with sandpaper. The entire structure is attached using a drill and self-tapping screws. To do this, the location of future shelves is marked on the side parts and all this is fixed using self-tapping screws. To give an aesthetic appearance, the structure of the shoe rack can be coated with acrylic paint. To prevent such a shoe rack from falling down with your own hands, for reliability you need to tighten its sides with dowels to the wall. Now you can safely use this design and not be afraid that the shelf may crumble due to careless movement. And we should not, of course, forget that this kind of design does not provide for the ability to store high boots on them.
There are many more different ideas to create unique furniture for hallways. And if you still need a shoe rack with your own hands, photos of various configurations can be found on the World Wide Web, and not only. And if you experiment a little with the already presented drawings of shoe shelves, then it is quite possible to create some kind of masterpiece and exclusive piece of furniture. Fantasy and fantasy again will help you create a unique interior for your hallway. With such furniture you can please not only yourself but also your loved ones. A DIY shoe rack you create will become a great gift for friends and family. This kind of present will not only be original, but also very functional. And, as you know, a gift made with your own hands is very pleasant.
Having familiarized yourself with some of the intricacies of creating shoe shelves, it becomes clear that there is nothing complicated about it and it is quite possible to independently create any design of shoe shelves. The main thing is to show a little imagination and hard work. And, of course, buy everything necessary tools for work and materials.
Shoes need to be stored somewhere, but is it worth spending money on purchasing an expensive shoe rack? If you wish, you can make your own shelf from any available materials - laminate, and even pipes and boxes. This does not require special carpentry skills.
We will briefly tell you... You will find lists of materials and tools, diagrams, drawings and photographs. It's time to take on your entryway!
The choice of materials and tools will vary depending on the design of the future shelf. Therefore, developing a single standard is problematic. The most technically difficult solution is considered to be the “slim” solution.
The complexity of such cabinets lies in the installation of a large number of different fittings. All other shelves are much simpler, so when compiling a list of necessary things, we will proceed from the most complex circuits. You will need the following tools:
- screwdriver;
- electric drill;
- hacksaw for wood (or metal);
- chisel;
- ruler;
- Sander;
- pencil.
DIY wooden shoe rack
How to make a shoe rack with your own hands
Before you start self-production shelves for shoes, you need to decide on the design of the future product, its dimensions and functionality. You can create shoe shelves from anything - profiles, wood, slats, laminate, metal and even cardboard. The most popular (in terms of design) are rotating, round and angular models.
In some cases you may need to drill and sand (metal, wood). In some places we will make do with simple gluing and cutting (cardboard boxes). And some varieties will seem exotic to you.
For those who have an old unnecessary closet, the process of making a shoe rack can be incredibly simple, just watch the following video:
You can build a modular shelf with your own hands from plywood, and not just a shelf for shoes. This shelf will be attached to the hallway wall and will not take up much space, and the drawings for its manufacture are quite primitive. In addition to sheets of plywood, you will need:
- drill;
- jigsaw;
- hammer;
- perforator;
- glue;
- pins.
Plywood is cut into identical rectangles (for example, 20x30 cm). The parts are carefully polished, after which the assembly process begins. Sheets of plywood form U-shaped structures that are “nested” into each other, forming something like a labyrinth.
You can hang any number of similar blocks in the hallway. Fastening is carried out using wooden pins and holes drilled in plywood.
Plywood shoe rack

Made of wood
The easiest way is to make a shoe rack with your own hands from store-bought items, rather than from “raw” wood. But since you have decided to start this business from scratch, prepare following materials and tools:
- sandpaper;
- plane;
- metal corners;
- wood glue;
- screwdriver (can be replaced with a screwdriver);
- saw;
- self-tapping screws;
- varnish (or paint);
- pencil and tape measure.
We will use as material wooden board. The width of the workpiece is 25-35 centimeters, the thickness is a couple of centimeters. The manufacturing process looks like this:
- Vertical ones are cut out side walls(80-90 centimeters each).
- The support bars and crossbars are being prepared.
- Four fragments of 60-70 centimeters are cut out (these are shoe shelves).
- All workpieces are processed with sandpaper.
- The bars are attached to the side walls using self-tapping screws.
- Metal corners are attached to the rear ends of the product.
- Shelves are laid on fixed beams.
- After assembly, the product is varnished (if desired, with paint of any color).
A DIY wooden shoe rack can also become a comfortable ottoman. In the following video you will learn how this is possible:
From chipboard
Making your own shoe racks from chipboard is in many ways similar to the previous options. In addition to a screwdriver, drill and other standard tools, you will need:
- mounting knife;
- hex wrench;
- square;
- edge tape;
- plugs;
- screws;
- confirmations.
The shelf can be made, or it can be made with rounded or straight ends. In general terms the process looks like this:
- The sidewalls are marked and cut out.
- Using a sanding machine we get rid of chips and unevenness.
- Take a hot iron and cover the edges with special tape.
- Trim off the excess edge tape with a knife.
- We process the corners with fine-grained sandpaper.
- We make cuts (if the plan requires it) and assemble the product.
The following video will tell you how to create a shoe rack with your own hands from chipboard and pipes:
From laminate
You can create a minimalist and stylish shelf for shoes and from regular laminate. To do this, you will need laminate sheets (the quantity depends on the level of the shelf) and metal tubes with slots. The slots can be made with a grinder (using metal circles), and plastic plugs can be placed at the ends.
If desired, you can create frame structure up to the ceiling, but then you will have to think about additional fastenings to the wall.
The number of sections is limited only by your imagination and the size of the hallway.
Photo of laminate shoe racks

From slats
Not a bad solution for country house slats can serve. Having stocked up required quantity Using this material and a minimal set of tools (hammer, nails, screwdriver), you can assemble a shoe rack with your own hands from slats with two or three tiers in a short period of time. Let's list the advantages of such a shelf:
- ease;
- budget;
- good ventilation;
- practicality.
Shoe rack made of slats

From profile
You can also assemble a shoe rack with your own hands - from a profile, using also materials strained glass. From the tools you need:
- Bulgarian;
- glass cutter;
- electric drill (with metal drills);
- jigsaw;
- building level;
- screwdriver
For your purposes, you can use a galvanized profile or a regular multi-colored one. The first will be more moisture resistant, the second will fit better into the chosen interior. A similar structure is mounted on the wall:
- The profile is applied to the wall and secured with one self-tapping screw.
- After this, take a level and check the horizontalness of the markings.
- The remaining screws are screwed in.
- The frame is mounted.
- Previously prepared glass shelves are installed.
Shoe rack in loft style

From boxes
Most a budget option- a shelf for shoes, assembled with your own hands from cardboard or cardboard boxes. It takes up little space and looks beautiful in a small hallway. Work procedure: do-it-yourself shoe rack made of cardboard
- The contours of the blanks are drawn on the box with a pencil.
- The blanks are cut out using a cardboard knife.
- Rectangles are folded into special boxes.
- The blanks are placed on top of each other, forming grooves for shoes.
- Fastening is carried out with staples.
- The shelf is mounted on the hallway wall and covered with decorative film.
Cardboard shoe rack

From pipes
To make this shelf, you can take plastic water pipes - for example, those from which risers are mounted in bathrooms. The tools you will need are a hacksaw. The procedure for assembling a shoe rack with your own hands from pipes is as follows:
- Sawing PVC pipes into equal segments - these will be the “boxes” of our shelf.
- Sand the edges with sandpaper.
- We cover the sections with decorative film.
- We fasten the sections together with plastic holders on both sides. The diameter of the pipes and the shape of the structure may vary. New cells can be easily integrated into the circuit if desired.
Pipe shoe rack

We do not suggest doing metalwork or going to a blacksmith. Primitive metal shelf for shoes it is quite easy to do it yourself - for this you need to get an old, out-of-use stepladder. Procedure:
- A fragment of a stepladder is cut out, consisting of several “steps”.
- The edges are sanded.
- The fragment is fixed on the hallway wall.
- Plastic hooks are attached to the crossbars - shoes will hang on them.
Homemade shoe rack made of metal materials

Corner
For the simplest corner shelf For DIY shoes you will need MDF sheets, a jigsaw, a drill, drills and screws. It is advisable to have a pencil, a building level and a jar acrylic paint. The actions are:
- Two identical rectangles and several triangles are cut out (their number depends on the tiers).
- The rectangles are fastened with self-tapping screws, forming a corner structure.
- The same self-tapping screws are used to mount the corner shelves inside.
- The shelf is covered with acrylic.
- Now we put the shelf in the corner of the hallway and secure it with dowels to be sure.

Round
To make a round shoe rack with your own hands, you will again need a jigsaw and MDF sheets. The shoe rack will have two tiers, so we will need to cut out three “round pieces”, the radius of which will correspond to the largest shoe size of your household. Further actions:
- Having dealt with the round blanks, you need to cut out rectangular ones (4 pieces).
- Grooves are cut in the middle of the rectangular blanks.
- Rectangles are inserted into each other, forming crosses.
- Using a screwdriver, the crosspieces are attached to round workpieces.
- The ends are sanded and covered with film.
Photo of a round shoe rack


