Children are amazing experimenters. Their curiosity knows no bounds. And that is great! Parents should not only support the child’s desire to learn more, but develop this desire, give the little mind as much food for thought as possible, teach the child to think and draw conclusions.
Experiments and experiments carried out together with a child will not only give him bright, unforgettable impressions. It is experiments that teach a child to see the world in a special way, through the eyes of a researcher, to pose questions and find answers to them. And it is not at all necessary to buy expensive “Young Chemist” kits to conduct experiments. You can use what is in every home. For example, ordinary food vinegar and soda.
If the baby has never seen the reaction baking soda and vinegar, be sure to show him this phenomenon, which is familiar to you, but surprising to him. This process is called a neutralization reaction. Its essence is that acid (vinegar) and alkali (soda) neutralize each other, releasing carbon dioxide.
You can tell an older child that carbon dioxide is constantly present in the air. This is what we exhale. Plants convert carbon dioxide into oxygen, which we inhale.
We also find carbon dioxide in carbonated water: it makes the water prickly.
The release of carbon dioxide can be confirmed by the following experiment.
To carry out the experiment you need:
- Small balloon, which is easy to inflate: it needs to be inflated and deflated before the experiment;
- Soda – 2 teaspoons;
- Vinegar – 1/4 cup;
- Water – 3 tablespoons;
- Glass bottle;
- Scotch.
Dissolve baking soda in water and pour the mixture into glass bottle. Keep the ball and tape handy. Pour vinegar into the bottle and quickly place a ball on the neck of the bottle. Secure the ball tightly with tape to prevent it from being torn off. You will see carbon dioxide begin to fill the balloon.
Children's experience with vinegar and eggshells
Interesting experiment can be done by having vinegar and a raw egg on hand. It will be especially useful for those kids who do not see the value in morning procedures and do not want to do it in the morning.
Take egg and put it in a jar. Pour vinegar over the egg, close the lid and leave for 4-5 days. After the allotted time, carefully remove the egg, wash it and give it to the child. The egg shell became soft - the acid dissolved calcium, which provided hardness eggshells. What does this have to do with the reluctance to brush your teeth? The fact is that in the mouth, where the teeth are not brushed, the same acidic environment is formed as the one in which we placed the egg. And calcium, which gives strength to our teeth, dissolves in it just as well, although not so quickly. Therefore, if you want to have strong teeth, do not forget to brush them daily!
Childhood experience - a volcano made of soda and vinegar:
Using vinegar, soda and dye, you can show your baby a real volcanic eruption. The volcano, of course, needs to be made, but it’s not difficult for mom.
We take pieces of old used plasticine (you can also take new one, if you don’t mind), divide the plasticine into two parts. From one we make the bottom of the volcano: it must be of sufficient thickness. This can be entrusted to the child.
 From the second half we make a hollow cone, the upper hole of which will be the crater of the volcano. We connect both parts tightly so that inner space was sealed.

 We place our volcano on a tray, tray or large plate.
 Add a tablespoon of baking soda and dye. If there is no dye, you can use red beetroot juice, although the lava will not be as bright.
 Pour a teaspoon of dishwashing liquid into the mouth. The volcano is ready to erupt. Pour 1/4 cup of vinegar into its mouth and the volcano wakes up!

Here we have a simple but interesting volcano made from soda and vinegar.
A volcanic eruption on a tropical island is a very spectacular and beautiful chemical experience (experiment) for children at home. Master class with photos.
Experience (experiment) "Volcano" for children
This experience (experiment) is quite easy and well-known, but children (and even preschoolers and even junior schoolchildren, if they were not already familiar with it) it invariably delights, and they are ready to repeat it again and again!
If you wish, you can purchase a kit for conducting the “Vulcan” experiment, but everything necessary for this is usually found in every home. For the most simple option This experience will only require:
- vinegar
- small container (bottle, bottle, shot glass or glass)
- soup plate
be careful: children can experiment with vinegar only under adult supervision!
And although my daughter and I also did this experience more than once in several versions, the photographs of the volcano from this article, surrounded by a beautiful tropical landscape, are so inspiring that we immediately want to do the same.
Moreover, besides intellectual development and expanding ideas about environment, the child will develop fine motor skills, as well as creative thinking. After all, in this option The experiment is proposed to be carried out not in a laboratory flask or a container that replaces it, but to make a beautiful background with your own hands. This background can subsequently be used for teaching geography to your child, for games and thematic installations.

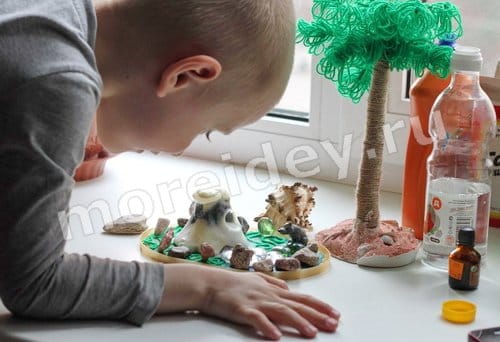
This work and master class were created specifically for participation in. Authors: Curly Kolya (4 years old, St. Petersburg) and his mother Yulia. Many thanks to them for their participation and the article with step-by-step instructions.
How to make a Volcano Eruption experience at home. MK
If you have enough baking soda, vinegar and dishwashing detergent at home, you can easily cause a small home disaster - a volcanic eruption. And at the same time introduce the child to the simplest chemical reactions.
A very exciting activity for a long time! We had “eruptions” for several days!
Materials and tools
What you will need:
- jar (we have half of a Kinder Surprise plastic egg)
- plasticine
- decorations (pebbles, beads, threads... In general, anything that will help visually create a tropical island)
- pallet (ideally a tray)
- vinegar
- dishwashing liquid
Stages of work
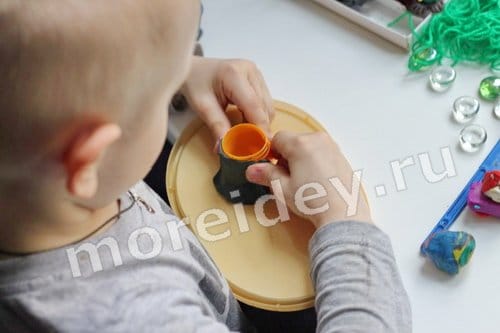
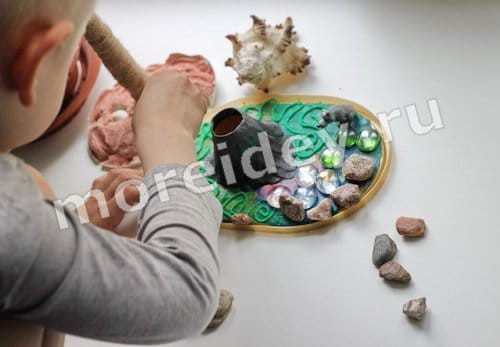
To begin with, Kolya and I created our own miniature island with a dormant volcano. They covered the jar with plasticine, decorated it with stones, colored glass, threads... They sat a toy wolf to watch.


Then we started chemistry!
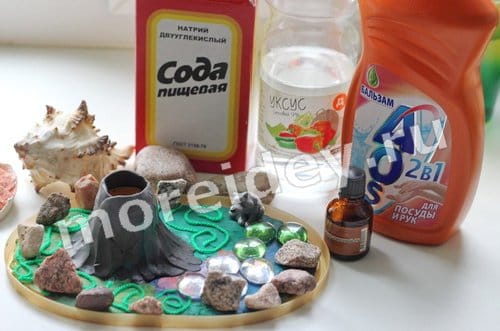
Kolya poured a full teaspoon of soda into the volcano. I also added a couple of drops of iodine and about a teaspoon of dishwashing detergent.


To ensure everything was evenly distributed, we stirred the mixture with a stick and, holding our breath, poured some vinegar into our volcano! Immediately everything hissed and snorted, and thick foam, colored with iodine, flowed from the crater of the volcano! It became clearly clear that our volcano model actually works and looks impressive!

The process of adding baking soda and pouring vinegar over it lasted a couple of dozen times. The young chemist’s delight did not subside; the vinegar ran out. Then I had to run for a towel and do the cleaning, so it’s better to do the “volcano” right away on a deep tray.
_____
I suggest looking at other articles with the tag or all articles from the “Developmental and educational activities” section.
© Yulia Sherstyuk, https://site
All the best! If the article was useful to you, please help the development of the site by sharing a link to it on social networks.
Posting site materials (images and text) on other resources without the written permission of the author is prohibited and punishable by law.
- Colored rain - an experiment with water, paint and foam...
- Rising paint - an experience with color, paints...
Within the framework of this article, a simple and accessible step by step guide regarding how to make a volcano at home. As the child develops, he asks more and more questions. It is best to give a confirmed answer to them a clear example. And one of them will be given within the framework of this article.
Ingredients
To solve the question of how to make a volcano from plasticine at home, the following components and materials are needed:
- Plastic container (you can take any bottle with a capacity from 0.5 to 2 liters).
- Plasticine for creating a model (depending on its size, you may even need several packages).
- Food foil.
- Two glass flasks for mixing ingredients (in extreme cases, you can use cups).
- Dishwashing liquid.
- The paint is red.
- Acetic acid.
- Sand.
- Disposable medical syringe.
- Scissors.
- Spoon.
We prepare all this in advance so that later, during the experiment, various hitches do not arise. Every housewife has most of this list. What is missing, we buy more.
Making a layout
The most difficult stage in how to make a volcano at home is creating a layout. Here you need to turn on your imagination and formalize it properly. We use as a basis plastic bottle. It should be in the center, and symbolic lava will erupt from it.
Next, layers of plasticine are placed on it to form a slide. Cover the crater of the volcano with food foil. At the same time, it is necessary to make a hole in it using scissors in order to be able to mix the lava ingredients. At the final stage, cover the surface of the plasticine with sand. If desired, it can be painted with paint to make the layout more natural.

Mix and get the result
Now let's figure out how to do it at home. First, mix the paint in one of the cones. Then add to them. Mix the resulting solution thoroughly until a homogeneous mass is obtained. Pour acetic acid into the second flask. Now, using a spoon, pour the solution from the first vessel into the volcano through a pre-prepared hole.
After this, everything is ready for the eruption. You just need to fill the syringe with acetic acid and then quickly inject it into the volcano nozzle. This will start a reaction inside, as a result of which lava will flow out through the hole. If desired, the experiment can be done several times. To do this, it is enough to then re-add
When thinking about how to make a volcano at home, do not forget that lava will flow out of its mouth. Therefore, it is recommended to arrange it in advance so that nothing gets damaged (for example, on a pallet or in the bathroom). Another nuance is that the plasticine model can be used repeatedly during such experiments. Therefore, in the future, to obtain a “volcanic eruption” you will only need soda, acetic acid, red paint and dishwashing liquid.

Summary
Within the framework of this article, an algorithm was given on how to make a volcano at home. Most of the materials used are available to every housewife, the rest can be purchased. There is nothing complicated about this, so you can conduct a bright and educational lesson with your baby. If desired, this experiment can be repeated again among his friends and use the same layout. The only thing you need are the ingredients to simulate lava, which shouldn't be a problem.
A DIY volcano is good entertainment for both adults and children. The main thing in business is not to be shy about using your imagination. The volcano can be made from foam plastic, papier-mâché, plasticine, earth or clay. It is very important to give the similarity to the real territory on which the volcano is located. This can be done by adding small parts: various animals running away from danger, miniature copies of people, trees, bushes, grass. It is necessary to breathe life into the overall picture, which will undoubtedly refresh the process of magma eruption. By adding dyes to the soda, the lava coming out of the crater will be much more spectacular.
How to make a volcano at home from polystyrene foam
In order to make a beautiful erupting volcano at home, in addition to ingenuity, you will need desire and some materials.
Materials for work
- Large glass bottle – 1 piece.
- Foam white, density No. 25. Dimensions: 35 cm height, 40 cm width, 40 cm length.
- Glue “Dragon”.
- Primer ST-16.
- The brush is wide.
- Sandpaper of different grains.
- Starting putty.
- Small rubber spatula.
- Primer for putty.
- Layout with a new blade.
- Water-based paints.
- Water-soluble varnish.
- Paint brushes are wide and narrow.
- Fiberboard – size 60 cm by 60 cm.
- Plasticine of different colors.
The working process
- A piece of polystyrene foam must be carefully divided into two halves -17.5 cm/20 cm/20 cm. It can be cut with a metal saw so as not to seriously injure the surface.
- After the foam is divided into two parts, you need to cut out the middle of the foam into which the glass bottle will fit. The neck of the bottle should be hidden under the top point of the foam. After the bottle is placed in polystyrene foam, the halves are glued together with “Dragon” glue. The bottle should come out through the bottom of the makeshift volcano.
- Further breadboard excess pieces of foam are cut off from the outside in order to give the shape of the volcano.
- After the foam has already become like a volcano, you can become cowardly fine foam fraction and start sanding surfaces with sandpaper. First large, then smaller.
- It was time to prime the surface (2 layers). Each layer is applied after the previous one has dried. The layers will prevent the putty from crumbling.
- The finished putty is applied with a spatula. The next layer is laid after the previous one has dried. The putty should not crack; the thicker the layer, the more likely the presence of cracks. When using flexible putty, the surface will be more resistant to movement.
- If all layers of putty have dried, the surface is sanded with medium and fine sandpaper. This is done in such a way as not to remove curves and waves. The volcano should still look like a volcano.
- A primer is applied with a brush to strengthen the putty (several layers).
- Now you can prepare the paints that will be used to paint the surface of the volcano. Color scheme, for example, blue and green, lilac and orange.
- The paint is water-based for quick drying. Gouache is also used.
- When the volcano is painted, varnish is applied. Now the surface is glossy and shimmers pleasantly. Instead of water-soluble varnish, the product is varnished with alkyd varnish. The surface will be stronger and reusable.
- A fiberboard platform for the volcano is being prepared. The area around the active volcano is inhabited by hand-made plasticine animals. Trees are planted, real or plasticine stones are placed.
- Now you can start activating your homemade volcanic creation.

How to make a volcano at home - lava
The following materials are used for lava:
- bicarbonate of soda - 4 tablespoons;
- vinegar - 1 glass;
- red dye.
Cooking process:
- Soda and dye are poured into a glass bottle through a funnel to add color.
- The bottle is placed through the bottom into the center of the volcano.
- The volcano is installed on the site.
- The next step will be launch. Vinegar is poured through a funnel. An eruption is happening!


The volcano model is made as big as your imagination can allow. A volcano can be low or high, the territory in which it is located is not necessary square shape. For example, using construction tools it is easy to shape a circle. A variety of colors are selected. If desired, it is very easy to make an impressive background from fiberboard, which depicts a sunset, birds flying away in panic, or even pteranodons.
How can a child talk about what a volcano is in an accessible and interesting way? You can, of course, arm yourself with books with cross-sectional pictures of a volcano and try to explain in words how magma is thrown out. Or you can make a volcano yourself at home. You will not only satisfy the curiosity of the young researcher, but also awaken interest in various sciences: geography, chemistry and geology.
Making a volcano at home is very easy. Simple products that can be found at home, and simple detergents allow you to create beautiful effects. It is recommended to conduct similar experiments with children six or seven years old: at this age they will be better able to understand the essence of the action taking place. Although such a spectacular spectacle will be interesting for both children and adults.
Purpose of the experiment- to form in children elementary representation O natural phenomenon“volcano”, clearly show the interaction of alkali with acid (neutralization reaction).
Tasks:
- explain how volcanoes work and what danger they pose;
- tell what an acid-base environment is;
- arouse the child's interest in research;
- develop self-learning skills;
- Teach children about the existence of an acid-base environment.
Materials and tools:
- flask or bottle;
- cardboard for making a “mountain”;
- plasticine to give the volcano its shape;
- water;
- soda;
- lemon acid;
- orange or red food coloring or gouache;
- dishwashing liquid;
- container for mixing ingredients and spoon;
- stapler;
- Plastic container;
- small figures (different types of animals, trees, stones).
Progress of the experiment
1. Let's make a volcano.
First you need to find a suitable container. You can use either a flask or a small juice or yogurt bottle. To give the bottle the appearance of a mountain, we make a blank from cardboard. Cut out a circle and make one cut along the radius. Fold the circle into a cone and secure it firmly with a stapler. Cut off the top of the cone.
We insert our container inside the figure - we get the frame of a volcano. Using plasticine, you need to give the volcano a shape: coat the cardboard with plasticine, make a “crater”, masking the neck of the container.

We place the volcano blank in a plastic container (or in a basin). We create an environment using different types animals (dinosaurs, animals), trees, stones. We pour stones at the foot of the volcano, arrange trees, arrange animals.
2. Prepare 2 lava solutions
First solution: fill the container with 2/3 of water, add food coloring (or gouache), a few drops of dishwashing detergent (so that there is a lot of foam) and 5 tablespoons of soda.
Second solution: dilute citric acid (recommended ratio - 5 tablespoons to 1.5 cups of water).
3. Let's start the eruption
Mix the mixture thoroughly in the volcano container. Slowly pour the solution into the mouth citric acid.
Watch the magic happen: a dormant volcano awakens and turns into a fire-breathing mountain!
Experience result
Fiery red foam erupts from the crater of the volcano.
 Volcanic eruption (no dye)
Scientific explanation
The volcano erupts as a result of the interaction of two substances - soda and citric acid. In chemistry, this process is called a neutralization reaction. Acid and alkali (soda) neutralize each other, releasing carbon dioxide. CO₂ foams the mixture poured into the crater and causes the mass to overflow over the edges of the crater. Dish soap makes the lava bubble more. We recommend conducting another experiment with a volcano, but this time with glowing lava.