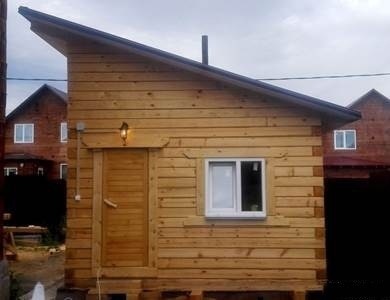
A reliable roof protects the building from bad weather and hot sun. Naturally, the bathhouse should also have a roof - a good-quality and practical one, built in accordance with all the rules of construction. What type of roof to choose, what materials to pay attention to, what are the main stages of construction - this is what will be discussed in our material. The purpose of this article is to give you simple instructions for building a roof for a bathhouse with your own hands.
The roof is the upper part of the building, insulating, enclosing and protecting it from the adverse effects of precipitation, wind and ultraviolet radiation.
Single-pitch and gable roof for a bathhouse
Before you start designing a bathhouse, you need to decide what type of roof to choose for the bathhouse (single or gable) and at what angle of inclination to build it.
Shed roof
A shed roof is the simplest type of roof. The roof rests on opposite walls and, depending on the difference in the height of the walls, forms a slope angle - the greater this difference, the sharper the angle. At the same time, the cost depends on the difference - the smaller it is, the cheaper the construction of the roof will cost.
Advantage: a simple and quick way to build a roof, which is low cost.
Flaw: if the slope angle is small, water and snow are retained on the roof surface after precipitation, which causes damage to the coating. You can prevent roof rotting by choosing the right material to cover the surface.
Shed roof - optimal solution for small baths, including buildings adjacent on one side to the main building. It is desirable that the roof area does not exceed 15 m2, since with large parameters its construction becomes economically unprofitable.
The angle of inclination of a pitched roof is selected depending on weather conditions or depending on the features of the landscape. Thus, in a region with heavy rainfall, it is recommended to install roofs with a roof slope of 35-45° so that snow or water flows down without staying for long. In the steppes with strong winds, it is better to install a bathhouse with a flat roof.
A pitched roof can be made with an attic, after installing attic floor, or without it, combining the roof with the ceiling of the room. A building with a pitched roof without an attic - a good option for a summer bath, besides, it costs less and is built faster. A bathhouse with a good-quality insulated attic can be used at any time of the year, and the attic space is often used for storing bathhouse brooms and for drying herbs.
Gable roof

A gable roof has two inclined slopes, which in the lower part rest on the walls of the building, and in the upper part they adjoin each other. This type of roofing is suitable for any weather conditions and almost any landscape.
Advantage: The roof is visually attractive and functional.
Flaw: Unlike a pitched roof, this option will be more expensive, as it requires more materials and installation time.
The bathhouse with a gable roof looks like a good one cozy house, and if we provide good thermal insulation, it can be used at any time of the year. Gable roof with attic space It’s easy to use; in addition, a bathhouse with such a roof is cool in summer and warm in winter. The angle of inclination of such a roof is given taking into account the climatic conditions and the roofing material that they intend to use.
The choice of roof pitch angle is made at the building design stage. The calculations take into account the coating material, snow load, and wind pressure. For example, with a slope of 45°, snow can not be taken into account in the calculations, since it will roll off the roof, but with such a slope, the wind load and windage of the roof sharply increase, which means the wind resistance decreases.
Bathhouse roof construction technology
The main elements of the roof are the mauerlat, rafter system, sheathing and roofing material.
Mauerlat

At the first stage of roof installation, a mauerlat is installed, which attaches the rafter system to the building frame. Mauerlat is laid on finished walls using special anchors. If the building is built of timber, then the upper crown is used as a support beam.
Considering that the Mauerlat is most often made of wood and is subject to rotting under the influence of steam and moisture, it must be carefully insulated with any waterproof material. It is enough to put several layers of roofing felt between the wall and the Mauerlat.
Rafter system
Rafter system - main element roof, the main task of which is to hold and withstand all types of loads. Correctly calculated parameters of the rafters will make the roof reliable and durable.

Rafter system for gable roof.

The rafter system is a structure of beams connected to each other in such a way as to evenly distribute external load, exerted on the top of the building. Depending on the slope and roof area, in addition to beams, lintels, crossbars, spacers and other building elements are additionally used.
There are two types of rafters:
Hanging: when load-bearing supports are connected to each other on one side, and rest against the walls on the other;
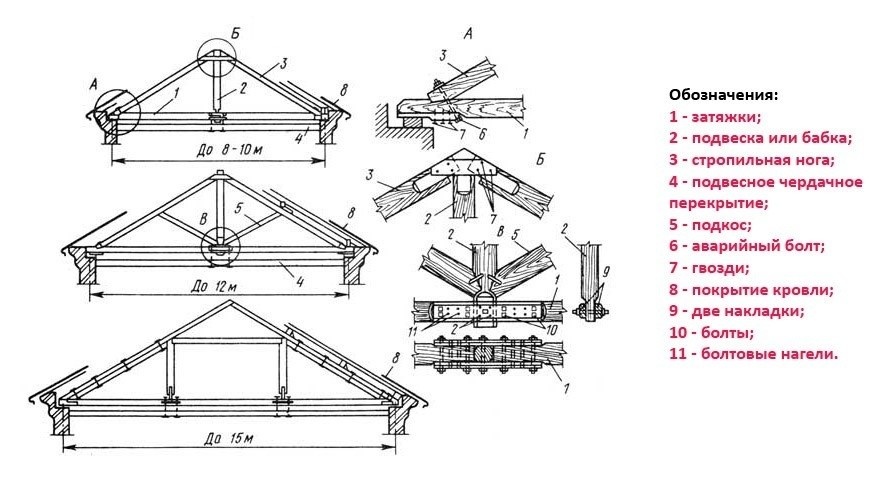
Device diagram hanging rafters

Layered, when the rafter legs rest against the mauerlat and the internal walls of the building.

Lathing
The sheathing consists of beams or boards laid on rafter legs. Roofing material is attached to the structure, which is laid perpendicular to the rafters. The sheathing is mounted from edged, unedged or tongue-and-groove boards, OSB-3 (oriented strand board) or FSF (extended resistance plywood).

Roofing material
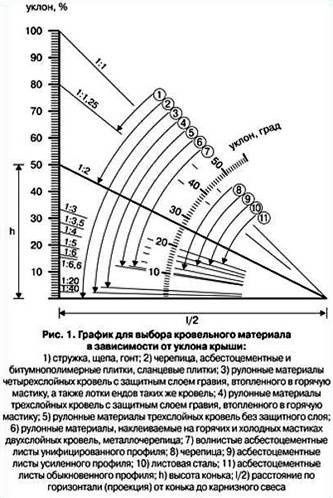
In the figure you can see what type roofing fits a certain angle of inclination.
After preparing the sheathing, they proceed directly to laying the roofing material. Everyone decides what type of roofing to choose depending on their financial capabilities, weather conditions, and the type of bathhouse.
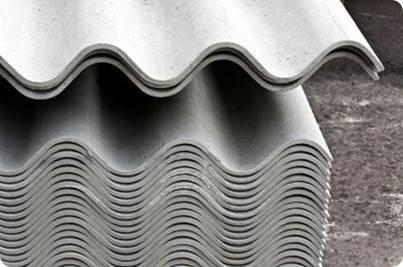
Slate is a traditional material, time-tested and tested in practice. The slate roof slope is 12°. The material has high strength, is resistant to fire, is quick and easy to install, and also has a low cost. Over time, slate becomes covered with lichens and moss, so it must be periodically cleared of overgrown plants.
Ondulin is lightweight and easy to install, can be installed at a roof slope of 5°, and has a warranty period of up to 15 years. The main advantage of the material is its lightness, but over time it changes color, has extremely low frost resistance (25 cycles), and can become deformed if the temperature is too high.

The tiles are a natural material, are installed at a roof slope of 25° and have a very long warranty period, up to 30 years. In fact, the service life of tiles reaches 150 years. The tiles absorb sounds well, have increased fire resistance, are resistant to low temperatures and are striking in a variety of shades and shapes.

Cement-sand tiles are similar in characteristics to natural tiles and are laid at a slope of 20°. The material can last up to 100 years, has good soundproofing and frost-resistant properties, and is resistant to high temperatures. From time to time, the surface of such tiles must be cleaned of accumulated moss.

Bitumen shingles are a popular material with excellent sound-absorbing properties. The roof slope for this material is from 12°, and it can be installed on any type of roof. Does not break or break during transportation. However, it has some disadvantages: the material cannot be installed at temperatures below 5°, the cost of the roof and its installation is expensive.

Metal tiles are installed at a slope of 15°, last from 15 to 50 years, and are characterized by quick and easy installation. Among the advantages of metal tiles are: big choice colors, simple design, increased fire safety.

The corrugated sheeting has a warranty period of 15 years, is characterized by convenient and simple installation, has a simple design and good fire safety. You can choose unusual and bright colors.

Stages of constructing a roof for a bathhouse
The roof is erected after the walls of the bathhouse are completely built. The principles of constructing a bathhouse roof are the same as for conventional buildings: first the mauerlat is laid, then the rafter system is installed, then the sheathing is attached, and at the final stage of the work the structure is covered with roofing material.
Mauerlat and rafter system
At the first stage of work, the protruding ends of the mauerlat should be leveled, because it is these logs that will serve as support for the rafter legs. The more carefully the measurements are taken and the smoother the logs are cut, the faster and easier the rafter system will be erected.

It is necessary to measure all the protruding parts of the Mauerlat and determine the smallest value. On the logs located along the edges of the structure, make a mark of the lowest value and drive nails there. Stretch the cord between two logs at opposite ends, make marks on all other parts and saw off the excess logs. After which you can safely begin installing the rafter system.
Before installing the rafter system on the mauerlat, you should lay a rough flooring on which you can walk. Flooring can be made from any boards.
The rafter system is made according to the roof parameters indicated in the bathhouse design. Those parts of the rafters that rest on the Mauerlat beams are impregnated with a special waterproofing agent, then wrapped in roofing felt, inserted into pre-prepared grooves and securely attached to the walls using metal brackets or studs.
Roof structure
An under-roof structure is mounted on the finished rafter system - it helps to securely attach the roof directly, transfers external load to the rafters and provides good ventilation in the space under the roof.
The roof structure consists of the following elements:
Rough flooring;
Waterproofing;
Counter-lattice;
Lathing.
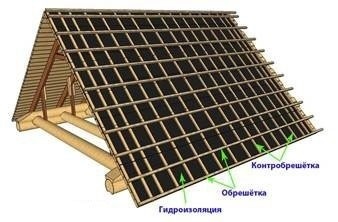
The rough flooring carries a huge functional load. Place on the flooring waterproofing material and attach the counter-lattice. In addition, together with the sheathing, the flooring forms gable overhangs with a length of 60 cm.
The rough flooring is made from plywood, boards, OSB or unedged boards. The gaps between the boards should not exceed 2 cm, so when laying the flooring it is necessary to adjust the protruding areas and minimize the possibility of gaps.
Additional rigidity to the roof can be provided by nailing the rough flooring boards to the junction with the rafter leg with two nails.
Waterproofing is laid on the rough flooring. Any rolled waterproofing material that is sufficiently resistant to moisture is suitable for an attic roof. Strips of waterproofing material are laid horizontally on the flooring with an overlap of 15-20 cm. For insulated attics, it is recommended to choose a material that allows steam to pass through.
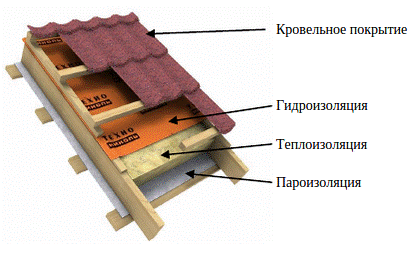
A counter-lattice is placed on the waterproofing layer. For this, bars with a length of 70 cm and a cross section of about 30 mm by 70 mm are used. Starting from the very bottom, the counter-lattice is filled with lathing - bars with a cross-section of 50x50 mm or 40x60 mm. The lathing scheme for all types of roofing material is the same, the main difference between the structures is the distance between the individual bars. So, for example, under slate the bars are placed at a distance of 50 cm from each other, under ondulin - up to 60 cm, under corrugated sheets or metal tiles - 35 cm.

The final stage of installing a bathhouse roof is the installation of roofing material. When choosing a roofing covering, you should consider the following factors:
Strength and reliability: the material must have sufficient resistance to wind and precipitation;
Functionality and durability: a good coating protects the structure from snow and rain, extends the life of the building walls; the longer the service life of the material, the longer the roof will last, requiring only ongoing maintenance and intermediate repairs;
Good thermal insulation: well-chosen hydro- and thermal insulation materials, as well as their correct installation, retain heat inside the building in winter and prevent walls from getting wet and rotting.

Competent roofing work is reliable roof for a bath on long years. If during construction all important points, then further operation will not require significant material costs; it is enough to periodically clean the roof of overgrown plants and small debris.
Video on the features of constructing a roof for a bathhouse
We also recommend:
When building a country bathhouse, it is important to properly arrange the roof, covering it with good material.
Choosing a suitable roofing material for a bath that will be durable, beautiful and warm is a very responsible task.
It is necessary to take into account the following factors: the shape of the roof, the climatic features of the area and the characteristics of the roofing material.
When choosing materials, you need to compare the characteristics and parameters offered by manufacturers.
Among the most popular roofing materials for baths, the most acceptable are the following:
- roofing felt;
- ondulin;
- metal tiles;
- corrugated sheeting;
- slate.
There is a pitched or flat roof shape. For a pitched roof, metal tiles, metal, and ondulin are used. The flat roof can be covered with resin roofing, modified bitumen roofing, EPDM rubber roofing.
Let's consider the advantages and disadvantages of each of these materials, which are most suitable for arranging a sauna roof.
Ondulin
Price: from 254 rubles per sq.m.
Not fragile, does not allow water to pass through, which is especially important if the climate is characterized by frequent cycles of freezing and thawing. The material is fire-resistant and has long-term use. Well suited for a bath.
By the way! Ondulin can be purchased on the official website of the manufacturer onduline.ru.
Onduvilla
Price: from 400 rubles per sq.m.
The roofing material is resistant to ultraviolet (UV) rays and does not require a gravel coating. The material can be used for a long time.
Does not emit harmful substances, keeps warm. Well suited for a bath.
Official website: https://www.onduvilla.ru/.
Metal tiles
Price: from 400 rubles per sq.m.
It is made of fiberglass or an organic base, coated on one side with mineral granules. Mineral coating is the most resistant to atmospheric influences.
Ruberoid
Price: from 20 rubles per sq.
The most flexible and durable roofing sheet. It is better not to use it for a bath. The material is more suitable for waterproofing than as a finishing roof.
Corrugated sheet
Price: from 350 rubles per sq.
Often chosen to cover baths or saunas. Fireproof. Can be used for a bath. Cons: poor aesthetic appearance, high price.
Slate
Price: from 350 rubles per sq.
Creates quality and beautiful coating, but has a high cost. This is a fire resistant material. There are several types of slate, so it is better to find the highest quality material.
Like tiles, slate is a heavy material, and the roof structure must be designed to support its weight.
Slate is harmful to humans - it is better not to use such material for a bath.
What should be the roofing material for a bathhouse?

Roofing materials for a bathhouse must have the following technical characteristics:
- Weather resistant— the roof must withstand rain and sun, hail and wind.
- Durability— service life should be a key parameter for decision making. The service life of profiled sheets, Ondulin or slate is more than 20 years.
- Heat and sound insulation- affect the warmth and comfort in the building (Ondulin is best suited here).
- Aesthetics- Appearance is also important.
- Have permissible loads — since the roof creates a force load on the rafter and load-bearing system of the building, the weight of the snow cover must also be taken into account.
- Consider roof configuration and slope— it is important to consider when choosing the flexibility of the material and its optimal permissible slope.
- Affordable price.
Most owners of private houses build a bathhouse on their property. Laying the foundation and building the walls is only part of the job. You also need to properly make the roof with your own hands, since this will determine how much the building can withstand precipitation. Only a combination of correctly performed work can guarantee you a high-quality result and comfortable conditions in the bathhouse. This can be achieved if you follow the step-by-step instructions for building it yourself.
Options for roof designs for bathhouses
Before you start building a roof in a bathhouse, you need to choose the best option. It should be as simple as possible, but reliable, since it is needed to protect the structure from rain and snow.
Most often, baths are:
- attic;
- roofless.
The roof structure itself depends on this. This is also affected by the frequency of operation of the bath. For the one that will be used all year round, it is best to choose a gable roof with an attic, as it is warmer. There you can equip a rest room.
Summer baths are usually built without an attic, but are designed to install a tank of water for heating under the sun. This type of roofing is easier to construct.
According to their shape, roofs can be:
- single-pitched;
- gable;
- multi-slope.
Shed roofs are the simplest. Typically used when attaching a bathhouse to the main house or other building. The rafters rest firmly on opposite walls at a certain angle of inclination.
The optimal tilt angle is 20–30°, but if the bathhouse is built in areas with increased level precipitation, this parameter increases to 45°.
Gable roofs are installed on separate structures. They consist of two parts connected to each other at an angle. For areas where a large amount of snow falls in winter, the connection angle should be quite sharp (from 45 to 80°) so that precipitation can easily drain and does not put pressure on the roof from the outside. And in areas where there are frequent winds, there is a minimum slope so that in the event of strong gusts it does not fly off the bathhouse.
Multi-pitched roofs are usually not erected on small bathhouses, as this is not entirely rational and convenient. But if a big one is being built bath complex, then it will be appropriate here. It has a beautiful appearance and allows you to arrange additional rooms under its arches (relaxation rooms, billiard rooms, storage rooms, etc.). The disadvantage of the roof is the complexity of its construction.
That is why masters often choose this option.
How to make a gable roof diagram correctly
The best option for small bathhouse is a gable roof. It can be inclined and hanging. The first option is equipped with additional wooden stops for greater stability. Hanging systems rest only on mauerlats or ceiling beams. At the top, the rafters are supported by crossbars.
Preparation for installation: sizing, drawings
For convenience, all calculations will be made for a bathhouse with a side of 5 m. It is recommended to build it from sawn timber, and use the top row as a mauerlat.
Before making rafters, it is necessary to make all the necessary calculations and measurements, as well as determine the angle of inclination of the roof and the dimensions of the wooden elements.
The roof system is subject to certain loads:
- the mass of rafters, sheathing and the roofing material itself;
- workers' weight;
- the likelihood of natural disasters (they are not taken into account in our country, since they have a low percentage of the likelihood of their occurrence).
When calculating the thickness and width of the rafter system elements, take into account the totality of all types of loads.
The lower elements of the rafters are placed on the Mauerlat, and they bear lateral and vertical loads. Horizontal ones are placed on crossbars. The ridge part of the rafters takes on the compression forces in the horizontal direction. Rafter spans are subject to the greatest degree of bending.
When calculating the load, it is necessary to use correction factors that depend on the height of the house.
There are also different snow load values depending on the climate zone.
Belonging to a certain climatic zone can be seen on a special map.
Choosing roofing material
The wood that is used for the construction of the rafter frame must have a minimum number of flaws (primarily this concerns knots and cracks).
For the roof of a bathhouse, pine or spruce boards are most often chosen due to their high degree of strength. This wood is easy to process. Experts recommend using grade I lumber, well treated with antiseptic and antifungal agents. But for a small bathhouse, grade II or III material is suitable.
You can use laminated veneer lumber with a high degree of strength without signs of deformation. But such material is expensive.
- 20% (if the inside of the bathhouse ceiling is completely covered with finishing materials);
- 23% (if some roof elements will be located on the street, for example, a canopy over a veranda or terrace).
Wood for a roof must be dried naturally (in a dry room at a low temperature) for 2–3 years or in special chambers at the highest possible temperature.
There are a large number of roofing materials:
- ondulin;
- metal tiles;
- soft tiles;
- roofing felt;
- slate;
- euroslate;
- metal profile.
The most popular and available materials are metal tiles and corrugated sheets, which are characterized by their low price and long service life.
The corrugated sheet is made of galvanized steel with a special coating. Its main difference from metal tiles is the thickness of the metal. For example, corrugated sheets with a thickness of more than 1 mm are not intended for roof construction.
Advantages of this material:
- high performance;
- ease of installation (sheets can be easily selected according to the exact size of the roof slope);
- light weight;
- affordable price.
There are also disadvantages, for example, low sound insulation characteristics, less attractive appearance compared to metal tiles, short service life (about 5 years).
Advantages of metal tiles:
- high degree of corrosion resistance;
- excellent sound absorption, which provides multilayer material;
- long service life (about 50 years);
- wonderful appearance.
Despite positive traits, it is not suitable for the device one pitched roofs, since it is laid only at an angle of at least 14°. Corrugated sheets have no restrictions.
Ruberoid is an inexpensive but short-lived material. It is easy to install and does not require much labor. For a budget roof covering for a bathhouse, roofing felt can be called a completely acceptable option.
Slate is an affordable roofing material that is suitable for a bathhouse. It has a fairly long service life (about 40 years) and does not require additional care. Installation of slate sheets is carried out quickly, which is very important in the final stages.
The disadvantage of this material is the high degree of water absorption, so after 2-3 years moss and various harmful lichens may appear on it - painting will help to avoid this. The high fragility of slate is also a significant disadvantage. Therefore, it is better to pre-drill holes into which fasteners will be driven.
What material and tools are needed
In order to build a gable roof for a 5x5 m bathhouse, you need:
- boards (pine or spruce) - 50x150 mm (the distance between the rafters is recommended to be 90 cm);
- unedged board for temporary fixation of rafters;
- edged board - 20x100 mm (length 3 m);
- metal corners;
- metal plates - thickness 2 mm;
- bars - 50x50 mm;
- bolts with washers and self-tapping screws;
- glued plywood, OSB or unedged board for sheathing;
- slats - 20x50 mm;
- insulation, vapor barrier and waterproofing material;
- metal tiles or corrugated sheets.
Tools:
- Bulgarian;
- electric jigsaw;
- stapler;
- hammer;
- tape measure - length at least 10 m;
- sharp knife;
- electric screwdriver;
- antiseptic agents and impregnations.
Construction of a bathhouse roof: step-by-step instructions
To install the roof you need to follow the following plan:
- Check the parallel position of the Mauerlat (the degree of run-up is no more than 2–3 cm). Fixing dowels must be placed at the required distances.
- For a 5x5 m bathhouse, six pairs are enough truss structures. In order to mount a large number of identical parts, it is recommended to make one general template, which will significantly speed up the work.
- To make a template, you need to take three-meter boards and knock them down with a nail at the top. Nail a piece of horizontal strip to one board, which will serve as a template for making the crossbar. Its distance from the ridge should be no more than 40–50 cm. Fix the crossbar on one board, and nail it to the second after determining the angle of inclination of the slings.
- Lift the template up and install it in place where the rafters are attached. Change the angle of inclination and distance of extension so that the future ridge is exactly in the center of the bathhouse. After finding the right place nail the crossbar to the second board. Reinforce the boards and ridge with two or three more nails.
- Place the template structure on the supporting mauerlat, mark the point where the rafters will combine. Connect these elements with timber and steel corners. Attach a wooden strip to the template at the point of contact with the support element.
- At the location of the gables, nail the bars vertically. Their height should be similar to the height of the slings. To check verticality, pull a construction cord between them. Check the template along the entire length of the bath structure. Take a step of about 1 m and look at the angle of inclination. The ridge part must go strictly along the cord. All irregularities can be removed during the creation of the sheathing. If the error is more than 1 cm, then it is necessary to adjust the template so as to reach the average values.
- If everything is done correctly, you can carefully remove the template and lay it on the ground.
- Place the template on level base and place one leg of the rafters against it. Monitor the structure of the ridge part. Trim the knots. Overhanging excess rafter elements can be sawed off before installation or after installation.
- Ridge rafters can be connected using several methods. One of them is the connection at the ridge part in half a tree.
- It is best to connect the slings at an angle of 90°. To prevent displacement on both sides, the assembly must be fixed with steel plates. The fasteners should be located evenly along the entire length of the rafters.
- Now you need to make marks at the top and bottom of the rafters. Saw off the top at an angle, as a butt joint will be made. The cutting location should coincide with the top and bottom of the template. It is not recommended to saw off two sling legs at once. It is necessary to remove the drawing on each of them from a certain side separately. This unit is connected by steel plates.
- Using the template, you need to mark the point where the rafter board will rest on the mauerlat, and attach a board in this place that will rest against it. It can be fixed from the bottom of the sling to the edge of the board or from the side. This assembly will withstand significant shear loads, so it is recommended to use strong bolts for fastening.
- Place two rafter boards on a flat surface, and check the location of the nodes using a template. Remove it and fix the bolt in place.
- The upper elements of the slings must rest firmly against each other along the entire cut.
- Then we bolt the crossbar with an overlap to the legs of the slings. You will need 2 bolts for each strap.
- The crossbar is subjected to compression - even slight vibrations should not be allowed at the fastening points. To prevent the rafters from cracking when installing the bolts, it is recommended to drill holes for them slightly smaller than the diameter of the bolts by about 1 mm. The excess part of the bolt must be cut off with a grinder.
- In the same way, it is necessary to install all the other rafters: lay them on top of each other, and check that all sizes match.
- Once all the rafters have been made, you can begin assembling the roof frame. You need to first attach the outer rafters and secure them with pieces of boards. Carefully install each rafter leg and check the dimensions. Pull the cord from the side parts at the overhang of the rafters to the ridge.
- Mark the fastening points of the remaining slings on the Mauerlat in increments of approximately 1 m.
- Lift each sling one by one, align it along the cords and secure it with boards. Nail them at a certain angle.
- When all the rafters are aligned, you need to check the accuracy of their placement, then begin fastening them using steel angles and strips. The corners must be fixed on both sides of the rafters. The result is a stable and reliable system. Now you need to align the length of the slings from below along the cord so that they protrude beyond the bathhouse by about 30–40 cm.
- Install additional supports made of boards under the outer legs, which in the future will serve as a frame for cladding the gables.
Creating a sheathing
The sheathing can be slatted or solid.
After installing the sheathing, it is necessary to close the end sides of the roof. If you plan to create an attic, then you need to leave space for installing doors and windows.
Insulation from the inside
For insulation, you can use mineral wool 10 cm thick. First, it is laid on the rafter system vapor barrier material for protection against moisture from outside interior spaces baths
Insulation is laid on top of it, and then waterproofing material, which will prevent moisture from penetrating through small cracks in the roof.
Protective hydro- and vapor barrier films They are laid with an overlap of about 15–20 cm, then glued together with construction tape.
How to properly cover a roof
Laying roofing material is no less important part roof installation than its construction. If you properly cover the bathhouse with metal tiles or metal profiles, you can protect all wooden structural elements from atmospheric precipitation, which will significantly extend their service life.
To lay metal tiles you will need:

Stages of installation of roofing material:
- The metal tiles are lifted onto the roof frame using special belts. The first sheet is placed and carefully aligned along the end part and the cornice. It is attached with self-tapping screws at the points where the wave joins the sheathing slats. They are screwed in a certain order.
- Laying is done from left to right. The edge of the second sheet is brought under the end of the first, and then they are carefully aligned. If the material will be laid from right to left, then the second piece should be placed with a slight overlap. All sheets are screwed one by one.
- The first sheet is placed on the sheathing slats with a protrusion of about 40–50 mm, and secured with a self-tapping screw at the very edge of the ridge and the bottom of the cornice.
- To install the second sheet, two pieces of the profile are joined using a lateral overlap method, so that there are no gaps or distortions. They are connected to each other with self-tapping screws under the transverse part of the wave. You need to start connecting from the eaves to the ridge. In this way, 3–4 profile sheets are fixed. A temporary self-tapping screw is unscrewed and the entire row of the metal profile is aligned in relation to the cornice.
- The correctness of the offset on both sides of the block is measured. The sizes matched - everything was done correctly. Now the sheet is firmly secured with a self-tapping screw. All other profiles are attached at the joints with each other and screwed to the sheathing.
- After the work is completed, it is necessary to remove all the shavings from the metal tiles with a soft brush, and slightly tint the drilling areas with paint of the same color as the material itself.
- Then you need to secure the ridge in such a way that the attic is ventilated. It is attached to the metal tile using self-tapping screws at the top of every second wave. The overlap should be about 10 cm in length.
- Attached cornice strip which will protect front board from external factors. To do this, they are laid with an overlap of approximately 50 mm. They are nailed every 30 cm.
- The end strip is placed on the side board and screwed with self-tapping screws (a step of about 1 m). It is attached to the sheathing slats through the top of the roofing sheets with self-tapping screws in increments of 40–80 cm. The plank should overlap the upper edge of the wave.
- A special insulation is attached before installing the ridge strip. To do this, remove the protective film and stick it from the edge of the ridge towards the center at a distance of about 25 mm. The ridge itself is attached to the roof every third wave with an overlap of 10 cm.
Video: how to properly make a roof for a bathhouse from a log house with your own hands
Only if the roof of the bathhouse is installed correctly can you be sure that it will serve for many years and withstand any natural conditions. Therefore, the construction of this element must be taken very seriously and responsibly, since it takes on heavy loads, and therefore must be as strong and reliable as possible. And then you and your friends can enjoy relaxing in the steam room at any time of the year.
To understand the question of how to make a roof for a bathhouse, let’s immediately divide the answer into two parts - theoretical And practical. Because everyone has their own specifics, it is better to show the principle than to give a bunch of examples. However, there will also be examples.
And further. The article will not replace training in construction, and a roof is, after all, a complex structure that requires knowledge, so for those who, without experience, intend to build a roof for a bathhouse with their own hands, we advise you to at least read books on roofing, after reading it will be clear whether you can handle the task or not.
Let's start with the theoretical part.
Height
When it comes to bathhouse roof height, then you need to understand what is meant tilt angle. And it is not an arbitrary value, but depends on what winds blow in your area and how much precipitation falls.
ADVICE! Proceed from the fact that increasing the angle of inclination simultaneously increases the wind load and prevents the retention of precipitation on the roof surface.
Minimum tilt angle, at which the roof is considered pitched, begins with 2.5 degrees. Less - flat roofs, and up to 10 degrees - sloped, but even there will be problems with removing sediment, you will need manual cleaning. But the accumulated snow means hundreds of kilograms pressing on the roof!
Maximum tilt angle we will assume equal 60 degrees. It is believed that maximum snow will put pressure on a roof with a slope of 30 degrees, and with a slope of 45 degrees the snow will slide down on its own.
Another factor associated with the choice of angle of inclination is the technical characteristics of the roofing material. You can select the material for the optimal angle of inclination for your area, or you can rely on the material and look for a compromise with climatic optimum.
BY THE WAY! An increase in the angle of inclination will also entail an increase in cost.
Cards And explanations for them, and simplified calculation formulas you will find in this. We strongly recommend that you familiarize yourself with them and study the formulas that will determine the load and affect the calculation of the roof mass.
However, you can use a simple life hack: You are not the first to build, take a closer look at your neighbors’ buildings, talk to them about problems with the roof, if there were any - the optimal degree of inclination will be determined without unnecessary hassle. And the material will also be clearer.
Types of rafter systems
First we'll show you types of pitched roofs. Rafter systems are something like ribs that are easy to imagine under the outer layer of these structures. Accordingly, you can imagine the complexity of each specific system. Rafter systems are named according to the type of roof.

Rafters according to the material can be made of tree or metal In our case, consideration metal structures unnecessary, so only wood.
The principle of connection and load transfer varies depending on layered And hanging rafters The first ones are attached at one end to the ridge, and at the other to the wall frame. In this case, the load is transferred to the ridge, and from it to the gables/gables, internal wall or supports, and the other end transfers the load external wall. With this transmission, the rafter works only to deflect in the middle part.
Hanging The rafters rest against each other with their upper edges, creating a spacer. In this case, the skate is missing. To compensate for this expansion, the bottom of the rafter legs is connected with a tie.
All this can be seen in the figure below. It also clearly shows rafterless system, which was used in traditional log construction - instead of rafters, fall ill, ledge-laying pediments (males). The orientation is slightly perpendicular to the rafters.

taken from the book by Savelyev A.A. - “Roof structures. Rafter systems" (2009)
Making rafters for a bathhouse with your own hands is a feasible task, but it must be preceded by many calculations of the loads to which the roof will be subjected. Full payment done by professionals, both complete and simplified calculations can be found in the literature.
Types of roofing coverings
In addition to wind and snow load roofing weight- an important factor influencing the calculation of the rafter system, which must withstand all - static and dynamic - loads during the operation of the structure. Therefore, it is worth deciding on the type of coating in advance, even before developing the project.
The technical characteristics of the roofing material also include minimum or maximum roof angle at which it can be used. Take this into account when choosing the height of the bathhouse roof.
Metal tiles
Light weight metal tiles– its main advantage, because it reduces the load on the rafters and the structure as a whole.
Made from iron, copper And aluminum Iron - in the form of steel, which is susceptible to corrosion and therefore needs protection - for example, galvanizing. It is clear that copper and aluminum varieties are much more resistant to corrosion and would last for several decades, but they are also less durable.
BY THE WAY! The service life of conventional galvanized steel tiles is 10-15 years.
Regardless of the metal used, metal tiles are coated on both sides polymer. This is done to give it desired color, as well as for additional protection.
The thickness of the metal layer varies, the weight of a square meter of coating depends on this, but recommended thickness amounts to 0.5 mm. Weight is approximately 5 kg per square meter.

Bathhouse with a gable roof made of metal tiles. Photo
Minimum roof slope for metal tiles it is 12 degrees. (More is possible.)
With its help you can do pitched roof on the bathhouse, gable and broken (with an attic).
Slate
Slate can be different - from natural (slate plates) to ceramic plastics. However, most often you can find asbestos-cement variety - these are flat or corrugated sheets of material in which cement is mixed with asbestos.
IMPORTANT! The presence of asbestos makes it harmful to health.
A common roofing material weighing about 11 kg per square meter with a thickness of 4.8 mm.

Laying a slate roof for a bathhouse. Photo StroyDom
Fragile, brittle, but non-flammable and quite durable - it will last for 30 years quietly. Especially if you process it protective compounds, and moss will not grow on it, its waterproofing properties will become much better, and it itself will be more durable. In addition, it has good noise insulation performance.
Installation of slate is cost-effective when roof slope more than 12 degrees. It is quite possible to make a roof for a bathhouse from it.
Ondulin
Similar in appearance to slate (the same corrugated sheets), but a completely different material. It is made from cardboard, which, to obtain the desired properties, is corrugated and impregnated with bitumen, as well as heat-resistant resin and dyes, giving it bright shades.
Due to impregnation, the material becomes waterproof. In addition, it is quite flexible and not fragile. The weight of 1 square meter of ondulin is slightly more than 3 kg. Available in sheets of 2 m by 0.95 m. The advantages include a variety of colors.

Fragment of the roof of a bathhouse made of ondulin. Photo
Mounted on slopes with slope at least 6 degrees. At the same time, it is not necessary to remove the old roof, if any. A good option for covering the roof of a bathhouse.
INTERESTING! The noise absorption of ondulin is such that the noise from rain hitting the roof will be practically inaudible, unlike all materials made of metal.
The shelf life from the manufacturer is 15 years, in practice it may be longer.
Roof tiles
It is unlikely that many bathhouse owners will cover them ceramic or shale tiles are expensive materials that you will not find on outbuildings. Their main advantage is, of course, their service life, which reaches (for slate) two centuries! But this is not only expensive, but also heavy material that requires a reinforced rafter system. In general, it is unprofitable.
In addition to ceramic and slate, there are also cement-sand And silicate tiles, they are a little cheaper, they also have a long service life, but we will not recommend them either.
But there is another class of tiles, so called very conventionally, from which it is quite possible to make a roof for a bathhouse with your own hands.
Bituminous shingles
This is a flexible roofing material made from fiberglass(a dense sheet of glass fibers) coated on both sides bitumen and sprinkled stone chips(basalt or shale).
ADVICE! It is better to prefer basalt chips to shale chips - they crumble less.
Flexible tiles are easy to install and are completely undemanding to surfaces. Of course, you won’t see the dome in the bathhouse, but she could handle it. Minimum slope roofs for its installation on the roof of a bathhouse is 12 degrees.

Bath from double timber with a gable roof made of bitumen (soft) tiles. Photo
Shingles weight varies quite significantly depending on the amount of bitumen and the manufacturer. There are single-layer ones that weigh 5-8 kg per square, there are laminated multi-layer ones that weigh 13 kg per square.
IMPORTANT! Since bituminous shingles rest only on a solid(!) sheathing made of moisture-resistant plywood or OSB, the weight of the plywood (or OSB) and their cost should be included in the project in advance.
Corrugated sheet
Another type of metal roofing material that is noisy during rain. However, he cheap and is in demand.
The metal that goes into the corrugated sheet can be different - this is also steel, requiring galvanization, and aluminum, And copper, And chromium-nickel steel. The types of corrugated sheets differ in the presence or absence of a polymer coating, the height and shape of the corrugation (profile).
ON A NOTE! The height of corrugated sheeting intended for roofing works, is 44-57 mm. What is smaller is wall corrugated sheeting, what is larger is for permanent formwork of reinforced concrete floors.
The weight of corrugated sheets ranges from 4-9 kg per square. Install the sheets overlapping, on a roof with a slope of at least 8 degrees.

Bathhouse with a corrugated roof. Photo StroyDom
A bathhouse roof made of corrugated sheets is a completely acceptable, budget solution.
Gable, do-it-yourself: based on wall material
For those who decided to make their own for the bathhouse gable roof, you need to know what role the material from which the bath walls are built will play in their choice.
How to make a bathhouse from a log house
We have already said that wooden construction traditionally dispenses with the modern rafter system, replacing it with logs (legs) laid perpendicularly on the gables (gables). Such a solution requires professional skills, just like the construction of a log house.
Let's start with the fact that the log house must stand for 2-3 years, so that later its roof does not “go.”
The usual tilt angle is 45-60 degrees. Easiest to customize gables on the ground - remove the upper crowns, place them on the ground and achieve correct geometry pediment - logs form steps, gradually decreasing in length. Lay down are placed in two or three rows; for this purpose, the cutting method is used, for example, “into the paw”.
At the very top of the gables will lie skating slightly, and the ledges of males are cut down to a regular triangle. A log with a diameter of 18-20 cm is used for the sledges. The slegs should protrude 50 cm beyond the roof.

Bathhouse roof slats on which the roofing material will be laid. Photo StroyDom
Lightly laid on top laths, on which the roofing material will be attached. A traditional slab roof is made without nails at all.
How to make rafters for a gable roof on a bathhouse from other materials
In principle, the usual rafter system is applicable to log houses and timber buildings, so what is said below can be applied to them as well. Walls can be made of brick, block cellular concrete, frame. Brick and concrete will require installation of wood on top of the walls Mauerlat, and in frame structures performs its function top beam wall strapping. If we're talking about about the log house, then the mauerlat will be upper crown.
A gable roof involves supporting the lower end of the rafter leg on Mauerlat, and the top one - on the ridge, or with emphasis - on the top of the other rafter leg. In the latter case, the bottoms of the rafter legs are pulled together puff.
The gables are made from the main material of the walls and serve as a support for the ridge beam. If the roof is heavy, the ridge will require intermediate supports. Usually in such cases, under the ridge just passes interior wall, on which it fits sill and lean ridge supports. But in our case, the roof should not be too heavy - and the dimensions of the bathhouse do not contribute to this, and the roofing materials are quite light.
The end of the rafter leg can rest entirely on the mauerlat, or it can continue further in the form of an overhang, while the support on the mauerlat comes from nicks on the rafters (or extensions).
Due to the fact that the structure is subjected to various loads, it is better to make the rafters of a gable roof for a bathhouse with movable mount, which will relieve unnecessary stress at the joints.

How to build a lean-to: according to the wall material
What was said above about a gable bathhouse applies, in part, to a lean-to bathhouse. Only here it is not provided for a log house classical solution for this type of roof, but a frame one is quite capable of claiming specialness, because the lean-to version is very suitable for it.
ATTENTION! The site has one entirely dedicated to how to build a pitched roof. There you will find calculations and step-by-step instructions for building a bathhouse roof with your own hands.
Frame
Advice for those who want to do it themselves frame bath, will be found in this one.
For construction pitched roof you will need to raise one of the walls (it will become a ridge and set the angle of the roof). The video below shows that the height of the ridge wall is set initially, and there is no need to increase it. The video demonstrates the stages of construction frame structure of the atticless type, that is, the ceiling is the roof.
However, it is worth noting that pitched roofs may well be attic type. We recommend reading the book Miller M.R., Miller R. “Construction Manual frame house and roofing work".
Those who chose SIP panels, can use them for roof covering. This is cost-effective if the length of the roof plane does not exceed 5-6 meters. But if you make a frame bathhouse with a pitched roof, then this is quite possible. All that remains is to choose a lightweight roofing material and cover the outside of the roof with it.
Other options
In all other options, you will also have either a wall made of the main material continued above, or a superstructure, possibly made of wood, with which you form the desired height ridge wall.
The videos below are not entirely relevant to our topic, but we can learn from them useful information, which will help you correctly make a roof for a bathhouse.
Shown here interesting way fastening the rafters to the mauerlat using beams. The base is walls made of cellular concrete. You can adapt this idea to make a pitched roof for a bathhouse with your own hands as follows:
Make one wall higher than the other, put it on both Mauerlat, as shown in the video.
Then fix it on a high wall board, which will keep the beams parallel to the ground.
On a high wall it will not be possible to attach the rafters to the beams, so they will have to be undercut and put it as described in the one we have already mentioned.
Sequence of roof battens and counter battens:
Here are the answers to how to fasten the battens:
However, do not forget that the rain will drum loudly on such a roof, and it will last for 10 years, no more. He chose not the roof height, but the wall height (20 mm profile), though. And soon I encountered a problem: the corrugated sheet covered with film collected condensation and had already begun rust. And if condensation was easy to deal with, then the quality of the sheet cannot be corrected:
So be more careful when choosing material when building a bathhouse roof!
Of course, we have already mixed theory and practice, but still there will be more practical things to come.
Construction and installation of the ceiling step by step
Attic roofs automatically imply the presence of a ceiling, which will become the ceiling of your building from below and the attic floor from above. There are two types of such overlaps: flooring And hemmed.
In the first case, you don’t even have to install floor beams - just fix the flooring boards on opposite walls. However, do not rush to rejoice - if we are talking about a log house, then you need to choose ceiling crown, which will not be the last one (there are 1 or 2 more crowns above it), remove it on opposite walls, and make notch for laying boards.
In other cases it can be mounted on the wall beam, which will be the “stand” for the ceiling boards.
IMPORTANT! The boards must extend onto the wall/beam to a depth of at least 5 cm.
5 cm is the optimal value, allowing you not to worry that the ends will deteriorate and the board will not hold.

False ceiling in the process of installation. Photo StroyDom
Can be used tongue and groove board or fasten the boards on the outer (top) side with bars so that they do not fall apart. It is also possible to fasten the boards into a shield while still on the ground, and install it in its proper place.
ACCORDING TO STANDARDS, flooring should not be used in spaces larger than 2.5 meters, because the boards sag. Or you need to use partitions as intermediate supports.
So, the boards are laid, fastened, you can attach foil or film from below for vapor barriers, on top - put kraft paper and pour expanded clay or vermiculite a layer of 20-30 cm. In our opinion, this is excellent insulation. Only the boards must be strong enough, for example, 50 mm thick.
Hemmed the ceiling starts with beams. For them, a recess is made in the walls, 2/3 of the wall - in the log house it is cut down, during construction from block construction an empty space is left. Through hole It's not worth doing. Beam spacing is 0.6-1 m.
ATTENTION! Instead of a notch, you can use a metal “beam holder” fastening.

Metal fastening “beam holder”
Nailed to the installed beams cranial beam, which will be a “stand” for draft ceiling. Boards are laid on the protrusions of the cranial beam rough flooring.
Vapor barrier can be done from below, from the ceiling. Then insulation is placed in the spaces between the beams, and on top of it the waterproofing, rough flooring is placed on it or logs, next layer - finished floor. From below, from the ceiling side, a vapor barrier is made finished ceiling, for example, from lining.
Well, let's move on to building a bathhouse roof with our own hands.
Construction instructions and step-by-step guide
Any construction involves a phase of preliminary calculations. In the case of a roof, you will need to consider the weight of all components of the roof itself(rafters, roofing material, insulation, etc.), as well as snow load (which you can find out from the regional map) and wind load (another map in the already mentioned article).
Next you will need formulas for calculating sections of wooden structures. They are quite complex and even in books they are often presented in a simplified form. We advise you not to rely on “average indicators” on the Internet, but to calculate your own case from books.

Construction of a bathhouse with a garage under one roof. Photo StroyDom
Perhaps there are programs not only for calculating the cross-section of beams, they could make your task easier. We found online calculators that calculate the rafter system, material weight and much more for you: Stroy-calc - Professional construction calculators.
When all calculations are completed, lumber is purchased, the processing phase begins. Don't forget that antiseptics And flame retardants on the roof are your friends (in the steam room they were enemies). The junctions of the tree with everything else are accepted waterproof something: mastic, roofing felt, etc.
In addition to lumber, you also purchase fastenings The fastenings themselves are also described in books - in some places it can be rigid, in others it can have degrees of freedom in certain planes. Freedom is needed so that the roof is not blown off by the wind, so that the elements do not collapse when the soil moves, the log house dries out, etc.
An example of calculating a roof on a bathhouse 6 by 6 meters
We go to the appropriate calculator and enter our data. Nizhny Novgorod is in zone 4, we’ll figure out the rest as we go - for an angle of 30 degrees, the rise will be about 175 cm (trigonometry, the leg and the opposite angle are given). The length of the overhangs suits the pitch of the rafters and the parameters of the sheathing too. We will use 1st grade wood for the rafters.
At the end we have: roof area - 47.68 sq. m. Metal tile weight 286 kg. Rafters 22 pieces, with a minimum cross-section of 40x150 mm, length of each 297 cm, total weight 241 kg. The same data for the sheathing.
As you can see, the calculator eliminated unnecessary engineering pains, and with such data you can already start working.
Making a choice
Now let’s try to answer the questions that often arise among bathhouse owners.
What is better to cover: corrugated sheeting or metal tiles
Above we have already described the properties of corrugated sheets and metal tiles. Now let's think about what is better to cover the roof of the bathhouse, if the choice is between these two.
Approximately, price metal tiles are twice as high as corrugated sheets (approximately). Consequently, its advantages should also be “twice” more noticeable.
Both materials, as stated, are subject to rusting, if it is not made of copper or aluminum, but the use of non-ferrous metals sharply increases the cost of the material.
Metal tiles are usually well protected upper layer, in contact with the atmosphere, but the lower one needs protection, so you need to do a good vapor barrier and ventilation to avoid condensation.

Installation of metal roofing. Cromwell Photos
Corrugated sheets also have coating, but, as you saw in the video, they sell it as “made in Italy”, and it starts to rust after the first condensation.
In essence, here both materials are equal and depend too much on the manufacturer and his honesty.
In both cases, by the way, vulnerabilities become fastening places because they are penetrating. Therefore, it would be a good idea to varnish them and cover them with wide fastener caps.
Both materials noisy, this was also discussed. Both low thermal insulation. Both weigh little.
Actually, the whole difference comes down to one single subjective factor - beauty. Metal tiles look prettier and “richer” than corrugated sheeting, which is traditionally used to cover garages, sheds and other outbuildings. If appearance does not matter, corrugated sheets will cost cheaper. Otherwise, rely on metal tiles.
How to cover inexpensively and efficiently
Here we dare to present our own vision of what can be used to cover the roof of a bathhouse inexpensively and with high quality.
Based on real budget savings, then optimal material can be called ondulin or bituminous (flexible) tiles of economy class. Both materials are bitumen based.
Ondulin costs approximately the same as corrugated sheeting, while flexible tiles cost the same as metal tiles. Of course, bituminous shingles come in very different prices, but they are cheaper than the tiled variety of ondulin - onduvilla.
It is also convenient that in the event that you have to repair, replace the ondulin sheet or flexible tiles much simpler than corrugated sheeting (they try to take them so that there are no horizontal joints, which increases the area of the sheet).
Additional questions
How to make a pipe in a bathhouse through the roof
We consider the question “how to make a pipe through the roof in a bathhouse” in detail in this article.
How to build a house with a bathhouse under one roof
How to build a house with a bathhouse under one roof is described in this one, which you will also find on our website.
DIY sauna from foundation to roof
But this question cannot be answered with one article. Below is a list of articles that may be useful to those who decide to build a bathhouse from foundation to roof with their own hands:
***
Well, what could be said on the scale of the article has been said. Books that can clarify many points related to the design and construction of a roof can be easily found on the Internet. Although it would be worth starting to make the roof yourself, after all, from the barn.
In contact with
The question of how to cover the roof of a bathhouse is relevant for summer residents, owners of private houses and luxury cottages in Moscow and other cities of Russia. The roof in the bathhouse performs two functions at once: it protects the building from atmospheric factors and provides comfort to people taking bath procedures.
A roof for a bathhouse must have the following qualities:
- Tightness. The ceiling of the bathhouse must effectively retain the steam heated by the stove.
- Strength(the ability to absorb snow and wind loads without deformation).
- Aesthetics. A modern roof for a bathhouse can give a building original look. This will allow it to fit harmoniously into any architectural ensemble.
- Simplicity. The roof for a bathhouse usually has a simple design, which makes it possible to assemble it with your own hands.
- Durability. A long roofing resource can be achieved by using modern roofing materials.
Before dealing with the question of how to cover the roof of a bathhouse, you need to decide on the type of supporting structure. Right choice The roof of the bathhouse ensures savings in material, determines the appearance of the structure and its durability.
Types of roofs for baths
Baths are most often built with several types of roofs:
- single slope (with one slope);
- gable (with two slopes).
Single pitch roof structure used for arranging attached baths. Its main advantage is low cost. It is three times cheaper than a gable one. Small area roofing will significantly save on bathhouse coverage. Quantity used for the construction of a lean-to structure building materials will also be small.
Gable roof structure is very popular among residents of cottage villages, home owners in Moscow, the Moscow region and throughout Russia. In this case, you can use a wider range of materials for the roof of the bathhouse, combining it into a single color scheme with the roofing material of a gazebo or other building.
For those who like to relax after bath procedures (for example, billiards), the building will be ideal attic floor(attic structure). A furnished attic above the bathhouse can also serve as a utility room for storing bath brooms and various utensils.

Shed roof for a bathhouse

Gable roof for a bathhouse
How to choose material for a bathhouse roof
When considering the question “how to cover the roof of a bathhouse,” you need to know the following design parameters for the roof of the future building:
- Tilt angle.
- Lathing pitch width.
- The amount of snow and wind load.
- Strength of the rafter system;
- Features of pipe removal (where the bathhouse pipe passes through the roof).
The angle of inclination of the roof structure directly affects the choice of covering. Each bath roof material has its own unique performance characteristics, which should be taken into account when planning construction or repairs:
- Ruberoid can be laid on roofs with any angle of inclination (from 5), only its consumption varies. At 15 degrees, the number of laid layers should be at least four, 20-40 - three, more than 45 - two.
- Slate is limited in tilt angles. For it, the bevel value should not be less than 20.
- Metal is more durable, but is susceptible to deformation under heavy snow loads. The roof slope angle for it should not be less than 18.
- The tiles are heavy and have special locks for fastening, which limits the range of their use to angles of 22-60 degrees.
- Flexible tiles RUFLEX are laid on roofs of any configuration; the minimum roof inclination angle for it is 11.


Flexible tiles RUFLEX

The width of the sheathing pitch (the distance between the bars) directly affects the consumption of building materials. The sheathing pitch is from 15 to 25 centimeters for asbestos or bitumen slate (Euro slate), up to 50 centimeters for corrugated sheeting. Laying soft roll material produced on a continuous sheathing. Installation of RUFLEX soft bitumen roofing is carried out, as a rule, on sheets of moisture-resistant OSB plywood.
Snow and wind loads can limit the use of fragile or heavy roofing building materials. If these parameters are large, the use of slate, ondulin, slate and natural tiles is excluded. Best proven metal elements(thanks to numerous fastenings), roofing felt and soft tiles RUFLEX. The latter option is more durable (warranty from 35 years, with the possibility of extension to), which further increases its popularity.
Increased strength of the rafter system is needed for installing slate roofing or laying natural tiles. Asbestos-cement slate is also heavy. Light bitumen materials such as rolled roofing and flexible tiles provide the least load on the roof.
The location and arrangement of passages through the roof requires certain knowledge and experience. The pipe on the roof of the bathhouse heats up to high temperatures, so it should not come into contact with rafter system(no closer than 15 cm) and directly with the roofing elements. To prevent the scattering of sparks, spark arrestors are used. Arranging the passage of the pipe on the roof of the bathhouse is best done after preliminary study.
Advantages and disadvantages of bath covering materials
Baths are covered with the following types of building materials:
- Metal (metal tiles, seam roofing, corrugated sheets).
- Wood (wooden planks, shingles, wood chips, planks).
- Asbestos-cement and bitumen slate.
- Slate.
- Soft bituminous materials (roofing felt, flexible tiles).
Galvanized sheet metal , copper, corrugated sheets and metal tiles have the following advantages:
- durability;
- ease of installation (except for seam roofing);
- reliability (ability to withstand high loads);
- wide selection of colors.
Disadvantages of metal roofs are high thermal conductivity, low sound insulation, low wind resistance and special maintenance.
Wooden elements made from wood chips and planks are considered the most environmentally friendly. Their advantages include a magnificent appearance, the ability to create an exclusive architectural ensemble (for example, you can stylize an antique bathhouse together with a gazebo). Among the disadvantages wooden covering it is worth noting:
- complexity of installation (not every craftsman is able to carry out competent installation of a wooden roof);
- fragility (usually the service life of such coating does not exceed 10-15 years);
- difficult to care for (turf grass requires watering, wood requires complex pre-treatment).
Asbestos cement slate traditional roofing building material. It has the following advantages:
- durability;
- excellent sound insulation;
- simple installation;
- low price.
The disadvantages of slate include:
- ordinary appearance;
- low heat resistance;
- a large amount of waste with a complex roof;
- fragility.
Natural tiles is a favorite material of architects and designers. Using natural tiles you can give any building a monumental, antique look. Its advantages include:
- fire resistance;
- strength;
- long service life;
- aesthetics;
- low thermal conductivity and hygroscopicity;
- excellent sound insulation.
Natural tiles have significantly fewer disadvantages:
- very heavy weight;
- low laying speed;
- high price.
Slate the most aristocratic building material for roofing. It has the following advantages:
- hygiene;
- long service life;
- ease of processing;
- excellent soundproofing qualities;
- fits on roofs of any configuration.
Among its disadvantages it is worth noting:
- high price;
- heavy weight;
- difficulty during installation;
- small selection of colors.
Soft bituminous materials are considered the most promising. Modification of bitumen significantly increases the service life of such a coating and increases its reliability. This class includes the following materials:
- soft roll roofing;
- flexible bitumen shingles.
Soft roll roofing has an excellent balance of quality and cost, and perfectly withstands the effects of natural factors throughout its entire service life. The disadvantages of this building material include the complexity of installation (partial melting with a gas burner is required) and the presence of a continuous sheathing on the roof.
RUFLEX has virtually no disadvantages. Its advantages include:
- large range of colors;
- wide choice of texture (configuration) of bitumen shingles;
- high sound insulation qualities;
- greater mechanical strength;
- durability;
- ease of installation;
- availability.
But no matter what material you choose, no matter how much it costs and no matter how much its owners praise it, everything can be brought to naught by illiterate installation of the roofing pie. After all, a bathhouse is a specific structure that must retain heat and not allow the insulation to get wet, both outside and inside.


