Thanks to the lightning-fast development of innovative construction technologies, in the arsenal of home craftsmen planning to repair flooring, in addition to traditional methods, such as installing a self-leveling floor and finishing with tiles, another one has appeared - laying porcelain stoneware on the floor. Despite the fact that porcelain stoneware is a relatively new material, it has been used for the installation of floor coverings for quite a long time, along with ceramic tiles. In addition, the relatively recent appearance of porcelain stoneware did not prevent it from occupying a strong niche in the construction market, which is explained by its durability, high aesthetic characteristics and environmental safety. However, the process of laying porcelain tiles is somewhat more complicated than finishing the floor with ceramic tiles and is characterized by certain nuances, starting from the calculation features required quantity material and finishing with grouting technology. By observing these nuances, you will be able to install high-quality flooring that will last as long as possible and, at the same time, preserve the original appearance.
Porcelain tiles: features of flooring and rules for choosing materials
Porcelain stoneware is a material made from a mixture of quartz, feldspar, clay and mineral dyes. The technology for manufacturing porcelain stoneware involves pressing and firing the specified composition in special kilns, resulting in high-strength tiles that are no different from natural stone in their aesthetic and performance characteristics. Due to the high strength, wear resistance and moisture resistance of porcelain stoneware floors, the installation of porcelain stoneware slabs, carried out in accordance with all the rules, will guarantee a long service life of the floor covering, which will retain its original appearance.
Since the floor is the basis of any room, in the process of choosing flooring it is necessary to take into account the functional purpose of the space. Due to the fact that porcelain stoneware, unlike ceramic tiles, is a more durable and heavier material, its installation is a technologically more complex process.

When installing flooring in residential premises, take into account the requirements for certain premises. If we're talking about about the hallway, then flooring must be moisture-resistant, resistant to negative chemical influences (salt, which is sprinkled on sidewalks in winter time) and dirt, as well as mechanically strong and wear-resistant.
The floor in the kitchen should be characterized by wear resistance, insensitivity to cyclic temperature fluctuations, and resistance to chemical-based detergents. Similar requirements apply to the floor in the bathroom, which in addition must be resistant to moisture and non-slip. Thus, porcelain stoneware, which is characterized by the above characteristics, can be used for installing flooring in the specified rooms.

In addition, matte porcelain stoneware, unlike polished, is characterized by a rough surface and, due to its high resistance to mechanical stress and high humidity, can be used for installing flooring in workshops, boiler rooms and garages, where increased demands are placed on it.

Advantages of porcelain tiles: their differences from ceramic tiles
Despite the fact that porcelain tiles and ceramic tiles are similar in appearance, distinguishing them is not as easy as it seems. However, they have significant differences.
Unlike ceramic tiles, porcelain stoneware can withstand high mechanical loads, being a material with high strength. The manufacturing features of porcelain stoneware determine its specific color not only on the outside, but also on the inside. The features of the pattern are formed during the manufacturing process of the tile itself. Thanks to these nuances, the pattern can be seen not only on the surface, but also on the cut of the porcelain tile. The technology for making ceramic tiles involves applying a pattern only to its surface after production.

In addition, porcelain stoneware has the following advantages:
- Long service life;
- Resistance to high and low temperatures;
- Increased moisture resistance;
- Immunity to chemical-based detergents;
- Wide selection of sizes and colors.

Selecting porcelain tiles and preparing them for installation
Before purchasing porcelain tiles, sketch out a plan of the surface on which installation will be carried out and calculate the required amount of material. Calculate the total area of the room and based on 1 sq. meter of surface, determine the total laying area and the required number of porcelain tiles. Having calculated the required amount of material, add 8-10% of the total amount of material to the resulting figure and thus you will get the required number of porcelain tiles that you need to purchase. This will allow you to insure yourself against errors in calculations and damage to the material during transportation. When purchasing porcelain stoneware slabs, make sure that their design, color scheme and format are identical for the entire purchased batch of material.
In the process of choosing porcelain stoneware, the purpose of the room in which installation will be carried out is taken into account. If this is a bathroom or kitchen, in order to avoid possible injuries that may occur when water gets on the floor, try to give preference to porcelain tiles with a rough surface.

Subtleties and options for laying porcelain tiles on the floor
It was previously noted that porcelain stoneware has a varied shape, wide color palette and a large selection of sizes. Without even using it special types porcelain stoneware, you can install it different ways shown in the figure below.
Methods for laying porcelain tiles on the floor

By choosing one of the presented options and giving preference to single-color porcelain tiles, you will get an original image, especially if you combine tiles different sizes and flowers.
Important! If the room in which the flooring will be installed is characterized by an irregular shape, the installation of porcelain tiles can be done in accordance with the drawings presented below.

Peculiarities of image perception determine certain subtleties, compliance with which will be appropriate in the process of laying porcelain stoneware. They are as follows:
- The size of the tile has a direct impact on the visual assessment of the room: tile large sizes visually reduces the room, small - increases;
- To visually increase the width of a room, designers recommend giving preference to patterns laid out across, while patterns laid out along the room help to visually increase its length;
- To combine several areas of the room into a single whole, it is recommended to use a through pattern. The division of a room into several zones is carried out using a single drawing;
- The use of light-colored tiles helps to visually increase the area of the room, while dark colors visually reduce its area;
- If during the installation of the flooring you place the tiles at an angle of 45 degrees, the edges of the porcelain tiles should be positioned strictly parallel to the diagonals of the room, as indicated in the figure below.

Methods for laying porcelain tiles: procedure
Depending on the type of surface on which the installation will be carried out, there are several options for laying porcelain stoneware on the floor, which are most often used in practice. These include:
- Laying porcelain stoneware slabs on raised floors, involving the use of special structures for their fixation. This method of laying porcelain stoneware is relevant not only for installing false floors, but also for ventilated facades. It requires specialized professional skills and is carried out mainly by experienced craftsmen.
- Laying porcelain tiles on the floor using special adhesives, which even a beginner can do.
The procedure for laying porcelain tiles is as follows:
- Preparation of materials and tools that will be required during the work process;
- Preparing the base for laying slabs;
- Laying porcelain stoneware slabs;
- The final stage is grouting the joints.

Materials and tools for laying porcelain tiles
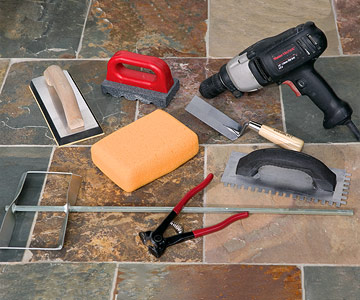
To get started, prepare the following tools:
- A grinder equipped with a diamond wheel, or a tile cutter;
- Building level;
- A metal ruler or building level, which are necessary for taking measurements;
- A simple and notched spatula, as well as a rubber trowel;
- A marker with which the surface will be marked;
- Drill equipped with a mixing attachment;
- Container for mixing the solution.

In addition, you will need materials from the list below:
- Primer intended for treating the base;
- Porcelain tiles;
- Adhesive for installation of porcelain tiles;
- Silicone sealant;
- Grout for seams.
First of all, experienced craftsmen advise carefully considering the installation plan for porcelain tile flooring, which involves determining the installation method, the nature of the pattern, and the thickness of the layer. adhesive composition and the method of its application. Recently, seamless laying of porcelain tiles, which has visual effect formation of a monolithic coating. However, to install flooring using seamless technology, you will need special rectified tiles characterized by precise geometry, taking into account minimum tolerances. Porcelain tiles with different surfaces can be subjected to the rectification process: polished, matte or structured.

Disadvantage this method installation, it is considered possible to use tiles of only one size, as well as the impossibility of ensuring the same length of seams and uniform filling. However, this method also has advantages - its use allows you to provide a uniform surface without seams and save on the materials used. Despite the advantages of the method, many prefer traditional method styling
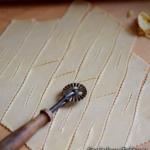
Before the beginning installation work The surface of the tile is cleaned of the protective layer applied by the manufacturers to preserve its integrity. Most often, technical wax is used as a protective layer, which can be removed warm water with detergent. If paraffin was used as a protective layer, it is removed with a spatula.
Preparation of the base: main nuances
Porcelain tiles can only be laid on a perfectly flat surface with sufficient bearing capacity, which will be the key to the quality of the flooring. In case of unevenness on the mounted surface, they will cause a difference in the thickness of the laying layer and a subsequent difference in stress on the coating, which will lead to a deterioration in the adhesion of the tiles to the base. In this regard, before laying porcelain stoneware on the floor, the price of which depends on the quality of the material used, the installed surface is cleaned, dusted and primed.
Important! If the installation of porcelain stoneware is carried out on wooden surface, make sure that it does not spring under the weight of a person. If a defect is detected, pack the reinforcing mesh onto the wooden surface.

Choosing adhesive for laying porcelain tiles
Porcelain stoneware is a material characterized by zero water absorption, and this must be taken into account when choosing an adhesive mixture. Due to the fact that the adhesive for laying porcelain tiles must have a high degree of adhesion to the surface, it is forbidden to use it for installing porcelain tiles on the floor. cement mortar.
Important! The cost of laying porcelain tiles on the floor will be slightly higher if you use adhesive mixtures characterized by a large percentage of polymer additives, however this option is the most preferred due to its high reliability.

When choosing an adhesive for laying porcelain tiles, take into account the nature of the base on which installation will be carried out, as well as the recommendations of the adhesive manufacturer presented in the instructions.
If the installation of the flooring will be carried out in a corridor or other room with high foot traffic, experts recommend giving preference to more rigid adhesives, for example, two-component cement-based adhesive, which contains latex and epoxy resins. To lay floors in rooms with high humidity, use elastic adhesive with high elasticity.

How to install porcelain tiles seamlessly?
This installation method is relatively new and requires compliance with certain technological nuances.
- Seamless laying of porcelain tiles involves the use of large-sized porcelain tiles measuring at least 600 x 600 mm. By observing this requirement, you can minimize the number of seams;
- As part of the seamless installation of porcelain tiles, the seams act as a kind of buffer that softens the load placed on the porcelain tile surface. Grouting compounds used to finish joints contract and expand during temperature changes, which prevents cracking of the floor covering. If these materials are neglected, the floor covering will soon fail, losing its original characteristics;
- Laying porcelain tiles using seamless technology can only be carried out in a certain temperature range from +5 to +35 degrees;
- When laying porcelain tiles, you can leave a gap of no more than one millimeter, which is filled with a special grouting compound and epoxy resin, which matches the tone of the tile;

- If the sketch of the design of your flooring involves creating a symmetrical pattern, it is better to start installing porcelain tiles from the middle of the room, stretching the string along the line of symmetry;
- The adhesive, mixed to a creamy consistency, is applied to a small area of the surface to be mounted and subsequently leveled with a spatula. It is important to prevent the formation of bubbles;
- Make sure that no voids form in the adhesive layer between the floor and the porcelain tiles, which will prevent the tiles from cracking during use.
- The adhesive surface obtained during the installation process is treated with a notched trowel;
- After laying porcelain tiles on the adhesive composition, check the correctness of its installation using a building level;
- The distance between each subsequent laid element should be no more than 3 mm. This laying rule is common for all types of porcelain tiles, with the exception of edged porcelain tiles, when the gap is almost invisible and does not exceed 1 mm;
- The porcelain tile coating, laid in accordance with the rules described above, is left for 3-4 days until the adhesive composition has completely dried, after which it can be used with maximum loads.

- The final stage of installing porcelain stoneware flooring is grouting the joints. During the selection process color scheme grout takes into account several parameters - the color of the tile and the width of the seam. In most cases, experts recommend giving preference to the least easily soiled gray tones of grout.
- To grout tile joints, use a rubber spatula, which is also used to remove excess grout.

The quality of installation work performed is assessed in accordance with the following criteria:
- The surface of the porcelain stoneware flooring should be characterized by the absence of bulges and depressions;
- The surface of the flooring should create the impression of a single harmonious composition.
Laying porcelain tiles on the floor video
Porcelain tiles appeared on the building materials market not so long ago, but immediately became in demand due to their excellent properties and high performance characteristics. Laying porcelain tiles is not the most difficult procedure, it is available for self-execution, but requires a serious approach and care.
Types of porcelain stoneware
When choosing porcelain stoneware, you need to consider where it will be used and under what conditions it will be used. There are several of its most popular types:
- glazed;
- matte;
- polished;
- technical.
Porcelain tiles are a very strong material, suitable for installation in any room, but glazed and polished tiles should not be used where intense loads are expected. These coatings may wear off over time due to prolonged exposure and their color will become faded.
Selecting glue and tools
Porcelain tiles are low-porous and have a very low moisture absorption coefficient. It is because of these properties that its installation has several features that must be taken into account. It does not fit on regular cement mortar. For installation, special adhesives based on a cement-sand mixture with the addition of polymers are used. They increase adhesion and give the glue good elasticity. To mix glue mixture with water must be done exactly according to the manufacturer's instructions, but remember that the mixture is added to the water, and not vice versa.
In addition to glue, you will need to stock up on tools necessary during the work process:
- drill;
- nozzle for mixing the solution;
- mallet;
- notched spatula;
- level;
- tile cutter or grinder;
- rubber scraper;
- plastic crosses.
Surface preparation
Any type of porcelain stoneware is very demanding on the base where it will be laid. It should be smooth, without cracks, scratches, or protrusions. It is very important that the surface is hard.
This is especially true if porcelain tiles are laid on wooden base. In this case, the logs must be strong and aligned strictly horizontally; the subfloor is tightly fixed to them. It can be filled with self-leveling mixture or leveled using thick plywood sheets.
Regardless of what material is used for the base, it is covered with a primer in two layers. This will remove dust from the surface and increase the adhesion of the adhesive.
DIY porcelain tile installation
After all the preparatory work has been completed, all the necessary materials and tools have been purchased, you can begin to work. If the tiles are laid in a straight line or in a checkerboard pattern, work begins from the corner of the room, laying the first row along the wall. If an ornament of several colors is laid out, or a complex type of installation is used, then start it from the middle of the room. It is advisable to draw a plan directly on the floor according to which the tiles will be laid, and sign the name of the colors. Otherwise, during the work you can make a mistake and not immediately notice it.
The process of laying porcelain tiles on the floor is not very complicated, the main thing here is to take your time and follow the sequence:
- The adhesive is applied to the base using a spatula over an area equal to two or three tiles. Since porcelain stoneware is a heavy material, the adhesive cannot be applied in too thick a layer, as the tile will simply sink into the mortar under its own weight. A small amount of glue must be applied to the tiles. This is necessary to ensure that voids do not form underneath it later. The glue is leveled using a spatula, and then furrows are made with its serrated side at an angle of up to 60 degrees to the base.
- The tile is pressed tightly until excess glue appears from under it. This is an indication that the solution is distributed evenly and there are no voids left underneath. The excess is immediately removed with a rubber spatula, otherwise the solution will harden later, and this will be very difficult to do.
- By evenly tapping the ends of the tile with a mallet, it is leveled, leaving a few millimeters for the seam, where plastic crosses are inserted to the full depth. This will prevent the seams from corroding before the solution hardens. If the design involves seamless installation, crosses will not be needed, and the tiles will press tightly against each other. After several tiles have been laid, their horizontalness must be checked with a level in different directions.
- After laying the entire surface, you must wait 24 to 48 hours. This time is necessary for the solution to completely harden, and only then can you begin to grout the joints. This is done with a rubber spatula in the direction transverse to the seam. Excess is removed with a damp sponge. The grout color is selected depending on the design. It can be either the color of the tile or, conversely, contrast with it.
The porcelain tile flooring will be ready for use in 6-7 days, at which time you can also connect the “warm floor” system.
Porcelain stoneware itself is a durable material and during operation, especially when used as a floor covering, significant loads arising during the operation of the floor do not cause damage to it. However, you can fully use all the capabilities of this material only if it is installed correctly. That's why correct styling porcelain stoneware is an extremely important and responsible stage of work, which largely determines its further successful operation.
As usual, any work begins with a project. In this case, it is necessary to decide on the laying scheme of porcelain stoneware. The required number of tiles and its dimensions will depend on this. The fact is that tiles can be laid in various ways, creating a real mosaic on the floor, and porcelain stoneware can be used in it different color. Below are pictures showing some possible examples of laying porcelain tiles, as well as the required number of tiles and their dimensions.
Of course, the examples given do not cover all possible options for installing porcelain tiles; everything here will be determined by your imagination. You can do it simply and lay porcelain tiles on the floor in rows. But this is everyone’s personal choice.
The most important thing here is different. It is necessary to determine the installation method - whether the porcelain stoneware will be laid without seams, or the conventional installation method with seams will be used. This choice determines which porcelain tile you need to buy - rectified or regular.
In addition, you need to estimate the required number of tiles per 1 m2 and determine the required amount of porcelain stoneware, and then increase it by (10-15)%. This is due to the fact that when porcelain stoneware is laid, there may be additional unaccounted costs, defective tiles, as well as trimming and adjusting the tiles in place.
Quite a lot important also has a definition of the laying technique - the thickness of the adhesive, the width and direction of the seams (straight, zigzag, etc.) between the tiles or choose that the porcelain tiles will be laid without seams, and also determine required volume surface preparation work. The result of such elaboration should be a set of tasks, the result of which is the desired surface of porcelain stoneware.
Tile selection
Once it is clear about the required amount of tiles, you can begin to select the material itself. In the case when laying porcelain stoneware on the floor will be done in the bathroom, hallway, kitchen or toilet, it is better to use tiles with a rough surface. There is less chance of slipping and injury on such tiles.
First of all, you need to pay special attention to two things - the caliber and tone of the tiles. Caliber refers to the discrepancy geometric dimensions tiles So, for example, a 300x300 tile can actually have dimensions of 298x298 and 302x302 (rounded values). This is due to differences in the properties of materials (clay) obtained from different deposits.
Typically, the manufacturer selects tiles of the same size and packages them together, so that one pack contains tiles, for example, 298x298. This is the caliber.
And if laying porcelain stoneware on a floor of similar sizes is still somehow possible (compensation for the size of the tiles occurs due to the thickness of the seam), then with large discrepancies, installing tiles of different calibers is simply impossible. And often there is a situation when tiles of the required caliber are not available, because the factory does not specifically produce such sizes; they are obtained during selection from finished products.
Therefore, when choosing tiles for laying porcelain stoneware on the floor, you must definitely choose tiles of the same caliber and take them with a reserve, because... It may simply be impossible to find the same one again.
Another, no less important, feature when choosing tiles for laying porcelain stoneware is the selection of tiles by tone (shades of color). This, like the caliber, is due to differences in the properties of the original components. As a result, the color of tiles from different batches will vary and this must be taken into account when selecting tiles.
Manufacturers, when completing a batch of products, select by tone, but laying porcelain tiles to achieve required quality surface (no color spots) should be done with tiles of the same tone. The selection of tiles of the same tone is carried out when purchasing it.
What tool will you need?
To perform quality work, you need a quality tool. Laying porcelain tiles is no exception. To do this you will need:
- container for diluting glue;
- drill with a nozzle for preparing glue;
- tape measure (ruler) for taking the necessary measurements;
- level for checking the horizontality of the laid tiles;
- Master OK;
- putty knife.
Some of these tools can be seen in the photo
Required auxiliary materials
First of all, you need to stock up on glue. When considering the problem of how to lay porcelain tiles on the floor, you need to remember that porcelain tiles do not absorb moisture. Therefore, special glue is used when working. The use of cement mixtures is impractical, because they do not provide a strong hold for the tiles. To ensure the required bond strength, glue manufacturers add special additives to its composition that increase adhesion to the surface of porcelain stoneware.
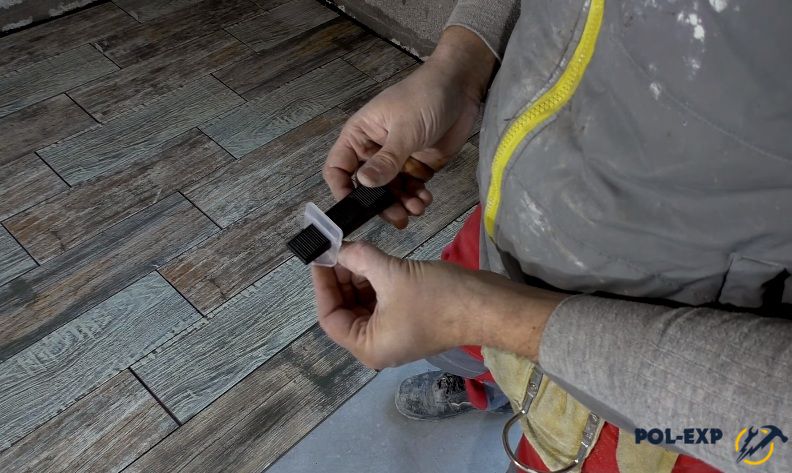
To ensure that the laying of porcelain tiles is smooth and beautiful, special crosses are used during installation to create permanent gaps between individual tiles, which are removed after installation is completed.

When the tiles are fixed, the resulting seams are filled with a special grout.
Preparing the surface for laying tiles
If you look at the construction of porcelain stoneware floors, there is nothing complicated about them. A layer of glue is applied to a concrete surface (or any other surface - drywall, plaster, boards), on top of which porcelain stoneware is laid. However, to ensure a high-quality and durable coating, the surface must be prepared.
In this case, the determining factor will not be how to put porcelain stoneware on the floor, but where to put it. If the floor surface is uneven, then it must first be leveled, for which it is necessary to remove protruding sections of the surface, seal seams, cracks, depressions and depressions. Any contamination present on the base must be removed.
After the floor has been prepared in accordance with the recommendations described, it needs to be primed. You must use a primer designed for the floor material.
Although this does not directly relate to surface preparation, before laying porcelain tiles on the floor, it is necessary to assess the surrounding environment. It is not recommended to carry out tile laying work at temperatures below 5°C, especially if the work will be carried out outside the building. Also, do not carry out work while the heating is on, especially underfloor heating.
Laying porcelain tiles
After graduation preparatory work You can start laying porcelain stoneware, as it was decided to lay it at the design stage. Yes exactly. This is achieved, in particular, by the fact that the installation begins from the middle of the room and is carried out symmetrically relative to it. It is best to mark the line of symmetry with twine. This is done in order to whole tile was located in the center of the room, and the cut one was located along the edges.
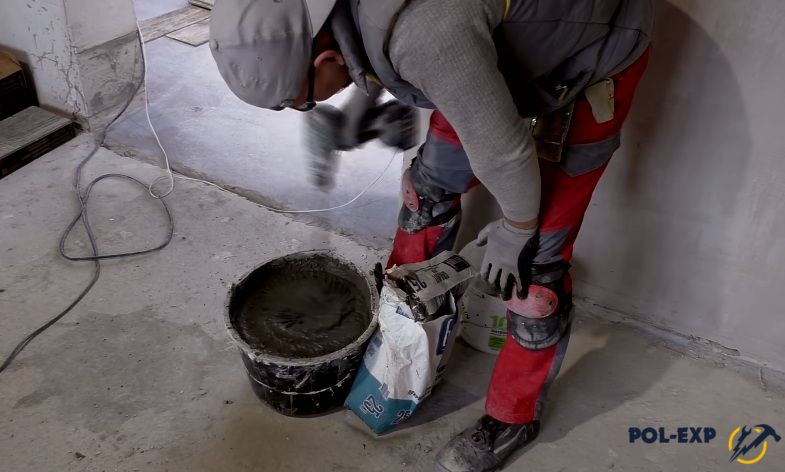
First, a solution is applied to the surface, to a small area.

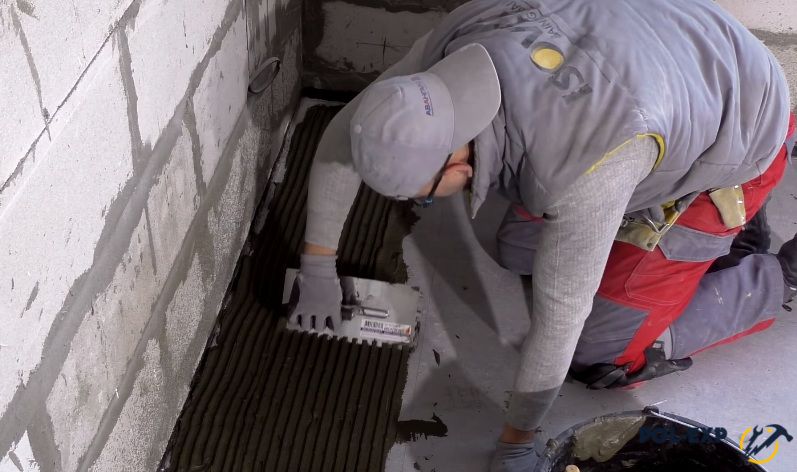
Before laying porcelain tiles, the glue is leveled with a smooth spatula; it must be held at an angle of approximately 45° to the base. The resulting smooth surface is then processed with a notched trowel, as shown in the photo.

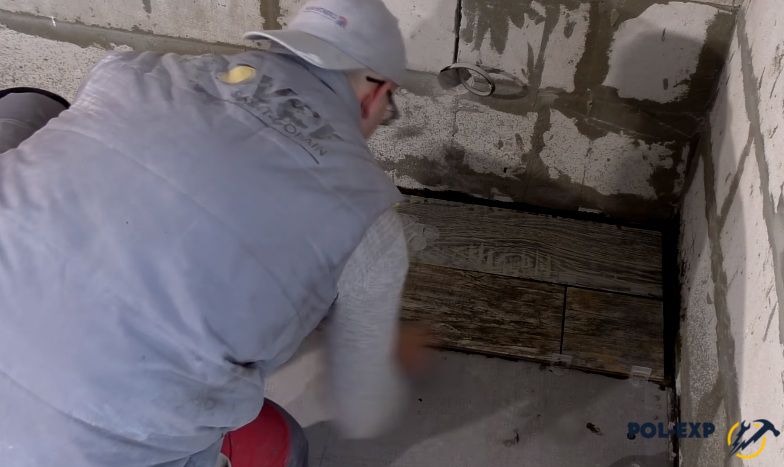
You can lay the tiles as shown in the photo below. If the tiles are covered with a protective layer, which is applied by the manufacturer to preserve the porcelain stoneware during transportation, it must be removed using cleaning solutions.

After laying, the tile must be slightly moved away from the adjacent one, while the gap between the tiles must remain free of glue, unless, of course, seamless laying of porcelain stoneware is used.
A constant gap over the entire surface is ensured by the use of crosses. The gap must be at least 3 mm.
The laid tiles are checked with a level for correct laying and, if necessary, leveled.

After all the tiles have been laid, it is necessary to soak the tiled surface for three to four days until the glue hardens.
When the glue layer has gained strength, begin grouting the seams. The color of the grout is selected depending on the width of the joint and the color of the tile. Typically, experts recommend using gray grout as it is less easily soiled. To grout joints, a rubber spatula is used to apply the grout and remove its remains.

Before applying grout, make sure that the seams do not contain any adhesive residue. The grout is diluted with water to the required consistency and applied over the tiled surface. When the grooves are filled, the excess is removed with a spatula and sponge.
Wipe the finished surface with a sponge soaked in a cleaning solution, being careful not to wash the grout out of the joints. After two weeks, the surface can be washed with the usual detergents. Additional Information How to lay porcelain tiles - video
Where can tiles be laid?
On a wooden floor
Porcelain tiles can be laid not only on concrete floors. Using special techniques and technologies, it is possible to lay porcelain stoneware on a wooden floor.
To do this, the coating is initially removed and the logs are positioned strictly horizontally. They are impregnated with antiseptic compounds. Expanded clay is poured between the joists to the top level, and then a “rough” board is attached using self-tapping screws with a gap of five to ten millimeters.

Waterproofing is laid on top of the “rough” floor. Then you can create the base itself, on which the tiles will be laid in the future.
Then it is possible to use two different options. A metal mesh is placed on top of the subfloor and secured with self-tapping screws. Then beacons are placed along which a cement screed is poured, forming a horizontal plane. Self-leveling mixtures can also be used. When the screed hardens, you can install porcelain stoneware.

Another option uses a so-called dry screed. In this case, sheets are laid on the waterproofing moisture-resistant plasterboard, gypsum fiber sheets or cement bonded particle board. The sheets are arranged in several layers and attached to the floor with self-tapping screws. After this, the surface is primed in several layers.
Porcelain stoneware can be placed on a surface prepared in this way. When choosing an adhesive, you need to pay special attention to whether it is suitable for working with drywall.
On plywood
It is quite possible to lay porcelain stoneware on plywood. With this option, the plywood should be placed on the joists with a small pitch. The thickness of the plywood layer must be sufficient, at least 30 mm. The plywood must be firmly attached to the joists, ensuring a tight fit over the entire surface. The resulting surface is sanded, debris is removed, and the seams are sealed.

After this, the plywood is primed twice, and when the second layer of primer has dried, installation of the tiles can begin. In this case, it is necessary to use polyurethane glue used when laying parquet.
Labor costs for laying porcelain tiles
As already noted, despite the excellent characteristics of porcelain stoneware, the quality of the resulting coating will largely depend on its installation. Experienced tilers know all the subtleties and nuances of the process, and they will provide high quality work. The cost of laying porcelain tiles on the floor will depend on the scope of work.
It is common practice to provide discounts when the volume of work increases. If porcelain stoneware is being laid, the price for large volumes (in square meters of surface) will be per square meter. less than a meter.
Of course, it is a matter of personal choice whether to do the installation yourself or use the services of professionals. Moreover, to find qualified craftsmen who can perform high-quality work difficult work, sometimes quite difficult. And, nevertheless, taking into account the durability of porcelain stoneware coverings and the cost of purchasing materials, the cost of laying porcelain stoneware may not turn out to be prohibitive in comparison.
At the same time, entrusting the laying of porcelain tiles to specialists, the price of whose services, among other things, depends on their qualifications and available recommendations, it is necessary to represent the total scope of work and the stages of its implementation. This will allow you to control the process and get the desired result.
Laying tiles, despite its apparent simplicity, is associated with many nuances and subtleties of the process. However, it is precisely this that allows you to fully reveal the capabilities of porcelain stoneware and obtain a coating that is unique in its technical capabilities, creating a bright and unforgettable impression of its beauty and originality.
Among all modern floor coverings, porcelain stoneware is rightfully considered the most versatile; it is used both in residential and commercial, warehouse, industrial and technical premises. This versatility is explained by the high physical characteristics of the tiles.
Moisture absorption. This parameter is important for unheated rooms with high humidity. The less moisture is absorbed, the lower the risk that water will destroy porcelain stoneware after freezing. No one can withstand the pressure of ice Construction Materials. Glazed porcelain tiles absorb only 0.1% of moisture, and unglazed porcelain tiles absorb no more than 0.5%. This figure is much lower than that of ceramic tiles (3.5–4.5%).

Frost resistance. The tiles can withstand at least 200 freeze/thaw cycles. This high result is explained by low moisture absorption. Manufacturers guarantee at least 75 years of operation while maintaining the original physical characteristics.

Wear resistance. In accordance with the generally accepted classification, stability artificial stone meets grade 4 abrasion. It is slightly superior to glazed ceramic tiles.

Thermal stability. Porcelain tiles do not lose strength at a temperature of +125°C for 45 minutes. The data fully meets stringent fire protection requirements.
High mechanical strength. In some cases, porcelain stoneware can withstand a load of 500 kg/m2, which allows it to be used in industrial workshops with heavy equipment.

Plastic. Slight plasticity increases the resistance of the coating to sudden dynamic loads.
Chemical resistance. The material does not react to the effects of chemical compounds, including aggressive ones. Such characteristics greatly facilitate the maintenance of coatings.

Manufacturability. Porcelain tiles are easy to process and cut. Unlike natural stone, it does not chip or crack. Another plus is maintainability. If cracks or depressions occur for various reasons, they can be repaired without replacing the tiles. At the same time, the repair site is invisible to others.


Wide range of choice in thickness, size and appearance. The thickness of porcelain stoneware slabs ranges from 7–30 mm. Thin material is used for finishing walls and floors of residential premises; thicker slabs are recommended for use during construction trading floors, office or government premises. Slabs approximately 30 mm thick are used to construct steps entrance groups private and commercial buildings.

Health safety. The manufacturing process of porcelain stoneware slabs does not involve the use of toxic substances. During operation, the material does not release prohibited compounds into the air.
The technology for laying porcelain tiles is simple and almost no different from laying ceramic tiles. The work can be carried out by mid-level tilers; special expensive tools and equipment are not required during installation.

But porcelain tiles also have several disadvantages:
- relatively high cost;
- high thermal conductivity, “cold” floors.
The last parameter is considered both a disadvantage and an advantage. Due to the fact that porcelain stoneware has high thermal conductivity, professionals recommend this material as a finishing coating for artificially heated floors. All other coatings reduce the efficiency of floor heating; low thermal conductivity causes additional energy losses.

Porcelain tiles are the best finishing coat for heated floors
Types of porcelain stoneware
In order to do optimal choice When finishing specific premises, you should know the features of the manufactured slabs.
| Type of porcelain stoneware | Brief description of performance indicators |
|---|---|
| The front surface of the slabs is covered with glaze using the hot firing method. Due to this, the quality increases significantly, the glaze is firmly soldered to the material. Glazed porcelain tiles are recommended for use in rooms with low load on floor coverings. Disadvantage: the slabs are very slippery, especially when wet. |
| The surface of the slabs after grinding is polished using special equipment. The slabs have mirror shine, look great in large rooms. Disadvantage - not recommended for outdoor use and public buildings. Micro scratches are noticeable on polished surfaces; they lose their shine and original attractiveness. |
| The coating is less slippery and more resistant to difficult conditions operation. The boards are universally applicable and can be installed in both residential and non-residential premises. |
| Special processing technology allows you to create matte front surfaces, the floor does not slip, and micro-scratches are not visible on it. Matte tiles can be used for finishing various architectural elements located outdoors. |
| Plates imitate a natural stone, wood, brick, etc. They are used when creating exclusive interiors, they allow you to organically fit new rooms into existing styles registration |
| During production, salts are added to the mass; when fired, they burn out and the surface becomes polished. The strength of the material increases, the tiles are not afraid of scratches and shock loads. Universal use, can be installed in large sales areas. |
| Rectification is a separate stage in the production of ceramic tiles, at which the dimensions of the material are adjusted. During rectification, all linear deviations that occur after thermal firing of the mass are eliminated. Rectified porcelain tiles can be laid without seams, which increases the tightness of the coating. |


Prices for porcelain tiles for floors
porcelain tiles for flooring
When choosing a specific brand of porcelain stoneware, you need to take into account the maximum number of individual factors, including the cost of the material. Only an informed decision will allow you to achieve the desired result with minimal financial losses and in the shortest possible time.
Technology for laying porcelain tiles on the floor
For example, consider the option of laying porcelain stoneware on a heated floor. We already mentioned above in the article that this particular material is considered optimal when installing heated floors. The type of heating does not make a fundamental difference.
First, draw up a preliminary plan for your actions, this will help you strictly follow existing work technologies. Calculate the number of tiles, taking into account unproductive waste, buy materials.
Important. The amount of waste depends not only on the professionalism of the master, but also on the chosen installation method. Remember that all diagonal layouts have more waste than straight ones.
To work you will need a mixer, a simple and comb spatula, a trowel, a tile cutter, a level, usually a tape measure.
Step 1. Check the condition of the base. Porcelain tiles are laid only on concrete load-bearing surfaces. With help long rule or level, check the horizontal plane. If there are significant elevations, they need to be cut down. It is not necessary to specially seal the recesses; the base will be leveled with glue while laying the porcelain stoneware.

Step 2. Prime the base. Buy only high-quality primers, do not leave any gaps. If the base absorbs liquid very quickly, then priming must be repeated. It is easier to cover the floor with a roller, and use it in hard-to-reach places paint brush. Before priming, clean the floor from dust; this can be done with a vacuum cleaner or broom.

The primer performs several functions:
- increases the strength of the top layer of the cement-sand base, glues the smallest particles of sand and dust, and does not allow the coating to crumble under the tiler’s feet;
- increases the adhesion coefficient of tile adhesive to the surface. Due to priming, the adhesion force increases by at least 20%;
- reduces the rate of moisture absorption. All adhesives for porcelain tiles are made based on cement. To fully gain strength, cement must be kept moist for a certain time; a lack of moisture during hardening significantly reduces physical strength. The primer creates a waterproof film on the surface of the floor base, which improves the conditions for hardening of the glue.
Wait until the primer is completely dry. The time depends on the number of layers applied, the type of primer, temperature and humidity in the room.
Step 3. Proceed with laying out the porcelain tiles on the floor. Decide on the layout method; it should take into account the texture features, the size of the room, the placement of windows and doors. Manufacturers indicate recommended types of layouts on the boxes, try them too. Try to ensure that the layout requires a minimum number of cuts. The fewer cuts, the less waste and the easier it is to lay porcelain tiles.

The first installation method is straight

The second method of laying is staggered

The third installation method is a square with tiles in different directions
If the tile has a non-uniform texture, then on the back there are arrows indicating the direction of laying. All arrows must be placed in the same direction. Before starting work, mix tiles from different packages. The fact is that production technology cannot guarantee complete identity of materials; if they are not mixed, large color spots will be noticeable.

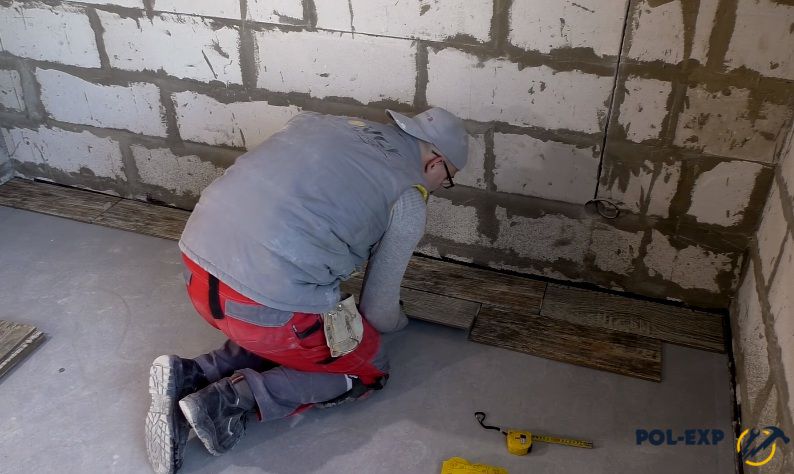
Step 4. Start working from the far corner of the room and gradually move towards the exit. Do not forget to leave a gap of approximately 1–2 cm wide between the tiles and the wall. The gap will later be closed with a plinth.

Practical advice. You can cut porcelain stoneware only with a special water-cooled tile cutter or a grinder with diamond blade. In the first case, the cut is perfectly smooth, in the second, the quality depends on the qualifications of the craftsman. Remember that porcelain tiles cannot be cut with a ceramic tile cutter. When cutting, do not apply much force; select the cutting speed experimentally. Correct modes guarantee a smooth, chip-free edge.

Step 5. Cut the pieces to size into several rows, taking measurements each time. Don’t rush, porcelain tiles are one of the most expensive finishing materials, minimize waste. In order to make the markings correctly, you need to turn the tiles over reverse side follow the arrow, use a sharp pencil to mark a point at the cutting site and draw a line under the square. The tile cutter has its own square, but double control will not hurt. If you have to cut the tiles not at a right angle, then you will have to align the tile cutter disc only along the drawn line. Make sure that the finished factory end lies on the visible seams, and the cutting line is located near the wall.

Step 6. To constantly monitor the correct installation of porcelain stoneware, it is recommended to make several parallel lines on the floor in accordance with the position of the rows. Lines are drawn using laser level or an ordinary tapping cord with blue.
Leveling the position of the tiles can be done with a special device consisting of a base and a wedge. Such devices are sold in specialized construction stores. It is recommended for beginners to work with the devices; professionals control the position of the tiles with an ordinary bubble level, this is much faster and cheaper. As for quality, the indicators are no different. The final results of a tiler's work depend not so much on the tools as on skill and conscientiousness.


Step 7 After laying out, carefully fold each row of tiles into a separate stack, do not mix them up.
Step 8 Prepare the glue. Follow the manufacturer's instructions; the amount of glue should correspond to your capabilities. For heated floors, special glue should be used. The fact is that during heating/cooling of the floor, the linear dimensions change, as a result of which the tearing forces increase significantly. Stir the mixture very thoroughly, always pour water into the container first, and then add the dry ingredient. After stirring, give the mixture 5-10 minutes for final infusion. The consistency of the finished glue should resemble rich sour cream.


Practical advice. Select the height of the spatula combs taking into account the quality of the base. The more unevenness, the higher the comb should be. Keep in mind that the tool tilts as you work, which reduces the height of the glue ridges.
Step 9 Using a comb, apply glue to the surface of the base. Place the first row. It is very important that the glue does not protrude into the joints of porcelain stoneware. In order to prevent such a negative phenomenon, before laying the second tile around the perimeter of the first, you need to slightly remove the glue using a trowel or spatula. The width of the removed strip should be approximately one centimeter. If glue gets on the surface of porcelain stoneware, remove it immediately with a slightly damp sponge or cloth. It is especially important to immediately clean the surface of complex structured tiles; this will make finishing work much easier and faster.

If you have little experience in tiling, then lay no more than two rows at a time, and apply glue to the base according to this calculation. Remember that adding water to thickened glue is strictly not recommended. The glue hardens not because the water evaporates, but because it enters chemical reactions with cement. The hardening process cannot be stopped by increasing the amount of water.


Step 10 Continue laying subsequent rows using the same technology. Constantly monitor the position of the tiles, and if problems are detected, eliminate them as soon as possible.

Important. The quality of tile laying largely depends on the correctness of the first row. Don’t be lazy to do it very carefully; check the position of each tile several times.
And one more note. If you use to check the position special devices, then you need to work with them very carefully. The fact is that they only align the tiles in one plane in relation to each other, but do not control horizontality. If the first tile had a slight slope, then the second one will have exactly the same angle, and the distance between it and the base will increase. Depending on the initial parameters, after several tiles the distance from the base may increase to critical values. You will have to remove all the porcelain tiles and start the work all over again.


Another big drawback of wedges is that under load, the tile that has less adhesion changes its position, and not the one that is needed. This means that the last tile will not always be recessed; the previous one will often be raised. As a result, it comes off the glue. This not only significantly worsens performance characteristics floor, but also further deteriorates the horizontality of the surface. Conclusion - do not rush to purchase widely advertised devices, learn to work with proven and reliable tools and devices. The first practical experience will appear after just a few hours of work, and in the future everything will become much clearer and simpler.

If you plan to finish work or take a long break, remove the glue from the floor
Step 11 You can start grouting the joints only after the glue has completely cooled, in most cases this requires 48 hours. Grouting is done using conventional technology; before starting work, the seams should be cleaned of any glue residue.
If you have completed all the work according to the instructions, you can be sure that the porcelain tile floor will serve for a long period of time. And one last thing. Never throw away remaining pieces of tiles; they may be needed for urgent repair work.
Professional answers to emerging questions
How to choose the right adhesive for porcelain tiles?
A large list of manufacturers and aggressive advertising make it difficult to choose an adhesive. When reading the description of properties, do right choice It is very difficult to find a specific brand - all manufacturers claim the highest quality of their products. This is true; modern compositions are distinguished by high adhesion rates. Professionals advise paying the main attention to the type of base under the tile; try to buy glue specifically for this parameter. The compositions of the brands Knauf, Ceresit, Yunis, Rusean, Volma have excellent reviews.

How to select tiles for an existing interior?
A large assortment of ceramic tiles simplifies the process of choosing a specific type. If you do not have the opportunity to consult with professional designers, then take a small sample of wall decoration material to the store. This could be a piece of wallpaper or clapboard, a paint can or a ceramic wall slab.

Video - How to choose porcelain tiles
What are the criteria for choosing bath tiles?
Enough complex issue, in bathrooms there are specific requirements for floor coverings. This is explained by the operating conditions. Wet polished porcelain tiles are very slippery, so it is not recommended to install them on the bathroom floor. European standards require slip characteristics to be indicated on the packaging; for bathrooms this parameter must comply with DIN 51130.
Video - Types and types of porcelain tiles
What is indicated on the packaging boxes?
Before studying the labels on the packaging, pay attention to its appearance. If the pictures or letters are vague, or the pack does not have right angles, then this is a fake. Do not buy such products and do not pay attention to the labels. Conscientious manufacturers indicate on the packaging the country of origin, company name and address, grade and name of the tile, linear dimensions and thickness, number of tiles in pieces and square meters. The color is indicated separately in accordance with the generally accepted table, surface type, water absorption class, and batch number. The information on the packaging gives a complete picture of the product; carefully study all the labels.

How to check the quality of porcelain tiles?
Remove the tile from the packaging and carefully inspect the surface. It must be clean, without mechanical damage, chips or uncharacteristic stains. Place two tiles with their front surfaces facing each other, look at the gap. There is a gap - the surfaces are uneven. Place the tiles on their side surfaces; they must be level; cracks and vibrations are prohibited.

Video - Checking the quality of porcelain tiles
Porcelain stoneware is a durable material that can withstand significant loads during operation. But all the possibilities of this material Can only be used if installed correctly. And the correct installation of porcelain stoneware is considered a very responsible and important stage of work, which largely determines its subsequent successful operation. Therefore, you should first learn how to properly lay porcelain stoneware on the floor.
Where to start?
Like any work, it all starts with a project. In this case, you need to choose a porcelain stoneware laying scheme. The required number of tiles and its dimensions depend on this. possible in different ways by creating a mosaic on the floor, while multi-colored porcelain stoneware can be used in it.
The technology for laying porcelain tiles on the floor is determined only by imagination. The main thing here is different. You should choose an installation option: seamless laying of porcelain stoneware or using the usual way installation with seams. This choice determines the type of porcelain tile: regular or rectified.
In addition, it is necessary to calculate the number of tiles per 1 sq.m. and the amount of porcelain stoneware, then increasing it by 10-15 percent. This is due to the fact that when installing porcelain stoneware, there may be unaccounted additional costs, adjustment and trimming of tiles in place, and defective tiles.
 Laying design options.
 The choice of installation technology is also important - the direction and width of the seams (zigzag, straight, etc.), the thickness of the adhesive, or whether to prefer seamless installation of porcelain stoneware, also determining the required amount of work on surface preparation. The result of such elaboration is a set of tasks that make it possible to achieve the desired porcelain stoneware surface.
After selecting the required number of tiles, you can select the material. When laying porcelain stoneware floors, as technology suggests, in the hallway, bathroom, toilet or kitchen, it is advisable to choose tiles with a rough surface. Such tiles reduce the likelihood of slipping and injury.
First of all, special attention should be paid to two details - the tone and caliber of the tiles. Caliber refers to the discrepancy between the geometric dimensions of the tile.
So, for example, a tile measuring 300x300 can be 302x302 and 298x298 (rounded values). This is due to differences in the properties of the material (clay), which are obtained from different deposits.
As a rule, the manufacturer selects the tiles same size and is packaged together so that the package includes tiles, for example, 298x298. This is the caliber. Therefore, it is worth understanding that with large discrepancies of different calibers it is impossible.
 Each package of tiles has similar signs that will help you make your choice.
 In addition, it often happens that it is impossible to find tiles of the required caliber, because the factory does not produce products of this size on purpose; they are obtained by selecting them from finished products. Therefore, when choosing tiles for installing porcelain stoneware on the floor, it is imperative to select a tile of the same caliber and buy it with a reserve, because it may be impossible to find one again.
Another, no less important feature when choosing tiles for installing porcelain tiles, it is to select tiles according to tone ( color shades). This is also associated with differences in the characteristics of the initial components. As a result, the color of tiles from different batches differs, and this should be taken into account when selecting the material.
Required tools and materials
Before laying porcelain tiles on the prepared floor, you need to stock up on tools: a drill with an attachment, a level, a spatula, a container, a ruler (tape measure) and a trowel. You should stock up on glue. When considering the task of installing porcelain stoneware on the floor, it should be remembered that this material is not capable of absorbing moisture. Therefore, during the work, special glue is used. Inappropriate to use cement mixtures, because they are not able to provide a strong fixation of the tiles. To ensure the necessary strength of the connection, glue manufacturers include in its composition various additives, which increase adhesion to the porcelain stoneware surface.
 A necessary tool.
 To obtain a beautiful and even laying of porcelain tiles, special crosses are used to create gaps between the tiles during the installation process, which are removed after installation is completed. After fixing the tiles, the seams formed are filled with a special grout. It is better to learn how to lay porcelain tiles on the floor by studying the relevant videos in advance.
Surface preparation
Many people do not know how to lay porcelain tiles on the floor, but you can learn this by looking at photos and videos, and reading articles. There is nothing complicated about this. An adhesive layer is applied to the concrete surface (plaster, drywall, boards), which is laid on top with porcelain stoneware. But to ensure the durability and quality of the coating, the surface should be prepared.
The determining factor in such cases will not be the laying of the porcelain tile itself on the floor, but the location of its installation. When uneven floor surface it is pre-leveled, for which protruding areas of the surface are removed, cracks, depressions, seams and depressions are sealed. Contaminants on the base must be removed. After preparing the floor in accordance with the described recommendations, it is primed. It is recommended to use a primer designed for flooring materials.
 Surface priming is a mandatory preparation step before laying porcelain tiles.
 Despite the fact that this does not directly relate to surface preparation, before laying porcelain stoneware on the floor, the surrounding environment must be assessed. Tile installation work is not carried out at temperatures below 5 degrees, especially if they are carried out outside the building. You should also not carry out work with the heating or underfloor heating on.
Laying porcelain tiles
After completing the preparatory work, you can move on to the question of how to lay porcelain stoneware on the floor. This is achieved due to the fact that installation begins from the middle of the room and is carried out symmetrically relative to it. The symmetrical line is marked with twine. This is done so that the tiles are placed in the center of the room, and the cut ones are located at the edges. First of all, the solution is applied to a small area of the surface.
Before laying the porcelain tiles, use a smooth spatula to level the adhesive, keeping it at a 45-degree angle to the base.
After this, the resulting flat surface is processed with a notched trowel. Laying tiles can be done in various ways. If the tile has protective coating applied by the manufacturer to preserve porcelain stoneware during transportation, it is removed using cleaning solutions.
After installation, the tile moves slightly away from the adjacent one, while the gap between the tiles should remain free of glue, unless a seamless method of laying porcelain stoneware is used. The use of crosses allows for a constant gap to be maintained over the entire surface.
Sorry, nothing found.
The laid tiles are checked for correct laying using a level and, if necessary, leveled. After laying all the tiles, the facing surface should be left for 3-4 days until the glue hardens.
After the glue has gained strength, grouting of the joints begins. The grout color is selected depending on the color of the tile and the width of the joint. As a rule, craftsmen recommend choosing gray grout because it is less easily soiled. Grouting is done using rubber spatula, which can not only apply the material, but also remove its residues.
Before applying grout, make sure that there are no glue residues left in the seams. First, you need to dilute the grout with water, bring it to a suitable consistency and apply it to the facing surface. After filling the grooves, excess must be removed with a spatula and sponge. The finished surface is wiped with a sponge, which should first be moistened in a cleaning solution. At the same time, you should not wash the grout out of the seams. After 2 weeks, the surface can be cleaned with ordinary detergents.
Where can tiles be laid?
On a wooden floor. Not everyone knows how to properly lay porcelain tiles on a wooden floor. Installation is carried out using special technologies and techniques.
 Of all the types of adhesives for laying porcelain tiles, you need to choose the one that is suitable for the base of the floor.
 First, to do this, the coating is removed and the logs are set in a strictly horizontal direction. Then the logs are impregnated with antiseptic compounds. Expanded clay is poured between them to the top level, and then the “rough” board is fixed with screws with a gap of 5-10 millimeters. The “rough” floor is covered with waterproofing on top. Then the base itself is created, on which the tiles are subsequently laid.
After this, two different options can be used. The subfloor is covered on top metal mesh and is fixed with self-tapping screws. Then beacons are installed, along which the filling is carried out cement screed, forming a horizontal plane. Self-leveling mixtures can also be used. After the screed has hardened, the installation of porcelain stoneware can be carried out.
Otherwise, a dry screed is used. In such cases, gypsum fiber sheets or sheets of moisture-resistant plasterboard are laid on the waterproofing. The sheets are placed in several layers and fixed to the floor using self-tapping screws. Then the surface is primed in several layers. Porcelain stoneware can be placed on the surface prepared in this way. When choosing an adhesive, you should pay attention to whether it is suitable for working with drywall.
Sorry, nothing found.
On plywood. It is also worth learning about how to lay porcelain tiles on the floor (watch the video). With this option, plywood should be placed on logs with small pitches. At least 30 millimeters are used. The plywood is firmly fixed to the joists, ensuring a tight fit over the entire surface. Then the resulting surface is polished, debris is removed and the seams are sealed. Then the plywood is primed twice, and after the second primer layer has dried, the installation of the tiles begins. In this case, you should use polyurethane adhesive intended for installing parquet.
Work expenses
Despite the excellent properties of porcelain stoneware, the quality of the resulting coating largely depends on its installation. All the nuances and subtleties of the procedure are known to master tilers, and high quality work is ensured. The cost of installing porcelain tiles on the floor is also affected by the amount of work. Basically, when the volume of labor increases, specialized companies provide discounts. For large volumes of porcelain stoneware installation, the price is 1 sq.m. there will be less.
Naturally, everyone decides for themselves how to lay porcelain tiles on the floor - do the installation themselves or use the services of professionals. Moreover, sometimes it is difficult to find qualified specialists who can do complex work efficiently.