A potbelly stove is a compact iron stove with a chimney at the top. It consists of a chamber into which it is poured solid fuel, a grate in the form of a metal grate, a pipe - a chimney and an ash pan for collecting ash.
If you know how to handle a welding machine, the device is easy to make, and at the same time, it will serve faithfully in an unheated room, in field conditions, in the absence of centralized heating for decades.
How to do it yourself?
Manufacturing options:
Rectangular oven
It is a metal box; you can independently weld the structure from steel sheets. For a rectangular potbelly stove, an old car tank or box will do just fine.

Typically, this form is chosen when it is necessary to cook food on the stove.
On the spacious platform you can place 2 large pans or containers for heating water at once.
The manufacturing principle is simple: doors are built to cover the ashpit and combustion chamber, a hole is made for the chimney, combustion products must leave the room in a timely manner, otherwise you can inhale carbon monoxide.
From a gas cylinder
The most common type of potbelly stove. The cylinders have thick walls, making the stove durable, mobile, and fireproof.

First, a drawing is drawn and markings are made. The combustion chamber door will be located in the center of the cylinder. The blower is in the same plane, only 10–12 cm lower.
Instructions:
- We take an angle grinder, cut out both doors, draw a closed line between them.
- Along the line cut the balloon into 2 parts.
- At the bottom We weld the grate - the ash pan.
- Install grate, weld both parts again.
- For valve make a hole with a radius of 10 cm.
- For hood insert a hole into the pipe, weld objects together by welding.
- Simple stove from the cylinder is ready, you can use it, add fuel and check its operation.
For cooking on the top of the stove, the design is slightly different:
- Cut off the top of the balloon.
- Inserted inside and the rods are welded.
- Top side a hole for the pipe is cut. You can heat and cook food at the same time.
- The hole is welded, the valve is screwed in, a comfortable handle is adjusted.
- From the pipe, barrels can also be made into a furnace. The barrel or pipe must be selected according to its diameter.
- Below the barrel pipes, cut 2 holes for the firebox and ash pan.
- Make the doors.
- Do framing holes made of metal strips.
- Under the fire door At a distance of 10 - 12 cm inside the barrel, weld brackets in the corners, the grate will lie on them, pre-weld it from any fittings.
When making a stove from a pipe, weld the bottom, as well as the part on top:
- Down to the bottom weld 4 legs.
- On a surface cut a hole, weld a pipe to it, this will be a chimney.
- Weld the hinges to the previously cut holes, install the doors. Also, mark and attach a hook so that the doors lock tightly.
- For design aesthetics process all welding seams, clean them 10. Paint the outside of the device with heat-resistant paint. Whatever the factory product, you can sell it or successfully use it yourself.
Working furnace
The option is distinguished by a specific odor that oil waste will emit during fuel combustion, even in the presence of an exhaust hood.
Instructions:
- To make this model, pick up sheet material at least 4 mm thick, a chimney pipe, and individual small structural elements.
- Do it on a sheet precise markings of all elements, having previously drawn a drawing.
- Embed all elements with a grinder, clean the edges of the parts. Drill holes round shape in the pipe.
- Top of the tank cut a hole for the pipe off center to the left.
- Offset to the right Drill a hole on the circle for the connecting pipe.
- It turned out to be 2 circles, weld them to the pipe; the thickness of the upper tank will depend on its length.
- Decorate the bottom part of the stove in the same way., but now cut the hole right in the center of the marked circle.
- Cut side by side second hole, attach the sliding cover to it.
- Weld to the bottom plane 4 legs.
- Clean seams after welding, paint the surface with high temperature resistant paint.
- Connect the chimney to the stove. The waste will be poured into the lower part of the tank; after the paper is ignited, the sliding lid closes and the waste begins to burn. Oxygen will penetrate through the holes, and the waste will burn intensely.
Necessary materials, tools
Before starting work, prepare the tools:
- metal brush;
- chisel, pliers, hammer;
- tape measure, chalk;
- drill with metal drills;
- sander;
- metal circles;
- welding machine;
- protective mask;
For the body you will need a pipe 30 cm in diameter, at least 5 mm thick. You can use sheet metal of the same thickness instead of a pipe.
For the chimney, you should select a pipe 12 cm in diameter, with a thickness of at least 3 - 4 mm. To prevent burnout, the ash pan is suitable metal box, so you need to choose durable sheet metal.
Step by step guide
First you need to cut the metal, taking into account the thickness and length of the required blanks.

Remove the chamfers from the parts, touching the stove will be safer, and the welding seams will be stronger:
- Check that the parts are correctly marked before you start cutting them. When cutting, take into account the thickness of the oven walls, as well as the thickness of the circle.
- Remove the chamfers from the prepared parts for safety from accidental contact with a hot device.
- Check all part markings.
The structure is installed in the following sequence:
- Connect welding machine to the network.
- Take electrode with a thickness of 4 - 5 mm, taking into account the sheet or pipe.
- Install current on the device is up to 160 A.
- Put it on special glasses and overalls, protect your hands with gloves.
- To the bottom of the oven weld three walls.
- Bottom of the device place it at least 5 cm from the floor.
- Connect parts at right angles. Check their perpendicularity with a level.
- Where you need it, straighten the corners of the parts.
- Weld parts and joints relative to the floor level, at an angle of 45 degrees.
- Weld a partition between the ash pit and the firebox, having previously cut holes so that ash does not accumulate.
- Endure the distance between the holes is at least 5 cm from the walls of the stove. The distance between the partition and the bottom of the structure must remain at least 10 cm.
- Last but not least by welding, cut holes for installing the chimney on the rear panel homemade stove.
- Make your markings, drill rectangular holes in places intended for the firebox and vent.
- Combine with a partition all the lower parts of the holes. The distance between the walls of the firebox and the upper side edges should be at least 3 - 5 cm. The opening for the vent is slightly smaller, but not more than 5 cm.
- Bulgarian cut two holes from metal and form doors. Weld them onto the canopies, raise the blower as much as possible to the top of the slab opening so that they do not sag in the future under the influence of high temperatures.
- To the doors Weld the bolts, they should open and close easily, without obstacles.
After all welding work, check the quality of the seams and tap them. If there are defects, correct them immediately. At the end of the work, weld the upper part of the device.
How to make a long-burning potbelly stove?
To ensure that the potbelly stove radiates heat for as long as possible without adding another portion of firewood, and does not burn out quickly, the fuel will not burn, but will smolder, the heating process without adding firewood can be extended for several hours.

Making a stove for long burning is somewhat different from the usual design.
The best cylinder for the stove is:
- Cut the top off of it, this will be the stove lid.
- Make a hole at the top and side of the stove, this will be the hood.
- Make a hole in the center so that the balloon can be easily inserted.
- Weld to the cut hole of the pancake a pipe, slightly longer than the cylinder. The pipe will serve as a blower, and oxygen will flow into the furnace, and the fuel will not smolder and not burn.
- Cut off part of the cylinder in the center, insert a pipe into the hole as a blower. The operating principle of a long-burning potbelly stove is to create pressure inside the chamber. After the firewood ignites, a heavy metal circle plunges inside and begins to put pressure on the fuel, creating pressure on it, the fuel begins to lack oxygen and slowly smolder. The smoke, going upward, comes out through the chimney, the room will not be smoky.
Advantages and disadvantages
 Like any other heating device, the stove has both pros and cons.
The undoubted advantages of a homemade stove are:
- Compact size.
- Use of any available fuel, can be heated with peat, firewood, sawdust, wood chips, and coal.
- Low cost of manufacturing the device, you can basically make do with handy materials.
- Installation of the structure does not require laying a foundation or chimney.
The disadvantages of the stove include:
- Fairly high consumption fuel material, the principle is this: while you heat it, it’s warm. To keep the room from cooling down, you need to add fuel more often, otherwise you may simply freeze.
- Furnace walls become very hot and can cause burns if they come into contact.
- Can't be allowed coals falling out of the stove can cause a fire.
Where can it be used?
Stoves were popular in the first half of the last century. They warmed the soldiers' dugouts, dugouts, and heated carriages.
Today the stoves are still heated garden houses, garages, warehouses, greenhouses, that is, where there is no gas pipeline, and electrical devices They are ineffective and burn a lot of electricity.
Types of homemade potbelly stoves
The material for the construction is cast iron or stainless steel. The stove consists of a container, an ash pan, a pipe, a chimney, and a combustion door.
They are distinguished by type:
- pyrolysis furnaces;
- with a cooking platform on top for cooking;
- furnaces lined with a casing for efficient heat transfer. For homemade products you can choose old cylinder, barrel, large vat, can. Furnaces can be cylindrical, rectangular shape;
Installation safety rules
Any homemade heating device is designed to heat the room, making it more comfortable, but at the same time, such devices are far from safe and are fraught with ignition and fire.

When installing the structure, it is very important to follow safety rules:
- Bake must be installed on a fire-resistant surface, otherwise the floor may burn out. To do this, it is good to lay brick or tiles on the floor.
- Stove walls should not overheat too much; for this purpose, special drywall and other non-flammable material are used in production.
- Highly flammable materials Do not place it near the firebox, it may catch fire.
- Take care about ventilation in the room where the potbelly stove will be located. Carbon monoxide must escape outside in a timely manner and not accumulate inside the room.
- Use in production only high-quality, fire-resistant material.
- If there are panel or wood walls in the house install the stove at a distance of 1 meter from them.
- Be sure to mount chimney preferably from one section.
- When passing a pipe through a wall install a brick thermal barrier. Do not use concrete for these purposes; it crumbles quickly.
- For garage would be better suited The potbelly stove is being used up, so don’t rush to throw it away rims from the wheels.
- Don't put on the stove near flammable materials.
- Pipe section exactly above the roof, perform from non-flammable material, so the oven will cool down much more slowly.
- Think it through ventilation system, there should be no burning in the room.
- Lay out the floor and walls near the structure with a brick, or facing material, the stove is a fire hazard. The same applies to the chimney; the distance to the walls and ceiling must be at least 1.2 meters.
- Set for security purposes metal fencing around the device.
- grate It’s better to make them from cast iron grates in a set, so they will be easier to pull out of the firebox.
- Install all chimney parts only at the top of the structure, they must withstand high temperatures of over 300 degrees.
- Treat seams after welding with durable and high-quality sealant.
- Do not clean the pipe with a brush, metal objects, the pipe walls can quickly become leaky.
- Installing a chimney, make an anti-rain canopy, rain moisture will not get inside the pipe.
The human body is able to function normally within a narrow temperature range. Prolonged overheating or hypothermia is not just uncomfortable, but also deadly. The task of maintaining normal temperature regime– this is a task of survival. Having a normal apartment, efficient public utilities, you don't have to worry about this. But for a number of reasons you may find yourself outside your home, the work of public utilities may be paralyzed by man-made or social factors, so it’s not superfluous to have a backup option. Or you simply decide to save on heating by installing a highly efficient stove (up to 60% efficiency) at home, in the garage or in the country house, running on almost any type of fuel (including sawdust and paper waste). The stove in question was developed at the beginning of the last century in Russia, in conditions of complete paralysis of public services, fuel shortages, harsh winters, and the collapse of industry. That is why it had to be economical, “omnivorous”, and produced in artisanal or semi-artisanal conditions. This problem was solved, and as a result a stove appeared, which is now known as a potbelly stove.
It is easy to buy a potbelly stove in a specialized store or on the Internet. The choice is rich, as is the price range: from antique cast iron to modern professional military ones, of varying power, stationary and portable. Made of cast iron, steel... Or order a stove in a workshop where metal products are produced according to the individual wishes of the customer. And the third option for those who know how and love to work with their hands: you can make a potbelly stove yourself.
The ideal material for a potbelly stove is cast iron. Sheet steel, at least 3 mm thick, is suitable. Some craftsmen suggest making it from aluminum. But this is a low-melting metal, and the stove made from it does not last long. So if you are offered a potbelly stove made from a milk can, refuse.
How to make a potbelly stove with your own hands?
The simplest potbelly stove made from a barrel. For production you need a steel barrel with a volume of 100-240 liters. Design advantages:
- You can make it in an hour.
- production price - one barrel.
- does not require welding.
Flaws:
- low efficiency.
— local overheating in the central part.
A simple and cheap homemade potbelly stove can be made from a gas cylinder. The advantages of such a stove are its low cost. The cylinder body is an almost ready-made furnace, and its production takes little time. Disadvantage - the efficiency is lower than that of a classic potbelly stove.
If you decide to make a potbelly stove from a gas cylinder, then first of all this cylinder must be safely disassembled.
Vertical potbelly stove from a cylinder:
The above stoves are very simple, but they have low efficiency, which means high fuel consumption.
The most effective potbelly stove with your own hands (+ drawings)
 If you want to make more efficient homemade potbelly stove with high efficiency, let's understand the theory. At first glance, the potbelly stove looks extremely primitive: simple metal box, in which wood burns... In fact, this stove was developed by highly qualified specialists, and there are many tricks in it.
Scheme the simplest stove DIY potbelly stoves
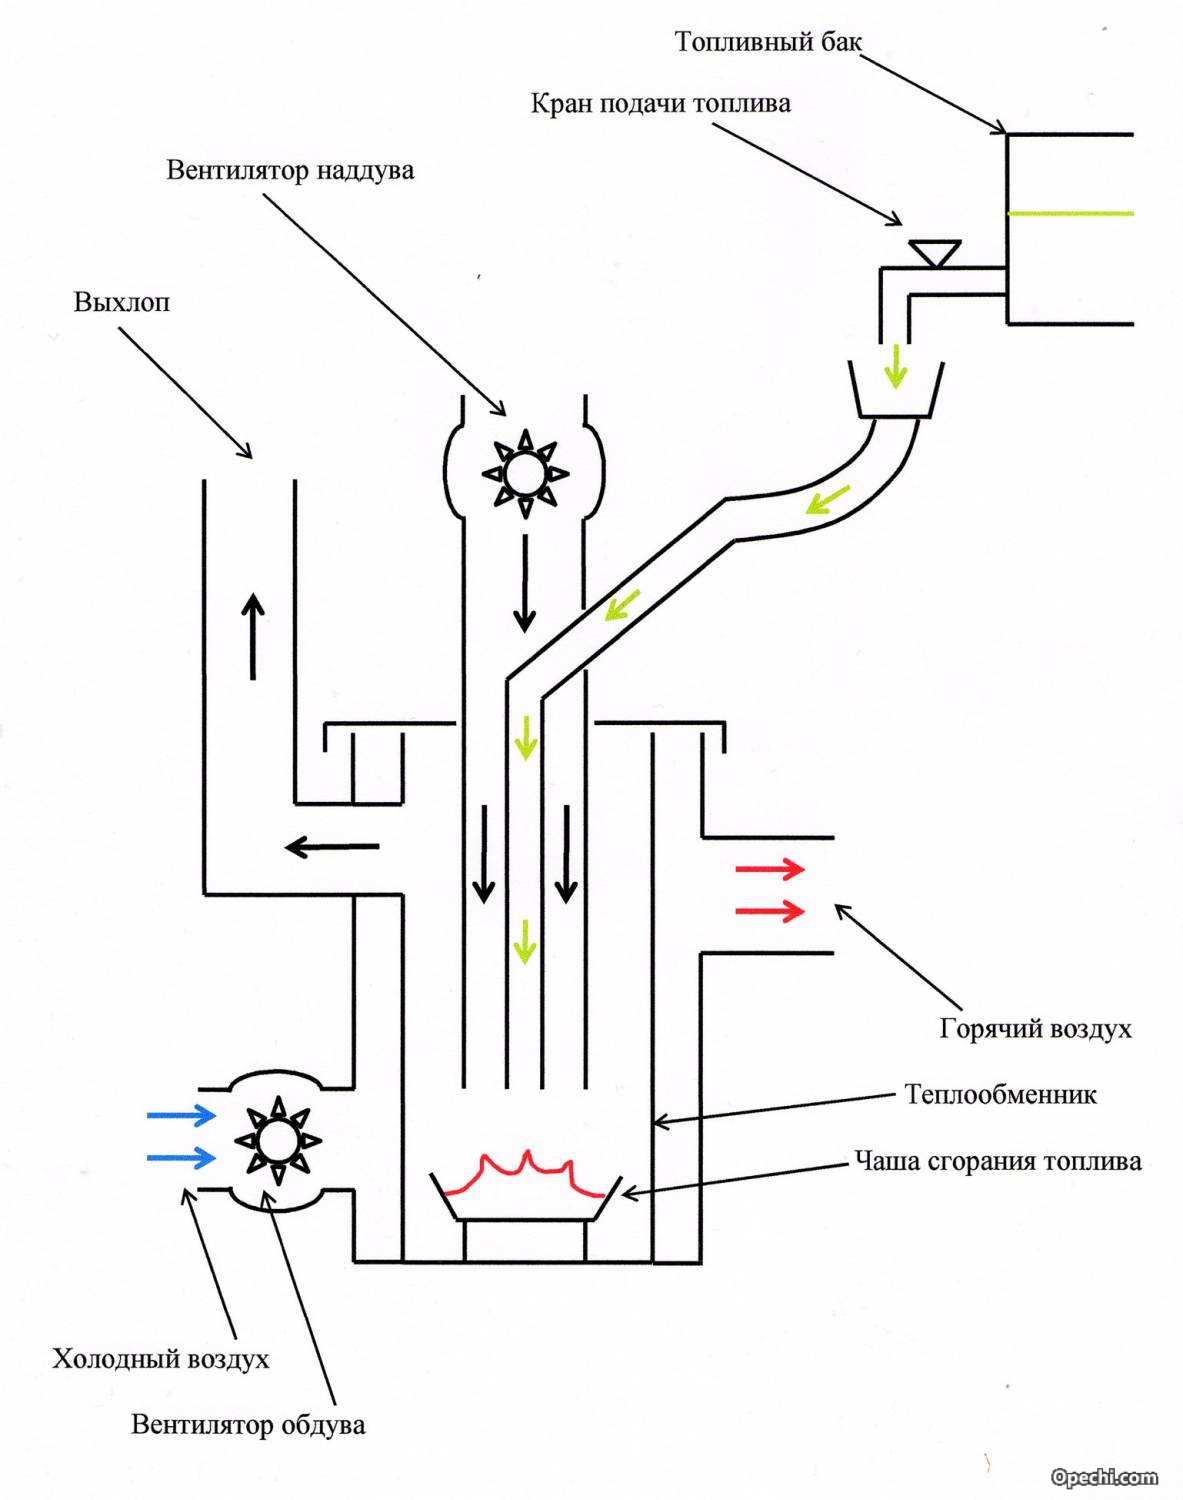
- Pipe. In a conventional stove, the heat literally flies down the chimney, uselessly warming the street. The trick of the “potbelly stove” is that the throughput of the chimney is less than the gas production capacity of the stove. Therefore, the heated gas, before “squeezing” into the chimney, circulates inside the stove, giving off heat to the walls, and enters the street fairly cooled. To achieve this effect, the diameter of the chimney pipe (in mm) must be 2.7 times larger than the volume of the firebox in liters.
- Screen. Simply circulating heated gas is ineffective; the gas cools quickly and does not burn out. In addition, the fuel should not burn, but smolder, so there should be a high temperature inside the stove. For this purpose it is used metal screen on three sides: sides and back. The screen is 50-70 mm away from the oven walls. It reflects most of the IR radiation back into the firebox. Due to this, the temperature inside the firebox increases, which allows the stove to operate in pyrolysis or smoldering mode, and the temperature of the stove walls decreases, which reduces the likelihood of a burn or fire. In addition, the screen performs another function. When you first light a stove, a lot of heat is released at the beginning of combustion, which can simply fly out into the chimney. The cavity that forms between the screen and the walls of the stove retains heated air, the heat from which goes into the room due to convection.
- Chimney. The combustion of gases during convection inside the furnace is not complete, and the gas enters the chimney not completely cooled. So a properly constructed chimney can further increase the efficiency of a potbelly stove. First comes the vertical part, 1-1.2 m high, covered with thermal insulation. Then comes the horizontal or slightly inclined part (hog), at least 2.5 m long, and preferably 4.5 m. A correctly made hog gives off at least a quarter of the heat from ovens.
Safety regulations:
- It is necessary to make a bedding under the potbelly stove; the stove is installed on a sheet of metal with a distance of 350-600 mm along the contour of the stove. Under the sheet there is thermal insulation: asbestos sheet, basalt or kaolin cardboard of at least 6 mm thickness.
- The hog must be at least 1.2 m away from walls covered with non-heat-resistant plaster. From wooden walls– not less than 1.5. The distance from the floor is preferably at least 2.2 m. If this is not possible, the hog is covered with a screen made of metal mesh.
More complex options for making a potbelly stove with your own hands
From the very beginning, the stove was designed exclusively for dry wood or peat. Then minor modifications were made to it to adapt it to other types of fuel: a grate and horizontal partitions were added to form smoke channels.

Heating and cooking potbelly stove. The point is that due to the design, on the left bend the gas pressure is always less than atmospheric, so carbon monoxide will not get from the burner into the apartment. If you additionally extend the stove pipe to a distance of at least 1.5 m above the ridge of the roof (and equip it with a “mushroom”), you can safely add a second burner.
Multi-mode slow burning potbelly stove with Loginov air regulator. The slow burning mode is ensured by air supply from above, so that the smoldering fuel itself sucks in as much as needed. The grate is not solid, but a set of separate cast-iron grates (they can be mounted or dismantled through the firebox door), attached to steel corners or pieces of reinforcing bars welded to the walls. The blower is round, with a M60x1 pipe attached to screws or rivets.
This oven can operate in three modes:
- The vent is completely open - the potbelly stove is heated with solid fuel: firewood, coal, peat, pellets.
- The Loginov choke is screwed onto the ash pan, the grate is removed - the potbelly stove operates in a slow burning mode using waste fuel: sawdust, wood chips, waste paper, etc.
- The grate is installed, the gasifier outlet pipe is built into the ashpit - the potbelly stove runs on waste, dark heating oil.
There is one more trick to increase the efficiency of a potbelly stove. During development, these stoves were designed to heat a large room with infrared radiation. Modern apartments less, and the stove wastes time overheating the walls. To avoid this, you can surround the potbelly stove with a U-shaped hot water boiler instead of a screen. This will not affect the operating mode of the furnace, the walls of the boiler will reflect IR radiation no worse than the screen, plus you will have a tank with hot water for technical needs. In the conditions of a dacha or a garage - just a godsend. A potbelly stove for a wood-burning cottage, also with a water heating function - this is the most convenient and economical option of all possible.
How to heat a potbelly stove?
For getting maximum efficiency it is necessary to put in enough fuel to create circulation in the furnace.
To determine the required amount of fuel, do the following:
- We are preparing a bucket of fuel.
- We put a minimum amount of fuel into the stove, just for kindling, and light it.
- We add fuel to the stove until the beginning of the hog glows cherry color.
- Let's see how much fuel you took from the bucket - this is the minimum volume of the bookmark.
- We add a little more until 1/5-1/6 of the far part of the hog remains dark.
- Let's see how much they took - this is the maximum volume of the bookmark.
There are no similar articles.
Compact heating stove small room, popularly known simply as a potbelly stove, will soon celebrate its 100th anniversary. Having appeared in the 1920s, such metal stoves with a chimney became simply indispensable during the Great Patriotic War. Patriotic War. The potbelly stove has not given up its position to this day, remaining a necessary attribute of a garage, greenhouse or country house. Such a stove is needed wherever people need to warm up and cook food, despite the lack of central heating.
A potbelly stove has its advantages and disadvantages. The undoubted advantages of such a heating device include:
- energy independence and autonomy;
- cheap fuel in the form of coal, firewood, sawdust, wood chips, peat, waste technical oil, diesel fuel, paint and varnish waste, etc.;
- fast heating;
- small dimensions;
- installation without foundation;
- no capital required;
- ease of operation;
- low financial costs if you make your own stove.
However, the potbelly stove also has disadvantages:
- required good ventilation in room;
- high fuel consumption;
- the need for constant monitoring of fuel levels;
- rapid cooling (however, this drawback can be corrected - to increase the efficiency, the stove can be lined with bricks).
Note: If you feel the need for such a device, then you have two options - buy a metal stove industrial production or make it yourself.
First, let's talk about purchased potbelly stoves, the cost of which starts from about 4,000 rubles (for example, the Ugolek stove) and rising to 40,000 rubles and above (this cost is typical for potbelly fireplaces with beautiful names"Bavaria", "Baron", etc.).
With heat exchanger 
In the middle of this price range fall, for example, potbelly stoves with a water heating circuit and a heat exchanger, an army cast-iron stove, and a long-burning potbelly stove of the Klondike type.
The materials for stoves and potbelly fireplaces manufactured in workshops are usually stainless steel and cast iron. The standard drawing assumes the presence of a bunker with a firebox door, an ash pan, and a chimney pipe. However, it happens that a potbelly stove is equipped with a hob, burners and even an oven. The enterprises also make heater stoves, as well as potbelly stove fireplaces, in which increasing efficiency A ceramic or steel casing is installed, which significantly increases heat transfer. If you wish, you can buy a fireplace-stove for your home or just a stove with a gas generator.
Homemade potbelly stove
It’s not difficult to make a potbelly stove with your own hands, even without a drawing. Available materials are suitable for the work, be it a gas cylinder, a milk can, a barrel, a piece of pipe or sheet iron lying around in the garage. Having decided what you can put into action, choose a drawing of a rectangular or round section combustion chambers.
For example, you need to do the heating yourself country house and you have an unused milk can (for arranging the stove itself), a bent piece of pipe (for creating a chimney) and a piece of metal fittings with a diameter of at least 6 mm (for the grate). To make a stove out of all this, you just need to be familiar with the tools, as well as use a little ingenuity.

The can is installed on its side - this is the basis of our home-made potbelly stove, its combustion chamber. A rectangular blower is cut out under the neck, the edges are processed with a file. The blower can be left in this form, or you can attach a damper to it, resulting in an output stove with adjustable draft.
In the upper part of the bottom of the can you need to make the markings yourself for the chimney (it should be 2-3 mm less than the diameter of the pipe). We cut out a hole and tightly push a piece of pipe adapted for the chimney into it. Half the work is done.
Next we deal with the insides of the potbelly stove. With our own hands we make a grate in the form of a “snake” from a metal rod. We insert the rod into the neck of the can and position it so that the grate stands horizontally in the future combustion chamber. That's all! If desired, you can place the resulting stove on an iron pallet and a rack of bricks. This will help avoid heating the floor and also reduce the likelihood of a fire to a minimum.
Note that a similar algorithm of actions can also be applied if you want to have a potbelly stove from a barrel. Long burning Such stoves cannot boast, but they cope well with the function of quickly heating the room.
Second life of a gas cylinder
Good idea for small stove- reuse containers that can withstand high heat. We have already talked about barrels, but how do you like, for example, a potbelly stove made from a gas cylinder or even two? These containers are good because they allow you to make your own stove for a country house or garage, both vertically and horizontally.
To create such a potbelly stove you will need the following tools:
- welding machine;
- grinding machine with wheels;
- drill with drills;
- brush with metal bristles;
- tape measure and construction pencil for marking;
- hammer, chisel, pliers.
The materials you need to make your own stove are:
- 1 or 2 gas cylinders;
- Metal sheet for the ash pan and hob (thickness must be at least 3 mm);
- cast iron doors (old ones, for example, from wood stove, or made with your own hands from sheet metal);
- chimney pipe;
- thick metal fittings for making legs and grate.
Before starting work on a gas cylinder, open the valve and leave it in this state for at least 12 hours to ventilate the container. Another way to clean a bottle is to fill it to the top with water and then empty it completely.
For a vertical stove-stove, the gas cylinder is placed in its standard position, the neck is emptied and markings are made for the future firebox and vent. The marked pieces are cut out with a grinder. The grate is made separately - for this, fittings cut to the required dimensions are welded in the places marked at the bottom of the cylinder.
Hinges are welded to the cylinder on which the doors are hung. Next, latches are installed, which are designed to protect and increase the efficiency of the potbelly stove. A smoke exhaust pipe is welded on top or on the side of the cylinder.
For a horizontal potbelly stove-stove, the cylinder is installed on the “legs” sideways. It's cut out square hole for the door and round for the chimney pipe. Instead of a grate, a series of holes are drilled at the bottom, and a rectangular container for collecting ash is welded below the cylinder. The stove is almost ready, all that remains is to hang the door with your own hands and install the chimney.
If desired, the set of vertical and horizontal stoves made from gas cylinders can be expanded by hob made from a sheet of metal attached on top.
Free fuel
Note: If you want to minimize the cost of fuel for your potbelly stove, consider making homemade design for heating using automobile oil drained from the car.
The potbelly stove is especially good for garage owners. Its design drawing includes two tanks connected by a pipe, as well as a chimney.
To create a stove for mining you will need the following materials:
- Metal 4 mm thick for a potbelly stove.
- Metal 6 mm thick for the top tank cover.
- Metal rods for the legs of the stove (3-4 pieces of suitable thickness).
- Pipe made of heat-resistant material for connecting tanks (diameter at least 100 mm, length about 400 mm).
- Chimney pipe (length at least 4 m).
Work on the formation of a potbelly stove during mining is carried out in the following order:
- Legs are welded to the lower tank.
- A lid with holes made for oil and air is welded onto the top of this tank.
- At least 50 holes with a diameter of 9 mm are made on the connecting tube.
- Weld the tube to the lid of the lower tank.
- A second tank with a filling neck and a chimney pipe is welded on top.
Using this potbelly stove is easy. Oil is poured into a cold device through the filler neck almost to the top, not reaching the reservoir cap by just a few centimeters. Kindling material in the form of rags or newsprint is also placed there. All you have to do is set it on fire, and soon you will enjoy the warmth.
As a rule, such stoves “consume” from 700 to 2000 ml of waste oil per hour. Potbelly stoves during mining allow you to boil water and cook simple food. However, their operation requires mandatory presence there is good ventilation in the room to remove carbon monoxide, as well as compliance with the rules fire safety(you cannot place flammable materials near the stove, use flammable materials such as gasoline, acetone, etc.). The waste tank must be protected from water. Refilling with oil is carried out only after the stove has completely cooled down.
Sheet metal
How to make a potbelly stove from metal? This project can be completed yourself if you have experience in welding and necessary tool. The following materials will be needed:
- sheet metal (its quantity determines the size of the stove);
- steel corners 5 mm thick;
- metal tube about 30 cm long;
- pipe with a diameter of 180 mm.
To obtain a potbelly stove-stove, you need to weld a rectangle of metal sheets joined end-to-end (without a lid yet). On one side, place the ash pan and the firebox door. Inner space The stove is divided into smoke circulation, firebox and ash pan.

In the last two compartments, a grate is installed that will hold solid fuel. To do this, steel corners are welded inside the potbelly stove on the sides at a height of up to 15 cm. A pre-welded grate is placed on them (it can be made from steel strips welded to thick metal rods at a distance of about 5 cm). It is better to make the grate removable, so that later, when it burns out, you can easily replace it. In addition, the removable grille design makes cleaning the heating device easier.
Let's return to the construction of the stove. To increase the efficiency of the potbelly stove, you can make fastenings for a removable reflector (a metal sheet with a thickness of at least 12 mm), which will separate the firebox and smoke circulation. To do this, two metal rods are welded on top. After installing the reflector, you should have a smoke channel.
Having arranged the insides of the potbelly stove, you can weld the top metal sheet, which will become the lid of the structure. A hole is made in advance to secure the chimney pipe. Next, the stove is equipped with jumpers that delimit the doors made for the ash pan, reflector and grate. As a rule, a small door is installed under the ash pan, but two steel doors are made to fit the full width of the stove, so that it is convenient to remove the reflector and grill.
The next stage is welding the latches and legs to the structure (metal tubes with a diameter of up to 3 cm and a length of 10 cm are suitable for them), as well as chimney pipes from a curved pipe with a diameter of about 18 cm (note that the chimney is placed on a 20-centimeter sleeve ). The sheet metal potbelly stove is ready.
Warm brick
A potbelly stove using wood, coal and other types of fuel can significantly increase its efficiency. To do this, it is enough to build a screen of baked clay bricks around it with your own hands. If you look carefully at the drawings of such a mini-building, you will see that the bricks are laid at a short distance from the walls of the stove (about 10-15 cm), and, if desired, around the chimney.

Bricks require a foundation. Do you want the masonry to last a long time? Then fill the base one at a time to form a monolith. It is better to take concrete as the material for the foundation, which should be reinforced with your own hands. steel reinforcement. It is advisable to place the reinforcement layer at a distance of approximately 5 cm from the surface of the concrete pad.
Ventilation holes are made at the bottom and top of the brickwork, which will ensure air movement (heated masses will go up, cold air flows will come from below). Ventilation also prolongs the life of the metal walls of the potbelly stove, delaying the moment of their burning due to cooling by circulating air.
Bricks laid around the stove accumulate heat and then release it for a long time, warming the air in the room even after the stove goes out. In addition, brickwork additionally protects objects surrounding the stove from fire.
If desired, you can completely lay out the stove from brick. Such a structure is advantageous in that it will last long years without additional effort on the part of the owner. However, there are also certain disadvantages. The disadvantages of this option include the following:
- the process of laying out such a stove is quite labor-intensive and is suitable only for those people who have experience in masonry with their own hands;
- a brick stove is quite expensive, as it requires the use of fireproof materials, including special clay for mortar.
In order to get a small potbelly stove with wood, it is enough to lay out a cone measuring 2 by 2.5 bricks, 9 bricks high. In the combustion chamber, rows 2-4 are laid out of fireclay bricks. An ordinary fired clay brick is suitable for a chimney, into which you must remember to insert a stainless steel sleeve.
Whatever the method of making a miniature stove or potbelly fireplace with your own hands, whether you make them according to a drawing or by eye, the main thing is that at the end you get an effective heating device, and in an extended configuration also hob for cooking food. Look around for suitable materials(barrels, sheet iron etc.) and forward to your own homemade stove or even a potbelly fireplace!
Heating problem outbuildings, like sheds or garages, is not as easy to solve as it seems. After all, main gas is not always available, and using electrical appliances for such purposes is not a cheap pleasure. One of the options that has proven itself well in practice is a potbelly stove. Despite the not very high efficiency, this device has become widespread.
- Easy to use, no complex skills required.
- Undemanding to the fuel used, which can be used as firewood, coal and even peat.
- Sufficiently high fire safety is ensured by a properly manufactured and installed stove.
- The ability to make such a device yourself, if you have everything at hand necessary materials and tools.
All this can be attributed to the advantages of a potbelly stove. And since it is not always possible to purchase such a stove, many are looking for information on how to make it with their own hands.
Options self-made There are many potbelly stoves. But not all of them give satisfactory results. Solutions with dubious technical and operational merits include:
- Structures made from ordinary metal barrels. No doubt, such material is quite accessible and cheap. However, the walls of such containers are too thin. They will simply burn out quickly, negating the efforts spent on their production. The resource, in most cases, is enough for one season.
- Household gas cylinders– a slightly more promising material for creating homemade system heating. The strength of their walls is quite sufficient. But the volume is relatively small, so the resulting stove can only heat a small room.
- There is an opinion that cylindrical potbelly stoves are not very good option, because, compared to rectangular structures, they have a smaller surface area and their heat transfer is worse. Proponents of such designs forget that in a cylindrical furnace more favorable conditions to create draft and convection of hot air flows.
It is not for nothing that cylindrical potbelly stoves have become most widespread. We will consider the option of manufacturing such a furnace. But, first of all, it should be noted that the indicated sizes and recommendations should not be adhered to particularly strictly. Don't be afraid and experiment. Ultimately, everything will depend on the materials at hand and the ingenuity of the master.
What you need for work
In order to weld a potbelly stove with your own hands according to the recommended scheme, you will need:
- Welding equipment. Since you will have to work with metal of considerable thickness, a semi-automatic machine will not be able to cope with such a task. It is better to give preference to conventional electrode welding. Gas welding can also cope with the task.
- A grinder, with the help of which you will have to cut the material at your disposal if you do not want to cut it with a welding machine.
- Tools for working with metal - hammers, pliers, pliers, metal brushes and files.
- Welded hot-rolled pipe. The presented option involves using standard pipe outer diameter 426 mm and wall thickness 10 mm. Metal of this thickness will be enough for the finished structure to last a long time.
- Small, about 100 mm long, a piece of standard steel pipe with a diameter of 106 mm and a wall thickness of 5 mm.
- Sheet metal. It is desirable that its thickness be at least 4 mm.
- Steel corner with a shelf width of about 40 mm.
- Grate. You can do without it, but then the efficiency of the furnace will be significantly lower. Moreover, ready-made grate bars are on sale and their price is not too high. The design under consideration involves the installation of two removable grate bars of the PISLA HTT 1D model with an outer size of 135 x 250 mm. They should be removable to make it easier to clean them from dirt. If you do not want to purchase a finished product, you can make a grate yourself from a metal rod of a suitable cross-section. But steel will serve worse than a cast iron grate.
- A pair of fairly strong door hinges.
If you have all this at hand, then you can start. What we would like to get as a result is shown in the drawing.
Sequence of operations
In order to get something like this, first of all, you should cut off a piece of pipe the right size. As already mentioned, it is not at all necessary to adhere to the specified values exactly. The main thing is to try to maintain proportions. Then you need to do in in the right places holes for the firebox and ash pan. After all, you have to put firewood into the firebox, and remove the ash and ash that accumulates there from the ash pit. Next, we proceed in the following order.
- Cut from metal sheet two round blanks, the diameter of which exactly matches the outer diameter of the furnace. This will be its bottom and lid.
- From the same material we make several round pancakes, with an outer diameter corresponding to the inner diameter of the pipe. The resulting blanks should fit inside the future furnace, but without too large gaps - after all, they will have to be welded to the walls.
- In one of the small-diameter blanks we cut a square hole into which the grate bars will be placed. We weld two corners on the sides. They will become holding shelves.
- We cut other blanks from one edge, approximately adhering to the size indicated on the drawing diagram. These will be internal partitions. From them it is necessary to create a kind of labyrinth through which gases heated by fire will move. The design in question provides minimum required- two partitions. There may be more of them, but you cannot overdo it, as cravings may worsen.
- From a piece of pipe used to make the body, we cut out the doors for the ash pit firebox. Their size should be slightly larger than the size of the holes in the furnace wall. In order for the doors to fit better to the surface of the potbelly stove, they will have to be straightened, reducing the curvature.
- In the lid of the future stove we cut a hole for a pipe of smaller diameter, which will become the beginning of the chimney.
When everything is ready, we begin the actual welding, installing the parts as shown in the diagram. You can watch this process in videos, of which there are plenty posted online. It would be correct to start with the details located in depth. Lastly, the lid, bottom and doors along with the hinges are welded.
To make it convenient to open the doors, it is worth making handles using pieces of the existing corner. Fuel will be put into the potbelly stove through the upper hatch, and the lower hatch should be used to remove ash and as a blower, regulating the access of air entering the firebox.
The resulting body should not have any gaps. This can be verified by spilling water on the welds, or by conducting a more thorough flaw detection. We put in the grates, and we can assume that the potbelly stove itself is ready. But there are still a number of things to be done.
Furnace installation
Putting the stove on the floor is not the best best idea. From the corner used to make the support shelves of the grate, you can make legs by welding them to the furnace body, or a support frame. The main thing here is that the stove is as stable as possible.
The important point is the choice right place location of the potbelly stove. To prevent its hot metal walls from causing a fire, the floor and walls near the stove must be insulated with bricks or clay-impregnated felt and covered with sheets of metal. A space of 35–40 cm around the perimeter should be protected. It is recommended to add another ten centimeters on the door side. This will prevent flying sparks from hitting surrounding objects.
Chimney equipment
You should approach the installation of the chimney with great responsibility. First, its vertical part must be at least 1.2 meters high. Then a horizontal branch should extend to the side at an angle of 90 degrees to the vertical. It is sometimes called "hog" or "boar". The length of such a branch should be 2.5 meters or more, since this is where the burning of hot gases and the fuel particles contained in them occurs.
The presence of a “hog” is mandatory, since such a device significantly increases the efficiency of the furnace. Then, to prevent the changing wind from driving the smoke inside the room, you will have to install another vertical section of pipe. The chimney must be kept away from brick or concrete walls at a distance of 1.2 meters. For wooden structures the distance will have to be increased to 1.5 meters. To avoid accidental burns, it is recommended to install additional protection. If you don’t want to punch a hole in the wall, you can put the pipe directly out the window, taking care of its thermal insulation.
Spin off
The resulting stove can work not only as a heating device. It can also serve kitchen stove, because its flat top surface can easily accommodate a kettle of water, a saucepan or a frying pan. This is one of the reasons why it is worth using a vertical rather than a horizontal cylindrical body layout. There are other advantages - with a vertical layout, traction is better and the efficiency of the device is higher.
Freedom of creativity
As mentioned above, the dimensions indicated are not used as a rigid guide, but as an example of maintaining proportions. If desired, the basic dimensions can change for a variety of reasons. This may be affected by:
- The dimensions of the room that is supposed to be heated. In accordance with them, the potbelly stove can be made larger or smaller. After all, it is not at all necessary to place a bulky stove in a cramped room, which occupies a significant part of the space. 0
Potbelly stoves can be a great way to warm up a garage or utility room. However, the metal walls of such stoves quickly heat up and cool down quickly. Craftsmen have figured out how to increase the efficiency of a potbelly stove. We need to improve it. Change the design of the body and chimney, experiment with fuel and additional coolants.
Collapse
Why increase efficiency?
The compact dimensions of the stove mean that the surface that heats up during operation is small. Not much heat flows outside and the room quickly cools down. Sometimes it seems that the return from the potbelly stove is weak.
To help it increase efficiency, several tasks are solved:
- the duration of combustion and smoldering increases;
- a sufficiently high combustion temperature is ensured;
- achieved high level traction.
Standard potbelly stove efficiency
We can talk about the efficiency factor in relation to a potbelly stove in a conditional manner. This parameter is approximately 65-70%.
Methods to increase efficiency
There are several ways to increase the efficiency of a potbelly stove in the garage and stop freezing. They are complex in varying degrees: from a sandbox to an updated design. All of them are produced without serious financial costs, and improvised means are used for their implementation. Let's consider each method for increasing the efficiency of a potbelly stove separately.
Changing the chimney
The efficiency of a potbelly stove is directly affected by the shape of the chimney. To ensure that heat transfer does not suffer, the pipe design must meet certain parameters.
To conserve heat, a damper is embedded into the chimney structure, which regulates the air supply to the combustion chamber. The fire will burn and the fuel will burn faster when the damper is fully open, and if it is closed, the firewood or briquettes will burn more slowly. Smoldering in the firebox is the key to long and uniform heat transfer.
Brick screen around the stove
The brickwork around the device allows you to retain heat and protect yourself and others from contact with hot metal. Properly placed masonry increases heat transfer by about a quarter. When the potbelly stove is heated, brickwork warms up. After the fuel burns, it will continue to share the collected heat. Experts advise laying bricks not close to each other, but 30 centimeters from the walls of the firebox.
To lay out the screen, you will need a couple of dozen heat-resistant bricks:
- the screen is laid out on clay mortar;
- the first row is laid out according to the intended markings;
- in the second row, ventilation gaps are made the size of half a brick;
- the brick is laid out in accordance with a pre-designed shape and size for the opening;
- A steel strip is attached to the last row for additional fixation.

When laying out the screen is completed, remove excess solution damp cloth. After 24 hours, the structure dries out - then defects on the walls, if any, appear, are cleaned out. The cleaned and retouched screen dries within several days. Before use, you should heat the stove a couple of times for 15 minutes.
Improving heat transfer using fuel
Drowning metal stove in different ways: from firewood to sawdust with small debris. To improve heat transfer in a potbelly stove, compressed sawdust, briquetted industrial waste and coal are used.

It is also worth assessing the traction force. This can be done by looking at the color of the flame. If there is not enough air, the flame turns red and dark streaks appear; if there is too much oxygen, the flames become bright white. The draft, and with it the efficiency of the stove, is normal when the flame is golden-orange. For better traction, you can blow the potbelly stove using a conventional fan.
Sandbox
If you have no desire at all to re-equip your stove, add something, or experiment with different types fuel, there is the simplest and most economical method. A box is placed on the potbelly stove, in which two buckets of sand are placed.

Place 2 of these buckets in a box on top of the stove.
Such a box, like brickwork, absorbs energy and warms up the garage when the wood in the firebox burns and the coals go out. Despite its simplicity, the method helps to increase the utility of the potbelly stove.
Redesign of the structure
Steel corners welded on the sides strengthen the device itself and increase the temperature of the furnace. Metal side screens are also screwed on for these purposes.
Craftsmen attach sheets of iron 6 centimeters from the walls of the firebox. This is done so that the heat energy is transferred using convection, due to which air moves between the installed plates and the body of the potbelly stove.

Install protective metal screens
To prevent the heat energy from disappearing so quickly, you can use a metal cassette. It is a cylindrical object welded from a sheet of steel. It is called a cassette because it is inserted into the combustion chamber. A little firewood is loaded into the cassette, turned over and placed in the potbelly stove so that the firewood itself gradually falls onto the heated coals and ignites. While the wood already in the firebox is burning, the remaining wood in the cassette is dried and lights up after the first layers.
Using additional coolant
The stoves are supplemented with water tanks and so-called water jackets in order to use them as an additional coolant and save energy.
The water jacket is designed as follows. A U-shaped tank in which water is heated is mounted in the housing. Two pipes branch off from the tank: for supply and processing. The tank itself is fed by tapping into the pipeline.

Thus, the craftsmen transform the potbelly stove into a device capable of heating air and replacing the heating system small size At the same time.
Conclusion
The efficiency of a potbelly stove increases without the help of specialists and serious financial investments. To make the stove heat up better, we can resort to changing the design, additionally covering it with masonry, or simply change the type of fuel. All these methods differ in complexity, but have one thing in common - they work.
←Previous article Next article →


