Laying bricks in the corners of a building is a very important and responsible process. When building a house, the cutting of corners is entrusted to the most qualified and experienced masons. The strength and evenness of the laid ones directly depends on how smoothly the corners are laid out and how the rows are tied correctly in them. If the masonry of the corners is not strictly vertical, then it will not only look unsightly, but will most likely collapse, pulling the wall with it.
Therefore, you need to carefully check and control all stages of the work, starting from the layout, the quality of the laid material (for corners you need only selected material, without cracks, chips, chips and other defects) and rechecking the vertical every 2-3 laid rows.
Organization of the work area

Quality will be very difficult without proper organization working area. This zone includes the brick house itself, which is being built, and the area within 2.5-3 m from the walls being driven out, on which the necessary tools and materials. If the area is smaller, something will constantly interfere with your work; if you make it larger, then bringing materials will be far away and inconvenient. In both cases, this will significantly affect the pace of construction of a brick house.
The work area is divided into three parts. The first, within 0.5 m, is the space that will be occupied scaffolding. Within these limits there should be no large piles of materials, no buckets of solution, or bulky tools. The second, approximately 1.5 m, zone of materials and tools. The third, 0.5-1 m, is a buffer between the first and second zones, the main task of which is to ensure the free and uninterrupted delivery of materials to the house under construction.

High-quality bricklaying of corners will be impossible if at least one of the necessary tools is not available:
- trowel;
- jointing;
- container for preparing the solution;
- container for supplying mortar to the masonry;
- scouring;
- hammer-pick;
- building level;
- roulette;
- plumb line;
- square
When carrying out work, especially when you have to climb scaffolding, you need to be extremely careful. The slightest carelessness or overconfidence can cause serious injury.
Return to contents
Start of laying the house
Since the brickwork of corners, as part of the walls, always begins with laying the first row on the plinth, before it begins, it is better to beat off the outer boundaries of the walls with a cord. When outlining the boundaries, you must ensure that the intersecting lines form angles of strictly 90º. You also need to align the diagonals with a cord.

When laying a brick house, especially for those who do not have sufficient experience, they should start with a trial layout. Those. simply place the bricks of the first row on the plinth, at a distance of 10 mm from each other, without sitting them on the mortar. This way you will see the whole picture, where and what size inserts need to be made, since even the most experienced and qualified mason will not be able to make masonry using only whole bricks, without inserts of quarters, halves and three-quarters.
Be especially careful when laying corners. The complexity of this construction operation lies in the fact that it is necessary to lay inserts made of quarters and three-quarters. Therefore, in the corners it is better to perform a test layout to a height of 3-4 rows, while experimenting with how best to bandage the vertical seams. And only after fully assessing the situation and remembering the location of the bricks can you get to work.
Before starting work, it is advisable to moisten the base with water. If this is not done, the base will draw moisture from the solution placed on it. The solution itself is placed on the base with a trowel, while making sure that a strip 15-20 mm from the outer edge of the base remains free.
Return to contents
Features of corner forcing

First, two bricks are taken (or a brick and an insert) and placed in the corner, pressed against the mortar. When laid, they should form a right angle. Use the handle of a trowel to lightly tap them, and then fill the gap between them with mortar. Be sure to check the horizontal lines using a level.
Then the masonry is carried out according to the chosen scheme. The thickness of horizontal joints between rows after hardening of the mortar should not exceed 10-15 mm, vertical joints between individual bricks - 6-8 mm. You need to place 3-4 bricks on each side of the corner, making sure to control the evenness of their horizontals and verticals. Then, following the dressing scheme, row 2 is laid on top, then row 3, etc.
We should not forget about aligning the seams. This is done by scraping and jointing while the solution is still soft. The easiest way is to slightly recess the seams into the masonry, for which you just need to run a jointer over them and wipe off the excess mortar from the wall.
The direction of the work does not really matter; do it the way that is most convenient for you. For right-handed people, it is better to build a brick house from right to left, for left-handed people - vice versa. If a team of masons is working, then 5-6 rows are simultaneously driven out in all 4 corners, and then the walls are built up row by row, observing the initial gap (the corners should be 5-6 rows ahead of the wall) until the work is completed.

But you can’t cope with such a volume of work at the same time. Therefore, use the following order: first on the desired height drive out 2 corners, then place 1-2 rows of bricks between them, drive out the 3rd corner and connect it with the same number of rows to 2, then drive out the 4th corner and connect it to 3 and 1 corners. And so continue to work, after each circle raising the brick walls of the house along the entire perimeter by 1-2 rows until the masonry is completed.
When forcing corners, you will inevitably have to make stepped cliffs, the so-called. fines. Partly this will be due to the fact that it will be necessary to use cut-down bricks - inlays, partly - to ensure a more durable connection of corners and walls in the future.
For a future brick house, it is extremely important that the corners are straight and strictly vertical. The angle is checked with a square; the brick should fit tightly against it. The verticality of the corners, especially above 7-8 rows, is controlled using a plumb line, and the horizontal - using a building level. Professionals take measurements every 4-5 rows, but if you do not have enough experience, do not be lazy to take them more often.
Return to contents
Basic brickwork patterns
To give the brickwork strength, its longitudinal, transverse and vertical seams are bandaged. All schemes use not only whole bricks, but also inserts of quarters, halves and three-quarters. To make partial pieces, use a hammer-pick. To make them, it is better to take bricks with defects. Such partial pieces are always laid with the broken edge inside the masonry, so that the whole side always faces outward of the wall.

Image 1. Laying right angles: a - walls of 2 bricks; b - walls of 2.5 bricks.
Longitudinal seams are seams that run horizontally. Their bandaging is necessary to evenly distribute the resulting stress across the entire width of the wall. In addition, the dressing does not allow the brickwork to separate into even thinner layers.
The dressing is performed in rows laid out across the main direction of the masonry. Such rows are called bonded rows and are laid at the rate of 1 bonded row per 4-5 rows of regular masonry, although other options are possible.
Transverse and vertical seams are the seams between bricks inside the masonry. They are bandaged to give brick wall monolithicity. Bandaging of transverse seams is carried out mainly in spoon rows, in which the bricks are laid with the long side along the direction of the masonry with each newly laid row shifted by a quarter or half a brick in relation to the one already laid.
But there are options for building a house made of bricks, in which the ligation of transverse seams is carried out in bonded rows. In practice, transverse sutures are most often ligated using both methods. Vertical seams are not tied separately; if the laying is done correctly, they are tied automatically.
There are three main suture ligation patterns that differ in width: single-row (also known as chain), three-row and multi-row.
Since the corners of a brick house are driven out ahead of the laying of the walls, negligence or an error in performing the chosen method of dressing in the corners almost always leads to the appearance of longitudinal, transverse or vertical - depending on the method of laying and the mistake made - cracks in the wall.
The most characteristic part of the house, from the point of view of architectural decoration, is the corner of the house. In this part of the building you can see all, or almost all, elements of the facade stucco.
Roof overhang decor
The roof overhang is decorated with large or small, complex or simple, single or composite. An additional dividing strip on the facade may run slightly lower, allowing for color zoning of the facade of the house. The corner of the house itself is designed in many ways in order to visually reduce or increase the height of the structure. Rusts, pilasters, combined options- these are the main types of facade decoration of the corner of the house. A separate and most important part of decorating the exterior walls of a house is the façade window decoration.
Window decor
The main task in decorating a window opening is also to equalize the overall proportions of the building through the decor. More detailed and detailed information about window slope design you can see on a separate page of our website. Also very important part façade decor is an interfloor dividing strip. With the help of this decorative element the issue of separation is easily resolved various materials finishing the walls of the facade of the house.
Home wall decor
Also, with the help of interfloor molding, we visually reduce the not always proportional height of the house. And the final piece in the set of façade decorations for the walls of a private house is. This item first of all, it is a logical separator between the basement part of the structure and the main wall. The base profile can also perform technical functions - smoothing out the difference between the protrusions of the wall and the base, drip edge, etc.
Below are some finishing examples. facade decor on the corner of the house. More ready-made options you can see the entire façade design of the house HERE.
1. Example of House Facade Decor
In this example of facade design country house the under-roof cornice consists of two individual elements forming a massive filling.

Decorating the corner of the house
The corners of the house are decorated with rusticated chamfered stones. The rustics at the corner do not join each other, but are mounted each on its own side.
Window decor, slope
The second floor windows are framed with 12 cm wide molding along the wall. The top of the window is complemented by a profile with an angular trim, as well as a keystone. On the first floor windows, in addition to the molding, a decorative window sill profile is used.
Decorative division
In this case, a double interfloor division of the facade was used. One the streak is coming along the line of the window sills of the second floor, and the other along the floor slab of the first and second floors. This technique helps to significantly reduce the visual height of the building. Decorative frames with a thin façade profile are used between the dividing strips.
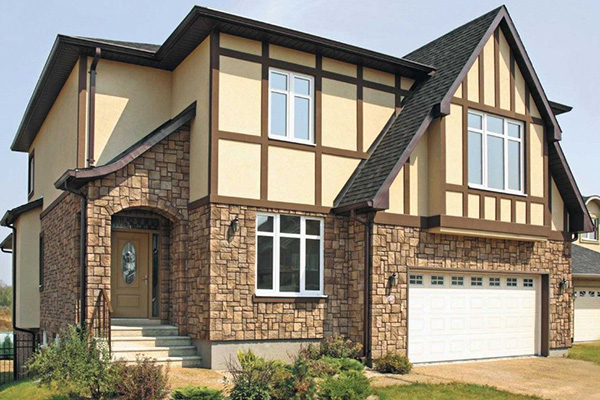
When building a house, the decoration of external walls plays an important role. It not only provides visual appeal, but also protects the house from the influence of bad weather and environment, thus significantly increasing the service life. In this article we will look at options for exterior finishing of walls and corners of the house, and also analyze the option decorative cladding outside corners of the building.
general information
Before you begin processing the external walls of the house, you will need to first install windows and doors, if the building has just been built. If finishing is planned wooden house outside, then it is necessary for it to shrink. Also keep in mind that wall cladding should be carried out after the wood has completely dried.
The work can be carried out almost at any time of the year, so no complications should arise with this. The choice of covering often depends on the material from which the building was constructed. Sometimes simple plastering or painting is enough, but in other cases it will be necessary additional insulation walls
Also keep in mind that some types of finishes can significantly increase the pressure on the foundation, so make sure the building's foundation is strong before using stone or brick.
Types of external wall cladding
Nowadays, there are quite a large number of surface treatment methods. Most often the following are used for external walls:
- wall cladding with natural stone;
- brick covering;
- artificial stone;
- cladding using siding or lining;
- applying plaster to the wall.
Let's take a closer look at each option.
A natural stone
The use of stone for external walls will give the house a strict appearance. This treatment of external walls demonstrates the success and prosperity of the owners of the house. The advantages of stone cladding include:
- strength of the treated facade;
- long service life of the coating;
- attractive appearance.
Also keep in mind that due to its properties, the stone will do an excellent job of protecting the surface from external moisture. Stone can be used both for complete finishing and for partial finishing, for example, for the base or corners of a building. You can choose two types of building stone: processed or untreated. The latter option looks more attractive, but working with it is a little more difficult.
Quite often, granite is used for external walls; this option also has a decorative effect. Marble is also used, which has a wide variety of shades. The price is really quite high, so not everyone can afford this luxury.
Another disadvantage is the large weight of natural building materials. However, there is a stone called travertine, it weighs much less, but has good sound and heat insulation effects. The finishing method using travertine is significantly simplified, and the price is not so high.
Keep in mind that decorating external walls with stone is in any case a rather expensive and difficult task that will require special skills and knowledge from the worker. Therefore, we recommend paying careful attention to other cladding methods.
Fake diamond
Choice artificial material - a good option for processing external walls. He won't even ask for any preliminary preparation. This stone has almost the same characteristics as the real material.
This finishing method allows you to give the building a pleasant appearance and only requires minimum costs. Keep in mind that the texture of such a stone can be either smooth or embossed, so the choice is yours. There is also a fairly large variation of shades, which will allow you to provide your home with unique design.
Siding
Siding has gained quite high popularity in our time due to good price and quality indicators. This covering is mounted with an overlap - this must be taken into account when finishing the wall. Mostly this material is made of vinyl, but there are options made of metal or even foam. This treatment of external walls and corners has the following advantages:

Installation of siding must be carried out on the frame of the house. Quite often, insulation is used during installation. The only drawback This finishing option can be considered a poor combination of siding with other decorative options. Please note that installation must be done extremely carefully to prevent damage to the material.
Clapboard finishing
The lining is made from natural environmental components, so it will not cause any harm to humans. It is made in the form of processed wooden board. The lining will provide the house with an attractive appearance, in addition, it will visually align the outer wall and provide good sound insulation.
However, such finishing for external walls and corners has almost all the disadvantages of wood, so additional treatment with special solutions will be required. Lining is most often made from the following types of wood: oak, pine, spruce, birch, walnut and linden.
Using bricks
Brick will provide good protection external walls and corners of the house from environmental influences. This processing method can be considered one of the most durable options. In addition, brick will provide an elegant appearance and will not require special care. The installation method is also quite simple.
Thanks to the ability to vary the dimensions and shape of the brick, you can create unusual design. Using fired bricks will also achieve impressive results. The main disadvantages of this finish can be considered the heavy weight and high price of the material.
Plaster cladding
Plaster is mainly used when it is necessary to create decorative effect outer wall and provide fire protection. Decorative solutions are different types, silicate mixtures are especially popular.
Acrylic solutions are also often used, which have improved characteristics. Decorative plaster for external walls and corners is available in many options, so the choice will not be easy.
This finishing will protect the building from moisture and fire. Significant disadvantages include the short service life, which will not exceed ten years, as well as the need for additional leveling of the wall, especially the corners, which will require time and effort.
Combined finishing
There are two ways to combine:
The latter method of combination began to be used much more often. These methods will provide interesting interior building and endow it with the properties of each type of cladding.

Finishing the external corners of the house
Corner treatments are often made from the same materials as the wall. Also, when you want to create a decorative effect. For finishing corners the following is used: brick, stone, plaster, polystyrene foam, tile and other materials. Remember that working with corners is quite hard work and sometimes it can be difficult to do without the help of professionals.

Recently, they have begun to be used to decorate the outer corners of a building. special panels made of polystyrene foam, which provide an unusual decorative effect. The same treatment is also suitable for wooden houses. With this cladding, the building acquires the effect of antiquity and becomes like a castle. We recommend watching the following video to see corner processing using polystyrene foam in practice:
Summing up
As you can see, exterior decoration walls of the house is an extremely important activity that provides a decorative effect and allows you to achieve additional protection. There are quite a lot of options, and choosing one of them will be quite difficult. Each of them has its own advantages and disadvantages, which were discussed in detail in the article. If desired, you can choose a combination option, however, it must be taken into account that finishing will be quite difficult, since special skills and knowledge will be required. The choice of method for cladding external walls will depend only on you and your personal tastes and preferences. We recommend watching a special video to learn even more about the methods of finishing the exterior walls of a house and their corners.
June 13, 2017
Specialization: facade finishing, interior decoration, construction of cottages, garages. Experience of an amateur gardener and gardener. We also have experience in repairing cars and motorcycles. Hobbies: playing the guitar and many other things that I don’t have time for :)
How to finish the corners of the walls so that they turn out smooth, durable and beautiful? Previously, I was often interested in this question, but now, having gained experience, I myself will tell you how corners are finished - external corners inside and outside the building. I am sure that this information will help beginners cope with the task.
Finish options
The difficulty of finishing corners lies not only in the fact that they must be even. The fact is that these sections of the walls are often subject to shock loads, so it is necessary to provide them with sufficient strength.
Currently, there are several ways to solve this problem. The choice of method depends on the type of wall decoration, which can be as follows:

Option 1: plastered or plasterboard walls
If the walls are plastered or covered with plasterboard, then special plaster corners are usually used to finish the corners. They come in two types:
- Aluminum perforated. Used for finishing flat areas;

- Arched. Made of plastic. Their main feature is their increased flexibility, which allows them to be used for finishing curved surfaces;

The corners are glued with plaster or putty at the stage of rough finishing of the walls. During their installation, be sure to use a level. This allows you to install them strictly vertically or horizontally.
It must be said that this solution applies both to interior walls, and for facades. But, most importantly, this finishing of the outer corners of the house allows not only to level them, but also to protect them from mechanical damage.
Price:
Please note that all prices are current as of Spring 2017.

Option 2: finished with PVC clapboard
Recently, PVC (polyvinyl chloride) lining, which is simply called plastic panels, has become very popular. Most often this material is used in the following rooms:
- Bathrooms;
- Kitchens;
- Hallways.
If the walls are finished with plastic, the corners can be decorated in the following ways:
- Using profiles. This is the simplest method, the essence of which is to use corner profiles. They are installed on the lathing using a level, just like plaster corners.
As a rule, profiles are fixed to the sheathing using a stapler. Then the panels are simply inserted into special grooves;

- By bending the panels. To bend a plastic panel with your own hands, you need to cut its inner side along the fold line. It is even advisable to cut a thin strip, as shown in the photo diagram above.
Before bending, it is advisable to heat the front side, for example, using a hairdryer.
Price. The price of guides for PVC panels starts from 25-30 rubles per 3 m (standard length).
Option 3: finished with wooden paneling
Not so long ago, when finishing walls with clapboards, the boards for corner joints were cut and adjusted. At the same time, the remaining cracks were filled with putty. Nowadays, you can purchase a special wooden corner to decorate corners.

You can secure it to the lining using window nails. The only thing is that it is advisable to bite off the nail heads so that they are invisible.
It must be said that in this way you can finish not only external, but also internal corner joints.
Price. Price wooden corners on average is about 50 rubles per linear meter.

Option 4: facade finished with siding
Many beginners are interested in how to decorate the corners of the house on the facade? As I said above, for wet facades You can use perforated plaster corners.
If the facade is sheathed with siding or other facade panels, you should use special additional elements, which are usually sold complete with panels.

Such corners perform several functions at once:
- Provide fixation of panels;
- Design the joint of the panels;
- Protect the ends of the panels from mechanical loads;
- Serve as guides for siding.
In fact, installing siding corners is similar to installing guides for PVC lining. They are also mounted on the sheathing, but not with a stapler, but with self-tapping screws. In this case, a level must be used.

Option 5: wooden walls
At first glance, there is no need to decorate the corners of a wooden house from the outside, since they themselves look quite attractive and are quite durable. However, not everyone knows that the ends of lumber are the areas that are least resistant to moisture and rot.
To protect them, special sealants and impregnations are used for the corners of a wooden house.
Price. Below are the most popular formulations and their costs:
You can use compounds for the ends of lumber not only outside, but also inside wooden house inside.

Option 6: wallpapered or finished with liquid materials
Above, I have already talked about the rough method of finishing plastered walls. Finally, let's look at how it's done decorative finishing such walls.
So, there are two most common ways to solve this problem:
- Decorative overlays. Finishing external corners in the apartment implies PVC installation or polyurethane corners.

These products can be made to look like wood or even look like an expensive baguette. The latter are usually made of polyurethane. They look rich and are used in classic interiors;

- Decorative stone. In this case, the corners are covered decorative stone, which can be made of plaster, cement or even natural stone.
It must be said that this method can be used not only for interior walls, but also for the facade.
Installation instructions decorative corners requires removal finishing coating in the area where they adjoin the wall. This is especially true for heavy polyurethane linings.
Price. Below is the cost of some materials for decorating corners:
Conclusion
Now you know what methods and materials are used to decorate the corners of a house outside and inside. Additionally, watch the video in this article. If you have any questions on this topic, you can contact me in the comments.
June 13, 2017If you want to express gratitude, add a clarification or objection, or ask the author something - add a comment or say thank you!

- Be sure to leave in the upper and lower parts of the masonry ventilation gaps so that moisture, which is poorly permeable to the brick, comes out and does not destroy the load-bearing walls due to the steam that forms between the walls.
- Another method of dealing with moisture: every 5 vertical seam in 2 horizontal rows is left unfilled with mortar.
- If several types of brick are used, a dry test row is made for each of them.
- At temperatures below zero, even the most careful cladding work will not provide maximum aesthetics. Only positive for work!
- Before laying, the brick is immersed in water so that it does not absorb water from the mortar and the latter does not dry out prematurely.
- We use a standard solution with Portland cement and lime. For example, this: 1/1/4 (cement, lime dough, sand). The order of adding compounds to the mixture is as follows: water, then lime, cement and finally sand.
- After finishing the cladding, its appearance is brought to perfection using a 10% solution of chlorine acid: the facade is wiped with it to remove frozen splashes of the solution and dust. Attention! The composition is applied after the walls have dried, protecting structures made from other building materials.
- Brick facing wall They are also attached to steel corners, which are screwed with anchor bolts to the foundation.
- The wall is usually placed on a foundation; if it is small, then it is either expanded or an additional one is poured, fastened to the main anchors.
- You can increase the reliability of a wall made of facing bricks by cutting roofing iron, which connects both walls (load-bearing) through 13 rows, horizontally - every meter.
Decorating a house with brick: what can it be?

At decorative masonry there are rules.
So, one of them is alternating spoon and butt rows. In this case, the latter appears every 6 rows in a continuous masonry of this type or alternating.
Multi-row masonry is almost always used. The bricks are placed both horizontally and vertically, on the edge and on the face, at a certain angle. Shaped masonry is made from shaped bricks with oblique and round corners and decorative chips. Relief brick patterns look very impressive. They are often used to distinguish windows and doors, cornices, and pilasters.
Cottage decoration facing bricks - economical solution, as it will allow you to forget about the problems of thermal insulation and decor for decades, and will keep the cottage in its original form.
Construction of a brick house: what technologies provide strength?

The properties of brick are known to everyone. First of all, its strength deserves respect. The strength of the house is enhanced monolithic floors(no cracked surfaces at the joints), which are more convenient to finish, unlike prefabricated ones.
Modern construction material This type is also frost-resistant and not susceptible to fungus and mold. Expensive brick does not efflorescence and looks great. A cottage made of such material, built according to all the rules, - reliable fortress for the whole family. This is a full-fledged residential building with huge benefits in front of apartments and seasonal wooden dachas. You can live here all year round, for many years in a row.
In order to achieve this, builders insulate the facade using the same expanded clay that is used to fill the well masonry, or insulation ( mineral wool): it is attached to load-bearing wall, leave an air gap of 3 cm and lay a facing wall. Besides. External insulation is possible, in which the material is covered with a ventilated facade.
Many masons and craftsmen can build a house from brick. Due to the prevalence of technology, new products that enhance the properties of brick and its new types, building a cottage from this building material is now a matter of several months, not years.
Facing
The most durable and reliable building material for a home, brick, is in demand and is not only used to build houses, but also to clad already completed, long-term buildings.
The facing wall is extended beyond the edge of the foundation by 1/3. Its standard weight, when finishing 100 m², is 40 tons. Therefore, it is necessary to build a house from bricks solid foundation(recessed, made of reinforced concrete, blocks), and under the cladding it is often necessary to strengthen it or pour another one. The foundation will cost 1/3 of the cost of the house (without finishing - the box of the cottage itself). If the plan of the house is such that the first floor is wider than the second and its roof rests on the wall of the 2nd floor, during cladding you will have to remove the roof to give the brick support.
Very reliable technology, which resurrected more than one old house.
We bring to your attention a video on facing a house with brick.