Parquet flooring is one of the most wear-resistant; if properly handled, it will last for decades. But someday the time will come when our beloved parquet floor will require replacement. The question immediately arises: how to remove old parquet with your own hands? In the article we will discuss what features the dismantling of old parquet flooring has.
When it becomes necessary to remove old parquet
 Parquet flooring has many advantages, including maintainability. It can be repaired and restored if necessary: damaged parquet flooring can be removed and new ones installed in their place, the entire floor area can be sanded and varnished. But execute partial or complete renovation parquet in certain cases is impossible, i.e. the coating cannot be repaired:
- The presence of deep cracks or areas with swelling in the planks. The cause of such defects is most often the prolonged exposure of the wooden floor to water. Wood absorbs moisture well; as a result, the coating becomes deformed after drying and swelling forms in the dies. A way out of this situation can be found by performing a partial or complete replacement of the parquet floor.
- The loose state of the parquet material. If the parquet flooring has become loose and darkened, most likely it is affected by mold or mildew. Parquet material affected by fungal microorganisms must be replaced, and after dismantling the parquet floor, it is necessary to thoroughly disinfect the base.
Required Tools
 How to remove old parquet? Of course, parquet removal must be done carefully, without damaging the walls or getting injured during the work. For disassembly you need a certain set of tools:
- chisel;
- hammer;
- mount;
- hatchet;
- A circular saw may be necessary.
The difficulty of dismantling parquet is determined by several factors:
- Type of material: piece parquet, modular or parquet boards. The most labor-intensive disassembly process piece parquet when the dies are glued to the base.
- Method of connecting parquet planks to each other and the base. The easiest way to remove parquet boards is with a system of locking elements. It is much more difficult to disassemble parquet flooring that is attached to the base using nails or glued to it.
- What is the base: chipboard, plywood sheets, boards or cement screed.
The complexity and duration of disassembly work, as well as the cost of the work performed, depend on the above circumstances. This is especially true when dismantling work is carried out by a specialist for a fee.
Carrying out preparatory activities
 Before you begin dismantling the parquet, you should take care of your own means of protection. Bring dust-proof clothing, a pair of gloves, a hat and hard-soled shoes. In addition, there must be a working fire extinguisher in the room where dismantling work is carried out.
As a result of dismantling the old coating, a lot of garbage will accumulate, therefore, it is necessary to prepare special containers and bags to ensure removal of the accumulated garbage.
Actions to remove old parquet begin with preparatory activities in the room:
- The room is completely emptied: of furniture, equipment and all other things.
- Before you start dismantling an old wooden floor, you need to put on clothes, shoes and protective equipment prepared for this work.
- Start dismantling the baseboards.
How to remove parquet
The process of removing old parquet includes several steps:
- dismantling parquet flooring;
- dismantling the old substrate;
- garbage collection;
- preparation of the base.
 Let's consider various options dismantling the old wooden flooring depending on the type of parquet.
How to remove block parquet
- The dies are broken and pulled out in parts, using a chisel and a hammer, because they cannot be removed whole due to the adhesive installation.
- It is not recommended to use a scraping machine when removing parquet flooring to avoid damage to it by nails or screws found in old parquet flooring. Correct dismantling should be done one die at a time, using a hammer, chisel and pry bar.
How to remove panel or modular parquet
- First, find the module that was installed last and has an open slot. The guideline is the principle of laying parquet from the window, therefore, you can find the necessary module in the area of the door.
- After determining its location, all that remains is to pry it and remove it.
- Next, all the elements of the old parquet are raised one by one.
How to remove a parquet board
- Thanks to the locking system, dismantling is much easier.
- If glue is used during installation parquet boards The flooring is disassembled using a chisel and a hammer.
It would be better to entrust the dismantling of the old parquet floor to specialists. Often plywood sheets are laid under the parquet or OSB boards in good condition, reusable. If disassembly is carried out ineptly, they can be easily damaged.
Dismantling or repairing the base
The basis for parquet flooring can be chipboard, plywood sheets, boards. If their condition is unsatisfactory, they should also be dismantled. This is not so difficult to do; just remove the fastening elements (nails, screws), and then remove the backing.
Bitumen is also used as a base for parquet flooring. Dismantling it is much more difficult and takes longer, but it is also doable.
If you need to replace the parquet, but leave the base and do it quality training, you have to go through the following stages sequentially:
- Remove all debris: remnants of the old covering (pieces of parquet, wood chips, nails, etc.).
- Remove dust using a vacuum cleaner.
- Remove dust from the cleaned base using impregnation or primer.
 Dismantling the screed
There is absolutely no need to remove it. As a rule, it must be cleaned and treated with special mixtures. After leveling, the floor is ready for a new covering. There is a dry floor screed - this is a good basis for subsequent installation of any type flooring.
Now you know how to remove old parquet. You can do this yourself, but there will be purchasing costs. necessary tools. Or you can entrust the work to specialists who know how to dismantle old parquet correctly and quickly.
If necessary, obtain Additional information Watch videos about dismantling:
Dismantling block parquet:
Removing old parquet boards:
One of the most important conditions successful implementation repair work, in particular the replacement of flooring, is the preparation of surfaces. Whatever the finishing coating, you need to understand that it must be laid on the most even and durable surface. Installing a new coating on top of the old one is unacceptable, as this will reduce its strength, aesthetic and other properties. performance characteristics, which means you need to know how to remove the old floor, and not only know it, but also do it correctly.
For a professional person in this matter, dismantling any old floor covering is unlikely to cause any difficulties, but those who are faced with the need to carry out this type of work for the first time should familiarize themselves with some rules.
Work rules
The work of dismantling old flooring will vary to some extent depending on the type of flooring. Therefore, for a better understanding of the issue, it is better to divide the description of these works into several separate paragraphs.
First of all, you need to understand that work related to the dismantling of indoor coatings will lead to the formation of dust and dirt, so before starting, you need to prepare the means personal protection. You will need safety glasses or a mask, gloves, a respirator, and garbage and dust bags. In addition, it will not be possible to do without auxiliary tool like a claw hammer, a hammer drill, a screwdriver and a hammer. Then you need to remove the furniture from the room. After the preparation is completed, you can begin the work itself.
If the floor covering was used rolled materials, such as linoleum, carpet and the like, then work should begin with removing the baseboards. This structural element must be cleaned around the entire perimeter of the room. It should be noted that it often happens that the nails with which the plinth is attached rust and their dismantling becomes possible only when the plinth itself is completely destroyed. In this case, the remaining nails must be cut off using a chisel. After removing the baseboard, the coating simply comes off the surface, but you need to know that it is best to start from the corner of the room.

In the case when parquet or laminate is used as a floor covering, the floor should be dismantled depending on what type of installation was chosen. If the coating was installed using a floating method, then first, as in the previous case, the plinth is removed, and then the coating is disassembled into individual elements. In addition, if there is a locking connection, then these elements can be reused.
If the coating is fixed with adhesive, then things are somewhat more complicated. In this case, after removing the plinth, it is necessary to beat each element separately using a hammer drill. To do this, you need to install a special attachment on the hammer drill. If there is no puncher, then you can do the work using a crowbar, prying the element from below and tearing it off.
If a wooden floor on joists was installed in the room, then this covering can be removed quite simply. If the boards were attached to the joists with self-tapping screws, then you just need to unscrew them, and the boards can be easily removed. If nails were used, the boards at the fastening point are pryed off with a crowbar and torn off. If you don’t need to save the boards, then you can do it simpler. Using a jigsaw, the boards are cut across and simply torn off. The logs are also dismantled depending on the method of fastening. If they are attached with anchor bolts, then unscrew them. Or you can simply knock the joists off the base using a sledgehammer.

When we're talking about about dismantling a tiled floor, for example, tiled, you should know that the work ahead will be dusty and quite labor-intensive. The tiles are removed using a hammer drill with an attachment or a hammer and chisel. It is important to note that the main difficulty with this type of work is removing glue residues and leveling the base. For these purposes, you can use the same hammer drill.

It may also happen that under finishing coat a plywood leveling base can be placed. Sheets of this material must also be removed, since a new coating laid on top of the old base may begin to creak after a while. If the plywood is screwed with self-tapping screws, then you just need to unscrew them, and if the plywood is glued to the screed, then it is removed using a hammer drill. It must be remembered that it must be positioned at an acute angle to the surface.

The work of dismantling old flooring is not too complicated from a technological point of view, and it does not matter whether we are talking about removing wooden floors or disassembling a floor made of tiles. It just takes some knowledge and diligence. However, it is important to follow safety rules.
If you have a baseboard:
Wooden painted, nailed to the floor, nail heads are simply recessed into the wood (sometimes sticking out above the surface of the baseboard) and painted (rusty) - 55%.
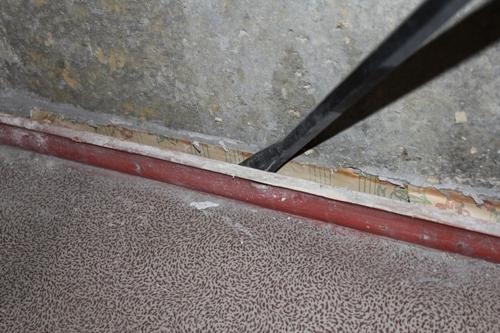
Everything is simple here too. Drive the nail puller (1) with a pointed blade under the baseboard (2) at the place where the baseboard is attached to the floor and tear off the baseboards. According to the above theory, at the point of support of the nail puller on the floorboard, a pressure will arise that is 5 times greater than the effort you apply. Simply put, you will press a hole in the floorboard. To increase the support area of the nail puller by floorboard and thereby reduce the pressure, place plywood or a thin board (4) under the nail puller at the fulcrum point (3):
Figure 1141.1. Inserting a crowbar under the baseboard nailed to the floor.
If the plinth breaks during dismantling or the nails push through the plinth and remain in the floor, or turn out to be so long that the short arm of the nail puller lever is not enough to completely pull out the nail, then at the point of support of the nail puller, additional material is placed on the floorboard wooden block:

Figure 1141.2. Removing the baseboard nailed to the floor.
To avoid breaking the baseboard, start dismantling from the edge. Raise the plinth 1-3 cm from the floorboard at the first fastening point, then on the second nail and on all the others, repeat the manipulations in this order until you remove the plinth. The farther you drive the nail puller under the baseboard from the attachment point, the greater the likelihood of breaking the baseboard.
If you are going to replace the baseboards with new ones or you are unable to remove the nails without damaging the surface of the floorboard, you can use a chisel to remove the layer of wood around the nail head and then pull out the nails by catching them by the heads with a nail puller. In this case, the support point of the nail puller is on the plinth or on a wooden block.
Wooden painted, nailed to the floor, nail heads recessed into the wood, puttied (filled with choppers) and painted - 33%
Typically, skirting boards are fastened at intervals of 50-70 cm, the outer fastenings are 10-20 cm from the wall. If you cannot find the heads of the nails, drive the nail puller with a pointed spatula under the baseboard 10-20 cm from the wall and try to gradually lift the baseboard. This will expose the first nail, and in the place where the baseboard has bent and begins to move away from the floor, there is most likely a second nail. Otherwise, the dismantling technology is the same as in the first case.
Wooden painted, screwed to the floor, screw heads recessed into the wood (sometimes sticking out above the surface) and painted (rusty), closed with plastic plugs - 3%.
Wooden coated with clear or tinted varnish, no nail heads or screws are visible, there are only some knots - 2%
Most likely these are not knots, but wooden plugs; they are usually used for baseboards painted with clear or tinted varnish. They are quite easy to find by their characteristic dark rim or, in extreme cases, by the texture of the wood:

Photo 1141.1. View of a wooden plug on an oak plank
The surface of the plug is a cross section of wood, the surface of the plinth is a longitudinal section of wood. Usually the plugs are drilled out or knocked out with a narrow chisel.
Typically, skirting boards are fastened at intervals of 40-70 cm, and the outer fastenings are 10-20 cm from the wall. If you cannot find the heads of the screws, drive the nail puller with a pointed spatula under the baseboard 10-20 cm from the wall and try to shake the baseboard a little. Usually the putty cracks at the attachment points.
Wooden painted, nailed to the wall - 2%
The dismantling technology is the same as in the first case, only the nail puller blade is driven between the baseboard and the wall:

Figure 1141.3. Removing the plinth nailed to the plug in the wall.
Wooden painted, screwed to the wall - 1%
Just unscrew the screws with a screwdriver.
Wooden finished with fine wood veneer with a latch into mounting brackets - 0.5%
Mounting fastenings for skirting boards come in 2 types: with mounting the skirting board on top and with snapping the skirting board onto the wall. To dismantle such skirting boards, it is better to use a wide spatula. Try to drive the spatula from below and lift the baseboard; if the baseboard does not rise, try to unclip the baseboard by driving the spatula between the baseboard and the wall.
Plastic (paper from MDF), with a latch into mounting brackets - 1%
Plastic, if you look closely, you can see two stripes approximately in the middle - 1%
Such skirting boards with cable duct are increasingly gaining popularity. They have the most reliable fastening. Such skirting boards are screwed on with screws and even nailed with self-tapping screws for quick installation, and the fastening points are covered with a special strip. Theoretically, such skirting boards can be removed and replaced many, many times. To get to the fasteners, a spatula is usually used:
Other options - 1.5%
2. Remove the boards
When laying a wooden floor, the first board is laid with a tenon to the wall (or a quarter up); accordingly, the dismantling of the floor should begin with a board that has a groove for a tenon (or laid with a quarter down) or with a board that is narrower than all the others, and therefore has been cut to width.
If the boards were attached with screws, simply unscrew the screws and remove one board at a time.
If the boards were nailed, then everything is a little more complicated:
When dismantling the first board into the gap between the board and the wall, drive a nail puller between the joist and the board and undermine the board so that the edge of the board rises 1-3 cm. Using a hammer and a piece of plywood, put the board in place, but the plywood should not overlap the nail head . If you did everything correctly, then after you have seated the board in place, the nail head (2 or even 3 heads) will stick out above its surface to a height of 0.5 -1.5 cm. Place a piece of plywood or thin board where the nail puller rests on the floorboard and pull out the nail(s):

Figure 1141.4. Removing the first floorboard.
Repeat the manipulations at the points where the floorboard is attached to the remaining joists. If you do everything carefully, i.e. do not undermine the board higher, then the tenon of the board is usually not damaged and this will allow you to use the removed boards later for laying a new covering. After the nails are pulled out, a crowbar or chisel is carefully driven into the gap between the first and second boards and the first tenon of the first board being removed is pulled out of the groove of the second, still nailed board. Although you can usually push the first board out of the groove of the second board even with your hands. Once the tenon is pulled out of the groove, the first board can be removed. The remaining boards are torn off more easily, since it is more convenient to insert a nail puller. The algorithm of actions is the same.
Note: the tenon of the board being dismantled and the groove of the adjacent board are the weakest points when dismantling the floor completely objective reasons, therefore, the lower the height of the board, the less likely it is that the tenon or the top of the groove on the board will crack. Nevertheless, this cannot be ruled out. Wood is an anisotropic material; knots, rot and other defects may well occur. Therefore, when a board on a tenon or groove cracks (not often, but this has happened to me, one or two boards per room, in my opinion, is a completely acceptable result), I treat this with understanding. If a tenon cracks, there is nothing fatal about it; tenons and grooves in the floorboard are needed not so much to join the boards at the same level, but to more evenly distribute the concentrated load acting on the board. Therefore, the worst thing that can happen in the absence of one or two tenons is the creaking of the boards, and if the distance between the lags is relatively small, then there will be no creaking. Calculation details wooden planks You can look at the deflection. The same can be said about the breakdown of the lower part of the groove. If the top of the groove is cracked or broken off, then the problem becomes more aesthetic than functional. When laying a new covering, the cracked or chipped part can be glued with PVA glue or nailed with small nails. But if the aesthetic requirements are very high, then the board will have to be changed.
If the gap between the wall and the floorboard is very small and does not allow you to pry the board up with a nail puller or there is almost no gap at all, try knocking down the plaster in the place where the joist meets the wall.
If there is no plaster, or the joist is not adjacent to the wall, then you need to cut (drill, knock out with a chisel) a piece of floorboard near the wall so that you can drive a nail puller into the resulting opening, and it is desirable that the resulting opening is subsequently covered with a plinth.
If all else fails, use a hammer and chisel to knock down the layer of wood around the nails and remove the nails with a nail puller. When you put the board in place after the repair, the holes from the chisel can be filled with acrylic sealant, and if you are making a new coating, then there is nothing to worry about at all.
From the author: We welcome our readers! Today we will talk about how to dismantle a wooden floor with your own hands, spending very little time and effort. It’s good if you can involve at least one assistant in the process, then the work will go faster.
Wood flooring is rightfully considered the safest, environmentally friendly and durable. At correct installation and with careful care they last for more than 50 years. But time does its job, and a moment comes when there is nothing left but to ruthlessly remove the old floor.
Sometimes partial replacement of boards is required, but most often the floor covering must be completely removed. In some cases, after removing the boards from the floor, you can find a lot of defects underneath them, left by the first builders of the entire building.
The following lead to the unsuitability of the floor:
- increased humidity in the room;
- activity of insect pests, exposure to fungi;
- significant mechanical damage;
- low quality material;
- wear and tear due to long service life.
What needs to be considered before starting work? All points of the upcoming event need to be carefully considered, you can even write it down on paper, as this will allow you to estimate the approximate volume, cost and time spent on completing all its stages.
The results of calculations can be influenced by the most various factors(area of the room, type of wood covering, availability concrete base under it, the need to use special equipment), so they are individual for each case.
Planning the workflow
It is important to remember that removing old flooring is a noisy undertaking; this point should be taken into account and the time of work should be planned so as to cause a minimum of disturbance to family members and neighbors.
In advance, you need to prepare a place for collecting future construction waste, containers for it and transport for transportation. To protect yourself from large amounts of dust, which is inevitable when carrying out this type of work, we recommend wearing work clothes, a respirator, construction gloves and a hat.

The next step will be to prepare the tools necessary for removing boards in the apartment and house:
- sledgehammer or assembly hammer;
- nail puller;
- jigsaw or saw for cutting long boards;
- screwdrivers, pliers and pliers;
- chisels;
- hatchet or crowbar.
This is a minimum set of tools, which may vary depending on the type of wooden flooring.

Important! Immediately before removing it, you can cover the doorway with a large piece of damp cloth, and place mats moistened with water near the threshold. This technique will help prevent the spread of dust to other rooms.
Work stages
So, all preparatory measures have been completed, it’s time to take action. The procedure for removing old floorboards in an apartment or house is as follows:
- Removing skirting boards. It is recommended to carry it out using a nail puller, starting from the corner of the room. If the old baseboard is covered with several layers of paint, you must first determine the place where it can be easily lifted with a flat screwdriver, and then use a nail puller. If its stroke is not enough to remove long nails, place a wooden block under it. It is easier when screws were used to fasten the baseboard, since they are quite easy to unscrew with a screwdriver.
- The next step is to remove the entire floor surface. Usually it is laid from a board with the tenon facing the wall, so dismantling begins in the opposite direction. If the floorboards are planned to be reused in the same room, they must first be numbered so that they can subsequently be laid in the correct order. When the flooring is fixed with screws, the work will consist of unscrewing the fasteners and sequentially removing each board. If the floorboards are fixed with nails, the following sequence of actions is observed:
- the side of the floor where the last floorboard is fixed is determined;
- a nail puller is driven under the board using a hammer;
- the floorboard is raised 1–3 centimeters from the joist;
- then the board must be pressed firmly against the base of the floor again, with the heads of the nails protruding above the surface. If necessary, the floorboard is raised and lowered several times;
- A block is placed under the nail puller, after which the nails are carefully removed. This way, the floorboards will remain undamaged and can be used for laying a new floor or for other construction work;
- After this, use a chisel to widen the gap between the boards. If the previous steps are completed correctly, the tenon of the floorboard freed from nails will easily come out of the groove with an arc that is still secured;
- If a board tenon or groove is accidentally damaged, this trouble can be eliminated using glue or small nails. The floorboard will look a little worse, but its functionality will be restored;
- A nail puller is also used to remove lags.
Important! Even if you do not plan to reuse the removed boards, the work must be carried out carefully so as not to damage the base of the floor itself and to avoid difficulties when installing a new floor covering. If it is necessary to dispose of floorboards, it is better to cut them into small pieces, which will be conveniently placed in containers, taken out of the room and transported. You should not roughly break the boards, since sharp fragments can seriously injure you, and it is much more difficult to free the room from them.
If you have carefully read this material, you now clearly understand the procedure for dismantling work and know the features of this process.

Subscribe to our groups on social networks - because there are still a lot of interesting and useful articles on the topic of repairs. Share links to information with friends so that they can solve their construction issues on their own. We'll see you again soon, bye everyone!
Quite often, when carrying out renovations, it becomes necessary to dismantle the old floor. The reasons may be complete replacement coatings, reconstruction of individual components of laminate or parquet.
The article describes how to remove a wooden floor without resorting to the services of third-party specialists, what tools to use when self-dismantling. In addition, here are some methods for repairing flooring without removing wood floorboards.
The need to dismantle a wooden floor
Wooden flooring is considered the safest, environmentally friendly flooring. Subject to installation technology and correct operation such a floor will last more than 50 years. However, over time, the boards may become unusable and need to be partially or completely replaced.

The main reasons for dismantling old floors:
- wear and tear of the flooring;
- increased humidity in the room - it is better to replace the wooden floor with a waterproof coating (tiles, linoleum);
- damage to the floor by fungi and insects;
- cracks in wooden boards, creaking, etc.
Advice. Planning major renovation, it is better to get rid of the old wooden floor. Of course, such work is very labor-intensive and dusty, but it is completely justified. The new coating will “lay down” smoothly and stop squeaking.
Before you begin dismantling work, you must carefully inspect the floor. Extra furniture take it out of the room, remove accumulated dirt. Special attention Pay attention to the uniformity of the floor strip and the degree of its wear. If the coating is not deformed, then it is enough to redecorating. Sometimes, a wooden floor is re-laid by turning the existing boards inside out.

There are often situations when repairs are required for a separate area (corridor, passage part of the room). In this case, the damaged boards are removed and replaced with new ones.
Advice. Rotten floorboards can be identified by tapping the floor with a hammer. Boards that produce a dull sound must be replaced. If most of the floorboards require updating, then the old floor will need to be completely dismantled.
What to consider when removing wood flooring
Dismantling old wooden floors has some features:

How to dismantle a wooden floor: work order
Preparing tools
To dismantle parquet or other wooden coverings, you may need the following tools:
- nail puller;
- sledgehammer or assembly hammer;
- pliers, screwdriver and pliers;
- saw or jigsaw for cutting long boards.
Note that for dismantling concrete screed Under a wooden floor, you will additionally need a hammer drill and a chisel.
Removing the baseboard
It is customary to begin dismantling the floor in an apartment or private house with the removal of wooden or plastic skirting board. Sequencing:
- Remove furniture from the premises, remove structures located on the floor, work surface wipe damp cloth- this will reduce the amount of dust raised during dismantling work.
- Start removing from the corner of the room, otherwise the baseboard will begin to strain and break. Insert the sharp end of a nail puller between the floor and the baseboard. Make an effort to pull the first nail halfway out of the baseboard.
- Do the same with subsequent nails.
- Go back to the first nail and pull it out completely.
It is much easier to remove a plinth secured with screws - you just need to unscrew them. Painted baseboards, on the contrary, are more difficult to dismantle. To remove them, you need to drive a piece of wood under the fulcrum point of the nail puller. If the nails are very long and the stroke of the nail puller is not enough, then you need to place a block.
Usually the baseboards are nailed and painted with 2-3 layers of paint. In these cases, most likely, the fasteners are located at a distance of 50-70 cm. When removing the nails, the nail puller must be slightly shaken to knock down the shackle - this makes it easier to remove the baseboard without damage.
The procedure for removing skirting boards fixed to the wall is the same as for floor ones.
Removing the entire floor
After removing the baseboard around the perimeter of the room, you can proceed directly to dismantling the wooden boards. Considering that laying the floor begins with a floorboard facing the wall with a tenon, removal is carried out in the opposite direction - this will preserve the integrity wooden material and use it in other repair work.
If the floor is fastened with screws, then all the fasteners are unscrewed and the boards are removed sequentially. In cases where the floorboards are supported by nails, you must act in the following sequence:
1. Determine the side of the floor where the last board is laid.
2. Drive a nail puller under the board with a hammer or hand.
3. Raise the floorboard 1-3 cm from the joists. 
4. Press the board so that the floorboard lies back. As a result of the work done, the nail heads will remain protruding above the floor surface. If it doesn’t work the first time, then the board must be raised and lowered again.
5. Place a board under the nail puller and remove the nails with a nail puller. The added board will protect the floorboard from being pressed through.
Important! To avoid damaging the floorboard, lift the floorboard from the joists no higher than 3 cm.
To remove the end board, you need to remove all the nails in the manner described. Then gradually use a chisel to widen the gap between the floorboards.
During dismantling, there is a possibility of damage to the groove and tenon of the board. This can happen when the nail puller is pressed hard or due to the poor condition of the wood itself (presence of cracks, rot, etc.). The broken off upper part of the groove can be restored using glue or nailed with a small nail. Appearance the boards will deteriorate somewhat, but functionality will not suffer.

During dismantling and construction work, certain difficulties may arise, for example, the tight fit of wooden boards to the wall. If the nail puller is difficult to fit into the gap, you will have to hammer it in with a hammer. With this removal there is a risk of damaging the plaster. Sometimes you have to resort to using a drill to remove part of the floorboard. It will be possible to drive a nail puller into the resulting space.
Removing lags
It is better to entrust the dismantling of joists and concrete screed to specialists. Removing the subfloor is a rather complicated undertaking that requires special technical means.
At independent execution dismantling proceed in the following order:
- Typically, logs are installed on substrates, between which there is insulation. Thermal insulation material pull out. When removing glass wool, personal protective equipment must be used.
- Whether to pry the logs with a crowbar or break them depends on the wear of the wooden elements.
- After removing the joists, it may be necessary to dismantle the concrete screed and pour a new base.

It is necessary to assess the condition of the lag. If the logs are rotten, they will have to be thrown away. In place of the old ones, new, well-dried wooden ones must be installed. It is important to choose dried logs that will not shrink during use and the floor will not warp.
If the old logs look more or less tolerable, then the wooden floor can simply be strengthened by installing additional new logs between the old elements.
Advice. To extend the service life of the logs, they must be impregnated with drying oil and painted. This will protect wooden elements from moisture, fungi, mold and other microorganisms.
Removing the old screed
To remove floor screed you will need a jackhammer, a hammer drill or the use of diamond cutting wheels. At home, where you have to work on a small scale, you can arm yourself with a hammer, chisel and sledgehammer.
The dismantling process becomes significantly more complicated large areas, where the screed is equipped with reinforcement. Delete metal mesh It is difficult to make from cement with a chisel and hammer. A diamond wheel will do a better job with this job.

The screed must first be crushed, after which it can be easily removed from the surface. The remaining concrete is placed in bags and removed from the premises. If the garbage is not planned to be removed immediately, then the bags should be placed under cover - if it gets wet in the rain, the concrete will become heavier and the loading process will become significantly more complicated.
Dismantling a concrete screed is a very dusty and noisy process. Such work should be carried out in daytime, coordinating actions with neighbors. In addition, it is necessary to follow safety rules and wear a respirator so that the smallest particles of construction debris do not enter the respiratory system.
Wooden floor repair: removing squeaks
Very often, it is the appearance of squeaking that is the reason for dismantling the wooden floor and pouring concrete on the base. However, there is no need to rush - this problem can be solved in one of the following ways.
First method. In the creaking floorboard above the beam, drill a hole with a diameter of 12-16 mm and fill it with cement diluted with water in a ratio of 1:1. After 2 days, drive a wooden pin soaked in glue into the hole until it reaches the floor panel. After complete drying, this area should be plastered, patched, varnished or painted.

Second method. Drill a hole at an angle of 45° with a thickness of 6-8 mm between the creaking boards. Drive a wooden pin coated with wood glue into the hole. Cut off the protruding part of the glazing bead with a chisel, and the area to be repaired is puttied.
Third method. IN apartment buildings With central heating, creaking is often caused by excessive dryness. This drawback can be eliminated using lubricant. Ordinary talc is launched into the cracks through a rubber pharmaceutical bulb. You must act carefully so as not to spill talc onto the surface of the floorboards, otherwise after wet cleaning There will be white streaks on the floor. After finishing the cracks, fill them with putty.