The boxes were originally intended for storing jewelry and expensive things, so they were found mainly in the homes of wealthy gentlemen.
The variety of shapes, sizes and materials used to make the boxes was amazing. They were made of gold and silver, encrusted with diamonds and other precious stones. There were also simpler wooden boxes. Centuries have passed, but the fashion for these original and elegant products has survived to this day.
It is noteworthy that making a wooden box with your own hands is not as difficult as it seems at first glance. The main thing is to apply a little skill and use your own imagination.
Where to begin
Making any craft begins with a project, a diagram. The master imagines exactly what his masterpiece will be like, and, starting from the drawings, stocks up with the necessary materials and tools.
For many ordinary people, a wooden box appears as a rectangular box with a closing lid. This is true, but not entirely. A box is a real work of art, and even a handicraft made from scrap materials can look like an expensive antique.
Any box has its purpose in the house. Based on this message, the master thinks over the shape of the product. The following options are possible here:
- for jewelry. Such wooden models have a traditionally rectangular shape, but the internal surfaces are lined with velvet, and the lid is complemented by a mirror. As a result, jewelry is not scratched and is convenient to try on;
- for jewelry, trinkets. A characteristic feature of this product are drawers that move freely inside the case. The number of retractable elements is unlimited, and a tight fit does not require special guides;
- a small box for cherished and memorable items. Made in the shape of a heart and great for storing letters, cards, photographs and other things;
- Puzzle . A rather complex product that simultaneously serves as a decorative decoration and a children's toy. A system of wooden gears, reminiscent of a clock mechanism, is installed here, and the lid opens after rotating the handle or one of the wheels;
- to hide a small amount of money. It is made in the form of a rectangle, but the external decoration is made to resemble a book;
- for needles, threads. Such wooden boxes usually have several compartments where you can store sewing supplies. The case is often complemented by a carrying handle.
In addition, there are boxes with watches, locks and secrets, original boxes and drawers for storing cigars, and products that make melodious sounds when the lid is opened. The shape is not limited to rectangular. In fact, with modern tools for woodworking, it can be anything, including round.
It is noteworthy that all of the above options can be done independently at home. But it’s still better to start learning how to make wooden boxes with your own hands with simple designs, complicating the task as skills develop.
How to make a classic box
Even a teenager with minimal skills in handling woodworking tools can cope with this task. Such a box is made from multi-layer plywood, and the selected sheet should not have visible damage: knots, cracks.
At the initial stage you will need a pencil and a ruler. In order not to complicate the task, it is better to choose the correct geometry of shapes for the walls, lid and bottom, for example, a square or rectangle. On a sheet of plywood, draw the outlines of four walls: 2 side walls are shorter and 2 front walls are longer.
Note! The sides of the bottom are calculated in such a way that after gluing the sides, it is recessed inside the walls.
Then all the drawn elements are carefully cut out with a jigsaw, the irregularities are processed with sandpaper. To ensure that the end and side walls are beautifully connected to each other, small grooves can be made at the edges of the ends, corresponding to the thickness of the plywood sheet. This tip will help give the case a monolithic look and overall make the structure stronger. The walls are glued together, then the bottom of the box is placed. If the lower part enters with difficulty, the edges are processed with a file. The bottom should fit tightly.
After this, they begin to make the lid. To make the design more original, it is better to choose not a flat, but a deep lid. For this, the scheme described above is used. A large blank is cut out, which will directly serve as the lid, end and side walls. In essence, it turns out to be a smaller copy of the casket body. All parts are sanded and glued together. The lid is attached to the body using small hinges. After assembly, the finished product is varnished or painted in any color you like.
In a similar way, you can make a box from solid wood. A wooden board is used for this. It must be sanded and cut into pieces of the required size. It is more difficult to cut wood with a jigsaw; it is better to use a circular saw. Curly edges can be made with a router.
If you need a drawer
In general, a wooden box with a drawer is made in the same way as the classic version, but there are a number of features.
A simple rectangular shape of the lid and bottom will spoil the appearance of the product. It is better to make the long sides of these elements wavy using an electric router. In addition, by choosing this option, the lid and bottom are not placed inside the body, but left outside.
The walls are made of different heights. In particular, the back part and ends are made of the same height and glued together. For the front wall, cut out a die half as wide as the back part. This element is not recessed between the ends, but is installed overlapping and fixed with glue.
The box consists of two parts: the box, which fits freely between the walls, and the front part, which is similar in size to the top die. The elements are also mounted on wood glue.
A partition is installed between the upper and lower parts, which will serve as the bottom of the upper compartment of the box. Inside the retractable and stationary drawers, you can make partitions from thin plywood, delimiting the internal space into several compartments. The lid is installed on decorative hinges, the wood is covered with several layers of furniture varnish.
How to decorate with carvings
Carved boxes look much more original and interesting, but such work requires certain skills and knowledge. For beginners who decide to try their hand at wood carving, experienced craftsmen recommend starting with simple geometric shapes and large patterns. With a certain amount of patience, even a novice master will be able to cope with such a task.
The drawing is applied to the surface with a pencil, each line is well drawn. After this, the pattern is carefully cut out with an oblique knife or chisel in strict accordance with the applied markings. Small flaws and irregularities can be corrected with a file or fine sandpaper.
How to put a lock
An interesting solution is a mortise lock, which will be opened with a small key, but such work is difficult to do even for an experienced specialist. Therefore, it is better to limit yourself to a padlock or a decorative hook.
To install a padlock, loops are placed in the central part of the side wall and lid, which are screwed with small screws. The location of the hinges must be calculated in advance: even a slight displacement will break the symmetry, and the box will lose its attractiveness.
Making a complex-shaped box from solid wood will take much longer. To do this, you must use a power tool, while parts from plywood can even be cut with a hand jigsaw. A large field of work opens up for the artist to design the finished product. You can paint it with paints, attach decorative fittings, decoupage or burn it.
Every woman has many little things that need a special storage system. These are various decorations, accessories for creativity or handicrafts and many other items. A DIY cardboard box can be an excellent option for storing all the little things you need. Creating a suitable drawer is easy. The main thing is to use your imagination and give it a unique and original look.
A simple box. Preparatory stage
This option is easy to create. The box is a cardboard box. Its capacity and functionality depend on your needs. To make the task easier, it is recommended to use blanks. In this case, it is much easier and simpler to make cardboard boxes with your own hands.
The diagrams must be transferred to paper. Before calculating the dimensions, think about what purposes your box will be used for. If jewelry will be stored in it, then you should not make it bulky. But if the box is intended for needlework, the dimensions of the box should be much larger.
Manufacturing technique
So, let's look at how to make a box with your own hands from cardboard:
- Prepare thick cardboard.
- Using the diagram, mark the contours of the box on it.
- Cut out the resulting blank.
- Fold the fold lines. Carefully glue the places where the box is connected. If you take thick cardboard, it is difficult to work with. But it is precisely this that allows you to create a durable structure. Such a box will be an excellent place to store various things. You can use superglue or PVA. But a more reliable option is tape.
- The resulting box needs a beautiful case. To do this, use wrapping paper. This is a thin material that perfectly decorates the surface of cardboard. Old wallpaper is a good option.
- When gluing the box, be sure to leave allowances for the hem. Wrap them up and glue them to the inside of the box.
- Choose wrapping paper that suits your style for interior decor. Cover the bottom of the box with this material immediately. Then - the inner side parts.
- Now all that's left to do is come up with the decoration. For decoration you can use any ornaments, flowers, beads, beads. It all depends on your imagination.

Round box
Sometimes it seems that making a box of this shape is difficult. Totally wrong! It is quite easy to make a round box from cardboard with your own hands. You will see this for yourself.
Round box manufacturing technology:
- Mark a circle on thick cardboard. This will be the base of the box.
- Draw a long rectangle. This is the side of the box. Its width is the height of the future box. And the length should correspond to the circumference plus 2-3 cm per connection.
- To assemble such parts together you will need allowances. They can be left on the base of the box. So, as shown in the figure or on a rectangular blank.
- Having carefully calculated the dimensions, cut out the blanks.
- Connect them with glue or tape.
- Make the lid for the box using the same technology. But remember that the base circle should be a little larger. After all, the lid should be easy to put on the box. And its height is less.
- So, you made an excellent cardboard box with your own hands. All that remains is to decorate it. When thinking about an interesting decoration, do not forget about an important point. All hems must be carefully disguised. Therefore, it is recommended to decorate both the external and internal sides.

Scotch tape box
This is a simple but original solution. How to make a jewelry box with your own hands from cardboard and a reel (from tape)?
Let's look at it in detail.
- Trace the bobbin on thick cardboard in an outer circle. You will need two such blanks. One will become the base, and the other will become the lid.
- Connect the bottom to the bobbin. You can use tape for this. Or leave a hem allowance at the base in advance.
- To make the lid, use the technology described in the previous example. Remember that it should be slightly larger than the base.
- You have created a wonderful box with your own hands from cardboard with a lid. Now it's up to your imagination. The original decor will make it a real work of art.
Soft box
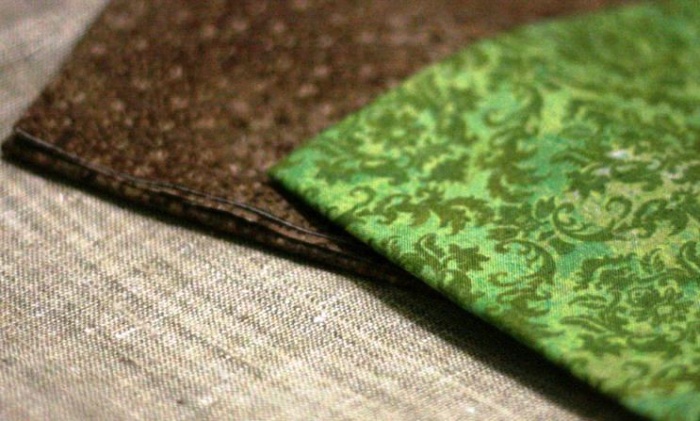
Having considered simple options, let's try to diversify the technology a little. For example, if you want to create boxes with your own hands from cardboard and fabric, then you can use the following method. This box will be a great place to store important things. In addition, it is an excellent decorative element.

Let's look at how to make such a box with your own hands from cardboard. The master class will greatly help with this:
- You will need a round box. You can use a ready-made blank (for example, left over from a hat) or make it yourself.
- Apply a thin layer of glue to the outer side surface.
- Glue thin foam rubber to it.
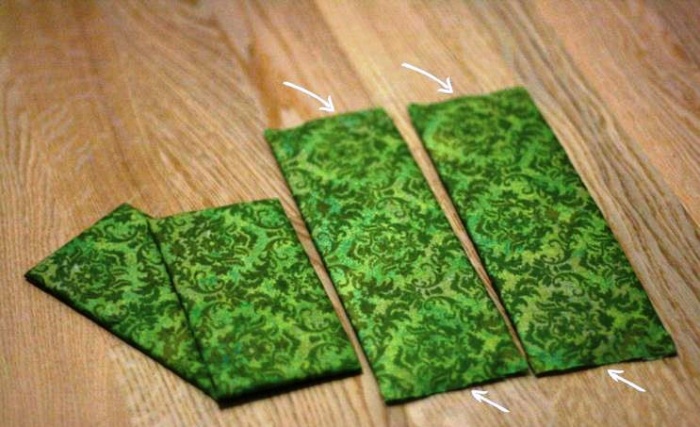
- Choose a nice fabric. Measure a rectangular cut on it. Its width should be equal to twice the height of the box plus 10-15 cm for free folding. The length corresponds to the circumference with the addition of seam allowance. Wrap your box in this fabric.
- Cut a cardboard circle that will easily fit inside the box. Cover it with foam rubber and fabric. It is better to choose a lighter fabric for the bottom.
- If desired, you can decorate such a box in any way. Use ribbons, beads, buboes, beads.
Heart box
This box itself looks quite original. In addition, this box is easy to make with your own hands from cardboard.

The master class allows you to understand the progress of the work:
- Cut out two hearts from construction paper.
- Prepare two rectangles. Decorate one side with “teeth”.
- Glue a rectangle around the perimeter of the heart. Combine the prepared “cloves” with the base. It is best to use Moment glue. This will provide the necessary strength.
- Repeat the procedure for the other rectangle. In this case, be sure to take into account the allowance required to connect both side parts.
- Glue the second heart blank at the bottom. The decor imitating lace looks original.
- Create the lid for your box in the same way.
- Cut out pictures of bears or illustrations in a romantic style will add sophistication and originality. Complete the decor with beads, flowers, butterflies.

Box made of threads
This is another amazing technique that you can use to make a box. Let's look at how to make a box with your own hands from cardboard and thread.
Progress:
- You can choose any shape for the base. It can be a circle, rectangle or heart. Cut out two blanks from thick cardboard.
- One of them, which will become the bottom of the box, needs to be decorated. You can choose any solution for this. As a last resort, cover it with colored paper.
- In this base, mark holes around the perimeter with a needle. The distance between the “holes” is 1 cm. Try not to leave much space from the edge. Screw toothpicks into the marked holes. Each of them must be glued.
- Now you can take up the threads. Place the first row between toothpicks. Pass the thread as follows: in front of the stick, then behind it. The next row is placed in a checkerboard pattern.
- Braid to the middle. Now place a bead on each toothpick. Continue weaving with threads.
- Having finished the box, you need to secure the structure. To do this, put and glue beads onto each toothpick.
- The upper and lower parts of the box can be decorated with an original chain or ribbon.

Now you know how to create a beautiful cardboard box with your own hands.
Conclusion
If you are inspired to create such a masterpiece, then many of the recommendations given in the article will be useful to you. Such a detail will become an amazing decoration of your home and a source of your pride. In addition, a beautiful cardboard box, created with your own hands, can be an excellent gift. After all, every woman needs such things.
Many people think that making a box with their own hands is a complex and time-consuming process. And in order for the finished box to look aesthetically pleasing and beautiful, you will have to spend a lot of time and fork out a lot of money. But there are plenty of ways to do it easily, quickly and cheaply.
There are a large number of techniques for creating handmade boxes and boxes. But one of the simplest methods, which is suitable for both experienced needlewomen and those who are just discovering the huge world of creating decorative objects, is cardboard.
Cartonage- is a special technique for creating various products from cardboard. The main feature of the process is the combination of cardboard parts of various thicknesses with fabric trim, which are connected in a special way using ordinary PVA glue.
Particularly pleasing is the possibility of creating boxes made using this technique in a variety of sizes and shapes. They can be round, square or rectangular. If you wish, you can divide the interior space of the box into compartments, the number of which may vary, depending on the wishes of the master.
Preparing for work
Before you begin the creative process of creating a box, you should decide what size and shape the product will be. For those who are completely unfamiliar with cardboard, it is best to give preference to the simplest form of the product, not divided into sections. But if you decide to create a more complex box at once, be patient and everything will work out for you. This article provides detailed instructions on how to make a small rectangular box with your own hands at home, with two compartments, measuring 21x16x6 cm, with a hinged lid.
And so, when you have thought carefully and already imagine what your creation will look like, you need to prepare a work table, materials that will be used in the work and the necessary tools for the work. To make a box using the cardboard technique you need to have on hand:
- PVA glue.
It is better to buy glue in stores with building materials; it connects the parts more firmly. But you won’t be able to purchase the amount of glue that you will spend on creating one box in a hardware store, and a whole kilogram is too much for one product. You can also take regular PVA glue from an office supply store. But it is very important to remember that the strength of the product directly depends on the quality of the glue.
- Glue "Moment".
- Cardboard, the thickness of which is at least 2-3 mm. This thickness will allow the product to keep its shape well.
- Kraft paper. It is usually used to strengthen the joints of parts. Kraft paper can be replaced with regular masking tape.
- Whatman paper, or watercolor paper, or drawing paper.
- Scissors.
- Ruler.
- Stationery or construction knife.
- Pencil or pen.
- Glue brush.
- Stack or spatula.
Beginning of work
The first stage of making a box is developing a drawing. Your creation can have any size and shape at your discretion. The sample box will be rectangular and relatively small in size - 21x16x6 cm. Once the shape and size are chosen, you can begin to create a drawing - draw the bottom of a rectangular shape, the size of which will be 21x16 cm, 2 side walls, which will be the length of the product - 21x6 cm, 2 short walls, which will become 16x6 cm wide, a rectangle-lid, the future product, it should be the same size as the bottom (21x16), a partition, the dimensions of which will be 16x6 cm, and the inner bottom. The dimensions of the inner bottom should differ slightly from the dimensions of the bottom by 1 cm, so its dimensions will be 20x15 cm. And the spine, its dimensions completely coincide with the size of the long side - 16x6 cm.
Considering that the box will have a partition, the drawing must indicate the place where this partition will be located. To do this, you need to measure the required distance from the edge of the bottom with a ruler; in this case, it is 6 cm. Next, you should mark the place where the partition is attached on the side parts of the length of the product. In the same way, measure 6 cm and mark.
Having dealt with the drawings, you can start cutting out blanks from cardboard.
Under no circumstances should you use scissors for these purposes. If you cut cardboard with scissors, the edge will be uneven and jagged, which will subsequently affect the appearance of the work.
Using a stationery or construction knife, very accurately and carefully we begin to cut out the parts from the cardboard. You need to cut very carefully, trying to make the cut as smooth as possible. Only a smooth cut will be glued well and reliably in the future. If you don't get a perfect cut the first time, don't despair. Uneven edges can be removed using standard zero-grit sandpaper or an ordinary nail file.
The next stage of creating a handmade box is assembling and gluing the parts. At this stage it is very important to remember that you will be working with glue that can get dirty. Therefore, first we prepare the workplace. It is best to cover the working surface with something from which traces of glue can be removed, such as oilcloth. When the workplace is ready, you can begin.
It would seem that gluing together several pieces of cardboard would not be particularly difficult. But in practice this is not the case. There are a couple of little secrets that will make this task much easier.

Firstly, it is best to glue the sides of the future box to the bottom from above, namely, lubricate the cut of the side part of the part with glue (preferably a larger one so that the frame is strong) and glue it to the bottom. It’s worth starting with the largest parts - the longer side blank. The wall must be pressed well; to do this, press on the part from above. Excess glue must be removed very quickly before it hardens. You can use a small spatula for this. Then the next part must be attached to the already glued wall, according to the same principle. The only difference is that you need to lubricate two cuts with glue (the bottom one, which will be connected to the bottom, and the side one, which we will join with the already glued wall). And then we fix the 2 remaining cardboard blanks, according to the same principle.
Now we glue the partition into the finished frame of the product. You choose the location of the partition yourself. It can divide the box into two equal parts, or one compartment will be smaller. In our particular case, the product will be divided into one large section and one smaller one. We glue the partition in the already familiar way, but apply the glue to the bottom and two side sections of the partition.
Now it is necessary to further strengthen the edges and joints of the finished frame. To do this, you can use craft paper or masking tape.

Cover kraft paper or tape with a thin layer of PVA glue and glue the joints inside and outside the box. This must be done very carefully and carefully, trying to avoid the entry of air and the formation of air bubbles, so that there are no wrinkles and folds. After you have glued one joint with tape, you need to treat it with a spatula, stack or the end of a ruler (run along the length, this will allow you to better glue and smooth the tape). Such actions must be carried out with all joints.
When all the edges of the product are strengthened and the frame of the product is almost ready, it is necessary to decorate the gluing areas. During the process of decorating with fabric, a situation may arise that the glue will be visible through the fabric and this will ruin the entire appearance of the work. To prevent such a nuisance from occurring, the edges of the box can be painted with white quick-drying paint, or the entire box can be covered with white drawing paper. In this work, you can do without this, because the box will be soft, and the fabric will not be glued to the cardboard itself.
Decor of the frame of the future box
From this moment the most creative and interesting work begins. The decorating process gives flight to your imagination and allows you to realize your wildest imaginations. It is at this stage that the faceless white box turns into a beautiful, originally designed box with a strong personality.
In the decorating process, you can use a variety of materials: fabrics of various textures, lace, beads, beads, artificial flowers, rhinestones, ribbons, decorative elements made of polymer clay, metal and plastic parts, sea shells, mirrors, natural stone and a huge number of other items. , which at first glance are not intended for this at all.
But there is a minimum set of materials necessary for decoration:
- Natural fabric base.
It is much easier to work with natural fabrics, because... they keep their shape and do not stretch. It is better to take several scraps of fabric with different colors, so the design of the box will be more interesting. You need to choose a fabric that will cover the entire box and which will serve as the basis for subsequent decoration. It can be of any color, with an ornament or pattern. You can use several colors of fabric. It all depends only on your imagination.
- Sintepon. It's better to take a thin one.
- PVA glue. It is with this glue that the fabric is glued to the cardboard.
- The tape is 20-25 cm long. The lid of the box will be secured with tape.
But this box will not just be covered with fabric, it will be soft to the touch. To achieve a similar effect, we will cover it with padding polyester. First you need to cut out strips of padding polyester the same size as the cardboard parts. Then, you need to apply Moment glue to the outer part of the bottom of the box and glue the padding polyester to it. “Moment” is better suited for attaching a synthetic padding lining, because it can secure the material more reliably. The glue needs to be distributed evenly over the entire surface of the cardboard, then press the padding polyester well so that it is better fixed. It is very important to use thin synthetic padding so that the box does not turn into a pillow. Using the same principle, we glue all the outer parts of the box frame.
Now comes a very important and responsible stage of creating a box - the stage of decorating the box with fabric. At this phase of the creative process, there are a number of very significant points to consider. It is necessary to try to minimize the number of seams and joints, avoid the formation of folds, and if their presence is unavoidable, ensure that their thickness is as small as possible.
Finally, the long-awaited moment has arrived, the preparation of the blank with material. To begin, cut out a 21x6 cm rectangle from fabric, which will be glued to the back outer wall of the box frame. We coat the outer surface of the side wall with glue and very carefully glue a rectangular piece of fabric, avoiding the formation of folds.
Now you need to cut a long strip of fabric, the length of which will be equal to the length of the two short sides and the long part that is not pasted over (in this case, 16+16+21=53 cm), and the height will be equal to the height of the box, but taking into account allowances. The allowances require an additional 2-3 cm. Therefore, the fabric strip will be 55x8 cm in size. On the fabric piece, you need to mark the location where the partition is attached. That is, measure 7 cm from the edge (since the workpiece has allowances) and make a slot - 1 cm deep. The width of the slot should be equal to the thickness of the cardboard you are using. In this case 3 mm.

When the fabric blank is ready, it must be glued to the frame. The fabric is usually glued with PVA glue. The glue needs to be spread in an even, thin layer on the sides, already covered with padding polyester; for this you can use a brush or roller. If the glue is not distributed evenly, the glue may bleed through the fabric, or in some places it simply will not stick.
If it happens that the glue does seep through the fabric, a damp piece of fabric can save the situation; they need to blot the place where the glue seeped until it completely disappears.
When gluing, it is very important to avoid the formation of folds and wrinkles, as well as distortions.
Then you need to connect the frame and the fabric rectangle. It is better to start from the middle of the long side part, this will allow you to glue the fabric as evenly as possible. And move from the middle to the edges. Particular attention should be paid to the edges of the box and the edges.
When decorating the box, you need to try to hide all the cutting lines of the fabric. To do this, allowances need to be glued to the inside of the box and to the outside of the bottom. To do this carefully, it is best to apply glue to the inside of the box frame (you will get a 1-1.5 cm strip of glue edging the inside of the box). And only after that start gluing. The cut edge of the material is folded inward and fixed. You need to glue it in the same way, starting from the middle of the long side panel. To better secure the fabric, you can use paper clips or clothespins.

When you get to the first corner, you will need to make a fold and cut off the excess fabric. You need to make folds very carefully and carefully. Thus, you need to glue the three inner sides and the outer part of the bottom.
If you doubt that you will be able to immediately make a neat, not very protruding corner, you can practice before applying glue to the surface.
Now you need to decorate the inner bottom of the box with fabric. To decorate the inside of the box, you can use the same fabric or use a fabric of a different color or texture. In this case the same fabric will be used.
At this stage, you need to take watercolor paper and cut out two rectangles from it, the size of which will be equal to the size of the two sections of the box. The bottom of the large compartment will be 15x16 cm, and the small one - 16x6 cm. Then you need to cover the paper rectangles with fabric. To do this, you need to cut out rectangles from the fabric corresponding to the paper sizes + allowances. It is enough to leave 1-15 cm for the allowance. When the fabric blanks are ready, you can glue them to the paper ones. Coat the paper rectangle evenly, glue it and connect it to the fabric one. Now you need to glue the resulting paper and fabric blank to the inside of the box. Very carefully apply glue to the bottom of the compartment and glue the workpiece with the paper side and, of course, press it well. All that remains is to glue the allowances to the sides of the box compartment using the already familiar method. This way we decorate the bottom of both compartments.
At the next stage, we begin decorating the partition between the compartments. To do this, you need to cut out two rectangles from paper, the size of which will correspond to the size of the partition (16x6 cm) and one rectangle from fabric, the size of which will be equal to the size of two paper parts + an allowance of 1-1.5 cm (length - 17 cm, width - 13.5 cm). Now you need to glue the paper parts to the fabric. First we glue the first rectangle, then we retreat 3 mm from it. (cardboard thickness) and glue the second one symmetrically. At this point, the workpiece is ready and all that remains is to connect it to the partition itself. The main thing is that the gap between the paper parts coincides with the end of the partition.
To make the lid of the box, you need to take the remaining cardboard blanks - the lid, the inner bottom and the spine. First, you need to cover the lid of the box with padding polyester. Then cover the spine and inner bottom with watercolor paper.

Now you can decorate the lid of the product with fabric. To do this, you need to cut a piece of fabric, the size of which will be equal to the size of all the remaining parts (that is, width -21 cm, and length 16+6+15=37 cm) + allowances of 2 cm on each side. When the fabric blank is ready, you can start gluing cardboard parts to it. First, evenly apply glue to the padding polyester of the cardboard cover and press down. Then you need to retreat 5 mm. and attach the spine in parallel. Again we retreat 5 mm. and glue the last part. Now all that remains is to glue the allowances to the inner parts of the lid, in a familiar way.

Of particular importance for the appearance of the future product is the careful design of the corners of the lid. Therefore, when gluing the seam allowance to the long side of the lid, you need to glue the seam allowance to the very edge of the cardboard, then cut off the excess fabric along the cardboard line. Make a small fold and glue it.
Now you can attach the limiter tapes. To do this, you need to cut two pieces of satin ribbon, 15 cm long. While we fix only one edge of the ribbon, glue both ribbons to the inside of the lid.
Now that the ribbons are securely fastened, you need to decorate the inside of the lid. You can use fabric or a mirror for this.
Boxes with a mirror lid look very good, but simply gluing them with Moment glue is not reliable; it is better to use liquid nails.
In this case, decor with fabric of a different color will be used. For this purpose, you will need to cut out a paper rectangle, slightly smaller than the lid itself (20x15 cm) and a fabric rectangle 21 cm. in length and 16 in width. A rectangle of paper must be decorated with fabric and attached to the lid.
When manipulations with the lid are completed, you can assemble the box. To do this, you just need to connect the lid and frame. It is most convenient to start with the largest elements. Therefore, we cover the outer part of the bottom of the future product with an even layer of Moment glue and connect it to the bottom of the lid. As usual, press well and check for excess glue. In the same way we fix the spine of the lid. And our masterpiece is almost ready.

All that remains is to decorate the inner sides of the product with fabric. They need to be glued last in order to hide the place where the lower part of the limiter tapes will be attached. Apply glue to the free edge of the tape and secure it to the inner side of the box. We carry out the same manipulations with the second satin ribbon.
And so, all that remains is to finish the side parts. Its decor is carried out by analogy with other elements. That is, we cut out a strip whose length will be equal to the sum of the lengths of all four sides of the internal compartment, and the height will be equal to the height of the work itself. Thus, we get a paper strip of 62x6 cm. All that remains is to cut out a fabric strip of the same size + allowances. And decorate the inner walls of the large compartment. We do the same with the small compartment.
In fact, we can say that the product is finished and can be used. By and large, it is not necessary to follow the specified algorithm. Some stages can be swapped. When a master gets better at it, he begins to do it in his own way, because it is convenient for him, because this is a creative process, and creativity does not tolerate rigid boundaries.
Depending on the purpose of the box and your preferences, you can supplement it with various elements and details. You can equip it with a magnetic clasp, or a hook closure, or tie it with a ribbon.
On the inside of the lid you can place not only a mirror, but also a small organizer with pockets or a photograph. There are no restrictions or frames, you can create and create real masterpieces.

For example, a small compartment can be adapted to store rings. That is, place felt rollers in it, decorated with fabric of the same color as the entire interior decoration.
You can complement the lid of the box with decorative elements - artificial flowers, beads, rhinestones, lace and ribbons. Here everything will depend on your taste and flight of fancy.
Thus, we can conclude that creating an original handmade box is not such an impossible task. Patience, a little free time and a modest list of necessary materials and tools that can be easily obtained in a nearby store and an exclusive item is ready.
The box is a wonderful thing in which you can store various little things. Not only is it functional, but it also brings a certain charm to the design of your room. However, you don’t have to go to the store and buy a suitable box. You can make it yourself from available materials. This DIY jewelry box will be a great addition to your home.
In this article we will look at what a box can be made from with your own hands, and how exactly.
Box of postcards
A simple but beautiful box. To work you will need:
- postcards, 13 pcs.;
- scissors;
- needle and thread;
- pencil and ruler;
- textile;
- cardboard.

Now let’s look at a step-by-step way to bring everything to life:
- Take 4 whole cards and sew them along the edges with a buttonhole stitch.
- Take the other 4 cards and cut out triangles from them. Make a square from 1 other. Sew all 5 blanks again with a buttonhole stitch.
- Take cardboard and cut out 5 identical squares, the width of which is identical to the width of the postcard, and cover them with fabric.
- Now, using a needle and thread, connect the sheathed sheets of cardboard so as to obtain a box with a bottom and four walls.
- Take 4 whole postcards that you covered at the beginning, attach them to the top and bottom of the box on each side, bending the postcard in an arc.
- Make a box for the finished design from triangles and 1 square.
- To cover the sides of the box, make a stencil and cut out the sides from the remaining four cards. Sew them with a buttonhole stitch too.
- All that remains is to sew on the sides and the lid. To ensure that the lid closes and opens normally, sew only one side.
Now the DIY postcard product is ready.

DIY wooden box
The most common option for handmade is wood. The material is affordable, beautiful and easy to process. This homemade box will be an excellent gift for a friend or family. You don't need special tools or expensive materials.

The base will be plywood, 4-6 mm thick. It is important that it is dry. To work you will need:
- jigsaw (can be manual);
- jigsaw files;
- hammer;
- hacksaw for wood;
- various files;
- sandpaper;
- pencil, ruler, tape measure;
- varnish, paint and tampons.
The first thing you need to do is draw drawings. One of these is provided below if you can't make your own.

Now you need to compactly place all the parts on the plywood, adhering to the dimensions. To make things easier, use templates. And finally, use a jigsaw to cut out all the parts. Having all the components on hand, it is easy to combine them into one beautiful box.

Your DIY plywood box is ready. This wooden gift, made by yourself, will please everyone.
DIY cardboard box
Quite a simple and economical option. Here's what you'll need to get started:
As for the tools, the set is standard: a knife, scissors, a pencil and a ruler, a clamp, needles and threads. First, you need to cut the cardboard correctly. The photo shows how to do this. Light paper is thin, and darker paper is thick.

Note! A cross indicates an unnecessary part.
So you see 6 types of paper. Let's figure it out;
- The first four parts (No. 1) have a size of 7x13 cm. These are cardboard and paper.
- The next four parts (No. 2), size 7x19 cm.
- Under No. 3 is a paper blank, measuring 7x19 cm.
- This is a cardboard blank 7x20 cm.
- Under No. 5 there are two blanks 13x19 cm.
- And the last two blanks are 14x20 cm.
This would be a great DIY craft box. Here are step-by-step instructions for its construction.
Take all pieces #4 and #6 and glue an identical piece of fleece onto them.

Place the blank on the fabric and cut out a rectangle, leaving a margin of 2-3 cm on each side.
Fold and carefully seal the edges as shown in the photo. You will have to do this often.

Secure the structure with paper tape.

All that remains is to cut out everything around the edges.

Place the workpiece on the fabric and carry out all the same manipulations as with the first part.

For reliability, you can sew lines where there will be a bend.

All that remains is to bend it inward and secure it with tape.

The base is ready, you can put it aside and take the rest of the cardboard parts. Cover them with fleece.

As always, cover the whole thing with fabric. But please note that there is no need to bend the long strips on the short side.
Now glue the 4 pieces on the sides of the box. First long, and then short.
You can set aside the finished box. Take workpiece No. 3. Cover it with fabric. This time you need to cover the short sides and leave the long ones as is.
A gift made with your own hands has always been considered the best. A paper box will be an original gift for any holiday that will please everyone. After all, every woman or little girl has a bunch of little things that need to be put somewhere. In addition, such a box can become an interesting decorative item.
DIY classic paper box
At first glance, it may seem that making a box is a complex process. But in fact, creating such a casket is very easy. In stores you can find a large number of materials for needlework. But if you wish, you can make a box from improvised materials.
For production you will need:
- two types of cardboard (thick and thinner);
- fleece;
- decor;
- glue;
- scissors;
- fabric of one or more types (optional);
- scotch;
- clamps;
- ruler;
- pencil.
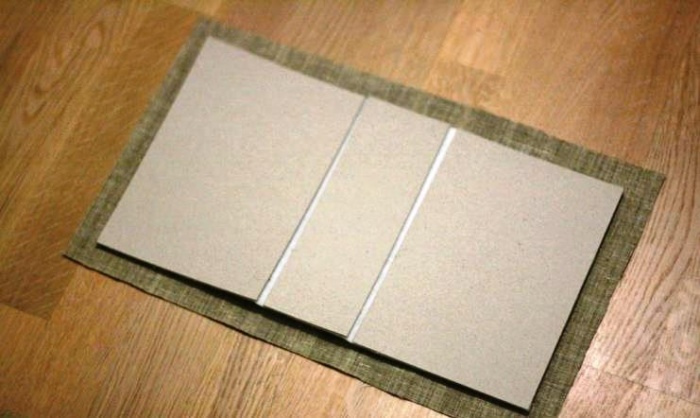
First of all, you need to make a cutting. Two parts measuring 13*7 cm and 19*7 cm are cut out of thick and thin cardboard. Then two parts from thin cardboard measuring 19*13 cm and two parts 20*14 from thick cardboard. Afterwards, one piece is cut out from thick cardboard 20*7 cm and from thin cardboard - 19*7 cm.
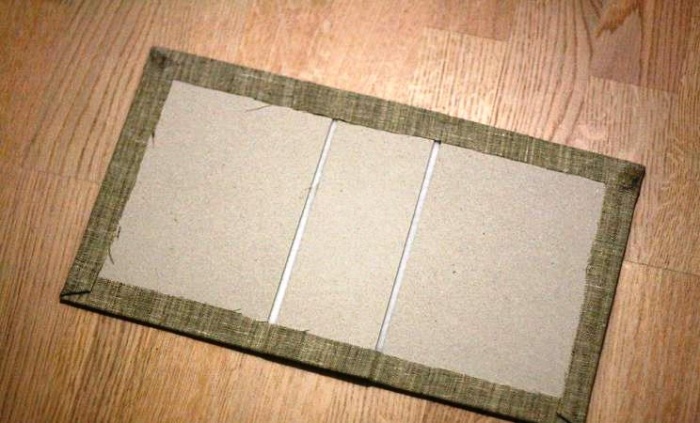
After cutting, fleece measuring 20*36 cm must be glued to parts measuring 20*7 and 20*14. The parts must be laid in such a way that element 20*7 is in the middle, and there is a distance of 0.5 cm between all parts. Then the resulting part lay on the fabric and make a small allowance on all sides. The allowances are folded over and glued to the cardboard. This will be the lid of the box. If desired, you can sew a button that will serve as a lock and decorate the lid with other decorative elements.
Now you will need a thin cardboard piece measuring 19*7. It is also covered with fabric, but the allowances are sealed only on the short sides. This element is glued in the middle of the workpiece to the cardboard. The same is done with a 19*13 piece made of thin cardboard (in this case, all allowances are sealed). The part is glued next to the 19*7 element.
The next step is to make the boxes. To do this, take parts from thin cardboard with dimensions 19*7, 13*7 and 19*13.

Then the joints are glued together with tape. The resulting part is cut out of fleece and covered with fabric. The joint lines are additionally sewn on a sewing machine, after which the sides are folded so that the fabric base is inside. This structure is wrapped with tape. Thus, the inside of the box was created. All that remains is to cover it with fabric and attach the lid.
To do this, you need to take the remaining elements from hard cardboard, duplicate them with fleece and cover them with fabric. On long planks, the short sides are not folded. Then these long strips are glued to the box obtained earlier (clamps will be needed here). Then the short ones are glued.
The last step is to glue the lid and insert an elastic band that will serve as a lock.

DIY paper box in the shape of a heart
Such a box is very easy to make, spending a minimum of time. To create this casket you will need thick cardboard, glue, scissors and decorative elements.
First, cut out 2 hearts of the same size and 2 wide rectangular strips from cardboard. One side is decorated with cloves. With their help, the strips are glued to the heart. Then the resulting sides are glued together. Next, glue two ribbons to the box and to the lid. After which the inner and outer sides are covered with decorative paper. You can come up with any decor. Here the flight of imagination is limitless.

Unusual origami box
If you don’t want to glue something, you can use the original method of creating a paper box using the origami technique. In order to make such a miracle, you only need 10 square sheets of paper and a little skill. By following this diagram, you can easily assemble a pentagonal box.

Step 1. The sheet is folded along one diagonal, straightened and folded along the other. Then the sheet is turned over and the lower corner is folded to the previously obtained diagonal. The sheet is turned over again, leaving a corner at the bottom. The lower part is folded in half again so that the corner is on the outside. Next, raise the lower corner to the middle (now it will be slightly above the diagonal), bend the left corner to the left side of the resulting triangle and bend the right side from the upper corner to the lower right corner of the triangle. Then they bend the protruding piece. Then the right side is hidden behind the central triangle. Then bend the entire structure in half, aligning the lower right corner with the left. The top corner is folded in half.
Step 2. Now the resulting structure is unbent, canceling the last two steps. The entire module is rotated 180°. Using the resulting folds, an angle is formed and a fold is laid.
Thus, you can create an original gift or gift wrapping with your own hands that will please and surprise anyone.
Video on the topic of the article


