Build beautiful fence at the dacha is considered not a simple process.
But by following the instructions that will be discussed today, you can learn how to build a fence correctly, saving valuable time and effort.

Corrugated fencing
One of the most common materials for constructing country fencing is corrugated sheeting, which has many advantages.

Do-it-yourself installation of a fence made of corrugated sheets helps save valuable time due to the speed of the work process.

You just need to determine the required location of the fence, mount the posts, which will subsequently be covered with corrugated sheeting.
Advantages of the material
Such a fence reliably hides the area from prying eyes, especially in comparison with a fence constructed from mesh.

The corrugated sheet reflects various sounds as much as possible and protrudes practical material, which does not require professional installation.

To create a fence, a photo of which can be seen below, it is preferable to purchase corrugated sheeting with corrugation about 20 mm in height. After all, the large height is intended mainly for arranging the roof.
Installation of corrugated fencing
Before constructing a fence, it is necessary to perform the appropriate calculations. To do this, you should outline the location of the future building, decide on the location of the gate, as well as the gate.

In addition, it is important to determine where the posts for the fence will be installed, to calculate its height along the perimeter, as well as the height of the gate with a wicket. The amount of material directly depends on the listed parameters.

Then you should install the pillars using metal pipes with a diameter of 80 mm. The upward-facing part of the column should be welded to prevent moisture from entering the pipe.

To arrange the pillars, you will need a hole, the width of which reaches 1.5 meters and the depth of up to 1 meter. Arrange the foundation and after it has completely hardened, install the profile, which is designed for attaching the profiled sheet.

It is important to secure the profile, as well as the pillars, with electric welding, then coat it with a primer to prevent corrosion. At the final stage, secure the corrugated sheet to the frame with self-tapping screws.
Mesh fencing
Fencing a site with a fence made from a chain-link mesh must begin with precise marking of the placement of pillars, for which metal pipes are used.

For intermediate-purpose posts, 40 cm recesses are made in the ground with a drill; tension type a recess of up to 60 cm is required.

As soon as the tension posts are installed in the corners of the proposed fence, it is necessary to connect them by welding or bolts to adjacent posts, using supports.

But such a fence will not be reliable, so you cannot do without wire rod, which must be passed through the cells.
Note!


To stretch the wire rod between the posts, several holes should be drilled in each. You can attach the mesh to prepared poles.

To learn how to make this fence with your own hands, place the roll in a vertical position next to the support post and make sure that the folded sides of the stitches are placed at the top of the roll. Attach the stitching at the top of the mesh to the top of the post, then proceed to the other post, slowly unwinding the roll.

After the wire rod is passed through the mesh between the prepared pillars, it is necessary to insert its ends into the holes that were prepared in advance, pulling the wire as tight as possible, securing it well on the surface of the pillars, using tension-type bolts.
Fence decoration
Often, owners of suburban areas are faced with a reasonable question related to the design of a wooden or other material fence at their dacha.

The first option for decorating a fence is, of course, decorating it with plants. A vertical gardening method is used. Hops or grapes are suitable for this purpose. It is also good to plant annual plants, winding along pre-tensioned wires.

Note!

Another way to decorate the fence at the dacha is by painting and painting.

It is good to hang a special pot with petunias on a blind type fence. These plants are completely unpretentious and bloom almost throughout the warm season.
Blind type fencing will serve for many years in the construction of a gazebo, since one wall surface If you already have it, you will need a few more additional supports, after which you can begin installing the roof.

Innovative technologies make it possible to build a fence from durable material. Also, the fence can have any height. It all depends on the preferences and wishes of the owner of the suburban area.

Therefore, focus on your wishes and financial capabilities and arrange your property outside the city!

DIY fence photo

Note!


The construction of fences from corrugated sheets is a common method of fencing a site. This type of fencing fits perfectly into any landscape. Manufacturers produce canvases in various colors.
We'll tell you: how to properly make a fence from corrugated sheets with your own hands, we’ll tell you about the features different designs, we will describe step-by-step instructions. In the article you will find answers to the questions: how to make a fence from corrugated sheets with metal, stone and brick supports.
Construction materials
To install a fence yourself, you need to prepare certain building materials:
- Polymer corrugated sheeting. It can be painted on one or both sides. The material is coated with a polyester compound, which ensures a long service life of the product. You should not purchase galvanized profiled sheets. They have one advantage - the price, and the galvanization is quickly coated rusty spots. On a sunny day, such a fence will further raise the temperature. If you plan to install a two-meter fence made of corrugated sheets with your own hands, and a foundation will be installed as the base, subtract the height of the base from the planned height (2 meters). The difference is the height of the profiled sheets that need to be purchased. The distance between the pillars is the width of the span of corrugated sheets. If you do not know how to install the posts, we recommend placing them at a distance of 2.5 - 3 m from each other.
- Supports. Metal pipes, round, rectangular or square, are used. If desired, stone or brick columns are installed as supports. Brick supports look much more attractive than metal ones. To install non-metallic poles use decorative brick, stone, cement and sand. What pillars are needed for maximum structural strength? Metal supports should have dimensions of 40 x 60 mm or 60 x 60 mm. Then the structure will withstand loads of varying strength.
- Metal logs– they are necessary for transverse fastening of corrugated sheets. The optimal size would be logs measuring 20 x 20 mm. The technology for constructing a fence 2 meters or more high involves two rows of logs. Otherwise, the structure may become deformed under physical impact.
- Fastenings(or dowels for installation). With their help you can attach the corrugated sheet to the fence.
Stone, sand, crushed stone (screenings), cement - will be needed to create the foundation. To properly build a fence from corrugated sheets, you need to install it on a foundation. Without quality basis The fence will not last long. Vegetation, soil erosion, and animals can deform the structure over time, and the foundation will prevent this possibility.
We have already written in more detail about what types of foundations exist in the article: types and methods of pouring.
Tools for work
When we build a fence from corrugated sheets with our own hands, we need the following tools:
- Sledgehammer.
- Shovel.
- Roulette.
- Cord.
- Level.
- Apparatus for welding work.
If the tools and materials for construction are prepared, we proceed to building a fence from corrugated sheets.
How to build a fence?
Stages of work:
- Marking the territory and calculating materials.
- Installation of foundation and columns (installation support pillars in a fence without a foundation).
- Installation of corrugated sheets on joists.
Before building a fence from corrugated sheets, we mark the territory and collect site data. We wrote how to do this correctly.
We hammer pegs into the corners of the future fence and stretch the thread between them. Along it you need to put marks where pillars or metal supports will stand.
The construction of fences from corrugated sheets on a sloped area involves a stepped structure. We check the height and evenness of the steps using a level.
We calculate the number of columns that will be installed. To do this, divide the length from the corner to the next one by 2 - 3 meters. These will be spans. It is necessary to make markings for gates and gates and take these additional supports into account when purchasing material.
Depending on the type of construction, corrugated sheet fencing can be of the following types:
- A fence without a base. The corrugated sheet is placed at the height of the fence.
- Constructions.
Construction of a fence from corrugated sheets without a base is less expensive. In addition, installation is faster, but the second option looks more respectable, although it requires more costs for materials, funds, and labor.
Building a fence with metal posts
To correctly install a fence made of corrugated sheets, where sections will be used as pillars metal pipes, do the following:
- We place corner posts in the marking areas. To properly make a fence from corrugated sheets, we advise you to immerse the post in the ground a third of the length, in this case maximum resistance to wind is created. Fill the recesses with concrete mortar.
- We will organize the formwork. In this way, a board is created that connects adjacent posts. The width of the formwork depends on the wishes of the owner, but the side, about 20 centimeters wide, looks aesthetically pleasing. If we build a fence from corrugated sheets with formwork, it will last longer.
- Along the length of the structure, at a distance of 2 - 3 meters, we install markings. We stretch the thread between the corner columns.
- We dig in the columns according to the markings. Building a fence from corrugated sheets with your own hands involves installing pillars at the same distance.
- Pour into the formwork container concrete mixture. Additionally, we compare the accuracy of the transverse, longitudinal and vertical columns. Leave the structure until completely dry.
- We weld to the finished structure cross bars. To install a corrugated sheet fence correctly, you need to check the evenness of the structure with a building level.
- We attach the corrugated sheeting to the transverse joists. For reliable fixation we use metal screws. We recommend choosing fasteners that match the color of the sheets.
Important: Special attention pay attention to attaching the first sheet. The appearance of the entire structure depends on how smoothly it is attached. After all, each subsequent profiled sheet is attached to the previous one. You need to make an overlap, the size of one wave.
Installation of brick and stone pillars
Construction metal fences made of corrugated sheets with brick columns involves the creation of formwork for the future foundation.
The brick layer is built using reinforcement. Metal parts are placed in a vertical position and lined with brick.

Building a fence from corrugated sheets with your own hands with brick columns cannot be performed without reinforcement. Brick is a fairly heavy material. Metal jumpers will only increase the load on the foundation, which can collapse over time under the influence of gravity. If we make a fence from corrugated sheets with our own hands, it is necessary to reinforce the foundation layer.
- We lay out the pillars and intermediate lintels with bricks. If the height of the fence is standard, we install the brackets in the posts at a height of 20-30 and 1.50-1.60 m from the ground, where the horizontal strips will be welded. We periodically check the verticality with a level.
- We weld horizontal strips to the embedded parts. It is advisable metal parts cover with paint. This will help prevent corrosion in the future.
- We fasten with self-tapping screws profile structures. You can use rivets and attach them with a special riveter.
The peculiarity of building a fence from corrugated sheets with brick columns involves creating a roof for each column. The design will not be affected precipitation and weather phenomena (snow, rain, wind).
More detailed instructions with video tutorials and images on installing fences with brick pillars presented in this article: ?
Video
You can see how to build a fence from corrugated sheets with your own hands in this video:
To finish the facade, designers recommend installing a fence made of corrugated sheets with your own hands with posts. It looks stylish and emphasizes the status of the owners. On the back side, it would be appropriate to build a fence with metal columns.
We determine which option suits us best and install the fence. As you can see, building a fence from corrugated sheets with your own hands is quite possible, and videos, photos and detailed instructions will help you achieve your goal.
The question is how to make a fence on garden plot, worries both summer residents and owners of private cottages to the same extent. In addition to the functions of dividing areas or protecting against the entry of strangers into the territory of a household, the fence also serves an aesthetic purpose. Creative ideas home craftsmen sometimes lead to the creation of real masterpieces from available materials. But both the elite and the simplest fences are built according to the same principles. Therefore, it is useful to know how to properly install a fence on a site.
How to choose the right material?
Among those offered at construction markets There are a wide variety of materials that are perfect for constructing fences. Among them, the following can be particularly noted:
- lumber (boards, slabs, picket fences) are considered the most affordable and convenient, since almost anyone can process it without the use of special equipment and with a minimum set of tools;
- corrugated sheeting, metal picket fence, forged sections or polycarbonate during installation require preliminary installation of metal supports, which means working with materials that are difficult to process;
- the chain-link mesh is convenient in itself, but installing supports involves the same manipulations as in the previous case;
- improvised materials of various kinds leave room for imagination, but require non-standard solutions during installation;
- brick, reinforced concrete and stone need to be connected using cement mortar or mesh.
In the latter case, the structure will turn out to be quite heavy, so it is necessary to lay a foundation under it. The device of this structural element requires earthen and concrete works, which significantly complicates the process of erecting a fence. Such massive structures are usually made for country house, in which they live permanently. They are an element of the overall design and are often created from materials that are in harmony with the decoration of the facade.
The combined designs look very nice.
They include fence elements made of different materials. The most common options are combining brick or stone pillars with metal or lumber.
In each individual case, the owner of the site decides how to choose a fence for the cottage, focusing solely on his own needs. The cost of parts and the entire structure as a whole also plays a significant role in the choice.
Do I need permission to build a fence?
Building rules and regulations regulate many aspects of the construction of fences: distance to reservoirs and trees, to buildings for other purposes, to roads, etc. But SNiP for the construction of a fence is not a law, but only advisory acts, on the basis of which the administration of each settlement creates construction rules. Most often, permission is applied for if you want to install a fence more than 2 m high. The city architect must allow construction on a corner plot, since an incorrectly installed fence can obstruct the view at a street intersection.

The production of fences between areas is also regulated. So that neighbors' beds and green spaces do not suffer from lack of sun, building codes provide that maximum height the fence should not exceed 1.5 m. For the same purpose, there is another rule: it should be as transparent as possible. This quality of fencing depends both on what material to choose and on the design of the structure itself. For a fence separating 2 neighboring areas, it is recommended to choose different meshes, picket fences, openwork sections made of concrete or metal. In any case, the gap between the opaque elements must be no less than the width of the part itself.
A blind fence can only be installed on the street side, but with an agreement with neighbors, it is possible to build it between properties.
In this case, it is better to draw up a written contract even before making a fence at the dacha.
To avoid a dispute between neighbors regarding land surveying issues, before making fences, you need to contact the BTI. After accurate measurements of the boundaries of the site, you need to mark the area. This part is required in preparation for the main stages of construction.
Preparatory work
Before you build a fence at your dacha, you should familiarize yourself with the options for its design. For inspiration, an illustration in a book, stills from your favorite films, your own imagination or a beautiful fence near a cottage are suitable. Fence projects for country houses are also available in the architectural bureau: when applying for permission, you can simultaneously resolve the issue of choosing the appearance of the fence for the dacha. By looking at sketches of fences or creating them yourself, you can draw up a site plan and determine its length and width.
Based on these data, it is easy to calculate how much material is required for the posts and fencing fabric. The fence diagram should be drawn to scale so that the calculation is as accurate as possible. In some cases, you will need to take into account how high the fence should be. When purchasing reinforced concrete products, boards and sheet materials, you have to take into account standard sizes individual elements.

Once the plan has been drawn up, you can mark the area. To do this you will need pegs (poles) and a thin cord. If the border along which fences and fences for the house are erected is a straight line, then it will be enough to drive stakes at the corners of the site. If the outlines of a private household are curved, markers will have to be placed on relatively straight parts of the border. A cord is pulled tightly between the stakes, along which the entire row of support posts for the fence will subsequently be aligned.
Using a tape measure, you need to find and mark the location of each support and the location of the entrance group.
Usually the column spacing is 2 m, but this is an optional figure. Sections can be made smaller, but it is not recommended to install long spans: the mesh may sag, and blind fences will have too much windage with a minimum of fastenings. When choosing components for a fence with fixed dimensions, you need to determine the pitch depending on the length of the material. A peg must be driven in at the location of each post, since the mark on the ground can be washed away by rain or accidentally rubbed off during the movements of people and animals.
What is needed for construction?
Building a fence with your own hands must begin with the acquisition of some materials and tools that may be needed in the work. In order not to make a mistake with your choice, you need to know what the fence is made of, and based on this, decide what you can build it from. The main details of any structure are the supporting elements (pillars), veins or slabs (horizontal fastenings) and the fence web (a plane made of some material).
Having decided what to make the fence from and determining the quantity necessary materials, House master goes to the store and buys the following tools and components for the fence:
- shovel;
- plumb and level;
- roulette;
- wood saw or grinder (for metal fence);
- hammer and nails or screws and screwdriver;
- pillars for support (10x10 cm block or pipe steel diameter 10 cm);
- cement, sand and crushed stone;
- corner or thin pipe for metal veins;
- 5x5 cm block for wooden parts;
- materials for the fence fabric - of your own choice.
When building a fence made of polycarbonate, corrugated board or chain-link, you will definitely need welding machine for attaching veins to posts. But this service can be ordered from a trade organization, providing dimensions and a sketch, or you can call a specialist to your home, because not everyone knows how to make welds correctly.
When building a country fence with your own hands from non-traditional materials, you will have to think through the method of attaching the canvas to the supports yourself. If a heavy stone structure is planned, then bricks or natural material will be required.
For gabion structures you will have to purchase a special mesh.
Fencing installation technology
Light fences and fences for the house are built according to the same principles. Regardless of what material is chosen for fencing the site, the construction of fences is carried out according to the following scheme:
- After the markings have been made and the location of each pillar is indicated, you need to dig holes for the supports. Since deep pits have to be expanded when working with a shovel and the pole may move during installation, the mark can be transferred to the cord, marking the center of the support with colored electrical tape or thread. After this, the pole must be pulled out and a hole must be dug at least 50 cm deep. It is advisable that its bottom be below the freezing point of the soil.
- Backfill by pouring crushed stone into the hole in a layer of 15–20 cm. Compact the material.
- Place the post in the hole, aligning it with the mark and vertical. In order for it to maintain its position, you need to prop it up with large stones or wooden wedges. If the work is carried out with an assistant, he can hold the support in the desired position. Fill the pit with crushed stone mixed with sand and dry cement (4:3:1, respectively) to the top, tamping it down during the filling process. Check the verticality of the column again and lightly pour water over the cement-crushed stone mixture (the amount of liquid is approximately 1/10 of the volume of the mixture).
- Install the remaining pillars in the same way. It will be possible to continue work after 24–48 hours.
- When the footing has set, you can begin attaching the veins. It is advisable to calculate their installation locations so that the ends of the boards or edges sheet material were no more than 30–40 cm above and below them. If the canvas is chosen to be partially transparent (picket fence, polycarbonate, mesh), the same distance from the upper and lower edges of the canvas to the veins will look beautiful. Check with a level that each layer is horizontal.
- After installing the horizontal structural elements, you can begin attaching the fence panel. Individual parts (board, picket fence) are installed individually, fastening is done with nails or self-tapping screws. Before making a fence with your own hands, it is advisable to tighten the cord to level the piece elements in height. It is easier to check the horizontality of a profiled sheet or polycarbonate with a level.
- To install a wooden gate, you need to lay the bars parallel to each other and fill them with pickets, making sure that the parts do not move. Turn it wrong side up and measure the block to make a diagonal stiffener. Cut its ends at an angle, lay it between horizontal bars and attach it with nails or self-tapping screws to each vertical plank at the intersection. For a wicket or gate made of sheet material, you need to weld a metal frame on which to fasten a profiled sheet, mesh or polycarbonate cut to the size of the product.

According to these rules, you can build a budget fence on a summer cottage from relatively cheap materials. You can complement and decorate it with decorative columns made of brick or stone. To do this, after installing the vertical supports and attaching the veins steel pipes covered with building materials, connecting masonry elements cement mortar(1 part cement and 3 parts sand). If you have a large number of bricks, you can lay out decorative plinth under the sections.
Thanks to this design, a fence placed near the house with your own hands looks much more solid than a conventional fence made of a metal profile or chain-link on a frame. Brickwork can also be combined with wood, but the supports still need to be made of steel, welding short sections of angle onto them, to which after construction brick pillars sections can be attached.
A homemade fence made from openwork bent or forged sections will turn out to be especially stylish and elegant. This is not the most cheap option, but the owner has the right to decide for himself which fence is in better harmony with his house. Ready-made sections can be purchased or ordered according to your own sketches from a construction company or blacksmith shop.
They are installed by welding.
You can build an original fence for your dacha with your own hands from waste material. Many people collect empty plastic bottles to make a variety of items out of them. They were no exception country fences: By connecting empty containers with wire or cement, people make reliable fences for a plot in a gardening cooperative.
To make 1 fencing element, you can cut off the bottoms of bottles same size. After this, the parts are strung on a fishing line or wire, passing it through the lid. The bottles are pushed one into the other through the cut off lower parts until they stop. The line is fixed.

Having made many of these “pickets,” they should be strung on thick steel wire tied to the posts. Aligning the piece elements in height, the wire is passed through side surfaces bottles at the top and bottom. If the plastic picket fence is very high, you can make 3-4 horizontal rows of wire to make the fence stronger.
Plastic fences for a private home can be made differently. This will require concrete mortar from sand and cement. Having filled the foundation and a low base (about 20 cm), PET bottles are laid horizontally in the formwork, placing their bottoms in one vertical plane. After this, a row of empty containers is filled with solution and the procedure is repeated until the desired height is reached.
Decorative wooden fences
If the plot in a private house is registered in rustic style, then a wattle fence or a fence made of poles will be an excellent addition to the garden design. The first option involves creating a fence of vertical posts intertwined with flexible material. Clearing a new property or neighborhood of American maple, willow, or other shrubs with long, straight branches can simultaneously remove debris and create a beautiful fence.
Many people know how to install decorative wattle fence correctly: this is the most common type of fence in Russian villages. Even the presence modern materials has not reduced the popularity of durable and cheap fencing. To make a fence, a series of thick stakes are driven into the ground. The step between them is small, only 50–60 cm. After all the stakes are installed along the marking line, they are intertwined with horizontally arranged flexible rods.
A fence made of poles has a rather symbolic meaning, marking the boundary of the site.
Several horizontal crossbars are tied or nailed to the dug posts. The distance between them is quite large (up to 50 cm), so such a fence will not save you from unauthorized entry. It can be used as a fence between areas.
Gabion fences
There is another way to put up a fence without extra costs time and money using waste raw materials. To create a gabion, use rigid galvanized welded mesh. The most important thing is to choose a cell size such that the contents do not fall out.
To install the structure, you need to dig in steel posts, as for a regular fence.
The grid is positioned so that the columns are between its 2 layers. The space inside can be filled with cobblestones or stone fragments, broken glass, rubble, etc.
Having filled 50 cm of the gabion height, you need to install a series of hooks (braces) so that the mesh does not deform during further filling. The step between the braces is 30-50 cm. After this, you can fill another 50 cm of volume and again strengthen the wall with hooks. Continue this way until the end, raising the layer of filler to the very top of the mesh.
Fence designs can be very different. It is important to monitor the verticality of the columns at the very first stage of construction. Knowing how to install the supports correctly, the master will be able to cope with other operations without much effort.
It is very important that at the dacha the eye enjoys not only the plantings, but also the surrounding environment. About, and we have already talked about, it’s time to talk about how to make fences for your dacha with your own hands. Settlement without them dacha area is not possible and therefore it is better to take care of creating a strong and good fence. And it’s even better that it fits into the overall picture of what you create on your site.
DIY garden fences cheap
Don’t let the length of the fence or its height bother you. Let's start with the fact that it is easy to make a fence with your own hands and quite inexpensively, because if you have the desire and basic knowledge“fence theory”, then you can safely move on to the next stage - the choice of materials.
Country fencing can be made from:
- wood;
- picket fence;
- metal profiles;
- grids;
- yes everything, anything!
You just have to choose what you like best and fits into the overall design.

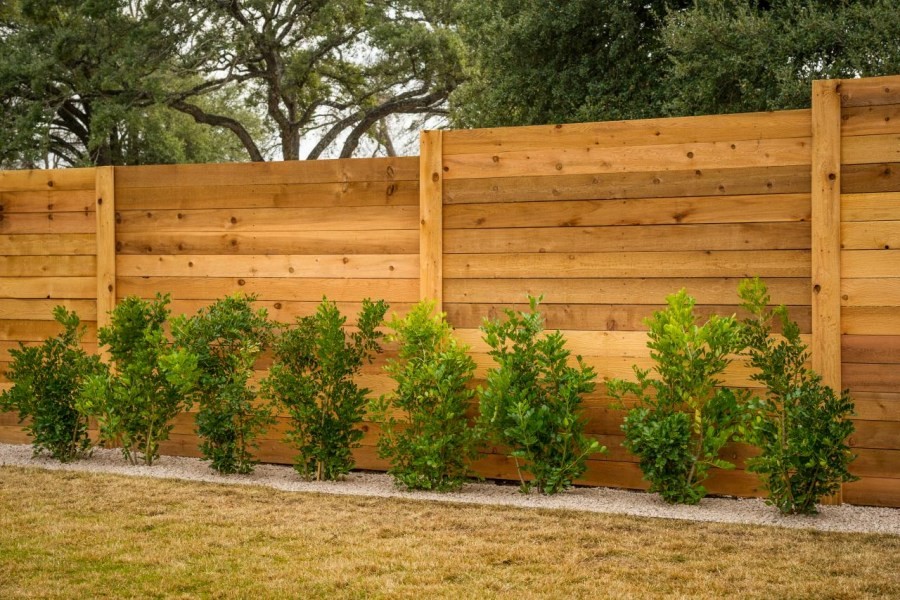
Wooden garden fence
Wood is one of the the best materials. It looks noble, can withstand bad weather, can be purchased without problems, and at the same time it is environmentally friendly.

It is not necessary to purchase a pre-prepared board. Just take out the supplies and scraps that have accumulated in the backyard and are still suitable for use - for example, ranch fences allow the use of uncut and uneven boards. You only need to dig in wooden poles along the intended path and nail the boards to them in a horizontal position.

It's quite simple and cheap fence for a summer residence, and if you take into account its environmental friendliness, then you should give preference to just such fencing.
In addition, depending on the length of the board, you choose its direction yourself, so you can build either a ranch fence or a simple vertical or horizontal fence, which has long proven itself.

To install a wooden fence with your own hands you will need:
- beam;
- boards;
- nails;
- hammer;
- shovel;
- sand.
If desired, you can add cement and bitumen to this list if you want the timber to be installed as stably as possible.
The principle of installing a wooden fence is very simple. You dig holes to install the support beam and fill them with cement or cover them tightly with sand, compacting it. This way the supports will not deform under the load of the boards and will become more stable.

Next, all you have to do is nail the boards to the posts. If you want to attach the boards vertically, then you will have to stretch and nail two planks between the supports, onto which the boards will then be attached. If you still want to see a ranch fence on your property, then it is enough to immediately attach the boards from pillar to post. More details in the video Ivan Galkin:
Just don’t forget that wood has its own shelf life and doesn’t like moisture. Therefore, be sure to paint the fence after construction and periodically inspect it for damage in order to repair or replace the board in time.


Picket fence
And picket fences are the most popular variety wooden fences. And no wonder, because the picket fence is so easy to install, economical to purchase and beautiful when finished.


Before starting construction, it is necessary to mark the area where the building will be located, determine its height and the frequency of installing the picket fence. Although we install a fence for protection, if we close the area tightly, we can deprive the plants of light, which will lead to crop failure.

The set of materials for building a picket fence is similar to what we presented above:
- timber for supports;
- board for horizontal screed;
- cement;
- sand;
- nails or screws.
Tools can be different - from a shovel with a hammer to a screwdriver and an electric drill. Only the speed of construction will depend on this, but not the quality of the fence.

First you need to install the pillars, which will become the basis of the fence. Therefore, dig holes for the timber at an equal distance from each other, but no further than the length of the board that will serve as a screed. After this, install the supports and fill them with cement mortar.
While the solution hardens (and this will take at least 3 days), you can proceed to the installation of sections. To do this, we cut the board to a length sufficient to attach its ends to the support. We place the sections on supports using nails or self-tapping screws and then attach a picket fence to them at an equal distance.
As you can see, the process of building a fence is quite simple and does not require any special construction skills - just patience to wait for the solution to harden. Then you can create a fence to your liking.


Well, to understand the intricacies of working with a picket fence and its installation, we recommend watching a video master class Andrey Krylov:
Metal profile fence
And yet, despite the beauty and cheapness of the picket fence and wood in general, it has one drawback - such a fence is short-lived and its maximum service life is only 15 years. Therefore, many, wanting to save money, are looking for a more durable, affordable and strong material - metal profiles.

Due to its durability and availability, corrugated sheeting has long been widely used among summer residents. It is used for garden beds, roofing and, of course, fencing.
Metal profiles do not have the most aesthetic appearance, so most designers categorically bypass corrugated sheets when creating beautiful and original fences. But its accessibility and ease of use plays into the hands of summer residents, allowing them to good fence for a do-it-yourself dacha.
The construction of such a fence is not much different from others. You will need the same support posts and boards for the horizontal screed, on which the profile itself will be attached.

And since metal profiles are still not the most popular material for creating a fence, it’s worth dwelling a little on basic requirements for its installation:
- The distance between supports should not exceed 2.5 meters. It’s better to stick to a more frequent, half-meter installation. This is due to the fact that the profiled sheet is quite flexible and will be deformed under the pressure of the wind, losing its beauty and, most importantly, strength. Therefore, the shorter the sections, the better the quality of the fence.
- The supports must be buried at least 1.5 meters into the ground. Despite the flexibility of the metal profile, the sheet itself is quite heavy and requires stable support. That is why it is recommended to cement all supports at the base.
- It is best to use not a beam as a post, but a pipe with a diameter of 6-8 cm and a wall thickness of at least 2 mm; such supports will definitely become a good basis for a stable and strong fence.
- It is recommended to use 3 horizontal logs when installing the profile - top, bottom and middle. This way the fence will be more resistant to deformation and will better hold its shape under any pressure.

And so that you can be convinced of the simplicity of building such a fence, we invite you to watch the channel’s video master class We do it ourselves 36, where they share with us all the tricks of working with metal profiles:
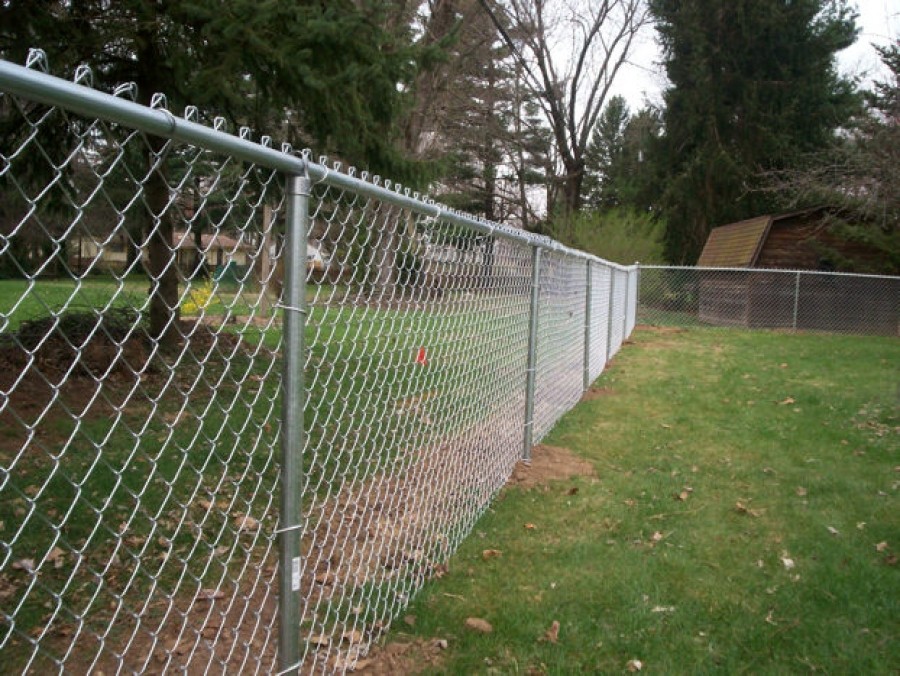
Mesh fence for a summer residence
And yet, one of the most budget-friendly options is a mesh fence. Like any metal product, the mesh tolerates most natural phenomena. And even rust can be prevented by timely treatment. Therefore, fences made from it are quite durable.

Fence mesh comes in several types:
- Chainlink, which is sold in rolls, treated with polymers to prevent corrosion and can be easily installed between posts without unnecessary partitions,
- Grooved, formed from wire with a cross section of 6-7 mm and bent by a wave. It has a strong weave. And thanks to it, it keeps its shape well.
- Welded, has a smaller wire cross-section than in the case of corrugated wire, but due to welding it is stronger. True, using it for a fence will be more expensive than in the case of chain-link.
A fence from any mesh can be made in two different ways:
- Stretch the fabric around the perimeter and attach it to the support posts.
- Stretch the mesh over the frame, and then assemble the fence from the resulting sections.


Allows you to keep track of your pets
Both methods have their own characteristics, so it is impossible to single out one of them as more profitable or simpler.
So, for example, by simply stretching the mesh from pillar to post, you will reduce the time for preparing materials. After all, you will only need to drive in the support, determine the height of the future fence and stretch the mesh, attaching it to the posts with wire.
This method is easy to implement and practical if you are short on time and want to make a temporary fence.
And yet it is worth considering that for a chain-link mesh, the posts will have to be placed at intervals of 1.5-2 meters, and this will increase the budget for the material. While for a corrugated mesh a distance of 3-4 meters is sufficient.

But if there are differences in height on your site, then this is the only solution if you have chosen mesh as the material. Sections are already prepared frames from metal profile, which brings us to the limitation - if you install them in a descending manner, there will be open space under the fence, which does not add either safety or aesthetic beauty to the site.
Installation of sections is simpler than stretching the mesh fabric. The finished frames are simply attached to pre-installed poles equipped with the necessary anchors, or even welded to them.

As you can see, the choice of grid and method depends entirely on your desire to improve the area, the time you have and, of course, the budget allocated for this.
To figure out which material is right for you, you can take a look at a detailed master class on selecting materials and installing them in a fence.
If you want more clarity and understanding of how to do everything correctly, with explanations from an experienced master, then you should watch the video tutorial from the channel RemontHelp.com:
The grid itself consists of cells, i.e. your area will be clearly visible from the street. Therefore, it is usually recommended to use this material only between areas so as not to block the plantings from light.

Original ideas for a fence at the dacha from scrap materials
Every practical summer resident will consider it his duty to save as much as possible and use everything that remains from other projects. Therefore, before you start building a fence with your own hands, we suggest you think about whether it’s worth rushing to the store to buy a mesh or picket fence? Maybe we can make do with improvised materials?
Then let's see what we have accumulated over the entire time we owned the dacha? And is it possible to make decent fences out of this trash?
There is only one answer - yes, you can.
AND car tires, and , and the covers from them can become a fence or its decoration. Moreover, it will be no worse or more boring than one assembled from high-quality materials.
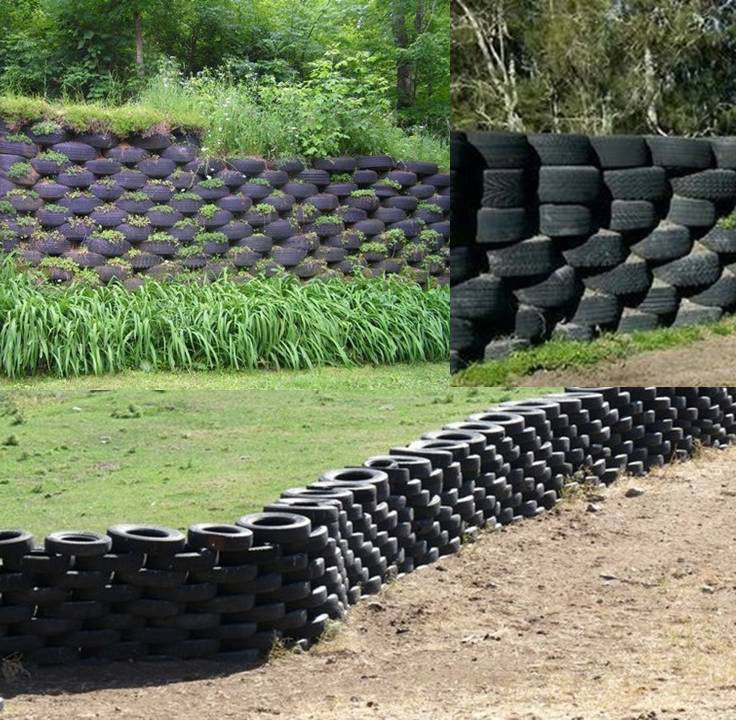
Tire fence
Let's start with tires, for example. A lot of this stuff always accumulates, so over time the question arises of where to put it. Recycling costs money, but the fence will also bring benefits. The choice is obvious.

Somewhat eclectic

All that remains is to fill the area well and begin to install the tires on top of each other in a checkerboard pattern, as if laying out bricks, or secure them to a previously installed chain-link fence.
By the way, if you build a fence from tires according to the pyramid principle, then the soil in the protruding parts can be used for flower beds, thus creating an entire green wall.
Fence made of plastic bottles
Plastic can be considered an ideal material for a fence. After all, it decomposes in at least 60 years, which means that a fence made from it will not suffer from rain or sun. Although bottle plastic is still soft, and its shape at first glance is not suitable for building a fence, many began to give it a chance and use it for other purposes.
To enclose the whole country cottage area like this plastic fence", you will need to accumulate a lot of bottles to create a complete fence.
The low weight of the material makes it easily deformed from physical damage. In addition, if you have accumulated mostly transparent bottles, then such a fence will not provide protection from prying eyes. But the cost of the finished fence will be small.
If you combine bottles different color, then you can assemble entire mosaics. That's why creative personalities agree to endure shortcomings for the sake of original fence, attracting the attention of passers-by.
To create a complete fence from plastic bottles It is recommended to take the same size of material. And it can already be assembled into a wall, stringing it on a wire like a curtain, or placing it on top of each other, filling the voids with cement mortar. The result will depend entirely on your desire to strengthen the fence or make it more airy.

By the way, bottle caps will also be used. After all, you can make a movable fence from them, and even with any pattern.
This will require a lot of caps with four drilled holes and meters of wire. Based on the colors you have, choose a pattern, and better diagram for embroidery with beads, and then simply string the lids in order, as in embroidery, in rows. Then pass the wire through the vertical holes, thus connecting the rows.

If you're just bored old fence, and you still want to put the covers into use, then simply screw them on with self-tapping screws, creating a bright pattern-panel on the fence. And now you already have interesting wall on the site, attracting the attention of kids and pleasing your eyes.
A master class from Soloremont.
However, an ordinary picket fence or an old picket fence can simply be painted in an original way.


Fun pencils


You create your own mood and desire to visit the dacha more often!
Do-it-yourself wattle fence in the country: a master class for lovers of rural romance
And if you have ever seen a Ukrainian farm or met huts in the south of Russia, then your heart could not remain indifferent to this peaceful romance. And it’s not even these dear ones that sink into your soul, as if toy houses, With thatched roof and whitewashed walls, and a wicker fence with clay hanging on it upside down.
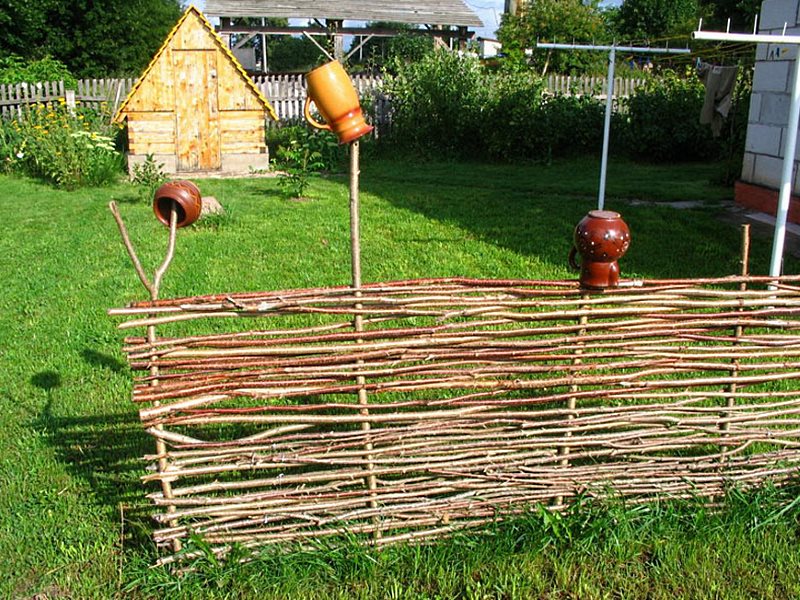
And yet, in addition to the decorative component, the wattle fence is perfect solution even for modern dacha. Such a fence is not inferior in strength to either wood or metal. And in terms of beauty and attractiveness it will rank first among them.
And from the point of view of economy, it fits well into our criteria. After all, weaving such a fence will allow you to realize your creative side, and will also save your budget.

Flowers are clearly visible
But first, it’s worth preparing the material:
- timber or logs as a support and basis for weaving;
- material for weaving (preference is given to willow twigs, although twigs of other trees are also suitable, the main condition is their plasticity);
- gloves;
- shovel;
- sand.
If you are going to weave along already driven posts, then first dig them in and cover them with sand and tamp them down. After that you can start working on the rods themselves. It is necessary to steam the rods so that they become more flexible and do not break when deformed.

You can weave in different ways:
- horizontally, passing the rods in a figure eight between the pillars. This method was borrowed from weavers;
- vertically, between horizontally located logs. This weaving turns out to be more decorative than practical. That is why it is used for fences between adjacent areas, but not external ones;
- diagonally, forming an original wooden mesh. This type weaving is the most labor-intensive, because the rods must be long for the fence to be at least of medium height. In addition, it is recommended to dig each rod into the ground for greater stability.

To understand the intricacies simple weaving and try to make your first wattle fence, we recommend taking a look at the video tutorial Oleg Bryukhanov, where he shares the secrets of creating a simple but beautiful fence.
If you prefer sectional fencing, then the master class will be useful for you Yury Kulakevich, where he shows how to create a wicker wicker base.
As you can see, a fence is not just a protective structure that hides a summer cottage from prying eyes, lovers of other people's crops and stray dogs. A fence created with your own hands is also a decoration of the territory, allowing you to enjoy every day spent in nature, among the plants we planted with great love.


