Through the correct implementation of the appropriate project, it is possible to ensure convenient storage important things and... A high-quality wall-mounted key holder with your own hands will be made quickly and without extra costs after reading the materials of this article. There are general thematic data and photos of particularly successful solutions. Some production technologies described in detail. Therefore, anyone can reproduce them accurately even without previous experience in performing similar work operations.
To formulate a list of requirements for this design, it is necessary to make several clarifications regarding the intended purpose:
- Decorative wall key holder installed in entrance area, in a visible place. Its aesthetic characteristics should.
- The direct loads from the keys themselves are not great. However, with intensive use it is difficult to count on very careful handling. Possible mechanical influences should be taken into account.
- Resilience will come in handy decorative coatings to changes in humidity and temperature. The differences in these parameters are especially large in the hallways of private houses.
- It is necessary to ensure good visibility of all objects. If necessary, install.
- In some cases, it is necessary to equip the structure with closing doors.
Taking into account the features noted above, we can consider various traditional solutions.

One glance is enough to check that objects are in their place. An additional advantage of this design is its simplicity. Decorative design is chosen individually. But a base with several hooks can be created in just a few tens of minutes. Of course, you will have to provide a suitable fixation system on the wall. But this problem is not difficult to solve using ordinary screws with dowels, or other standard ones.

They provide some protection against theft during visits by courier service workers and other strangers. For good review installed in the door glass insert. If necessary - inside


This modification rationally uses the free space inside the door. A mechanism was installed there that performs decorative and practical functions simultaneously.
For your information! Similar project not too difficult to implement on your own. You just need to purchase a watch that matches the size of the product. It is better to choose an electromechanical or electronic model to reduce the operating load on users.

It must be remembered that such accessories should not interfere with free movement. To store a large number of keys, you can use the internal volume, or open shelves.


It’s not difficult to make a wall-mounted wooden key holder at home
One of the main advantages of this material is its ease of processing. You can make a beautiful and functional key holder from wood with your own hands using simple carpentry. Chisels are also used to give the desired size and shape. An ideal flat surface is created using a plane and sandpaper. Interesting natural cut lines are preserved using clear varnish. If necessary, decoupage or other decorative coating techniques will be used.

In the example in the photo, you will need to find a birch log of suitable size. After cutting and cleaning the ends, hooks are screwed in from below. This completes the manufacturing process of the device.
This product is a fitting illustration of the shortcomings of simple solutions and the material itself:
- The primitive appearance imposes significant restrictions on matching the interiors.
- Without treatment, the log will become a source of pollution.
- If you do not treat the product with a deep primer, the structure will be quickly damaged by changes in humidity and temperature.

It’s not difficult to buy a wall-mounted wooden key holder in a store. But it’s much more pleasant to create the desired product yourself. If the plans are implemented correctly, it will become a source of pride that will be shown to guests.

This example shows that the key holder, with appropriate equipment, can be used to store jars and smartphones, gloves and other small items.
Reliability and durability of metal wall key holders


Metal products are highly durable. They keep their functional characteristics over many years of use in excellent condition. Using special technologies parts are made from these materials complex shape. The only drawback destruction can be called corrosive chemical reactions. To eliminate such negative manifestations, use different kinds decorative and protective coatings.

Metal is more difficult to process than wood. To manufacture some products you will have to master welding, casting, etc. complex technologies. You will have to equip your home workshop accordingly. Even without a thorough analysis, it is clear that the total investment will be significant.
What's good about making a plywood key holder with your own hands?
This material is better for the following reasons compared to the options discussed above:
- Plywood is created in factory conditions, so the thickness and other characteristics are precisely known.
- If you purchase a moisture-resistant variety, you can prevent damage from appropriate external influences.
- The outer surfaces, even without treatment, are quite smooth. They are well suited for applying images using various techniques.
- Unlike metal, plywood is not difficult to process.
- Even large products made from it weigh little.


Important! When using plywood, take into account the relatively low hardness of the material. The attachment points of hooks and other additional parts may become loose over time. We must also not forget about the limited resistance of wood to moisture and microorganisms. To protect against them, special impregnations are used.
Quick creation of key holders from cardboard with your own hands


These pictures explain the algorithm for creating a functional . You will need to first compile a list of necessary components. To avoid mistakes, you should prepare the project in advance. It is enough to make a sketch by hand with dimensions and other design parameters. You should also choose and master the application of beautiful, long-lasting images in advance.
This material itself is inexpensive, but you will have to take into account the additional costs of production technologies. We must not forget about the limited resistance of cardboard to mechanical loads, high humidity

In this photo of a do-it-yourself wall-mounted key holder, only a container for small items was made from a box. Solid base and decorative overlays- made of plywood. Metal hooks with the desired aesthetic characteristics were purchased at the store.
Examples from other materials
These examples clearly demonstrate the wide possibilities when using different materials. Quite often, craftsmen use combined designs. When preparing the appropriate project, you should pay attention to the following general recommendations:
- The power frame is calculated taking into account real future loads.
- The dimensions are selected so as to eliminate obstacles to the free movement of people.
- All parts of the product must be designed for the appropriate operating conditions. If necessary, they are protected from adverse external influences.
- In any case, it is necessary to consider the entire complex of works. Some complex components (hooks, locks) can be purchased in a retail chain, or ordered from a specialized workshop.


DIY key holder: master class and useful recommendations
Before making a pocket key holder with your own hands, you need to decide on the method of securing objects inside it.


In this example, you can look at some of the components:
- button for fixing in the closed state;
- You can use a carabiner to attach this useful accessory to your belt;
- rivet;
- device with rotating elements for keys;
- linings to prevent edge wear.
For manufacturing you will need not only leather and the special metal fittings listed above. Drawing the workpiece and cutting will not cause significant difficulties. However, quality seam.


To make a wall-mounted key holder from wood with your own hands, buy an expensive specialized equipment will not need. A suitable blank could be a completely free piece of driftwood of a special shape, found while walking through the forest. When purchasing in hardware store small boards, plywood - no significant costs will be required. You can also purchase standard fasteners, hooks, varnishes and paints there.

The following description will help you create such a key holder for the hallway with your own hands without mistakes:
- After specifying the dimensions, you need to buy plywood (up to 10 mm), rings with key chains.
- Make life-size drawings of individual parts. With its help, templates for the lower and upper parts and key rings are cut out of thick paper.
- They are applied to a sheet of plywood and outlined with a pencil.
- Cutouts are made along the marked lines using a jigsaw.
- Surfaces are sanded with sandpaper. Drill holes in the key rings for subsequent installation of the rings.
- The “house” and the base are fastened using PVA wood glue.
- “Hearts” and other decorations can be applied using burning devices.
- The products are varnished. After drying, fix it on the wall.
When creating a wall key holder with your own hands, it will help improve the decorative parameters of the product without extra costs and personal artistic talents. That's why this technology worth studying in detail:
- By preparing the surface, chips and irregularities are removed.
- Apply 2-3 layers of white paint, which forms a neutral color background and eliminates minor defects.
- Cut out the design you like from a napkin, making the edges uneven.
- Having attached such a blank to in the right place, apply (transparent PVA). Move from the center to the sides to remove air bubbles.
- After drying, coat with varnish.
Article
What is a person most often looking for before leaving home? This could be a mobile phone that you have to call from another or your home phone. Glasses that are always hiding somewhere. Well, the most important thing is the keys. It is their disappearance that causes the greatest stress when there are only a few minutes left before the meeting. To ensure that all these things are always in sight, it is important to know how to make a key holder with your own hands.
What can she be
A key holder is a small device, the design of which is limited only by the creative abilities of a particular person. She may be:
- Wall-mounted. It is usually located closer to the exit at eye level, so as to always be visible to the eye. It may have hooks in its design, or a more creative way of attaching the bundle may be used.
- Pocket. It is a small wallet in which keys are hidden. This product is useful because it allows you to prevent scratches on any gadgets, as well as prevent holes from appearing in pockets and bags.
- Tabletop. In this case, it can be made in the form of a small box with attractive patterns. In order not to forget to put your keys in it, a special keychain is put on them.
- Place it on the locker door. Many have a dressing table installed near the exit. Why not put the inside of the door to better use.

This item does not have to be only a place for keys. Additionally, it can be adapted for business or other notes. A special mount will be useful for glasses or a mobile phone. In addition, additional shelves will allow you to remember where your brush and shoe polish were left last time. You can also store portable storage devices (flash drives) here, or their covers, which inevitably tend to get lost somewhere. If wall-mounted key holders are located close to the door, then it is better to provide additional levels of protection so that no one sticking their hand in can take possession of the key ring.
There are a huge number of ready-made options. They are designed taking into account the location where they will be used. For office or other companies they do hardware which have a built-in lock. Hotels can boast of solutions that are created for a specific interior. Warehouses are not fancy, but are designed to serve their primary function rather than being pleasing to the eye. But the renovation of a house or apartment is a reflection of the inner world of its inhabitants. Therefore, it requires an individual approach.
Options for wall key holders

In the hands of a creative person, any little thing can become an element of design or decor. To make the simplest version you will need:
- intricately shaped branch;
- metal hooks;
- self-tapping screws;
- dowels

As the first element good decision there will be a knot from oak, larch or other wood, the wood of which is highly durable. But it doesn’t matter, you can take what you like the most.
- The wood is sanded with sandpaper. If possible, the bark is peeled off. This must be done because It may have unpleasant neighbors who will undermine the wood.
- Using a drill, several holes are drilled. Everything will depend on how many key rings there are in the family. The diameter should be slightly less than the diameter of the hook thread. Two additional ones will be required for mounting to the wall.
- To give the desired tone, the product can be coated with stain. After complete drying, it is worth walking over the surface with fine sandpaper to remove any raised fibers.
- The next step is varnish. It will give the pendant a complete look. You can use both matte and glossy, everything will depend on what would be better suited to the interior.
- The element is applied to the wall, and marks are made for fastenings for installation.
- The holes are prepared using a hammer drill, dowels are inserted and the key holder is screwed into place.
- The screw caps are recessed. They can be decorated with overlays or wood putty.
- The final touch will be screwing in the hooks and hanging out the key rings.
This option would be an excellent solution for bathhouses, houses made of logs or logs. Well suited to interiors where wood was used for decoration. Additionally, each hook can be marked with some symbol. They are applied using an electric burner or another method.

Most people have picture frames at home. Some of them may have been collecting dust on the shelves for a long time, because there is nowhere to put them. There is an advantage to breathing into them new life. For this you will also need:
- glue;
- a small piece of plywood or fiberboard;
- decorative hooks.
If you don't really like the appearance of the frame, then you can sand it and paint it in the color that suits you best. Plywood or fiberboard is adjusted to size so as to fit on the protruding sides of the frame. Additionally, this element can be covered with any fabric. In this case, you will need to make a gap of several millimeters on each side. The cover is fixed with glue. They also attach the hooks to the surface. The final touch will be installation on the wall.
Another option is to not use sheet material to cover the frame. After processing it, it is enough to screw the hooks into the inner upper end and further decorate them.
If you have jigsaw skills hand saw or electric, then you can implement another unique project. For it you will need:
- a piece of plywood measuring 25x15 cm;
- stain or paint.

Before starting production, you should think about what shape you would like the keychains to be in. It can be a figurine of a boy and a girl, circles various diameters, figures of objects to which the keys belong. Next, you can find a suitable simple drawing on the Internet or draw it yourself. After that:
- The ends of the board are processed. The chamfer is removed and the corners are rounded. This can be done manually with sandpaper or using a sanding machine.
- The drawn or printed picture is applied to the plane. This must be done so that its lower part coincides with the lower edge of the workpiece.
- The image is transferred with a pen or pencil. You can simply crush it with a suitable metal object.
- The lines are drawn so that they are clearly visible.
- Manual or electric jigsaw, in which a file with small tooth, cuts are made along the intended contour.
- The figures are put aside.
- The main sheet is trimmed by 5 mm from the bottom end. This is necessary so that the key rings protrude a little.
- The surface of the cut products is sanded to remove all chips. Holes for the rings are drilled.
- If desired, the surface can be treated with varnish, paint, stain, or some kind of pattern can be made using a burner or cutting knives.
- The product is screwed to the wall.

This key holder can be customized for each family member. For example, larger keychains are made for dad and mom, and smaller ones for children. Each of them will have its place and will no longer be lost.
One more interesting solution there will be a key holder made of a small block. To work you will need:
- block 25×8×3 cm;
- end a circular saw or jigsaw;
- a vice or stand in which you can maintain an angle of 45°;
- metal or wooden blanks.
Wood can be processed well using a sander or other device. The corners can be rounded a little, but you shouldn’t overdo it, because... the product will lose its appearance. Then, every 5–7 cm, transverse marks are made with lines. Using these marks, cuts are made at 45°. They must be to the middle, otherwise the structure will simply lose its strength. The block is fixed to the wall so that the slot goes down. For each bunch of keys, a small metal or wooden keychain is made. It can be anything in shape, but its thickness must match the width of the cut. When the keys are no longer needed, the key fob is simply inserted into the slot.

You can refuse keychains. Then the slots can be made of such a size that one of the keys can fit through them. All you have to do is insert it into place and you're done. The slots do not have to be at an angle. It is possible to position them completely horizontally.
Another interesting option would be to use small furniture locks. They can be purchased at any specialized store. Their number should correspond to the number of family members. Additionally you will need:
- wooden block;
- feather drills;
- screwdriver;
- sandpaper or sanding machine.

The beam must be of such thickness that inner part the castle could fit completely inside it and not look out. Spade drills will be needed in two sizes. The first should correspond to the diameter of the core, and the second to the diameter of the clamping nut. The wood is processed as desired so that the shape and configuration of the final product matches the existing elements in the house. Marking is being carried out. In this case, it is necessary to take into account the width of the facing ring. Using a feather drill of a smaller diameter, a hole is drilled from the front side. The castle is being tried on. Using a tape measure, measure the length of the thread for the nut. WITH reverse side a hole is drilled with a large drill to a depth slightly less than the length of the thread. It's necessary to drown fastener. The structure is fixed to the wall. Each keyhole is signed or highlighted in a specific color.
An original solution could be to use the decoupage technique. At its core, it is the process of decorating various surfaces with a pattern or picture you like. To carry out the entire operation you will need:
- any wooden blank;
- a napkin or rice card with a pattern you like;
- PVA glue;
- acrylic lacquer;
- acrylic white paint.

The surface is well cleaned and polished. Next, prepare the background for applying the desired image. To do this, the front side is painted with a white composition. After the first layer has dried, you need to apply another one. This way you can hide all the imperfections. The required area is torn out of a napkin or rice card. Or the edges are simply cut off so that they are not evenly cut, because it will not look as attractive. The drawing is placed in the middle of the prepared surface. PVA glue is applied with a large brush. You should start from the middle and move towards the edges. It is in this case that you will be able to smooth the paper well and also remove all air bubbles. The glue needs to set and dry. If the edges are left empty, then they can be decorated. Selected coloring composition in tune with the overall picture. A small piece of foam sponge is cut off and clamped into a clothespin. The device is dipped in pigment, the excess is removed and blotted in the gaps where there is no lining. The final touch will be a protective varnish. It is applied in two layers. To make it easier to see bald spots, just turn the plane towards the light. After drying, you will need to go over it with fine sandpaper to smooth out any imperfections. Hooks are selected as desired.
In addition to open options, you can make a secret one, which will be hidden behind a picture or other decorative element. To work you will need a small wooden box. You can take any cigar box, cream, or an old box that is no longer used for its intended purpose. A frame with some kind of beautiful picture. A recess is made in the wall. If it is drywall, then it will be enough to cut it to the required size. In the case of a concrete wall, you will have to tinker a little. The outline is cut out using a grinder with a diamond wheel, and the rest is knocked down with a hammer drill. The main compartment is placed in the middle and secured with self-tapping screws and dowels to the wall or spacer mechanisms to the drywall and sheathing. For the main lid, you will have to select hinges that would allow it to open together with the picture frame. Hooks are made inside. If you don’t show it to anyone, it will be difficult to guess that there is something hidden behind the drawing or photo.
If there are children in the house who like to play with Lego, then some of its parts can be used to secure keys. A single strip or small module is perfect for this. It must be glued or screwed to the wall. A small brick will be used as a keychain. Eat ready-made elements, in which holes have already been made. If they are missing, they can be easily drilled or melted with a hot awl or nail. When you need to leave the keys, you need to attach the part to the board.

A variation on the Lego theme will be the use of men from this constructor. You should proceed as described above, but it is better to glue the figures to the bar. You will also have to firmly fix your hands. The ring is inserted into the palm or simply hung on the forearm. It looks nice - it looks like the designer is asking you not to forget your house keys.
A convenient and unobtrusive option would be a unique design that will allow you to hang your keys without even looking. To implement the idea you will need a metal magnetic plate. These are usually used for knives in the kitchen. You just need to choose a convenient place near the exit, screw it to the wall and use it. How more keys not made of non-ferrous metals, the more securely the bond will hold.

Don't limit yourself in terms of materials used. For example, don't buy ready-made hooks. If there are unwanted keys from an old castle or apartment left in the house, then the holes in them are perfect for fastening them to a surface with a self-tapping screw, and the bent ends will be used for hanging. Forks can be used for the same purposes. In aluminum products, the teeth are bent to create a greeting gesture with two raised fingers or a branch climbing plants. Small wooden knots glued to the base will also act as holders.
A beautiful solution that will suit almost any interior is the use of beads or wooden balls. To complete the work you will need:
- balloons various sizes by the number of ligaments;
- small wooden block;
- strong thread or chain.

Made in balls through holes. A rope or chain is threaded through the holes. One end of it is fixed with a smaller bead or a beautiful knot. The second part is attached to the ring. Transverse slots are made in the treated block and it is fixed to the wall. In order to hang the product, you just need to thread the thread through the slot; the balls will prevent the bundles from falling out.

You can complement any key holder with a small drawer that will serve as an organizer. You can buy it at a store that sells household items. Often their purpose is to store clothespins. It is also easily assembled from small strips of plywood. This product will be an excellent accessory for a mobile phone or glasses.
It is much more convenient to carry things with you when they are neatly packed. A pocket key holder is not only a functional accessory, but also part of the image of its owner. It can be made with any design or with the family coat of arms and initials. You can really do all this yourself. For one of the common options you will need:
- a flap of skin measuring 16×10.5 cm;
- leather-colored rivets;
- riveter;
- blank for a key holder with carabiners;
- scissors;
- punch.

The key holder will look prettier if its edges are rounded. To apply markings, you can use a bottle cap, an intercom key, or something suitable. The following steps proceed in this order:
- A blank with carabiners is applied to the intended installation location.
- The marks from the holes are transferred to the skin.
- A bunch of keys is placed inside and the edges are rolled up. This will allow you to try on where you need to install rivets in order for the product to close. A corresponding note is made.
- The space under the keys is lined with the same leather. This will strengthen back wall and prevent wear and tear.
- Holes are made using the marked marks using a punch.
- The workpiece is fixed with rivets, and then the rivets are attached to the lapels.
An additional highlight will be a stitch of contrasting thread, which can be done with a slight indentation from the edge.
Another option can be made using the multitool principle. In order to determine which specific piece of leather is needed, you need to collect all the keys into one bunch and fasten them with something. You will need to place them on the material and make width marks with a margin of a few millimeters. Next, folds are made and marks are made. One of the sides remains open, and the strap serves as a fastener. The point is that the keys will be in a case, and you can take them out like a penknife. Additional components you will need are eyelets and furniture fasteners. The latter is usually used to fasten adjacent cabinets. It is a threaded bolt that goes into the tube. Their hats are made the same way.
- A hole is made in the places where the keys will be secured.
- The elements are placed in place, small leather pads are placed between them so that they do not rub or ring.
- Furniture fasteners are inserted.
- Rivets are fixed into the strap and on one of the sides.
- A grommet is installed at the bottom to which you can attach a keychain or something else.
Some people prefer a key holder in the shape of a wallet. To do this, a piece of leather is selected and a zipper is sewn into it. The ends are sewn up. A small braid with a ring or carabiner is attached inside. A bunch of keys hangs on it.
Desk key holder

The table key holder is often located on the dressing table. It is installed in the most visible place, so that when you enter the apartment, you can throw in the keys without looking and go about your business. In its role, you can use any small saucer or jewelry packaging. Exist ready-made solutions in the form of shell-shaped products or small cabinets.
As you can see, wooden or metal key holders are an affordable solution. You can make them yourself using what you have on hand. Many of the solutions presented can be used as a basis for your own research. We are interested in what ideas you have. Share them in the comments to the article.
Video
How to make a beautiful Japanese-style wooden key holder:
Master class on making a pocket key holder:
Photo


Key holder - convenient and original way keeping keys in order. There are two types of key holders - wall-mounted and pocket-mounted. We invite you to familiarize yourself with original ideas for making wall key holders with your own hands.
DIY wall key holder - varieties and characteristics
The design features of key holders changed in relation to the type of keys used. With the great popularity of spring and lever type locks, the size of the key holder was large and very original. Key holders had various shapes; forging, wood carving, painting, etc. were used to decorate them. Household key holders were made in the form of wall linings to avoid damaging the finish with a metal key.

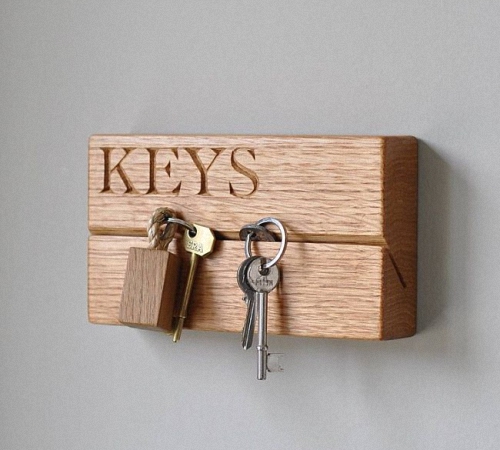
One of the most popular options is to make a key holder on a board, which easily fits into any type of interior, takes up little space and has a simple design.
Key holders in the form of small shelves are also distinguished by their compact size and ease of use. To make the simplest key holder, it is enough to use wood or plywood. This key holder can also be used to store other small items, such as glasses.
If the house has a large number of locked rooms, sheds, outbuildings, etc., then installing a key holder will be relevant large sizes. Most often, it has the shape of a board, each of the fragments of which has a certain type of key. The location of such a key holder is usually near the kitchen or in the utility room. For a standard set of keys used for locking front door, a small key holder is installed, usually located in the entrance room.
If access to the key holder is limited, it is necessary to install a lockable cabinet option. Such key holders are located in secluded places; some of their options are additionally locked with a key or a special code, which is even more convenient.
The most popular option for a key holder is the board key holder. Their wide distribution is explained by their simple design, ease of operation, and ease of self-production. It is quite possible to make such a key holder from a regular piece of board. However, it is recommended to choose boards that have oblique grooves for making a key holder. Next, you should install the fasteners for the keys. Most often, these are nails or screws. If necessary, the key holder is painted in accordance with the individual characteristics of the room and installed on the wall.
The key holder in the form of wooden block. All fasteners for keys are located on it firmly, without the possibility of deformation.
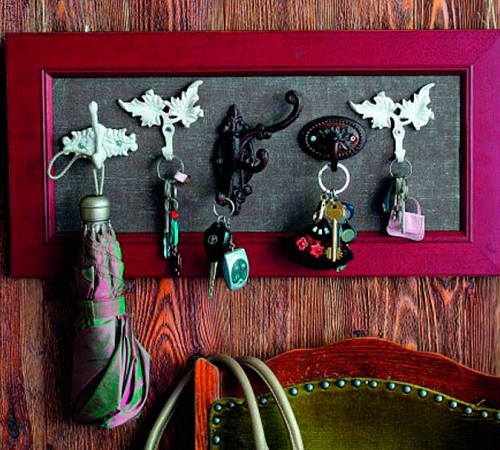
Another option for making a key holder is a frame. It goes well with the wall and makes the interior unusual and original. It is enough to build a frame from wood or other materials, attach hooks for keys to it and hang it on the wall. When provided with a durable finish, it functions as a highlighted image on the wall. To fix the frame to the wall, use glue or additional fasteners. The installation method is determined individually depending on the material from which the walls are made.
To combine several beneficial properties key holders, we recommend taking a closer look at the key holder and organizer. On such a spacious shelf there is room not only for keys, but also for various papers, notes, and reminders.

If there is a need to install secret locks or store not only keys, but also additional documentation, we recommend choosing a key holder cabinet. Sometimes the front door of such a key holder additionally serves as a clock.
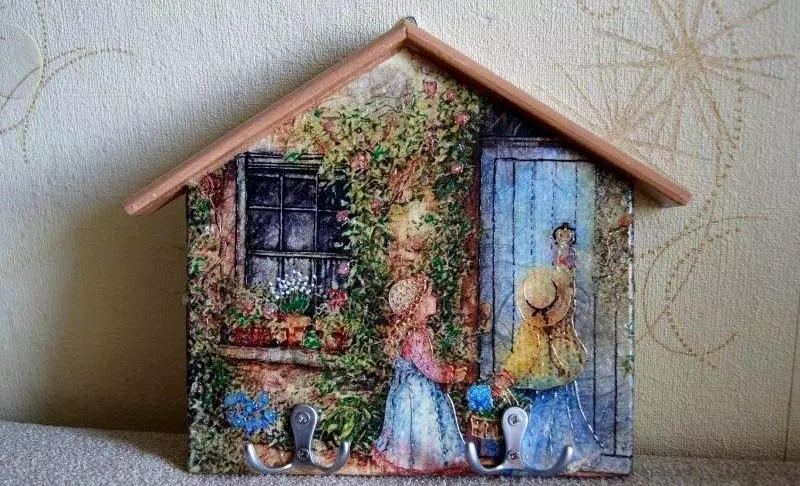
Another subtype of a cabinet-shaped key holder is a house key holder. Wood is most often used for its manufacture. The front door of the key holder is decorated with carvings, original drawings or even decoupage. The size of the house key holder is smaller than that of the closet, it is more compact and roomy.
DIY wall key holder - master class
If you have an unusual, original box in your house, you can also use it to build a key holder. In this case, fittings are attached to the back wall of the box to hold the keys, and it is fixed to the wall with self-tapping screws. Please note that the box in this case must be made of wood.
The same key holder can be made from an old wooden box, additionally decorating it. For additional strength, the wood is coated with moisture-resistant compounds.
Quite often, key holders are made from leftover plywood. With the help of a special tool, it is possible to create incredible works of art in the form of small key holders. For additional protection of plywood, it is varnished after sanding. Artistic sawing using plywood allows you to make key holders in the shape of a horse, heart, star, animal and plant.
In production, this process is performed using laser systems. However, it is quite possible to make this version of the key holder at home. For these purposes, follow the instructions below:
- draw or print the picture you want to receive;
- prepare a hand jigsaw;
- if you have a vibrating jigsaw, use it to cut particularly thin elements;
- the workpiece is made using manual cutting; in order to hide minor irregularities, the surface is additionally processed using an electric wood burner;
- To manufacture such a device, you will need an old soldering mechanism and a power supply unit.
We offer the option of making a key holder in the shape of a key from plywood. To make it, prepare a sketch of the shape you like. This type of key holder is especially interesting for children, as it has an extraordinary shape and resembles a “Golden Key”.
DIY wall key holders photo:

To make original wall key holders with your own hands, it is enough to use simple improvised means. The first option - fixing branches with knots on a wooden plank allows you to get a completely original key holder. Do not choose branches that are too small, as they may break under the weight of the key. Do not forget to additionally treat the wood with antiseptic compounds.
The second method is to use previously dried boletus mushroom. These elements are characterized by high strength and long service life. Using old tableware in the form of forks and spoons, you can also build original key holders. By bending the fork in a certain position, you get an original key hanger.
If you have experience working with various techniques for decorating key holders, you can build entire masterpieces in the form of wall key holders. You can make a key holder from polymer clay various forms and color solutions. The most important thing is that this element should be in harmony with the overall style of interior design. After drying, polymer clay acquires special strength and has a long service life. Additionally, fittings of a suitable size are fixed on the key holder.
For baking finished part oven is used. Only after complete cooling is the part ready for use and further opening with varnish.
The prepared surface of the key holder is also decorated using decoupage technique. To fix this removal, a matte or glossy varnish is used. There are two methods of decoupage - direct and reverse action. The first involves pre-coating the surface with a primer, applying glue and gluing the picture.
The second method uses transfer-type pictures installed on the surface. DIY wall key holder decoupage - has an original and unusual appearance. Particular attention must be paid to the absence of wrinkles on the surface that can be decoupaged. It is possible to decorate the key holder with 3D decoupage. However, for this you need to have experience in carrying out this kind of work.
How to design and make a wall-mounted key holder with your own hands
The process of designing a wall key holder needs to be given Special attention. After all, both the aesthetic appeal of the resulting product and the duration of its operation will depend on the quality of this process.
Most often, wooden key holders can be painted, varnished or artificially aged. For painting wooden products We recommend using paints on acrylic base. Their drying time reaches five hours. They are distinguished by a wide range of colors, the presence of simple and glossy shiny shades. With their help you can imitate wooden, metal, nickel, chrome surfaces.
After applying paint to a wooden wall key holder with your own hands, you can obtain a thin, durable and elastic coating. Thus, it is possible to achieve the effect of an aged surface. For these purposes, an abrasive sponge is used, which is used to treat the surface after painting.

As additional elements for decorating the surface of the key holder, we will highlight the following means:
- varnishes - these compositions allow you to obtain a glossy, matte, textured or smooth surface;
- varnishes with a 3D effect - allow you to create a fairly thick protective covering, which has individual optical components and makes the image convex;
- textured type pastes - after drying, they allow you to create an image in the form of an aging, cracking texture.
The technique of decorating a key holder with crackle consists of obtaining a cracked surface. At the same time, there are many varieties of this technique and different types of compositions for the formation of cracks.

How to make a wall key holder with your own hands photo
Particular attention should be paid to the key holder, with a secret mechanism. This option The key holder has the shape of a regular picture, which opens with a special lock. By pressing the secret bar, you can open the key holder. The secret bar, in this case, is equipped with special bevels that allow it to open and close with one click.
To make such a key holder you must have special experience and knowledge. First of all, you should draw up drawings and determine the mechanism for opening the picture. Next, you should build its frame part.
There should be hooks inside the picture for placing keys. Additionally, the mechanism is equipped with spring mechanisms and clamps. We recommend purchasing such a key holder in a specialized store, since its manufacture will require a lot of time and effort.
Another option for a hidden key holder is a key holder in the form of a shelf with a hidden lock. To open it, a special magnetic locking mechanism is used. Therefore, to open such a key holder you will need a special key.

DIY wall key holder made of wood
When working on a key holder you will need:
- scraps of plywood or fiberboard sheet;
- acrylic paints;
- varnish for treating wooden surfaces;
- napkins;
- brushes;
- glue;
- fittings and fasteners.
To make such a key holder from wood or plywood, make a rectangle or square. In order to give the surface maximum smoothness, sand it additionally. After stripping, the workpiece should be coated with spray paint. Next, the workpiece is varnished in several layers, allowing each layer to dry completely. Further actions to decorate the surface are determined individually and are described above.

To secure any decor, a moisture-resistant varnish is used, which will protect the key holder from destruction. Additionally, secure the key fittings to it. Using self-tapping screws, hang the finished product on the wall.
Making a wall-mounted key holder with your own hands is a completely individual process, the procedure for which is described in the drawings and depends on the preferences of the craftsman performing the work.
This article contains 7 step-by-step master classes- how to make a key holder with your own hands on the wall in the hallway on a very budget! This does not require a lot of materials and time, because they can be made from scrap materials such as wood, branches, old toys
And with the help of the original design of a key hanger, you can emphasize the style and interior of your home or apartment.
Sometimes, looking at familiar things from the other side, you can notice completely new possibilities for their use.
Here we offer a new look at using Lego. We perceive it as an educational children's game (of course, adults too, because it's no secret that parents sometimes buy toys more for themselves than for their children). But with the help of a few tools you can use it to make not only different figures for games, but also an original wall-mounted key holder.

Key tag - also made from a construction element

Wall-mounted key holder made of plastic Lego
You will need:
- Lego pieces: a flat rectangular platform and as many small pieces as you want to hang keys
- Drill with fine bit
- Screws, dowels (2 are enough)
- Keychain rings
- Ruler
- Marker
- Lace
- Scissors
Manufacturing:
- On small parts of the construction set (square or rectangular to your taste), on one side, mark the middle with a marker and carefully make a small hole with a drill.
- Tie a string to the ring and to the small part of the construction set (thread through drilled hole and tie a knot).
- On a large flat platform, make two symmetrical holes for screws.
- Attach the platform to the wall (depending on what kind of wall, use dowels)
- Put your keys on rings, hanging from small pieces and attach them to the platform.
Enjoy using it and don't lose your keys again!

Master class No. 2: Original key tags
Let's look at how to make a simple wooden key holder that can be mounted on the wall. This Master Class is very simple, for complete beginners in tinkering with their own hands.

Materials:
- Dremel 8050 Micro multi-tool or similar model (can be used separately grinder, saw, drill)
- wooden block approximately 2.5 cm x 5 cm x 14 (we made it for 4 keys, if you need a different number, take the appropriate size)
- two small pendants for shelves (consider the selected size of the bar)
- leather lace (we used 1.5mm thick, but a regular strong lace can also be used)
- screwdriver
- 4 small opening rings
- 4 pendants around the neck (you can take the keychains you like)
- wire cutters
- round pliers
- pencil
- ruler

Step 1: To make the holder you need:
- Sand the wood block.
- Fix it and go through it first coarser grinding disc to remove irregularities and protrusions, then medium and smooth.
- Mark with a pencil the place for the hangers on the back side of the block and use an engraving cutter to make recesses with a depth of approximately 3 mm(the bar is symmetrical, so choose one of the two back sides at your discretion).
- In the place where there is an opening in the suspension, make recess another 3 mm.
- Place the hangers on the block and secure them with screws.
- On the front of the block, make marks for 4 openings(parallel, as in the photo) and using a cutter attachment, make indentations about 1 cm deep.
- Attach the block to the wall.
Step 2: All that remains is to make the keychains:
- Regardless of whether you took a pendant or a keychain, remove the mount (the keychain is too thick for the opening, and the pendant is too long). Use wire cutters if necessary.
- Place the release ring on the key. Can be clamped with pliers.
- Cut off from leather lace 4 even parts, thread through the key ring and keychain, tie.
Instead of a wire polygon, you can use any object, for example, any toy or ball.

Key tags can be made of any shape and type
Master class No. 3: Key hanger made from tree branches
The easiest way to make a key holder is to use tree branches.
- How to do it right .
- Then we decorate them at our discretion, either varnish or paint with paint.
- We buy in the store hooks, they must be sharpened on one side and carefully hammer it into the wood.
There are many design options for such hangers - look at the photos and choose!

Boho style key hanger


Very simple and beautiful!


Different options for hangers for keys and not only using branches

Master class No. 4: Made from wood and old keys
It sounds strange, but it is true, in this master class we will actually make a key holder, the hooks of which will be made from old and unnecessary keys.

Retro housekeeper
You will need:
- Rectangular wooden board
- Old keys (3-5 pieces depending on how many hooks you need)
- Nails (short and thin, but the head should be wide enough)
- Pliers
- Sandpaper
Manufacturing:
Using a saw, give the board the desired size and shape, and round the corners. Then use sandpaper to remove all burrs. If you are lucky enough to immediately find a suitable board, this step is skipped.

Attaching hooks to the base of the key holder
- Lock the key head, and bend the blade with pliers to form a hook shape. Repeat this step with the remaining keys.
- Place evenly hook keys on a board.
- In the place where there are holes in the key heads, drive in the nails(the hat must be bigger hole on the key to hold it).
- The key holder is ready, all that remains is to hang it on the wall. This can be done by attaching hangers to the back of the board or driving two nails into the wall and making holes in the board and hanging them by them.
It looks very original and immediately reminds of its purpose.
Master class No. 5: Key holder with a vase
In fact, such a board with hooks can be used not only as a key holder in the hallway, but also as a kitchen hanger for potholders and towels, or for the bathroom.

Key holder with vase
It looks interesting and unusual, because it’s not often that you see a vase of flowers on a hanger.
Materials:
- Rectangular wooden board
- White paint for wood
- Hooks (3-4 pieces)
- Jar (maximum 0.5 l)
- Metal pipe clamp (must fit the jar)
- Hangers for fastening
- Screws
- Drill
Manufacturing:

- Paint the board in White color . This will perform two functions at once: aesthetic and protective, the latter is especially important when used in the kitchen or bathroom to reduce the effect of heat and moisture on the wood. Let the paint dry.
- Attach the hooks and clamp to the board using screws and a drill.
- The hooks have special holes for screws, but most likely they will not be in the clamp, so you should use a drill.
- Attach the hangers to the reverse sides e boards and hang them in the chosen place.
- Insert a jar with a bouquet or sprig of flowers into the clamp.
It turned out beautiful housekeeper in soft colors. It will complement the interior well and will serve as an additional accessory for decorating the apartment.
We also described in more detail how to make such a mount - as in the photo below.

Master class No. 6: Housekeeper “like in a hotel”
Such a housekeeper has not only original design, but a definite advantage over others described here is clarity and orderliness. It’s not for nothing that they are used in hotels, because each key location can be signed.
Only we will indicate not the room number, but the purpose of the key: for the house, work, dacha, car, mailbox, parents’ apartment, staircase, etc. Often the keys to different rooms look the same, such a key holder will once and for all save you from situations when, instead of keys to the office, you put the keys to the dacha in your bag, and then you cannot open the door.

Large wooden key holder

Necessary materials:
- Thin wooden strip (approximately 8 cm wide)
- Frame strips
- Set of metal tags
- Hooks (threaded)
- Dye
- Suspensions
- Small nails or screws (very thin)
Assembly steps:
Step #1: Prepare the base
Saw the wooden plank into 5 equal parts. When choosing the length of the planks, keep in mind that you will then glue them together to make a rectangle or square; calculate the dimensions for the desired shape.

- Form a frame the right size from planks for frames.
- Staple 5 planks and frame special glue for wood, as it shown on the picture.
- Now we need to paint this entire structure.
You can first apply a wood antiseptic, wait until it dries, and then apply several layers of paint one after another. Wait for it to dry.


If you wish, you can give the wood an antique effect by rubbing it a little with sandpaper.
Step 2: Attach tags


- It's time to attach the tags. Think about how the board will hang: so that the slats are vertical or horizontal (in our example they are vertical). Lightly with a pencil mark the mounting locations, they should be at the same distance. You can place them under a ruler or make a stencil out of paper. Attach the tags to the wooden base with nails or screws.
- Under the tags in the center of each of them Make thin holes for the hooks with a drill, use the thinnest nozzle.
- Screw the hooks into the holes.
- Attach pendants on the back of the key holder and hang it on the wall.
- Insert notes about the purpose of the hooks into the key tags and hang the keys.
Use it to your heart's content!
Ideas for key holders using improvised means
From a tennis ball
Easy way to make a key holder from a tennis ball:
- fasten with liquid nails a ball to the suction cup (bath hooks are sold like this),
- make a cut sharp knife in the center
- decorate: attach eyes (can be taken from an old doll) or draw with a marker.

How long have you been looking for your keys? It doesn’t matter when: in the morning, hurrying to work, or in the evening, getting ready to go for a walk. The question is that in the ranking of the most frequently lost items, keys are in first place (sharing it with the TV remote control). This problem constantly steals your precious time and nerves.
What to do about it? Naturally, have a separate storage space.

There's a place for everything
Just putting your keys in one place is trivial. Moreover, there have been key holders for a long time - original and convenient way storage They come in two types: pocket and wall-mounted.

Don’t rush to run to the store and buy yourself a key holder, because you can make it yourself!

Types of key holders for walls
When choosing a storage location, the main attention should be paid to the shape and size of the keys. These parameters will be the main ones during manufacturing.


How to make a key holder in the form of an overlay for a wall? Most often, planks are used, which can easily be placed in absolutely any corner and take up little space. If compactness is for you main criterion, then you can use small shelves.

You don’t need a lot of materials or money here, just find a sheet of plywood or timber. In this case, in addition to the keys, you can place several more items on the shelf.

Nowadays it is very popular to structure everything: from the workplace to the work schedule. This approach can be transferred to the home environment.

Place a board on which the keys will be marked figuratively. The solution is perfect for those who have a large number of keys. It will be immediately clear which elements are missing.

Separately, it is worth noting the key holders, access to which must be limited - a mini-safe. The design will look like a lockable cabinet (you can find a huge number of various photos hand-made key holders), and should be placed in a secret place.


For those who constantly improve their home and keep it in good condition own style, you can make a cabinet in the shape of a house or decorate it additional elements. This will allow you not only to make a decorative element, but also to surprise everyone with your imagination.


How to make a wall-mounted key holder with your own hands?
Let's move on to the most interesting part. Buying furniture is nice, but doing something with your own hands is beyond competition. Let's start with the simplest and cheapest method.

We will need a box. The more original it is, the more effective the wall key holder will be. We attach elements to the back wall to fix the structure on the wall. It is enough to place loops that will be convenient to hang on the screws.

For light keys you can use cardboard box, but to be safe, look for a wooden one or a box. In the second case, you need to cover the wooden key holder with a moisture-resistant compound, so it will last longer.

Plywood - universal material, which can be used almost anywhere. If you have leftovers or pieces, using a special tool you can create a unique work of art.

What do I need to do? Everything is very simple:
- draw the required design on a sheet of plywood;
- find a hand jigsaw in your stash;
- carefully cut out the elements (if the surface is slightly damaged, use an electric wood burner);
- fasten all the elements and enjoy the result!

Ideas for decorative key holders
Let's reveal a few more secrets of making a decorative masterpiece.

Using dry branches will add uniqueness to your creation. It is enough to place them on a wooden board. You should not choose thin branches, because they may break under the weight of the key. Be sure to treat the wood!


For decoration, you can use previously dried mushrooms - boletus, for example. They are highly durable and can “please the eye” of the owner for a long time. To execute decorative design, just bend the fork in the desired direction.

This is just the beginning of the journey! Having gained experience, you will be able to realize all your fantasies and completely decorate your room with masterpieces.

Design of key holders
If you are more of an artist at heart than a sculptor, then it doesn’t matter! Stock up acrylic paints and fantasy. After all, you can make a work of art from any box or board.

This approach is suitable for anyone, because you do not need to have special cutting tools or skills. All you have to do is start drawing.


“A gift with your own hands is the most valuable.” This phrase has been with us since kindergarten. If we made crafts from leaves and chestnuts then, then why not apply these skills now?


After all, a homemade key holder will become a valuable item not only at home, but also an excellent gift for family or friends. When we do something ourselves, we put our soul into it. Any person will appreciate this approach.

DIY key holder photo


