The COX Pointing Gun can be used to apply most bulk materials, although it is intended primarily for replacing mortar in brick and masonry joints.
According to this functional purpose it has two fundamental advantages over traditional trowel grouting methods:
- Greater productivity - especially with a team-integrated approach, including, for example, preparation of the seam, preparation and then application of the mortar.
- Dense filling of the seam from depth to surface ensures high quality finishing and virtually eliminates the possibility of the formation of voids and cracks.
- The result of this treatment is a strong and durable seam that is resistant to freeze/thaw cycles.
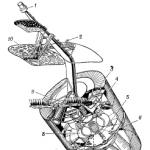
POINTING GUN The grouting solution is placed in a plastic cylinder, one end of which is open and the other has a tightly fitted spout.
This cylinder is placed in the frame body of the gun, after which a rubber plunger is inserted into the open end to supply material from the cylinder.
The advantages of this pistol, which uses durable steel and aluminum in its construction, include:
- wear-resistant, durable drive cartridge;
- high gear ratio of the feed mechanism 12:1; ergonomically shaped handle and trigger lever that fit any hand size, ensuring comfortable operation over long periods of time.
NOTE: Only fluid or high-grade solutions containing rounded sand can be used with this Cox gun - otherwise the materials will not flow freely under pressure.
- 1.Standard cylindrical body with tightly fitted conical spout = replacement of components without high costs
- 2.Rubber plunger placed between steel washers = ability to regulate optimal material flow.
- 3.High transmission ratio of the feed mechanism = minimal effort during operation and reduced fatigue.
- 4.Patented driver chuck (sintered steel) = high efficiency and long term services
- 5.Hardened rod, trigger and hinge pins = high durability
- 6.Galvanized working parts = corrosion resistance
- 7.Specially shaped handle and trigger lever = ease of use
- 8. Steel frame made using relief welding = strength and durability
- Durable epoxy coating = corrosion resistance
VERY IMPORTANT!!! When using grout, in the process of grouting, you need to know and remember some of the features of this mixture: if there is no practice in using such products, then it is better to first work out the process on rejected finishing materials (panels, etc.), and it is better to start grouting the seams from the back sides of the building, from niches or openings, from places adjacent to the roof that are not very noticeable in order to “fill your hand.”
Mixing the mixture.
It is poured into the bucket pure water(4.5-5.5 l of water per 25 kg of dry grout mixture) room temperature From +15 to +20 ˚С and 2/3 of the bag is poured into the water. Mix thoroughly for 1 minute with a drill with an attachment (400-600 rpm), after which the rest of the bag is poured out and mixed for 5 minutes. Then the grout is allowed to stand (breathe) for 2-5 minutes, this is necessary for all components to react. In practice, the thickness of the solution should be such that if you take it on your finger a small amount of mixed mixture, then the ideal state will be when the mass is very plastic, but does not flow (does not slide) off the finger. This needs to be worked out experimentally.
Working with the solution.
Grout gun being filled ready-made solution(in this case, it is better to cut the nose of the gun to the width of the seam or 1-2 mm less) and apply it evenly, tightly into the seam, always with a slight overlap, 1-2 mm. Those. the grout should protrude from the seam in an even ridge, 1-2 mm above the tile level, but at the same time not protrude onto the surface facing material- do not get it dirty. Depending on the time of year, weather conditions and temperature environment THE JOINT IS RUBBED STRICTLY AFTER THE SOLUTION HAS STAYED IN THE JOINT TO THE CONDITION OF WET SAND, approximately from 30-40 minutes to 2.5 hours (2.5 hours in early spring or late autumn). In other words, this is a state when grout mixture It has almost given up all the water to tiles, bricks, etc., but has not yet begun to set. This can be determined by using a spatula or other object to remove a small area of 1-2 mm in depth from the grout that has been kept for a long time. If the grout begins to crumble with wet grains of sand or small groups of grains of sand, then you can start grouting. If the solution is still stretchy and sticky, then you need to wait a little longer.
- if the seam is rubbed traditional way- the mixture will be “smoothed” and a dye will come out of it, which when dried will give a color change half a tone lighter, and will not have the rough surface inherent in natural masonry. If this happens, then you can try to carefully “comb” the surface of the seam with a narrow brush of medium hardness, without staining the finished surface of the brick or tile (especially relevant when rubbing clinker tiles, especially clinker tiles with increased porosity);
- if you embed the still plastic mixture, the grout will simply crawl, reaching for the jointing tool with all the ensuing consequences.
IMPORTANT!!! Under no circumstances should the grout be rubbed wet using a sponge! The dye is very strong; when grouting “wet”, it penetrates even into the glazed surface of the tile, leaving stains, not to mention porous materials. If it is necessary to achieve the effect of rubbing the grout “behind the face”, then after 40 minutes - 90 minutes the excess grout rising above the clinker tiles is removed with a rubber or plastic spatula, as if removing shavings. After this, we “brush away” unnecessary residues, dust, individual pieces or grains of sand, without “excessive fanaticism,” i.e. do not rub into the embroidered material (as the grains of sand in the solution were dyed, if you are too zealous, the dye may stain the front surface). If it is necessary to achieve the effect of a semicircular recessed seam in the form of a “groove”, then also remove 1-2mm from the surface, but using a semicircular jointing tool. After finishing the seams, all excess, crumbs and dust are brushed off with a not very hard brush (a brush with natural fluffy bristles works well). Other methods of jointing joints filled with mortar are possible, it all depends on creative approach to the jointing process, the main thing is to remember the above!
If in some places the grout does get onto the front surface, then on the glazed tiles these places can be treated with a strongly wrung-out rag. In case of clinker materials or materials with increased porosity, you need to wait for the rubbed seams to dry, and after that you can carefully scrape off the “stained areas” with a drywall knife or other sharp object and then carefully “brush off” the dust from the surfaces. To a greater extent, the implementation of these recommendations is necessary for selected light tones of grout in combination with dark shades bricks or tiles.
After jointing, the surface looks embossed due to the large fraction of white quartz sand, natural stone fraction 0.84mm/1.0mm and perfectly highlights the beauty of clinker tiles on thermal panels, creating the impression of a building built from European clinker bricks in a colored solution.
The development of technology and the emergence of new materials has not spared such an industry as construction. New species building materials significantly improved both the quality of the houses being built and the attractiveness of the finishing. This also applies to the material of walls, roofing, windows, insulation and fire safety, finishing materials.
Finishing work is now experiencing a real boom. Every year new technologies and devices appear that improve the quality of finishing, new types of finishing materials. For example, instead of glue or cement for gluing PVC tiles onto concrete coverings manually now they use glue - foam located in a pressure cylinder. Using a special gun, the foam comes out of the nozzle and is evenly applied to the surface. The clutch is fast and of high quality. Also, instead of spatulas for grouting joints in decorative masonry A gun is used between the stones, with which the seams are filled very quickly and efficiently.
Stone grout gun
Of course, if you need to grout the seams on the tiles on the work wall in the kitchen, it is not at all necessary to buy a gun for this purpose. Ordinary is enough rubber spatula.
 Types of spatulas for grouting joints
 These spatulas can be used to manually grout the joints between the tiles at home. But if you cover external surfaces, for example, with artificial tiles imitating torn stone, then traditional methods won't fit. To do this, you need to use a construction gun, which was invented specifically for such purposes. An ordinary culinary syringe was taken as the principle, but everything took into account the characteristics of the working mixture itself and the place of work. A gun for grouting stone joints has a high productivity, which is very important in a team approach, which consists of one person preparing the joint, another applying the mortar, and a third finally cleaning the joint.
There are two types of guns: for filling joints between stones and for grouting joints between ceramic tiles.
The design of the pistol is:
- cylindrical body;
- nozzle, which is a cone with a long spout;
- piston - a plunger to squeeze out the solution;
- the actual trigger device.
For example, this tool is POINTING GUN, an English manufacturer, which will ensure quality and ease of use.
 Design of a gun for grouting stone joints
 Its features are:
- a body with a spout, if any component needs to be replaced, it can be easily done;
- a piston, which is located between the washers, with the help of which the flow of the mixture is regulated;
- feed mechanism with increased feed, so as not to waste much effort when working;
- drive chuck, the company’s own know-how with a long service life;
- a rod with a starting device, also with a long service life;
- all parts are galvanized;
- comfortable handles;
- welded steel frame, very durable and can withstand pressure loads;
- epoxy coating.
If the material is porous, not only like stone, but also like artificial tiles in the form of bricks and other similar materials, it is recommended to use a gun version to fill the joints between stones.
Using a pistol
To start ready mixture filled or using a spatula or other device into the cylinder body, then squeezed out using a piston into the seam. If the seam is horizontal, the strip is applied from left to right; if it is vertical, then it is applied from bottom to top. This gun can also be used to fill various unplanned voids and cavities.
 Sealing process
 Working with a gun is also convenient because it maintains cleanliness when working; you do not need to clean the edges of the tiles, as when working with a spatula.
But in some cases, the use of this device is impossible, for example, when laying directly with bricks, not brick-shaped tiles, clinker tiles, natural stone. This is due to the fact that the mixtures for filling the joints between tiles and between bricks have different compositions and the latter, containing sand, simply cannot be squeezed out through the gun.
Therefore, you need to know what kind of grout is used for what material. Basically, the same composition used for grouting is used to glue the tiles. But are currently being developed special compounds for filling joints, and glue is recommended to be used only for gluing tiles.
There are several types of grout composition:
- made on a cement base;
- made with the addition of epoxy resins;
- manufactured with the addition of various latex-based plasticizers;
- made with the addition of silicone;
- made with the addition of rubber.
You can choose any one, the only condition is that the mixture must be used within 40 minutes. Therefore, it is better to choose a dry mixture and prepare the composition immediately before use.
Before starting work, you must first clean the gaps and crevices between various types tiles, then moisten them with a sprayer, prepare a solution and fill the gun cylinder. And then get to work. And when the seam begins to harden, the seam begins to be unstitched using a jointer.
Which stone grout gun to buy?
These syringes are produced by various companies, some are expensive, some cheap tools. The main thing is that the equipment is of high quality and the mixture comes out evenly through the spout, and not through the cracks from the piston.
If this happens, this is not only an unnecessary consumption of the mixture, but also poor-quality work and dirtying not only your hands, but also the material, especially if the surface is rough. It will take a lot of time to clean it up.
The choice of tools is not as wide as it may seem at first.
If we look at the models, a good option would be STAYER Profi 0673-31, German company, made in China. It is quite cheap, no more than 400 rubles, but judging by the reviews, it leaks a little grout and you have to put the bag on the piston.
You can see a gun for grouting stone joints at a price of 1,500 rubles
You can see the difference with the QUICK-MIX stone grouting syringe gun. The price of this gun for stone grouting is already 6100, but this is a tool for real professionals who value both their reputation and their time. This is a Russian brand, but the quality of workmanship speaks for itself.
 Grouting gun from a Russian company
 There is also a middle ground between them - POINTING GUN for 3,300 rubles, from the British manufacturer P.C.COX., and of excellent workmanship, easy to use and does not require much effort on the handle, where the system increases the pressure using a mechanism. The tool comes with a manufacturer's warranty. Moreover, they can also work with mortar for filling joints between bricks, which not every syringe can do and use a cut to fill the joint with a spout. It is easy to both fill and empty the mixture.
You can also see a gun for grouting stone joints at a price of 1,300 rubles Russian manufacturer Euro Clinker.
 Syringe - pistol from the Euro Clinker company