The camera does its job, keeping the image in front of the lens, highlighting the light required areas frame for artistic effect. The photographer sets the shooting parameters and clicks the shutter. What is the model doing at this time? If she had just stood there, there would have been no problem setting up the shot. And the work of a fashion model would not be so highly valued. The role of a model is to work with your body, in your stance, pose, facial expressions and hand position. Professionals from both sides of the lens know how to stand and turn around to hide figure flaws and highlight advantages.
Correct body curves during a photo shoot
There are poses for any type of shooting - standard options suitable for any body type: stand or sit beautifully, lean on a table or wall, add objects to the frame. The photograph should have an idea and story reflected in the details, outfits and pose of the model.
- It’s quite simple to stand or sit correctly in order to get a beautiful figure and feminine curves in a photo. Rule 3, following them, the camera will capture a photogenic image in any position.
Rule one
We stretch our neck, the body stretches, the shoulders drop, and the body automatically aligns. The lines become smooth, feminine, graceful. The main thing is not to overdo it, an unnatural neck that is too elongated will not add beauty. Bring your shoulder blades together as much as possible, and your back will straighten, your neck will lengthen, and the pose will look natural.
Rule two
A bend in the lower back will allow you to show off your figure. The rule commonly referred to is "S", which stands for correct position bodies for a photo shoot. Standing photography requires beautiful lines and curves: bend your waist as far as possible, with your shoulders back and neck long, and shift your weight to one leg. A similar situation will occur when shooting against a wall; if you lean your whole body, you will get a straight back without bends, and you won’t be able to bring your shoulder blades together. Lean slightly forward, arching your lumbar region, and squat slightly. In this form, the body is shaped like the English letter S, which looks beautiful and feminine in the photograph.

Rule three
Don't relax, especially when shooting in sitting poses. Bend your lower back as much as possible, lean forward, keeping your neck extended and your shoulder blades retracted. This will make it possible to draw in the tummy, emphasize the line of the chest and back, and beautifully show off the legs. Try to keep your shoulders below chin level, pulled back as much as possible. A simple rule will allow you to enlarge your breasts, emphasize the line of your neck, make your back softer and more beautiful, tighten your tummy, and make your butt round.
Poses for shooting while sitting
- The main task in sitting shooting is to show the femininity and elegance of the model, hiding flaws. For example, extra centimeters in the waist area or legs that are not long enough.
You can sit on the floor or a horizontal surface, the body is located in one line, you can lean on the wall or interior items. The neck should be elongated, the shoulders should be straightened, and the back should be arched in the lower back to make the body look feminine and proportional. Do not strain your muscles too much and make the pose unnatural; try not to show any effort; your face should look relaxed. Try bending one leg and placing it in front of you, or stretching it out and sitting on your knees. The main thing is to make sure that there are no visible folds and that the tummy does not “fall out”, and that the hips do not appear flattened.
If you use a high chair, sofa or any surface that allows you to lower your legs to the floor, then it becomes possible to show their beauty and visually lengthen them. To do this, the photographer must be 30-40 cm below the level of the model’s face. And the legs need to be extended, but they should not overlap each other and look natural.
When shooting while sitting, it is permissible to round your back, lean on your knees, or hug them with your arms to achieve the effect of fragility and defenselessness. But the neck should still be kept tense, as should the abdominal muscles.


.jpg)

Poses for a standing photo shoot
The most popular type of filming with many variations of posing and framing has unlimited scope for imagination. The photo in full height There are a few important features, unless the artistic idea provides for another option. The main thing that a photographer needs to know is that to get a proportional silhouette, you should shoot by lowering the camera to the level of your chin or chest, your legs will visually stretch out, and your body will appear slimmer, taller and thinner. Using this technique, you can visually add height to a girl. If the situation requires the opposite solution, then raise the camera a couple of centimeters above the model’s head, the body will visually shorten.


As for shooting while standing in a photo studio, special backgrounds and cycloramas are used, as well as lighting and soft boxes that allow you to set the right light for certain positions. Main rules:
- If the photographer does not intend otherwise, then the back should be straightened, and the lower back will have to bend as much as possible. A straight stand without bends looks ridiculous and does not add beauty to the model. The standard is the English letter “S”, showing all the lines of the body. The weight should be transferred to one leg, the stomach should be pulled in and the shoulder blades should be pulled together, the head and chin should be pulled up, stretching the neck.
- There are many variations in the position of your hands when shooting standing: raise them up, rest them on your sides, put them in your pockets, or play with your hair. They should look natural, a little relaxed, but without the “hanging lashes” effect. It is better to straighten your fingers, do not clench them into fists or fan them out.
- The model should be relaxed and collected at the same time; the camera reinforces and emphasizes any tension. An excessively retracted stomach, clasped hands, and a tense face are the result of overexertion and look ugly in the photo.
Don't be afraid to move, some successful shots are taken in motion, when the body is in a natural position and there is no feeling of being picturesque. Again, every photographer’s idea can look original and interesting, even if it violates all known posing rules.


Portrait photography, features
A close-up implies perfect clarity, the absence of visible imperfections and an emphasis on the eyes and face of the model. At the same time, do not forget about the position of the back and neck at this moment. If your back is not straightened and your neck is not stretched, then the effect of fullness and a double chin may appear, even where there was none at all. You can take pictures looking directly at the camera, half-turned, looking over your shoulder, and so on. In any of these options, you need to emphasize the jawline, and this can only be done by lifting it and stretching the neck as much as possible.


Poses for filming in a long dress
Putting on a long beautiful evening dress, every woman turns into a princess. While shooting in a photo studio long dress You can play around with decorations and interior items in an interesting way. Popular furniture in this situation are sofas and wedges, stairs, high chairs, armchairs and beds. How you need to stand so that not only the dress, but also the model itself looks beautiful in the photograph.
The main emphasis when shooting in a dress should be the silhouette, so pose and body position are the most important thing. A long train or a beautiful hem of a dress can be shown more effectively if you lower the camera below the level of the model’s chest and move away - you’ll get a long fairy-tale character.

In general, the pose should be as simple and majestic as possible. The back is only straight, the shoulder blades are brought together as much as possible, and the chin is extended. If the dress has a corset, it will tighten your waist and emphasize it. chest line, and without tightening you will have to keep your stomach tense throughout the photo shoot. 
It will be beautiful to lean your elbows on a piece of furniture, sit on a sofa or stand against the background of a window. The main thing here is to maintain the image of a princess and not allow yourself to slouch, fall over or relax too much.

For a feminine and soft look, place your feet next to each other and shift your weight to one of them, then the pose will be more graceful. Regardless of the type of dress, wear high heels under the dress; they will highlight the desired curves and make the silhouette more proportional and harmonious.
- Shooting in a dress allows you to turn your back to the photographer or stand half-turned, including turning your head in profile.
The recently popular cloud-type dresses create a fabulous image that allows you to do a photo shoot, practically without taking difficult poses. Corsets help you maintain your posture, and the chic, voluminous hem and train hide your legs and shoes, all that remains is to straighten your shoulders, lift your chin and place your hands beautifully. Another option for shooting in such a dress is to lie on the train, as if in the clouds. Hands are raised above the head or one rests on the chest, the other in the hair.

As for the hands, you can put them on your hips, raise one to your hair or face, bend your elbows in front of you, and many other things. The fingers should be slightly straightened, not tense, and it is not advisable to hide your hands behind your back.

Photography for curvy girls
Often girls are embarrassed by extra pounds, even eating a minimal amount of them. And that’s why they don’t arrange photo sessions for themselves, for fear of looking even fatter in the photos. The camera adds volume - this is true, but only an unlucky or inexperienced photographer does this cause reluctance to work. There are many beautiful poses for photo shoots, they are suitable even for girls who consider themselves fat.
- The photographer’s job is to position the frame and model correctly, select light and pose, and only then comes post-processing.
For fat girls or those with curvy figures, the following poses for photography are recommended.
- Shooting while lying on your back with your legs raised - this pose will perfectly hide extra centimeters in the waist area and visually lengthen your legs, making them smoother and thinner. An excellent addition to the frame would be fabric or pillows; they can focus attention on attractive places and will perfectly hide what the model does not want to show.
- When filming while sitting, you will have to pull in your stomach as much as possible and bend your back. full models You should not choose to shoot on a chair or lean on tables and walls - this will create additional volume in the buttocks and make your legs larger. Also, you should not lean on something with your side, hand or elbow, this will emphasize the curve of the body, and may unfavorably emphasize the tummy.
- It is better to sit on the floor or on a sofa, the main thing is that your legs are at the same level as your butt. Then they can be thrown on top of each other or placed next to each other, the socks need to be pulled out as much as possible - this will create a beautiful line of the hips and distract attention from the extra centimeters in the waist area. It is encouraged to use objects, pillows, accessories, and also place your hands so that they also draw the eye to your feet.
- Shooting while standing will require effort, as you need to straighten your shoulders as much as possible, stretch your neck, bend in the lumbar region and slightly turn your body. These actions will help highlight feminine lines, draw attention to the chest and make the figure a little slimmer.

Let's sum it up
The difficulty of shooting in a studio lies only in the emphasis on the model and her pose, so you need to pay more attention to all parts of the body and the silhouette in general. For thin girls there are practically no restrictions on the position of the body and arms: you can take pictures standing, lying down, sitting, leaning on a piece of furniture or a wall.
But girls with a size above 44 should not be upset and refuse photo shoots either. There are certain basic poses for shooting any body type and any build.
It is enough just to correctly place the accents, divert attention from the shortcomings, and emphasize the advantages. You can use accessories and furnishings to fill out the frame.
The main thing in a photo shoot is the professionalism of the photographer; it is he who will tell you the right position of the body and hands, put the best way in the frame and will process the image after shooting. Properly placed light will make plump girls look slimmer, distract attention from flaws, veil and hide them, and emphasize what is needed.
Spectacular poses for a photo shoot need to be chosen correctly. It often happens that a girl is very pretty, but the photo turns out poorly. And the point is not that she is photogenic, but that she was poorly prepared and chose the least advantageous poses.

No matter who tries to argue, the dream of many girls on the planet is to become a famous fashion model, to show off on the covers of fashion magazines, to participate in famous brands. Who doesn’t like it when photographers run around you, camera shutters click, everyone enthusiastically admires your grace and ability to pose.

But, unfortunately, everything is not as simple as it seems. After all, sometimes, even at home, a girl cannot take a beautiful pose for a photo when the camera lens is pointed at her - she suddenly freezes. Thoughts arise about where to put your feet, where to put your hands, how to turn your head.

Yes, choosing the right pose is not the easiest thing, requiring dexterity and skills. But it’s not that difficult for someone who puts effort into it.
You will need some knowledge, a certain base, a couple of trainings and - voila, beautiful photos began to appear on their own. You just need to learn a few simple rules for yourself. And earlier there were tips, a jacket.

The most important thing is calm and confidence
The most important thing is to calm down and relax before the photo shoot. The photographic lens clearly captures any nervous tension, if you are very worried, this will be reflected in a tense face, a tense posture, an unnatural smile or grimace.

Try to set yourself up for success; if self-setup doesn’t help, take something calming. Breathe deeply for a few minutes, do yoga the day before, visit a massage therapist or spa, and take a relaxing bath with aromatic oils and candles at night.

Before a photo shoot, go to bed early so that the next morning you look fresh and without circles under your eyes.
Calculate your time so as not to rush, but at the same time arrive at the shoot a little early to calm down.
Choose your clothes in advance
Two or three days in advance, select the outfits in which you are going to pose. Consider several options at once when arranging clothes with shoes. If you will be photographed in several outfits, choose ones that can be quickly changed.

Don’t forget to prepare your outfit, wash and iron it if necessary, so you don’t have to worry about it on the last day.
A little advice - choose clothes and shoes in which you feel comfortable, so that nothing rubs anywhere. Everything should be comfortable for you.

Avoid clothes in purple, dark brown or dark blue colors; these tones will emphasize fatigue, highlight the circles under the eyes, and “age” you. The same applies to shiny fabrics or lurex, don’t forget, they will also add extra volume.
But in clothes of light colors, as well as in combinations of white, coral (see) or gray, you will look as fresh as a morning rose. A photo in black and white clothes will look very good.

Don't choose trendy clothes, they will quickly go out of fashion, so in five years you will look ridiculous in them. Pick up one of the timeless classics. If you like high-heeled shoes and feel confident in them, take pictures in them. Firstly, your legs will look slimmer and more toned. And secondly, since you love her, you will feel more confident in her.

Don't forget to think about your makeup
It is better to do makeup, if possible, right in the studio immediately before filming. If this is not possible, take it with you anyway to refresh it.
In any case, think about your makeup (more details -), apply it in advance, after looking at yourself different lighting. Choose an image, whether it will be a natural daytime one, or a brighter evening one. The main thing is not to overdo it, so as not to look like a caricature.
For a photo shoot, completely avoid shiny, light-reflecting cosmetics, otherwise glare and unnecessary spots will appear in the photo. In the same time. If you want your lips to look fuller in the photo, apply a little gloss in the very middle.
Practice smiling, work on your facial expressions
Practice smiling in front of the mirror at home. Find the smile with which you look most advantageous, remember it. Smile several times so that the facial muscles remember the information and form the desired smile at any time.

By the way, this is what professional photographers advise novice models. Also try grimacing in front of the mirror, expressing different emotions: fear, joy, surprise, etc. As with a smile, remember the facial expression that you liked the most.

And now the main thing is what poses to choose?
- Now let's try to find the best poses for a photo shoot and have a good time for aspiring models.
- Initially, you need to understand that the pose you take may or may not be successful. Girls should look through magazines, albums, and look at photographs on the Internet.
- You will definitely have to learn how to choose an angle, dress beautifully, and be able to present best sides. Practice in front of a mirror, rehearse your gaze, the tilt of your body and head, make your image exclusive and interesting.
- It would be appropriate to try lying down poses. Such photos turn out spectacular. Nowadays, shots are popular when a girl lies on her stomach and looks over her shoulder into the lens. Try to make the poses you take for the photo shoot natural and relaxed, as if the camera happened to be next to the model.
- What is needed is a sincere smile, not a semblance of one. There is no need for grimaces in the photo. By the way, you can practice a dazzling smile and laugh near a mirror. Remember, intuition is a woman’s best assistant.
Now let's talk about several win-win techniques that allow you to take a successful shot.
Tricks for Great Photos
Here are just a few tricks to avoid standing at attention with your arms down.
- The girl seems to be trying to push away from herself or, conversely, attract some non-existent object to herself.
- Trying to keep his body weight on his leg.
- It has become popular to depict predatory animals, cats, but you can experiment with a rabbit or squirrel.
- Play with an object: a cane, an umbrella, a ball, a large soft toy.
- Grab yourself around the waist or hug an object.
- Pretending that it is very cold or hot.
Spectacular poses for a photo shoot - ideas
And these are a few ideas for a photo shoot, you can use your imagination and try something of your own.

- A girl sits on stones, a chair, steps, her knees are connected together, and her feet, on the contrary, are apart.
- During nature filming, it will be great to lie in a haystack, on the grass, or feed the animals.
- An excellent pose is to put your hands in your jeans pockets (), in the back or front.
- A slight forward lean looks great if the blouse is unbuttoned and the model has gorgeous breasts.
- The effect of quick movement will help to emphasize chic hair. For example, shake your head sharply, lower your hair, and then raise your hair.
- A curious pose when your arms are crossed on your chest.
- It looks funny when the model hides her hands behind her back or peeks slyly around the corner.
- A full-length photo will look better if you place your hands on your hips or waist.
- Try looking thoughtfully into the distance, to the side, as if dreaming about something. Such photos at sunset are beautiful.
- Try yourself in dancing, the photographer will definitely capture the right moment. You can relax with your favorite music and become natural.
- In general, poses for a photo shoot matter for a successful shot, but don't forget, you need to be yourself and smile.
Remember that in any photograph the main thing is naturalness and ease, then you will not hide the photo in the table. Also, try to follow a few tips.

- When shooting, do not slouch, do not drop your shoulders down and forward. You are a confident young lady, so keep your back straight.
- Stand a quarter turn in relation to the center of the lens, do not look directly into the pupil of the lens, the bird will not fly out of there anyway. Better set yourself a goal - a corner of the camera, your gaze will not be tense.
- If you suddenly have to hide a double chin, do not press your head into your shoulders. Stretch your neck slightly forward, and lower your head slightly down so that the fold is hidden by your lower jaw.
- Do not stand with your legs straight, put them on different lines, cross them, cross your legs.
Use at least some of the tips and very quickly learn how to take beautiful photographs and choose the right effective poses for a photo shoot. The main thing is not to be afraid of anything, and success is guaranteed.
Not all photographers work with models. The job of many photographers is to photograph ordinary people, and our goal is to make them look like models in the photographs. How do we do this if our clients have no experience posing or managing their faces in front of the camera? Here are seven tips to help your subjects feel like models.
1. Working with hair
We often don't think of hair as a part of the body that can be controlled, but it is possible! If you are filming a person long hair- then poorly laid hair will be the first thing that catches your eye in the photo. No general rule to make the hair look “super” in the frame. To different people fit different variants hair location
Let's say you're doing a simple portrait shoot without a makeup artist or hairdresser. The first thing to remember is that hair lying on your shoulders looks terrible. They give the model a wild look and something needs to be done about it. Here are six options for working with long hair.
- Original "wild" variant
- All the hair in the back
- All hair in front
- Hair on one side in front
- Hair from the other side in front
- Hair collected
Option #1 should be avoided at all costs. All other options are applicable depending on the model and the effect you want to achieve. The existence of options 4 and 5 is explained by the fact that in life, hair can look better on one side than on the other.
Typically you want people to be looking at the camera and have most of their face visible. For this article, I chose option No. 6 with her hair tied up so that it would be better to see how the girl follows my instructions and there would be no distractions. For many women, the “tail” is home option hairstyles, but she looks very nice in portraits, revealing her face.
2. Move your chin (or ears) forward
When a person stands normally and relaxed, or even stands beautifully and poses, a small crease may be noticeable under the chin. This manifests itself almost regardless of thinness. If you tell people to point their chin forward, which sounds obvious to you, they will likely point their chins at you, which will look like photographing their nostrils (not very attractive). So instead, encourage your model to move her ears forward.

“Before” and “after” the suggestion to move your ears forward.

The same thing from the outside. I sometimes call it "turtle" because it looks like a turtle pulling its head out of its shell. It may be a little uncomfortable or unnatural, but the results are always worth the inconvenience.

The same technique performed by a man. He is fit and athletic, but still, in a natural pose, his chin is not photogenic enough.
3. Raise your hands
When people just stand as usual, they often have their arms pressed to either side. This causes several problems. Firstly, it makes them look awkward and uncomfortable in photographs. Secondly, the arms pressed to the body look thicker than they actually are.

This can be corrected simply by raising your arms a few centimeters so that they are not pressed against the body. Or you can put your hands in some position, for example resting on your hip. In the picture above, the red line indicates the apparent size of the hand before changing position. The line of the same length in the second picture shows how much thinner the arm looks when it is not pressed to the body.
4. Leave visual space around the waist
Everyone likes to look slimmer. One of simple ways The way you can make your client look slimmer is to show their “natural” waist without any additions. I mean visually isolating the waist so that it doesn't look wider than it is. My model is standing with her hands on her hips. The first photo does not show the best position. The arm behind the body is not visually separated from it and adds width to the waist. But if you move your hand forward a little, space will appear, so that nothing will be added to your waist size.

The red line shows the apparent width of the case in the first photo. It is moved to the second photo to show how much the hand added. This rule applies not only to hands. Anything in the background behind the model can create this effect. This could be, for example, other people, tree trunks, lamp posts.
5.Rotate Your Shoulders
It's very simple but important advice. If a person stands straight in front of the camera, he looks bigger. This is good if you are photographing a football player or the director of a large company, but is not very suitable for photographing model portraits. When turned, the model shows a more beautiful profile and looks slimmer.

The red line shows the width of the model standing exactly in front of the camera. A slight twist produces a photo of the model still looking at the camera, but with a slimmer profile.
6. Don't show the whites of your eyes
If you want to capture a distant, dreamy look away from the camera, don't ask your model to look into the distance. Point to a specific object behind you so you can control where you are looking.

In the first photo, I invited the model to look towards the door next to us. You can mostly see the whites of her eyes, which is not good. You want to see the iris, the colored part. I invited her to look out the window. A slight change in the direction of the gaze brought her eyes back to us and the result was a more attractive portrait.
7. Don't let your nose interrupt your facial contours
This rule is a little more complicated, but also important. If you don't want to take a frontal shot, you ask the model to turn slightly to the side. Let's say you don't want to shoot a classic profile, in which only one side of the face will be visible, and the model will turn about a quarter so that both eyes are visible. If you mentally draw a line along the side of your face, then this line should not intersect with your nose.

If she turns too much, the nose will cross this line, ruining the natural contour of the face. This creates a “Pinocchio” effect and visually increases the length of the nose. To avoid this, you should ask the model to turn slightly back towards the camera so that there is a little space between the tip of the nose and the edge of the face. You should not cross this line or your facial features will look disproportionate.
Putting it all together

Here's a sample list you can follow on your next shoot.
- Hair is pulled back over one shoulder and loose in front of the other.
- The chin is pushed forward to create a stronger facial line.
- The arm is raised from the body.
- The waist has no visual enhancers.
- Shoulders turned.
- The pupils are visible, not the whites of the eyes.
- The nose does not cross the line of the face.
What are you doing to ordinary people did you look like a model in the photographs? Share your thoughts on the tips you read or your own tricks in the comments.
About the author: Ben Lucas is a Seattle-based portrait and wedding photographer. He strives to preserve the best emotions of his clients, be they brides, actors, chefs or even lawyers. You can follow his news at
Now let's talk about group photography.
There are generally three types of group photography. The first type is official photographs from big amount participants. The second is more informal pictures of friends. And finally, the third type is family photography. Let's look at ideas and poses for photo shoots in that order.
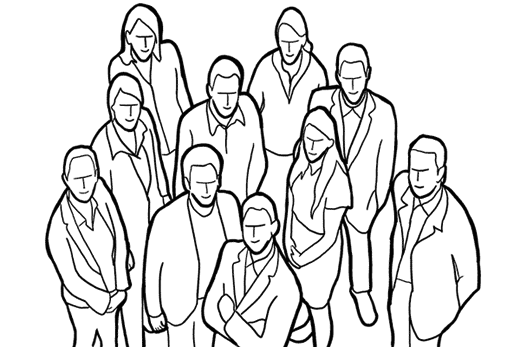
1. When working with large groups of people, you don't have the ability to control each individual's posture or facial expression. There's nothing wrong with this as long as you pay enough attention to the overall composition. Think of the entire group as a single entity. Make sure that all participants are clearly visible.
2. Often in a group photo shoot, the only possible composition that allows you to fit everyone into the frame is a full-length shot. This is usually an official photo showing an important event, so your main goal will be to ensure that all participants are visible.
3. If possible, try to take a photo with small height. You can go out onto the balcony or climb onto the car. The effort will definitely pay off, because instead of a standard group photo, you will get a photo with an interesting and non-standard composition.

4.
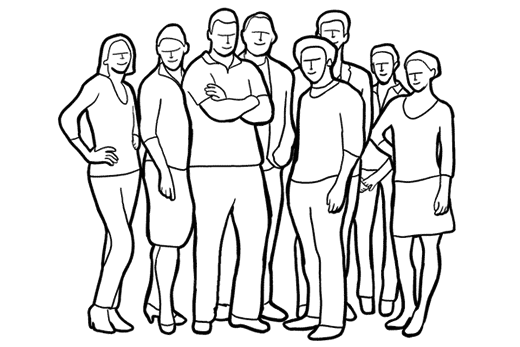
In some situations, people standing alone look better in the frame than a group standing closely together. Maybe it's not the best option for a friendly photo, but it is perfect for a team photo, for example, a musical group or people working together on a project. If the team has a clearly defined leader, place him or her in the foreground for a more expressive composition.
5. It's quite standard option photos of a group of friends. Yes, it's simple and a little boring, but it works. So why not?

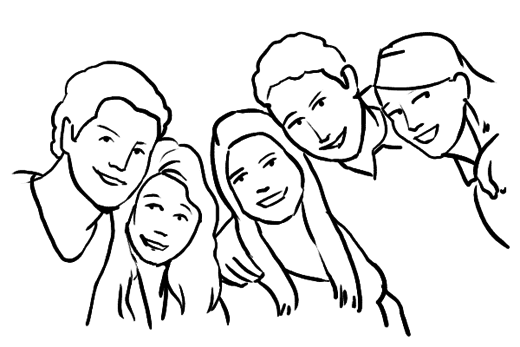
6.
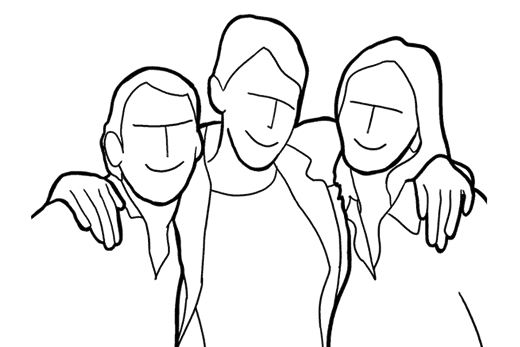
This funny composition perfectly conveys the friendly relationship between the participants in the photo. Ask people to stand close and tilt their heads slightly toward each other and toward the camera.

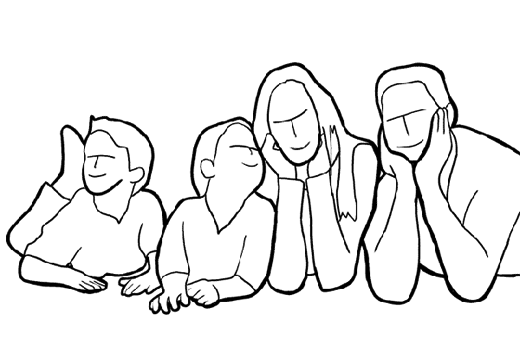
7.
Ask participants in the photo shoot to lie in a circle with their heads in the center, on the grass, on fresh air or indoors. Shoot from above.


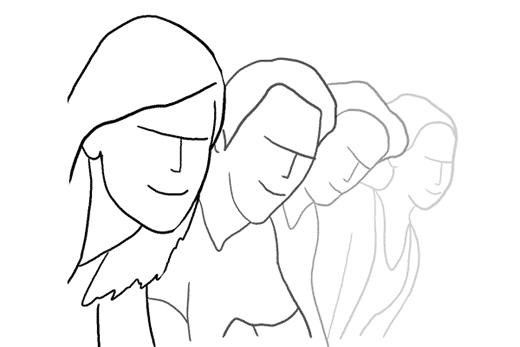
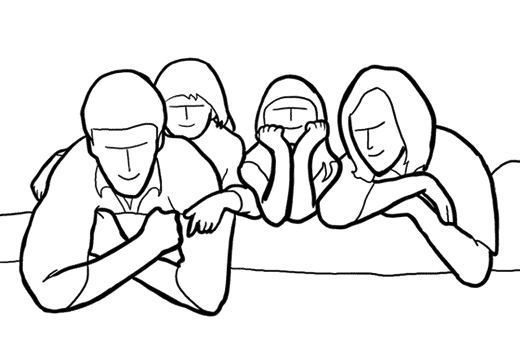
8.
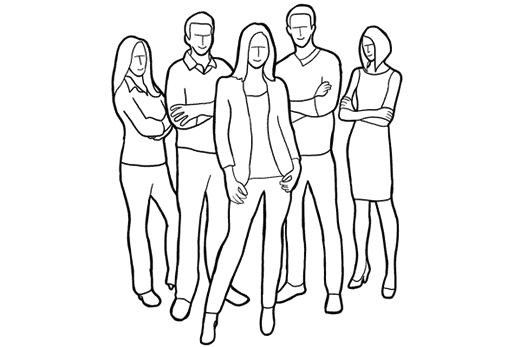
A very simple and advantageous way to place a small group of people in the frame. Select the "team leader" and place him or her in the foreground. The remaining participants must join one at a time. Each of them should look into the camera from behind the previous one. Ask them to lean on the person in front, this will add warmth to the photo.


9.
Variation of the previous pose. Place the leader in front and the rest of the participants so that they look out from behind each other. Try experimenting with depth of field, and then decide which shots you like best - those that focus only on the leader or all the participants.


10.
A very fun way to capture a group of friends. For best result ask the models to jump after a short run.


11.
Very profitable and interesting composition for a group of people standing in a row. Make sure everyone is clearly visible and shoot close with a wide aperture and focus on the first person in the row. Indeed, distant participants will look blurry, but they will not be offended, since the result will be a very interesting and unusual group photo.

12.
Continuing, let's look at examples of family photography. The most common location for taking family photos is the sofa in the living room. This is not the most creative idea for a family photo, but it works great. The easiest way to add variety to this standard composition is to trim it tightly around the edges. There is no need to make your favorite sofa and furniture in the living room full-fledged participants in the frame. Let family members be in the photo, and only them.

13.
Here's another one great idea for family photography — go out into the fresh air. Sit on your front lawn, in a park or on the beach - all of these places will provide a stunning backdrop. Most importantly, do not forget that you should not photograph sitting people while standing. Sit down and shoot from their level.

14.
Family members sat comfortably nearby. Ask them to rise slightly, leaning on their elbows. Shoot from a low angle.

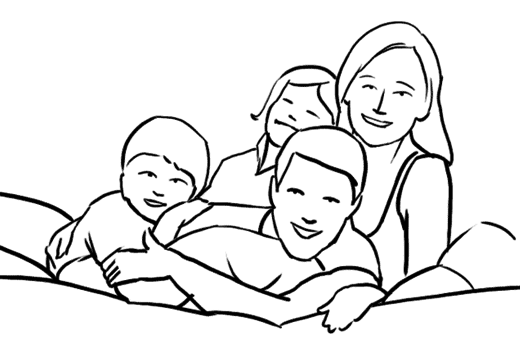
15.
Very beautiful composition for a family photo. The shot can be taken both outdoors and at home on the bed. Looks equally good with any number of children.


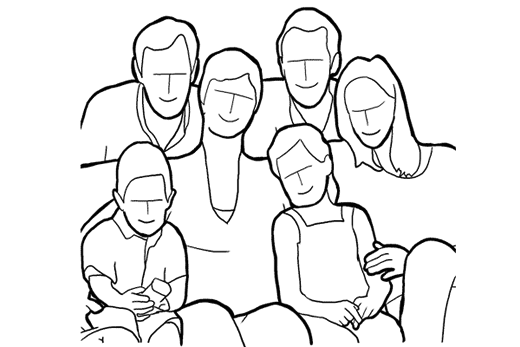
16.
Cozy pose, family sitting comfortably on their favorite sofa.


17.
For an interesting and unusual photo, it’s worth adding a little variety to the photo on the sofa. Just take a photo from the back of the sofa and you'll see that the frame looks completely new.

18.
Photo option from the back of the sofa.

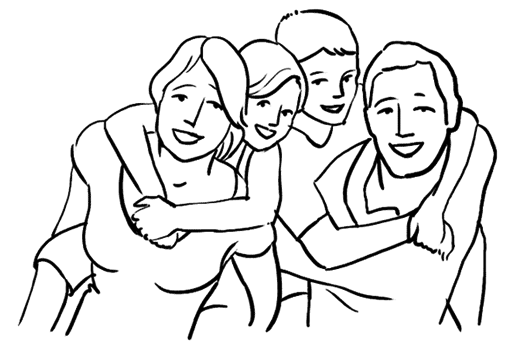
19.
Very nice option family photography. Ask parents to give their children piggyback rides.

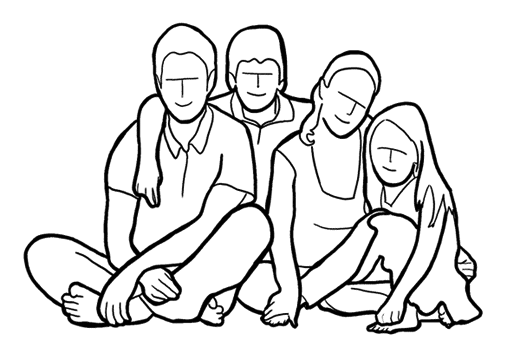
20.
A very simple pose for a full body shot. Equally suitable for any number of people.


21.
Include a photo of the family holding hands while walking outdoors. Take a series of photos and choose the photo with the best position of your legs. Use autofocus tracking mode to take this shot.


In conclusion: be original and try to vary these poses own ideas. Think about how to adapt this or that standard pose to the location and scenario of your shooting. Use our ideas as a runway for your own creativity!
In order to receive nice photos, several conditions are necessary at once: the proper environment, a skilled photographer, etc. But poses for a photo shoot on the street also play a special role, as they allow you to favorably emphasize bright, memorable features of your appearance and cleverly hide those small flaws that do not suit you. It is clear that you need to pose even when shooting takes place indoors. But today we will only talk about street poses.
Basic poses for girls
Poses for an outdoor photo shoot for girls are presented in several options:
1) "Triumphant".
This pose emphasizes that the girl is the center of attention. You need to bend one leg at the knee and lift it slightly, while raising your arms up or spreading them to the sides. The chest should be tucked up and slightly tilted forward, and the chin should be slightly tucked.

2) "Supermodel".

This good example poses for an outdoor photo shoot in the fall, for example: you need to redistribute your body weight onto one hip, placing it slightly to the side. The hand should also be placed on the thigh. It is also possible various options with this pose: so, you can just stand half-turned, but this will already significantly change the overall picture.


3) “Criss-cross”.

Another good option beautiful pose for an outdoor photo shoot, which allows you to achieve a simultaneous combination of audacity and sophistication. General technology execution does not differ from the previous pose, however in in this case legs should be crossed. This means that one leg, bent at the knee, is put forward, and the second - straight - acts as a support for the first. At the same time, your hands should be relaxed; you can put one hand on your thigh.


4) Based on an object.

This pose allows the girl to look absolutely at ease. For execution, you will need to find a certain support point (any surface can play its role, be it a door or an architectural column). You can cross your legs or use the technique from the previous pose;


5) "Defile".

As the name of the pose suggests, it was borrowed from the model's arsenal. The most significant advantage of this pose for an outdoor photo shoot is various photos will confirm this - giving the image dynamics. Correct technique The execution of the pose in question is as follows:

- head slightly lowered;
- the back is rounded;
- the body, as well as the toes of the shoes, are directed away from the camera, as if the girl is about to leave.

It is only important not to tilt your head too low, otherwise you will get the feeling that the girl is looking at her own shoes or hiding her face.


“What if I’m with a friend?”

Photos of two girlfriends turn out to be very attractive: brightly playful or mysteriously passionate images can give the picture an indescribable liveliness. And if you have a real girlfriend, then why not have a great photo shoot?
Let's talk about what poses there might be for a photo shoot on the street with a friend. First, you can start with portraits. Especially interesting options obtained in the warm season, when you can lie down on the grass.
Those photos look unusual in which one of the girls turned out to be sharp, and the second one was somewhat blurry.
As an interesting pose for an outdoor photo shoot in winter, you can use this option: two friends stand holding hands. The full strength of their friendship can be reflected if they are captured in a photograph without outerwear, moreover, during a snowfall.
You can also create a dramatic image: then the two friends should simply stand behind each other, and the clothes and background should dominate dark shades.


Now about the guys
Let's not forget to mention the poses for a photo shoot on the street for guys. There may also be many options here, but we will look at the most affordable and popular ones.
So, the simplest pose is standing man, who crossed his arms over his chest. It is only important to take into account two nuances: the shoulders should be pulled back slightly, and the stomach should be pulled in.
A relaxed pose also looks great - when a man puts his hands completely or partially into his pockets.
The best pose for an outdoor photo shoot for men is the following: a man sits with his legs crossed. In this case, you also get a fairly relaxed pose.
Let's give another example of a relaxed pose for a guy: he stands with his back against the wall. In this case, let your hands be in your pockets, and let one leg, bent at the knee, rest against the wall.
In conclusion, we can note the following: there are a great many options for different poses for a photo shoot. Some of them are rarely used, while others are ubiquitous. Take, for example, poses for an outdoor photo shoot in the fall: almost every girl has a photo with leaves or against a background of leaves. Therefore, any pose can be diversified if you add some of your own to it. unique elements.


How to pose correctly: Video


