Many owners of suburban areas and summer cottages are faced with the fact that by the end of the season they accumulate a lot of unnecessary canisters and plastic bottles.
Such things don't throw it away: from them you can create a wide variety of crafts for the garden, cottage or garage, which can perform both practical and decorative functions.
Most of these items can be built with minimal costs strength in 10-20 minutes, and they can make the territory more interesting and original.
 Depending on the characteristics, such containers classified according to the following parameters:
- Volume – from 1-2 to 50-80 liters.
- Form. Canisters can be flat or rounded, oval, rectangular or square in cross-section, and have a handle with a lid.
- Color. Plastic products Most often they are white or translucent; there are also canisters in green, blue, red and other shades.
For creating decorative items And practical devices containers for food products, water, fuels and lubricants, fertilizers, and other liquid products are suitable.
Before you start making a craft, it is advisable to inspect the canister for damage, thoroughly clean and degrease it.
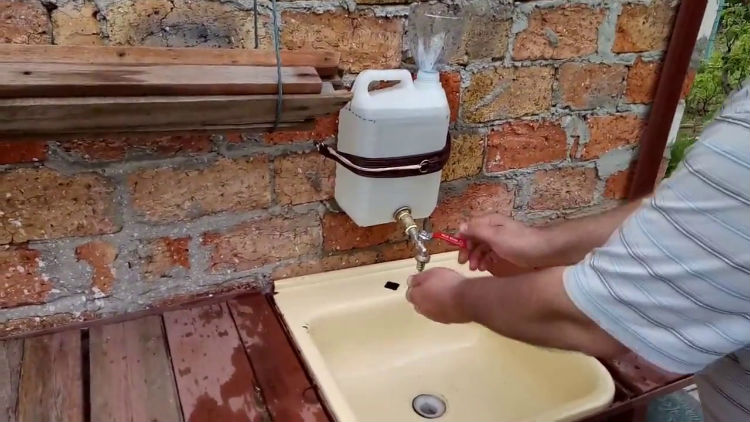
How to make a washbasin?
A 5 liter plastic container is ideal for creating country house or camping device for washing.
The filling hole of the canister will be used to fill it with water, and in the bottom you need to make a hole and insert a tap or valve.
To do this, you need to use a pair of seals in the form of rubber gaskets and a fastening nut so that water does not leak out and the tap is firmly fixed.
Finished washbasin or washbasin can be hung on a crossbar, hook, attach to a vertical surface with a belt or even tape. You can insert a funnel into the filler hole for convenience: this way, when filling the canister, water will not spill onto the ground.
If you install a simple tap, you can adjust the pressure by turning the handle.
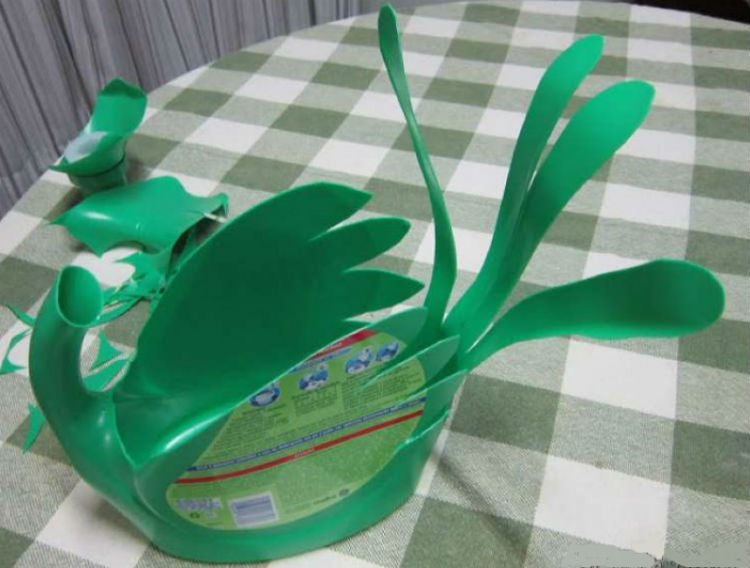
Master class on creating a swan
Bird sculptures for decoration suburban area often made of plastic. Present to your attention small master class on making a swan from an old canister.
For this purpose 5 liter containers required. It is necessary to cut the product so that the body, tail and long neck are immediately cut out.
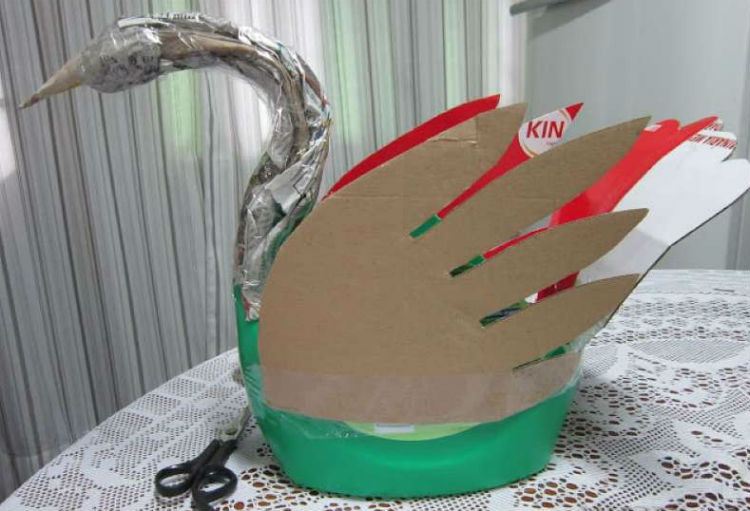
Then you need to prepare the wings from thick cardboard.
Worth a neck cover with newspapers and tape, then do the same for the entire workpiece.
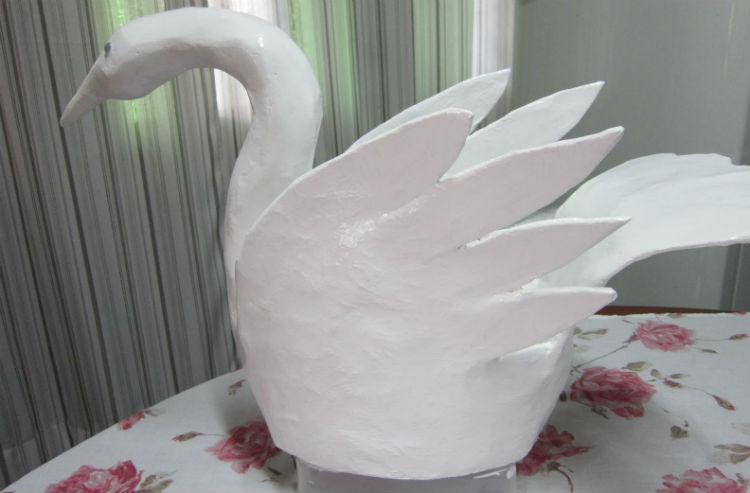
After you need apply a layer of simple napkins and coat the future sculpture with plaster mortar.

As the surfaces dry, they are sanded, painted and decorate additional elements (for example, the eyes of a bird can be made of colored stones or glass).
Flowerbed for the garden
Many owners arrange flower beds in the garden or front garden, and plastic canisters can be adapted for two purposes:
- Container for planting flowers. You will need to cut the product, turning it into two halves, and dig it into the ground, then pour the prepared soil with fertilizers inside and sow flowers. The canisters themselves can be decorated with colored paper, paint, or other methods if desired. In addition, the mini-flower beds themselves can be lifted off the ground, as shown in the photo below: this is especially true if the soil is initially not suitable for specific varieties or is too wet.
- Fencing For finished flower bed. This option is great for large flower plantings: canisters are dug in around the perimeter, blocking the plants. This design is rather decorative in nature, for it it is better to use colored containers of the same shade or alternate 2-3, then the fence will look aesthetically pleasing.

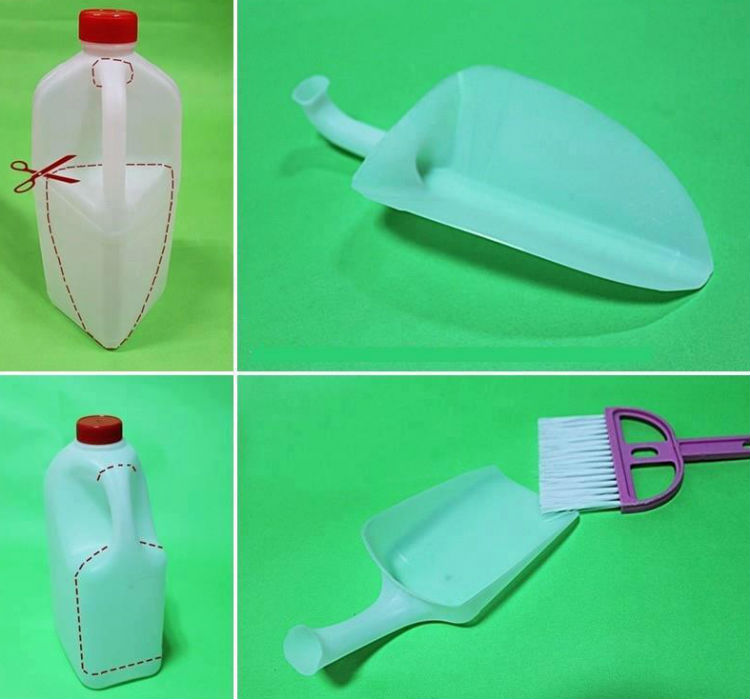
Plastic scoop
If the canister has small size(1.5-2 liters), you can make a scoop from it for cleaning or garden work.
You will need to mark the future product on the surface and cut it out; the handle matches the handle of the container. The bow can be made either triangular or square.
In the first case, the scoop is convenient to use for digging up plants with a small root system from soft soil, and in the second, for collecting debris.
Sprayer
A large capacity (10-30 liters) can be used for spraying plants with chemicals that protect plantings from pests.
Canister equipped with a manual or electric pump for ease of spraying. For carrying, you can attach a handle or straps to carry it on your back.
The hose, spray nozzles and boom can be purchased at any hardware or plumbing store.
A rubber nipple can be used to install the valve.
This sprayer is suitable for processing small vegetable gardens and front gardens; for larger areas an extension cord may be required.
Most often the device is made from a plastic canister used for spraying chemicals against pest beetles, cabbage beetles, as well as mold and mildew. Can also be used prepared according to folk recipes products, from soap solution to urea.

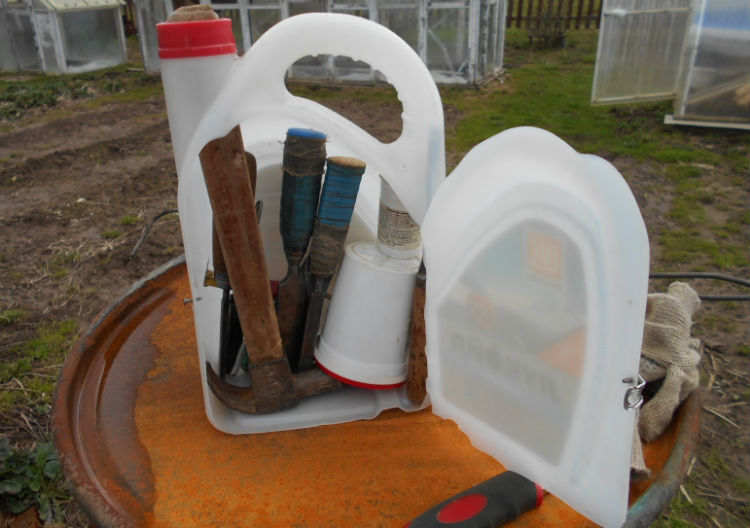
Tool box for garage
To create such a device, you can use canisters of different sizes; the choice depends on how many things you plan to put inside.
The most commonly used containers are 10-20 liters for water, food, chemical, and flammable products. The shape should be rectangular, with a handle in the middle at the top.
Manufacturing instructions:
- make a vertical cut on the side of the neck and handle, leaving the wall of the narrow part of the canister intact;
- bend the resulting “door”, opening the container. Inside you can place sections from plastic cups or boxes, any other fasteners. In such a box you can store small items (nails, screws, paper clips, electrical tape, etc.) or tools directly (hammer, pliers, pliers, etc.).
To make the tool box more durable and airtight, the sides can be strengthened metal plates , for this the walls will need to be drilled and secured with bolts and nuts.
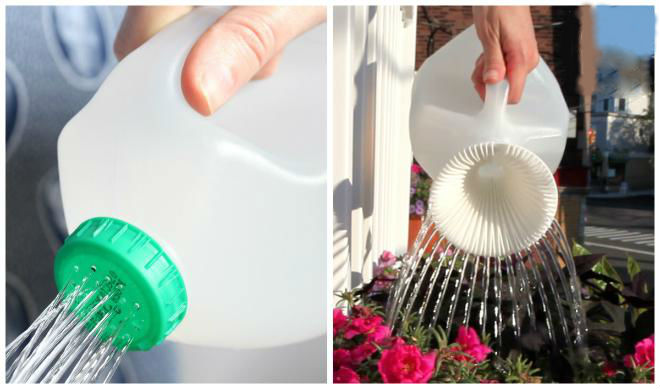
Watering can
For such a product, it is optimal to take a canister from under detergent or other products that have slightly flattened shape and comfortable handle.
It is necessary to thoroughly wash the internal parts from any remaining liquid, then drill thin holes in the lid. Optimal size– 1-1.5 mm. Just above the handle you need to make a larger hole for air supply: if this is not done, watering the beds will be more difficult due to the pressure difference.
If necessary, you can equip the watering can with a plastic tube, which can be purchased at hardware or plumbing stores: it will increase the spray range.
Filling water is done through a plug, for this convenient to use a funnel or hose to prevent liquid from spilling.
You can also cut a wider lid, then using a funnel when filling with a regular bucket is not necessary. However, in this case, you should ensure that when watering the plants, water from the watering can does not flow onto the ground through the lid.
Creating a flowerpot
Hanging or stationary flower pots can also be made from plastic containers.
Canister can be cut in half horizontally, then treat the edge with a medium so that it is not sharp: grinding will be required. After this, holes are made 0.5-1 cm from the edge into which a cord or rope of small thickness is inserted, fastened together, making an allowance of 20-40 cm (the size depends on what plant the pots will be used for).
Then a single suspension is formed; it can be made in the form of a loop. Flowerpots can be hung on hooks, wire, or nails.
If the products are planned to be placed on a stand, It is not necessary to make holes for fastening.
In any case, small cuts are needed in the bottom: they allow you to create a proper soil microclimate and remove excess moisture.
The surface of the finished flowerpots can be woven into knitted covers, decorate with applique or paint - an example of such a craft is presented in the photo below.
Fishing box
For this purpose, you can use 20-liter oil cans; side pockets, if necessary, are made from smaller containers.
The canister is cut off, leaving a height at which the fisherman it will be comfortable to sit for a long time , strengthen the cut with an aluminum strip fastened with rivets.
Inside you need to place a partition made of thick plastic: it not only divides the item into compartments, but also serves as an auxiliary stiffener and prevents the lid from deforming.
The lid is cut from thick plywood sheet and attached to hinges. The upper part is usually pasted over soft material for comfort.
A strap is attached to the sides of the canister so that you can carry the fishing box on your shoulder. The internal compartment for tools can be divided into smaller segments (for equipment, rods, donks, circles, etc.).

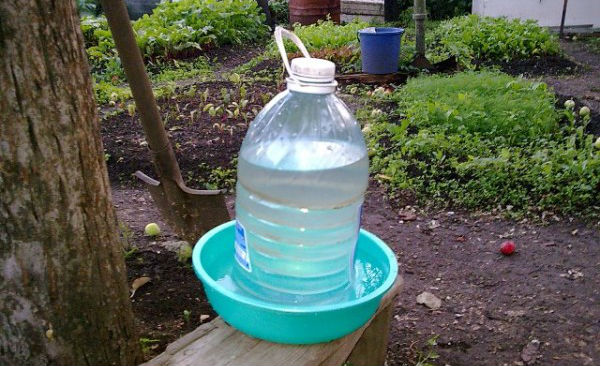
Drinking bowl for chickens
Device for providing poultry fresh water can also be made from a 20-30 liter canister.
Required prepare a wide pallet, impermeable to moisture. Make slits in the bottom, then place the canister in the tray, leaving a gap of 1-2 cm between it and the bottom (for this you can make stands along the edge under the container).
The structure should be secured so that the water container does not overturn from an accidental push.
After filling liquid will flow evenly into the pan, where the chickens can drink from.
This drinking bowl for chickens is good not only for its simplicity, but also for the absence of the need to manually regulate the water flow.
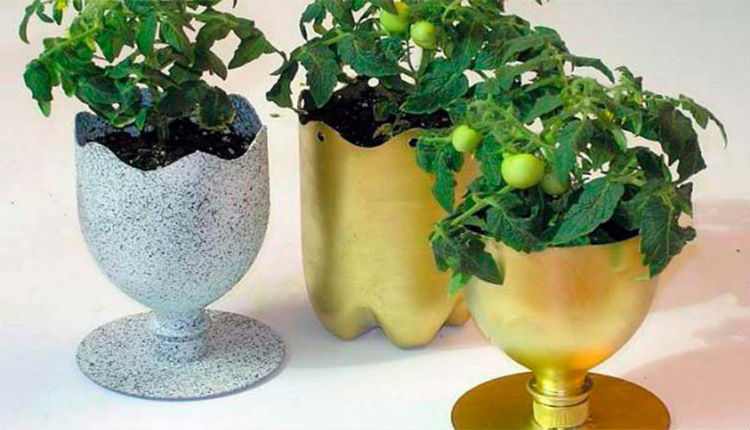
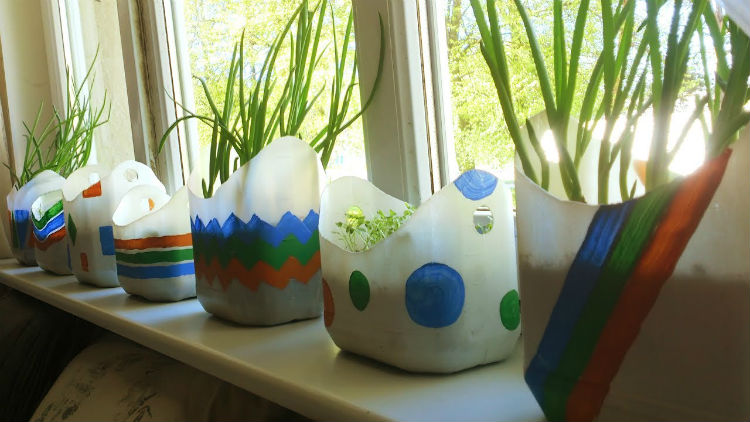
Flowerpots
It is very easy to make such products: just cut off the top part and make holes in the bottom for drainage excess moisture. Canisters are placed on stands, soil is poured inside and seeds or flower seedlings are planted.
Such flowerpots can be decorated or treated with moisture-resistant paint, or decorated with appliqué.
Most often they are placed on terraces and in gazebos, turning the resting place into a paradise filled with living greenery.
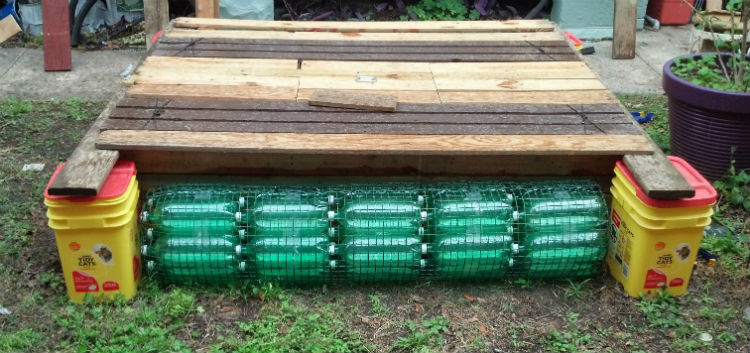
Raft of empty containers
This design is suitable for crossing a river, fishing, and mobile bridges on a pond.
The frame of the raft is made of 3 mm boards, knocking it down with nails or screws.
A raft is made from empty canisters with a volume of 40-50 liters, they are attached to the frame with packing tape or a special darkened film.
The second option is interesting because it protects plastic surfaces from burning out under the rays of the sun. The frame must first be coated with antifungal agents and varnish to protect it from rotting when in contact with water.
Ready design can be equipped with the following equipment:
- mooring ladder;
- feeders for luring fish;
- seats, loungers;
- shelter from the sun;
- anchor.
Shower for the cottage
The procedure for creating such a design includes the following steps:
- Creating a handle. For this you can use simple rope, passing it through the handle of the container and tying it around a tree or other structure where the shower will be attached.
- Installation of the nozzle. You should make many small holes in the lid, blow them out, then insert it into the container tap. The joint should be sealed to prevent moisture from leaking.
- Creating a stopcock regulating water pressure. This product can be found in the plumbing department. Rubber seals will be required for installation.
- Cover arrangement where the water will be poured. It is better to make it closed so that dirt, leaves and insects do not get into the canister.
- The sides are covered with black electrical tape so that the water inside warms up faster: black walls absorb ultraviolet radiation better.

Useful video
Another idea to use plastic canister- holder for toilet paper plus a shelf in this video:
Conclusion
If you have unnecessary plastic canisters and you cannot find a use for them, you should not throw them in the trash.
Plastic recycling and reuse in industry – best option allowing use resources rationally without harming the environment.
In addition, the containers themselves can be used for both decorative and practical purposes - the choice depends only on the owner’s imagination.
From the article you learned what can be made from 10-50 liter canisters for the garden or garage, you learned how to make a washbasin, a swan, a watering can, a raft, boxes for the garage and other useful devices.
In contact with
It's wonderful when we can keep beautiful indoor plants and other useful herbs in pots. But generally, watering them from bottles or cups creates permanent depressions in the soil that don't look good, expose plant roots, and don't help the water spread evenly.
With that in mind, here's an easy way to make your own versatile watering can. indoor plants.
Universal watering can for the home
To do this, you just need a bottle with a wide plastic cap, a thick needle and matches. If you have a drill, that's even better. Then you can do everything even more carefully.
However, if you decide to do it the simplest way, then heat the needle and use it to make a hole in the lid. Then repeat the procedure until you have made 20 evenly spaced holes. Their number depends on the size of the lid. When you have finished drilling, you can place the cap of the water bottle and start watering.
How to make a simple homemade watering can

If you're the type of person who likes to make useful things out of recycled materials, then here's useful idea for watering your plants.
If you have a garden or have potted plants that need watering, you can now make your own watering can. It's really easy and simple to complete.
All you need is a thumbtack and an empty plastic milk container. By punching small holes in the milk container lid, you'll have your own reusable watering can made from scratch.
This may seem very simple exercise...however this great way introduce children to the world of growing plants. Watch!
How to turn an empty milk jug into a watering can
Can't find your watering can? Don't make your plants wait until you buy new ones from the garden store. Make one with an empty milk jug now!


I only have one watering can, so I need to fill it four or five times to water all the plants on my patio. Instead of buying more expensive watering cans, I use old milk jugs. I drilled a few holes in the lids, filled the jugs with water, and I was ready to go. – Harrison Berg.
How to make a watering can from a bottleAgree, watering can - necessary thing for the gardener, but it is not always at hand when you grow indoor plants. After all, watering simply from a mug at the root is not suitable for every plant and does not always have a beneficial effect on their appearance, since some plants need to be watered from above, capturing leaves and flowers.
Today we will look at an example of how you can do without a purchased watering can at home. And to make it from simple plastic bottle.
1. Take a half-liter or liter plastic bottle and wash it thoroughly, removing any stickers and any remaining soda or juice.

2. Using a marker, place dot marks on the bottle where the holes will be located in the future. The holes on the bottle should not be too close to each other, but also too far from each other, since at a close distance, the water will flow in one continuous stream. The optimal number of holes for irrigation is 25 pieces, 5 horizontally and 5 vertically, forming a square on the walls of the bottle.

3. Take pliers and a small nail. Clamp the nail with pliers near the head and bring it to an open fire. For an open fire, you can use a paraffin candle. Only the tip of the nail needs to be heated over the fire for 20 seconds.

4. Bring the heated nail to the plastic bottle where the markings are located, then pierce the wall of the bottle, slightly pressing on the nail. If the nail cools down when making holes, heat it again over a candle.

5. On the opposite side of the bottle, using a knife, cut a square hole for pouring water into the bottle. Diameter square hole you choose yourself, but it should not be lower than the irrigation holes, relative to the bottom of the bottle.

6. For convenient watering from a bottle, you can make a handle from adhesive tape.
Anyone who grows seedlings knows firsthand how difficult it becomes to water seedlings when they grow.
To somehow make their work easier, summer residents invent various watering cans.
And it’s not at all necessary to go to the store and buy a watering can, especially if you don’t use it often.
You can make a tool for watering plants with your own hands from available materials.
We invite you to familiarize yourself with some of them.
Ways to create a watering can for the garden
Option 1
- Insert a slightly curved tube into a clean plastic bottle (1.5-2 l). It should be longer than the height of the bottle so that you can easily water the seedlings even in the most inconvenient place.
- To prevent it from decreasing in diameter (flattening) when bending the tube, cover one edge of the tube with plasticine or clay, pour in water and place in the cold (you can freezer), so that water does not spill out of it.
- When the water turns into ice, bend the tube. In this case, the handset itself will receive the required form, and the ice will not allow the walls of the tube to shrink.
Many gardeners grow seedlings and a watering can made in this way will be an excellent assistant in caring for seedlings.
Option 2
Sometimes seedlings do not require root watering, but with the capture of leaves. To avoid accidentally dousing the seedlings with water, make a shower head with your own hands.
- Wash the half-liter plastic bottle thoroughly, remove the stickers from outside and use a marker to place dots, instead of which you will later make holes.
- Place the dots in a 5x5 square.
- Hold the head of the nail in the pliers and burn the end of the nail over a fire (candle) for 20-30 seconds.
- Now pierce the drawn points with a heated nail. When the nail cools down, heat it again.
- On back side Using a knife, cut a hole for filling the bottle with water so that it is 2-4 cm higher than the watering holes.
- Fill the bottle with water and carefully position it horizontally over the plants.
- For convenience, you can use tape to make a handle on a watering can.


Option 3
There are never too many watering cans either at the dacha or at home for seedlings and plants. Many plants cannot be watered with a hose, this rule is especially often heard in greenhouse gardening, so it is best and easiest to have a watering can at every step.
In order not to spend money on the purchase, we suggest making it yourself:
- To do this, take any plastic canister (for water, car oil), polypropylene pipe 50 cm long and rotated 60°.
- Place a “turn” near the bottom on a flat place and use a marker to mark the diameter of the future hole.
- Cut out and try on how easily the pipe fits into the canister ( large gap must not be).
- Thoroughly lubricate the joint with hot glue, insert the pipe and leave to dry.
- Next, all you have to do is put a piece of pipe on the pipe and, if necessary, shorten it by cutting off the excess. The optimal length of the “spout” is considered to be the height that does not exceed the lid of the canister.
- Tie the tube (spout) to the handle of the canister so that it does not break under water pressure.
- You can insert a cut plug into the spout so that the water fan out in a limited flow.
If you have to use a watering can to scoop up water in a well, then for ease of filling with water, make a hole on the opposite side of the spout so that the air can quickly escape.


Option 4

You can also make an excellent watering can from a small plastic container (shampoo bottle). To do this, just make holes at the bottom with an awl or nail. Fill a container with water, close the neck, turn it upside down and water.
Option 5

You can make the most primitive watering can. Make holes in the lid of the plastic canister and on the opposite side for air to escape.
Option 6
If it is not possible to regularly water seedlings or seedlings, then it makes sense to use automatic watering. To do this, make holes in the bottom of a plastic bottle with a hot nail, fill the container with water and close the lid. Plant bottles in the ground near each plant in the garden or one for several seedlings.


As you can see, there are many options for making a watering can with your own hands, choose yours, make it and share your suggestions.


