A bench is an essential element of any summer cottage. Today, such structures perform many important functions: from their intended purpose to giving the garden a unique design.
Many owners of suburban areas prefer to build benches themselves, since this simple task will not take much time and money.

There are several basic materials that are used as the basis for constructing benches.
Wood

The most popular option is wood. It is believed that it is from this material that the most aesthetic designs are obtained.
Due to the universal aesthetic characteristics of the material, wooden benches fit perfectly into the landscape of any garden. It is important to consider that the benches are always in the open air. Therefore, it is necessary to choose those types of wood that are characterized by maximum resistance to atmospheric conditions.
These include: hazel, oak, cherry pine, and larch. For additional protection, the material is coated with a special varnish.
Metal

Metal is popular for the production of benches for many reasons: durability, practicality, resistance to precipitation, ease of use. As an optimal option for the garden, openwork structures with interesting patterns are most often made. As an alternative, you can stick to minimalism.

Stone


Stone benches are impressive and monumental. Main materials: granite, marble, quartzite. In some cases, rough stone is used to create a unique design, in others, stone with a smooth surface is used.
Plastic

Plastic is the most affordable, convenient option. It is considered more seasonal and budgetary than aesthetic and decorative. However, with the correct design of a plastic bench, it can become a decoration of the garden. Colorful pillows, lanterns, flowers and much more are often used for decoration.


Types of benches
Garden benches are traditionally divided into several categories. The criterion for division is location.


They are usually installed near the threshold, which determines the choice of material. Design experts insist that appearance The front bench should match the exterior of the country house. Thus, if the structure is made of stone, then the bench, accordingly, should also be made of stone.
water bench

The main purpose is to be able to spend time comfortably near a body of water. For the construction of structures, it is recommended to choose waterproof materials - artificial or natural stone.


Can be located virtually anywhere in a summer cottage. Plastic is usually used as a base, as it is lightweight and easy to maintain.
![]()
An indispensable option for hardworking summer residents. Garden benches are installed so that the owners of the site can relax comfortably while working in the garden. To ensure aesthetic pleasure that accompanies relaxation, the structures are located next to flower beds.


This variety can also be called a “solitude bench.” The fact is that it is customary to place them in the most remote places of the garden so that a person has the opportunity to hide from prying eyes. A popular material for manufacturing is wood.
Seasonal bench

This is a foldable design that is lightweight. This makes the task of moving the bench from one place to another much easier: summer period– in the shade, in autumn or spring – in sunny places. Optimal material– plastic.
DIY wood bench
There are many different types of wooden benches. We'll look at a few of them.
Standard wooden bench

Materials:
- slab - a board with bark on one side - 2 trimmings one and a half meters long;
- bars - 2 pieces;
- cuttings of bars - 2 pieces 15x20 centimeters.
Step 1. We dig two holes and level them in depth.
Step 2. Align the angles between the posts and bars so that it will be comfortable to sit on the bench later.
Step 3. We nail the bars with nails at 200 millimeters.
Step 4. Bury the blanks.
Step 5. Compact.
Step 6. Nail the back to the posts.
Step 7. Nail the back to the bars.
Step 8. Treat the wood with special enamel or varnish.

The described option is an ordinary country bench, which acts more as a functional option than a decorative element.

List of materials:
- suitable boards – cedar is best;
- a simple pencil;
- roulette;
- saw;
- self-tapping screws;
- nails;
- hammer;
- polyurethane glue;
- plant pots;
- priming;
- plants.
Bench manufacturing technology
Step 1. Arm yourself with a calculator and tape measure, calculate the dimensions of the bench.
Step 2. Sand the boards so that there are no nicks, burrs or other defects left on them.
Step 3. Cut out 46 pieces of equal length (about 50 centimeters each).
Step 4. Set aside 6 pieces to the side for further construction of the turret.
Step 5. Assemble the support boxes from 40 pieces.
To do this, we place two segments parallel to each other, and then place two more segments on top perpendicular to them. In this way we lay out the remaining planks to form a turret. We secure the corners with glue and self-tapping screws for greater strength. Each drawer requires 20 slats.
Step 6. We take long boards and begin to make a frame for the future structure. To do this, we lay the boards on their sides and secure them in the middle with a crossbar.
Step 7. Attach the frame to the support boxes using self-tapping screws and glue.
Step 8. We make a “turret” from the remaining 6 segments. To do this, we lay the planks on one of the support boxes in the same way as we did earlier.
The last row must be made continuous using short pieces that are inserted between the walls of the boxes.
Step 10. If desired, we make “window sills” on the top row by adding four sanded boards with oblique corners.
Step 12. Take long boards and cover the future seating area with them.
Step 13. Place pots with plants in the turrets.
This is a very beautiful and simple design that does not take up much space, but contributes to pleasant leisure time.
We will look at the production technology of the simplest country bench without a back. It only takes a few hours to assemble the bench. The basis of this design is profile pipe.


Set of tools:
- welding machine;
- profile pipe;
- steel corner;
- Bulgarian.
Step 1. Determine the location of the future bench and carry out the appropriate calculations. The standard length of such a bench is 120 centimeters.
Step 2. Using a grinder, cut three metal blanks 120 centimeters long. They will act as a seat.
Step 3. Lay the pieces evenly on a flat surface. You can use a stove.
Step 4. Take a steel corner and cut off two cross members.
Step 5. We apply the crossbars perpendicular to the workpieces, stepping back from the edges about ten centimeters, and weld them.
Step 6. We weld two bench legs to the corners, the length of which is adjusted according to the wishes of the owners of the site.
Step 7. We weld a transverse bar to the legs, stepping back from the bottom of the seat by about 20-25 centimeters.
Step 8. From the scraps of the corners we make two crossbars.
Step 9. We weld these cross members to the bases of the bench legs.
Step 10. Apply protective covering to metal.
Step 11. Install the bench.


If desired, you can modify the structure by welding railings and a backrest to it. Bright paint will give the bench an interesting appearance.
Construction from scrap materials
First of all, you need to decide what materials will be used as the frame of the structure. It can be:
- stones;
- wooden pallets;
- bricks;
- bottles.
Also during the work you will need following materials: clay, straw, water, sand, paint, brushes.
Preparing a frame from pallets


- Fill the bottles with soil.
- We lay them in several layers on a bed of sand and gravel.
- We tie the bottles with wire.
Preparing clay solution


Stage 1. Mix straw with sand and clay.
Stage 2. Add water to the mixture and stir the contents of the container.
Stage 3. Using your hands, roll small balls from the solution.
Stage 4. We apply the balls to the pre-prepared frame, thus forming the outline of the future bench.
Stage 5. Cover the finished bench with polyethylene so that the solution gradually dries and does not crack.
It is believed that clay benches can last up to a hundred years without losing their attractive appearance. In addition, this is a fairly economical option that will certainly add originality to any garden.
Choose the option that will fit well into your garden plot and bring maximum satisfaction.
Video - Do-it-yourself benches for a summer house
Video – Garden benches
A bench is simply necessary in a country house or garden. Its main purpose is a place to relax. Anyone who knows how to work should also be able to rest. Some people simply install a bench, while others create an interesting corner that will certainly invite you to have a good rest. You can simply relax, or you can simply enjoy the surrounding nature and the results of your work. There are many ideas worth considering. Of particular interest are ordinary designs that can be repeated by anyone familiar with wood and owning a primitive set of tools.

Everyone can imagine what the most ordinary bench looks like, but not everyone likes simplicity and most opt for original solutions. Everyone wants to have something that, for example, a neighbor in the country does not have. Almost all summer residents start by decorating their country house or personal plot, and there are just as many options here. Alternatively, you can start designing the area by installing a bench, having previously decided on a resting place. After all, a place of rest is not needed later, it is needed now. Therefore, the design of this place should be tackled at the first stages of the process of decorating a summer cottage or personal plot, and only then proceed to the design of the rest of the territory.
As a rule, summer residents are very keen on growing various green spaces and flowers. Especially, there are a lot of them near buildings. Alternatively, you can combine plantings with a recreation area by installing a bench not far from the dacha. IN in this case, everything will look organic: green spaces, flower beds, and an original bench.
 Two flower beds made of boards and a bench between them
 There are a huge number of options: from the simplest to the most sophisticated. The simplest option may consist of two wooden boxes in which flowers are planted, and two boards built between these boxes. The boards must be planed and well sanded. This structure can be placed directly next to the wall of the dacha. You can attach a couple of the same planed boards to the wall, which will serve as a kind of backrest. Instead of wooden boxes, you can install concrete cabinets, which can last much longer than wooden elements.

It is very simple to build such a structure, and most importantly quickly. As for the boards, you can buy them ready-made or make them to size yourself using untreated boards. But in this case, you will have to work hard, but the bench will not cost anything, and the result will definitely please you. If used concrete flowerpots for flowers, then the boards can be secured using metal corners. The only problem is the difficulty of drilling holes in concrete. Under no circumstances should you use a hammer drill, as a flowerpot, even a concrete one, will easily split, especially if it is made independently.

You can not fasten the boards, but instead of the boards put a huge log, which does not need to be fastened if it is installed correctly.
As mentioned above, there are many options, and they are created on the basis of the real possibilities that the owner of the dacha has. Alternatively, you can simply install a bench for relaxation away from flowers and green spaces. After all, it’s no secret that various insects hide in flowers and between the leaves of plants, which in no way encourage rest, but, on the contrary, force you to leave behind the worst memories of your holiday.

As a bench, you can use hollow blocks, into the voids of which treated boards are simply inserted, which can serve as seats.

To make sitting comfortable, the sharp corners of the blocks should be rounded. It's good if these blocks turn out to be heavy and large. If the blocks are small, then they can be pinned together into one piece.
Log bench
The site can be decorated in any style, but almost everyone moves away from standard approaches to solving the problem. Everyone wants to have something of their own. But not everyone knows that what is new is an improvement on the old. As an option for a new, but somewhat improved old one, this is the option of using a log as a bench. As a seat, you can use a log of large diameter, sawn lengthwise. A log of smaller diameter, also sawn lengthwise, is used as a backrest. Or a trunk with a smaller diameter, but cut closer to the edge. Narrow sections of logs are used as legs.
 Log bench - quick and easy
 The legs and seats are connected to each other using metal pins. Holes of slightly smaller diameter are drilled for the pins. The pins must fit into the holes with force. In this case, half of the pin is driven in by hitting the pin, and the other half is driven in by hitting the wood. As a rule, they do not hit the wood itself, since marks from the hammer may remain, but with the help of a wooden point. Such a connection must be reliable, although there are many mounting options.

In the photo just above, you can see another option, in the “ethnic” style. Its organization is associated with the presence of stone, although this option is quite feasible if there is a log. Sufficiently used as a seat thick log, and as legs - part of a large diameter deck. In one and the other part of the deck, grooves are cut for the seat. An ax or grinder is used as a tool. Alternatively, you can use a chainsaw. These are not post-Soviet “Friendships” or “Urals”, which have significant weight, and are, perhaps, convenient for felling pine trees in Siberia. If you take the Calm chainsaw into service, then with its help you can make even lesser works of art.
It is possible to make a table from logs, which is simply necessary in the country. In the photo you can see the results of such actions. The tabletop is made of boards, and the rest of the ensemble is made of logs of different diameters.
 Table with log benches
 The next bench, built in this style, has a completely original design. Here, the legs and armrests are made of branches of various thicknesses, and the seat is made of processed, high-quality unedged boards.

Another bench is made in the same style. The only difference is that the boards and branches have the opposite direction. The result is a completely different look. As for execution, no special skill is required. The more careless the end result, the more valuable it is. In any case, this is how others perceive this approach. Most likely, people are tired of imaginary perfection and they prefer handicraft and primitivism.
 Wicker back - not seen often
 Alternatively, you can organize a rest area around the tree and install a bench.
 Relaxation area under a tree
 This is not at all difficult if you install a swing and a gazebo nearby. It is better to build a pergola, similar to an arch, above the bench itself. All that is missing for a complete relaxation is a pond, fountain or waterfall.
Benches made of metal and wood
As a rule, no one decided to build a bench out of metal. In the summer, they can heat up to such temperatures that it makes no sense to talk about rest at all. In case of cold weather, the picture is the same. The bench becomes so cold that it is impossible to sit on it. But benches using a combination of metal and wood are the most in demand. As a rule, the frame is made of metal, which ensures high reliability of the structure, and the seat and back are made of wood, which provides a certain comfort.
 Bench made of profile pipe
 If the design is improved and soft armrests, soft seats and backrests are made, as in the photo, then such a design can compete with the most modern options benches for rest. To make the seats, armrests and backrests soft, just cover suitable material furniture foam rubber. In this style it is possible to build a tabletop.
On a note! When using wood, it is advisable to leave between separate elements gaps up to 5 mm. This is due to the fact that when the ambient humidity changes, the dimensions of the elements also change.
 Stylish benches made of metal and wood
 In the process of creating a recreation area, care should be taken to ensure that there are no sharp corners, especially in metal structures. This is very important if you have children. All elements of the ensemble, such as benches, tables, garden chairs, are made from round and square pipe, bending them so that smooth transitions are obtained.
 Table and bench made of pipes and boards
 The presence of metal allows you to bend structures of any shape, although this cannot be done so easily and you need a special device. The presence of such capabilities allows you to bend structures in one go, without using other tools, such as a grinder and a welding machine. The main thing is to think through the design down to the smallest detail. If wood is used, then only well-processed wood. Wooden elements should not be allowed to have burrs or chips.
Benches made of boards
The most popular option is benches made of boards. There are quite a lot of execution options. There are even designs that look like sofas. If you put them on soft pillows, then you can lie down.
 This garden bench is more like a sofa: if it is of sufficient size, you can lie down
 Constructions garden furniture, based on a modern approach, are assembled simply. As a rule, they consist of rectangles with partitions made of thinner wood, connected together into one whole.
If you stretch your imagination and put it to work, you can build a work of art from an ordinary bench if, for example, you install wooden wheels instead of legs and armrests.
 A bench made of boards with a back and wheels instead of sides - looks interesting
 One of the most simple designs The country bench consists of one board, to which legs are attached in the shape of the letter “X”. Our ancestors built similar shops, although they can still be found today.
 Traditional bench design
 Using wood, you can build a bench in the shape of the letter “P”. In this design, it is very important to ensure reliable fastening of the seat and legs. Similar option involves the use of thick boards or timber for reliability. As an option, you can install the board “on edge” for greater rigidity, and for greater reliability it is recommended to fasten it using metal corners.

This photo shows an option where the cut is made at 45 degrees. This is not difficult to do with the help of a special tool. If you connect all the parts, you get an angle of 90 degrees. If the board is thick and the seat does not sag, then the bench will last quite a long time.
In the photo below you can see another option for an interesting solution, which is characterized by increased reliability. Boards of different lengths are used as legs. The difference in length is the thickness of the board: every second board should be shorter. The structure is connected using nails. Moreover, through one board, the nails are driven either into the board for the seat or into the board for the legs.
 Modern style bench
 Original solutions
Along with the classical approach to the process of making benches, there is also an original one, although solving such a problem requires appropriate materials and tools.
For example, you can also build a bench from a large stone if you attach an appropriate wooden platform to it.
 Bench made of stone and boards
 If bamboo is available, a seat is also made from it, which will take on a more exotic look.
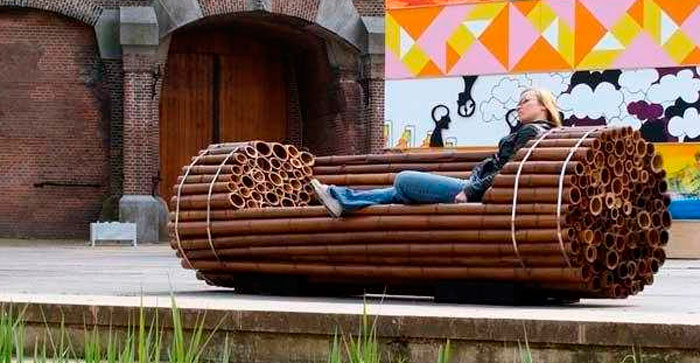 Made from bamboo, and whole
 Or a stone.
 Sitting in winter will be unpleasant, but beautiful...
 It all depends on the flight of fancy. A real owner does not have unnecessary things or materials in his dacha. With a reasonable approach, you can attach any thing, and it will not just lie around in the country or lie like a dead weight in the garage or shed.
How to make a bench: photo reports
Naturally, not every owner has a set of tools for making benches from stone, but everyone has a minimum set of tools for working with wood, especially since these are very simple and affordable tools. Therefore, it makes sense to consider wood structures. Everything that is done with one's own hands is ultimately a source of pride.
Bench without back
The design, although simple, has a rather impressive appearance due to the material used. The legs are made from timber with rounded edges. As a last resort, such a beam can be prepared independently from round logs of small diameter, trimming them on 4 sides. The result will be the same timber. Therefore, there should be no problems with the construction of the bench. The legs of the bench will be made from this material. To do this, you should lay the cut beams flat (horizontally) one on top of the other. It is this design solution that brings a certain exclusivity to the design.
 A simple bench looks interesting due to the material
 The bench without backrest is 120 cm long, 45 cm wide and 38 cm high. It is permissible to round the edges of the beam in any way. In order not to strain too much, you can already find a ready-made, profiled beam. Although it will cost much more, it is a pleasure to work with it.
Depending on the size of the bench, it is not difficult to calculate how much timber is required. If you take a beam with a cross-section of 70x70 mm, then with a height of legs of 380 mm, it is enough to place 5 beams on top of each other. We calculate: 45 cm multiplied by 5 pieces. and you get 2.25 m of timber. Since there are 2 legs, there will be 2 times more timber, which means 4.5 meters of timber. A board 40 mm thick and 90 mm wide is used as a seat. Given the width of the bench, you will need 5 boards, 1.5 meters long. If you calculate more accurately, you will need 1.2 m x 5 pcs. = 6 m of board.
At the first stage, boards are cut according to size. In this case, it is necessary to round off all sharp edges. To do this, you can take a plane or just coarse sandpaper and carefully process the boards. In order not to have to do much yourself, there is another option: you can simply negotiate at the sawmill and get a well-processed board, especially since they have all the capabilities for this. All that remains is to take them and coat them with varnish.
 Treated boards
 After this, they begin to manufacture the legs, for which the beams are cut into identical sections, 45 cm long, after which they are stacked one on top of the other in 5 pieces. The next stage is connecting the legs for stability. In this case, the beams can be fastened with metal pins or wooden dowels. The distance between the fasteners is 7-10 cm. As a rule, such a connection is made using glue, then the connection is more reliable.
 Lines where the pins will be installed
 The pin connection requires precise drilling of the holes, otherwise the beams will not be on the same line. For this, it is better to use a template. In addition, the dimensions of the leg elements must be the same, then it will be possible to accurately mark the location for drilling holes. For those who are familiar with drawing, tape measure and pencil, it will not be special labor do everything right.

The pins should be installed in a staggered pattern, so it is necessary to mark with this feature in mind. In the same way, the boards are attached to the legs at the rate of two holes per board.
If you look from a technological point of view, this is not a bad connection option, but it requires some skill and experience in working with wood. The connection stage can be simplified if the bars for the legs are stacked one on top of the other and firmly connected them using a clamp. Then drilling accuracy will be ensured. Alternatively, the beams can be connected using long metal pins and nuts with washers. In this case, it is enough to drill 2-3 holes through.
The seats can be nailed to the legs, which greatly simplifies the entire manufacturing technology of such a bench.
 The bench was made by hand. Finishing work remains
 When using nails, it is advisable to hide the heads, as they will then rust, which is completely undesirable. To do this, hammer the nails so that the heads are hidden almost 5 mm deep into the wood; for this, you can use a guide. After this, putty is taken, a little sawdust is added to it to match the color, and the recesses are puttied. After complete drying, the areas are thoroughly sanded. sandpaper. So that the place where the nails are driven does not stand out against the general background, they are coated with a suitable varnish.
The technology for varnishing wooden surfaces is quite simple, especially since it is described in detail in the instructions for use.
Bench for a summer house made from broken chairs
If you have two old chairs and don’t have enough imagination to adapt them somewhere, then you can make a bench out of them. Only the same ones and strong enough will do. If they are loose, they will have to be repaired. The chairs are disassembled so that the backs and legs remain. After this, two chairs, or rather what is left of them, are installed side by side and their backs are connected using slats of the appropriate thickness.
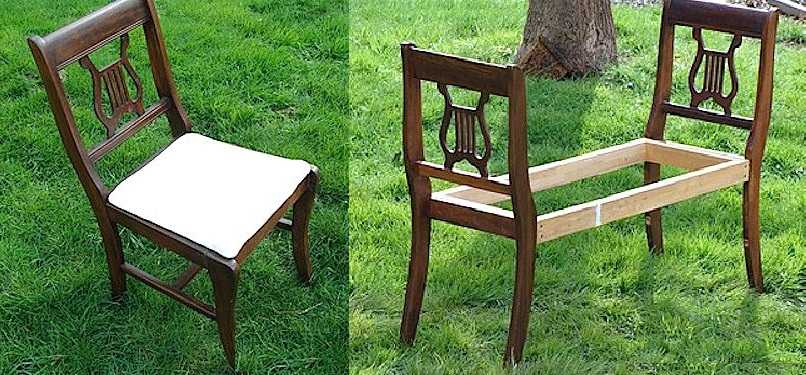 Bench made from old chairs
 To make the structure rigid, at a height of 20 cm from the floor, the structure is tied with the same slats along the entire perimeter. Subsequently, these slats will serve as a footrest, and if the bottom is sewn up, for example, with plywood, then you can store some things here.
 We paint the completed structure
 After the structure has been strengthened and sanded, it can be painted. In this case it will do regular paint, which can hide some flaws in the entire structure and especially in old chairs. All that remains is to cut out a sheet of plywood, lay foam rubber on it and cover it with some fabric. At the same time, one should take into account the fact that the bench will mainly stand outside until the coldest weather. Therefore, it is better to opt for, for example, leatherette. In any case, the material must be moisture resistant.
 Finished bench made from strusses
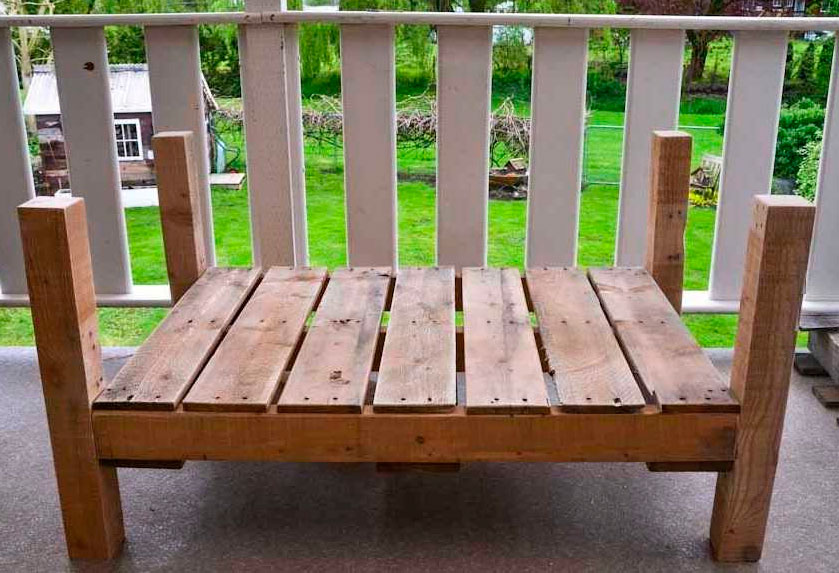
 Garden bench chair made from pallets
For a reasonable owner, any material has its own value. Garden furniture can be made from cargo pallets without any problems. Moreover, there is no particular need to disassemble them: the back is made from one pallet, and the seat from the other. All that remains is to think about what to make the armrests and legs from.
 This is what should happen
 One of the pallets is reinforced with additional bars, which are secured with self-tapping screws.
 Strengthening the corners of the pallet
 After this, a beam with dimensions of 100x100 mm and an arbitrary length is taken, after which 4 identical sections are cut, up to 80 cm long. They are attached in those places where the reinforcement bars, placed in advance, are located. As a result, legs 20-25 cm long will be sufficient. Self-tapping screws with a length of at least 150 mm are used for fastening. During the work, you need to make sure that the bars are screwed correctly so that you can install legs of the same length.
 Screwing the legs-supports for the armrests
 If after these steps it is not possible to obtain a completely flat structure, then the legs can be filed at the end if the bench does not sit level.
 The legs are screwed
 The second pallet is attached to the rear pillars, and on both sides there are boards for the armrests.
 Almost done
 If there are no such plans, then you can simply carefully process wooden elements sandpaper, after which the bench is simply painted with any paint, any color.
 Finished product: pallet chair
 Working drawings of wooden benches

You can relax calmly in the shade of trees in the summer or bask in the sun on a cool autumn day on a wooden bench that you installed in the garden yourself. In modern design, garden furniture is one of the full-fledged elements of landscape design.
Taking into account the decorative value of garden benches made of wood, you should try to choose a model that will harmoniously fit into the environment. For a young garden or summer cottage without big trees It is better to choose light furniture options with decorative thin metal legs, simple benches and benches that are laconic in shape. If the garden is old and well-groomed, then seats in the Provence style are suitable - with stylization like antique furniture with wooden decor.
I can decorate an overgrown summer cottage with an imitation of a wild natural thicket with benches assembled with my own hands from natural material- driftwood, driftwood, lightly processed branches. A bench made of logs hewn with an ax would look very good in such a garden. Such seats should be installed in places hidden from view: among flowering bushes or around the bend in the path.
When choosing a place to install a bench for a summer house, you need to pay attention to the views that will open to the eyes of those sitting on it.
It is not advisable to place the bench in such a way as to contemplate an unsightly fence or compost heap. Place it near a pond or flower bed, under a branchy old tree.
Then your relaxation will be complemented by the pleasure of the smell of flowers and the play of light on the water, the rustle of leaves and coolness in the shade.
Various types of benches can be installed on the veranda near the house, in the relaxation area by the pool or street hearth. They will also find use under a canopy in the garden. In each case, you must adhere to general rules compatibility wooden product with the general style of the site. How to do original benches from the pallets, watch this video:
Wood is traditionally chosen as a material for garden furniture - an easy-to-process material that allows you to bring almost any idea to life. Currently, along with ordinary boards and bars, you can use moisture-resistant varieties of thick plywood. From durable and aesthetic sheet material, you can assemble structures suitable for modern designer landscapes and for an ordinary courtyard that does not have certain style characteristics.
If wooden benches are made in stationary version, then care should be taken to protect them from moisture. A variety of impregnations and paints and varnishes. Outdoor furniture will have to be coated with paint or varnish every 1 to 2 years as the protective layer wears out. Such measures can significantly extend the life of a wooden structure.
How to build benches yourself?
In order to build a comfortable bench with your own hands, you need to make a sketch of it. Exist optimal sizes garden furniture, which must be observed in this case:
- seat height above the floor - 40 - 50 cm;
- width (depth) of the bench - 50 - 55 cm;
- The height of the backrest above the bench is 35 - 50 cm.
These dimensions allow a person of average height to sit comfortably, lean on the back, and stand up easily. If the owner’s build differs greatly from the average, then the dimensions of the bench will have to be selected individually. The backrest is usually made with a slight tilt back. For more information about wooden benches, watch this video:
To work with wood you will need the following tools:
- hacksaw or jigsaw;
- drill and screws, or hammer and nails;
- roulette;
- pencil.
For product assembly complex shape Wood glue may come in handy. It is used to fasten parts that are connected using the tongue-and-groove method or with a furniture dowel. For plywood products, long metal threaded studs and nuts are useful.
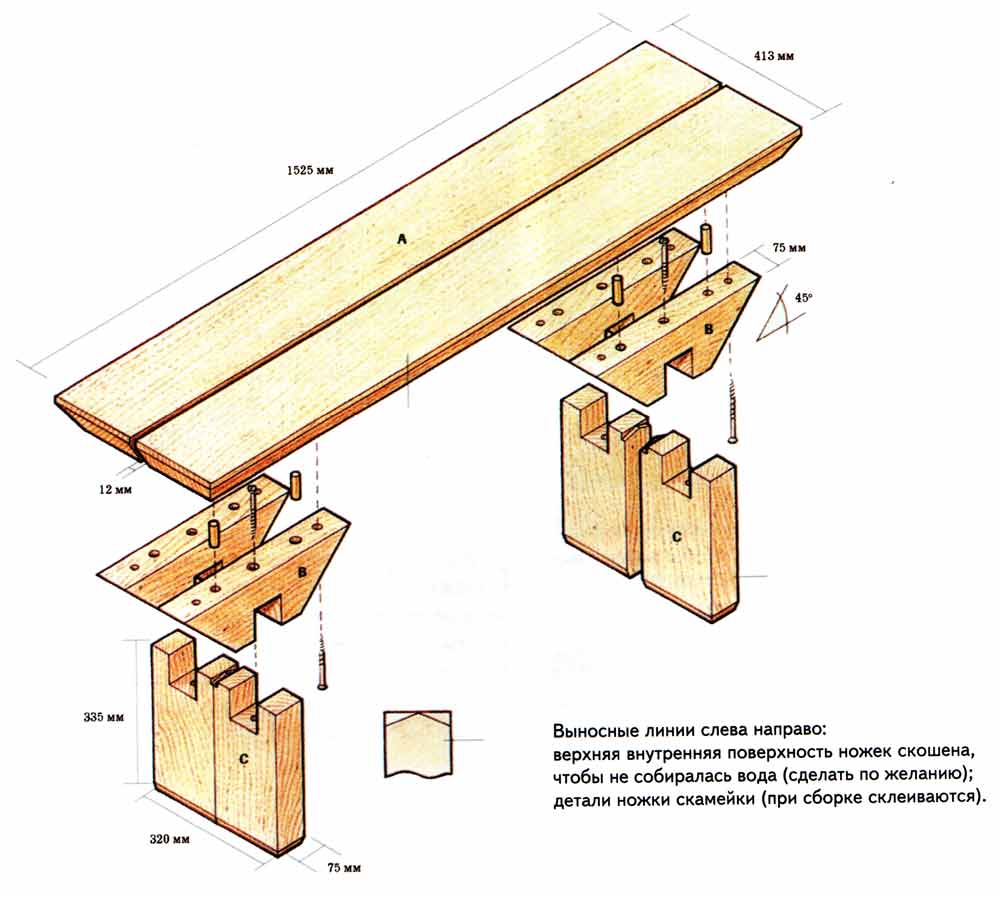
A simple bench for a vegetable garden or bathhouse
Even a novice craftsman can make a simple wooden bench with his own hands. Such benches can be seen in abundance at the gates of village courtyards; they can be placed near the beds, in a bathhouse or utility room. They are not distinguished by their sophistication and decorativeness, but they can perform the functions of garden furniture quite successfully. To make a bench you will need a board 2 - 2.5 cm thick and about 20 cm wide.

Benches for a bathhouse or vegetable garden are easy to make
According to the drawing in Fig. 1. you need to cut out the following parts:
- seat - 1 piece;
- apron - 2 parts, the length of each is 10 cm shorter than the seat;
- legs - 2 parts.
File off the corners on one side of each apron piece as shown in the diagram. Measure 2 - 2.5 cm from the edges of the element for the legs on each side in the upper part, cut a groove 10 cm long. If desired, cut out holes for the handles on the bench seat. To learn how to make a bench with your own hands, watch this useful video:
Assemble the product in the following sequence:
- Drill holes for self-tapping screws in the plane of the apron board at a distance of 10 cm from each end. Place the board in the groove on the leg parts and screw the screws through the holes into the edge of the board. Attach the 2nd leg pattern to the other side of the apron.
- Repeat all steps and attach the apron to the other side of the bench base.
- At a distance of 15 cm from each end of the seat, make several holes in the plane of the board. Place the part on top of the base and attach it with self-tapping screws, screwing them into the end of the leg part. For strength, you can make additional holes along the length of each side of the seat and attach it to the apron boards.
Sand the surface of the product with coarse sandpaper to remove burrs. If necessary, paint the bench to your taste.
Simple bench with backrest
Another simplest project shown in Fig. 2. To make a bench with a backrest with your own hands, you will need 2 pieces of logs about 25 cm long, boards for the back and seat, and 5x5 cm bars for the backrest posts. If you want the seat to be a little higher, you can take 4 pieces of logs or timber and lay them on top of each other, fastening them with dowels.

The back is screwed on with self-tapping screws on the reverse side
Making the bench is very simple. To ensure that there are no nuts or nail heads on the surface of the product, fasten the parts using dowels and glue. The back can be screwed with self-tapping screws from the wrong side so that they do not drill through the board.
To make dowels, you need wooden rounded rods (a thin handle is suitable for garden tools). Drill 2 holes in the log with a diameter equal to the thickness of the dowel. Based on their location, make corresponding recesses in the underside of the seat. The work must be done very carefully so that during assembly you do not have to adjust parts of the bench. For more information on making a bench with a back, watch this video:
Lubricate a piece of wood for the dowel with glue and insert it into the hole on the log so that a small fragment remains outside. Its length should be equal to the depth of the recess drilled in the seat (Fig. 3). Lubricate the dowels with wood glue and place the board on them. Do the same with another piece of log.
Cut the bars to the required length to make the backrest posts. Screw it to the ends of the logs with self-tapping screws. Drill 2 holes in the upper part for attaching the backrest. The distance between the holes should be less than the width of the board. Screw the screws through the holes into the board. The finished bench can be painted or coated with clear varnish.
Stylish bench with backrest
Making garden furniture according to the proposed project is not difficult at all. The basis of the structure is slabs of porcelain stoneware or concrete and boards 2 - 2.5 cm thick. If desired, heavy materials can be replaced with light plywood of the same thickness. A wooden bench with a back will be mobile.

Stylish bench has an interesting backrest
The following parts will be required:
- squares 50x50 cm for legs (plywood or board) - 12 pcs.;
- boards or plywood rectangles 15x200 cm - 5 pcs.;
- backrest supports 15x65 cm - 4 pcs.;
- crossbars 15x17.5 cm - 2 pcs.;
- threaded rod M16 55 cm - 4 pcs.;
- nuts and washers M16 - 8 pcs.;
- self-tapping screws
The plywood will first have to be cut into fragments of the required shape and size. If boards and slabs are used, this step can be skipped. To learn how to make an original bench with your own hands, watch this video:
Drill 2 holes at an equal distance from the edges in the upper part of the square parts of the legs. Adjusting the long parts of the seat as in the diagram (Fig. 4), make 2 holes in them on each side. Screw a nut onto one end of each rod and put on a washer. Alternating long and square elements, assemble the bench. Tighten the nuts on the other side of the studs.
This bench can be used without a backrest.
But for convenience, you can do it too. To do this, fix 4 boards 15 x 65 cm with self-tapping screws from the inside of the back of the bench. Glue crossbars between them or place them on dowels.
Decorative benches made from natural materials
Untreated wood is an excellent material for garden furniture. The bench, similar to the throne of a forest king, fits perfectly into the landscape, imitating wildlife. Such seats are very appropriate near rockeries or old trees with a spreading crown in an overgrown corner of the garden. Rustic benches go well with picnic areas trimmed with wild stones or barbecues made of sandstone and boulders. Original shop in this video:
The simplest option for sitting from logs is a monastery bench. To make it, a raw log needs to be sawn in half lengthwise. Legs are made from short sections, laying them cut down on the ground. Long halves of logs are secured to dowels from above, cut side up. To prevent the bench from staining your clothes, it is better to choose hardwood logs and dry them well before assembling the furniture.
To remove splinters and burrs, the cut plane must be planed smoothly with a plane and treated with emery cloth.
A complicated version of such furniture is a bench made of logs, supplemented with a backrest with your own hands (Fig. 5). To attach the backrest, you need wooden or metal supports and a crossbar. These parts can be made from thick wood branches, timber, or steel strips. Fastening is carried out using self-tapping screws of sufficient length or nails.

Examples of original wooden benches
A log bench can be made in another way (Fig. 6). The photo clearly shows the grooves in the upper part of a thick log sawn in half. You need to insert a board at least 4 cm thick or a beautiful cut of a tree trunk into the grooves. If desired, an exclusive piece of furniture made by yourself can be supplemented with a backrest. The supports for it need to be attached to inside legs on a flat surface. The crossbar can be a thick branch or the same cut of wood as for the seat.
Chopped table with benches
A set of table and benches will be convenient at the dacha in the dining area or near the barbecue (Fig. 7). It’s not difficult to make one if you know the basic techniques for making wooden log houses. To begin with, 2 logs of approximately equal thickness are placed on the ground. With an ax you need to cut out semicircular recesses (bowls) at the ends of the logs. The size of the bowls will depend on the diameter of the log that is chosen for the seats. This trunk needs to be sawn lengthwise. An example of chopped furniture in this video:
In the middle of the 2 lower logs, you need to cut out 1 more cup to install the transverse support. It may not be a very thick log. Its length should be such that the ends protrude beyond the side surfaces of the trunks.
For the table base you need shorter logs. Their length is approximately equal to the desired width of the tabletop.
In the middle of each trunk, you need to cut out recesses that are suitable in size to the thickness of the crossbar. Lay the parts of the log house with the cups down, covering the transverse log with them. Make a tabletop from the boards and secure it with nails. Place the halves of logs in the places designated for them.
How to make benches from branches or driftwood?
This is the most creative activity. Having found beautiful driftwood and polished driftwood trunks in the forest or on the shore of a reservoir, you can make furniture of amazing beauty (Fig. 8). Each such bench is unique, because it is difficult to find 2 identical branches. Therefore, there can be many solutions for how to make a bench from driftwood.
The main thing for all such products is one thing - the parts are adjusted directly on the spot to fit the already finished legs, seats, and backs. The branches should intertwine harmoniously, forming a structure that will support the weight of an adult. To connect non-standard parts, you can use both self-tapping screws and nails. The most reliable connection is with dowels and glue. Where a tight fit of the pieces of the structure is desired, driftwood can be trimmed with an ax.

The most original benches can be made from branches and driftwood
Such decorative benches can even be used to decorate rooms in a chalet or rustic style. They go well with wild stone trim. They will look harmonious in the garden among flowering bushes or near a pond.
The variety of models of benches that you can make with your own hands from wood is limitless.
The main thing in making furniture from wood is the careful fit of parts.
Then the finished product will be neat, without distortions. Treated with moisture-proof impregnations and coated with varnish or paint, any garden seat will last for many years.
The bench as a household item competes with the stool in antiquity. Because if a stump or boulder is already a stool, then a fallen tree is a bench or, if a branch extends from it, on which you can lean your back - a bench. In the last two forms, it has successfully survived to this day, which we will return to later.
A bench, with or without a back, “on paper” is not a piece of furniture, not a building, not a gardening tool and is not classified in any way. Therefore, it exists in many different types, and no restrictions are imposed on its design and design. The requirements of ergonomics, strength and reliability must be observed in it, but no one has the right to make claims for themselves.
Most often, this type of seating is outdoor: courtyard, garden, country, park. This could be a simple bench made of boards on a pair of logs, a classic village bench for gatherings, or no less classic garden sofa and park bench, the top row in Fig.

A wooden bench is an exquisite object that in many ways defines one’s personality. landscape design, therefore it is the object of close attention of specialists of the relevant profile. In the 2nd row from the top in Fig. individual results of their research. But the prices are my respect, sometimes more expensive than a good furniture set. There is a unique material, design, and wages for the craftsmen who embody all this in the product. And most importantly, there is a complete absence of restrictions on markups, because these are luxury goods.
Exclusive samples of benches/benches are not so technologically complex that you cannot make them yourself. However, in this article we will look at how to make a bench with your own hands, content with ordinary carpentry techniques and not even the most complex of them. You will get something like those on the 3-4 rows of Fig. And the acquired skills will be quite enough to later create a unique thing, if only there was material. You may have to learn only the simplest methods of wicker weaving on your own.
What about at home?
The bench, in fact, has never been completely pushed out onto the street. There were, are and will be benches in utility and utility rooms. Now they are gradually returning to living rooms: the increasingly popular studio apartment is essentially the same hut where everyone lived together in one large room. And the shop has proven over the centuries its ability to create a cheerful and benevolent life in housing not for biryuks. And we will further highlight a section about some types of indoor benches.
What to make it from?
The seat and back of the bench are almost always wooden. The metal gets cold, rusts, which is why it requires annual painting, and gradually erodes. Plastic is cheap, requires minimal care at first, but is uncomfortable and outdoors and/or does not last long if used intensively by random people. We are talking here about the arrangement of private property, so most of all we are interested in a bench made of wood, as a harmless material that is most pleasant to the eye and touch.
Note: The wooden parts of the benches are impregnated with biocides before assembly. The most affordable one in this case is used motor oil. The entire product is varnished (primed, painted) after a week of drying after impregnation. It is preferable to take water-based acrylic varnish; it somewhat protects the wood from darkening under the influence of ultraviolet radiation.
However, the supports/legs or power frame of the bench may not be made of wood. Eg, profile metal It resists shocks and shocks better and in contact with the ground is more durable than wood, especially concreted ones. Therefore, for benches for public use - street, courtyard - this design is preferable, especially since a simple country bench on a steel base will cost less, at least due to the smaller volume of blanks to be delivered to the assembly site.
Bench and stone
A very good garden bench is made on a stone base. For example, at pos. 1 pic. The flagstone only adds naturalness to the wood and the masonry joints do not detract from it at all. The creators of the one in pos. 2, they simply poured the rubble into wire baskets, which also served as supports for the tray-table. Shop with flower girls at pos. 3 nothing prevents you from relying on mini rock gardens instead. If you also build a pergola over such a bench, you will get a very cozy alcove, pos. 4.

Note: There are also benches with a stone seat, but a suitable slab will be expensive; it requires quite a bit of stone valuable species, very tough, resistant to fracture and chipping.
To rest to your heart's content
At the dacha you want to have a good rest, especially after agricultural work. Therefore, it is highly desirable that the garden bench meets the requirements of industrial ergonomics:
- Seat height 400-500 mm.
- Seat width 500-550 mm.
- Back height 350-500 mm.
- Backrest tilt 74-78 degrees.
- The profile of the seat (back and seat) is smooth, without a dip under the buttocks.
- In the area of the neck and knees, smooth bends of the profile are made back and down, respectively, so that you can throw back your head and tuck your legs without feeling the sharp edge.
Note: The dimensions of the bench are selected within the recommended limits individually according to height and physique.

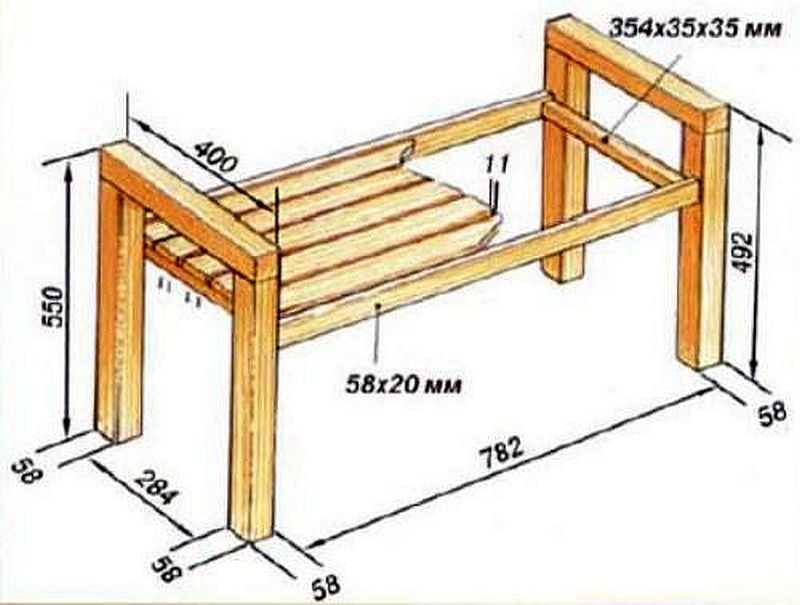
Drawings of a garden sofa suitable for such conditions are shown in Fig. Its design is quite labor- and material-intensive, but technologically not complex: it does not contain parts whose configuration would require the use of patterns or templates. Its significant drawback is the large waste expensive timber, 1.3 m from a 6-meter workpiece, and a 3-meter piece is not enough. Garden bench-sofa on the trail. rice. It’s simpler and doesn’t require a thick beam, but 4 parts need to be cut out along the grid. Which, however, is not scary if you have a jigsaw.

And the children too

It is known how much children love to play on benches, whether it is a noisy group of people rubbing elbows, or a whole doll world of the little mistress. As well as the fact that at the same time they fidget with enthusiasm, crawl, and, not feeling lateral support, flop. There's nothing wrong with that, it's just a child's matter. But there will be less roaring and pouting faces if the children's bench is equipped with low railings. However, it does not need a backrest, so that several shellaputs can approach both from the front and from behind, or sit astride the seat with their legs dangling.
A suitable hybrid of a bench, bench and sofa in this case is shown in Fig. It is better to place this structure near the children's playhouse. However, see what is most convenient for you, this bench is suitable in size for adults, and it is much easier to make than the previous one.
The whole world
A table with benches at the dacha just begs to be next to each other. On an already landscaped plot with overgrown trees, there will be a cozy family seating area: a table with benches. Diagram with dimensions of one of the combined designs country table with benches in one block is shown in Fig. Its design is characterized by ease of assembly and disassembly and the almost complete absence of metal fasteners.

There are only 4 permanent and several technologically complex connections in this product: T-shaped bench-beams in cross-section are assembled on dowels or dowels, depending on what you have manual frezer on wood or not. But for the winter, the entire complex can be easily disassembled, put into a compact bag and put away in the pantry. Material: weather- and pest-resistant wood: pitch pine, larch, oak. On the base panel you will need 24-30 mm plywood, waterproof or twice impregnated with a water-polymer emulsion.
Note: It is advisable to attach wooden blocks to the lower edges of the base panels using glue and screws square section. This will additionally protect the plywood from delamination. Gluing the connection is necessary, otherwise, due to capillary locking, the service life of the panels will only decrease.
Combi for two

Fans of a philosophical and romantic tete-a-tete in the lap of nature may like a pair of garden chair-bench with a back and a table. For a volume of favorite poems, of course. The diagram of its device is shown in Fig. on the right, and drawings and assembly diagram in Fig. below. The material everywhere is 30mm board. This product is already designed for quite experienced craftsmen, because patterns are given only for shaped parts (the grid pitch is 10 mm), and other dimensions will have to be restored using the base grid (see appendix); forming a radius of recesses for the backrests in the rear support of 1300 mm.

Metal based
A 40x40x2.5 corrugated pipe with welded ends, thrown directly onto the ground in the Moscow region, rusts right through from below after more than 15 years. And after that, the remaining box can hold the bench no less. There is no need to talk about strength: even Hollywood superheroes cannot cut steel with their hands. True, in the USSR they once made a rather stupid movie in which the late Lev Durov pierced a metal tank with his finger. Tin, for drinking water.
So, everything is OK with the strength and durability of metal benches. Garden benches made from profile pipes can be quite attractive, see fig. But please note: a pleasant appearance is achieved by using parts bent along a radius. To achieve the same aesthetic effect with straight pipes, you will need at least twice as much work and material, as shown below on the right.

To smoothly bend the workpieces, you need a fairly expensive and complex pipe bender for profile pipes. Alternative option– hot bending of a pipe filled with sand. But, firstly, at current prices, you need a forge with a forge: in order to bend the sides of the bench with a propane torch in the tutorials, bottom left in the figure, you need to almost completely burn a 20-liter gas cylinder. Secondly, hot bending is a delicate matter. If you manage to ruin no more than 3 blanks before the part comes out without wrinkles and with the ends in the same plane, you are a born blacksmith.
The next circumstance is that the strength of a bench made of metal profiles is significantly excessive. Therefore, if you make one, the main thing is your own taste and invention. And we give a couple of drawings of benches made of corrugated pipe 40x40x2.5 for purely utilitarian purposes. On the left in Fig. - a large hardware store, and on the right is Scott's shop. Why it is and what to do with it is well known to fans of bodybuilding and fitness.

Is it just a pipe?
The corrugated pipes are drawn from ordinary structural steel, and nowhere does anyone say that any other metal will not work on the bench. For such cases in Fig. several examples of metal benches. Pos. 1 – a shop for secluded and little-visited places. There is no point in stealing it: the “gain” is tiny compared to the fuss of robbery and dismantling, and reclaimed wood is not yet accepted anywhere. Material – steel strip 4-6 mm thick. Its legs won’t be able to withstand wild fun, so this bench is mainly for the cemetery.

Pos. 2 – bench/lounger-wicker for sun and air baths. There is no pressure anywhere, the body breathes from all sides. The base is made from an old Soviet folding bed, so even a child can rearrange it much more conveniently. The supporting frame, instead of the now expensive aluminum, can be assembled from propylene water pipes.
A functionally and aesthetically complete garden bench, pos. 3 is collected on the basis of worn-out parts of agricultural machinery and vehicles. The latter, however, is not necessary: instead of leaf springs, the same steel strip or corner will be used.
About transforming benches

Transformable furniture saves a lot usable area. In a city apartment this advantage can be decisive. Unfortunately, it is the only one: transformable furniture is more complex, more expensive, serves less functionally than conventional furniture and requires additional user operations when converting to another use case.
“Transfurniture” probably came to the garden/dacha only under the influence of fashion. A transforming garden bench is most often either a paired bench or a lounger that can be folded out from a table with benches, see fig. However, it is still more pleasant to bask in the sun on something soft, like the wicker described above. And if the transformer is a double bench, then it’s a garden bench, not a park bench. It is not customary to sit with your back to each other between relatives, friends and acquaintances.
There is one more circumstance: there is many times more dust and climatic influences outside than at home. therefore, if, say, a transforming apartment table, with careful use, will last 7-10 years, then a garden table will last 3-5 years, especially with wooden hinges.
In general, transformable garden furniture is not for everyone. If you want to practice mechanics and kinematics, it’s your choice. But in reality it will be easier and more useful to think through the layout of the site so that everything you need fits there separately.
Benches indoors
A bench as a piece of furniture is absolutely necessary in a bathhouse: they use it to change clothes, take a break from the gang, relax after steaming, drink tea with lime color, dried raspberries or blueberries. Very useful, by the way. But grabbing something cold after something cold or eating something strong is a perversion that is fatal to your health.
But for the bench, the bathhouse is not a pleasure, but hard labor: every now and then there is dampness, the temperature can jump from –30 to +60 in 2-3 hours. Therefore, firstly, wood for a bath bench is required to be resistant to rotting, but without resins, tannins, salicylates, aromatic compounds and other natural chemicals. And it should only be treated with biocides made from purified mineral oils or silicone-based. Steamed skin is sensitive to substances that are harmless to it under normal conditions, and when sweat is reabsorbed, unwanted “additives” penetrate the body.

Secondly, in a small bathhouse, where the beds won’t fit, they steam on a bench. What kind of steam is this if there is a squishing under your stomach? Therefore, the bench in the steam room is made in the form of a lounger with gaps or a grid of small slats, see fig. But even in this case, wood is required to be porous, easily absorb moisture and just as easily release it into the air.
Thirdly, the sauna bench should not contain metal parts that could be accidentally touched. The thermal conductivity of metal is high, which means it gives off heat easily. A piece of wood heated to +80 can be touched without fear, but a piece of iron at +60 (which is normal for a bathhouse) will cause a burn.
The best bath benches are made from Asian poplar tugraq. An almost complete replacement is aspen or black alder. Linden and birch are much worse; they rot easily. Silver poplar, plane tree, horse chestnut or, in the southern regions, ailanthus will last longer. All these types of wood in a bathhouse will not become slippery only if the bench dries well, for which purpose there should be no gaps in the structure that can retain moisture for a long time. And it is desirable to have the entire product easily disassembled for maintenance and, if necessary, replacement of unusable parts.
Branded shops do not meet the latter conditions and are expensive, because... made from special types of tropical wood. And a homemade bench for a bathhouse can be made no worse than a “company”, at least according to the drawing in Fig. With the thickness of the seat/lounger boards being 50 mm, its length can be increased to 2 m to allow you to steam while lying at your full height. Then the width is needed from 60 cm; it is obtained by adding a board and a pair of its heels with legs. The red arrows show the oak pads of the legs; they greatly increase their resistance to rotting.

Not only for the bath
In addition to the bathhouse, benches, as mentioned at the beginning, are also returning to living quarters. And not only in a studio apartment: in a country house or in the kitchen, a bench will save a lot of space. Don’t be surprised, a bench under the wall, equivalent to a pair of chairs there, saves about 0.5 square meters. m area. And this is already small stove or a corner fireplace, plus you can sleep on a bench. Of course, the appearance of a home bench should be more elegant, and it is assembled “in a furniture style”, from wood on dowels or from laminated chipboard on confirmations. A technologically simple version of a home bench for two riders is shown in Fig. It will also suit urban cuisine, if there is no room for a soft corner.

Note: in Fig. on the right are options for making the well-known household mini-bench from available scraps. Height – at the knees; seat dimensions - according to your own fifth point.

Anything from
Antique
Here we will talk about benches made from scrap materials. Since the log bench is perhaps its oldest variety, we are looking for logs of suitable thickness, from 200 mm. Because independent logging is prohibited by law (although it is practiced in some places) and does not benefit nature; we pay attention primarily to dry fallen trees (easier to process) or unusable trees cut down in the garden. Crooked, knotty - so much the better; visible roughness only gives the log bench more rustic charm, see fig.

Next you need to turn the log into a bench. Here you can find instructions like: “Accurately (carefully) saw the log lengthwise.” Without a sawmill with a centering and feeding mechanism? Advisers of this kind have a clearly vague understanding of wood processing. In fact, it is possible to make a bench from a log at home in 2 ways.
The first produces a large waste of material, so it is only suitable if there is an excess of it, but it is accessible to any amateur, and you can work with a regular cross-cut saw, even a hand-held one. For those who don't know: wood is cut along the grain with special rip saws. So, first we make cuts on the log to the required depth more often, pos. 1 in Fig., and break out the pieces with a crowbar (this is by no means just a thief’s tool), a nail puller or a pry bar. They just jump out of dry dead wood, but on damp wood you will have to sweat over the first ones, and remove the others with a chainsaw, it will cut along, pos. 2.

Next, we first remove the remaining chips with an ax and chisel, pos. 3, and then rough out the surfaces with a planer. The product is cleaned using a grinder, pos. 4, or just use sandpaper by hand. In this way, a solid log bench is obtained. It is up to you to debark the sides or leave it as is, and biocidal treatment, staining and varnishing are the same as for any wood outdoors. Slightly rotten dead wood (with dark spots) will first have to be treated with a wood restorer (brightener).
For the second method, you only need a chainsaw, because... she saws both along and across. It requires a steady eye, a steady hand and a strong grip, but the result is a full-fledged bench with a backrest, as in fig. higher, with virtually no waste. Technological process in this case it is elementary, and the bench is completely ready for sitting 2-3 hours after starting the saw, see video:
Video: log bench without nails
Rough, but fast and easy
Summer residents and developers, as a rule, do not immediately think about benches. And they soon realize that it’s in vain: you can’t rest or eat properly on bricks, a box or a random log. If by this time the first pallet from under the brick has been released, then it will fit just right on the bench, which can be built within an hour.

Benches from pallets can also be made in two ways. According to the first, a standard 110x80 cm pallet is cut into 2 unequal parts, on the left in the figure, which will go to the seat and back. Simple and fast, but the side braces and legs, right there, require additional lumber, or you need to remove the board from the seat with the backrest, and an uncomfortable gap forms under what they are sitting on.
The second method requires extra work for disassembling the pallet, see below, but it allows you not to touch the boards prepared for construction and the bench is more convenient, because its back turns out to be inclined. The first cut is made across the top side of the pallet, where there are more boards, pos. 1 in Fig. The next one is across the bottom side (red line in position 2), but on the opposite side of the middle bosses from the top (shown by the red arrow).

Next, the part with 2 rows of bosses is disassembled, as shown in pos. 3. The bosses of the upper shield are inserted into the openings of the rest, pos. 4, for which they will have to be pulled apart with a crowbar or a pry bar (double-sided arrows in the same place), and fastened with nails or self-tapping screws, as shown in pos. 5. Residues visible in pos. 4, will go on legs, pos. 6.
How to disassemble pallets
The pallets are assembled on nails with their heads recessed, and the nails sit in them very firmly, especially those that have rusted in pallets that have been in use for a long time. If you disassemble them as usual, then one or several boards will definitely crack. Therefore, the board to be removed is first carefully lifted a little; It’s more convenient to do this with an axe, because He gives large area supports. Then the same board is put in place and the nails are pulled out by the exposed heads using a nail puller or pliers.

Simple and economical
Construction pallets are made from high-quality wood, which can subsequently find a variety of uses; at least for building a shed or building a shelving unit. If you are going to disassemble the pallet, then it is advisable to use less wood from it on the bench. A simple bench that will require barely half the boards of the pallet, and all the bars will remain for best use, shown in Fig. on right. Its backrest is somewhat flatter than ergonomics require, due to the smaller width of the seat; This makes this bench quite comfortable.
A little about technology
Bolted joints are often used in garden furniture. If it is one-piece and not hinged, it is better to hide the heads of the bolts with washers and the nuts with them. The first is for the sake of aesthetics, and the second so as not to get scratched.

To conceal the connection of wooden parts with bolts, in addition to a spiral drill for wood, you will also need a feather drill, on the left in Fig. Use a pen to select holes for the head and nut. After assembly, the remainder of the threaded body of the bolt is cut off with a grinder and the connection is tightened again, because when pruned it weakens. Then the holes are filled with wood putty; You can thickly mix the sawdust with Express glue (liquid nails) or PVA for wood. Not office grade PVA for paper!
As for the hinge joints, steel clips must be inserted into the bolt holes in both parts being connected; their diameter must be taken into account when drilling. Without clips, the bolt will quickly break the wood and the hinge will wobble haphazardly.
Bolt clips can be rolled from sheet metal or galvanized steel. In this case, 2-3 drops of motor oil are added to them twice a year, at the beginning and end of the season. If it does rust and seize, brake fluid will help out, the same 2-3 drops. The rust disintegrates from it and the hinge “releases” almost instantly. After the “brake” it is dripped with oil again.
The manufacture of garden furniture also requires tongue-and-groove connections, on dowels and dowels (through round wooden bosses). In this case, firstly, the wooden fasteners are made from the same wood as the parts being connected. For outdoor use, some strength must be sacrificed in order to ensure that the temperature coefficients of expansion, moisture capacity, swelling and drying of the wood of the entire assembly are the same. Otherwise, the connection will quickly become loose.

Secondly, it is very, very desirable to make joints of “open sky furniture” with wedging, see fig. on right. Wedges are cut from hard, durable wood: oak, walnut, boxwood, dogwood. Their thickness is 2-2.5 mm, but not narrower, because... the achievable accuracy of the wood-to-wood connection is plus or minus 1 mm.
An important condition: the wedges must be oriented across the fibers of the attached part, otherwise it may split during landing and subsequently the connection will fall apart. If perpendicular (crosswise) parts are connected, then the wedges in the dowel (dowel) should be oriented at 90 degrees relative to each other. Otherwise, the production of country and garden furniture does not contain anything that would not be subject to ordinary working ingenuity.
Appendix: how to take grid dimensions
Let's look again at the drawing of a paired “romantic-philosophical” bench. How to calculate missing dimensions? First of all, we visually determine the type of oblique projection; in this case it is isometry, so both oblique axes are equal.
Then we take a longer part, for which the linear size is indicated; in this case, it is a drawer with a length of 1350. According to the drawing, using the Pythagorean theorem, we determine its length in fractions of the grid pitch. Correlating it with a known linear size, we obtain a scale factor. If the projection is arbitrary, then you will need to calculate 2 scales based on 2 parts, for each of the oblique axes.
Then it starts to get pretty painstaking work: the missing dimensions are determined from the drawing in fractions of the grid pitch and multiplied by the scale. For each pair of parts to be joined, we check the fit, taking into account that the accuracy for wood is 1 mm. If, for example, the tenon turns out to be thicker than the groove associated with it, it’s clear that it won’t fit, you need to look for where the error crept in. If it is already more than 2 mm, this is also not good, it will wobble and the error will begin to accumulate in the calculations. And if the tenon fits into the groove with a gap of 0-2 mm, everything is tip-top, calculated perfectly.
With the onset of summer, it becomes impossible to sit in the house - you want to spend as much time as possible outside. Today we will show you three ways to make benches with your own hands.

Each version of the bench requires its own skills, but the first bench can be easily made even by someone who does not have special skills in working with tools.
DIY benches in half an hour
Here is an example of the simplest bench you can think of. If you have all the materials, this bench can be assembled in a matter of minutes! 
All you need are eight cinder blocks with holes through them, four pieces of wood, and construction adhesive. It is better to select the beams according to the width of the holes in the blocks, but if they are a little narrower, then this is not a problem.

Don't forget to sand the wooden surfaces to avoid splinters.

The blocks and beams can be painted if desired to give the bench a more pleasing appearance.

All that remains is to install the blocks vertically, having previously lubricated the contacting side surfaces with glue, and insert the bars into the holes. Once the glue dries, the bench is ready! If you wish, you can equip it with pillows: it will be more beautiful and comfortable.

How to make your own wooden bench with a metal frame
If you have at least minimal welding skills, then here is a project that will suit you. The bench stands on two metal supports and is simple but reliable. You will need a profile pipe or a thick plate for supports and, of course, wide board for sitting.

If you are far from welding work, then you can collect metal carcass on the corners and fasten with metal screws.

After the bench is assembled, metal legs it is necessary to treat them with a metal primer, which will protect them from corrosion, and then paint the legs with metal paint for external use.

The wooden seat of the bench must be painted with varnish or paint for outdoor use. This simple DIY bench option will serve you for many years.

You can experiment and create your own bench design. For example, such a laconic designer bench is quite suitable for you because... it is done exactly according to the same principle.

How to make your own bench with a backrest
It is easy to attach a backrest to a bench standing on metal supports.

To do this, you need to take metal plates and bend them at the desired angle. This is easy to do even with your hands, or you can fix the edge of the plate and bend it with a hammer. The plates will act as a support for the back. We fix the plates from below under the seat at one end, and screw the backrest to the other end.

It is better to recess the bolts on the back (and on the seat too) into the wood so that they do not create discomfort.

If you don’t want to mess around like that, you can use bolts with a round head.

A more advanced solution for the backrest is to attach it to the frame rather than to the seat. This design is certainly more reliable.

To do this, you will have to weld some parts at an angle, because it is more comfortable to sit on a bench with an inclined back. And this requires great care.

There are special devices that allow you to fix the parts to be welded at the correct angle - they are called magnetic holders or positioners.

But there is also a “folk” method. Make a wooden block and attach the parts to it while welding. So you can cook required amount supports, precisely maintaining the same angle.

All that remains is to attach the backrest to the frame, and the bench is ready!

DIY benches from old furniture
Old unnecessary furniture can still serve us in the country. You can practically make benches from it yourself.

We don’t throw away an unnecessary crib, but make a bench out of it with our own hands. One of the headboards of the bed will be the back of the bench. The second backrest is divided into two parts: the lower part is the lower front part of the bench; the upper part is divided into two parts and serves as the handrails of the bench. The bench has a convenient drawer for storing pillows.

A wooden bench repurposed from a regular size bed. Provide a small drawer in the seat for storing pillows, then you won’t have to carry pillows from home all the time and come up with places to store these pillows.

Running out of beds? You can make a bench with your own hands from old shelf— painted and made a pillow, that’s all the work. But this simple bench can turn into almost a throne if you have an old unnecessary door in stock. You can use it to make a beautiful high back for a bench. By the way, old wooden windows can be adapted for the same purposes.
Even if you don’t have a single board, you can still make a bench for your favorite dacha!

That's all! Simple benches You can do it yourself in just a few hours, without spending much on materials. And it will definitely become a favorite vacation spot for the whole family. After all, it’s so nice to read on a bench, drink tea, chat with friends, or even work while taking your laptop with you!


