For dachas, land unsuitable for cultivation is usually allocated Agriculture– steep slopes and steep banks of water bodies. In this regard, to develop the site, it is necessary to build on the slopes concrete stairs(concrete steps), allowing for construction on your own.
Where to start?
Before starting “earth” and “concrete” work, it is necessary to calculate the number of steps. In turn, in order to calculate the number of steps, it is necessary to determine the height of the slope using the following simple technology.


- At the highest point of the slope, a small wooden or metal peg is driven in;
- Below, at the base of the slope, a man stands with a long stick resting on the ground;
- The peg and stick are connected with twine, which is pulled strictly horizontally. Horizontality is checked with a regular building level.
The distance from the ground to the place where the twine is attached to a long stick is the height of your slope - you can begin to calculate the number and size of steps. To make movement along the steps safe and comfortable, it is necessary to combine treads and under steps according to the attached table:
| Tread width, mm | Height under steps, mm |
| 450 | 110 |
| 430 | 125-130 |
| 400 | 140 |
| 380 | 150 |
| 330 | 165-170 |
The number of steps is calculated as follows - divide the height of the slope in millimeters by the height of the steps in millimeters, and thus obtain the number of steps. If the calculation fails to obtain an integer number of steps, you will need to either increase the height of the slope or remove the soil at its base.
The width of the steps should be at least 300 mm, but it is better that the steps have a width of 600 mm (to allow two people to move).
Construction stages
Using pegs and string, mark the contours of the future flight of stairs. Next, using pegs and twine, the number of steps and the width of the treads are marked. Starting from the top step, we take out the soil and form the rough contours of the steps. On large flights of stairs (10 steps or more) it is recommended to fill concrete base. This is necessary to strengthen the lower riser and thus insure it from sliding and subsequent destruction.
To do this, a trench is opened under the first riser, which should be twice as wide as its width, 100 mm longer than the length of the step and 100 mm deeper. The trench is filled with crushed stone (broken brick, slag or other solid stone waste) and filled with M200-M250 concrete. The base is leveled and left for two weeks to dry completely.

Next, the plank formwork is assembled at the prepared site. The formwork can be of two design options: for all shear steps or for each step separately. In the first option, the formwork design should exactly follow the contours of the future staircase. Using a hammer, the formwork is pushed slightly into the ground and the correct installation is checked.
Drainage is poured into the base of each step - a cushion of crushed stone, broken brick or slag. In this case, the drains should not reach the formwork. To increase the strength of the steps, reinforcement with wire with a diameter of 5-6 mm is used. Concrete is prepared in the following proportion of components: 1 part M400 cement, three parts sifted sand, three parts crushed stone fraction 5-10 mm.
Pouring the structure with simultaneous operations: compaction by so-called “bayoneting” and leveling the surface until water appears on the surface of the filled steps and ironing. The formwork is dismantled 72 hours after pouring.
If the formwork option is used separately for each step, four boards are connected to each other (preferably with wood screws). The resulting “box” is installed on each step and, one by one, “from bottom to top”, each individual step is filled. Important! When pouring the structure, it is necessary to make a slight slope of the tread surface away from the slope to drain the water.
The steps represent important element landscape design at the dacha or local area with a slope. Making such a decorative design with your own hands is not too difficult, but you need to prepare the necessary tools and materials, as well as choose the best design option.
How to make steps on the slope of a summer cottage with your own hands
Decorating a slope with a staircase involves taking into account several important factors presented by:
- location of groundwater;
- slope slope;
- geological features of the soil;
- the presence of a danger of washing away the site in the spring or from a body of water located on the territory;
- level of soil pressure on the slope;
- the presence of buildings and vegetation;
- general landscape concept.

To make the design durable and strong, beautiful and practical, you should take care of purchasing in advance necessary tools and materials
It is also necessary to correctly determine the materials used in the manufacture of the structure and the designation of the construction work area.
Required materials and tools
To make the design durable and strong, beautiful and practical, you should take care in advance to purchase the necessary tools and materials:
- wooden or metal pegs;
- long metal or wooden pole;
- strong and long enough rope;
- building brick;
- concrete finishing slabs;
- fine crushed stone;
- dry cement mixture;
- container for preparing cement mortar;
- hammer;
- building level and tape measure;
- bayonet and shovel;
- Master OK.
Depending on the type of design, additional purchases are required. facing materials and lighting elements.
Step-by-step instruction
There are several basic options for stairs that allow you to properly and aesthetically organize space on a slope of any height. They all differ in the materials used, appearance and labor costs during production. Despite the simplicity of any work with wood, the best option


After all, the construction of brick-concrete steps will begin using the following technology:
| Approximate design parameters | Height under steps, cm |
| 11 | 45 |
| 12,5–13 | 43 |
| 14 | 40 |
| 15 | 38 |
| 16,5–17 | 33 |
Tread width, cm If a staircase on a slope is presented big amount
steps, then designers recommend dividing the flights of stairs with special platforms. It is desirable to equip them in areas where traffic direction changes.
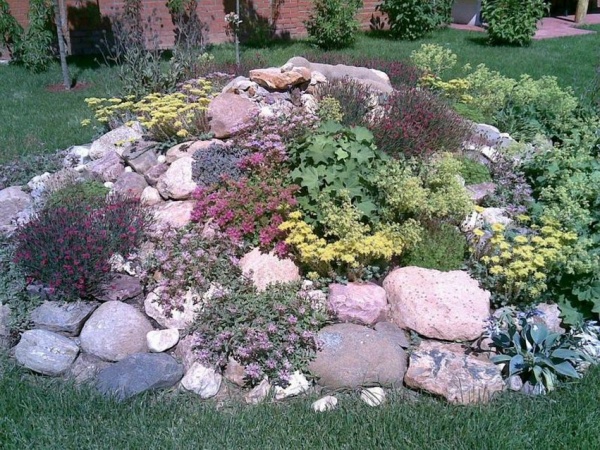
Areas of sufficient size can be decorated with decorative but functional benches or benches, as well as elegant and compact architectural forms or flowerpots. A harmonious complement landscape style
there will be stone steps decorated with ferns, saxifrage and decorative ground covers Experts in the field landscape design consider it advisable to use more building materials for the manufacture of stairs located on a shady slope light color
To increase the rigidity of the structure, stringers are used - side longitudinal boards that are placed on the edge to fix the steps
Any areas with stairs located on the northern slope have their own advantages. In such areas there is an excellent opportunity to use shade-tolerant ornamental vegetation in the design, even in the absence of a highly efficient artificial water supply system. On the southern slopes, the design of the staircase involves growing plants that can withstand drought and high temperatures.
Design ideas
Modern landscape design of a staircase on a slope can look very unusual and stylish. Ramps are a practical addition if there are elderly people or small children in the family.
A slight slope of 1–2% of the tread depth in each step will prevent water from stagnating
Stone staircase elements can withstand significant mechanical loads, do not lose their attractiveness under the influence of fire and water, and also have a decorative appearance.

If you need to connect small differences, where even three steps would look somewhat cumbersome, you can simply level the area or build an additional embankment
A small garden staircase, made of treated wood and filled with decorative pebbles, looks very organic in landscape design in almost any direction.
You can even make a miniature recreation area out of a flight of stairs: place a table with a bench, install an umbrella, attach a small lantern
Original budget option will be the use of small wooden platforms when decorating a garden staircase structure.
To avoid opening the ground and collapsing steps, it is necessary to build retaining wall
Concrete stones of different sizes that remain after repair work, can be used to create practical, original form garden steps.

The width of the steps should be proportionate to the steepness of the climb
A bright and stylish mosaic staircase will help complement the unusual landscape design of the local area with a small slope in height and width.

The wider the staircase, the more field for creativity: on the sides of the spacious steps you can install floor vases with flowers, and the railings can be woven with beautifully flowering vines and climbing plants
Big staircase design, independently made from finishing bricks or paving slabs, is practical option for a slope with a significant slope.
When designing stairs, the main thing is not to disturb the plasticity of the relief
Log garden steps, impregnated special compounds, perfect for the steepest climbs.
A mosaic of wooden stumps is made from the trunk and thick branches of a tree, cutting logs 10–15 cm high
Granite paving stones in last years It is increasingly used to create landscape stairs; this design is characterized by durability, practicality and noble appearance.

Most often, stairs are equipped with railings, but for small transitional structures with gentle steps, the presence of railings is not at all necessary
The connecting element can also be a real wooden staircase. This could be, for example, a rise from a river or pond.

As finishing coating It is better to use a material with a non-slip surface
Taking into account the basic nuances and rules for creating a staircase with your own hands, you will receive a reliable, functional and beautiful design With minimal costs time and financial resources.
Sometimes there is a natural difference in elevation in a summer cottage. As a rule, the owners of the site try to improve such a hillock. And the most the best option- construction of stairs. This makes walking around the site much more convenient, and provides another opportunity to create beautiful flower borders.
Such a staircase can be adapted for any area where there is at least a small slide.
You will need:
· Boards measuring 200 x 50 mm. You can take new building material, but disassembled pallets or pallets can be used just as successfully. In principle, you can take any boards that have already been used.
· Large crushed stones, stones, brick fragments.
· Slag.
· Metal fastenings.
· Screws and nails.
In addition, you will need the following tool:
· shovel;
· screwdriver;
· building level;
· saw.
Please note that the proposed staircase construction option excludes the concreting stage. And this significantly reduces the cost and simplifies the entire process.
Step #1
The photo (see above) shows a staircase with a step width of 1.2 m. The length of the sides will vary depending on the depth of the staircase bend. In this case, the length of the outer edge will always be greater than the inner one.
We won't need a foundation here, but a stage earthworks is not excluded. So, let's begin. It is necessary to remove a layer of earth at the site of the first step, forming a flat platform.

Step #2
Now you can start assembling the mold for the step. Here you only need to decide on the size. Do not forget that the depth (pitch) of the step and its length must be the same for all workpieces. Otherwise, the staircase will look sloppy.
Only the opposite sides of the step blank box will be different - internal and external. Because it is they who form the beautiful bend of the staircase.

Don't forget to carry out preventative treatment wooden boxes steps from rotting. Here you can purchase specialized preparations or paint, or you can also use improvised means, in particular, drying oil or used machine oil (at least inside the box).
Step #3
Now you can start assembling the ladder. The lower stage is set first. It should have a slight slope so that rainwater did not accumulate on the steps.
You can control this stage of work using a building level.

We continue to work, digging niches in the ground for each step individually (see photo). This way, you will take into account the slope of the site and be able to create the necessary curvature.
But under no circumstances change the height of the steps, as this will make walking up the stairs uncomfortable.
Step #4
After all the steps have been set, they must be secured. To do this, fix the frame of each step in the places of contact with each other using cutting boards (inside the staircase boxes).

The board must be fastened in four places (in all corners) to ensure maximum rigidity.
Step #5
To prevent the ladder from moving during operation, it must be well secured.

Long metal plates with a hole for fastening (see photo) you need to drive it deep into the ground. We fix the upper part with a screw.
We use this type of fastening in several places for each step box.
Step #6
Now that the staircase frame is assembled and fixed, you can begin filling it.

Large stones are laid out first (you can take a brick). It is desirable that they be hard and not crumble.

We do not fill the boxes completely. Leave a few centimeters of free space at the top.
Step #8
Now the slag layer needs to be compacted thoroughly.

Can be used manual roller, if there is. Or you can build a device - a “pusher” as in the photo.
Step #9
Now fill out the degree form to the end using granite chips, coarse sand, you can add a little clay to it.

We level the layer with a spatula and finally spray the steps with water using a sprinkler.

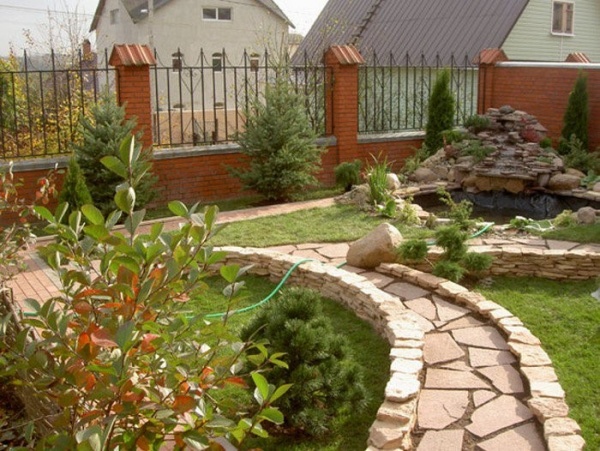
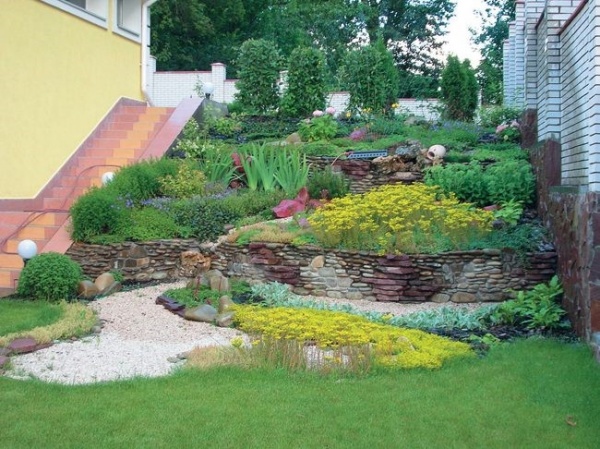
Owners of a plot on a slope are in an ambiguous position. Standard methods for placing beds are unacceptable here, and the arrangement of such a site involves significant material costs. However, after studying existing approaches to design, the owner most often comes to the conclusion about the advantages of such a situation. Landscape design for a site on a slope will be developed and implemented by specialists. The ideas presented can transform the territory, making it unique, immersing it in the beauty of mountain landscapes.
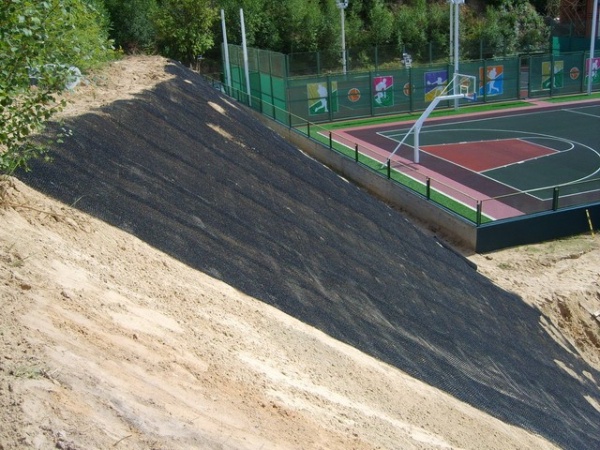
Strengthening the slopes on the site with your own hands
Landscaping begins with work to strengthen the slopes on the site. This will prevent further destructive processes that can damage buildings and landscape design.
Preparatory actions
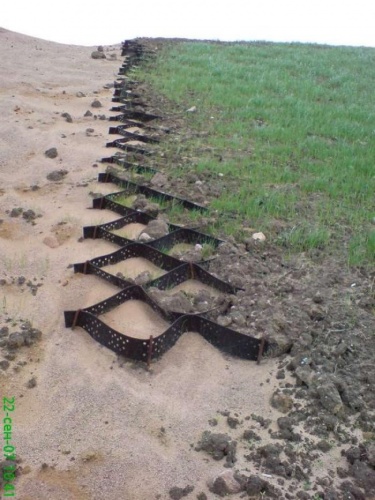
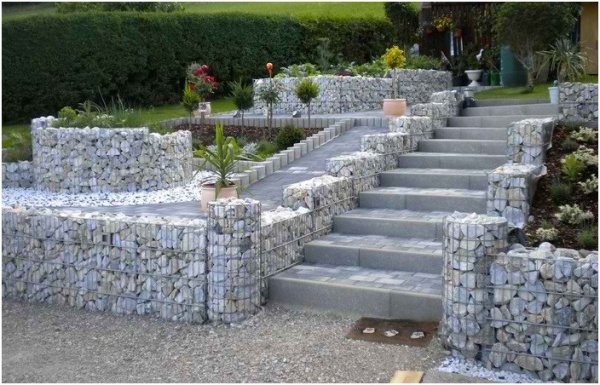
When strengthening slopes they use various methods and designs. Landscape design allows you to use stones and concrete blocks, biomats and gabions, logs and lawn gratings. To properly strengthen the slopes, it is necessary to study and calculate the following points:
- how close the groundwater is;
- what slope is the slope at;
- geological features of the soil;
- is there a danger of the area being washed away if a body of water is nearby;
- take into account the soil pressure on the slope;
- decide on the material for strengthening;
- identify the area in need of strengthening.
At slight slope allows you to solve the problem of soil consolidation by planting trees and shrubs with a developed root system. If the slope is significant, terracing or the use of geotextiles will be required.
Ways to strengthen slopes
The simplest and most inexpensive option for landscape design when strengthening a slope on a site is planting plants with a developed root system. This solution is acceptable provided that the slope and its area are small. Plants are planted in cells, which act as a reinforcing structure. Subsequently, developed root system intertwined with fastening elements and prevents landslides or soil erosion. Juniper is the leader in this method of strengthening the soil; it is also recommended to plant Chinese blackberries, lilacs and hawthorns.

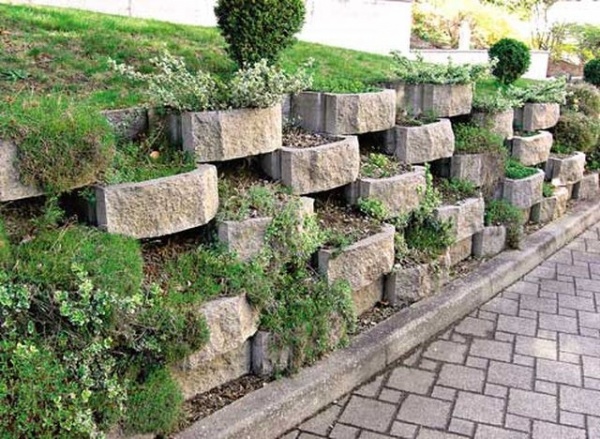
Slopes in a summer cottage are often reinforced with fences made of concrete slabs, sandstone, brick or limestone. The advantage of this method of landscape design is as follows:
high level of resistance to external destructive factors;
- does not require significant care efforts;
- does not interfere with the growth of green spaces;
- durability of the structure.
Such fences are erected subject to certain conditions:
- a solid foundation is laid;
- minimum height of the fence – 1 m;
- the thickness of the fence is 1/3 of the height;
- mandatory equipment drainage system(water flowing down the slope should not wash away the structure)
- fences are built from the bottom up;
- it is recommended to build a cascade structure;
- it is necessary to provide a slight slope towards the slope.
The landscape design of the site provides the opportunity to decorate such a structure with flower beds, decorative stairs, flashlights.
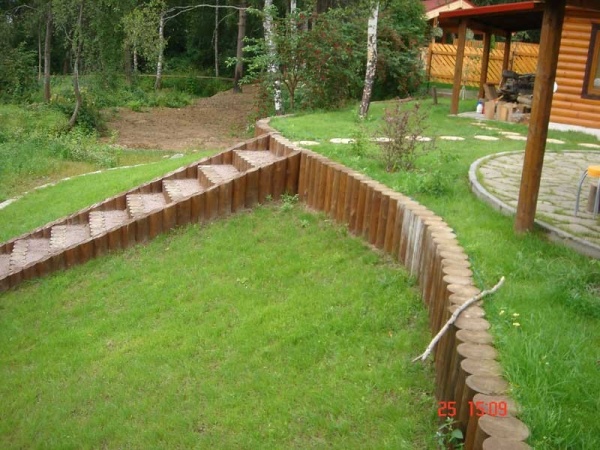
Another option for strengthening the slope on the site is the use of stones and logs. They are dug into the ground, having previously studied the type of soil and the condition of the surface. At the same time, do not forget about the aesthetic appearance of the site and take care of the presence of drainage. Such inexpensive way landscape design is acceptable on both small and large slopes.
Modern developments in landscape design suggest using geotextiles in arranging a site on a slope. This product in rolls, consisting of polyester and polypropylene fibers, has the following advantages:
- waterproof;
- protection of soil from freezing;
- when water converges, it prevents the mixing of soil layers;
- plastic;
- has high resistance to damage;
- ease of installation on the ground.
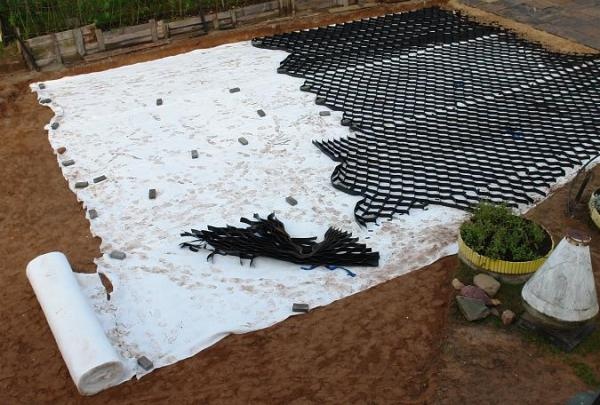
Another option acceptable when developing landscape design on a slope is laying geomats. This waterproof material consists of polypropylene grids, superimposed on each other and connected by exposure to high temperatures. Geomats have the following features:
- do not contain toxic substances;
- UV resistance;
- maintaining the natural beauty of the landscape;
- are not afraid of aggressive substances;
- resistant to low and high temperatures;
- easy to install.
The presented methods of landscape design when strengthening a slope can be done with your own hands or with the help of professionals. Their choice depends on the preferences of the owner and further plans for the development of the site.
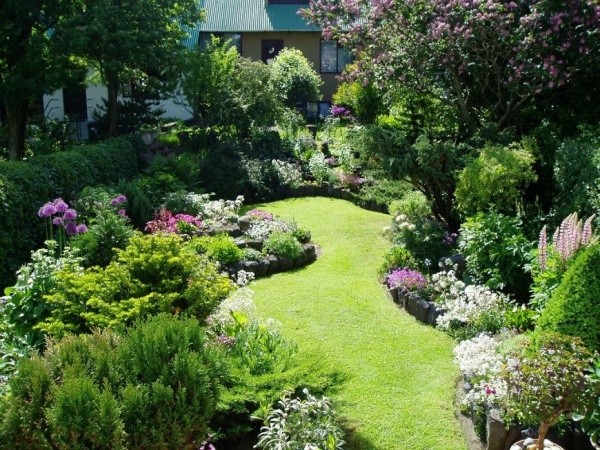
Design options
The landscape design of a site on a slope opens up broad prospects for the realization of vivid fantasies and bold ideas. Considering the need for serious financial investments in landscaping, the approach to planning a site on a slope requires special care and thoughtfulness. Development design work landscape design is necessarily preceded by a study of the technical indicators of water supply and soil characteristics. Special attention deserves the favor of the future outbuildings and recreation areas. Based on their location, they plan the construction of future terraces, flights of stairs, retaining walls and other elements of landscape design. When landscaping a site on a slope, its location relative to the cardinal points must be taken into account.
Terracing
Having decided to use terracing in the landscape design of a site on a slope, avoid excessively long retaining walls in a straight line. This design will create the impression of a huge staircase. Landscape design experts recommend arranging terraces randomly with ledges or cascades. This will create a picturesque picture of the overall view.

Winding paths or paths are provided between the terraces, and several steps are designed on steep slopes. Retaining walls on the site are made of various materials: natural stone and brick, wood and concrete. It is better to equip a steep slope with retaining walls using cement mortar; on a flat site, dry masonry will be sufficient.

Original ideas in the design of retaining walls on the site are welcome. Avoid straight lines; rounded shapes will ensure smooth relief transitions and visually make them less conspicuous. Terraces with different functional purposes will allow you to move away from standard approaches. Landscape design allows you to place in separate areas, vegetable beds and shrub plantings. Combining them with winding paths will visually create a single picture of incompatible things.

Terrace location on wet ground assumes the presence of drainage fill made of crushed stone. It is located between the wall and the ground with a width of 10-15 cm. It is recommended to supplement the masonry with pipe scraps, which will ensure the release of moisture to the outside and will not allow it to accumulate behind the retaining wall. The absence of such protective measures will provoke rapid destruction of the structure.
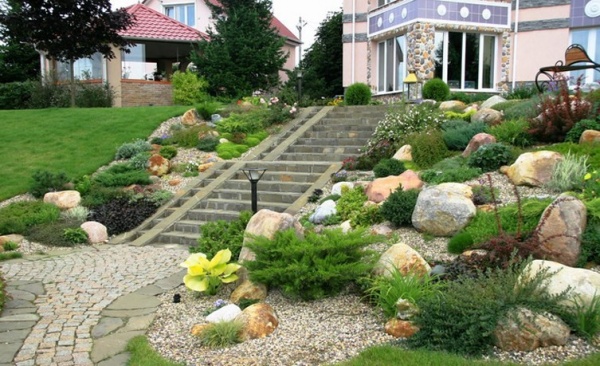
Arrangement of paths and stairs
An indispensable attribute of landscape design are neat paths that help achieve an organic connection between the terraces. To ensure compatibility, it is better to make them from similar material.
Important ! Large decorative elements, be it stones, tiles or circles of wood, can create good visibility and a bright perception of the path.
The winding shape of the path hides the steepness of the slope, while the serpentine layout, on the contrary, emphasizes it. Following the rules of landscape design for a site on a slope, it is better to emphasize the bends of paths with low trees, shrubs or evergreens. Stairs to steep slope area will definitely be needed. In width it can correspond to the path that continues it or be slightly narrower, but not less than 60 cm. If the staircase has many steps, it is better to separate them with landings. It is advisable to equip them in places where the direction of movement changes. If the size is sufficient, the area is decorated with a bench, an elegant statue or an original flowerpot. Landscape design experts recommend a staircase located in shady place, execute from building materials lighter shade.
Remember! The beauty of landscape design must be combined with safety; choose non-slip material for paths and stairs.
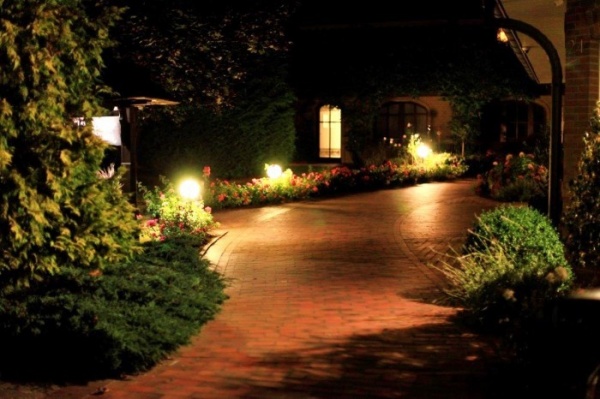
Thoughtful landscape design will provide comfort during evening walks with the help of proper lighting. There are many ways to design it, and choosing an option that matches the overall style will not be difficult.
Floristry of the site
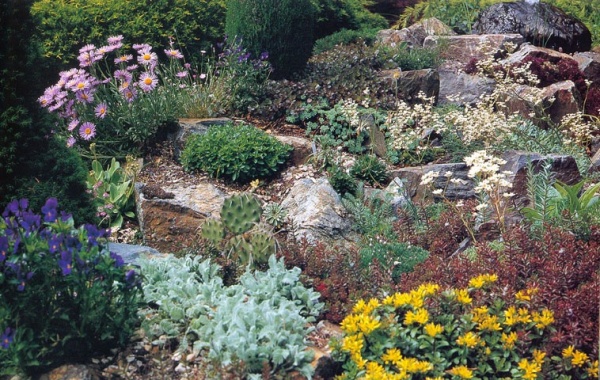
When choosing a floristry concept, the best option for landscape design would be the style of a mountainous area. In this case, the location of the territory relative to the cardinal directions must be taken into account. In this aspect, a site on the northern slope has its advantages, due to the possibility of decorating it with moisture-loving plants that are accustomed to a shady location. For the south side, herbs and flowers that can withstand high temperature and drought.
Landscape design is developed in such a way that the planted plants have different period flowering. Tulips, hyacinths and crocuses will be the first to please the owners in early spring. They may be replaced by decorative onions, California poppies and marigolds, and autumn will delight bright colors asters and chrysanthemums. Disembarkation perennial plants will make gardening easier.
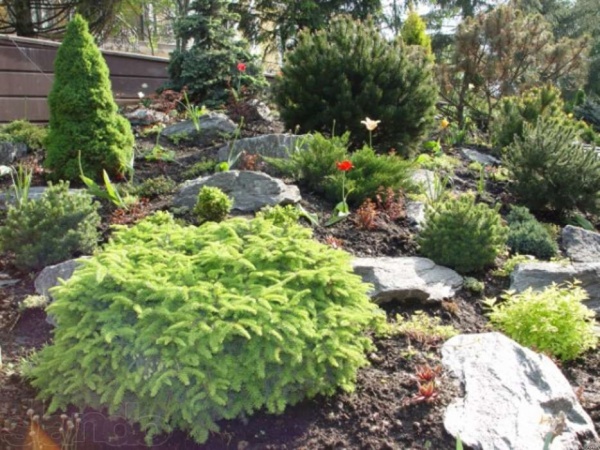
Trees on a site with a slope, according to the rules of landscape design, are planted in a special way. If the house is located at the top, tall plantings in the form of thuja, spruce or pyramidal poplar are located next to it. Create interesting composition barberry or lilac will help.
Please note! Planted trees and shrubs should not cover the house.
The shorter plants are found further down the slope. Evergreen shrubs and colorful flower beds can add nobility and sophistication. Juniper, magnolia, and boxwood would be appropriate here. The region in which the site is located also plays a role. Therefore, when choosing green spaces, take into account the climatic conditions of your area.
The basic rules for landscape design of a site on a slope are as follows:
- correctly organize the division into zones;
- build strong retaining walls;
- protect the site from soil erosion with the help of a competent drainage system;
Emphasizing the originality and natural beauty of the sloped area. With the help of such structures, the steepness of the site is reduced and a convenient transition from one level to another is provided. You can make such a staircase yourself with minimum investment. In number gardening tools also includes ladders and stepladders. In this article we will talk about both stationary and extension ladders. This article will discuss how to make a garden ladder with your own hands.
By installing stationary stairs on the site, you can give it a noble charm and an aristocratic zest. You can make a small staircase on any site. Sometimes, to move from one level to another, it is enough to make it in two steps. Minor geoplasticity of a flat area will allow you to make it more diverse, and you can decorate small rises with stairs consisting of several steps.
Stationary garden stairs can be free or mortise. The first option is laid directly on the soil, and the second assumes the presence of retaining walls. Steps can be made of wood, brick, concrete or natural stone. When choosing a material, it is important to consider the design style of the site.
If you decide to decorate the site in Art Nouveau style, then narrow steps can serve as steps. concrete plates. Planted along the edges of the stairs flowering plants, you can cover the edges of the steps with them. To create a romantic atmosphere, the stairs can be decorated with flowerpots.

Architectural style and design features stairs also depend on its location. Small structures with gentle steps do not need to be equipped with railings. This rule does not apply to other types of stationary stairs.
During the design process, it is important to take into account the terrain without affecting its plastic. Transitions through the stairs should highlight the advantages of the site, while hiding its disadvantages. To calculate the number of steps and their sizes, you will need to take 2 slats, fasten them at a right angle, then place the free end of the first slat in the place where the first step is installed from below, and the end of the second should be installed in place of the top step. So, you can determine the length of the entire structure. To determine the length of the steps, you need to divide the length of the horizontal rail by the estimated number of steps. Using the same scheme, the height of the steps is calculated. The length of the vertical rail is taken as a basis.
The width of the steps should be proportional to the magnitude of the rise. In addition, the width of the stairs must match the width garden paths. It is worth noting that a wide staircase provides more opportunities for its design, but may not fit into the design of the site.

As a rule, stairs in the garden have 3-4 steps. If your site has a steep slope and you plan to take 12–14 steps, then it is best to do it in the middle landing. Small differences in the area can be filled in a little so that you can build a small staircase, at least three steps.
When arranging a stationary garden staircase, it is important to consider some nuances:
- The surface of the coating must be non-slip. This will minimize the likelihood of injury on the site. Textured stone of natural origin, as well as tiles with a corrugated surface, have these qualities.
- To make it safe to walk on stairs at night, you need to think through and do street lighting. It is better that the rays from the lanterns are directed downward, in which case they will not blind a walking person. Another option is to install glowing stones. They will provide the stairs with soft light.
- Height differences of 70 cm and above must be equipped with stairs with railings. They can be made of metal or wood.
If you make steps with a slope of 1–2%, then water will not accumulate and stagnate on them.

Today there are many designs of garden stairs, which are offered detailed instructions for their production. We hope you find the information below helpful.

If you have not yet decided how to make a staircase in the garden, then we offer you the easiest way. Make slanted notches at the distance you want your steps to be. Then lay the boards in them on edge. You can secure them with pegs. Fill the resulting void with soil or gravel. Pay attention to how the bulk steps are designed in the photo.

Initially prepare the following materials:
- Logs are the same length.
- Gravel or fine bark.
- Metal/wooden pegs.
A trench should be dug on the slope and compacted under the stairs. Start installation from the bottom. Drive pegs at the base of the stairs into which the bottom step will rest. The first log or step is placed in a vertical position close to the pegs. In this case, the resulting void should be filled with soil, which must then be compacted. All steps are installed according to this scheme. After completing the installation of the stairs, the voids must be filled with fine gravel.

To wooden elements stairs have served you for as long as possible, treat them with used machine oil or special antiseptic impregnations.
A staircase laid out in the form of a mosaic of logs will look very original. To make it you will need thick branches and tree trunks. Logs need to be dug into the soil.

The durability of stone is its main advantage over other materials used to make stairs. Typically, stone steps are laid to form a solid floor or with gaps filled with compacted soil and then covered with pebbles or fine gravel.
To make the garden look more dynamic, make steps with a lateral offset relative to each other. Before laying the stone, it is important to make a sand-crushed stone cushion. This is due to the weight of the stone. To fix the elements of the steps, a conventional cement mortar. You can use it later to seal the seams between the stones. Another option is to fill the gaps between the stones with sand and sow decorative grass in them.
To prevent stone steps from collapsing over time, you should build a retaining wall of concrete and stone.

In the process of garden care you cannot do without ladder. Its structure is very simple: steps - crossbars - are fixed on two strings or supports in increments of 25–30 cm.
The maximum permissible height of an extension ladder is 5 m, and the width is from 35 to 60 cm. However, it is important to note that the wider and longer this product, the more difficult it is to move from one place to another.

Pine bars are best suited for making an extension ladder. The workpieces must be free of knots, cracks and cross-layers. Otherwise, the product will be unreliable and may break at any time.
For the bowstring you will need bars with a cross section of 40x50 mm, and for the steps - 35x40 mm. This optimal sizes bars, since if you buy thinner pieces, the ladder will be fragile, and if you buy thicker ones, it will be too heavy. You will also need fastening elements: screws, nails and metal tie rods.

First, make wooden elements. The main thing here is to be able to handle hand saw or a router. The first step is to make two strings of the same length. For step bars, you need to cut 35x40 mm bars 50 cm long, with a step height of 25–30 cm in mind. The corners of the bars need to be rounded.

There are two ways to attach steps to strings:
- Tenon and groove.
- On top of the supports.
In order for the tenons to connect the structure as reliably as possible, they must be cut at an angle to the central axis of the bar.

Grooves should be cut in the bowstrings, repeating the shape of the tenons in the crossbars. Essentially, the grooves should be 0.2–0.3 mm smaller than the tenons, which will ensure maximum fastening density. The discrepancy must be very slight, otherwise the bowstring may burst during the process of inserting the tenon into the groove.
It is important to ensure the symmetry of the cut grooves on two opposite bowstrings. Even a slight deviation will cause the crossbar to be installed at a slope.
If the tenons and grooves are already ready, then you can begin assembling the stairs. To do this, lay one string with the inner wall facing up on a flat area. Insert the crossbars with spikes one by one into the glue-coated grooves of the bowstring, hammering them in with a mallet. Then insert the second string into the opposite tenons, having previously coated the grooves or tenons with glue. Hold the ladder at the slope by inserting a tenon halfway into the first slot. After this, lower the string and guide the tenon into the next groove. After inserting all the tenons into the grooves, they need to be driven tightly into the second bowstring.
To ensure a secure ladder, the connections should be secured with nails/screws. It is better, however, to use wood screws. Screws are also not the best option. These are products made of raw metal, but are acceptable for such a connection. When screwing in, the bit often turns in them, licking off the edges. You can also drive into pre-drilled tenon joints dowel holes.

A simpler method is to pack steps on top of the bowstring. In this case, the crossbars simply need to be placed on top of the bowstrings and the parts connected to each other with nails/screws.

To give the stairs greater stability, you need to shape the lower supporting edges. To do this, they need to be cut at an angle.

To reduce the degree of sliding, rubber pads can be placed on the lower end. This is done provided that the ladder will be used in the house, for example, to access the attic. Well, if you need a ladder for a garden, then metal spikes should be attached to the lower supporting ends. They will sink into the ground, thanks to which the ladder will be fixed.

Oil paints are not suitable for painting a ladder because the steps may become slippery. Such products must be coated with drying oil. You can apply several layers, and then, if desired, open the stairs with transparent varnish.
These measures will protect the wood from swelling when exposed to atmospheric precipitation. As a result, the service life of the staircase will increase significantly.

When harvesting from garden trees you may need a stepladder. If you follow the instructions below, you can make your own stepladder. At the end of the article, drawings and diagrams will also be provided to help you determine the size and optimal characteristics of the product.

To make a ladder you can use wooden blocks, as already described above. And, although wood has many advantages, its significant drawback is hygroscopicity, which is why wooden product will need additional processing protective impregnations. A more durable and less demanding material, from which a stepladder can also be made, is a metal profile.
A garden stepladder made from a profile will be less weighty than its wooden counterpart. The elements of the stepladder will not be deformed due to the profile section. This product can be made of steel or aluminum. Suitable blanks can be purchased from hardware store. This way it will take you less time to assemble.

The choice of stepladder configuration depends on its operating conditions and purpose. The easiest way to make an A-shaped stepladder at home. Of course, it is better if such a product is foldable, in which case it will be easier to store. But to implement this task you need to have some skills in working with metal.
Stepladder elements can be connected using bolted or welded connections. However, the latter is more reliable. Although, it depends on what you cook it with. If CO, then yes, but simple home electric welding can weaken the metal. In addition, metal rusts faster in welded areas.
If you have no experience working with welding machine, then you will have to connect the parts with bolts. But at the same time it is necessary to make an accurate calculation of the loads. Otherwise fastener it is simply deformed, which will make folding the stepladder difficult and inconvenient. In the worst case, such a product will simply fail. If you overdo it, it's too much large holes the racks will weaken and they will break in these places. We need to look for a middle ground.

To work you will need a set of the following tools:
- Drill.
- Welding machine or fasteners and keys.
- Grinder with metal discs.
- Roulette.
- Square.
- Hammer.
- Marker.
Follow safety rules when working with a welding machine and when cutting metal with a grinder.
Materials you need to purchase:
- Metallic profile rectangular section in sufficient quantity.
- Fasteners
- Straps that will not allow the stepladder to decompose during its use.
Make a sketch of the stepladder, and then prepare the drawings. Determine the height of the product and cut the 4 profile segments corresponding to it. Clean the profile at the cut points using a drill with a brush attachment.
Future supports must be secured in pairs with two long bolts. This will allow you to quickly get the stepladder into working condition.
Assembling a stepladder

After the supports are prepared, they need to be laid parallel to mark the rungs and steps. To maintain a 90º angle when marking, you need to use a square. Make steps from the profile.
After, spot welding you need to secure the lower and upper steps. If the connection was made correctly and nothing needs to be adjusted, then welding seams can be made. Then weld the remaining steps.
The support section can be made with or without steps. If there are no steps on it, weld 2 crossbars on it - at the level of the upper and lower steps. To increase the rigidity of the support section, another diagonal crossbar should be welded between them.
In the next step, secure the restraint straps in the middle flight of stairs and weld a fragment of the corner/profile from below to the ends of the supports. Afterwards you need to prime and paint the stepladder.
Video
The provided video materials describe the production different types garden stairs:
Drawings and diagrams
To make a staircase yourself, you need to draw a diagram and prepare a drawing. We invite you to familiarize yourself with some options: