Probably, any gardener sooner or later thinks about how to make his work easier. personal plot. Various little things, tedious, repetitive work take a lot of time and effort. One of these types of work includes planting crops that have very small seeds.
It's no secret that radishes, carrots, etc. need to be planted at some distance from each other in order to be harvested in the fall decent harvest. And because of the small seeds of these crops, it is necessary to thicken the sowing, and after germination, thin it out, that is, waste large quantity seeds in the spring only to then simply tear out up to 80% of the future harvest.
Methods for uniform sowing of seeds
Summer residents go to great lengths to at least slightly reduce seed consumption and ensure more or less uniform sowing of crops. Let's look at some of them.
- Mixing seeds with sand. This method assumes that “diluting” the seeds with clean river sand will ensure less consumption. The method does not always pay off, since it is necessary to ensure that the seeds are mixed evenly, otherwise, the same thickened plantings with obvious “bald spots” where only clean sand has got into the ground will be in the garden.
- Gluing seeds onto thin strips toilet paper. This method involves quite painstaking work, which also cannot always be justified. If you are 100% sure that the germination rate of your seeds is high enough, then you can safely use it. And if not? All your work will go down the drain.
- Use of manual seed drills. Probably the most convenient way planting, which does not require any preparation in advance and significantly saves both seeds and the cost of time resources. The only problem is that commercially available seeders are not very effective - they are usually primitive cones with latches through which the seeds fall unevenly.

It is much easier to spend some time in the winter and make a manual seeder with your own hands.
Types of seeders
All manual seeders are divided into several types:
- garden;
- fertilizer;
- grain-cereals.
Garden (vegetable manual seeders) are designed for sowing crops in personal plots.
Fertilizers - used for spreading mineral fertilizers and lime.
Grain-cereals - intended mainly for planting grain on large agricultural fields.
The seeder can also be single-row or multi-row. From the name it is clear that such seeders, when sowing, “scatter” the seeds in one or several rows at the same time.
Purpose of a manual seeder
The basic requirements for any seeder, whether store-bought or home-made:
- uniform distribution of seeds along the entire length of the row;
- reduction of seed consumption;
- sowing seeds to a given depth;
- gentle planting without damaging the seed.

Below we will look at examples of such seeders that you can make yourself.
Universal hand seeder
It is a box with a movable insert into which seeds are poured. Depending on the area of the proposed planting and the number of seeds required, it can be a matchbox, a school pencil case, a box for some kind of toy, etc. At the bottom of this box, a hole of the required diameter is drilled or pierced (approximately the size of the seed) .
When planting, you only need to tilt the hand seeder in different sides so that the seeds fall into the hole. This is, so to speak, the most primitive example of a manual seeder.
It can be slightly improved by placing a spring or elastic band between the walls of the movable insert and the main container and drilling two holes in the top and bottom of the container. The upper hole in this case should be slightly larger, and the lower one should coincide with the diameter of the seed. In this case, the holes in their normal position should not coincide with each other. In this case, you can pour any number of seeds into the upper container: by pressing on it and aligning the holes, you will move it to the lower compartment a small amount of for landing. The entire sowing procedure will consist of simple actions: tilt - press - move - tilt - press.
For such a manual precision seeder, you can not only adapt some available means, but also make it out of plexiglass, polystyrene, even plywood (the plywood in this case needs to be thoroughly “cleaned” so that the seeds do not cling to jagged edges and fell out without any problems). But it’s better if the top is transparent in order to monitor the number of seeds.

Such a manual seeder can be made not just one, but several with different sizes holes for different crops.
Manual carrot seeder
Another example of a manual seeder for small seeds, such as carrots. To make it you will need:
- A piece of electrical box.
- Micromotor with eccentric.
- Battery.
- Button.
Install the motor, battery and button in series on the box, connecting them to each other. It works quite simply. By pressing the button, we activate the motor, which runs on a regular battery. The motor turns the eccentric, which scatters small seeds over the surface of the soil with air currents. With a little practice, you can achieve good seeding uniformity from this manual seeder.
Manual seeder for large quantities of seeds
Perfect for sowing lawn grass, although if you make it small sizes, it will also serve as a manual seeder precision seeding any crops. To make it you will need:
- seed box;
- shaft with recesses for seeds;
- wheels.

The principle of operation of such a seeder is that when the shaft rotates with wheels, a seed falls from the box into a recess on it and as they rotate, they alternately pass under the box and fall into the ground. The distance between landings will be determined by the distance between the notches on the shaft.
Such a seeder can be made from sheet iron, soldering together necessary details. The distance between the box and the sleeve should be minimal, which will prevent a large number of seeds from falling out. It is enough to make recesses for small seeds of 0.4 mm, for larger ones - 0.6 mm.
It should be said that making such a manual seeder with your own hands is not entirely easy; you need to have not only the materials, but also certain knowledge. To achieve the greatest efficiency, you can use a seeder as a basis industrial production and according to her scheme, make an independent version.
Manual beet seeder
Let's consider another way to make a manual seeder for more large seeds, for example, beets.

Making such an “assistant” will require a minimum of knowledge from you. So, we need:
- a plastic transparent jar, for example, from canned fish;
- a bolt that will serve as a shaft and rotate the container with seeds (plastic jar);
- a plastic tube, the length corresponding to the depth of the jar;
- the metal tube is slightly narrower than the diameter of the plastic tube;
- washers to secure the container;
- a metal plate for making a door that will cover the hole through which the seeds are poured (a tin from a tin can will do);
- aluminum wire;
- cutting of the required length.
Manufacturing
- Exactly in the middle plastic jar Drill a hole through and make another one on the side to fill in rectangular or triangular shaped seeds.
- Make a lid from a tin that will cover the second hole. Make sure that it fits tightly to the jar and that the seeds do not spill out through it. It is best to secure it at the bottom and leave the top part movable. To add the seeds, you only need to slide this lid.
- Insert the metal tube into the plastic one and place it in the center of the jar, making a kind of shaft on which the jar with seeds will rotate.
- Secure these tubes with a bolt, placing washers on both sides so that the container rotates freely.
- Using a hot nail, we make holes of the required diameter at the required distance along the side of the can. It is clear that these sizes will depend on what crops you will sow with its help.
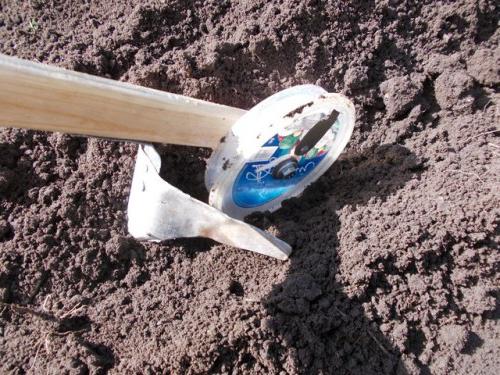
- The seeder is ready, all that remains is to screw it to the wooden handle. For greater efficiency and automation, it can be placed on the front of the chopper. In this case, after sowing, you will immediately cover the seeds with soil using a hoe.
Advantages and disadvantages of homemade manual seeders
It is clear that the main advantage can be considered that a simple seeder can be made very easily from scrap materials with minimal monetary costs, and sometimes without them at all.

But simple manual seeders are designed for sowing only one type of crop, or more precisely for one size of seeds. Making a universal hand seeder that fits all sizes is quite difficult and requires certain knowledge and skills in working with metal or plastic.
Store-bought seeders are basically all the same type; they differ only in the method of feeding seeds; the hole sizes are almost the same. You can make your own devices with different diameters, suitable for all types of garden crops, and almost completely automate the sowing process.
A manual seeder is a convenient and simple sowing unit used by small farmers, owners of summer cottages and personal plots. Having simple settings and used for sowing vegetable and herbal crops, it can be either purchased at a specialized store or made independently.
Description
The simplest single-row manual precision seed drill consists of the following parts:
- Funnel-shaped seed hopper with a capacity of up to 1 liter (1-1.5 kg);
- 2 support drive metal wheels with lugs, with protrusions 1-3 cm high;
- A sowing hub (drum) with holes with a diameter of 3-5 mm, located on the same shaft with the drive wheels;
- Wedge-shaped vomer;
- Attachments for cuttings in the form of a tube screwed into the front of the seed hopper.
In addition to this simple design, there is also another, more advanced and reliable one. The single-row model of such a seeder consists of:
- Rectangular frame;
- Seed hopper with a capacity of up to 2 liters with a tight-fitting lid;
- The sowing unit is a bushing mounted on a shaft with a sprocket for a chain drive. In this case, the size of the holes on the bushing ranges from 3-4 to 16-18 mm;
- A coulter with a harrow installed behind it for filling a furrow with seeds placed in it;
- Front drive wheel;
- Drive chain mounted on the sprockets of the front wheel and seeding unit;
- A wide rear press wheel with a bracket for cleaning it from dirt and sticky wet soil;
- Markers for adjusting row spacing;
- Split handle with length adjustment.
Such seeders are used to sow such vegetable crops, How:
- Eggplant;
- Peas;
- Carrot;
- Cucumber;
- Pepper;
- Parsley;
- Radish;
- Beet;
- Tomatoes;
- Beans.
Also, with the help of such seeders, you can sow honey-bearing grasses in rows: alfalfa, sweet clover.
Manual seeder
Important! To sow non-standard seeds, many practical gardeners buy bushings without any recesses and make holes of the appropriate diameter in them themselves.
Among the types of manual seeders described above, the first ones are used for sowing small beds of small-seeded crops in greenhouses and greenhouses, while the more productive second ones are used for sowing large-seeded vegetable crops in open ground.
Principle of operation
A mechanical precision seed drill of the simplest type works as follows:
- A sowing bushing with holes for a specific crop is installed on the drive shaft
- Seeds are poured into the hopper;
- Using a marker (for seeders of the second type described above), the row spacing is set
- The seeder is installed at the beginning of the first row of the sown area;
- The seeder is set in motion with a smooth and jerkless movement;
- The process of sowing seeds, hidden from the human eye, occurs as follows: each seed fits tightly into a hole in the bushing, then when it rotates, it falls into a groove made by a harrow and is filled up.
- If there is a press wheel at the back of the seeder, installed exactly in the center of the row being sown, the soil above the seeds is thoroughly compacted. This improves the contact of the seed material with the soil, accelerates its germination, absorption of nutrients and moisture by the sprout and its root system
- When working with such a unit, the sower must periodically check the amount of seeds in the hopper, filling it with new ones if necessary.
- After sowing is completed, the remaining seeds are poured out of the hopper, the sowing hub, coulter, harrow, and support wheels are removed and cleaned. The drive chain and sprockets are periodically lubricated with special lubricant.
Important! When operating the seeder, it is necessary to check the coulter, which can become clogged with grass or wet soil. If such an operation is not performed, gaps may appear - unseeded places that can only be discovered when seedlings appear.
When operating the seeder, it is necessary to check the coulter
Characteristics
The manual precision seed drill has the following characteristics:
- Number of sowing units (rows) – y modern models it ranges from 1 to 5-7;
- Type of sowing device - bushing or brush;
Important! The brush sowing unit consists of a drum with brushes and a calibration disk installed outside the hopper. The principle of its operation is as follows: when the drum with brushes rotates, the seeds fill the space between them and are pushed out into a certain hole in the calibration disk, installed opposite the exit window of the sowing apparatus.
- Type of harrow - plate harrows are installed on most manual seeding devices;
- The type of opener is wedge-shaped (pointed);
- Working width – in multi-row (2 or more row seeders) this characteristic on average is 7-8 cm. In single-row units, the row spacing is adjusted by changing the length of the marker and can be up to 50-60 cm;
- Seed sowing depth – from 1 to 5 cm;
- Capacity (volume) of the seed hopper – the seed hopper of various units can hold from 0.4-0.5 to 2 liters of seed material;
- Type of rotation transmission from the drive wheel(s) to the sowing unit - direct (the sowing units are located on the same axis with the drive wheels) or chain (the sowing unit is connected to the drive wheel through two sprockets and a chain);
- The recommended speed of the seeder is 3-4 km/h;
- Productivity – from 2-3 to 10-12 hundred parts/hour.
Important! When you type in a search for this unit, the service often gives an option such as “sequivalley seeder” in the search prompt. Following this prompt will not bring any benefit to the user, as it relates to the field of dating, erotic videos, and photographic materials for adults.
Manual precision seed drill
Adjustment
In manual seed drills, before sowing the following settings are performed:
- Seeding rates;
- Seed placement depths;
- Row spacing.
These settings are very important for quality sowing.
Seeding rate
Seed rate accuracy various types sowing units are regulated in their own way:
- In bush sowing devices, the seeding rate is regulated by selecting a bushing with the corresponding holes and the pitch between them;
Important! In order to make a bushing with non-standard holes and pitch, you can buy a blank and, having marked it according to the given parameters, make recesses (holes for seeds) of the required diameter.
- In brush sowing devices, the seed sowing rate is adjusted using a calibration disk with holes. The seeding rate is regulated by installing a corresponding hole on the calibration disk opposite the outlet window of the sowing apparatus.
Planting depth
The depth of seed placement is adjusted in seeders with a chain drive of the sowing apparatus. The adjustment process occurs as follows:
- The seeder is installed on a flat area;
- Place a board under the rear press wheel with a thickness equal to the planned sowing depth;
- Using the adjusting bolts, the coulter is lowered until it touches the floor. In this case, it is not the tip of the opener that should touch the floor, but its entire lower plane.
Row spacing
The row spacing is adjusted by changing the distance between the sowing units or extending the marker. The latter option is more convenient and allows you to create large row spacing when sowing, for example, a crop such as corn.
Manufacturers
Among the manufacturers of manual seeders, the most famous brands are:
- "ROSTA";
- "GARDENA";
- SOLO.
Do-it-yourself manual seeder
You can make a homemade precision seeder with your own hands using the following technology:
- A seed hopper of the required volume with a lid is made from tin;
- A hole is made in the lower part of the bunker for the shaft of the sowing apparatus;
- Two bearings are welded to the outside of the hopper on both sides. They are welded in such a way that the center of their inner diameter coincides with the center of the hole for the sowing apparatus shaft.
- An asterisk is welded to a metal axle 4-5 cm longer than the seeding wheel. On the other side of the shaft, a hole is made for a stopper - a cotter pin.
- A seed box with a coulter from an old pneumatic seeder is attached to the bottom of the bunker;
- A rectangular frame with two cross members is made from a corner or plates. The short end sides are not welded.
- A convenient two-horned handle with length adjustment is welded to the frame;
- A wheel from a clamshell bicycle with an asterisk is mounted in the front part of the frame;
- A wide metal wheel is attached to the rear of the frame;
- The hopper with the seed box and coulter is welded to the frame crossbars;
- From round section From ebonite or dense plastic blanks, sowing bushings with holes for various crops are made. A hole of the same diameter as the driven shaft with the sprocket is drilled in the center of the resulting bushing.
- The sleeve is inserted into the neck of the hopper, a shaft with an asterisk is passed through it, which is locked with a cotter pin from the outside;
- A chain is put on the sprockets of the seeding unit shaft and the drive wheel;
- Before starting work, the chain and sprockets are lubricated with a special lubricant.
Important! You can make a spacious and convenient seeder from a separate section of an old corn or vegetable seeder. To do this, you need to make a handle in the rear part and install a wheel with a sprocket in the front part of the section and connect it with a chain to the shaft of the sowing device. Due to its heavy weight, such a seeder is not convenient for a girl, a physically weak teenager, or an old man. At the same time, its reliability and durability will be many times higher than that of other homemade analogues.
Manual seeder for vegetables and small seeds (grass and lawn mixtures) – convenient device, which will greatly facilitate the sowing campaign both on a small plot or in a greenhouse, and on medium-sized plots where there are no access points for tractors. Anyone in the household can use such a seeder, even a teenager. It has no dangerous moving parts and is easy and time consuming to set up. This technique is economically beneficial - each vegetable grown using it will have less labor and cost compared to manual sowing.
Manual single-row precision seeders can be divided into two types: some seeders are used for manual sowing of vegetable crops, while others are designed for sowing lawn grass.
Nowadays there are a lot of manual seeders on sale from all over the world. There are many models - there are Gardena and Al-ko from Germany, there is EarthWay from the States, etc. The main purpose of these units is to distribute the seeds as evenly as possible over the area, which is why they are called seeders-spreaders.
Technical characteristics of manual precision seeder
Most of these seeders are two-wheeled, but there are models without wheels at all (for example, the 9-liter Solo 421 spreader, produced in Germany). Beyond the seeds lawn grass Using such a device, you can evenly distribute fine gravel, for example, on icy paths in winter. Sand and dry mineral fertilizers can also be distributed using these devices. Such a device costs approximately 20-25 dollars.
But it’s not easy to find them on the Russian market, because they are produced by single companies, and are supplied through dealers.
 But if you try, you can find it. Most often, seeders are found at special farm exhibitions. The most reliable and inexpensive are Ukrainian-made “Dachnitsa”, “Zorka”, Chinese SM and others. The above mentioned manual seeders are a small seed hopper on two wheels. In one approach you can sow from 1 to 5 rows.
The seeder consists of four (maybe more) sowing units with seeder hoppers, which are mounted on the main shaft. The picture on the right shows a manual precision seeding vegetable seeder with six hoppers. The seeding bushings of seeders have a similar design and purpose. Depending on the model, the number of bins will vary. If your garden is small, then you should not buy a seeder with 5 or more compartments. Each sowing device has one sowing sleeve, which is used for sowing seeds of carrots, radishes, and parsley. Such a device is rigidly fixed on a transverse rod with an interval along the axes of approximately 80 millimeters.
Operating principle of a manual seeder
The principle of operation of such a device is very simple: you fill the bookers with different seeds and go for a walk along the paths on which the seeds should be planted. Thus, you walk, and behind you there is a trail of seeds. In the same way, you can cover the area with sand or other material. There are different seeders with different controls. But the majority of manual seeders work this way.
Preparing for sowing
First you need to deal with the soil: clean it for future seeds, make it loose. It would be ideal if you water the soil. It is recommended to prepare buckets of soil in advance, because after distributing the seeds, they will need to be covered with a layer of soil. If you own an expensive seeder, then it will definitely have devices that create furrows in the ground where the seeds are then placed.
Sowing with a hand seeder
If you decide to purchase such an assistant, the sowing speed will increase 10 times. After all, you don’t have to climb around the garden and plant every seed. Therefore, a manual seeder is an excellent device that greatly simplifies and speeds up the process. Don’t forget that the soil needs to be leveled and prepared before sowing.
A grain seeder for a walk-behind tractor belongs to the category of agricultural machines used to evenly plant seeds into the soil. Before the invention of the seeder, crop seeds were scattered manually, as a result of which required density sowing
In addition, planting seeds by hand requires a lot of physical effort. Economically, manual sowing is not justified: scattered seeds fall unevenly onto the soil, and much more is wasted than when using a seeder. Also, manual planting leads to uneven distribution of seeds, as a result of which the soil is quickly depleted.
DIY seeder for walk-behind tractor
Nowadays, seeders occupy worthy place among the equipment used by farmers. Using seeders, row planting of grain crops is carried out: oats, rye, barley, wheat. Grain seeders are also used for sowing leguminous crops: peas, soybeans, beans, lupine, lentils and chickpeas. In addition, sowing equipment is used to plant crops similar to grain in size and seeding characteristics: sorghum, buckwheat and millet.
It will be appropriate to use a manual seeder in small areas. If the area is quite large, then a seeder for a walk-behind tractor (made with your own hands) is used. But any of them will help speed up the process of sowing seeds and increase uniformity in the placement of plants as they grow.
Grain seeders are divided into three groups, depending on the crops sown:
Combined seeders are equipped special devices, which add mineral fertilizers to the soil along with the seeds.

- Universal seeders used for sowing almost any crop.
- Special seeders are needed to sow certain types of crops.
- Each grain seeder can be purchased, or you can make it yourself.
Let's consider several options for making a seeder for a walk-behind tractor with your own hands
Vertical identical disks (3 pcs) are mounted on the axle at equal distances. Seed nests are drilled in the rim of any of them, in the amount of 12 pieces. When the seeder moves, the disk with seed nests falls into the hopper installed on top, where the seed grain is located. There the grain is captured and transferred to the furrows, which are mounted in front of the seeder discs.
A horizontal drag bar is installed to the frame of the implement to plant seeds. The diameter of the rims and wheels and the distance between them is determined by the manufacturer.

A homemade seeder is placed on three wheels. The front wheel is taken from a baby stroller, the rear wheel is from children's bike. The frame, bent in the shape of the letter P, is made of strip iron, 11.5 cm wide and 52.5 cm long. A seed hopper is installed on it, which is a box made of multi-layer plywood.

After which the bunker is tightened with bolts. A sowing unit is installed inside, on two plain bearings. It itself is a shaft made of birch and covered with varnish, the shape of which vaguely resembles a spool of thread.

When a homemade seeder moves along a plowed area, the sowing apparatus coil rotates due to the tension bicycle chain. The tape cell captures the seeds in the hopper and drops them into a specially attached funnel of the seed tube.
A more modern version of a homemade seeder for a walk-behind tractor
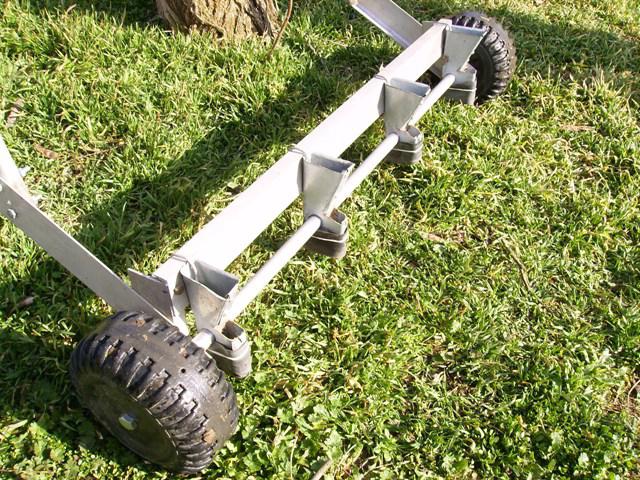
A homemade seeder for a walk-behind tractor consists of three main parts: two running wheels, a sowing roller, a seed box, two bearings, two brackets for attaching the coulter and handles with a bracket.

The seed box is made using wooden boards, 15 mm thick. To close them from below, use two steel overhead bottoms, 1 mm thick. The transverse and longitudinal walls are connected with self-tapping screws, tenons and steel angles. At the bottom of the walls of the box, wooden plates, 15 mm thick, are installed on screws or nails.

To install the seeding roller, semicircular cutouts are made in the linings and walls. For the same purpose, fastening brackets are screwed to the linings with screws. In order for the seeds to be dropped from the cells, rubber plates are installed in the inclined bottoms.

The seeder wheels have a diameter of 200 mm and hubs of 60 mm. The hubs have holes that are the same as the diameter of the seeding roller. The coulter is attached to brackets and is made of 1.5 mm steel sheet. Several holes are made on the bracket. You can adjust the depth at which the seeds will be planted by re-attaching the opener in the holes. On back wall A bracket is attached to the seed box, through which there is a connection to the walk-behind tractor.
Drawings of a seeder for a walk-behind tractor

Related Posts:
 Let's do homemade caterpillars on the walk-behind tractor: photos, videos, recommendations
  How to make a homemade gearbox for a walk-behind tractor, photos and drawings
  How to make a pneumatic walker from a walk-behind tractor, instructions, photos
  Motoblock Agros and homemade products for it
  Attachment for walk-behind tractor snowmobile description and reviews
  Homemade potato digger for walk-behind tractor - photo, video
  Do-it-yourself hitch to a walk-behind tractor, photos, drawings
  Homemade mower for walk-behind tractor (rotary, segmental)
  Homemade devices for walk-behind tractor, description, video, photo
A manual seeder can be an excellent assistant when carrying out work on your site. This design can be purchased at the store, but it will be cheaper to make it yourself. The design of this design is very simple, and while making it, you can make your own changes. The device contains a reservoir intended for seeds, as well as a handle. Quite often the design is supplemented with a steel device that resembles a stick. The seeder can be multi-row or single-row. The example will consider the option of a single-row design.
Preparation before starting work
If you need a manual seeder, then to make it you need to prepare some tools and materials. Among them is a container for seeds, which should preferably be made of plastic. It could be regular jar. Application plastic product convenient because it is transparent and allows you to control the number of seeds.
You will also need a bolt that will act as an axis. On it, the jar of seeds will rotate while using the device. A hand seeder will be made using a plastic pipe, the length of which should correspond to the depth of the jar. You should also prepare a steel tube, the diameter of which should be smaller compared to the plastic one.
It will be necessary to use washers to secure the can. To fill the seed jar inside, you will need to make a window. The door can be made using cans.
Stock up on a piece of aluminum wire. To make a manual seeder easy to use, you will need to prepare a wooden handle for it.
Features of manufacturing the device

To avoid difficulties in the process, it is necessary to study the technology of work. The center should be marked on the jar. Markings will be needed to drill a through hole. The stability of the entire device will depend on the accuracy of the assembly. Next you need to remove the cover and make another one on the side through hole, which should have rectangular shape. It will be needed in order to be able to fill the seeds. You can prevent them from spilling out if you prepare a valve from a steel can, the dimensions of which should be bigger hole. This element will act as a cover.
Assembly of the structure
A manual precision seed drill must be manufactured using a certain technology, which at the next stage involves the need to fasten the prepared valve using aluminum wire. This must be done in such a way that it is possible to open and close the window.
In the central part of the jar you need to place plastic pipe, which will prevent seed spillage. A steel tube should be installed in a plastic tube. In this case, you will receive a kind of bearing, thanks to which the can will rotate as it moves forward. When a manual precision seed drill is manufactured, steel pipe a long bolt is inserted at the next manufacturing stage. It will need to be tightened with a nut, placing washers at both ends of the can in advance. This will provide the structure with the ability to rotate freely.

When making a hand seeder with your own hands, you need to make notes on the side of the container using a pencil. You need to remove them from each other by 3 centimeters. It is necessary to make holes in advance with a hot nail; when choosing a nail, you need to take into account the size of the seeds. Naturally, if you use small holes, large seeds will get stuck. At this point we can consider that the main part of the work is done.
Making a pen
To strengthen the handle, at the end wooden element you need to drill a hole to install the bolt. Then this workpiece is attached to the seeder. At the next stage, you will only need to make sure that the seeds in the ground are covered with soil. This will automate the process.
A do-it-yourself manual seeder can be supplemented with some elements. Among them we can distinguish a hoe, which should be made from a piece of steel. The workpiece must be bent to make raking the soil easier. After this, the prepared hoe needs to be fixed on the handle, positioned slightly above the can. That's it - now you can use the tool.
Another option for making a seeder
A manual carrot seeder can be made using another technology. This process is considered somewhat more complex. To work, you will need an aluminum tube with a diameter of 28 millimeters. You need to prepare holes on it, arranging them in three rows. Now you can move on to making seed containers.
To do this, use galvanized steel sheet, the thickness of which is 0.5 meters. This element will be a box of 80x70 millimeters. The height of this tank is 40 millimeters. The lower part, which will be intended for seeds, should be made in the form of a trapezoid with a hole. All joints must be soldered.
At the next stage, the hopper is attached to a frame equipped with wheels and a handle, bolts, and a screw. One of the screws will act as a retainer for the brush, which is located in the lower part of the case. With its help it will be possible to adjust the sowing density. A manual seed seeder may have a lid made of plexiglass. This will allow you to conveniently control the number of seeds.
The lid must be fixed to the front of the hopper using furniture hinges, can be supplied this element latch so that it can be left closed.


