Buy at good discounts for personal use and as a gift to friends and acquaintances.
Buy quality products at affordable prices V . Give gifts to yourself and your loved ones!
Subscribe to us on Facebook, Youtube, Vkontakte and Instagram. Stay up to date latest news site.
How to make a table for attachments
Table of contents:In feeder and float fishing you have to use a lot of baits, bite activators and rigs. To ensure that all the necessary accessories are always at hand, it is convenient to use a small table. It can be purchased at specialized fishing stores. But some fishermen decided to make this accessory themselves using improvised materials.
In this article we will look at how to make an attachment table yourself, what materials and tools will be required. Let's learn how to use the table.
Necessary materials and tools for making an attachment table
Our goal is to get a relatively inexpensive, lightweight and functional table. We will need a standard plastic tray of this type:
Its dimensions are: 49x33x3 cm. You can also use a smaller tray with dimensions of 27x39 cm. It depends on the preferences of the fisherman. For some, a miniature table is enough, while others need a more spacious one. It should be said that it is more convenient to knit installations and equipment elements on a standard table.
We also need 4 legs. Can buy pvc pipe, which is used when installing electrical wiring or in sewers. The diameter of the tube is 2 cm.

We will attach the legs using plastic corners, which we will also buy in the same store as the pipes.

From the tools we will need a screwdriver and self-tapping screws 3 cm long, with which we will form the structure. We also need glue to connect the halves of the corners
How to make a fishing table for baits with your own hands
First you need to cut two tubes, slightly shorter than the larger side of the tray. They will be used to attach the legs.

After this, we attach the corners to the tubes. These corners consist of two halves. To prevent these halves from detaching, the fastening points must be lubricated good glue and press well.

The corners of the tube must be greased with PVC glue and then placed on the tubes.

As a result, we should have the following two fasteners.

The next stage of work is that we must screw the tubes at the bottom of the tray with self-tapping screws.

First, you need to make markings in the places where we will attach the screws. Take a marker and make marks on the tube and on the table top.

After this, we drill holes using a screwdriver at all marks.

Drilling into a countertop is easier than drilling into pipes. Therefore, it is necessary to hold the tube well so as not to miss.

After all the holes are drilled, we begin assembling our table. We take self-tapping screws and screw them in from the top of the table, having first placed our tubes under them.
This stage is the most difficult, since you need to ensure that the holes on the table and tubes match. This operation must be carried out very carefully so as not to damage the parts.

If everything is done correctly, you should end up with something like this:

For reliability, you can screw one self-tapping screw on each of the 4 sides of the tray where the corners meet the side.

It will turn out like this:

It should be noted that the resulting design is quite reliable. Everything holds up well, and you don’t have to worry about the integrity of the table in the future.
The final stage will be making the legs and threading them into the corners. The length of the legs is 30 cm. We cut them out with a hacksaw. We pre-measure and make marks with a marker at the required distance. The result should be identical legs like this:

We will also need rubber plugs of this type:

They can also be purchased at an electrical supply store. These plugs will allow you to install the table on various surfaces. Thanks to them, our product will take a stable position, and dirt will not get inside the legs. We choose plugs with the same diameter as our tubes.
Before putting the plug on the leg, lubricate the outer part of the tube with glue to firmly fix this element. The glue is suitable for rubber or for PVC products.

After this we put on the plug, and we should get something like this on all legs:

Most final stage work is threading the legs into the holes of the corners:

After all the work, we will have this neat and functional table for baits and various fishing little things:
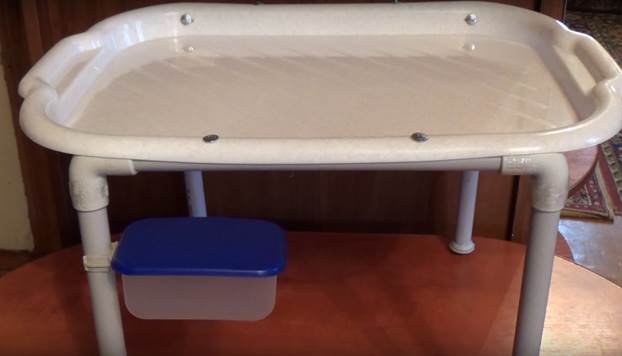
We see that the box is attached to one of the legs using a plastic fastening element - a clip. It looks like this:

It can be purchased at the same store. By screwing this clip with self-tapping screws to a plastic container, we can fix it to the leg.

You can place attachments in this container and place it under the table so that direct sunlight does not damage it. You can attach several similar containers and place bloodworms, maggots, worms and other baits in them. This way you will extend their life and they will remain useful throughout the fishing session.
Advantages of a homemade bait table for fishing
The cost of a homemade table does not exceed 7-8 dollars. If you buy branded tables, you will spend 4-5 times more money. What's good homemade table? When folded, it will fit into a medium backpack. It is advisable to choose a small handbag or case for it.
While fishing, you will see for yourself how comfortable it will be when all the necessary attachments are located at arm's length. Many operations have to be done on your knees, and some attachments remain untouched because you are too lazy to take them out or they are conveniently forgotten.
If you have a table like this, you can lay out all the attachments, extractor, small boxes and attractants as conveniently as possible. You won't need to reach into your backpack every time for some small change. You can also tie a leash, rigging or installation by laying out all the necessary accessories and tools on the table.
They will allow you to purchase any at competitive prices!
To become a real fisherman and learn the right choice.
TOP popular products For fishing— buy with good discounts for personal use and as a gift to friends and acquaintances.
Buy quality products at affordable prices in the best fishing online stores. Give gifts to yourself and your loved ones!
In feeder and float fishing you have to use a lot of baits, bite activators and rigs. To ensure that all the necessary accessories are always at hand, it is convenient to use a small table. It can be purchased at specialized fishing stores. But some fishermen decided to make this accessory themselves using improvised materials.
In this article we will look at how to make an attachment table yourself, what materials and tools will be required. Let's learn how to use the table.
Necessary materials and tools for making an attachment table
Our goal is to get a relatively inexpensive, lightweight and functional table. We will need a standard plastic tray of this type:
Its dimensions are: 49x33x3 cm. You can also use a smaller tray with dimensions of 27x39 cm. It depends on the preferences of the fisherman. For some, a miniature table is enough, while others need a more spacious one. It should be said that it is more convenient to knit installations and equipment elements on a standard table.
We also need 4 legs. You can buy a PVC pipe, which is used when installing electrical wiring or in sewerage. The diameter of the tube is 2 cm.
We will attach the legs using plastic corners, which we will also buy in the same store as the tubes.
From the tools we will need a screwdriver and self-tapping screws 3 cm long, with which we will form the structure. We also need glue to connect the halves of the corners
How to make a fishing table for baits with your own hands
First you need to cut two tubes, slightly shorter than the larger side of the tray. They will be used to attach the legs.
After this, we attach the corners to the tubes. These corners consist of two halves. To prevent these halves from detaching, the fastening points must be lubricated with good glue and pressed well.
The corners of the tube must be greased with PVC glue and then placed on the tubes.
As a result, we should have the following two fasteners.
The next stage of work is that we must screw the tubes at the bottom of the tray with self-tapping screws.
First, you need to make markings in the places where we will attach the screws. Take a marker and make marks on the tube and on the table top.
After this, we drill holes using a screwdriver at all marks.
Drilling into a countertop is easier than drilling into pipes. Therefore, it is necessary to hold the tube well so as not to miss.
After all the holes are drilled, we begin assembling our table. We take self-tapping screws and screw them in from the top of the table, having first placed our tubes under them.
This stage is the most difficult, since you need to ensure that the holes on the table and tubes match. This operation must be carried out very carefully so as not to damage the parts.
If everything is done correctly, you should end up with something like this:
For reliability, you can screw one self-tapping screw on each of the 4 sides of the tray where the corners meet the side.
It will turn out like this:
It should be noted that the resulting design is quite reliable. Everything holds up well, and you don’t have to worry about the integrity of the table in the future.
The final stage will be making the legs and threading them into the corners. The length of the legs is 30 cm. We cut them out with a hacksaw. We pre-measure and make marks with a marker at the required distance. The result should be identical legs like this:
We will also need rubber plugs of this type:
They can also be purchased at an electrical supply store. These plugs will allow you to install the table on various surfaces. Thanks to them, our product will take a stable position, and dirt will not get inside the legs. We choose plugs with the same diameter as our tubes.
Before putting the plug on the leg, lubricate the outer part of the tube with glue to firmly fix this element. The glue is suitable for rubber or for PVC products.
After this we put on the plug, and we should get something like this on all legs:
The very last stage of work is threading the legs into the holes in the corners:
After all the work, we will have this neat and functional table for baits and various fishing little things:
We see that the box is attached to one of the legs using a plastic fastening element - a clip. It looks like this:
It can be purchased at the same store. By screwing this clip with self-tapping screws to a plastic container, we can fix it to the leg.
You can place attachments in this container and place it under the table so that direct sunlight does not damage it. You can attach several similar containers and place bloodworms, maggots, worms and other baits in them. This way you will extend their life and they will remain useful throughout the fishing session.
Advantages of a homemade bait table for fishing
The cost of a homemade table does not exceed 7-8 dollars. If you buy branded tables, you will spend 4-5 times more money. What's good about a homemade table? When folded, it will fit into a medium backpack. It is advisable to choose a small handbag or case for it.
While fishing, you will see for yourself how comfortable it will be when all the necessary attachments are located at arm's length. Many operations have to be done on your knees, and some attachments remain untouched because you are too lazy to take them out or they are conveniently forgotten.
If you have a table like this, you can lay out all the attachments, extractor, small boxes and attractants as conveniently as possible. You won't need to reach into your backpack every time for some small change. You can also tie a leash, rigging or installation by laying out all the necessary accessories and tools on the table.
Good fishing online stores will allow you to purchase any Goods for fishing at competitive prices!
Popular sections of the site:
The fisherman's calendar will allow you to understand how all the fish bite depending on the time of year and month.
The fishing gear page will tell you about many popular gear and devices for fishing.
Fishing baits - we describe in detail live, plant, artificial and unusual ones.
In the bait article you will get acquainted with the main types, as well as tactics for using them.
Learn all the fishing lures to become a real fisherman and learn how to choose the right one.
Source: http://ribalka-vsem.ru/index/kak_sdelat_stolik_dlja_nasadok/0-1086
DIY fishing table
Without going into details, we can distinguish two types of camping tables – a table with folding legs and a suitcase table.
In the first option, when transporting or carrying the legs are retracted under the tabletop. Upon arrival, you just need to move the legs of the table to place it.
In the second option, the tabletop is something like a suitcase or chessboard- in the stowed position, the legs lie inside it, but in place they need to be taken out of the “suitcase”, connected to it and the table placed in the right place.
Both types have their advantages. A folding table is easier to make and literally takes seconds to set up. At the same time, the suitcase table is more convenient to carry and takes up less space, and, in addition, you can put dishes, skewers and other necessary things in it during transportation.
Aluminum is the most commonly used material for a homemade feeder table. Its main advantage is its strength and low weight. They use an aluminum corner for the frame, pipes for the legs, and sometimes sheets for the table top.
The first option for fishing from Vladimir Kruglov. For it you will need:
- Aluminum corner.
- Pipes made of the same material.
- A suitable piece of window sill is used as a table top.
The corner serves as a frame; its edge prevents feeder accessories and baits from falling during fishing. The legs are made up of two pipes different diameters, which allows you to adjust the height while fishing. Window flashing (painted sheet metal) provides a durable and pleasing surface.
The next option for a metal fishing table. In this option, the frame and fastenings for the legs are welded, which makes the structure even stronger. To reduce weight, the author suggests using three legs. You can cut a circle in the tabletop for a container with maggots, another attachment or bait for the feeder.
In the next video, the author offers a model of a fishing table made from sheet aluminum. The corner for fastening the structure is not used. The plate is bent at the edges, forming sides. For this option you will need:
- Aluminum sheet.
- A strip of metal for the frame.
- Metal pipe for legs or attachment to a fishing chair.
Here a sheet of aluminum is used for the table
And another option with telescopic legs. Although such an attachment table is more suitable for winter fishing, but it is not difficult to convert it to attach to a chair, or add legs to place on the ground separately. Model with extendable legs
What types of fishing tables are there?
Experienced fishermen consider it mandatory to have a bait table. It helps you keep track of all your small items, saving time and keeping you organized. Based on their structure, the following types of tables are distinguished:
- use of material in the frame and legs of the chair;
- use of material in the manufacture of countertops;
- by design: folding and non-folding models.
We make an attachment table from a metal structure
What material is best for making it yourself? folding table for hiking trips?
If ease of creation is your top priority and you don't have a wide range of tools or skills in working with plastics and metals, choose wood.
Timber, boards, chipboard, plywood - all this can be used to create a fairly simple folding table.
But a table made of wood, if its surface is not protected with varnishes and special coatings, will warp under the influence of dampness, sunlight and temperature changes and lose its attractive appearance. appearance.
Plastic and even metal can be used as material for legs and tabletops. But here you may need those tools that cannot be found in every home. In addition, working with such materials is more difficult than with the same wood. But tables made of plastic are not subject to corrosion, and those made of metal are very strong and durable.
Do-it-yourself attachment table made of PVC materials
In the first version, the entire frame is assembled with your own hands from a PVC tube, and the surface is from a tray. The main disadvantage of such a device: it cannot be disassembled.
For this design we will need:
- Tray of suitable size. Serves as a tabletop work surface. It should accommodate the feeder's necessary things for fishing.
- Rigid PVC pipe for laying cables (electrical wiring).
- Corners - for attaching table legs.
- Plugs.
- Stainless steel self-tapping screws.
A frame for the tray is made from the pipe. The frame is fastened with self-tapping screws, and a corner is attached to its ends. Legs of the required length are soldered or glued to the corner.
The easiest way to make a feeder attachment table is to use a bookcase. Some plastic bookcases are sold by section. You just have to choose a model that fits the size. We get a finished surface with small legs, which can be extended with the same PVC pipes. The easiest and most inexpensive way
Drawings of a folding picnic table
To make a simple and fairly strong folding table, you need the bare minimum of materials and fasteners:
- wooden boards, 20–40 millimeters thick. For the countertop, instead of boards, you can use a sheet of chipboard or plywood, approximately 10 millimeters thick;
- self-tapping screws, furniture bolts, and for each pair of legs the bolts must be of different lengths, wing nuts for the bolts;
- door handles for carrying the table and hooks.
First, cut from boards or sheets Chipboard table top the required sizes. If the tabletop is made up of several boards, assemble them together, lay them down and measure the length and width.
Stages of work
Step 1. Making the frame Place the boards for the frame on the tabletop, on each side the frame should be 2-3 centimeters away from the edge of the tabletop. Using a jigsaw, cut the boards to the required dimensions, then lay them back on the tabletop, checking that the length and width of the frame match the drawing. Outline the contours of the frame - use them to make holes in the tabletop for screws.
Step 2. Intermediate bars
Cut out the support bars on which the spread out table legs will rest, and make four holes in them for screws.
To prevent the table legs from colliding with each other when folding, make a second pair of legs wooden substrates, which will be located between the frame and the stop bars.
Step 3. Assembling the frame and tabletop Assemble the frame elements together, secure the stop bars and wooden backings, and use an electric drill to make four holes for the bolts.
Use screws to secure the table top and frame. Step 4.
Table legs Lay out and cut out the table legs with a jigsaw. In the upper part, where they are fixed to the frame, the legs should be rounded, while in the lower part there should be a cut at a slight angle (15–20 degrees).
Make holes for the bolts.
Step 5: Assembling the Table Connect the first pair of legs with a crossbar and secure to the frame with a bolt and wing nut. Repeat the same with the second pair. Check that the legs do not cling to each other when unfolding and folding the table. If they get stuck, treat the legs at the point of friction with sandpaper.
The folding table is ready. Additionally, you can attach a handle to it for easy carrying and hooks for hanging towels or barbecue equipment.
The table consists of two tabletops measuring 550 x 300 mm, which, when unfolding the table, turn into one continuous surface measuring 600 x 550 mm. Can be used as a tabletop furniture board, chipboard, thick plywood or wide boards.
For the table you need to make four legs measuring 690 x 45 x 20 mm. To stabilize the table, we cut the legs at one end at an angle of 45 degrees, and round them at the other end for a movable connection with the foot supports.
We drill holes in the legs for bolt fastenings according to the drawings.
The table tops are attached to the foot supports with self-tapping screws or other in a convenient way, you will need 4 supports measuring 500 x 45 x 20 mm. We attach two supports to each tabletop.
The supports are connected with bolts and nuts to the table legs.
We attach the crossbars to the legs in the lower part with self-tapping screws; you will need two crossbars, bars measuring 450 x 45 x 20 mm.
Protecting the camp table
A tree that is not protected by anything ages quickly enough: dampness, temperature changes that are inevitable in nature, sunlight and many other factors have a bad effect on the material and reduce the durability of the folding table.
Therefore, do not forget to treat all its surfaces, especially the countertop, which is most susceptible to harmful influences.
To treat wood against moisture and rot, use special antiseptic compounds and stains.
A final finish with varnish or paint will improve the appearance of the plywood or chipboard and make the camp table more beautiful.
A table for summer fishing is a very important thing. Without it, it’s basically a mess on the shore; you’re always looking for little things in the grass and preparing gear on your knee.
Therefore, I was actively interested in tables in stores and on the Internet, but came to the conclusion that the designer who would design a table to suit me had not yet been born. Sometimes small, sometimes tall, sometimes uncomfortable, sometimes unreliable. And those tables with legs cost a lot of money. So I decided to make a table myself, to suit my requirements and with my own hands. I thought for a long time about coming up with something like this, so that it would be easy to manufacture, would not require the use of special tools, would be easy to use and transport, and would be inexpensive.
Until, by some miracle, I wandered into a Russian forum, where someone like me had already come up with everything and I just needed to borrow his idea and slightly change the design to fit the available materials. (Kowtow to the fraternal Russian people for the development).
It turned out that making a good fishing table is very simple and trivial. All you need is an aluminum profile, sheet plastic (I used 5 mm PVC), a couple of hardware, a simple tool and the correct direction for the growth of your hands.
And this is what I got as a result of “painstaking work”:
Table for fishing in transport form
Dimensions - width 60 cm, length 40 cm, thickness 4 cm. Total weight 4 kg. Calmly fits into a bag with a chair, extra space not required during transportation.

In working position
For use there are two tabletops with an internal size of 54cm x 38cm. + Shelf for mobile, walkie-talkie, etc. There’s plenty of room to spread out and you don’t have to hold anything in your teeth or look for it in the grass.
The height adjustment of each leg allows you to cope with uneven shores. The profile sides prevent objects from falling off the table. Thanks to the ability to lower the center of gravity, the homemade table is not prone to tipping over.
It is also possible to use such a rod with hooks for deepening boilies and temporarily storing ready-made leashes.

On the other hand, it’s the same only without hooks - for towels.
Here's another use case

Single-story long table
Or this option

Single-story wide table
or this way

Adjustment to the desired angle
Or, as a last resort, like this

Two separate tables
Includes 2 table tops, shelf, 2 rods, 8 legs.
During transportation, the tabletops become a pencil case into which all the parts are folded
Assembled

To secure the threaded legs in aluminum profiles you can’t cut it, so I decided to use an M22 nut. Since it was planned to use legs with a diameter of 16 mm, this particular nut with an internal diameter of 17 mm was purchased. (I hurriedly suffered in vain, the width of this nut is 30mm and inner size profile 27 mm. I had to file off 3 mm using sandpaper.)
With legs of 15 mm. it was possible to take a smaller nut, but in any case it is necessary to select it so that the nut is not too narrow for the internal profile size and the wall thickness allows for a normal thread to be screwed on.
Next, drill holes in the nut and in the profile as shown in the figure.

In the nut, in one hole there is a thread cut for an M6 bolt, through the second hole the nut is attached to the profile using a rivet.
The profile is also attached along the perimeter to the PVC with rivets. The table is ready.
No special tools are required to make your own table of this design. Everything that every normal person should have was used - a hacksaw, a drill, drills, a file and a rivet gun.
Do you still put bait and tackle on the ground? It's time to get a special table. The prices for it in fishing stores are rather high (USD 30-100), but you can pick up a small suitable table for a picnic and convert it to your needs.
But you can also make a table with your own hands that will make life easier when fishing and can be useful for outdoor recreation. Bait, bait, flavors, dips and necessary feeder accessories - all this can fit on the table and be always at hand. And this is time saved that can be put to good use.
Homemade fishing tables can be divided into several types:
- According to the materials used in the frame and legs. They come in metal (usually aluminum) and PVC materials(more like a water pipe or electrical wiring).
- According to the material of the tabletop. The simplest tabletop is a plastic tray the right size. Instead, you can use laminated plywood, window sills, galvanized and aluminum sheets.
- By design. They do it more often simple models who don't understand. Although such tables are small in size, they require space during transportation. More complex designs have removable legs, adjustable in length.
Do-it-yourself attachment table made of PVC materials
In the first version, the entire frame is assembled with your own hands from a PVC tube, and the surface is from a tray. The main disadvantage of such a device: it cannot be disassembled.
For this design we will need:
- Tray of suitable size. Serves as a tabletop and work surface. It should accommodate the feeder's necessary things for fishing.
- Rigid PVC pipe for laying cables (electrical wiring).
- Corners - for attaching table legs.
- Plugs.
- Stainless steel self-tapping screws.
A frame for the tray is made from the pipe. The frame is fastened with self-tapping screws, and a corner is attached to its ends. Legs of the required length are soldered or glued to the corner.
PVC table
The easiest way to make a feeder attachment table is to use a bookcase. Some plastic bookcases are sold by section. You just have to choose a model that fits the size. We get a finished surface with small legs, which can be extended with the same PVC pipes.
The easiest and most inexpensive way
We make an attachment table from a metal structure
Aluminum is the most commonly used material for a homemade feeder table. Its main advantage is its strength and low weight. They use an aluminum corner for the frame, pipes for the legs, and sometimes sheets for the table top.
The first option for fishing from Vladimir Kruglov. For it you will need:
- Aluminum corner.
- Pipes made of the same material.
- A suitable piece of window sill - used as a table top.
The corner serves as a frame; its edge prevents feeder accessories and baits from falling during fishing. The legs are made of two pipes of different diameters, which allows you to adjust the height while fishing. Window flashing (painted sheet metal) provides a durable and pleasing surface.
Angle design
Manufacturing
The next option for a metal fishing table. In this option, the frame and fastenings for the legs are welded, which makes the structure even stronger. To reduce weight, the author suggests using three legs. You can cut a circle in the tabletop for a container with maggots, another attachment or bait for the feeder.
Welded frame
In the next video, the author offers a model of a fishing table made from sheet aluminum. The corner for fastening the structure is not used. The plate is bent at the edges, forming sides. For this option you will need:
- Aluminum sheet.
- A strip of metal for the frame.
- Metal pipe for legs or attachment to a fishing chair.
And another option with telescopic legs. Although this attachment table is more suitable for ice fishing, it is not difficult to convert it to attach to a chair, or add legs to place it on the ground separately.
Model with sliding legs
Its dimensions are: 49x33x3 cm. You can also use a smaller tray with dimensions of 27x39 cm. It depends on the preferences of the fisherman. For some, a miniature table is enough, while others need a more spacious one. It should be said that it is more convenient to knit installations and equipment elements on a standard table.
We also need 4 legs. You can buy a PVC pipe, which is used when installing electrical wiring or in sewerage. The diameter of the tube is 2 cm.
We will attach the legs using plastic corners, which we will also buy in the same store as the tubes.
From the tools we will need a screwdriver and self-tapping screws 3 cm long, with which we will form the structure. We also need glue to connect the halves of the corners
The cost of a homemade table does not exceed 7-8 dollars. If you buy branded tables, you will spend 4-5 times more money. What's good about a homemade table? When folded, it will fit into a medium backpack. It is advisable to choose a small handbag or case for it.
While fishing, you will see for yourself how comfortable it will be when all the necessary attachments are located at arm's length. Many operations have to be done on your knees, and some attachments remain untouched because you are too lazy to take them out or they are conveniently forgotten.
If you have a table like this, you can lay out all the attachments, extractor, small boxes and attractants as conveniently as possible. You won't need to reach into your backpack every time for some small change. You can also tie a leash, rigging or installation by laying out all the necessary accessories and tools on the table.
Good fishing online stores will allow you to purchase any fishing goods at competitive prices!
The fisherman's calendar will allow you to understand how all the fish bite depending on the time of year and month.
The fishing gear page will tell you about many popular gear and devices for fishing.
Fishing baits - we describe in detail live, plant, artificial and unusual ones.
In the bait article you will get acquainted with the main types, as well as tactics for using them.
Learn all the fishing lures to become a real fisherman and learn how to choose the right one.
Work order
First you need to cut two tubes, slightly shorter than the larger side of the tray. They will be used to attach the legs.
After this, we attach the corners to the tubes. These corners consist of two halves. To prevent these halves from detaching, the fastening points must be lubricated with good glue and pressed well.
The corners of the tube must be greased with PVC glue and then placed on the tubes.
As a result, we should have the following two fasteners.
The next stage of work is that we must screw the tubes at the bottom of the tray with self-tapping screws.
First, you need to make markings in the places where we will attach the screws. Take a marker and make marks on the tube and on the table top.
After this, we drill holes using a screwdriver at all marks.
Drilling into a countertop is easier than drilling into pipes. Therefore, it is necessary to hold the tube well so as not to miss.
After all the holes are drilled, we begin assembling our table. We take self-tapping screws and screw them in from the top of the table, having first placed our tubes under them.
This stage is the most difficult, since you need to ensure that the holes on the table and tubes match. This operation must be carried out very carefully so as not to damage the parts.
For reliability, you can screw one self-tapping screw on each of the 4 sides of the tray where the corners meet the side.
It should be noted that the resulting design is quite reliable. Everything holds up well, and you don’t have to worry about the integrity of the table in the future.
They can also be purchased at an electrical supply store. These plugs will allow you to install the table on various surfaces. Thanks to them, our product will take a stable position, and dirt will not get inside the legs. We choose plugs with the same diameter as our tubes.
Before putting the plug on the leg, lubricate the outer part of the tube with glue to firmly fix this element. The glue is suitable for rubber or for PVC products.
It can be purchased at the same store. By screwing this clip with self-tapping screws to a plastic container, we can fix it to the leg.
You can place attachments in this container and place it under the table so that direct sunlight does not damage it. You can attach several similar containers and place bloodworms, maggots, worms and other baits in them. This way you will extend their life and they will remain useful throughout the fishing session.


