When planning to install wiring in the house, conduct additional lighting or adding a couple of outlets without resorting to the services of professionals, you have to deal with many questions.
The essence of these questions comes down to one thing - how to choose from the variety offered the only option that will serve faithfully for many years.
In this article we will tell you how and which wire is best to choose for wiring in the house.
The first thing you need to decide is which wire to use for wiring wooden house -copper or aluminum. Although you can use both, experts still prefer copper:
Aluminum has only two advantages over copper:
- he's more flexible, which makes installation easier,
- he is much cheaper.
In all other parameters, aluminum is inferior to copper:
- oxidizes quickly(and the oxide conducts current less well and this place will heat up quickly),
- after a few bends may break, therefore, aluminum wires must be laid with greater care than copper wires, you will have to avoid bending them multiple times in the same place,
- screw terminals aluminum slips out over time, loosening the contact, and all places where there are clamps require periodic inspection.
The core can be made of aluminum copper - inexpensive composite material , which on the one hand combines good properties both materials, and on the other hand, it is inferior to each of them in terms of performance.
Wires differ in the number of cores (single- and multi-core, each core can be single- or multi-wire), cross-section and rated operating voltage; they are manufactured with insulation for 380, 600 and 3000 V alternating current. The conductors can be enclosed in a sheath made of vinyl plastic, PVC or rubber.To protect the wire from mechanical damage, it can be covered with a cotton braid. If it is intended for installation in places where there is a possibility of mechanical damage, it is additionally protected with a braid of galvanized steel wire.
Despite the fact that aluminum wires are cheaper, recently copper is increasingly replacing them because many homeowners prioritize reliability.
 Would you like to know how to make grounding in a private house? In the next review we will talk in detail about all the nuances, as well as what it should look like.
Read about the rules for installing hidden wiring in a wooden house here.
Retro wiring is not only functional, but also a decorative solution for those who want to decorate their home and make their wiring attractive. Detailed and helpful information.
Marking
The marking contains information about the material from which the conductors are made, the degree of flexibility, insulation and design of the protective sheath:
 For example, 4x2.5-380 means a 4-core wire with a core cross-section of 2.5 square meters. mm.
 Let's figure out what kind of wire is needed for wiring in the house. It is necessary to choose, taking into account the maximum amount of current consumed during the load, which determined by the formula P/220, where P is the rated power of the connected devices. So, for a 100-watt light bulb, the current will be 0.5A. Knowing the total power of all connected devices, you can calculate whether the selected wire is suitable or whether you need to select another one.
The choice for a home is made on the basis that For every kilowatt of load you need 1.57 sq. mm. You should adhere to the power characteristics:
- for copper 8 A per 1 sq. mm;
- for aluminum 5 A per 1 sq. mm.
Diameter of current-carrying core measured with a micrometer or caliper and calculated using the formula S = 3.14D2/4, where D is the diameter in millimeters. If the core is multi-wire, then the result is determined by adding the cross-sections of all the wires.
When installing wiring, you can focus on the following cross-section indicators:
- 2.5 sq. mm- sockets, air conditioning, washing machine, storage water heater;
- 6 sq. mm- electric stove;
- 1.5 sq. mm- lighting.
The load must also correspond to the installation method. : open wiring It cools better, rubber insulation allows heating no higher than 65 degrees, plastic insulation - 70 degrees. Here's how the type of wire depends on the way the wiring is laid:


Practicing electricians It is recommended not to save money, but to use stranded copper wires even where you can get by with single-core, because multi-core, with the same cross-section as monolithic, withstand overloads 5–10% better.
In addition, it is technically impractical to counterfeit a stranded wire, and in a “monolith” there is a danger of running into a counterfeit - an alloy with the addition of copper. But any advice from a specialist has some bias, so it is still better for the home owner to decide for himself what is more important - the economy of aluminum or the quality of copper.
If to this approach the critical stage of repair accordingly, you may never know what melted insulation, fire or short circuit is. You need to take a particularly responsible approach to the arrangement of baths and saunas - there elevated temperature and humidity, which leads to rapid wear of the insulation.
By following safety rules and GOST recommendations, you can protect not only your own home, but also your life from fire.You can learn how to choose a wire for electrical wiring in a private house or apartment from the video review:
Residential buildings made of wood are among the most ancient architectural structures. But even nowadays, when the range building materials amazes the human imagination, most happy owners suburban area They prefer to use wood with environmental qualities and natural beauty for the construction of a house, which cannot be compared with any finishing material.

Requirements for wiring in wooden buildings
To begin with, anyone who wants to independently supply electricity to a wooden house must understand that knowledge of how to distinguish a neutral wire from a phase analogue or connect a socket with a switch is far from sufficient. First of all, this is due to increased safety requirements use of electrical appliances in wooden buildings.
It is better to entrust all work to qualified electricians. But every homeowner needs to be aware of the basic rules of how to install electrical wiring in a wooden house, even for the simple reason that this will allow him to evaluate the work of specialists. So, what are the rules for electrical wiring in wooden residential buildings?
- It is important to completely eliminate or minimize the possibility of fire in electrical cables to prevent the transfer of an open source of fire to the wooden parts of the house if a short circuit occurs in the electrical circuit.
- Main indicators and characteristics of cables used in wiring must strictly comply with the rules and regulations and have sufficient power reserves to withstand peak loads. Under no circumstances should there be any manifestation of heating of the input wire or terminal connection.
- Technical condition electrical wires should not allow even the slightest risk of electric shock to the residents of the house or animals.
The question of the aesthetic component in conditions wooden houses should fade into the background. Today there are many options for solving this problem. But in no case should safety rules be neglected to improve the external characteristics of the building. Such actions can lead to irreversible consequences.
Features of electricity input in a wooden house
 The most dangerous area of electrical wiring is considered to be the entry of wires through the attic wall, made of wood. There is a misconception among craftsmen that a piece of rubber hose is enough to ensure safe cable entry into the house. But the use of such material is not applicable, since the composition of the rubber product includes soot, which is carbon that conducts current well.
Therefore, as a rubber hose ages, bridges may appear that allow electricity to pass through with fairly high resistivity values. Because of this, the cable heats up in local areas, which can lead to fire in dry wood.
If the owner's main goal wooden house is a complete reconstruction of the electrical wiring and bringing it into proper condition, then the modernization must begin with the introduction of the electrical cable into the building. Wherein specialists consider two main methods on how to install a power cable into a wooden building:
- Laying an electrical power cable underground is the most reliable in terms of safety, since the wires are hidden from the influence of external factors. But in terms of cost, this option is too expensive and requires earthworks. According to the rules for laying underground electrical wiring, the depth of the trench must be at least 80 cm.
- Overhead wiring involves work on an electrical pole, which is strictly prohibited without the necessary permission. This should only be done by qualified electricians.
 The section of the electrical main from the high-voltage pole to the wooden structure must be made of wires with a cross-section of more than 16 mm. The optimal ones are self-supporting aluminum wires with high-quality insulation. The service life of such a cable should be 25 years or more.
Naturally, introducing such a line indoors is unacceptable. If you follow established rules, laying electrical wires with current-carrying parts made of aluminum over highly flammable structural elements at home is strictly prohibited. Therefore, only copper conductors can be laid in wooden buildings.
The electrical cable connection must be carried out with outside Houses. For this purpose, special compresses are used, thanks to which quality contact is ensured, which does not subsequently oxidize and does not spark. Electrical wiring sections passing through wooden walls or ceilings between floors must be enclosed in metal sleeves. This additional precaution achieves the following goals:
- the electrical cable will be protected from mechanical damage caused by displacement of the house structure due to shrinkage or vibration of the soil;
- metal is a fire-resistant material that will reliably protect the wooden surface from ignition in a short circuit situation, leading to heating and further fire of the electrical wiring;
- electrical wiring in hard-to-reach and inconspicuous places will be reliably protected from small pests - rats and mice.
If we consider the thickness of the pipe walls, then it is regulated by the current rules. If it is necessary to lay wires whose cross-section does not exceed 4 mm, a pipe with walls of 2.8 mm is installed, and if a more powerful cable is used, thick-walled protection up to 10 mm is used. This will not allow the metal sleeve to burn out in case of short circuit. This rule applies to all areas of electrical wiring in a wooden house.
Laying wires from the entrance to the house to the electrical panel
 Another important section of the electrical wiring of wooden houses is the gap from the input to the intra-house distribution panel electrical system. A particular specificity of this section is the vulnerability of the latter from overload using automatic machines. And given the fact that it is laid in the attic or utility room, then the risk of fire in the event of a short circuit increases greatly, since it is not worth relying on the automatic protection of the substation. Therefore, two radical methods are used to solve the problem.
- The entire length of the cable is enclosed in a metal pipe, with parameters corresponding to the established rules. But this method is applicable over short periods of the electrical network up to 3 m long.
- A more acceptable method is to install the machine, placed in a sealed box right before entering the line into a wooden room. The response threshold of such a device should be a level higher than the main machine located in the switchgear.
Another solution to the problem is to place the machines and electric meter on the external wall outside the wooden house in a separate protected box. Naturally, this option is the most reliable, although inconvenient for property owners.
Installation of distribution boards
The electrical cable entering a wooden house directly, without additional branches, enters the distribution panel, which consists of the following elements:
- a box made of plastic or metal with places for placing the device, monitoring electricity consumption and automatic protective devices;
- electric meter with appropriate sealing;
- two-pole or three-pole automatic device protection of the main input cable;
- circuit breakers for indoor electrical wiring in a wooden house;
- It is very convenient if garage and yard lighting, as well as power supply for utility rooms, are allocated to a separate area.
The calculation of the machine’s power for each individual zone is carried out individually. The basic rule that guides this is protection triggers when an overload occurs on a weak section of in-house wiring. At the same time, the optimally selected nominal value ensures maximum safety. You should not get carried away with savings when purchasing hardware for the distribution system, since the safety of people depends on it.
Open wiring in a wooden house
 If we consider methods of wiring in a wooden house, then the safest option is the open option of laying wires. Plus, such work will cost the homeowner much less. Electrical cables are laid along internal walls and the ceiling of the room. For aesthetic camouflage of wires they can be decorated in retro style or put in decorative box made of plastic.
The electrical cable is laid in a self-extinguishing channel. At the same time, in construction stores you can find a product that matches the color in accordance with the general style of the building. This box is popular in log houses and buildings covered with wooden clapboards with smooth wall surfaces.
Using braided cables will give electrical wiring an aged, retro look. The wires resemble twisted cords attached to a wooden wall through a ceramic insulator. This method is considered quite safe for the simple reason that The cable has high-quality double insulation and does not come into direct contact with wooden surfaces. Plus, this type of wire will emphasize the overall stylization of the building.
Hidden electrical wiring in a wooden house
 If we consider hidden electrical wiring in a wooden house, then its installation is very labor-intensive and, if it is necessary to modernize or repair electrical cables, it makes the procedure expensive and inconvenient. But despite this, most owners of wooden country houses They prefer the hidden method of installing electrical cables.
Homeowners of wooden buildings do not want to spoil appearance finishing the house with distribution boards and wires. The installation of hidden electrical wiring begins at the design stage of the building. In this case, for safety reasons, the wires are placed in a metal or galvanized pipe, which must be painted. To lift the cable to the socket or switch, a special fire-proof hole is installed.
Installation of electrical networks in wooden buildings in a hidden way should only be carried out in accordance with the rules and regulations for electrical installation work and using special materials to ensure fire protection. Cables running in the floors of a building must be placed in a metal sleeve or pipe made of non-flammable plastic.
Also hidden way wiring can be placed in grounded metal pipes. Log buildings often shrink, which must be taken into account to ensure that the logs are not exposed to wires or metal sleeves. To route cables through walls, special metal sleeves are used. But due to the fact that it is open and closed ways Laying wires in a wooden house has its own advantages and disadvantages, so most often they are combined.
Features of installation of electrical appliances
 After studying the layout of electrical wires in a wooden building and marking the cable lines you can proceed to the installation of electrical distribution devices
– sockets, lamps and switches. In this case, the fastening of all electrical components should be carried out only on a pre-prepared metal platform fixed to wooden surface. Only thanks metal protection it is possible to ensure the proper level of fire safety in a wooden house. This rule also applies to distribution boxes.
After studying the layout of electrical wires in a wooden building and marking the cable lines you can proceed to the installation of electrical distribution devices
– sockets, lamps and switches. In this case, the fastening of all electrical components should be carried out only on a pre-prepared metal platform fixed to wooden surface. Only thanks metal protection it is possible to ensure the proper level of fire safety in a wooden house. This rule also applies to distribution boxes.
A problem for many fans self-repair When installing electrical wiring, failure to comply with fire safety standards and requirements in wooden buildings occurs. In no case You cannot use standard wires and electrical devices , as this is contrary to safety regulations.
The installation of electrical wiring in wooden buildings should be carried out only taking into account all recommendations, which will ensure the durability and efficiency of the work performed, as well as the safety of all residents of the house.
When developing an electrical wiring diagram for a log or timber cottage, one has to face many limitations and difficulties. To do it correctly, it is necessary to comply with a lot of SNiPs and PUE standards. Wiring in a wooden house must be absolutely safe from both an electrical and fire point of view. No matter what you treat wood with, it still remains a flammable material. Therefore, the installation of electrical wires in a building made from it should be done with the utmost care and in compliance with the relevant rules.
Basic requirements for wiring in a wooden house
All wooden private houses are characterized by an increased fire hazard. The requirements for installing electrical wiring in them differ from those that apply to buildings made of brick or concrete. It is not for nothing that problems in the home electrical network are one of the main causes of fires in wooden cottages.
When designing electrical wiring in a wooden house, it is better to relegate issues of interior aesthetics to the background, or even the third plan. The top priority here should be safety and once again safety. It is necessary, on the one hand, to minimize the likelihood of short circuits and heating of the wires, and on the other hand, to create a non-flammable barrier between the tree and potential sparks.
If you approach the design creatively, you can include interesting external electrical wiring into the interior
There are a lot of SNiPs and GOSTs that regulate the creation of an internal electrical network in a wooden building. But the main document is the PUE (Electrical Installation Rules). In the latest reaction, it was seriously tightened in the issue of organizing electrical wiring in rooms whose walls were built from wood. Therefore, if, when studying the norms, a conflict is revealed between different documents, then it is necessary to focus on the PUE.
Options for laying electrical wiring in a wooden house
You can install electrical wires in a wooden house:
- open method;
- using hidden technology (inside the walls);
- with laying in special cable channels.
You can use VVG or PVS cables with the prefix “ng”. Only they have insulation that is not prone to the spread of fire. Other cable products in in this case worth avoiding.
In cable channels
Not all professional electricians now recommend using cable ducts in wooden houses. The wiring in them is not visible and does not spoil the interior with its appearance.
However, for electricity supply lines, ordinary plastic boxes and baseboards cannot be installed along wooden walls. They are too flammable and everything is heading towards the fact that this method will be completely prohibited by regulations. If you choose cable channels, then only special non-flammable ones.

It is easiest to lay electrical wiring in cable ducts; you just need to select the right elements
Outdoor
The external option involves laying wiring in a wooden house along the walls on ceramic insulators. Typically, a double-braided twisted cable is used for this. And everything in the end looks quite beautiful both in the photo and in reality.
However, there must be a distance of at least 10 mm between the wire and the wall of the house. Otherwise, an asbestos or iron gasket should be placed between them. But this will definitely not look elegant. This type of installation should only be used in utility rooms, for living rooms he doesn't fit.

External electrical wiring looks beautiful, but in residential areas, especially if there are small children, it is better not to use
Hidden
Hidden electrical wiring in a wooden house is allowed only in metal pipes(copper or steel). The use of corrugations and any plastic channels is prohibited here. They are not able to completely stop the spread of fire. And in log or timber walls, even the slightest spark inside can lead to their ignition.
This option is difficult to do with your own hands and expensive. But the wires will definitely not be visible; they will all be laid inside the partitions and ceilings.

It is better to entrust the installation of hidden electrical wiring to specialists. A mistake can be very costly
Wiring installation
Installation of internal electrical wiring in a wooden house is carried out in seven stages:
- Marking on the walls of wiring lines and installation locations for sockets, switches, junction boxes, etc.
- Drilling holes for electrical installations and cable channels.
- Assembling an input panel with protection and an electric meter.
- Laying and connecting electrical wires using terminals or soldering (welding).
- Connecting switches and sockets.
- Checking the insulation resistance.
- General check of the system for short circuits.
Given step-by-step instruction is standard and does not depend on the material of the walls and the individual characteristics of the electrical wiring diagram being created in a private house. However, wooden cottages have their own nuances:
The first is all the passages of electrical cables through wooden external walls, partitions and ceilings are made only using metal sleeves (tubes). Even if cable ducts and ceramic insulators are used for surface installation, electrical wiring must pass through wood only with additional protection made of metal.

Sleeves for laying electrical wiring in different rooms
Second, it is recommended to avoid twisting the cores during connection. Such places are the most problematic in terms of safety and most often heat up. In a house made of logs or timber, the best and most reliable option for connecting wires will be a terminal one. You can also solder or weld them, but this is more difficult and takes longer.

Terminal connection of wires in the junction box
Third - if the electrical wiring is laid under the decor or suspended ceiling, then it must be mounted in metal pipes. Open laying is allowed only in uncovered places where the wires remain visible.

Wiring under suspended ceiling better to hide in cable channels
There is nothing particularly complicated. The main thing is to have skills in handling a screwdriver, drill and pliers. And then, in terms of complexity, independent electrical installation in your home is approximately the same as cleaning a chimney or building a heated greenhouse yourself without the involvement of hired workers.
Network connection and commissioning
After connecting the wiring, panel and sockets into a single network, it must be checked. For each line, an insulation resistance test must be carried out to ensure that the insulation resistance complies with the standards. Even a seemingly normal cable may have damage to the insulating braid that is invisible to the eye.
Without resistance testing to identify problem areas impossible in the home's electrical network. This work should be delegated to a professional electrician. It is worth doing it yourself only if you have the appropriate electrical knowledge and equipment.
A specialist should also be entrusted with the calculations of the cross-section of the cores and the RCD, and then invite a professional to perform a general check of the assembled electrical network before putting it into operation. There is no point in taking risks and experimenting with electricity.

Inputting electricity into the house
The wiring itself in a wooden house can be installed independently. However, the preparation of a proper electrical design and final inspection should be left to a competent electrician.
Connection to the general village network is made by electricians of the sales organization. They will once again check whether everything complies with the standards and technical conditions, and only then connect the cottage to the power supply. And here there is one point - if they discover that the in-house electrical network was assembled in violation of the rules, they will simply refuse the connection. Everything should be ready from the beginning for their arrival.

Options for connecting SIP to the intra-house network
Safety measures for a wooden house
Among the main errors in home electrical wiring in a wooden cottage are:
- poor-quality connection of the cores (such contacts then begin to heat up);
- using copper and aluminum wires simultaneously (connecting them directly is strictly prohibited);
- non-use of metal sleeves and junction boxes;
- use of cables that do not meet the requirements;
- incorrect selection of core cross-sections and parameters of protective devices;
- use of plastic corrugation when laying wires in wooden walls and for the decor.
Any of these mistakes leads to an increased risk of a fire in the cottage.

The use of plastic sleeves is prohibited
If there is even the slightest doubt about your own skills and knowledge, then electrical installation should be entrusted to a professional. WITH general construction everything is a little simpler.
For example, there are step-by-step instructions for arranging a pile foundation with your own hands in the form of bored piles. It is enough to follow it and the foundation will be reliable. With electrical wiring, everything is somewhat more complicated.
When performing electrical installation work, you should also not forget about basic safety measures for their implementation. All tools used must have rubber-insulated handles, and the electrical network must be de-energized.
Conclusion
The owner himself can easily install the electrical network in the cottage. You just need to clearly understand that electrical wiring in a wooden house is not some nonsense. To properly design and assemble it, you must have the proper qualifications and certain experience. The slightest omissions will later lead to serious problems. To the arrangement of this intra-house engineering system it is important to approach it seriously.
See also a video about errors when laying electrical wiring in a wooden house
Read about our other materials:

Major repairs or construction of a country house or country house, the construction of service outbuildings is usually completed with electrical supply and interior finishing. Do-it-yourself electrical wiring in a wooden house requires special attention, as well as compliance with a number of special instructions, standards and requirements. This is due, firstly, to the rules fire safety electrical installation in wooden houses and, secondly, the low thermal conductivity of wood and its hygroscopicity.
The installation of electrical appliances and electrical wires in a wooden structure has a number of features that must be taken into account during construction or repair. Electrical wiring in a wooden house, installation and fastening rules electrical outlets, automatic switches, electric energy meters have a number of differences compared to the electrical equipment of a brick house.

Correctly installed electrical wiring in a wooden house with your own hands will help ensure trouble-free operation of the power supply system at home or cottage.
Step-by-step instructions for performing the work include a number of mandatory actions:
- determining the type of power supply - overhead line or underground cable;
- production of a power supply diagram for the premises, taking into account the power of all consumer electrical appliances;
- layout plan for the electrical panel, circuit breakers, electric meter;
- marking the location of lighting devices, stationary electrical appliances and electric heaters;
- determining the location and number of electrical sockets and switches. Layout plan for the electrical cable to each connection point, indicating the length and required cross-section of the electrical wire.

Drawing up a diagram and power supply plan
When drawing up a power supply diagram and an electrical cable installation plan, the following must be taken into account:
- The distribution panel with an electric meter and circuit breakers should be installed close to front door at a height of about 1.5 m. This is due to ease of access to the panel and safety conditions.
- An input safety circuit breaker is installed in front of the electric meter.
- For each group of consumers, a separate circuit breaker is installed to protect against overloads.

The optimal height for lighting switches is 1.5 m; they must be located in the entrance area on the side door lock or door handles. Electrical sockets are placed, as a rule, at a height of 0.8 - 1 m above the floor level; their number and location are determined by the number of electrical appliances used. When drawing up a plan for the location of sockets and switches, you should also take into account the arrangement of furniture so that pieces of furniture do not block access to them.
Do-it-yourself wiring in a wooden house imposes increased demands on the electrical cables used in the work. For wooden buildings, it is necessary to use only a cable with a copper core, double or triple insulation made of non-flammable material, as well as the section corresponding to the load.

The diagram and layout of electrical appliances will allow you to calculate the total required amount of electrical cable and auxiliary elements. These include distribution boxes, connecting blocks, sockets and switches. After purchase necessary materials Electrical wiring in a wooden house can be installed quite simply and quickly.
Various installation methods
Electrical wiring in a wooden house (see photo) can be installed in various ways:
- external wiring on brackets or porcelain insulators;
- hidden wiring in cable channels;
- laying hidden cable in a hose or pipe;
- wiring in the cable plinth.
External or open wiring in a wooden house of an electrical cable using fastening brackets or porcelain insulators is one of the simplest and available ways installation The disadvantages of external wiring include:
- unaesthetic appearance;
- danger of damage to exposed cable;
- possibility of damage to junction boxes.
Most often, external installation of electrical wiring on mounting brackets is used for service and auxiliary premises, as well as for installation of power supply to outbuildings. Fastening wires on porcelain insulators is used like retro wiring in a wooden house when decorating a home in an antique style. More labor-intensive, but the most aesthetic and reliable is hidden wiring in a wooden house. This type of installation includes laying wires in special cable channels fixed to the wall surface. They are easy to attach, have an aesthetic appearance, and you can also purchase channels that have the color and texture of wood. Such products look very good on walls made of timber, logs or boards. Hidden cable routing also includes wiring in the electrical baseboard. This plinth is made of plastic and has compartments for fastening power or signal cables. To route the cable from the baseboard to the socket or switch, use either cable channels or laying between the load-bearing wall and the decorative finishing panel. Laying the cable in a metal hose or plastic corrugated protective pipe is used for hidden power distribution. It is produced in the space between the load-bearing wooden wall and the decorative wall panel. Installation of the house's power supply begins from the main circuit breaker and the input panel according to a pre-drawn diagram and layout plan for consumer electrical appliances. The entire installation is divided into separate sections, each of which is equipped with its own marked circuit breaker. Separate installation sections can be divided into various rooms, outbuildings, street lighting, individual high-power electrical appliances, etc.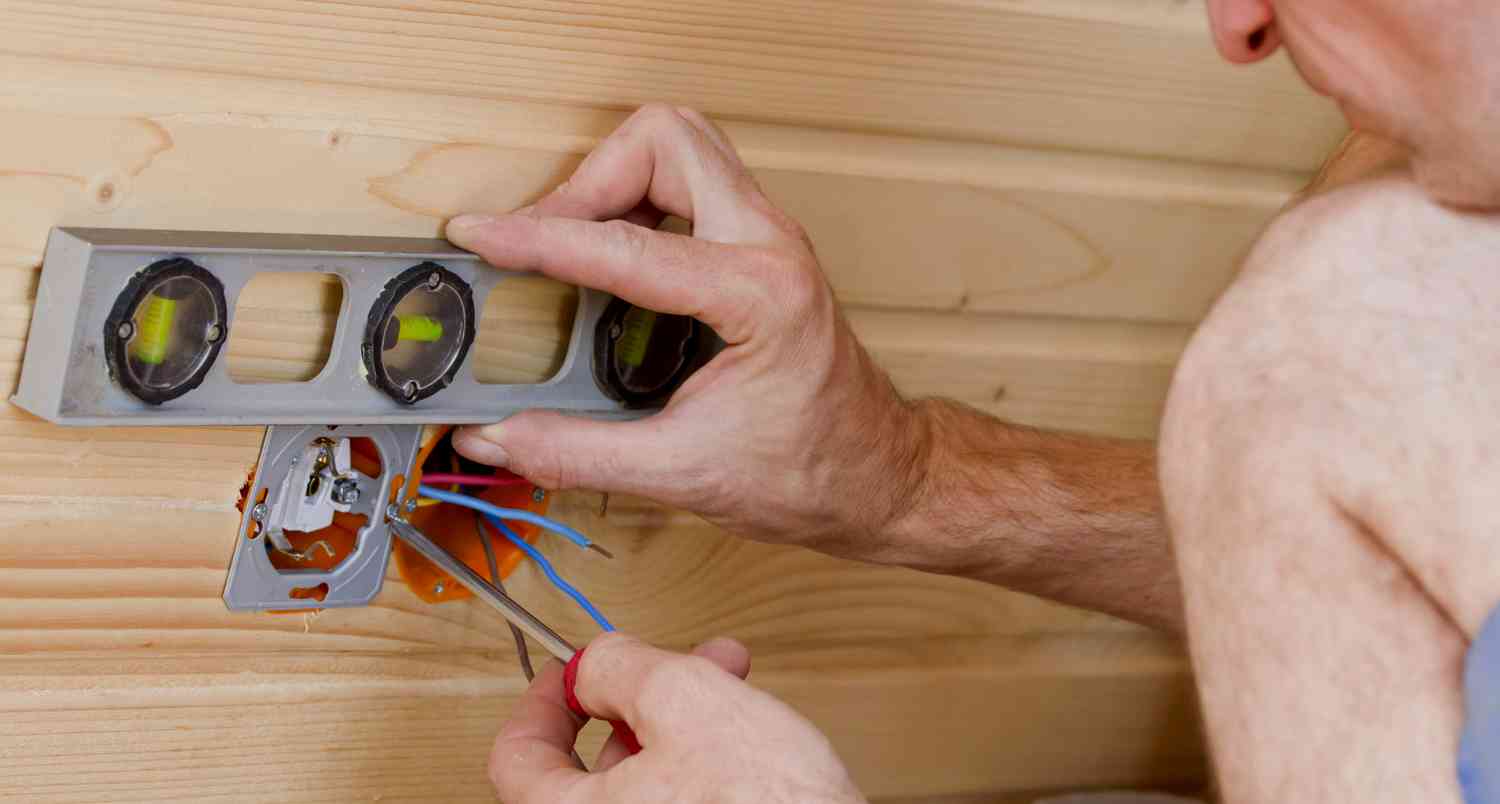
Hidden wiring in a wooden house
Electrical wiring installation procedure


