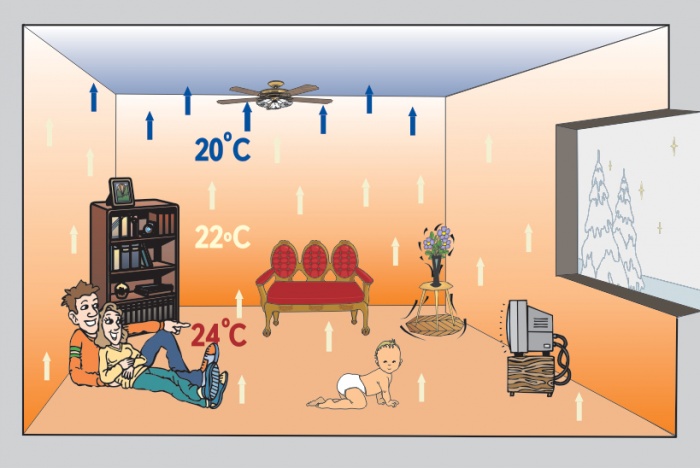
According to experts, the “warm floor” system can effectively heat a room of any size and area, even in harsh winter conditions. It is noted high level comfort: it is always warm on the floor, and at a height of about 1.5 meters the temperature is slightly lower. With this thermal regime, a person’s well-being improves significantly. Convection processes cover the entire volume of the room, so maintaining a comfortable microclimate is much easier.
Disadvantages of water heated floors
Floor heating warm water has been used for quite a long time, but this method was not popular, since the service life of metal pipes is not very long. The main disadvantage of water floors is considered to be complex, almost impossible repairs. The masters reluctantly poured metal pipes screed, since they quickly collapsed, and dismantling the concrete screed was difficult and expensive.
As a result, the use of the system did not become widespread. However construction market developed, and metal-plastic pipes appeared, which are characterized high quality and good flexibility. Therefore, water heated floors began to be used, first in parallel with radiators, and then instead of them. With the advent of cross-linked polyethylene pipes on the market, water-heated floors began to gain popularity, as the material was distinguished by high quality characteristics and relatively low cost.

Another disadvantage is the large height of the entire pie, in most cases it is about 10 cm. For rooms with low ceilings, this fact is of great importance.
Among the disadvantages of this heating method are also greater inertia. For heating floors and rooms up to comfortable temperature requires a lot of time and heat. Therefore, it is better to use water heated floors in places of permanent residence, rather than temporary visits.
Features of connecting underfloor heating to central heating
In apartments of multi-storey buildings, water heated floor systems are connected to the central heating riser. To do this, the housing maintenance organization must give special permission. However, it is not always possible to obtain such permission. Most often, such documents are provided without any problems for apartments in newly built buildings; they provide a separate riser for connecting the “warm floor” system.
In apartments of old houses, installing heated floors can be problematic. The fact is that in such houses in most cases it is installed single pipe system heating. When connecting underfloor heating from the riser, a large amount of heat will be consumed, as a result, the radiators of apartments located on the floors below will be constantly cold. Therefore, permission to connect a heated floor to a central heating system can be issued to the owners of apartments on the first floor of the building.

The question of how to make a warm floor from heating can be solved by connecting a warm water floor to the boiler. Such a system requires large financial costs for the installation of special equipment, but during operation the costs become significantly lower. Another option is to install an electric heated floor. This option has significant advantage: if a single section fails, the entire system continues to function.
When issuing permission to connect a heated floor, the Housing Office may require the installation of a heat meter. You should agree to this without a doubt, since with good thermal insulation you have to pay much less on the meter.
The process of installing a water heated floor
The first step in solving the problem of how to make heated floors from water heating is drawing up a project. It is necessary to draw a floor plan indicating the sizes of individual rooms and the location of risers. A collector unit should be placed near the riser to which the connection will be made. On one side, central heating is connected to this device, and on the other, pipes of the “warm floor” system. The collector unit has a temperature sensor that allows you to control the heating of the coolant. The device may also have a valve or valve that sets a certain temperature for each circuit.
A water heated floor system requires mandatory mixing of hot water from the supply pipe with cold water from the return pipe. This occurs in the manifold assembly, which is also called the mixing assembly. This is explained by the fact that sometimes the supply temperature can be quite high, at which it is not entirely comfortable to be on the floor. Device in mixing unit, which controls the temperature of the coolant, gives a signal about the need to add cold water.

For flawless and efficient work A water heated floor system requires the installation of a circulation pump. It is designed to provide a certain speed of water along the contour of the heated floor.
The next step is to select the type of pipes for the water-based floor heating system. For this purpose, pipes made of metal-plastic or cross-linked polyethylene are used. However, recently there has been a popularity of corrugated stainless steel pipes. This material is characterized by flexibility, reliability and relatively low cost, lower than the price of metal-plastic products. In addition, the pipes have a long service life and are not yet counterfeit. The only drawback corrugated pipe can be called high resistance to coolant flow due to the ribbed surface.
It is also important to decide on the method of laying the water circuit pipes. Two methods are considered popular: “snail” and “snake”. It is easier to lay pipes with a snake, but the snail heats the floor surface more evenly, and there is no alternation of warm and cold zones.

The diameter of the pipes for water heated floors and their length are no less important. In most cases, a pipe with a cross-section of 16 mm is used, as for the length of the circuit, here the standard of 4-5 meters for heating one square area is taken as a basis.
Pipes should be laid according to a previously drawn up scheme, otherwise nothing may work out. Even a simple snake is quite difficult to lay on small area, where there are no more than three contours. In this case, the length of each circuit is about 30 m, and both ends must be connected to the collector unit.
Installation of a "warm floor" heating system
Many homeowners are interested in the question of how to properly make underfloor heating. To solve it, it is enough to carry out all the activities sequentially.
If work is carried out in old apartment, then the first step should be to dismantle the floor coverings. WITH wooden floors Most often, no problems arise, but you will have to tinker with the tiles in the kitchen and bathroom for some time. In any case, the coating must be removed.

The next step is to level the surface. Normal operation The system is only possible on a flat floor; with significant differences in height, stagnation of the coolant may occur. If the unevenness is small, then a layer of cement mortar can be applied to the surface. On a flat floor, any holes or cracks should be repaired. Coarse sand applied to the thin layer, it must be well leveled.
The continuation of the work is the sticker damper tape around the entire perimeter of the room. In this case, one part should be attached to the wall, and the second to the floor. On smooth surfaces The tape is glued and nailed to the rough one with dowels. The damper tape will protect the heated floor screed from cracking in the event of thermal expansion.
The most crucial moment when installing a heated floor from central heating with your own hands is considered to be insulation of the surface. The most popular thermal insulation material in this case can be called foil foamed polyethylene or extruded polystyrene foam. To facilitate the installation process, some types of insulation are equipped with special guides, but in this case only a metal-plastic pipe is used as a heating element.
Thermal insulation material must be laid tightly to prevent the formation of cold bridges that contribute to heat loss. Therefore, the joints of slabs or rolls of insulation are taped with metallized tape.

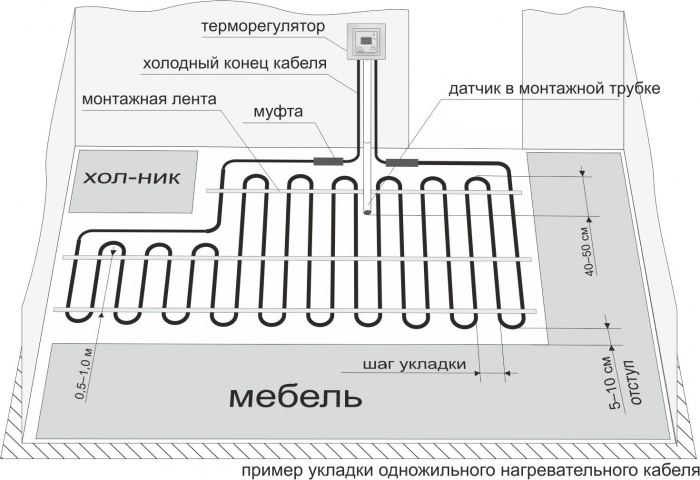
Special grids with cells are laid on top of the thermal insulation; pipes will be attached to them using plastic clamps or binding wire. during the installation process, they adhere to a certain step between two adjacent pipes in the circuit. Moreover, this value depends on the climate in the region and the requirements for room temperature:
- In the southern regions, the distance between pipes is recommended to be about 0.3 meters.
- IN middle lane For Russia, it is enough to arrange the turns in increments of 0.15 meters.
- In rooms where high air temperatures are required, pipes are laid at a distance of 0.15 meters.
- In the central part of the room, a gap of 0.2 meters can be maintained.
- They try not to lay pipes under furniture, but if necessary, the laying step can be 0.3 meters.
- Areas of the room near external poorly insulated walls, near doors and window openings requires more frequent pipe laying, in this case the step can be 0.1 meters.

The ends of the laid pipes are brought out to the collector unit, connected to the corresponding pipes and fixed using special clamps. The system is filled with water and left for a while. In order for the testing of heated floors from steam heating to be more effective, and all defects to become obvious, it is necessary to supply coolant under high pressure and with a temperature of about 50 degrees. If there are no problem areas, you can fill in the finishing concrete screed.

Work at this stage is carried out with the circuit filled. First of all, the beacons are placed at a height of 5-6 cm from the pipes; this is exactly the layer of concrete that should be on top of the heating element of the water heated floor. Next, start pouring. concrete mortar. It is best to use M200 grade composition with fine-grained filler for this purpose. The poured screed is leveled using the rule. The entire structure must stand for at least 4 weeks for the concrete to gain the required strength. After this time, the finishing floor covering is laid and the room is prepared for use.
Connecting a heated floor from a heating boiler
In the case where it is not possible to connect warm water floors with your own hands from a central heating battery, you can purchase a heating boiler. Such a device is quite expensive, but makes it possible to create an individual heating system. This option turns out to be more profitable during operation, even with the most expensive fuel.
Installation work on arranging a warm water floor from the boiler is carried out according to the same scheme as in the case of central heating. The sequence of actions is also preserved, except that the collector is connected not to the riser, but to the heating boiler.

Connecting the “warm floor” system to the boiler cannot be called difficult; the work can be done House master without the involvement of professionals. A safety group is installed on the supply pipe and the pipe is brought from the boiler to the collector unit, to which the water circuit is already connected. An expansion tank and a pump are mounted on the return pipe. forced circulation coolant.
The water heated floor in the apartment can be connected to central heating or a boiler. Each option has its own pros and cons. The efficiency of underfloor heating from central heating is determined by the operation of the boiler room; the costs in this case are quite high. A heating boiler and its installation are expensive, but further heating payments are significantly reduced.
Warm floors have become available to every home owner; such floors are especially relevant in private properties. It's nice to feel the warming warmth on your feet on a cold winter evening. And how great it is when a baby, who has just learned to crawl or is trying to walk, can stay on the floor for hours without the risk of catching a cold.
It is useful for every man who has his hands and head in place to know how to properly make a water-heated floor with his own hands, and our instructions with video will help with this.
In favor underfloor heating The following other points count:
- savings during operation up to 45%;
- the ability to avoid installing radiators, which allows for better use of room space;
- The finishing coating is suitable from any material;
- the air warms up more evenly, there are no drafts;
- The comfort of being in a space heated by thermal radiation is much higher than with radiator heating.
However, there are also disadvantages, which include pressure drop in the heating system due to the coolant being diverted to underfloor heating, as well as the inability to quickly find and repair a leak in the event of an accident.
In any case, the main argument in favor of underfloor heating is opportunity to improve living comfort with significant cost savings.
Design and main features of the installation
The principle of constructing a water-heated floor is as follows: pipelines are connected to the heating boiler or central heating system, through which hot water is supplied to a system of pipes laid in spirals along the ceilings, and the challenge given thermal energy water is supplied through the return pipeline back to the heating system.
Work should be performed in the following sequence:

- surface leveling, waterproofing (protection against leaks), thermal insulation, laying reinforcing mesh over a layer of foil;
- laying pipes using one of the methods (snake or spiral);
- arrangement of distribution units;
- connection to the boiler or heating system of pipes for hot water supply and return pipeline;
- pressure testing and installation of shut-off valves;
- system testing;
- pouring pipes into rooms with mortar (concrete) or laying them with boards;
- installation of a clean floor covering.
You should start laying a water heated floor with your own hands by installing a screed that levels the surface of the base horizontally. Further be sure to provide a waterproofing layer to prevent soaking of the underlying rooms in case of pipe damage and water leakage from the system.
Polyethylene film or special waterproofing materials can be used as protection against moisture.
The thermal insulation layer needs to be given special attention. In the basement or first floor, heat loss constitutes a significant proportion, therefore the thickness of the heat-insulating layer should be at least 20-25 cm. On the second and higher floors, a layer 50 mm thick is sufficient.
The following can serve as insulation:
- expanded polystyrene;
- mineral wool;
- glass wool;
- technical plug;
- basalt slabs, etc.
 Available at retail outlets special insulation with recesses for laying pipes, these plates will help reduce operating time and reduce labor costs.
Insulation Be sure to cover with a layer of foil, which serves as a heat reflector and increases heat transfer. It is advisable to take a serious approach to reinforcing the base for pipes, since in a year or two the insulation will bend in places, or even completely crumble, and all the work will go down the drain.
The screed is poured with a thickness of 50-60 mm, material - mortar grades 100-150 or cast concrete M-300, but certainly with the addition of plasticizers, which prevents cracking.
When heated, the mass of the screed will expand, and to avoid cracks it is necessary to expansion joint; most convenient for this leave a gap of 1-1.5 cm around the perimeter, which should be filled with elastic material. Instead, before starting work, it is recommended to glue damper tape around the perimeter.
A niche in the wall is knocked out with dimensions of approximately 60x40x10 cm, depending on the number of pipelines that will be located there. There are ready-made boxes on sale, specially designed for such cases, with a set of everything necessary.
Selection of coating, pipes and other materials
You should choose a coating depending on the purpose of the premises: in the bathroom, toilet and laundry room, ceramic tiles are preferable; in the hallway - linoleum; in the living room, laminate would be a good choice; for the bedroom and kitchen, you can choose any of the materials according to the hostess’ preference.
By technical specifications any floor covering is suitable, and the screed that has gained strength will be an excellent basis for a final coating.
 The situation is somewhat different; you should choose durable, light and elastic materials. This polypropylene or cross-linked polyethylene.
When choosing polypropylene you need to pay attention to pipes,, then the high degree of expansion of this material when heated is not terrible.
Polyethylene pipes have significantly lower coefficient of linear expansion, for this reason, many experts prefer to choose them.
Pipes are sold in coils or coils; with this form of release, they are conveniently laid out on floor surfaces. Diameters are usually used in the range of 16-20 mm, and there are two more conditions for their suitability: the ability to withstand a water temperature of 95 °C and a water pressure of 10B.
ABOUT comparative characteristics Read about cast iron heating radiators.
Calculation and distribution of pipes
Apply pipes with diameters 16, 20 or 25 mm. Using a pipe with a smaller diameter will result in impaired water circulation. By measuring the pressure in the heating pipe using a hydromanometer, you can find out the pressure in the system.
Too large a diameter of pipes for laying in a floor pie will lead to decrease in operating pressure and temperature drop.
Another characteristic of the material is its need, for which the length is calculated. Pipes can be laid in one of the following ways: snake or spiral (snail). DIY installation diagrams for a heated water floor look like this:

In the first case, significant differences in temperature are possible in certain areas of the area, the spiral gives better heat distribution. This layout method involves alternating direct and reverse supply of coolant.
On a sheet of graph paper or a squared notebook you should draw a sketch of the room on a scale of 1:50 or 1:100 and draw pipe routes, and the beginning should be at the riser closest to the window. The first row is laid 25 cm from the walls.
The pipe pitch is taken to be 25-50 cm(25 cm – with a diameter of 16 mm, 30-40 cm – with Ф20 mm, 40-50 cm – with Ф25 mm).
The length is measured on the sketch, a conversion factor is applied to the scale and the required size is obtained. To connect to the riser you should add 2-2.5 meters.
For each circuit, you need to buy pipe footage in one piece, since joining is unacceptable. One collector is made for several rooms, or for the entire floor.
Selecting and connecting the collector and boiler
When it is clear how many circuits will be connected to the collector, you can begin to select its length and decide on the number of valves, but also take into account that in order to be able to regulate the mode warm covering you will need a pressure sensor, air vents, drains.
 The manifold with its lower pipe must be located at the same level as the supply pipeline, slightly above floor level.
There are specially developed plumbing standards for the assembly of this unit. It is best to hide the collector in a niche in the wall, approximately in the middle in relation to all contours.
The boiler is selected based on its power sufficient to heat water, plus a certain power reserve. Determine the total power required as follows: 20% should be added to the sum of the circuit powers for reserve.
For greater system efficiency, it is advisable to install circulation pump, in most boiler models the pump is already included in the kit, capable of provide hot water one-two-story house with an area of 120-140 m2. For large areas, additional pumps are needed.
Pipe and coating technology
For fixing pipes, excellent devices - plastic tracks, representing combs. They are used as guides, and for more reliable fastening, special tightening elements are also used.
It must be remembered that the pipe must maintain its integrity, therefore sharp bends leading to the appearance of creases are unacceptable(For plastic pipes The bending radius can be at least 5-8 diameters). If the path to the collector passes through a partition or through a wall, then holes must be drilled.
The procedure and technology for installing a water heated floor with your own hands is presented in this video:
After finishing laying the pipes and connecting them to the collector, installing the boiler and all plumbing work, filling with mortar or concrete is unacceptable without conducting a hydraulic test of the system operation.
The pipes are filled with water, the pressure is raised to a level of 6 B and maintained for 24 hours. If everything is in order and there are no fistulas or breaks, then they are filled with cast mortar or concrete.
When screeding, pipes must be filled with water and under pressure, this is necessary to avoid crushing and squeezing of the pipes.
 For ceramic floors, the screed is made thicker, from 30 to 50 mm, for laminate and linoleum - no more than 30 mm, with one more gasket plastic mesh. Thus, the thickness of the cake will allow the coating to warm up quickly.
Making water floors with your own hands is quite possible, but for a truly long-term service of underfloor heating, a project or at least It is better to order sketches and calculations from a heating engineer, who will take into account all the fittings, equipment, materials down to the smallest detail and fulfill the specification.
Doing such serious work yourself will save significant money and increase the owner’s self-esteem.
One of the most pressing issues in winter time is heating. Dozens and even hundreds of different solutions and methods for installing systems have already been developed. Some people continue to use the stove heating method due to the availability of fuel, others have switched to solar collectors because they live in an area where there are enough sunny days. Most families have installed gas boilers and speakers that provide warmth in cold weather. Those who have hot water supplied centrally are wondering how to connect a water heated floor from central heating.
Implementation options
Warm floors can hardly be called a new product on the market. But the structure and approach to installing heated floors continues to improve and from year to year it receives more and more new solutions that amaze with their efficiency and ease of installation. In total, two types of heated floors can be distinguished based on the power source:
- heated floor powered by 220 V;
- heated floor with circulating liquid.
The electric version of the heated floor is available in two versions:
- heating cable;
- infrared film.
Each of them has its own nuances, except strengths. They are much easier to install and maintain than water heated floors, which also have several heating methods:
- solar collector;
- electric boiler;
- closed circuit with its own heating;
- from a gas boiler;
- from central heating.
Thanks to the use solar collector heating charges will be zero. All costs will go towards installing the main equipment. But if you live in areas where there are a lot of sunny days even in winter, then why not use this option. Remember that the manifold must be vacuum, and the circulating fluid must be antifreeze so that it does not freeze at night. It is also necessary to make a switchable circuit and backup source for the night. An electric boiler can be installed both for underfloor heating and for all heating. An example of a closed circuit underfloor heating is the “ Daewoo X-L Pipe". There is no need for any heating elements. Everything is already built into the tubes. It is enough to lay them down and connect to electricity. What should you consider before deciding to install a water-heated floor?

Is it really that good
Warmth from heating devices spreads throughout the room by convection. Its essence lies in the fact that air, the temperature of which has been increased, rises. Along the way, part of it dissipates, it cools down and, under its own weight, sinks to the floor. This means that the higher radiators or other products are raised, the more useless they become. It's another matter if you lower them to the floor. Water heated floors have the following advantages:
- warming up the entire area;
- the heated floor quickly reaches operating temperature;
- the warm floor is silent;
- the heated floor has a low temperature mode;
- big savings;
- Efficiency is higher than that of radiators;
- long period of heat retention;
- heat transfer by radiation;
- Possibility of installation under various coatings;
- expansion of usable space due to the absence of radiators.
Risks are an integral part, so they should also be taken into account in relation to heated floors:
- the costs of materials and installation are significant;
- complexity of the work;
- high complexity of repair work;
- when connecting to central heating, special permits are required;
- increasing the floor level;
- the importance of constant wet cleaning with a disinfectant.
Heated floor pipes are embedded in the screed, which is why it is very problematic to carry out repairs in any area. After all, until the leak is found, the floor covering, as well as the ceiling of the neighbors below, may be damaged. Also, if the coating is laid in a single contour, then dismantling will have to be difficult.
How to connect to central heating
You need to know a few facts about how to make heated floors through water heating and will it work? The total length of pipes that will be located in the floor can exceed 100 meters. While the water passes through the entire circuit, large heat losses will occur and the outlet temperature may be 15-20 ° lower initially. This can be a problem when connecting to a central heating system. In old houses, a single-pipe centralized distribution system is provided. This means that there can be several risers per apartment. One per room. It is designed so that water comes from below and rises to the top, giving the temperature to one radiator in each room of the apartment. With the current it becomes colder. If you connect a heated floor to such a circuit, then the water temperature will be 50° instead of the planned 70-80°. And the higher you go, the worse the situation will become. Therefore, with a single-circuit centralized system, it is unlikely that you will be able to obtain permission to insert an additional heating device.

Note! The administration may make concessions if you live on the top floor and the supply is from below. Then the drop in water temperature will not be so critical.
In houses that are built in compliance with modern standards, the conditions for connecting the heated floor circuit are already included in the design. For these purposes, another one is laid next to the battery riser. It runs through a through pipe through all floors. Its purpose is to connect a heated floor. Usually, if there is one, no special permissions will be required. But it is important to remember that payment for heat in this case will be much higher. There are still some disadvantages from connecting a heated floor system to central heating:
- water quality;
- resistance of pipes to corrosion;
- exceeding the permissible temperature.
The quality of the water in central system heating leaves much to be desired. This is due to the fact that it passes through boiler houses that were built a long time ago. As the current flows, it collects all the growths and waste, which means that it enters the apartment with various impurities. This may result in a blockage of the heated floor circuit. In another case, this can lead to corrosion of the pipes, which requires repairs with the dismantling of the floor covering. Another nuance is exceeding the permissible temperature. Typically, pipes that are developed for laying heated floors are designed to normal work at a temperature of 50-60°. But in order for it to reach the 15th or 20th floor, it must initially be higher, especially if several underfloor heating circuits are installed on each previous floor. Taking this into account, you will need to take care of more expensive conductors or additional equipment with thermostat.

Advice! After analyzing the above points, it is worth thinking about whether the matter is really worth the waste. As an option, it is possible to provide yourself with a separate device that will be responsible for heating the heated floor circuit. Then you can avoid trouble.
Required material
Having decided to acquire heated floors, it is important to know what material and tools will be required to carry out installation work. This will make it possible to approximately calculate the total cost of the project. The list of materials includes:
- insulation;
- collector;
- pipe;
- connecting fittings;
- mixtures for screed;
- facing material;
- fixing equipment;
- waterproofing;
- reinforcing mesh;
- damper tape.
Extruded polystyrene foam is usually used as insulation for such a project. This is due to the fact that it has sufficient strength and density, which prevent its deformation during operation. It also perfectly withstands the effects of moisture that will be present when pouring the screed. It is most convenient to take ready-made sheets with bosses. The latter are small protrusions that make it easier to fix the pipe and give it the required shape.

Under no circumstances are ordinary metal pipes suitable as pipes for heated floors. Although they have excellent heat dissipation, it is simply dangerous to wall such products, and they are easily subject to corrosion. It is worth considering cross-linked polyethylene, metal-plastic pipes or copper pipes. Copper pipes require a special approach when performing installation work. Although they do not corrode as much as iron ones, their cost is very high. Metal-plastic pipes are a pipe whose main shell is several types of plastic. It also has a stabilizing layer of aluminum foil. They have a long service life and good endurance. The inner walls are smooth, so no growths form on them.

Note! In the case when the choice falls precisely on metal-plastic pipe, then it’s worth taking the so-called seamless one. In its design, the metal layer runs in one continuous layer, which increases strength and eliminates the possibility of the seam diverging during bending, which would inevitably lead to leaks.
The best choice for heated floors was and remains a cross-linked polyethylene pipe. Their production method involves processing polyethylene at the molecular level. The structure is so dense that it can withstand physical stress during installation, is elastic and durable. Excellent products from Rehau. When installing metal-plastic and cross-linked polyethylene, you cannot use threaded fittings, only crimp fittings. They are less likely to leak.

Construction film or a special membrane can be used as waterproofing for heated floors. In the case of the latter, when laying it, you should be careful to position it on the required side. Otherwise, moisture will go in the wrong direction. The reinforcing mesh can be taken from ready-made metal or fiberglass. If the pipe is attached to it, then depending on the radius of rotation of the pipe, it will be necessary to have a tap hole of 10 or 15 cm.
Note! Another argument as to why threaded fittings cannot be used for underfloor heating is a reduction in the diameter of the passage. The fact is that the walls of the part that goes into the pipe have a large diameter, so the flow of water slows down.
Calculation work
Making a plan before purchasing heated floor components and installing them will save a significant amount of money. The first thing you need to do is take a piece of paper and draw a plan of the rooms where the outline will be laid. Areas with furniture are applied to it. It is important to note them, because warm floors are not needed under cabinets, beds and sofas. This will not only save your budget, but also extend the life of the furniture. The fact is that during the heating process, the air dries and dries out the objects around it. Wooden crafts They just dry out and fail.
If the premises are residential and there are always people in it, then the pipe will be laid in increments of 10 or 15 cm. For a pipe with a diameter of 16 mm, this means that 10 or 6.7 meters will be required per 1 m2. It is worth remembering that the length of such a pipe in one closed loop should not exceed 100 meters. This is due to pneumohydraulic losses. The consequences will be poor pressure and patency. For a 20 mm pipe, the length of one circuit for a heated floor increases by 20 m. If there is a need to cover large territory, then you will need to lay out several contours. In this case, the difference in length between them should not be more than 15 m. If this is not observed, then significant temperature changes may be observed in certain parts of the room.

Advice! The general formula for roughly determining the amount of underfloor heating pipe is to find the quotient or divide usable area, by the pipe pitch, converted to meters and add the length of the bends, as well as the length of the conductors to the collector. But the final figure should include another 10% of the pipe, which will be insurance.
Based on how much area will be covered, you can already determine the amount of bulk mixtures, insulation and reinforcing base, as well as the finishing coating. Be sure to make a small supply for each group of materials. During the installation of a heated floor, something may be damaged or there may be a gap in the calculations somewhere. In this case, you will not have to spend money on delivery or independent trip for missing components for installing heated floors.
Installation of a wet water floor
Wet installation of heated floors requires pouring a screed. For the whole process you will need the following tool:
- mixer or concrete mixer;
- perforator;
- fastening material for insulation;
- in some cases a jackhammer;
- rule;
- level;
- roulette;
- pipe bender;
- laser level;
- scotch.
To implement water heating in the floor, the first step is to evaluate existing coverage. If it is tile, linoleum, parquet, laminate or other cladding, then it is all dismantled. The next step is to check the quality of the rough screed. Attention should be paid to cracks and chips. If there is a likelihood of further destruction, problem areas are knocked down with a jackhammer or hammer drill. If its quality is satisfactory, the difference in the floor plane is measured. To do this you will need a laser level or a water level. A mark is made on each wall at the same height. Or the measurement is made from the projected line to the floor. The difference between measurements is calculated. If it exceeds 1 cm, then additional leveling will be required before laying the heated floor.

If the difference is up to 3 cm, use self-leveling mixtures. Strictly follow the recommended proportions. If things get really bad, then a new rough screed will be needed. To do this, the old one is completely dismantled. The new one can be made smaller in thickness so as not to overestimate it too much general level floor after laying the warm contour. Before pouring, beacons are set using a level. The latter can be metallic profile or pipes. They are fixed with tile adhesive or mortar. After this, a solution is poured between them and tightened with a rule.
Note! Rough screed must gain full strength before further installation of the heated floor. This may take up to three weeks.
After preparing a flat surface for the heated floor, waterproofing is laid. The width and length of the material may not be enough to cover the entire area. Therefore, you can use several parts of a film or membrane for a warm floor. At the same time, its size should be such that the overlap on the walls is 10 cm higher than the finishing screed of the heated floor. The overlap between the components should be 15 cm. You can connect them together with tape. A damper tape is laid along the entire perimeter of the room along the wall with the same overlap on the walls as the film. It can be secured to the surface with double tape. There are products that immediately come with it.

Note! The presence of a damper tape is required. She represents soft material made of foamed polyethylene. Its function is to compensate for screed vibrations due to temperature changes. The warm floor will constantly warm it up, so it will expand. IN warm period next year everything will be the other way around. If you do not take into account thermal joints for heated floors, then the screed will deform and crack.
Insulation for a warm floor is laid on the finished area. Adjacent sheets should be positioned so that the seams form a bandage. This will eliminate deflections when laying pipes for heated floors and pouring the finishing screed. If it is polystyrene foam with bosses, then this stage is complete. If regular smooth polystyrene foam is used, then another layer of waterproofing is laid on top of it. With the help of umbrellas it is fixed to the rough screed. Next, a reinforcing mesh is laid to which the pipe will be fixed.

Note! The thickness of the insulation for a water floor should not be less than 30 mm, it is better if it is 50 mm. Otherwise, heat loss from the circuit will be significant, especially if there is a basement or arched passage under the floor.
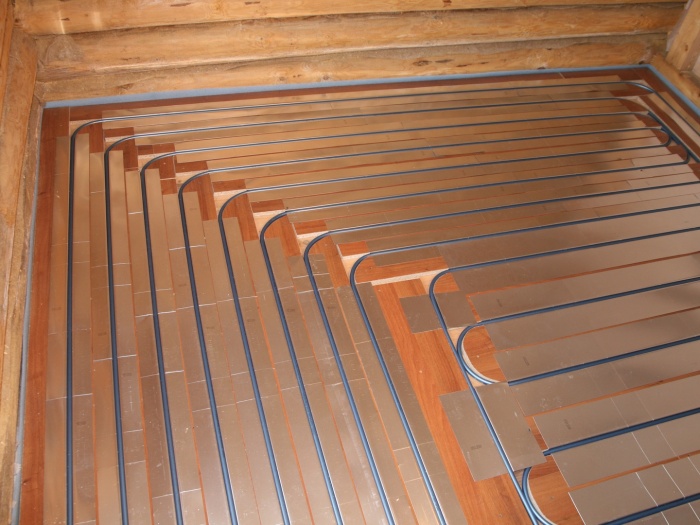
The pipe for the heated floor is being laid. The chosen step was discussed above. The most effective pattern for laying pipes for heated floors is considered to be “snail”. This is due to the fact that the pipe with the colder liquid is located next to the hot one, which guarantees less losses. It is worth remembering that you should start from external wall. This approach is important so that the walls warm up better and the dew point does not shift. Laying pipes for heated floors on insulation with bosses is much easier. If this is done on reinforced mesh for heated floors, then special staples or wire are used for fixation.

Note! If several underfloor heating circuits are being laid, then the installation of a collector will be required. It is carried out at the very beginning. And it will be needed to equalize pressure and temperature in different circuits.
After the pipe for the heated floor has been laid, there is no need to rush to fill in the finishing screed. Pressure testing will be required. To do this you will need a special pump or compressor. The entire circuit of the heated floor is filled with air with a pressure 2-3 atmospheres higher than what is planned in ready-made version warm floor. Everything remains in this form for a day. After this, the pressure drop is checked. If it is significant, then there is a leak at one of the joints. If nothing has changed, then you can move on.

The finishing screed is poured onto the pipes for heated floors, which must still be under pressure. This is important in order to promptly identify damage that may occur during the surface leveling process. After filling the screed, you can fill the heated floor circuit and turn it on for heating. The temperature should be adjusted so that it does not exceed 30°, then the concrete will not crack. Some nuances about how a heated floor is installed are given in the video:
Installation of dry water floor
When installing a heated floor, you can avoid a large increase in level due to the absence of a finishing screed. The scheme for dry installation of a heated floor is quite simple, so even those who do not have great experience. For this you will need special kind insulation with grooves for the pipe, which are manufactured at the factory. The preparation of the rough screed and the requirements for its drop are the same as in the previous case. Next is installation polystyrene foam boards with the arrangement of grooves according to the selected pattern of the heated floor contour. Sheets of molded metal are inserted into them, which increase the heating area and heat transfer. Lastly, the pipe is laid. The shape of the groove has already been selected in such a way as to properly fix the pipe for the heated floor. The final coating can be laminate. It is placed directly on top of the substrate. For more information on how to install a dry heated floor, watch the video.
Time flies, everything changes, big changes are also taking place in the construction of private houses. Let's take a look at how to make a heated floor from heating in a private house, which is in demand.
Pros and cons of using water floors
After the house is roofed, the owner begins to think: how to properly install a heated floor in his house. In this matter, numerous videos come to his aid on how to make a heated floor from heating in a private house and what pros and cons of a heated floor during installation.
PROS:
- Compared to radiators, water heated floors distribute heat better across the height of the room. The area of the room is heated evenly, the temperature of the heated floor creates additional comfort; it is pleasant to walk on it barefoot;
- Economic benefit - connecting a heated floor saves money on heating. Floor temperature is regulated by switching off heating circuits V warm floors non-residential premises;
- The use of heated floors keeps the rooms hygienic. There are no drafts or dust. When there are small children in the family, the advantages of a heated floor are obvious: laid pipes heat the floor, allowing you not to be afraid of children crawling on the floor catching a cold;
- Having a water heated floor, you don’t have to think about where to hide the radiators? The air is always fresh - there is no over-drying by heaters;
- The heated floor radiates power and immediately distributes heat;
- By installing a heated floor under the tiles, you will have a comfortable temperature in it.
MINUSES:
- A water heated floor is a disadvantage in terms of cost; laying a heated floor will cost a little more than radiators;
- It is necessary to choose the right coating; the pipes heat up to 55 degrees. The covering cannot be made of wood - it will crack. Laminate coating is also not suitable; it evaporates formaldehyde when heated. What remains are carpet, natural linoleum, tiles;
- Difficulty in installation during installation - in order to lay a water heated floor, the surface must be prepared and well leveled;
- There is also the possibility of a leak; to eliminate it, you will have to disassemble the floor;
- This coating serves well in rooms with reliable thermal insulation, where it cannot be laid (for example, stairs), you will have to install additional heaters with a power greater than that of the floor.
Laying schemes for water heated floors

There is more than one scheme for how to lay a heated floor:
- Snail;
- Snake;
- Combined, including both schemes, when half is laid with a snake and the other with a snail.
You can watch the diagrams in a video on the Internet - about how to install a heated floor in a house and what the power consumption will be.
Materials used
To make the best heated floors, you need to calculate how much it will cost and purchase the necessary materials:
- Pipes;
- Thermostats;
- Plasticizer;
- Collection group;
- Damper tape;
- Multifalga, used as insulation for heated floors;
- Expanded polystyrene;
Pipes are made of metal-plastic, copper and polyethylene, their strength guarantees against leaks, so you can make a warm floor with your own hands.
We need to pick the right system control, with its help adjustment is made and the power of energy consumption is reduced. You also need to take into account how much energy the heated floor will consume.
Surface preparation
First, the old coating is removed, after which the surface is cleaned. The thickness of the heated floor screed must be the same. When the surface is cleaned, apply a waterproofing film with a margin of 20 cm. The film is needed to prevent the warm floor from picking up moisture from the soil on which the house is located. Then you need to insulate the floor. For this purpose, lay polystyrene foam 2 - 5 cm thick.
It is good to purchase a heat insulator with recesses for pipes. When placed in the base, it will greatly simplify the installation of the heating circuit system.
At the edges of the room you need to attach a damper tape. It saves from destruction during deformation. The last layer reinforcement mesh is coming.
Step-by-step reminder:
- Remove old coating;
- Clean the surface;
- Place a waterproofing film;
- Place polystyrene foam;
- Attach damper tape;
- Lay down the reinforcing mesh.
Installation of heating circuits
Before it starts, a heating floor connection diagram is drawn up and floor heating pipes are laid. Pipes are sold in coils, which allows you to choose any length during installation. Having installed the collector combs, we assemble the heated floor unit.
Step-by-step reminder:
- Lay out the pipes according to a pre-selected pattern;
- Bring the end of the pipe to the distributor, secure with metal sleeves;
- Proceed to connecting the collector.
Installation of the collector and connection of heating circuits

Before connecting to the collector, the floor heating pipes are cut perpendicular to their end and a connecting fitting must be put on.
The collectors are installed in special cabinets; if desired, they can be mounted or mounted to the wall.
Having completed its installation, pipes are connected to it. To make the floor temperature more accurate, install a thermostat for heated floors and a mixer with control valves.
To select the power of the pump for the heated floor, you need to determine where the collectors will be located and what the layout of the pipes in the heated floor will be.
Step-by-step reminder:
- Cut the pipes along a perpendicular straight line;
- Place the connecting fittings on the end of the pipe;
- Install the collector in a specially designated place;
- Connect the pipe.
Pouring concrete screed
To understand whether it is possible to fill a heated floor according to the instructions, the installed heated floor system is checked at a pressure of 6 atmospheres using hydraulic press. Then the pressure is released to 2 atmospheres and the self-leveling heated floor is poured. To fill it, concrete for warm floors of grade 200 or 150 is used.
Proportions of concrete from M-400 cement, sand and cement
| Concrete grade |
Mass composition C: P: Shch (kg) |
P: Ш (л) |
|
| 100 | 1: 4,6: 7,0 | 41: 61 | 78 |
| 150 | 1: 3,5: 5,7 | 32: 50 | 64 |
| 200 | 1: 2,8: 4,8 | 25: 42 | 54 |
| 250 | 1: 2,1: 3,9 | 19: 34 | 43 |
| 300 | 1: 1,9: 3,7 | 17: 32 | 41 |
| 400 | 1: 1,2: 2,7 | 11: 24 | 31 |
| 450 | 1: 1,1: 2,5 | 10: 22 | 29 |
Proportions of concrete made from M-500 cement, sand and crushed stone
| Concrete grade |
Mass composition C: P: Shch (kg) |
Volumetric composition per 10 liters of cement P: Ш (л) |
Amount of concrete from 10 liters of cement (l) |
| 100 | 1: 5,8: 8,1 | 53: 71 | 90 |
| 150 | 1: 4,5: 6,6 | 40: 58 | 73 |
| 200 | 1: 3,5: 4,8 | 32: 49 | 62 |
| 250 | 1: 2,6: 4,5 | 24: 39 | 50 |
| 300 | 1: 2,4: 4,3 | 22: 37 | 47 |
| 400 | 1: 1,6: 3,2 | 14: 28 | 36 |
| 450 | 1: 1,4: 2,9 | 12: 25 | 32 |
Pipes are poured under pressure to avoid concrete damage. At the same time, the thickness of the heated floor is 2 cm higher than the reinforcement. When the concrete gains strength, heating can begin.
A warm floor under tiles is made in the same way.
After the installation of the floor is completed, it may happen that the system does not work fully.
Here are a few reasons why a heated floor does not heat:
- Most likely, when the adjustment was made, air entered the system. So is it possible to improve the situation? You need to call a specialist;
- The temperature may be low, if the boiler power is insufficient - you need to check the temperature sensors;
- Or, when installing a heated floor, little insulation was used.
To avoid such situations, calculations for a warm water floor are made very carefully. You should read the instructional instructions on how to connect a heated floor in the video, where everything is explained in great detail.
An alternative to calculating a warm water floor can be a film heated floor. Let's analyze this heated floor - the stages of its installation.
Today, film heated floors are a popular system; there is no need to lay underfloor heating pipes. The work occurs due to infrared radiation.
To install a film heated floor, you need:
- Film;
- Special clamps for connection;
- Thermostat for heated floors.
Conclusion: making a heated floor with your own hands is not very difficult, the main thing is to do everything very carefully, to correctly calculate the warm water field without errors. You can invite a team of specialists from a construction company. And you will become the owner of a surprisingly practical design that is so necessary in the house.
For many years, standard heating schemes using traditional radiators were considered the only possible and most convenient source of heat. The appearance on the market of heat-resistant and durable plastic pipes made it possible to create warm water floors in the heating circuits of homes, which initially played the role of an additional source of heat. It is not known who was the first to decide to radically modernize the heating system and make the created heated water floor with his own hands the main heating of the home. But nowadays this heating method is very popular.
 To the question - where to start, how to make a water heated floor with your own hands, the answer is clear. You need to start with thermal calculations and creation detailed diagram laying pipelines for using the system as the main heating. First, calculations are made of the heat losses of the premises and the required power of water heating of the floors. In the absence of experience and knowledge, it is strongly recommended to entrust this difficult work to professionals in order to avoid disappointment and significant material losses in the future.
 To carry out thermal calculations, you can use specialized computer programs or use a warm water floor calculator.
The practice of using heated floors, the obtained statistical data and experience made it possible to systematize recommendations on how to make heated floors from water heating in a house.
Doing thermal calculations, it is necessary to take into account first of all:

 Having the initial data you can easily draw general scheme, on which to mark the main highways and the location of the collector unit. A special (three-way or two-way) valve is usually installed in the manifold for a warm water floor to regulate the temperature of the coolant using the mixing method. The circuits have a considerable length (up to 80 meters), so the system is supplied. For large areas premises, the system should not be simplified; it is better to make several heating circuits with a pipeline length of no more than 100 meters.
Designers and heating system specialists give a number of recommendations, in particular, before you make a water heated floor yourself, you need to follow certain rules for installing the circuit as the main method of heating your home.
The essence of these rules is as follows:

These recommendations must be followed precisely and taken into account when creating a preliminary design, which on a sheet of paper will reflect the installation of a water heated floor with your own hands and prevent possible mistakes when installing the circuit.

The main elements of the heating system "warm floors"
 The home heating system, which is based on water-heated floors, operates according to simple principle. They are laid under the floor, along which hot coolant moves through a circulation pump from the distribution manifold. It gives off its heat to the floor, which evenly heats the room. It should be noted that the interior of the room changes beyond recognition, because there are no heating radiators, return and supply pipes, which allows you to create unusual design solutions on housing arrangement.
The main elements of the system and what is needed for a warm water floor in the house:

Requirements for the main elements of the heating system "warm floors"
 As with any heating scheme, the main element on which the efficiency and reliability of the heating system depends is the boiler that heats the water or other coolant in the system. Another element that is necessary for such a heating system is assembled, installed and connected. The third element for creating a warm floor is pipes for connecting and laying heating circuits.
Properties of the main elements of this heating method in more detail:

Laying water floors indoors
 In the practice of installing underfloor heating systems, two main methods of laying heating circuits are used - concreting and the laying method. But before you start laying the contour you need to do some preparatory work. The efficiency of heating will largely depend on their correct implementation.
Work that requires increased attention during preparation for installation:

Creating a warm floor using concreting
 Before you do it, that is, start laying pipes and creating a heating circuit, you need to install the collector in the place that was determined when creating the project. Then a damper tape is installed to compensate for temperature fluctuations in the screed. Pipes are attached or to reinforcing mesh or to special thermal insulation for underfloor heating, which has grooves and fastenings for circuit pipes.
 Laying is done in several ways: snake, loops, spiral or snail-type laying. These are the main ones wiring diagrams warm water floors in an apartment or in a private house. The laying step is different for different regions and external conditions, from 10 to 40 centimeters. The distance from the wall of the room to the nearest circuit pipe is at least 8 centimeters.
 After careful and careful installation, testing of the installed circuit during the day is necessary. Water is supplied to the circuit at a pressure of 5 - 6 bar and it remains under pressure for at least 24 hours. Then everything is carefully and carefully checked for defects or leaks. Only after a successful test of the circuit does the warm water floor begin to be poured with your own hands, with pipes filled with water under operating pressure. Under no circumstances should the concrete screed be dried using heating from a heating boiler due to possible cracking. The screed must harden naturally within 28 days.
The thickness of the concrete layer above the poured circuit pipes depends on the type of floor covering used.
 If you are planning warm water floors under tiles with your own hands, then in this case the thickness of the screed should be from 3 to 5 centimeters, and the distance between the circuit pipes from 10 to 40 centimeters. In the same case, if a laminate is used for a warm water floor, the thickness of the screed should be reduced to a reasonable minimum, and for strength, a reinforcing mesh should be laid over the circuit pipes. The mesh will add rigidity, strengthen the structure and reduce the thermal resistance of the screed.
Laying pipes
If the house has wooden floors, then the installation of a warm water floor is carried out using the so-called laying method. This method involves laying pipes in a specially prepared flooring.
There are many plastic modules on sale with seats and pipe mounts already prepared in them.
 Wood blocks with longitudinal channels and fastenings are also produced. With this installation method, to reduce heat losses, a special underlay for a warm water floor is installed on the prepared base, which has high waterproofing and thermal insulation properties.
 There are a lot of tips and recommendations, even step-by-step instructions for creating warm water floors with your own hands on the Internet. This topic is popular, despite the presence of other systems of heated floors and ceilings - infrared and electric (laying a special cable in a screed). Price per square meter warm water floor is the smallest among all existing ones. But it should be borne in mind that this is a very difficult and responsible job that requires knowledge, skills and abilities.


