The dacha has long been a place of mental relaxation and recovery after everyday work for a city person. Some summer residents prefer to create a mini-collective farm on their site with regular planting of various healthy vegetables and fruits, while having everything necessary products all year round. Someone just wants to relax on a piece of nature, breathe in unpolluted air or go to a barbecue. But the holiday is especially pleasant when country cottage area really well maintained.
Beautiful decorative elements plywood can turn any dacha into a work of art and weekends at the dacha will bring much more pleasure. Crafts from plywood and sawing from plywood (how to saw from plywood can be found here) - it’s not that difficult. The main thing is to have a correct understanding of materials and tools.
Material selection
 The first and most main criterion a job well done - right choice material. The most common plywood in this matter: its physical qualities Most suitable for cutting with a jigsaw. But there are several varieties of plywood that correspond to a certain type and scale of the future wooden product.
To work better with physical properties plywood, you need to understand how it is structured from the inside. Plywood sheets are made from veneer - a sheet of wood (from 0.5 to 1.5 mm thick), which is made by cutting a thin layer of solid wood different ways(peeling, planing or sawing). The most natural and most durable material is natural veneer, produced by planing or sawing. The plywood itself is made by gluing several layers of veneer in a cross pattern (along and across the fibers) using a factory or manually. A very durable material, available in many construction markets and having excellent qualities both for making crafts and for household work. The only thing that should not be allowed is moisture. There are a great variety of types of plywood: painted, with backings made of other materials, from peeled wood, from a solid cut (or rather, sawn), etc. The leaf thickness is usually 0.5-2 cm.

If the work is large-scale, with large elements, then it is worth taking thick, multi-layer plywood. If you have to cut out miniature parts, then a thin sheet of plywood is more suitable. But in any case, the material must meet a number of requirements, by paying attention to which you can wisely choose a good product:
- Veneer color. It must match the style and character of the future product. You can close your eyes to the heterogeneity of the color of the source material only if varnishing or painting is used at the end of the work.
- Optimal sheet thickness. As previously noted, each job requires its own material parameters. And for volume and greater artistic effect, you can use plywood of different thicknesses when working on one product (if the item is type-set).
- Specific humidity of the material. A very important criterion for maintaining the functionality of the jigsaw (or rather, reducing the frequency of replacing removable files) and simplifying work with wood. Before starting sawing, it is better to dry the material as much as possible so that it becomes more pliable.
- All work that is more complex than simple linear figures is best done from grade 1-2 plywood: this way you will save yourself from unnecessary unpleasant moments in the form of cracking or, conversely, excessive flexibility of the material when cutting.
- When purchasing, it is better to carefully select and inspect each sheet, because such small flaws as barely noticeable spots or knotty cuts are invisible only on the sheet, but on finished work may be noticeable.
- It is also more advisable to take sheets without cavities or holes filled with resin, avoiding delamination or poor-quality gluing of the layers.

In addition to the basic product, there are a number of products that will improve appearance Your work is made of wood and will extend its life. This is especially important when the plywood figurine is exposed to weather conditions, standing in the sun and exposed to moisture in the country. There are several methods of final processing: painting, staining (impregnation with varnish or paint), lamination, etc. Usually 1-2 layers paint coatings enough to create protection for a plywood craft.
You can also cover the product with an ornament or design. For this you can use different kinds paints: acrylic, gouache, watercolor. The main condition for painting: before starting, sand the plywood and prime it acrylic varnish or even PVA - this way its decorative qualities will become much better.

Choosing a tool for working with plywood
Tools for cutting plywood products can be hand-held (hand jigsaw, hand drill, screwdrivers) and electric (jigsaw, band saw, electric drill). What you should definitely stock up on before starting to work with plywood:
- Two types of jigsaws: electric and manual. In this type of needlework, these are 2 mandatory tools that are not always interchangeable;
- A set of files of various thicknesses: files will become dull and sometimes break, so an extra one never hurts;
- Files for sanding and shaping edges;
- Various household tools: hammer, pliers, set of screwdrivers, awl (for working with parts and assembling the finished product);
- Hand drill and drill bits different sizes To her;
- Pencil, charcoal or chalk, depending on what is more convenient to work with for drawing.
- Copy paper for drawing, if it is not possible to draw by hand;
- Sandpaper for final sanding of the product.

It is also important to arrange a place for comfortable work with tools. There are specialized workbenches for sawing, but you can do without it if you have a table on which it is convenient to place a jigsaw and other tools. But it is better to equip the table with an additional platform for the machine: basically, this is a formatted piece of timber attached to the table, which will serve as a platform and clamp for the jigsaw.
A jigsaw is often used for coarser parts: small and technically complex elements are best cut out by hand. Band-saw In general, it is mainly applicable for thick sheets, the elements from which are often made large: the power of the saw is even higher than that of a jigsaw, so it is used very rarely for artistic purposes.
A drill or awl is used to drill holes and small parts, which cannot be done with a jigsaw. A thin drill can also be used to round out curls and other shaped elements.
There are 3 types of files, which are the main working element of a jigsaw:
- With fine teeth and thin ribbon;
- With large teeth and a thick ribbon;
- Double tooth file.

For inexperienced craftsmen, the second option is more suitable, since it is easy to use and contributes to the rapid development of dexterity in sawing, the so-called. "stuffing" the hand. Unlike a file with large teeth, a file with a thin blade is designed for small parts and is much more difficult to control. In the hands of a beginner, it can easily break, since without experience in working with complex parts it is impossible to feel the tension force of the file. When purchasing, you need to pay attention to the quality of the teeth and the strength of the blade: good file bends freely.
Technology of work execution
Before starting cutting, prepare necessary materials and tools. We check the quality of plywood. If it satisfies your task, you can begin to grind its surface before cutting out coarse-grained and fine-grained sandpaper.

Then we make a sketch or transfer the drawing of the drawing onto the material (it is better to do the sketch in such a way that you have to cut less along the fibers). It is advisable to make the drawing carefully, without smearing the parts, as it will be more difficult to cut them out later.

According to the drawing, holes are made with an awl or drill in those places where the cut with a jigsaw will begin. Try to plan and drill all the holes in the plywood in advance, as once you start sawing, the sheet may crack under the drill. Before cutting out figured parts, it is worth practicing the technique on simple objects.

During operation, the jigsaw (file) is directed from top to bottom, so it is important to properly fasten the blade so that the cutting part is directed downward. It is also important to properly thread the blade before starting work so that there is tension in the saw blade. But there is no need to leave it in this state after finishing work, just as you should not leave a file stuck in the product - it can easily break.

When working at the machine, be prepared to constantly change the position of the workpiece: make several cuts in 1 hole, thus allowing the product to rotate freely around the blade.
If the tool deviates from the pattern when sawing, try to free the blade, giving the file free space and correct the direction.
At the end of the work, all edges are brought to a smooth state with a file and sanded with sandpaper - now the product is ready for coating paint and varnish materials. Here you will need a brush for varnish or PVA glue. It is advisable to coat the product in 1-2 layers. If you plan to paint on plywood in the future, it is better to apply one layer.

Drawings and drawings of plywood crafts for decorating a dacha
Here are examples of some plywood works for the dacha, made by cutting with a jigsaw. Thanks to them, the garden and dacha as a whole look well-groomed, which inspires you to create your own masterpiece. To create your own work, just a little practice and imagination is enough.


A few examples of drawings will help you decide exactly how you can decorate your garden at the dacha:


Who said money doesn't grow on trees? Plant such a tree in a secluded place and regularly fertilize its roots so that over time it will bear a rich harvest.
In this project I wanted to play with the metaphor “ Money Tree” and I decided to really show that in the stylized design elements. Coins pour through the leaves, accumulating at the roots in the form of a fabulous treasure. Simple technique Stroke allows you to achieve a three-dimensional effect using a single template. I hope you have a lot of fun working on your piggy bank.
John Olson, designer
Turn wood back into wood
1. From 3mm cherry plywood, cut four pieces measuring 280x280mm for the four front layers A-D. From 6mm cherry plywood (or glued 3mm) make a blank measuring 280x406mm for the back layer E.
2. Make three copies of the tree template. Cut off the root part of all templates and discard, leaving only one for further work. Using spray adhesive, attach one copy of the tree template to the first layer blank A, aligning the bottom line of the barrel with one of the ends. Set the rest of the templates aside.
3. With a #2 file in the jigsaw, cut the wood along a solid contour line. Saw off the crown from the trunk, and then make a cut in the crown. Note. The first layer A is the only one, in which you need to separate the trunk from the crown. This will help prevent the stain from spreading when tinting the trunk.
4. Tape the trunk to the crown again A and place the wood on the next piece IN. Using a pencil and a small washer, trace the sawn tree to create a new, slightly enlarged outline on the workpiece. (photo A). Make sure the cutout is outlined as well. Cut out layer B and make a hole for the file in the middle of the cutout.

Insert the tip of a pencil into the hole of a small washer and trace around the cut wood. The washer serves as a spacer that increases the contour.
Quick tip! DFor greater expressiveness and increased apparent volume, alternate the direction of the wood fibers in the layers. Shine, one of the properties that characterizes the appearance of wood, changes intensity depending on the angle at which the surface is illuminated.
5. Take one of the copies of the template, cut out the right part including the layer coin channel IN, and glue it to layer B (photo B), aligning the indentations on the edges. Now cut out only the channel for the coins in the layer IN. Then staple the layer pieces together IN tape (including the sawn channel). Continue enlarging the outlines to cut out the layers. WITH And D from the remaining 3 mm blanks. Glue the remaining copy of the template to the layer D, cut out a channel for coins and fasten all parts of the layer D with tape.

To avoid mistakes when cutting out a coin channel, use only part of the template. This will avoid mistakes and damage to the workpieces.
6. Take a copy of the roots template and attach it spray glue to the bottom of the 6mm blank. Align the layer D along the center and top edge of the roots template. Using a washer last time zoom in on the outline of the tree. Note. This time the cutout in the middle will be too small, so it's better to mark it by hand without using a washer.
Drill holes for the file in the layer E to make cuts in the crown and roots. Cut out the layer E and remove the paper templates from all parts.
 Your piggy bank will become four times more burglary-resistant and will discourage a potential thief (or prankster) if you use screws with different types splines. Using one screw of each type (Phillips, Torx, slotted and square), designer John Olson was able to see that not everyone can pick up a screwdriver and get to your treasures.
7. Apply gently thin layer white PVA glue (we chose white glue, since it becomes colorless after drying) on the back side of the two parts of the layer D, without smearing the edges about 3 mm wide to avoid squeezing out the excess. Lightly press the layer D to layer E, using the scrap from cutting the channel to accurately position the parts, fix the gluing and remove the scrap. Wait for the glue to dry and glue the layers in place sequentially. C, B and A.
Make a Treasure Cave
1. Cut out the sides from a 19mm maple board F, upper and lower walls G. Cut out the posts from 6mm material N and crossbars I the specified width for the front frame with an allowance of about 25 mm in length.
2. Install in sawing machine dialed groove disk and secure a wooden plate to the longitudinal (parallel) stop. Cut 10x13 mm folds along the rear inner edges of the box walls F, G, as indicated on drawing. Move the stop to cut 19mm rebates at the ends of the side panels. Then adjust the position of the stop and disk to make 10 mm wide folds for the plexiglass on the inner edges of the frame posts and crossbars N, I.

Hold the legs of the compass in vertical plane to mark the outline of the cutout using the drawing method.
3. Spread the legs of the compass by 13 mm. Lay down the tree A-E onto the workbench and press the top wall of the box against the bottom cut G and use a compass to draw the contour of the cross section of the trunk onto it (photo C). Then using jigsaw machine cut a notch in the top wall and double check the fit, making adjustments if necessary. Glue the sides of the box F, G.
4. Make bevels at the ends of the posts and crossbars of the front frame N, I, adjusting its dimensions to the box F/G. Glue the frame, fix it and wait for the glue to dry. Measure the fold on the back of the frame and cut out a piece of clear plexiglass J 3 mm thick for the window. Glue the frame N/I to the box from the front, placing the plexiglass in the fold.
5. Measure the fold on the back of the box F/G/H/I and cut out the backdrop TO made of 6mm birch plywood. Drill and countersink holes for screws in the backdrop (see Fig. drawing).
Add trim and then coins
1. Carefully tint the trunk and roots with a dark stain (we used General Finishes Antique Cherry stain on oil based) and let it dry. Quick tip! So that the stain does not spread from the trunk to the crown in layers B-E, make cuts in the outer layers of veneer sharp knife to create a clear boundary.
2. Cover the transparent window J masking tape and apply a colorless coating to all parts of the piggy bank. (We sprayed the semi-matte nitro varnish three times from an aerosol can, sanding in between with 320-grit sandpaper.)
3. When the coating is completely dry, assemble the piggy bank by screwing in the screws, with the roots located between the box and the backdrop. Now empty your pockets of change and watch the mountain of treasure grow.


The basic skills that are taught in labor discipline classes, for the majority of people, remain just a couple of trinkets for memory. But for some, a favorite hobby begins with the basics of working with metal or wood, which later brings pleasure from the opportunity to show imagination, apply skill and get a household item or simply decorative item. One of these directions folk art is sawing out of plywood, which is also popular among users of the FORUMHOUSE portal. We will dwell on it in more detail in our article, we will analyze what, with what and by what technology real carved masterpieces are created and in what cases stencils are used for cutting. Fortunately, our craftsmen are happy to share their experience.
- Characteristics of plywood
- Tools, templates, assembly


Characteristics of plywood
Plywood – multilayer, sheet construction material, made from hardwood veneer or coniferous species wood by gluing several layers into a single sheet. Due to the location of the fibers (at one angle), the sheet usually odd number layers - three, five or more. If coniferous varieties There are several types of plywood (fir, spruce, pine), while deciduous ones are mainly birch. There is also a combination - a coniferous “filling” and birch cladding, in which case the plywood will still be birch. The best is entirely birch plywood, but it is also the most expensive.
The material is divided into grades and brands, depending on the decorative effect and used in production chemical substances. There are five grades, differing in the quality of veneer and the appearance of the sheets:
- Elite grade (E) - no defects on the surface of the material, uniform, monochromatic, smooth texture without knots, cracks, wormholes or repair inserts.
- First grade (I) – there may be microcracks (up to 20 mm) and knots of small diameter on the sheets.
- Second grade (II) - even fused knots are acceptable if their number does not exceed ten pieces per 1 m² of sheet and their diameter does not exceed 25 mm. There may also be some wormholes and veneer repair inserts.
- Third grade (III) – fused knots without quantitative restrictions, voids in place of fallen knots, up to a dozen wormholes (up to 6 mm) per 1 m² of sheet.
- Fourth grade (IV) - the sheet must have a strong adhesive connection, peeling is unacceptable. The entire spectrum of appearance defects - in almost any quantity, but the diameter of wormholes, knots and voids - no more than 40 mm.

The grade concerns only the outer layers of the sheet and is indicated by two numbers, and the grade can be either common to both sides or vary, more often, within the same grade - I/I I/II E/I and so on. Except for the fourth, lowest grade, all other grades of plywood are sanded on both sides, and the elite grade can be additionally varnished.
Naturally, the higher the grade and decorativeness of the material, the more beautiful the finished product will be. But considering that the cost of the elite, and even the first grade, is decent, and the parts cut out are most often small in size, you can use a lower grade if you actually cut a high-quality blank from the sheet. The plywood from which the workpiece will be cut should not have knots - they may fall out and other defects. They also pay attention to the ribs - you cannot cut out masterpieces using fragments with voids in the middle layers.
The grade of plywood and its main characteristics are determined by the chemical compositions used:
- FB – impregnation of veneer with bakelite varnish, which provides resistance to high humidity.
- BS – bakelite glue (alcohol-soluble), gives high performance characteristics, such plywood is stronger and more durable.
- BV – water-soluble bakelite mixtures; plywood is resistant to high humidity.
- FC – phenol-urea resin bonding, relative water resistance, for indoor use.
- FSF – gluing with phenol-formaldehyde resin, moisture-resistant material for external use.
Which plywood is suitable for sawing
For sawing products intended for home use(boxes, stands, shelves, utensils, decorative elements) best option– FK grade plywood.
Phenol-urea resin is safe for others and well tolerated high humidity, therefore, products made from such plywood do not emit harmful substances and are resistant to deformation.
FSF brand plywood is not suitable for household items due to aggressive formaldehyde, but can be used for outdoor decoration - carved frames, coffee tables For open verandas or gazebos, various benches.
For cutting, plywood with a thickness of 3–5 mm is most often used. If loads are expected (chairs, stools, benches, tables, etc.), the thickness is increased. It is more difficult to cut from a thick sheet (more than 10 mm), so lace openwork from such material is unlikely to be obtained. As an option, a main canvas made of thick sheets and carved inserts to increase decorativeness.
Portal member temernik, who opened a topic that is still active to this day back in 2011, uses sheets of different thicknesses, depending on the purpose of the objects.
temernik FORUMHOUSE Member
For my father's anniversary, I cut out a carved frame from 4 mm plywood, and a stand for flower pot, on the bears, sheets 8 mm thick were used.

Tools, templates, assembly
Patterns on plywood are cut out using jigsaws - this can be done either manually or electric tool. For complex, openwork elements, a manual jigsaw with replaceable files is often used. They can accurately cut out the most intricate patterns, while a jigsaw is more likely to ruin the design if the skills are insufficient.
Even in labor lessons, they teach that the quality of the saw and ease of use largely depend on the tension of the file - with a loose set it is more difficult to make a cut exactly according to the template.
Temernik uses his son’s old jigsaw, left over from his school days. This simple tool is enough for him to create his plywood openwork.

To start cutting out a design, a puncture is made on the blank with a sharp awl, into which a file is then inserted; the second option is to drill with a drill with thin drill. In both cases, it is not recommended to bring the hole directly to the contour line, if the motive allows. Puncture or drilling at a distance will help avoid possible cracks and “cuts”. To process the edges of cuts (ribs), files or sandpaper with the appropriate grain are used; this grinding gives the pattern a finished look and removes minor flaws, leveling the edge. In addition to the basic tools, you may need pliers, a hammer, a drawing set (ruler, compass) and others.
Even the simplest design is cut out according to a template applied to plywood - if you have artistic talent, the patterns for sawing are drawn “out of your head”; if nature is not so generous, they are transferred from a stencil.
There are enough standard preparations on the Internet in free access, in thematic publications. In a thread on the forum, many craftsmen share their favorite templates with each other. Temernik The Internet and my wife’s drawing talent help.
temernik
I take drawings from the Internet, then I come up with a method of fastening and modify it; if something is wrong, then my other half completes the drawing, she does it well.
The design is transferred from the stencil to the plywood with a pencil or pen; for convenience, the base is secured to the sheet with buttons. Special attention is given to small contours; a few inaccuracies can spoil the entire appearance of the finished product.
To increase decorativeness, products cut from plywood are joined into a tongue-and-groove pattern and glued, most often with PVA glue for wood. First, dry “fitting” is carried out, and after adjustment and cleaning, the adhesive assembly is completed.
temernik
Everything is attached in the following way: some parts have grooves cut out, others, on the contrary, have protrusions, everything is first fitted “dry”, and then assembled with PVA glue. The ends were sanded.
After assembly, the plywood is covered with protective and decorative compounds - varnishes, stains, paints, depending on the desired effect.


Examples of work by portal participants
Open temernik The topic received a lot of responses, many shared their creativity in it.
Bosun1955 I started with a similar technique.

And now he combines it with equally interesting, multi-layer cutting.

Boatswain1955 FORUMHOUSE Member
I finally understood the essence of cutting out plates of various shapes - two drawings of the same size are made, the waves are drawn in opposition to each other. That is, where on the first there is a ridge, on the second there is a trough. After cutting, the parts are assembled one at a time. This makes two plates. Sawing with a hand jigsaw without any fancy, for a long time I could not figure out how such forms were made. So I took my soul away a little, sawed some plates and a basket.


56Vladimir1981 He is also a master at using a jigsaw.
All photos from the article
If you have creative potential and one day you have a desire to use it, then you can try making plywood crafts with your own hands using a manual jigsaw or an electric one. Although, the first option is used much more often.
Do-it-yourself drawings of plywood crafts are transferred to the surface to be treated with a jigsaw using carbon paper. However, it is best to secure the drawing with buttons along the edges so that it does not move when pressed by a pencil.
Finding a carbon copy is not difficult - it can be purchased at any office supply store. By the way, buttons can be bought here.
Now we need to determine where we will start from - sawing can start from the edge of the sheet or from the middle. If you have both of these needs, then it is better to start from the middle - after all, you will have to hold the panel with your hand and this will be much easier to do when its area is larger.
To start working with the body of the array, you need a hole where you can insert the saw blade. Just do it not strictly along the line of the drawing, but slightly to the side, so as not to spoil the edge of the cut.
The nail file is put on the holder through a hole in the plywood or without pulling it through the sheet, with the teeth from the handle to the opposite end. That is, you will press the handle, therefore, the working (cutting) moment will occur while the holder is moving forward.
On a note! The tension moment of the canvas is very important - it cannot be overtightened, as the material will burst during the first working movements. You can’t under-tighten it either, as the bending will cause the sheet of plywood to break (we’ll squeeze it with the edges of the cut).
Therefore, you need to find the best option, the so-called golden mean. If you have never used such a tool before, it is better to practice on some piece of plywood. Of course, you will break a few nail files, but you will feel what the correct tension should be.
In order to verify the direction of the teeth, you can simply look at the saw, but you can try to lightly run your finger along it - if you move it against the direction, the skin will feel resistance in the form of scratching.

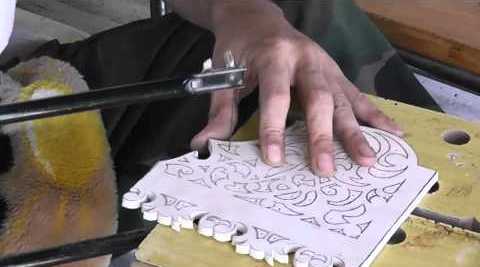
First of all, you need to properly organize working space. Despite the apparent formality, this is quite important condition. A properly equipped place provides not only comfort and convenience, which is important when working for many hours with a hand jigsaw, but also directly affects the quality of the project being implemented.
A special machine-table is used as a thrust structure, behind which the name “dovetail” is assigned. It is a small rectangular board with a wedge-shaped cutout that turns into a working field for sawing. The dovetail is attached to the edge of a table or workbench using a clamp.
They work with a hand jigsaw while sitting or standing, placing the workpiece for cutting at a level of 30-40 cm from the eyes. The light source is placed in front at an angle to the working plane. Compliance with these rules will allow you to control the cutting line as accurately as possible, thereby improving the quality of the cut project.
Which jigsaw should you choose?
Despite the simplicity of their design, modern manual jigsaws have a number of features that you should pay attention to when choosing. From models with a frame made of sheet iron It’s better to refuse and choose a jigsaw made from a metal tube. This option provides better tension on the blade and eliminates its distortion, so the file will not “lead” during operation.

The file is fixed in the frame by tightening the upper and lower wing nuts. When choosing a jigsaw, pay attention that it is equipped with blades made of high-quality steel with wide ears. This will significantly increase the ease of use of the tool during work.
How to properly prepare a tool for use?
The file in the jigsaw is fixed strictly vertically, with the teeth down. The canvas must be stretched. The degree of tension is regulated by compressing the frame: the tool is rested against the edge of the table or squeezed by hand, after which the wings are tightened, if necessary, tightening them with pliers. By straightening, the frame will ensure proper tension on the canvas.

To cut out small parts, figures with sharp contours and complex wood patterns with a hand jigsaw, small files with a large number of teeth per inch are used. They do not jam when turning, creating a thin and neat cut without leaving chips. To create large plywood products and long straight cuts, blades with large teeth are used, which cut much faster.
Let's get down to business. How to cut out plywood and wood with a jigsaw?
To get an accurate and neat cutting line, you should follow a number of basic rules:
- The hand with the jigsaw should only perform vertical movements.
- Up and down movements are made without sudden jerks and with maximum amplitude in order to use the entire working length of the blade.
- The second hand smoothly turns and moves the workpiece during the sawing process.
- There is no need to press the file onto the workpiece or apply lateral pressure to the blade.
- Sawing occurs only at the moment when the file moves from top to bottom, so the reverse movement should be performed freely without pressure.

When working with a hand jigsaw, it is guided not along the line of the pattern, but along inside contour, since even the thinnest blade leaves a cut, the width of which should be taken into account. This is especially important when cutting out products with precise fitting of elements, for example, or.
When you're done, don't forget to loosen one of the clamps so that the jigsaw frame doesn't lose its elasticity.
What about practicing basic techniques?
The most intricate patterns are always based on a number of basic shapes and elements, after working on which you will be prepared to carry out complex projects. It is advisable to do this on thin plywood up to 3 mm thick.
Obtuse and right angles : the jigsaw moves smoothly without pressing on the workpiece, as if making idling; at this time, the second hand slowly turns the wooden piece to the desired angle.
Inner circular outline : to do this, a small hole is drilled in the inside of the figure through which a file is passed. When cutting a circle, the cutting line is drawn along inner contour drawing. The stroke of the tool should be of medium intensity; the workpiece unfolds in proportion to the movements of the jigsaw.
Oval outline : when cutting out such a figure, increase the stroke of the jigsaw in steep areas, turning the workpiece faster in this place.
Sharp corners: a neat sharp angle without chips or other defects is obtained by bringing two cuts together.

Advice! When cutting out complex openwork patterns, start working from the center wooden blank, uniformly shifting towards the periphery. This will significantly simplify the cutting process and avoid breakage of the fragile work at the finishing stage.
You have gotten a good feel for the jigsaw, have achieved smooth movement and are maintaining a neat cutting line, but then the movement of the tool becomes difficult and the file jams in the workpiece. This is a typical situation that arises when carving plywood with a hand jigsaw. It happens for the following reasons:
- Overheating of the file - when long work the canvas expands due to heating. To avoid such situations, take short breaks or periodically wipe the canvas with a damp cloth.
- Features of wooden blanks. The movement of the jigsaw may be difficult due to the fact that the file has run into a denser area: a knot, a lump of glue in plywood, etc.
- On long cuts, the saw blade can become pinched between two nearly separated pieces of plywood. You can continue sawing comfortably by pinning the separated ends together with a clothespin.
What kind of plywood is needed for cutting with a jigsaw?
Practice shows that the best material for working with a hand jigsaw is birch plywood with a thickness of 2 to 8 mm. It is affordable, easy to use and highly durable.
To create small details or a “dense” openwork pattern, it is more appropriate to use three-layer plywood up to 3 mm thick. It is easy to saw and at the same time quite durable. The likelihood that you will spoil the sawn curl when the blade jams again is significantly lower.

When choosing material for crafts, pay attention to the fact that the plywood is smooth and without a large number of knots. Examine the end for the presence of air chambers; their presence indicates uneven application of the glue. It is better to refuse such low-grade plywood, otherwise you will not avoid a large number of chips that will spoil the appearance of the product.
What if you use wooden blanks?
For all its practicality, plywood does not have such an expressive texture as board. By sawing projects from planks, you can take advantage of these advantages: play on the difference in colors and shades, the orientation of wood fibers (as in intarsia), etc. Crafts made from wood have a more attractive end (without a layered structure like plywood) and are much easier to treat with a finishing compound.

For sawing with a hand jigsaw, workpieces from soft and hard rocks up to 10 mm thick are used. When choosing a material, give preference to tangential cut boards. It is not recommended to use radial cut workpieces, because... they have parallel annual rings, which, due to their hardness, will lead the jigsaw away when sawing.
What to do if chips keep appearing?
The number and size of chips depend on the type of plywood used, the quality of the blade and how correctly the master saws. A few tips and professional tricks will help you cut with a hand jigsaw without chipping:
- using low-quality plywood that is prone to chipping, saw more intensively, installing blades with fine teeth;
- use a saw blade with a reverse (reverse) tooth, designed to minimize chipping.
- glue the cutting lines with reverse side tape or masking tape;
- moisten the back of the workpiece.
How to transfer a diagram to a wooden piece?
There are several convenient options transferring the printed drawing onto a wooden base:
- using carbon paper and redrawing the template by hand;
- gluing the sheet with double-sided tape;
- gluing the picture onto glue, the remnants of which are rubbed off with sandpaper at the finishing stage.


