Typically, door structures are purchased with hinges built into them. However, there are often collapsible options that require self-assembly. How to install the hinges correctly so that you don’t have to see the whole structure skewed later? Studying the installation sequence of these elements will significantly help in solving the problem.
Scroll necessary equipment for work:
- Loops.
- Chisel and hammer.
- Screws and screwdriver.
- Pencil.
- Wooden wedges.
- Level.
Basics of making door hinges
Any leaf has door hinges. Their quality affects the process of opening and closing the sash. These small-sized parts carry a colossal load. Their correct installation will determine the further operation of the door.
The manufacture of such structures is based on materials such as steel and brass. The first version of the raw material is distinguished by its noble coating, but it is characterized by some softness of the base. Over time, such substances easily lose their shape. Brass door hinges are suitable for installing interior structures.

Steel options are distinguished by an incredibly strong coating; details of this type are characterized by highest quality and reliability.
Such elements can be seen on entrance structures. Intermediate samples door hinges door hinges made of zinc alloys can be considered. They are much stronger than brass elements and can withstand significant weight.
Return to contents
Various hinge design options
The samples under consideration differ in manufacturing materials and design capabilities:
- Screw-in ones look like two wings that are attached to the frame and door.
- Mortise ones allow you to prevent unauthorized persons from entering the room. Such samples cannot be cut. They are characterized by a long service life and are equipped with a bearing mechanism.
- Invoices.
To properly install door hinges, you need to clearly determine their number. The weight of the structure is of paramount importance in this matter.
So, if earlier 2 elements were used when installing doors, now 3 hinges are installed to increase the reliability of fastening. Massive samples of canvases involve the use of four and more components.

To understand how to install door hinges, you need to understand a few important points. So, standard design involves the use of two such elements. For heavy metal and wooden molds 3 loops are installed. Before starting work, the canvas is laid on its edge: in this way, installation can be significantly simplified. And it is known that inconvenience at work may not in the best possible way affect its quality.
Not last place During the installation process, the hinges are occupied by tools. On the eve of work, chisels should be sharpened well, and they should be different sizes. They can be used to carefully cut grooves for hinges.
Return to contents
Inserting hinges, main stages of installation
You can install door hinges by strictly adhering to certain rules.
So, focusing on the door leaf, it is worth noting that these small elements should be located at a distance of 20 or 25 cm from the boundaries of the leaf. Particular attention should be paid to its surface: the presence of knots, cracks and broken elements is not allowed. A screw screwed into such a base will completely destroy the box and lead to its distortion. It will be impossible to properly insert door hinges into a deformed coating. The presence of such places on the surface makes it possible to fix them in a slightly shifted plane, for which the standard distance moves slightly up or down.
In order for the interior door to be installed securely, it is necessary to install the hinges according to the rules. Many professionals use raised or deep planting in nests.
To install the hinges correctly, it is necessary to make a recess in the canvas equal to the thickness of the element itself.

Traditionally, inserting loops begins with markings. As mentioned above, the distance from the top and bottom of the structure corresponds to 20 cm. You should also set arrows that will determine the direction of the loops. This way you can avoid confusion in your work.
The loop is applied to the marked points, aligned along the edge, and its outline is outlined using a pencil. Accurate marking of the contour will allow you to secure this part deeply in the hole.
You can prevent the hinges from slipping by attaching them to the door leaf for a while using two self-tapping screws.
Return to contents
Sampling for installed hinges
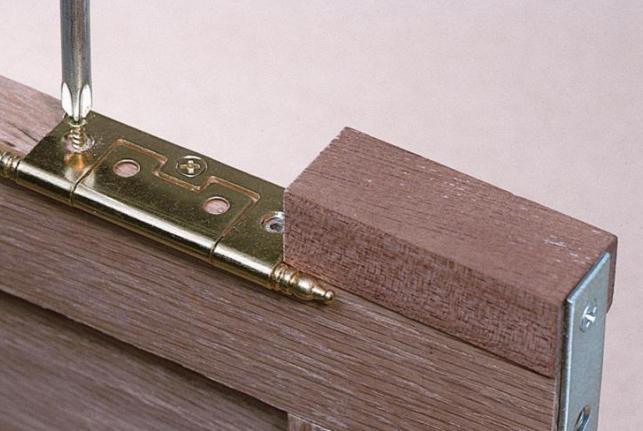
Using a router, a regular chisel and a hammer will help you complete this stage. Using a wallpaper knife, cut the borders. Next, a chisel is used to make a recess of the specified dimensions, usually it corresponds to 2-3 mm. A sample is made along the marked contours to a similar depth.
Usage sharp knife involves cutting wood along the grain. The transverse position involves capturing a thin layer of veneer. A small scratch appears on the base. The sharp edge of a chisel is inserted into it and the handle is struck.
During the process of cutting the grooves, the door hinges are placed in the finished place. An awl marks the points for drilling. For this, drills with a diameter of 3 mm are used. This way you can achieve preservation of the integrity of the paintings. Then the hinges in the finished hole are fastened with self-tapping screws. Their caps should protrude somewhat above the surface.
Once the hinges are in place, the door is leaned against the base of the frame. The outlines of the hinges are dragged onto the door leaf. Then the set of works is repeated. As soon as the hinge installation system is mastered, you can safely begin installing door closers.
Hinges are accessories that, just a few years ago, were an unremarkable unit of one option. Now the situation has changed and this fittings may be different. Hinges are required for opening and closing doorways. There are several options for mounting door hardware, the methods directly depend on the type of door. To carry out this work, some skills are required, suitable tool and the concept of a certain sequence of actions. Most often, hidden loops are chosen, since they are almost invisible and thanks to this everything looks more attractive. The insertion of closed loops is available to any craftsman.
Hinge options for interior doors
There are currently five options door awnings. Each option has its own specificity and strengths. You can find and purchase the following types of canopies:
- straight or card - simple classic, with special side plates;
- corner - similar to the first, classic canopy with a slight difference in the shape of the plates, most often installed on pendulum structures;
- “invisible” - special mechanisms that are recessed into the door leaf, most often used on expensive doorways;
- eversible - there are no plates, but only pins on a special eversible axis;
- Italian - equipped with a special hinge, installed on European doors.
All interior hanging structures are divided into universal and those that have a specific direction: right and left-sided.
As for the loop options, they are:
- mortise;
- invoices;
- screw-in
DIY hidden door hinges
Most often, the invisible version of the loops is a priority, as it allows you to make the object aesthetically attractive. Installation of this fittings is a little more complicated than overhead fittings and also requires more time, but if you wish and have some skill, you can install the hinges quickly and correctly with your own hands.
The advantages of this option are as follows:
- Reliability and safety - thieves will not be able to enter the premises due to the fact that they cut off the hinges, as happens with overhead options; hidden hinges are hidden from outsiders.
- High strength - the product can easily withstand the weight of the structure itself, made of metal or wood material.
- Practicality - products can last for decades with proper care.
- Visual appeal - when the doors are closed, the hinge is not visible, this allows you to maintain the aesthetics of the appearance.
- Great variety - you can choose canopies that can withstand heavy loads or small designs for closet doors.
The disadvantage of this method is the fact that installation is not easy and requires some effort. In addition to this, there are a number of weaknesses of this product:
- A hidden canopy is expensive compared to other options. But even among the category of hidden interior structures, you can find those that stand higher or lower. It should be understood that the quality of the hinge directly affects the price of the product.
- Unfortunately, there are a large number of fakes on the market; as a result, you can purchase a low-quality product and lose money
- A noticeable disadvantage is the fact that not every canopy can be disassembled if necessary.
- Due to the large recessing depth, it is not always possible to install this type of canopy.
Installing hidden hinges on doors
If you don’t delve into the installation features door design, then mounting the hinges of the hidden version is simple and straightforward: you need to cut out a niche and insert the mechanism, then securely fasten it and start using it. But in reality, everything is a little more complicated.
Installing hidden hinges yourself is not entirely easy. It is necessary to stock up on the tools needed to carry out the work. In addition, there is an instruction that describes all the stages; following the recommendations of specialists allows you to install the mechanism efficiently and quickly. The following tools and items are required for installation:
- "invisible loops";
- fastening elements for installation;
- a simple pencil;
- yardstick;
- sharp knife;
- chisel;
- screwdriver;
- screwdriver;
- hammer.
First of all, you need to make a hidden basting. It is important to think about which direction the door will open and at what level the hidden door hinges will be located. This is not at all blindly following the requirements for show; in fact, this will affect the ease of use, durability of the canvas and Supplies. To slow down the swinging of doors, experts advise installing special stoppers. In this case, the door will not hit adjacent furniture or the wall.
The number of hinges depends on the characteristics of the door: material, weight, purpose. A classic door requires the installation of two hinges, this is enough. A door made of heavy wood has a different weight, so a couple of hinges will not be enough; three elements need to be installed. Two are installed near the floor and top of the doorway. The third loop is located in the center of the side panel. All attachment points are marked with a pencil. It is necessary to calculate the depth of the excavation in advance.
How to install concealed awnings
As already mentioned, depending on the weight and size of the door, the number of hidden hinges is planned. The markup has specific stages, and they can be displayed in the following order:
- at a distance of twenty to twenty-five centimeters from the top and bottom, a mark is placed for future loops; for convenience, you need to mark with a simple pencil;
- to the future location of the canopies, it is necessary to attach loops and outline their contours;
- when installing the third loop, it is placed strictly in the center, at an equal distance between the first and second;
- two contours are immediately marked, internal for the canopy and external for the lining.
Marking the door, namely the door frame, is considered not an easy task. Like any other process, door marking has its own order and looks like this:
- the accuracy of the door leaf is measured using a building level and secured with wooden wedges;
- now you need to mark the places where the loops will be inserted;
- The loops are outlined with a pencil to indicate their attachment location.
To avoid mistakes, you need to carefully carry out the insertion process. Holes must be made after several checks of the correctness of the future location of the hinged hinges of the hidden version.
How to decide on the choice of invisible loops
The hidden mechanism is a kind of invisible mechanism, equipped with a hinge, equipped with two elements connected by a screw. To do right choice When purchasing hidden mechanisms, you should listen to the recommendations of experts:
- before purchasing a mechanism, you should study their features; if they are not universal, then you need to decide on the sides of the attachment - right or left;
- if the hinges are inexpensive, then most likely the manufacturer saved on the control mechanism;
- When installing heavy doors, you should not prioritize the issue of savings;
- when installing a door in a new building, it is necessary to purchase a copy with adjustment so that when the house shrinks, it is possible to correct the misalignment of the door, which will happen in any case;
- when installing awnings with adjusting screws, there will be no problems with large objects drifting in - the swing angle of the sash can reach 180 degrees;
- It is necessary to select hinges based on the characteristics of the door.
Door frame: how to install hidden hinges correctly
The first step to install the mechanism is milling. This is the creation of shallow recesses for recessing hinge elements. It is possible to make such connectors yourself using a hammer and chisel. The main requirement for the notch is accuracy and correct size. The depth of the notch depends on the thickness of the loop, and if a shallow one can be widened, it will be very difficult to correct an excessively deep one.
Using a drill, make a recess along the contour outlined with a simple pencil. There is no need to rush; the result depends on the measured actions. It is necessary to make recesses in the sash and in the frame. This work takes no more than forty minutes. The hinges are installed in the cleaned recesses. This involves the following actions:
- the canopy is immersed in a specially made hole, you need to ensure that the part fits tightly and takes its place;
- Recesses are made for the screws with a special tool - a screwdriver;
- You need to insert loops into the resulting recesses and tighten them, you need to make sure that the loop does not skew.
If necessary, it is important to adjust the “invisible” hinges. In this case, you can check the functioning of the door and make sure that the “invisible” hinges are located correctly.
Hidden hinges for doors with your own hands, adjustment
The adjustment features depend on the type and version of the loop. And although there is a wide range of hinges on the market for hidden installation, they all have identical adjustment options and design. To adjust the hinges, you must follow the following steps:
- the cover is removed from the loop, this allows you to expose the adjustment mechanism;
- to change the vertical skew of the door, you should turn the bolt; this manipulation can be done using a special hex key;
- Under the mechanism panel there is a screw with which the surface of the blade is adjusted.
Expensive and complex designs They have a complex adjustment mechanism in three directions at once and this makes it possible to create ideal conditions for operation and quality of service.
It is necessary to avoid the situation when hinges are purchased immediately before installing the product. Such purchases can be made in a hurry and without taking into account many features, which will negatively affect the durability of the door. It is recommended to purchase hinges in parallel with the purchase of the door, in order to take into account its dimensions and weight, and select the color of the hinges. And although they are called hidden and partially recessed, when open doors they are visible, so it is advisable to choose a shade.
Also, you should not purchase a mechanism of unknown origin or go for cheapness: hinges ensure reliable opening and closing of the door.
You can make installation easier and faster using a special template. This will help avoid mistakes when basting.
How to hide door hinges, requirements for the mechanism
There are certain requirements for fittings. The main thing is that they must withstand mechanical loads. Since the door material can be different, awnings are divided into three main categories:
- for doors up to sixty kilograms of weight;
- for a one hundred and twenty kilogram door;
- for massive structures weighing up to two hundred and fifty kilograms.
If the door has even more weight, individual structures for fastening are made. There are a number of requirements for hinges:
- they must be durable, reliable, and easy to install;
- the form must be made in such a way that the fastening is as reliable as possible;
- it must be taken into account that during its service life the door can open half a million times, so the material must be appropriate;
- priority is given to the use of hinges made of aluminum, hard plastic or metal - depending on each specific situation;
- parts must be coated with anti-corrosion agents.
If you still have questions about how to make a choice and install hidden hinges with my own hands, watch the video. There you will find answers to all questions. It is possible to install hidden hinges on your own if you follow the recommendations and prepare necessary tool. The use of such mechanisms will allow you to enjoy the quality and aesthetics of the product.
If you decide to install interior door structures in your apartment (or house) on your own, then installing hinges on the door will be a pressing issue. Indeed, for most people, this stage of work becomes an insurmountable problem on the way to achieving the assigned tasks. You will learn how to properly install door awnings here.
Diagram for determining the choice of loops.
More often construction stores offer to purchase interior door designs without hinges. They must be purchased separately, although it is worth knowing which door will presumably be installed and what its dimensions are.
What types of door hinges are there?
There are three types of door hinges:
- left;
- rights;
- universal.

Door device.
In order to decide on necessary option hinges on the door, you need to carry out the following manipulations:
- Approach the doorway where the interior structure will be installed.
- You need to stand on the side where the door will open towards you. Most people, mistakenly, stand on the side where the door opens away from them. You shouldn't do that. After all, you will end up with the wrong type of loops.
- Mentally we open the door towards ourselves. If this happens in right side, then it’s worth buying right hinges. If to the left, then, accordingly, the type of loops is left. It's all very simple and elementary. Just don't get confused.
List of required tools
- chisel;
- hammer;
- screwdriver.

Diagram of a metal door hinge.
These are the most important tools, which cannot be avoided during the process of installing a hinge on a door. But, of course, it would be good to also prepare additional tools, namely:
- drill;
- thin drills;
- screwdriver;
- cutter;
- awl.
Having such auxiliary equipment will greatly facilitate your work.
How to properly install hinges?
There is no fundamental difference where it is better to embed the hinges first, into the door frame or into the structure of the door itself. Although it is recommended to start the installation process with the door when it is made of solid wood and has small knots.
First, you need to decide on the place where the hinges will be attached. And only then do we accept optimal solution by finding the area on the door where the hinges will be located in the frame.
Experts recommend stepping back 15-25 cm from the edge of the door structure - this will be the location of the first cut. Costs Special attention pay attention to how the hinges are cut into other doors in the house, especially if they are located nearby, so that there is not a big difference. Perfect option- 20 cm from the edge of the door. If it turns out that there is a knot in this place, then it is better to retreat a little. After all, there are no strict regulations in the process of performing such work, and therefore you can easily change the insertion distance.
To begin with, it is recommended to take measurements along the upper and lower edges of the door structure. In this case, you should leave marks with chalk or pencil. Pay close attention to where the top and bottom are. interior design which you decided to install yourself, and on which side the glass is located, if it is present on the door.
During the marking process, each individual hinge must be applied in such a way that its hinges extend from the front side of the door.
Screw-in loop device diagram.
In this case, the front side is considered to be the side where the entire structure will open. It is recommended to mark loops in two ways.
In the first case, you need to place the loop exactly in the chosen place, and then trace it with a perfectly sharpened pencil. In this case, the edges of the hinge and the door structure must be located exactly and parallel to each other.
In the second case, you need to screw the loop using screws, and then cut the outline with a cutter or draw marks with a regular pencil. In this case, it is enough to tighten only two screws. But you should understand that in this case the hinge may move a little to the side, so you need to be extremely careful and as precise as possible so that the door does not stand askew later.
Subtleties of the process

Options for door hinge sizes.
It is recommended to tighten the screw exactly in the center. And to do this, it is better to first make markings using a pencil and an awl. After all, this is the only way to avoid the loop being pulled in during the tightening process. After the marking is made, it is worth cutting the contour with a cutter to the thickness of the loop used. And only then proceed to obtain a level surface with a chisel.
If desired, the outline can be punched using a chisel. To do this, it is recommended to place the tool in the required place and lightly hit it with a hammer to knock out the contour. Special attention should be paid to the fact that for a purchased door structure, most often in the process of improper use of a chisel, the contour jams the plane of the door.
And according to the rules, the chisel should be positioned so that this outline goes inward. This part will be selected in the future to obtain the most even and beautiful edge at the loop.
Correctly embedded hinges on the door must be located at the same level. In the case when you observe a slight bulging of a separate part of the loop, it is necessary to slightly deepen the entire surface of the area. It is important not to overdo it, since the deepening should be uniform. And checking how correctly you installed the hinges on the door yourself is very simple.
To do this, you will need to take a ruler and apply it to the surface of the loop. If it turns out that the hinge protrudes somewhat, then you will subsequently have a huge gap between the interior structure and door frame, and on the other edge the door may not close. Whereas a deeply located hinge will lead to enormous pressure on the door frame and further pulling of the hinges.
In order to eliminate the resulting consequences, it is recommended for the first case to unscrew the loop and seat it deeper. And for the second, calculate the required height of the gasket to raise the loop to the required level. This spacer is most often made from rigid cardboard, but it can be made from other materials you have available. This gasket must be placed directly under the hinge. In this case, no fixation is necessary; the loop twisted at the top will already hold it firmly.
What is the easiest way to choose a place to cut the hinges?

Options for installing different numbers of loops.
First you need to assemble the door frame. Then you should put the door in the previously assembled box. Step back 2-3 mm at the top and leave a small gap. And only then mark the required places on the box along the embedded area. In the case where you initially inserted hinges into the frame, make marks directly on the surface of the door structure.
Now you know well how to insert the hinge being installed. Next, it is recommended to apply your hinge to the surface of the door, then mark it with an awl and drill it thin drill. Then you need to take the screws and screw them in using a regular screwdriver. If you constantly doubt the quality of the work performed, then tighten only two screws at a time and see the result.
Butterfly loops - convenient and simple!

Door hinge installation diagram.
There are special hinges without mortise, which are mounted on the interior door structure as quickly and simply as possible. Distinctive feature Such elements are considered to be installed without the use of chisels and grooves.
They just need to be marked and applied directly to the surface of the door and door frame. The design of such loops implies that the elements enter into each other, and this eliminates unnecessary hassle preliminary preparation door interior structure and door frame for insertion of hinges.
After all, not every owner has the necessary skills to work with wood, as well as special tools.
Door adjustment
It is worth paying special attention to the fact that the adjustment process is carried out in stages.
- Adjustment of the door leaf from the opposite side to the hinge side.
- Next, it’s worth checking how parallel the lines of the door leaf and frame are.
- First, the vertical position of the door structure is adjusted from the hinge side.
- And only then can you begin to adjust the gaps between the door structure and the frame.
- The final step is to adjust the gaps on the lock side.
The complete set of interior doors is not complete without the appropriate fittings. Along with handles, chains, eyes and various inserts, manufacturers include loops in the sets. Perhaps this main element door set, on which the quality of fixation of the leaf in the opening depends. Typically, traditional hinge models are used, the design of which involves inserting into an array - for this purpose a special groove is formed.
Development technological methods manufacturing and installation of doors led to the development of the “butterfly” hinge, which does not require insertion. The new fittings have other fundamental differences, which are characterized by both pros and cons. Correct installation will preserve the advantages and minimize the disadvantages of the finished door structure.
Design Features

The main difference between butterfly hinges, which also affects the features of installation and subsequent operation, is the fit to the door surface. Such fittings do not require the creation of grooves for insertion - the looped card is placed on the surface and also twisted. The fastening sides are designed so that when the doors are closed, one part is built into the other, which explains the name “butterfly”. The number of screws varies depending on the set, but on average corresponds to classic sets of mortise hinges.
Installation process
To understand how to install a butterfly hinge correctly, you need to take a closer look at its design. The technology for installing overhead models, as noted above, is determined by the specifics of their work. The absence of the need to form grooves is a significant advantage of such hinges; otherwise, the installation process follows the usual method.
First, the location of the loops is marked. It is advisable to apply them inside, and then fix the drilling points. The gap from the edges of the fabric should be at least 200 mm - the average distance not only for a butterfly loop, but also for conventional versions of this fitting. Then neat holes are made for the self-tapping screws, which are usually supplied complete with hinges. The final touch will be directly screwing the sides of the “butterfly” to the canvas.
Installation nuances
The apparent ease of the installation process and, in particular, the absence of the need to create niches in the array captivates many. But all the advantages that the “butterfly” has end there. Only after installation can one appreciate how ambiguous such fittings are.

The fact is that you can get the proper effect from using hinges without insertion only if the installation is impeccable. Compared with traditional models, “butterflies” do not provide a wide field for improvement. Firstly, the sides must fold perfectly, otherwise an unevenness will form - the door will spring back or, at a minimum, not fit tightly. Secondly, you will have to come to terms with a small gap, which, naturally, is formed from protruding loop cards. And one more unpleasant moment, which also characterizes butterfly door hinges and the design without a mortise as such, is the impossibility of removal without unscrewing the screws.
How to fix errors?
It is impossible to get rid of all the listed consequences of using such original hinges, but it is possible to minimize their impact on ease of use. Among the most important tasks that craftsmen solve during the installation of butterfly hinges is ensuring uniformity when the cards converge. Typically, inconsistencies are eliminated by creating linings. For this, cardboard, thin wood chips, paper and similar material are used - it must be placed in the part opposite to the side that is not overlapped.
In addition, the "butterfly", due to design features, do not provide a high degree of reliability. Of course, it all depends on the product, but they are significantly inferior to mortise-type hinges. Therefore, it is important to perform the fixation with screws as efficiently as possible - the absence of protruding heads and tilts during insertion will be reflected in reliability.
Another questionable feature is the location of the screws on the map. On one side they are located closely, and on the other - at a distance from each other. The configuration cannot be corrected, but the possibility of damage to the door on which you plan to install butterfly hinges can be eliminated. Installation is carried out on solid and reliable areas - that is, suitable for screwing.
What doors are they suitable for?
Determine the segment optimally suitable doors under the design of butterfly loops can be based on the strength of the fastening. This nuance has already been considered, and it is quite natural that it is undesirable to supplement heavy models with such systems. Still, the operation of insertion into the array adds reliability to the fastening, while external fixation without insurance seems very risky when installing a 40-kilogram sheet.

Conversely, butterfly door hinges, which install as smoothly and cleanly as possible, are ideal for lightweight doors that do not require special effort in installation. In particular, representatives of the veneered category are combined with “butterflies” not only technically, but also visually. Models made from solid wood are recommended to be equipped with mortise fittings - the complexity of installation is compensated by their reliability.
Decorative effect
The overhead butterfly loop fastening system is also due to aesthetic considerations. No matter how neat the inset is, the master will not be able to preserve the integrity and decorative completeness of the door to the same extent. By bypassing all the difficulties of installing such hinges, you can achieve an unsurpassed result. Since there is no need to interfere with the capricious laminated surface, doors with butterfly hinges should be considered as best option for living rooms, bedrooms, offices and other rooms where stylistic harmony is important.
Bottom line
It's hard to name best choice for amateurs and beginners who can count on simple installation without creating an insert. Some risks are eliminated, but others arise. Nevertheless, subject to strict markings and verified alignment of the cards, butterfly hinges will provide the result in the form of aesthetic interior doors with an original fastening configuration.

Finally, it’s worth turning to mortise models, which still remain the most popular solution for fixing doors. This choice is worth making if you need durable and reliable design However, you will have to sacrifice decorativeness. Nevertheless, the clumsy principle of introducing such loops is incomparable with delicate overlay without damaging the wood.
They are sold ready-made, but you can order your own version. Another option is to purchase all the door parts and self-assembly. But in this case, you will need to install door hinges. Doing this work with your own hands is not at all difficult. The main thing is to follow the instructions. In addition to the installation technology, the article will discuss instructions for replacing door hinges and give useful tips.
DIY door locks and hinges
Repair and replacement of door hinges
You have become familiar with the technology of installing door hinges on a new door leaf. But what to do when door hinges need repairs? Basically, this work is carried out in conjunction with door repairs. Sometimes even this does not help and it is necessary to carry out work to replace the door hinges. Let's consider the step-by-step technology.
- We fix the door with wedges. To open the hinge, we open the door. We fix the doors by placing wedges under them. When replacing door hinges, the doors themselves do not need to be removed. If wedges are installed, the doors rest on them and do not tip over.
- Checking the sizes. When replacing door hinges, you need to make sure that the new mechanisms are the correct size. Using a tape measure, we check the correct location of the loops. The hinges should be located at a distance of 20 cm from the bottom and top of the door frame. If this is not the case, you need to cut the loops into new places using the technology described above.
- Remove the top loop. We unscrew the screws that hold the hinge wing. We remove the wings from the door and pillar and check the quality of the wood.
- We prepare the doors and pillars for screwing in new hinges. If the wood under the hinges requires repair, we clean it sandpaper and apply a layer of stain or paint.
- Installing a new loop. We install a new door hinge into the existing recess. We attach the wings of the hinge to the door and the counter. To do this we use self-tapping screws and a screwdriver. After that we insert the axle into it. This completes the installation of the door hinge.
- Repeat the steps for the bottom loop. We unscrew the screws from the old bottom hinge and replace it. Replacing door hinges is completed by fixing the elements in their old place. The hinge wings are connected to the axle.
- We check that the hinges are installed correctly. We remove the wedges from under the door, open and close it several times. If the door moves normally, the door hinge replacement has been completed successfully. All is ready!
What are door hinges made of?
Door hinges are important part any door. Their quality determines how well the doors will open and close in the future. Loops are one of the most important details all doors, since the entire load of the door leaf falls on them. Only right installed hinges will ensure long and quality work doors. If you attach the hinges poorly, the door may not only close poorly, but may fall off after a few days.
Hinges are made from various materials: brass or steel. One of the most popular materials is brass, polished and similar to expensive metals. The disadvantage of this alloy is its softness. After some time, these loops may change shape. On interior doors Usually door hinges are made of brass.
Hinges are also made of zinc alloys. This option is much stronger than conventional hinges and, unlike brass, can withstand more weight. Steel hinges are installed on steel entrance doors.
Door hinge design
Door hinges are made not only from different material, but also have different design. According to the type of construction, they are divided into three types: screw-in, mortise and overhead. The first option is a design of two wings that is attached to the frame, as well as to the door itself. It is important not to confuse the right and left hinges when purchasing. Before purchasing door hinges, we advise you to consult a specialist.

Mortise hinges. This option perfectly protects against penetration into the apartment. This type of loop cannot be cut. They are made on the basis of bearings and have long term services.
Screw-in hinges. Installing these door hinges involves screwing them into the door itself. Such hinges should not be installed on doors made of low-quality wood, since the material may crack at the installation site.
Previously, doors were installed on two hinges; now, in order to increase reliability, the door is installed on three hinges. The most heavy doors installed on 4 or even more loops.
When the door leaf is fixed, the horizontal and vertical levels are maintained, unscrew the middle screw from the top hinge card of the door frame. To securely fasten it to the wall, you need to screw in a longer screw. This trick should be repeated for the bottom door hinge. If the doorway in your house is chipped wooden beams, this action will ensure long and reliable operation doors.

Some modern doors impossible to conquer using an ordinary chisel. To make loop notches, you may need a router. Then you need to cut the grooves with a chisel, making necessary exit for loops. The next step is to drill holes and screw the hinges.
When installing door hinges, you need to remember that between the door frame and door leaf There should be a gap of 1 - 1.5 mm on both sides. This is done so that changes in the geometry and dimensions of the door associated with changes in humidity and temperature do not in any way affect normal functioning doors.
If you did everything correctly, then the installation of the hinges is complete. Modern hinges are well adjustable, which allows you to control the correct operation of the door.
This completes the installation of door hinges. We hang the canvas and enjoy the new door.
Video about inserting door hinges


