Toys! For a small child they have great importance. He spends a lot of time with them. He may even consider them alive. This is his wealth, his treasure! Through them he understands the world. And it would be foolish to underestimate their importance in a child’s life and treat them carelessly. Toys must be kept clean and periodically inspected for damage. And it would be nice if they were stored in a special basket, and not in a TV box. Your favorite bunny or teddy bear cannot live in old box. Therefore, we suggest you weave a basket for toys from wicker. Made from environmentally friendly pure materials, it will decorate the interior of any room and bring joy to children.
For work you will need these materials
1. A sheet of plywood measuring 40x60 cm.2. Drill, drill, nail, hammer, pencil and ruler.
3. Bamboo sticks with a diameter of 4 mm and a height of 30-45 cm.
4. Wood glue or superglue.
5. Long rods weeping willow.
6. Bush willow twigs.
7. 3 m of decorative twisted sea grass rope. You can buy it in large construction supermarkets.
8. Opening varnish wooden products on water based and a brush.
9. A piece of cotton fabric with a children's pattern measuring 1.5x1.5 m.
10. 2.15 m of lace and 1.5 m of elastic.
Let's start weaving a basket for toys
1. Take a sheet of plywood measuring 40x60 cm and 1 cm thick. Its corners should be rounded. Mark holes on the end of the plywood for the braids of vines that will decorate it. The holes should be spaced 2 cm apart and have a diameter of 3.5 mm. The braid bend will have 4 rods in the upper waves and 6 rods in the lower ones. In each hole you need to insert 2 twigs of a shrub vine. Bending a “braid” begins with weaving with 4 twigs. Therefore, at the place where it begins, you need to mark 2 holes three times as close to each other as possible. These pairs of holes will be 2cm apart, just like the other single holes. Make a dent in each hole using a nail and hammer. This will make the process of drilling holes easier.


2. On the surface of the plywood bottom for the basket you also need to mark holes for the main posts. Their diameter will correspond to the diameter of the bamboo sticks, since they will serve as stands in the toy basket. Mark them with a pencil and ruler at a distance of 3 cm from each other.


3. Drill the intended holes. Their depth at the end of the plywood will be approximately 1-1.5 cm. It is better not to make holes on the surface of the plywood through, so that the bottom of the basket has a beautiful, smooth appearance.
4. Weave a braid bend at the end of the plywood bottom.
5. Take bamboo sticks and place them on the glue in the holes drilled on the surface of the plywood. Let the glue dry. We took bamboo sticks 30 cm long. This is not very convenient, since the basket will be higher and the bamboo stands will have to be extended during the weaving process. It’s good if you find similar sticks with a height of 40-45 cm on sale.
6. Take 3 long willow twigs and place one behind the three posts. Weave a rope of 3 rods around the bamboo posts.
7. When the height of the rope reaches 5 cm, proceed to layer-by-layer weaving of 5 rods. To do this, place 5 long willow twigs behind each post and weave 25 cm upward in layer-by-layer weaving. We took weeping willow twigs here in order to inner surface baskets for toys, there were as few extensions of rods as possible. Although you can get by with shorter twigs of shrubby willow.


8. Having completed the layer-by-layer weaving of 5 rods, weave a couple of rows of sea grass rope simple weaving.
9. Now step back 4 cm and weave 2 rows again with the same rope. 4 cm of bare bamboo posts form peculiar squares, which will later serve as basket handles.
10. Weave 2 cm upwards with a rope of 3 rods.
11. Tightly secure the ends of the rope and proceed to building up the stands for bending the “rod” of three pairs of rods. To do this, cut the bamboo posts and add one post each of willow twigs in front of them. The rods need to be inserted deeply. So that they reach right up to the bottom rows, woven from sea grass rope.
12. Weave a “rod” bend from three pairs of rods.
13. Weaving the basket is finished. Open it up with water-based varnish. It is not as toxic as solvent based varnish. Therefore, it is often used to open a nursery.


14. While the varnish is drying, sew the lining for the basket. Fabric lining plays an important role in a toy basket. It covers the places where the twigs grew, and thereby protects children's fingers from unpleasant contact with them. The lining also prevents the basket itself from getting dirty. If necessary, the lining can be removed and washed at any time. Just cut the fabric so that its parts match the dimensions internal sides baskets and would expand slightly at the top. Leave a couple of centimeters for the seams. And also add 10 cm to the height of the lining. This is necessary so that it can bend outside the basket and be fixed to it with an elastic band.

15. Having sewn all the cut parts together, you will get a kind of bag. Fold and stitch its edges to create a hole for the elastic.
16. Tighten the elastic band into the bag.
17. Sew lace around the perimeter of the lining.

18. Sew a thick ribbon from the leftover fabric and tie it into a beautiful bow in the center of the basket.

Wicker basket ready for toys! Hurry to please your child!
Vine is the oldest material for weaving various devices: dishes, furniture and decorations. Recently, wicker weaving as a form of creativity is returning to its popularity - environmentally friendly materials and natural motifs in home interior decoration are coming back into fashion.
Types of products
Vine is a flexible, pliable material from which it is convenient to weave various items everyday life Most often, craftsmen use willow twigs and wicker - they are the most flexible and strong enough not to break during the work process.
Among the wicker products you can find the following:
- furniture - chairs, tables, shelves, large baskets for things;
- tableware - baskets, trays, bread bins, vases;
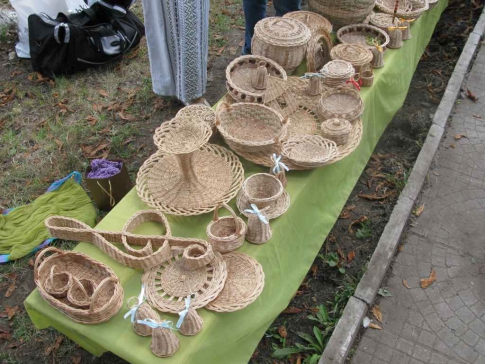
- decorating elements - floor vases, figurines, boxes, Christmas tree decorations.

Baskets, tables and chairs are made from wicker more often than other items due to the simplicity of their design. In some cases, their creation is similar to weaving using the macrame technique: the same technique of alternating knots and free parts of threads.

Toys from wicker began to be created in ancient times. But now this creativity has been revived thanks to the growing love for environmental materials.
Types of creativity
Many novice craftsmen may confuse this concept with techniques for weaving wicker products. Weaving differs not only in the methods of its creation, but also in appearance and the tightness of the rods. In addition, weaving from the same type of vine can combine different techniques.
Continuous weave
A classic way to create products from wicker. With continuous weaving, there are no decorations on objects in the form of openwork holes or patterns.

This type is used to create baskets, armchairs and tables - due to the tightness of the rod, the product can withstand heavy weight well.
Openwork weaving
This type is characterized by many openwork and twisted elements in the product. These can be slots, waves and loops.

Most often, souvenir baskets, crackers and vases of this type are woven.
Twisted weave
This type of weaving was forgotten for some time. And only in last years got a second wind. With its help, miniature products are created, such as Christmas tree decorations and figurines, and armrests for furniture.

The peculiarity of this type of wicker weaving is that the rods are not intertwined, but twisted together. In this case, the product is given a certain shape.
Spiral weave
High demands are placed on products made from this type of weaving, so it is mainly carried out by professionals. The basis is taken from rings of rods, which are braided through one another with a special ribbon.
In this case, the vine must be especially flexible and not leave creases. Therefore, instead of willow vines, spruce or pine roots are often used to begin the spiral weaving. In addition, the diameter of the beginning and end of the rod must be almost the same in order for the ring to be uniform.

The braiding tape is cut from the top glossy layer of willow vine. It should be thin and elastic, but very strong.
There is also a figured type of wicker weaving, which is based on combining several types of this creativity into one work. As a result, the master’s work is not geometrically correct, but with grooved edges in the form of waves.
Weaving techniques
Weaving from the vine is carried out 1 at a time simple principle- initially the master builds the frame of the product with long strong rods in the form of a fence. After this, thinner flexible twigs are taken, which braid the base into in a certain order, forming a pattern.
Currently, there are many different techniques for weaving wicker products. In addition, for each part of the product - be it the bottom, walls or edge - a different method is used.
But the techniques presented below are considered basic and easiest to perform. Therefore, beginners are advised to initially master them, and then move on to more complex ones.
Simple weaving
The easiest weaving technique. In addition, it is universal - you can use it to weave any types of products.
For execution simple way start braiding the frame rods with one vine one at a time: 1 rod in front, 1 in the back. For the next row, change the braiding order - now the first ply is braided from the back, and the second from the front, so that the rows form an interesting diagonal sequence.

To speed up the process and diversify the pattern, you can weave 2, 3 or more rows in the first order, and also 2 or 3 in the second to increase the width of the resulting pattern.
Weaving in inclined rows
This technique is also called the layer-by-layer method of creating products from wicker. In this case, the same number of entwining vines is taken as there are twigs in the frame.
The first twig goes around the first vine in the frame from the front, the second - from the back, and is brought out of the product. Repeat this with each vine, gradually weaving layers of your work.

This method is better suited for circular weaving - creating baskets, baskets, and large round household baskets.
To diversify the patterns on the product, you can also take 2 or 3 rods to perform one action.
Rope weaving
An interesting method of weaving from wicker, which is often used to separate 1 layer of patterns from another. It is possible to weave a rope from 2 or 3 rods. The pattern looks like a small twisted rope.

To weave a vine into two rods, bend 1 working rod around 1 vine of the frame from behind and bring it out. Repeat the action each time with the upper rod that was just used, pressing the lower one.

Weaving with 3 vines is based on a slightly different method - you need to go around not one, but two pegs of the frame, and not from behind, but from outside. After which the vine goes around the third riser from the inside and is brought out. Weaving in 3 vines can also be used for circular weaving of products.
Willow wreath: master class
If you have never tried your hand at creating complex twisted wicker products, but really want to learn this type of needlework, start with the simplest thing - weaving willow wreaths for interior decoration.
This master class does not require special knowledge in the field of weaving. At the same time, it will help you learn how to properly handle willow twigs in your work.
Collect willow twigs 30-60 centimeters long and clean them of the top glossy layer. Forty elements are enough for you to create 2-3 wreaths. After this, soak the vine in water for about 4 hours to make it more flexible. On this preparatory stage finished - you can start working.
- Weave a ring from the first twig. To do this, begin to wrap the thin end of the rod around its thick part.

- Take the second element and braid it around the first.
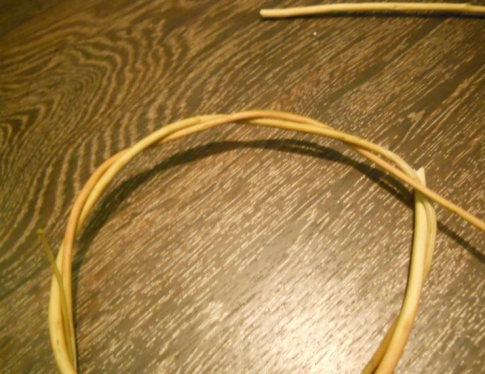
- Hide and fix the thin tip between the resulting slits of the wreath.
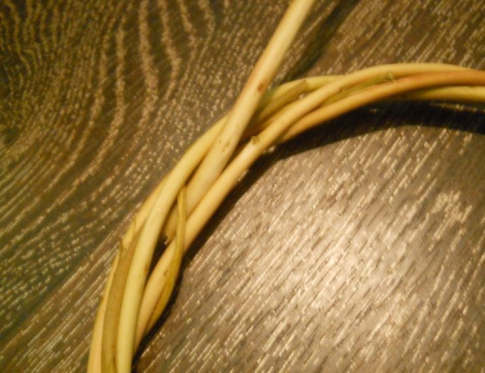
- Using the same technology, start wrapping the rods around the already formed base.
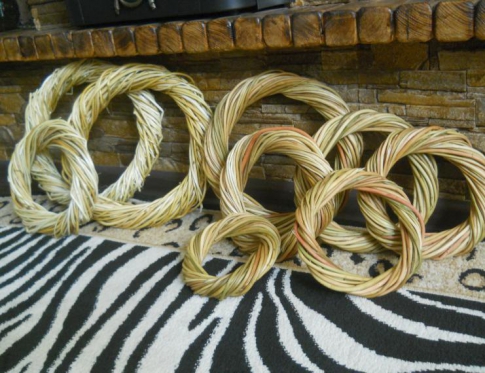
Leave the finished wreaths to dry in a warm, dry place for about 3-5 days. After this they can be used as finished item decor or base in more complex master class. Such blanks are often used to create wreaths for Halloween or New Year.
To work, you will need pruning shears, thin wire, varnish or spray paint, and to decorate the figures - sparkles, artificial berries, and various beads.Star
We take five identical branches 15-20 cm long. We fold them in the shape of a star and secure the corners with wire. The result is the frame of the future star (Fig. 1).
Then we take a thinner and longer shoot and, starting from the corner, weave it around the frame, as shown in the figure (Fig. 2).
In the same way, we alternately braid the remaining corners of the frame with one or the other end of a thin shoot. The ends of the shoots will intertwine with each other somewhere in the middle of the star. For strength, you can take one or two more shoots and “lace” the figure with them several times diagonally, but the weaving should not be very tight. Mesh, translucent figures look more impressive (Fig. 3).
To secure the corners of the star, we take very thin shoots and wrap them several times around the corners next to the wires.
Crescent
We take two branches 15 and 20 cm long and fasten their ends with wires, as shown in Figure 4.
Starting from the corner, we braid the figure with thin shoots (Fig. 5).
To make the crescent more durable, we pass a few more thin shoots from one end to the other, and wrap the corners with them next to the wire (Fig. 6).
Using the same principle, you can weave other flat figures.
Bell
We take five flexible shoots of willow or birch branches of the same thickness and length. We tie their ends together. It turns out the frame of the future bell. Then, using a thin long shoot, we begin to braid the frame using the “darning” method: the shoot alternately “dives” in a circle, either on or under the next branch of the frame (Fig. 7, 8, 9).
Applying the shoots to each other and trying to maintain the bell shape, we continue weaving (Fig. 10).
We carefully cut off the end of the last shoot and leave it inside the bell (Fig. 11).
To obtain an openwork along the edge of the bell, we alternately bend each end of the frame branch and fasten it next to the next branch (Fig. 12).
The “tongue” of the bell is a wooden bead suspended on a ribbon. You can make a “tongue” by twisting a thin long shoot of willow into a ball.
We dry the products for 7-10 days at room temperature. Do not place them on the battery: they will become brittle.
We remove the wires from the finished figures and coat them with NC varnish: it dries quickly, although any other wood varnish will do. We advise you to first try on a small fragment how the varnish applies. Once the desired effect is achieved, cover the product completely.
Instead of varnish, the figures can be coated with multi-colored spray paints (automotive or special ones sold in stores), for example, “New Year’s snow” or “ice pattern” sprays.
It is good to sprinkle the varnish or paint that has not yet dried with glitter, which is sold in stores. You can make glitter yourself by breaking up unnecessary Christmas tree decorations.
When the paint or varnish is dry, attach artificial berries, small spruce branches, cones, and beads. We tie ribbons to the decorated figures and hang them on the Christmas tree, window or wall on different levels.
Happy New Year and Christmas!
Nowadays, fashion for folk crafts is returning, and in particular, for products made from wicker. It could be original furniture, various baskets, boxes, etc. Lovers of exclusives pay good money for original works. Wicker weaving for beginners can bring in a decent income if you approach the matter seriously and responsibly. In this article we will take a detailed look at wicker weaving for beginners step by step.
Business registration
If you plan to work independently at home, you don’t need to register this business at first. But if you are interested in wicker weaving as a business, you need to officially register the enterprise.
To do this, you should register an individual entrepreneur or LLC. The choice of organizational and legal form largely depends on the planned scale of production. Also, be sure to obtain a permit from the fire department since you will be working with flammable materials.
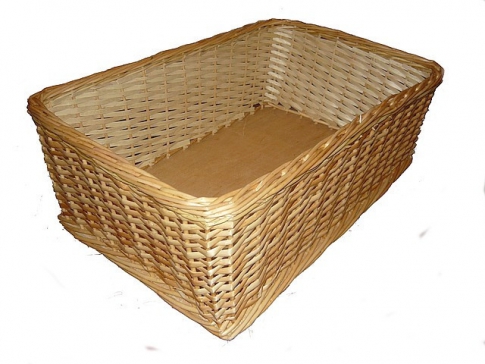
Types of products
Vine is a pliable material that is highly flexible. You can weave various items from it.These may be the following products:
- Armchairs, tables, sofas, shelves, chairs;
- Baskets, stands, bread bins, flower pots, trays;
- Souvenirs, figurines, Christmas tree decorations, vases.
Do-it-yourself wicker furniture is the most popular. To make such products, craftsmen use a technique somewhat reminiscent of macrame, that is, alternating knots and loose threads. Our ancient ancestors learned to create various products from wicker. Modern people began to appreciate environmental materials so love for folk art began to be reborn.
Craftsmen can use different types of weaving in their work:
- Solid;
- Openwork;
- Spiral;
- Simple;
- Weaving with rope.
If you want to master this art yourself, find a step-by-step video of wicker weaving for beginners on the Internet. But it's best to take lessons from experienced craftsman, which will help you gain all the necessary skills. Once you understand how to weave baskets from wicker, you can gradually move on to making more complex products.
Procurement of raw materials
Most best material, which is used for weaving wicker products with your own hands, is willow. You should be aware that you should not mix rods with different trees. You can prepare raw materials all year round. Its quality largely depends on what time of year they were cut. In spring and summer, the material has a beautiful milky color. The bark from such twigs is easy to clean, and the wood itself has a herbaceous structure.
In winter, the material is more elastic and durable. It does not need to be sanded, since the rods acquire beautiful colors in different shades. By combining them, you can make wickerwork with a pattern. After you cut the rods, they need to be sanded and split into several parts. It is advisable to do this in clear sunny weather so that the rods can dry out a little.

Pattern: wicker weaving technique
Technology
As a rule, training begins with a simple technique of weaving with wicker. This is the main element that is used to make various products. After you have mastered simple wicker weaving for beginners, you can move on to openwork.
We act according to the following principle:
- The rods braid the risers;
- The horizontal row goes around the vertical one.
The location of the risers largely depends on how correctly you choose the material. During operation, you should check the strips so that they are at the same distance and do not twist. The simplest option is weaving using one rod.
Once you figure out how to weave with vines simple products, proceed to making openwork furniture.
Business benefits
Original do-it-yourself wicker furniture is always in great demand. You won't spend a lot of money on making it. The biggest investment is your time and effort.
If you prepare the rods yourself, the cost of the products will be low, and accordingly, you will receive a high income. The most important advantage of such a business is that it does not require large capital investments. All invested money will be returned within 1-2 months of work.
Staff
When the business begins to develop, you can hire several craftsmen to work. Over time, their number can be increased. In this case, you can divide manufacturing process at several stages. Some workers will work exclusively on frames, while others will only do weaving. To diversify the models, invite seamstresses to work who will make furniture covers, sofa cushions and other elements made of fabric or leather.
Sales channels
The first buyers of your products will be your acquaintances and friends. The most profitable activity is weaving furniture from wicker. It can be sold online on your own website or on social networks.
All you need to do is take a photo of your products and put them up for sale at affordable prices. You can rest assured that the first buyers will appear at the earliest short time. In addition, you can sell products at markets or in your own store.
Financial calculations
To set up a home business, you will have to spend a certain amount.Main expenses:
- Taxes;
- Rent point of sale or website promotion on the Internet;
- Transportation costs for finished products.
You can cut costs if you reach an agreement with stores and sell your products. As a result, you can save on renting a retail outlet and transporting products.
For example, in one day you make 2 tables for 6 thousand rubles. For the sale of products, you will pay the store 20% of its cost, as well as 6% tax for operating entrepreneurial activity. For a month it will be approximately 35 thousand rubles. This is your net income.
Price policy
Furniture items can be made either as a set or separately. For example, there is always a high demand for chairs. They cost approximately 500 rubles. But if you make four chairs and a table, the price of such a set is already 10 thousand rubles.
The greatest demand is for wicker bedside tables, coffee tables, hangers and more. Rocking chairs also sell well. They are purchased wholesale by private sanatoriums and boarding houses.
Video on the topic Video on the topic
- You should not immediately take on the production of complex objects. Try to weave simple things, such as small baskets or coasters. First of all, you need to figure out how to make a frame, after which you can try to weave a vine into it;
- To give the product the desired shade, you can use special chemical compounds;
- The most common product that is in greatest demand is rocking chairs. One person can make two such products per day.
conclusions
For beginning entrepreneurs, the business idea of wicker weaving is attractive because it does not require large financial investments. The market for wicker products is not yet fully saturated. Mostly, consumers are offered expensive imported goods. If you bet affordable prices, the demand for your products will be high. This means that the business will bring decent profits.
Toys! For a small child they are of great importance. He spends a lot of time with them. He may even consider them alive. This is his wealth, his treasure! Through them he understands the world. And it would be foolish to underestimate their importance in a child’s life and treat them carelessly. Toys must be kept clean and periodically inspected for damage. And it would be nice if they were stored in a special basket, and not in a TV box. Your favorite bunny or teddy bear cannot live in an old box. Therefore, we suggest you weave a basket for toys from wicker. Made from environmentally friendly materials, it will decorate the interior of any room and bring joy to children.
For work you will need these materials
1. A sheet of plywood measuring 40x60 cm.
2. Drill, drill, nail, hammer, pencil and ruler.
3. Bamboo sticks with a diameter of 4 mm and a height of 30-45 cm.
4. Wood glue or superglue.
5. Long twigs of weeping willow.
6. Bush willow twigs.
7. 3 m of decorative twisted sea grass rope. You can buy it in large construction supermarkets.
8. Water-based varnish for opening wooden products and a brush.
9. A piece of cotton fabric with a children's pattern measuring 1.5x1.5 m.
10. 2.15 m of lace and 1.5 m of elastic.
Let's start weaving a basket for toys
1. Take a sheet of plywood measuring 40x60 cm and 1 cm thick. Its corners should be rounded. Mark holes on the end of the plywood for the braids of vines that will decorate it. The holes should be spaced 2 cm apart and have a diameter of 3.5 mm. The braid bend will have 4 rods in the upper waves and 6 rods in the lower ones. In each hole you need to insert 2 twigs of a shrub vine. Bending a “braid” begins with weaving with 4 twigs. Therefore, at the place where it begins, you need to mark 2 holes three times as close to each other as possible. These pairs of holes will be 2cm apart, just like the other single holes. Make a dent in each hole using a nail and hammer. This will make the process of drilling holes easier. 


2. On the surface of the plywood bottom for the basket you also need to mark holes for the main posts. Their diameter will correspond to the diameter of the bamboo sticks, since they will serve as stands in the toy basket. Mark them with a pencil and ruler at a distance of 3 cm from each other. 


3. Drill the intended holes. Their depth at the end of the plywood will be approximately 1-1.5 cm. It is better not to make holes on the surface of the plywood through, so that the bottom of the basket has a beautiful, smooth appearance.
4. Weave a braid bend at the end of the plywood bottom.
5. Take bamboo sticks and place them on the glue in the holes drilled on the surface of the plywood. Let the glue dry. We took bamboo sticks 30 cm long. This is not very convenient, since the basket will be higher and the bamboo stands will have to be extended during the weaving process. It’s good if you find similar sticks with a height of 40-45 cm on sale.
6. Take 3 long willow twigs and place one behind the three posts. Weave a rope of 3 rods around the bamboo posts.
7. When the height of the rope reaches 5 cm, proceed to layer-by-layer weaving of 5 rods. To do this, place 5 long willow twigs behind each post and weave 25 cm upward in layer-by-layer weaving. We used weeping willow twigs here so that there would be as little build-up of twigs as possible on the inside surface of the toy basket. Although you can get by with shorter twigs of shrubby willow. 

8. Having completed the layer-by-layer weaving of 5 rods, weave a couple of rows of simple weaving with sea grass rope.
9. Now step back 4 cm and weave 2 rows again with the same rope. 4 cm of bare bamboo posts form peculiar squares, which will later serve as basket handles.
10. Weave 2 cm upwards with a rope of 3 rods.
11. Tightly secure the ends of the rope and proceed to building up the stands for bending the “rod” of three pairs of rods. To do this, cut the bamboo posts and add one post each of willow twigs in front of them. The rods need to be inserted deeply. So that they reach right up to the bottom rows, woven from sea grass rope.
12. Weave a “rod” bend from three pairs of rods.
13. Weaving the basket is finished. Open it up with water-based varnish. It is not as toxic as solvent based varnish. Therefore, it is often used to open children's furniture. 

14. While the varnish is drying, sew the lining for the basket. Fabric lining plays an important role in a toy basket. It covers the places where the twigs grew, and thereby protects children's fingers from unpleasant contact with them. The lining also prevents the basket itself from getting dirty. If necessary, the lining can be removed and washed at any time. Simply cut the fabric so that the pieces fit the inside of the basket and flare out slightly at the top. Leave a couple of centimeters for the seams. And also add 10 cm to the height of the lining. This is necessary so that it can bend outside the basket and be fixed to it with an elastic band. 
15. Having sewn all the cut parts together, you will get a kind of bag. Fold and stitch its edges to create a hole for the elastic.
16. Tighten the elastic band into the bag.
17. Sew lace around the perimeter of the lining. 
18. Sew a thick ribbon from the leftover fabric and tie it into a beautiful bow in the center of the basket. 
The wicker basket for toys is ready! Hurry to please your child!
You may like:
- Crocheted rugs: interesting models, diagrams and...
- The craftswoman only needed nail polish and cotton pads...
- From all this, the girl created incredible beauty...