What to do if there is an empty wall in the house and how to decorate it and what decoration to hang on the wall - read the article!
Here we have collected the basic methods on how to decorate a wall on a budget with your own hands! FROM the most basic ideas that even a child can repeat, to more complex ones, such as painting walls - you choose any one!

Hanging large mirror on the wall!
Mirrors not only look beautiful on the wall and give you the opportunity to admire yourself, but also visually increase the size of the room. We have adopted mostly standard mirrors and for everyone they are basically located in approximately the same place: the bathroom and the corridor.
Designer mirrors are very expensive, just last week I was convinced of this hardware store. But even an ordinary mirror can be transformed and decorated in this way that neither him nor the walls will be recognizable.


Figured mirrors on the wall are at the peak of popularity

The feather mirror is a great accent on the wall!
Decorating the wall with wallpaper
An ideal option for decorating an empty wall for those who, for example, have old wallpaper on the wall or need to cover or disguise something.
- We buy a roll of wallpaper in a contrasting color or take scraps of old wallpaper.
- We lay out the collage on the floor first so that we can understand what will happen in the end.
- And glue it to the top of the old wallpaper with wallpaper glue.

Wallpaper accent wall
ATTENTION: You can glue over old ones only if they stick well!
Paint with patterns and drawings
The most expensive, but very nice method transform and decorate an empty wall in the apartment - applying a pattern with paint under a stencil or masking tape. The advantage of this method is that it is durable and can be applied to any room: bathroom, kitchen and bedroom.


Colored tape or self-adhesive paper
If you don’t want to spend a lot of time fiddling with paint, a simple way to decorate a wall is with colored tape or self-adhesive paper. We cut out crosses, circles or hearts - now it’s like this minimalist and geometric print on the wall is in fashion and it looks very stylish!

Small crosses on the wall

Decoration with adhesive tape

wall decoration with children's adhesive tape
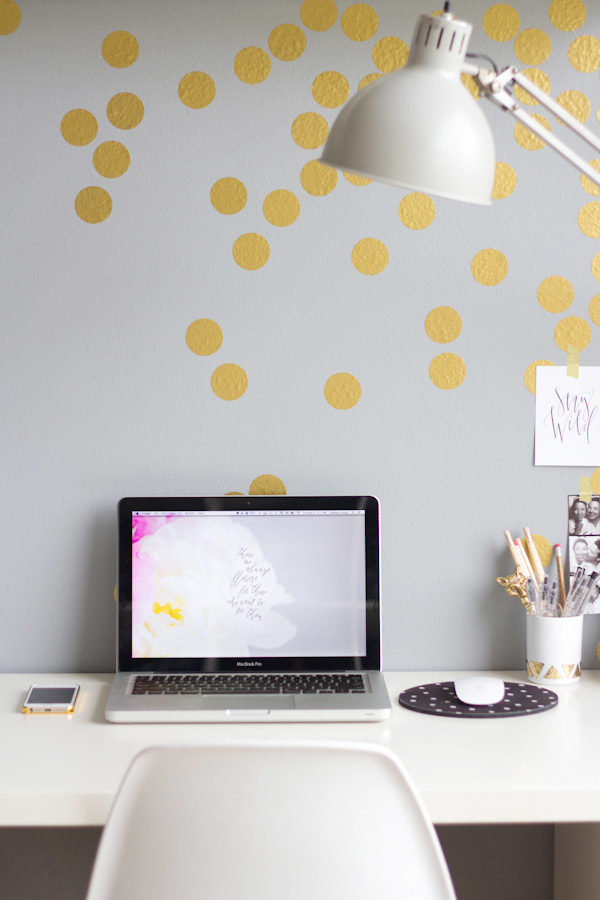
Decoration above the desktop with gold self-adhesive circles

Fabric panel
Such fabric paintings are an excellent wall decoration for both the bedroom and living room. They will look great at the head of the bed or near the TV.
The principle of creating panels from fabric:
- Required wooden subframe, its cost is about 1-2 dollars. And you can order it at any framing workshop.
- Choose any piece of fabric that matches the color. Can be used, for example, from an old dress or curtains.
- Using a wood stapler or furniture stapler pull it onto the subframe. This process will take no more than 10-20 minutes.


Branches
Create a corner in your home wildlife. Place the branches in frames and attach them to the wall. The photo shows options on how this can be done, you can use them, or your own on this basis. You can use both processed and rough branches.


Vertical mini garden
Green up your home without crowding your tables and window sills. Small, lightweight pots or vases, made in the same style and attached to the wall as a display, will help you do this. You can buy pots in a store, or make your own from wood or cans.

How - in this master class!


Shelves
This method will help not only decorate the wall, but also make it more functional, place those important things that you would like to have quick access to or just admire: books, flowerpots, souvenirs. Make (or buy) a shelf original form and it will not just be furniture, but a real element of apartment decor.


Paper crafts
Paper is inexpensive, can come in a variety of colors and densities, and you can do just about anything with it. Since the field for action is really wide, let’s break this point into sub-points:

Cut out figures
Butterflies, hearts, flowers and the like - for all this you only need scissors, paper and a little free time. You can cut it out using a ready-made stencil or draw it yourself; the figures can be flat or curved, creating volume.


Paper crafts with 3D effect
Here you already need to show painstakingness and endurance, but the result is worth it.

Stickers
Ordinary white stickers, folded several times, turn into original wall decor. Colored stickers look great even if you just hang them in smooth color transitions; you can also use the simplest origami techniques.


Paper panel
You can cut the paper into small pieces, rounded on one side, and hang them so that each one overlaps the previous one a little, thus creating a panel. At the end, you can spray paint it all or leave it in its original color.


Paper cupcake baskets
Thanks to their shape, size and reliefs on the sides, they are suitable not only for baking, but also for decoration: they can easily be formed into flowers or simply an interesting abstraction.


Other photo wall decoration ideas
Even things like wine corks, pencils, pebbles, spoons and other “ordinary” things can appear in a completely new light. Take a closer look at the things around you, turn on your imagination and think about how else they can be used, besides the usual functions, and you will undoubtedly see many various options for decorating an empty wall, which you never even thought about before.


2 ratings, average: 3,50
out of 5)
People have always believed that painting walls is a wonderful way not only to decorate their home, but also to attract happiness, peace and good luck. This design direction has not lost its relevance at all, quite the contrary - art painting walls are becoming more and more popular today. This is quite understandable - original version design of the surrounding space can transform a room, fill it with warmth, beauty and comfort.
How it all began
Decorative painting walls is associated with the emergence frescoes. Translated from Italian, “fresco” means “fresh.” The technique involved applying paints diluted with lime water to wet (fresh) plaster. This method made it possible to obtain durable paintings that did not lose the brightness of colors over the centuries.
.
The fresco was widespread in Rome and Greece in the 2nd millennium BC. Aegean art was popular among the elite and was considered the best method decoration of walls and ceilings. Unique technology The work has preserved the creations of ancient masters to this day and told about the beliefs, customs and traditions of their ancestors.
The sequence of creating a clean fresco was first described Cennino Cennini(1447). The image was applied to the plaster using powder, ocher or coal. Only rich people could afford such beauty: artistic painting is a labor-intensive process that requires high skill and appropriate remuneration.

Today, painting walls in the interior has become more accessible, but it still cannot be called a cheap pleasure. Handmade is considered the best way to create an exclusive interior that has no analogues. The variety of styles and genres guarantees stunning results - mesmerizing and realistic.
Application technique: varieties
The concept of “painting the walls of a room” includes many ways of applying images. It is customary to distinguish between 2 main types: traditional and modern techniques, which in turn are divided into several subtypes.
Imperishable classic
Traditional wall painting is a monumental work done manually, without the use of modern devices. In addition to the above fresco, traditional techniques include:
- encaustic- application of molten wax or oil paints. Although another option is more often used - the image is applied to canvas or wooden panel and then pasted on the wall;
- alsecco translated from Italian as “dry”. This technique of painting walls involves applying a color mixture to dry plaster. The paints were ground on eggs with the addition of lime and vegetable glue mixed with tempera, acrylic and oil solutions;
- sgrafitto translated as “scratched.” The procedure is technologically quite complex - the wall is covered first with black and then with white primer. The design is scraped onto the white ground until a black background appears. The technique was invented by the ancient Greeks and became widespread during the Renaissance.
Achievements of the current century
Modern variations are no less interesting, but more varied.
- grisaille translated from French as "gray". The peculiarity is that the drawing is done in a palette of all shades of gray - this gives the composition a sculptural orientation;
- drawing on decorative plaster . IN in this case Before starting work, the walls are finished in order to give the required volume. A painting on a wall treated in this way looks like a real one - “living” and “breathing”;

- acrylic painting walls are extremely in demand due to quick application and drying, the ability to convey the play of light and tones;
- visible and invisible colors glow in the dark and attract everyone's attention. The technique allows the use of coloring mixtures with the addition of mother-of-pearl and light-accumulating particles that shine in ultraviolet light - a truly mesmerizing sight;
- graffiti- a technique familiar to many, involving the use aerosol cans with paint;
- vinyl painting- one of the latest developments, loved by many for its ease of execution and cost-effectiveness. Ornament that is applied to vinyl wallpapers, brings the desired breath of novelty into a familiar environment and, with the right approach, becomes the main decoration of the interior.

Stencil painting
Question how much does wall painting cost- the first thing that worries those who want to decorate their home with “living” paintings. The cost depends on many factors: the complexity of the design, the application method, the size of the composition, and the chosen subject.
On average, an ornament will cost from 2,000 to 15,000 thousand rubles. per sq.m., landscape sketches - from 6,000 to 30,000 thousand rubles. per sq.m., compositions depicting animals and humans - from 20,000 to 60,000 thousand rubles. per sq.m.
If you want to create on your own, then stencils for painting walls will help you. It's simple and affordable way decorate the room with borders, friezes, ornaments and flowers. There are a large number of ready-made templates for painting on sale, but if you want something unusual and definitely in a single copy, then you can make the stencils yourself. It is enough to take a sheet of plastic or thick cardboard, draw the outlines of the desired design and cut it out.

All that remains is to fix the stencil on the wall and paint it using a special stencil brush and water-dispersion or latex paints. To create single-color patterns, single templates are suitable, while the use of multiple shades requires the presence of a multi-stencil consisting of several parts.
Wall painting with stencil pictures is especially popular when decorating children's rooms. The topic can be any depending on the age, gender and preferences of the child. It has been proven that taste formation begins in childhood— surround your baby with bright, interesting and educational stories that stimulate the development of imagination, and he will grow up kind, smart and talented.

DIY artistic painting
First of all, you need to decide on the location of the drawing and purchase materials for the work. If the choice of area for juicy experiments depends only on you, then paints and brushes must be purchased, taking into account the recommendations of professionals.
So the best acrylic paints are varnish and matte. They are non-toxic, dry quickly and are resistant to mechanical stress (the created sketch can be washed, but without fanaticism - with special diligence, you can erase anything).
Brushes for acrylic paints must be purchased with artificial bristles. Preferably different sizes that will help you choose best option stroke depending on the tasks
.
Next stage - surface preparation. The wall is puttied to perfect smoothness - there should be no bumps or depressions. Then it is painted with white paint, just white, and not tinted - otherwise we will get a faded pattern with spots. Before applying the pattern directly to the wall, it would be a good idea to work out the sequence of sketching the details on paper.
Draw an outline with colored pencils; if you use a simple pencil, then under the influence of acrylic paints it will blur and instead of a picturesque landscape, an artistic “daub” will appear in front of us. Make sketches from large to small details, i.e. identify the main elements first, and then supplement them with secondary ones
.
It is also necessary to paint over the drawing in stages - give yourself a rest. Intervals will help not only to maintain the thirst for creativity, but also to see minor mistakes and shortcomings. The paint is applied from large to small parts, from light to darker tones.
Final step- varnishing. Although the procedure is not mandatory for acrylic paints, it is better to play it safe and securely fix the created masterpiece, but when using watercolors and gouache - varnish coating extremly necessary! Apply the varnish carefully using a spray bottle several times thin layers. Now your efforts are reliably protected from the influence of dust and time; all you have to do is wipe the created splendor with a damp cloth from time to time.

Artistic wall painting is a very interesting activity that requires inspiration and special responsibility. Try to put a piece of your soul into your work, and then the result will delight the eye and fill the space with a special, festive mood.
Wall painting was very popular in the past: it decorated the walls of palaces and estates. Nowadays it can be seen less often, but modern technologies have allowed it to fit harmoniously into stylish interiors. We invite you to consider different kinds wall paintings, and also evaluate the most successful examples- we took some from our reports.
So, according to Image application techniques are divided into two types: traditional and modern. We will consider the latter - they are more relevant and occur much more often.
Acrylic painting
Painting with acrylic paints is the most popular type of painting on walls in the interior. For such a painting, it is very important to prepare the “canvas” well: the wall must be perfectly flat. They paint with acrylic on top of the top layer of plaster, after first applying a layer of acrylic primer so that the drawing sticks better.
Price acrylic painting quite high and depends on the complexity of the drawing and elaboration small parts. The price of simple drawings varies from 3,000 to 6,000 rubles/m2, medium in complexity (for example, detailed landscapes) - from 6,000 to 15,000 rubles/m2, and truly complex ones (portraits, copies of famous paintings) - from 15,000 rub./m2.
The artist must provide customers with a sketch from which he will create a panel on the wall, so that there are no surprises later.
Here interesting example work done by the guys from Studio 7, which paints walls.


During our reporting, we saw beautiful acrylic painting several times. For example, designer Masha Kolesnikova herself painted the bedroom wall for the birth of her daughter Zlata. The baby is already two years old, and she recently asked her mother where this fabulous tree came from in her room, and when she heard the answer, she exclaimed: “Mom, what a great fellow you are!” Masha recalls this incident with a smile.

We saw the most complex and at the same time the most interesting wall drawing in. Its n The first floor is dedicated to the fairy tale “Alice in Wonderland”.The pride of the owner is a painted library with a secret entrance to the Looking Glass. There are several references to the fairy tale on the panel: the book of the same name, a jar with the magic potion “Drink Me,” the Cheshire Cat and the queen’s chess piece.

I love my family and friends very much, and I wanted them to contribute something to our home. We gave them a task: to think about what kind of book they would like to write in their lives. And when the wall library was made, we “put” all these “works” in a closet: the artists painted a lot of books, and each family could choose the series, color and thickness of their volumes, and then write on them.


And a few successful examples.


Airbrush
Many people are familiar with airbrushing thanks to the painted cars found on the roads. But airbrushing is not necessarily associated with cars; it can also decorate interior walls. Airbrush drawings are made using a special tool - an airbrush. The lines are smooth, and thanks to the transparency of the layers, you can adjust the color. The price of simple compositions starts from 1000 rubles/m2, and complex ones, including even photorealism, start from 7000 rubles/m2. By the way, a popular trend is painting refrigerators using airbrushing.

Painting with invisible paints
Perhaps the most fantastic option from our selection. The painting is applied to the wall invisible fluorescent paint that only appears when turned on ultraviolet light(UV lamps). Sometimes such a pattern is applied to an existing acrylic, adding fabulousness to it, and sometimes designers choose a simple plain wall, which natural light doesn't even hint at the secret he's hiding. This is very convenient, since the drawing does not get boring.
In the photographs - the designer's projectSvetlana Krasnova.


Painting with luminous colors
Luminous paints containing a phosphor differ from invisible ones in that they are most often applied over an acrylic design so that it does not get lost in the dark. They store light during the day and then release it for another six to eight hours after dark.Such paints are rarely used in apartment interiors, since few people want the walls to glow at night, but they are very popular in the interiors of bars, bowling alleys and cafes.
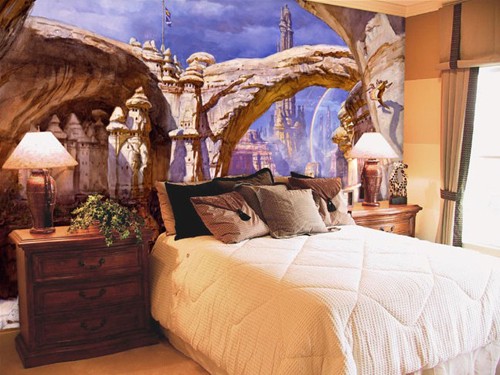
This option is perfect for a children's room. Big photo see the project with Avatar.


Interesting option- paint not walls with this paint, but individual decorative items, such as vases or mirror frames - at least the accessories can be easily removed if their glow disturbs.

Graffiti
Street graffiti art, although rare, still finds its way into interiors. Most often, such wall painting is chosen by young, creative people who have a love for this species drawings.
Graffiti is painted with aerosol paint in spray cans or special markers. The advantage of this paint is that it dries instantly, applies to almost any surface (from wood to brick), and such a design costs much less than acrylic painting (from about 1000 rubles/m2).


3D painting
3D technology has firmly entered our lives. It's hard to find someone who's never seen a movie worth putting on 3D glasses for. So this fashion has reached wall drawings. Such drawings are usually made with acrylic paints and differ from ordinary acrylic paintings only in the approach to painting the paintings themselves. The cost of work depends on the complexity, prices vary from 5,000 to 15,000 rubles/m2. 3D drawings on the walls can visually enlarge the room; for this you need to choose a plot with perspective.
In the photo: three-dimensional abstractions by artist Denis Kovalenko.


Photos: 4living.ru, stenomir.ru, pinterest.com, stenopis.com, Vanyantseva Elena
One of the most popular and sought after methods of decoration empty walls new apartment, country houses are increasingly painted. Photos of interiors in which, thanks to the owners’ decision to decorate the walls in the apartment, the most ordinary rooms turned into stylish rooms if desired, you can find it in a variety of blogs and magazines.
Is painting in the apartment possible?
Wall painting in various ways It has been used for many years now. It is enough just to remember the medieval frescoes depicted in school textbooks and the paintings of ancient times. Today, modern paintings on plain walls confirm the high sense of taste of its inhabitants.

It is a mistaken belief that to use artistic painting you must have a huge house. With a small, interesting design it is quite possible to decorate in an original way a boring gray wall in the hallway, any other room chosen for renovation, right up to the living room.

Technologies used in modern world, materials High Quality make it possible to turn any dull surface of one tone into an unsurpassed work of art. The most important thing is that you don’t have to complete special design courses or be a born artist.


Ways to transform a room
Below are described most in financially affordable, easy ways that will quickly enliven a room and make it comfortable to stay in.

Anyone can apply a wall painting they like in a magazine to an interior without any problems, the main thing is a sincere desire to independently decorate the room in such a way as if it were a masterpiece created by an interior designer.

Today there are various techniques, which can be used for original painting. To begin with, you just need to decide what is closer to you: relief, popular flat painting, perhaps a drawing made on the wall and in 3D.

The more complex the chosen design or technique, the higher the cost of the specialist’s work performed. The nuance is that not every professional manages to create a drawing that would correspond to the wishes specified by the customer, but cash it will be necessary to pay for the time spent.

In this case perfect option– painting the walls with your own hands, which quite possibly will not be a work of art, but definitely every time you look at the wall, show it to guests, you will feel incredibly proud of yourself.


To paint the new interior of a children's room, you can choose a child to help you if he can already hold a brush on his own. Painting a bedroom can turn the most ordinary evening into a romantic one if you do the work together with your significant other.

The main thing is to sincerely believe that artistic wall painting today is quite simple, because in the 21st century there is everything necessary to achieve beautiful drawing even if you don’t know how to draw at all, you’ve never even tried to draw. For example, stencils for painting walls, which are becoming more and more popular every year.

How to choose a drawing?
The choice of painting theme should depend on the room in which the painting is planned.

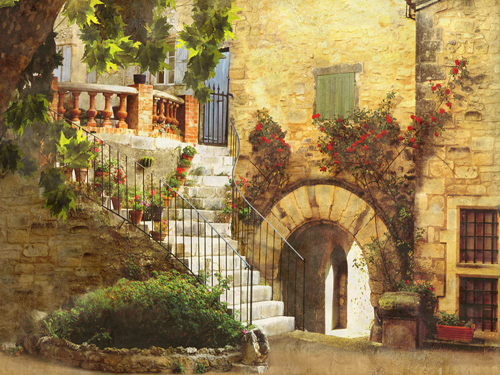
If you are painting a living room, then it is advisable to choose landscapes, beautiful flowers, trees. Of course, mountains and coniferous forests will look original, but a professional can draw them carefully.

But it won’t be difficult to depict dandelions and lilies on the wall. To make the ornament truly interesting, it is advisable to use the above-mentioned stencil.

For the kitchen, the ideal option for wall decoration, given the vast majority classic designs- a still life made in the colors of bright vegetables. Most will be able to draw a plate of fruit and glasses of wine with sliced cheese with interesting patterns. The main thing is to settle on a drawing that is relatively easy to execute.

For a child, in his room it is customary to depict cartoon characters, fairy-tale palaces, cars, in the case when the boy’s room is being renovated. The most acceptable solution for a room if a brother and sister will live in it are pets.


You saw a photo of wall painting and were inspired by the idea of repeating the drawing yourself, but you are upset that you had no experience in fine arts? No need to worry in advance. Just pay attention to the following techniques:
- Drawing made along the contour;
- Stencil;
- Drawing using slide projection.


Wall painting using acrylic paints
You need to prepare the following materials:
- container that will be needed for water;
- brushes of various sizes;
- acrylic paint of the colors that will be used in painting;
- roller (it will be useful when painting large areas with one color);
- simple pencil;
- ruler

The first thing you need to do is decide what the drawing will be. Moreover, in addition to the stylistic decisions of the room, this should also be influenced by other factors, such as personal preferences, because the main thing is that the owners of the house like the design.


Prime and putty the wall and paint it in the color that was chosen for the background of the painting. Using a cage, carefully transfer the selected design to the wall. To do this, first the drawing must be divided into small cells on paper, and then transferred from the sketch to the wall on a scale, that is, proportionally enlarged.


When transferring a drawing, it is best to use a simple pencil, since this will make it easier to remove all unnecessary lines. After drawing the drawing, you can safely remove all the grid lines and start coloring the picture.


To obtain interesting colors, acrylic paints can be mixed, white paint or water added to them. If we talk about consistency, it should resemble low-fat sour cream. If you make it too liquid, there is a risk of dripping off the wall.

First of all, paint should be applied to everything large areas and only then on small details and boundaries of transitions between colors.

When completing the work, it is important to wait until the paint has dried completely, after which the artistic wall painting must be covered acrylic varnish. This will increase the resistance of the new decorative element to ultraviolet radiation and significantly increase wear resistance.

Remember when choosing a pattern for painting that such a wall will definitely become the semantic center of the interior, so it is important that it does not suppress or dominate, but only decorates the room.

Photo of wall painting


The other day I finally did what I had been planning for a long time: I drew a picture with lettering and doodles on the wall of my Moscow apartment, which we were preparing for rent. This was my second experience of drawing on a wall - for the first time I tried to do it in Thailand, and although I was not very happy with the results, I realized that I like drawing on walls :) I decided to summarize the information in a post - in case you, too, decide to draw on the walls and Will you have the same questions and problems as me?
HOW TO PREPARE A WALL
Before you draw anything on the wall, you need to make sure that the wall:
a) flat
b) painted
If you have a wall with wallpaper, you need to tear it off, level the wall, prime it and paint it. If it’s already painted, you can paint right away if point “a” is followed. And yes, when talking about evenness, I mean not so much horizontal and vertical deviations (the drawing will really help to hide this and it’s not so critical), but smoothness. If your fingers and tights don't cling to the wall, that's ok :) If the wall is lumpy, then in theory you can still draw, but get ready that it will be difficult, you'll spend more ink, and the result won't be as wow-worthy as you'd like. Well, yes - most likely, you will spend more time on the drawing than if you did do the alignment.
I’m telling you from my own experience: the wall I painted on in Thailand had a “crap with pebbles and sand” texture. You know, this kind of thing can be found in Russian entrances, often painted green. I didn’t begin to correct it, because redoing it scared me more at that moment, and I thought that it would do just fine, but then I regretted it very much and for a long time: it was impossible to draw a straight line.
The wall in Moscow was delivered by the developer painted in White color, you could take a black marker and start drawing. But I wanted a black background (because simple ways are not for me), so before painting, I painted the wall black. I chose paint with the effect slate board from Siberia, because at that time I had not yet finally decided what I would use to draw on the wall and was considering ordinary chalk. I applied the paint myself with a roller and brush at the joints with the walls and ceiling (covering them masking tape), nothing complicated.
On the advice of Siberia representatives, they did not cover the wall with anything additional before application. After the first layer, the wall didn’t look very good - there were a lot of bald spots, but after the second everything evened out, the wall became pleasantly black, and, what I liked, slightly rough and completely matte. I tried to paint on the wall with chalk - the sensations are a little strange, it seems that the chalk is not perfectly washed off from the paint, but, alas, I have nothing to compare with yet, so this is a review about how this paint works specifically under chalk board I can’t formulate it yet. For my purposes, the paint suited me 100%.
WHAT TO DRAW: MY CHOICE OF MATERIALS
If nothing comes into contact with the wall, you can paint it with anything: even with a pen, even with CD markers - the main thing is that you are comfortable working with the tool and the line thickness/color suits you. But if someone or something touches the wall, everything is more complicated, especially if the goal is for the drawing not to be erased (if it was erased, a combination of chalk and slate paint will save you :)).
In my case, the matter was complicated by the fact that I planned to apply the drawing to kitchen apron, which is supposed to be washed at least sometimes. I can already see you clutching your head and shouting: “How can I scrub off the fat?!” But first things first.
I considered the following options:
- Draw a picture with chalk, cover with glass
- Draw a picture with a brush and some kind of indestructible paint and do not cover it with anything
- Paint with indestructible paint + cover with glass
The option with glass didn’t really appeal to me, because it’s an extra expense, and not a small one, and I don’t really like the way glass looks on part of the wall, and doing it on the whole wall is a little crazy. Therefore, the idea with chalk was quickly crossed out and I went looking for indestructible paint.
Here I planned to do a big review of a variety of markers and materials, but the truth is that when I went looking for something that was convenient to draw and difficult to erase, I came across only one brand everywhere: Molotow. They make markers with very powerful ink that won't wash off easily. And, alas, no one paid me for this publication (comrades from Molotov, I will not refuse free markers, if that happens;)).
Molotov has several types of markers, I was interested in acrylic ones - they are erased only until they dry, then they can’t be washed off with ordinary water, only with a solvent (at least I couldn’t wash them off, but I rubbed a lot). Acrylic markers come in different sizes and have different tips, detailed review I'll definitely do it somehow I'll write on Instagram . I liked the 4mm round tip the most, I would prefer larger size, but I couldn’t find any more round ones, and I don’t like the beveled ones. The markers are refillable, which means that when the ink runs out, you can add more. The tips can also be changed (they are erased), but you need to know which tips will fit which marker.
As a slightly cheaper alternative, I considered buying a regular white acrylic paint and paint with a brush - the effect is almost the same, but in terms of convenience it is much inferior, plus I wanted to get a line of equal thickness.
The bottom line is this: I am very pleased with the chosen tool - easy to use, economical consumption, the line turns out dense and bright, and yes, the drawing does not wash off! I rubbed furiously at one area for several minutes, the line didn't go away. And for those who are worried that greasy drops will remain, let me tell you that there are very cool and cheap grates for frying pans that save you from splashing, plus working surface Ours turned out to be 10 cm deeper than the standard and, accordingly, the slab does not stand closely. Well, if the tenants stain the wall so much that it cannot be washed, I won’t be too upset - I’ll paint it over it and apply a new design;)
WHAT TO DRAW
For a long time I was tormented by the question of what to draw. On the one hand, I wanted to do a lot of lettering, on the other hand, I wanted to do a lot of different lettering, on the third, doodles have firmly entered my life and it’s a pity to leave them behind. Also, the apartment was being built for rent, and the drawing was in the kitchen; I wanted the final picture to be quite neutral, but at the same time appropriate.
At some point, I decided that I needed to put my self-expression at the forefront, that is, draw in the style in which I would like to draw to order. This means that these are doodles + lettering. But I added a little challenge to myself: I decided that my objects would not be located separately and on their own, as almost always happens in my drawings, but would stick out a little from each other, overlap and flow.
I decided that I would have lettering and doodles on equal rights, that is, I will not highlight the lettering with complex decor and fill it with color, I will draw everything in the same thickness, without giving anyone the main role.
And then I thought about the sketch for a couple of weeks and even drew several approximate options.
Follow the evolution ;)
At first I wanted to do lettering in Russian and Cyrillic to practice, but then I hit a wall called “I can’t find funny, but short and meaningful quotes that would look appropriate.” Either I’m so picky, or the Cyrillic alphabet is still too obliging and attracts attention. I changed everything to English and felt relief - after all, working with the Latin alphabet is much more familiar and easier for me.
Then I tormented the doodliks for a long time - in the original version there was a lot of things not about food - clouds, rainbows and all that, but by the final version I decided that the kitchen is not a place for clouds, I need more sweets, vegetables, cutlery and everything related to food . Therefore, I took the last sketch as a basis and redid it on the fly on the wall.
HOW TO TRANSFER A DRAWING TO A WALL
If you have a sketch and want to transfer it from your notebook/iPad to the wall, there are three main ways to transfer it.
Method one: by eye
The most banal, obvious and does not require additional gadgets. Look at the picture - try to repeat it on the wall. This is exactly the method that I used, because I had no time to organize the other two. It will work if it is not very important for you that the picture is repeated exactly, if you know how and are ready to improvise, and if you are not annoyed when the picture on the sketch and on the wall stop matching :) I decided for myself that it is easier to draw directly on wall without a sketch than to “peek”, because it is more annoying than helpful.
Method two: squares
This method allows you to transfer the image quite accurately, but it takes time. The idea is this: draw your sketch into squares, then draw the same squares on the wall and transfer the picture, using this grid as a support. That is, they schematically transferred the contents of one square, then the second, third, and so on. This still does not guarantee perfect accuracy and you will still need to adjust, but in theory it is easier than without squares. I didn't have the patience to draw the squares.
Method three: projector
The most convenient, but at the same time the most expensive method, which, alas, I also only know about in theory, because I had to wait three weeks for the chosen projector model and I haven’t bought it yet. There are two types of projectors: directly for artists, for transferring pictures onto the wall, and ordinary ones, with the help of which you can also watch films.
The most famous projectors for artists are produced by the American company Artograph. Most models are designed as follows: you put a sheet of paper with a sketch, put a projector on top and it projects the picture onto the wall. In my opinion, there are many disadvantages to this approach: the sketch must be clear enough and of a certain size so that, on the one hand, it fits into the space under the projector, and on the other hand, it must show a sufficient amount of detail. Well, it's not very cheap.
A projector that can also be used as a home theater is, in my opinion, a more reasonable solution. But here you need to understand this: not every projector that can show movies will be good for projecting pictures on the wall. There are a million all sorts of murky parameters, which are very well described in this note, here are the main ones to keep an eye on:
- the projector must be short-throw, that is, it must have a parameter for the ratio of distance to image size; the smaller the better. Conventionally, 0.4:1 or 0.8:1 (means that to project a meter of image you need to move the projector 40 or 80 cm from the wall, respectively). A lot of projectors fall off here, because if for showing a movie the 1.55:1 ratio is completely fine, then when you try to paint a 2x3 wall using this small apartment there will be problems because the room is not long enough :)
- the projector must be contrasty and show well even in a bright room (because it is not always possible to curtain all the windows, and drawing at night is a dubious pleasure), so you need to monitor the parameters of the lamp power (from 200 W), contrast (from 10,000: 1), and lumens (from 3000).
- convenient if you can connect a flash drive
- Well, the most tricky parameter, which is rarely available, but is very useful: vertical and horizontal image adjustment. A projector with these two parameters can be placed not exactly opposite, but a little to the left-right-higher-lower and twisted so that the image does not skew.
Unfortunately, I cannot recommend you a specific model, because I myself was confused in the choice and have not bought anything yet. If I find time, figure it out, buy it and test it, I’ll definitely write additionally. Judging by the Yandex.market, models that combine all the above qualities cannot be found cheaper than 50,000, but rather you should count on 80-90, so the pleasure is not cheap. I definitely wouldn’t take it for a one-time painting.


