An integral component of the steam room is water. But so that it does not stagnate, it is important to know how to drain the bathhouse. In this case, certain nuances must be taken into account. For buildings that are on stilts, a thoughtful approach will be required to ensure that communications do not freeze. Depending on the load on the room, different decisions will be made.
Even before construction
It’s worth thinking about even before laying the foundation. In this case it will be much easier to draw a conclusion. The following points should be analyzed:
- What is the size of the planned building?
- What is the frequency of its use?
- How many people will be inside at the same time?
- Will it ?
- Will there be a washing machine? separate room or combined with a steam room?
- What is the depth of soil freezing?
- What is the composition of the soil?
- Is there a central sewerage system?
- How much free space is there around the bathhouse?
This questionnaire will greatly simplify the creation of a gasket drawing, and will also make it possible to determine which of the options, which will be described below, is best suited to a particular situation.
Briefly about floors

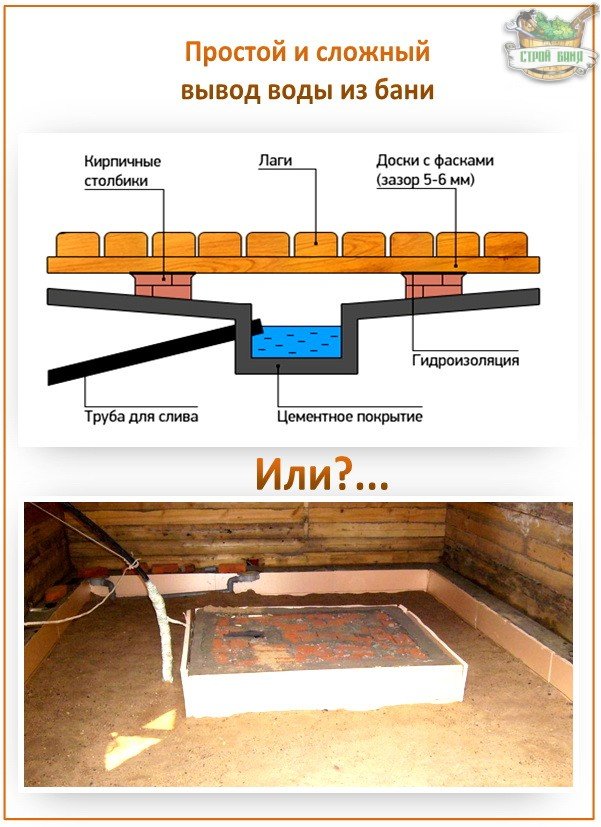
A big role in how effectively all moisture will be removed from a steam room or washing room is played by the right approach for the manufacture of the floor, as well as the drain hole. The flooring can be wood or concrete. The first, in turn, is divided into:
- leaky;
- leak-proof.
The essence of the leak is that a space is left between the boards through which the water can simply drain under the building. This solution is suitable for the southern regions. In the second option, the boards are laid in two layers with tight joints. In this case, the slope is maintained towards the groove or drain hole.

Concrete floors must be insulated. If you don't do this, your feet will be very cold. When pouring, just as in the case of a non-leaking wooden floor, a slope is maintained towards the drain hole or in the middle where the gutter will pass. Additionally, wooden gratings are placed on top to make those staying in the room more comfortable.

Ladder for various designs will also be different. If this is a bathhouse that is constantly heated, or it is known that the room does not freeze, then you can install a product with a water damper. Usually it is located in the corner or in the middle, where all the liquid collects. Installing such a structure in a wooden floor will not be difficult:
- The work is carried out before the finished floor is installed.
- The location of the drain hole is selected according to the slope of the surface.
- Markings are being made for the ladder.
- A hole is drilled so that a jigsaw file can be inserted. An opening is cut for the product.
- The entire floor surface is covered with thick polyethylene film.
- A slot is made in the place where the drain hole will be located.
- The plastic drain is mounted in place.
- The junction areas of the film are coated with silicone sealant.
- The finished floor is being laid.
Note! With this solution, even if water seeps under the floor somewhere, it will flow down the oilcloth to the drainage point.
But most often, bathhouses are used less often, and if you make a similar structure there, then this can lead to the fact that the water inside will freeze and the product will simply tear into pieces. To prevent this from happening, you can make a drain with a barrier without liquid. One of the solutions is easy to implement in wooden bath, the other is in a bathhouse with a concrete floor.
For wooden:
- You will need a small sheet of galvanized metal measuring 62x38 cm.
- It must be marked as follows: put 2 points from each edge at a distance of 10 cm. The points on the two sides must coincide so that the corner is a square with a side of 10 cm.
- In the resulting squares, a diagonal is drawn from the corner to the point.
- All points are connected by a line to form a rectangle inside. These marks will serve as a guide for us to bend.
- At a distance of 17 cm from the edge of the smaller side in the middle of the sheet we make a notch. This will be the center of the hole for the pipe if it is 50 mm in diameter.
- Now, along the drawn lines, you need to bend this sheet to make a small trough.
- The sharp edges sticking out on the sides are bent towards the larger side.
- Plastic or wooden plank. In size it should be 39 × 17 × 0.5 cm.
- The capacity of this container is about 6 liters. When the water begins to drain, it lifts the bar and freely enters the hole. After the level drops, the board falls into place and closes the hole. This is done so that there is no smell.
- Even if it happens that the board freezes to the trough, when hot liquid gets in, it quickly thaws.
Note! Such a drain mechanism will be very relevant for bathhouses that stand on piles or columnar foundation when the temperature under the floor is sub-zero.

For concrete:
- In order to implement the project, you will need a plastic or durable rubber ball.
- When the floor is poured, it will need to be placed above the drain hole and recessed there a little. You can press it with something on top so that it does not move.
- An additional slope is created around the ball.
- The ball remains in this position until the screed has completely hardened. Afterwards it is very easily separated from the frozen mixture.
- It is he who will serve as the shutter. When the water begins to drain, it will lift the ball. After this, it will fall into place and close the hole, preventing the penetration of unpleasant odors. This shouldn’t freeze, and if it does, it will thaw fairly quickly.
Simple water collection systems

The most simple solution drainage will be a solution for leaking floors.
- A hole is dug under the steam room (or washing room, if they are not combined). Its dimensions will coincide with the area from which the water will flow.
- It needs to be deepened slightly below the freezing point of the soil. Sand is placed in a 10 cm layer on the bottom and compacted well.
- The rest of the space is filled with crushed stone or expanded clay so that there is another 10 cm left to the top. Everything is carefully compacted.
- The remainder of the space is filled with the soil that was dug.
You don't need to do anything else. The liquid will fall into this hole, filter and go further into the soil.
Note! This design will be relevant if the bathhouse is used no more than once a week and there are 3-4 people in it at the same time. If the soil under the bathhouse is clayey, then it will be necessary to make a transition pipe to the pit, which can be located a few meters from the bathhouse.

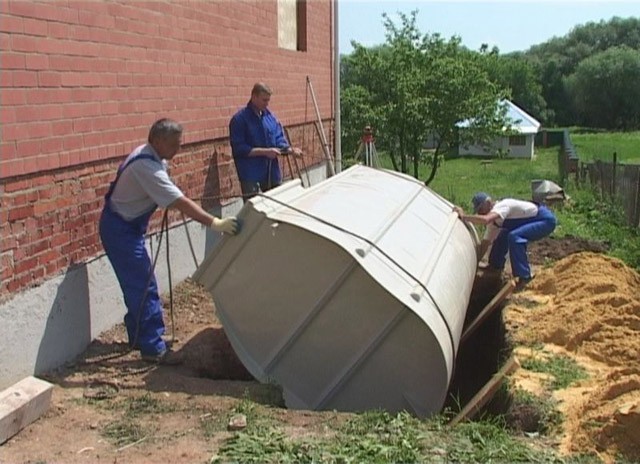
To implement the following idea, you will need a plastic or metal barrel with a volume of 200 liters.
- A place is chosen near the bathhouse.
- A hole is dug to a depth below freezing of the soil. Its diameter should be 30 cm larger than the diameter of the barrel. This is necessary for ease of installation.
- A 10 cm layer of sand is placed on the bottom and compacted well.
- A layer of fine crushed stone is laid another 10 cm and is also compacted well.
- A hole is cut in the side wall for a pipe through which water will flow.
- A hole is drilled in the bottom using a drill and a 26 mm drill bit. It is necessary for the ventilation hose.
- A nut is screwed onto the ¾" pipe and a sealing gasket is put on. It is pushed through the hole. Another gasket is put on and the entire structure is fixed with the help of a second nut. An adapter is screwed onto the upper thread to the HDPE pipe, which will act as a ventilation pipe.
- The barrel is placed upside down in the hole.
- The drain pipe is connected. It is desirable that it extends 15–20 cm inside. Thus, if the soil shifts, it will not be pulled out.
- Approximately up to the middle, the hole is filled with crushed stone and compacted, but so as not to damage the barrel. The remaining space is filled with soil.
This disposal method is also suitable for non- clay soils. The capacity is quite enough for 5 people to take a bath at the same time once a week.
Systems under intensive use

In cases where the bathhouse will be used in a more intensive mode or there will be a toilet in it, it is necessary to provide solutions that will allow the system to cope with a large volume of liquid. If the building is located near a private house and VOCs are provided for it, then you can draw a conclusion directly to it. The fastest way to prepare single-chamber septic tank or a cesspool, for this you need:
- Dig a pit. Its depth should be just over 3 meters so that 3 concrete rings can easily fit, and they do not reach the surface by 30 cm.
- If the bottom is planned to be filtered, then a 20 cm layer of sand is made, and a 30 cm layer of crushed stone is placed on top. Everything is compacted well. If not, then a 20 cm layer of concrete is poured and the rings are immersed in it.
- The walls can be strengthened in another way, for example, by laying them out of brick. In this case, it is necessary to do the masonry with holes for water drainage.
- A suitable hole is made to enter the sewer pipe.
- The pit is closed from above using a reinforced concrete slab.
- Installed in the lid fan pipe for ventilation.

This septic tank is cleaned using a vacuum cleaner. It must be located so that there is access to it. The distance to the building must be at least 2 m. It is possible further, but then communications will have to be laid to a greater depth.
In order to increase the interval between cleanings, you can make several chambers. In this case, the water will be purified more effectively, and it will also be possible to increase the volume of average daily wastewater. The essence of the device is to make the first two containers sealed according to the described method, and to make the last one with a filter bottom. At the same time, they are connected to each other using pipes. In the first and second compartments, heavy particles settle. There they decompose with the help of bacteria. The third section receives partially purified water, which then goes into the ground.

Alternatively, you can use plastic containers or buy
Issues related to the construction of a bathhouse are very relevant, as country houses are gaining more and more popularity. One of the important problems when constructing a room with a steam room and a washing room is the arrangement of water drainage. After all, she is main element, necessary for the functioning of the bath. Let's look at how to properly make drain systems yourself so that the floor does not rot.
Drainage device in the bathhouse washing room
There are two main schemes for drainage communications in a washing room.
In this case, in both options, they are always installed under the floor (for example, after the outlet) drain pipe, which goes at an angle into a common sewer line or into a separate well for a bathhouse.
Most often in modern country houses they make septic tanks - underground reservoirs in which waste products accumulate, flowing through a common pipe from the entire household - from the toilet, shower, kitchen, bathhouse, and so on. Once every few months, a filled septic tank is emptied using a pumping cesspool machine.
The presence of a septic tank minimizes the level of contamination of groundwater and soil with substances that are found in excess in sewer water
If there is no septic tank on the site, there is only one way out - to dig a hole for a bathhouse. But it must be located at a distance of at least three meters from the building. The design of the sink drain does not depend on whether a common septic tank or a local pit is used. In any case, a sewer pipe must lead to one of these objects from the bathhouse.
Preparing for system installation
Consider the option with a concrete floor. First, you need to imagine at least in your mind a communication scheme. The length of the drain line directly depends on the distance between cesspool and the planned location of the sewer drain. This unit itself, installed in the floor, has a grille on top.
The lower outlet of this product has a standard diameter for connecting classic PVC pipes used in any modern sewer system.
Red pipes are used for laying sewerage outside, and gray pipes are used indoors.
Drainage system drawing
You need to draw on paper a rough sketch of the structure of the floor, as well as the drainage system itself, mounted under the flooring. It is advisable to indicate in the figure the entire path of the drained water from the washing area to the pit.
By the way, the pit is often equipped with a simple metal barrel. It is enough to dig a cavity of a suitable size and lower an old watering container of about fifty liters into it.
Before the drain pipe enters the sewer pit, a vertical outlet is often made, leading the ventilation pipe to the top. This helps get rid of excess odors.
Selection of materials
For the drain line, a sewer line is usually used. PVC pipe standard diameter 100 mm. The mainline is assembled from two-meter or meter-long sections, which are joined together using existing sockets at the ends.
To connect a simple drain that does not have a side outlet, you will need to use a standard elbow to the drain pipe.
At the same time, the sewer drain itself has standard design in various variations. For a bath, you can choose either the simplest or the most complicated, since such products come with various additional functions.
The tightness of the device is of great importance for the operation of the drain system, so before purchasing a drain it is recommended to assemble the device and evaluate the tightness of the parts
Also, to construct a drainage line, you may need a sewer tee with a branch at forty-five or thirty degrees.
You will need a tee if you want to make additional drainage from the sink
It is advisable to immediately determine the slope of the drain pipe. After all, it depends on him what kind of knees you have to buy. Typically, the slope angle is taken to be 10–20 degrees.
In addition to PVC parts, we will need “cold” mastic to seal cracks if the sewer pit is equipped with an iron barrel. This material is sold in metal cans in construction hypermarkets. Before purchasing all the parts and consumables, it is better to make a list.
Mastic can be purchased at any hardware store
Pipe length calculation
To calculate the length of the drain pipe, you need to know the distance from the washing drain to the sewer pit. Let's assume this value is 10 meters. Let us take the slope of the drain pipe to be 15 degrees. Then the length of the drain line can be found from the formula for the cosine of an acute angle in a right triangle.
As you know, the cosine of an acute angle of a right triangle is equal to the ratio of the adjacent leg to the hypotenuse. In our case, the leg is the same distance from the pit to the drain along the surface of the earth, and the hypotenuse is the length of the inclined pipe. Using a calculator, we find the cosine of an angle of 15 degrees. Then we calculate the required length of the highway: L = 10 m / cos 15 = 10 m / 0.966 = 10.35 m.
If you take a steeper slope angle, then the drain pipe will be longer.
Required Tools
We will need the following items from the tools:
- rubber hammer (useful for driving pipes into each other);
- shovel;
- Bulgarian;
- putty knife.
You will need a grinder to cut an opening in a metal underground tank, through which the drain pipe will enter.
Step-by-step instructions for making a bath drain design
We proceed directly to installing the drainage system.
- The drainage system is installed before pouring the concrete wash floor. The first step is to dig a trench with a shovel for the drain pipe from the sewer pit to the bathhouse. This is done in such a way that a slope of 15 degrees is obtained. That is, the depth of the channel is taken to be equal to the diameter of the pipe (100 mm), plus another twenty centimeters offhand.
The depth of the trench should be approximately 50–60 cm, and the width depends on the size of the selected pipes
- Using a grinder, we cut a 100 mm x 100 mm square in the metal wall of the sewer pit. We insert the first pipe into the resulting opening - with the socket inside the container. We seal the remaining space around the crack with mastic. It seals the connection and at the same time secures the end of the pipe.
If a plastic barrel is selected, then the task can be cut out in it with a strong knife round hole and then insert the pipe with tension
- After the mastic has dried, we continue the process. We insert the remaining pipes in such a way as to bring the line to the bathhouse. If necessary, hammer each link with a rubber hammer.
When laying pipes, you should wear cloth gloves to avoid damaging your hands.
- The last link should fall between the pillars of the bathhouse foundation and go under the floor joists. We continue to work indoors. We attach a rectangular elbow or two elements to the final pipe, creating a right angle so that the main goes vertically upward. You may also need to insert a vertical pipe if it is too far from the floor level.
An additional small outlet for the sink can be attached to the nice pipe
- We install a sewer drain.
- Having laid a temporary flooring of boards as formwork, we fill the floor with concrete.
Many bathhouses additionally add a special layer of waterproofing.
The walls of the ladder must be firmly fused with the concrete. Otherwise, water will seep under flooring, which will subsequently lead to high humidity, unpleasant odors and even rotting.
Drying of the coating takes up to three days.
Proper drainage of water from a bathhouse is one of the most important points during construction. Its durability, the absence of harmful odors of raw materials or fungus, and how often the foundation will subsequently have to be repaired directly depend on this. In this article we invite you to understand various options drainage system devices.
The easiest way is to install a drain pipe
The simplest and most tried and tested method for draining water in a bathhouse for decades is a drain pipe, which is laid during the construction of the foundation of the steam room. It needs to be made obliquely in relation to the drainage hole itself - this way you won’t have to additionally insulate it.
The hole itself should be dug at a distance of 3 to 5 meters from the bathhouse, and its edges must be strengthened from possible collapses. It's better if they are concrete rings– or a frame filled with concrete. But it is important to make the bottom of the hole so that the water in it is freely absorbed into the soil.
To prevent the water drain for the bath from becoming clogged, it is advisable to make the pipe completely without bends - after all, it is from them that it is most difficult to remove debris. And yes - you can only take a sewer pipe for these purposes, the diameter of which has its own strictly defined value.

Installing the drain pipe is quite simple, just follow these instructions:
- Step 1. A hole is prepared, and a trench is dug from it to the bathhouse.
- Step 2. The drain pipe is installed - it is not necessary to insulate it, but it won’t hurt.
- Step 3. A cement floor is made in the washing room, with a slope along the entire perimeter towards the drain pipe. It is important that the floor actually turns out without dents - water should not stagnate anywhere later.
- Step 4. So that the bathhouse can all year round work, the water drain is equipped with a mesh - all the debris will be collected on it, and there will be no blockages in the pipe.
- Step 5. After all this, you can lay tiles on the cement floor - the color and style that you like and matches the style of the bathhouse interior. And then wooden grates with special impregnation are placed on the tiles so that during pleasant bath procedures you do not have to walk barefoot on the hot tiles.
Where and how best to drain the water?
But where the water itself will go - it all depends on the planned budget and the load on the drainage. So, it never hurts to build a separate cesspool at a distance from the bathhouse, and then lay a trench from it and put a sewer pipe in it with good insulation.
And the most a budget option– directly under the sink there is a gravel bed (both large and small), where the water will go.
Funnel made easy
Some bathhouse attendants also make something like a funnel under the washing and steam room - they concrete its walls and coat it with liquid glass. In the center of such a funnel is a drain pipe that extends beyond the bathhouse: into a pit, the walls of which are reinforced with bricks, or the pit itself is an old iron barrel without a bottom.
At the bottom of the pit there is gravel, at the top there is a thick metal lid and a hole for ventilation pipe. Judging by the reviews, it’s so simple, but reliable system You don't have to open it for ten years.
We also recommend reading the article about installing a shower drain in the floor under tiles on the Vannapedia website - the technology for installing a classic water drainage system is very well described there.
Drainage hole outside the bathhouse
But some builders today are convinced that the water must be removed outside the bathhouse. They say that sand takes a long time to dry even in summer, and in winter all the water that goes under the foundation in the old fashioned way will simply turn into ice - and oh warm floors you can forget about it in the steam room until spring.
Others are sure that very little water is used for one or two people in a bathhouse, the steam room is usually used from time to time, and if you take not ordinary sand, but a large fraction, then no problems should arise...
But the pit itself can be made using a technology that has recently become especially popular among bath attendants: the pit is made from tires of a jeep or similar car. The water flows into this hole plastic pipes, and so that neither cold nor unpleasant odors enter the bathhouse in winter, a water seal is made - something like a water lock:
Step 1. Take a five-liter plastic bucket, make a handle from galvanized tape, and place an iron pipe on the lowest cord from the top tire - across the pit. A bucket is hung on it - it will hang like a cauldron over a fire, below the top level of the pit.
Point 2. A corrugation is put on the end of the sewer pipe, which is lowered into the bucket from above - it will be located at a distance of 10 cm from the bottom and 10 cm from the edge, i.e. in the middle of the bucket. That's the whole hydraulic lock - after draining, all the water will be collected in a bucket and overflow, carefully flowing into the hole. And when the draining stops, the water that remains in the bucket will prevent the same air from entering the bathhouse. And, even if dirt or leaves settle on the bottom of the bucket, you can always turn it over to clean it.
What system to make for a large number of people?
For a steam room, which is visited from time to time by three or four friends, you need one water outlet in the bathhouse, but for a whole group of regulars, it’s a different one. In a bathhouse for a small number of steamers, a drainage hole is usually installed directly under the foundation. Its walls can be lined with bricks and covered with coarse sand - for summer bath that's it. But in the second case, you will need a special pipe that will go into the drainage well - and below the freezing level of the soil, otherwise it will freeze. Or you can combine both methods - using the first in the summer, and the second in the winter.
And so that the water from the bath does not go to waste and does not pollute environment habitat, you can use a septic tank, which will clean it and distribute it through irrigation pipelines. The most complex and expensive way to remove and purify water from a bathhouse is a well with biological filters. It contains slag, broken bricks and crushed stone. The whole secret is that if bathhouses constantly fall into the well Wastewater Over time, it becomes covered with silt, and in the silt there are microorganisms, which then purify the wastewater. Such a septic tank is usually built in the lowest place on the site.
That's all! Nothing complicated - you can do a proper drain in a bathhouse with your own hands.
The water drainage system in the bathhouse is usually installed directly in the floor. This option is much simpler and cheaper than building special devices or systems for draining used water.
The most commonly used three options are used for various floor designs:
- leaking;
- leak-proof;
- concrete.
The most structurally and technologically simple option, which has an important drawback - a bathhouse with such a drain can only be used in the warm season.
Step-by-step instructions for the drain device:
- Dig a hole (depth about 60-75 centimeters) approximately in the center of the foundation pit.

- Dig a trench towards the drain well or hole and lay a pipe in it with a slope of 5-7 degrees.
- After the foundations have been poured, remove the soil around the perimeter of the underground and install a screed so that water is directed through it into the dug hole, and from it through a laid pipe into the drainage well or pit.

- Install the floor covering from boards along the beams laid on the installed foundation.

Drainage device in a non-leaking floor
A system that can be used all year round, but is somewhat more complex than the previous one.

Step-by-step instruction:
- When performing foundation work, install a drain pipe.
- Raise the pipe to the level of the clean floor.
- Waterproof the foundation, then lay the beams, and carry out work on the foundation with a hole provided in it for the pipe.

- When installing a subfloor, lay the boards with an inclination angle of 4-6 degrees, organizing a drain to the pipe.

- When laying heat-insulating material, provide a hole for the pipe.
- Install a finishing board covering and install a receiving ladder at the outlet of the pipe.

Drainage device in a concrete floor
A concrete floor has a significant drawback - it is cold. Despite this, it is often used in construction modern baths. Work on the installation of drainage in concrete floor are carried out on an already poured foundation, immediately before flooring.

Step-by-step instruction
- Make holes in heat-insulating material, into which the drain ladder will later be installed.
- Mount the gutter at the bottom drain mark with an inclination of approximately 5 degrees to the side of the drain.
- Place and connect to the drain a pipe connecting the drain to the wastewater disposal system.
- After installing the finished floor, the holes must be sealed, and the drain must be covered with a grate.

The drain can be installed either in the center of the steam room, or in a corner, or against any of the walls. The last option is more common, since it is technologically the easiest to implement.
The result is a diagram:
- water after use moves to the drain;
- from the drain through the gutter it enters the ladder;
- from the ladder through the sewer pipe - to existing system wastewater disposal.
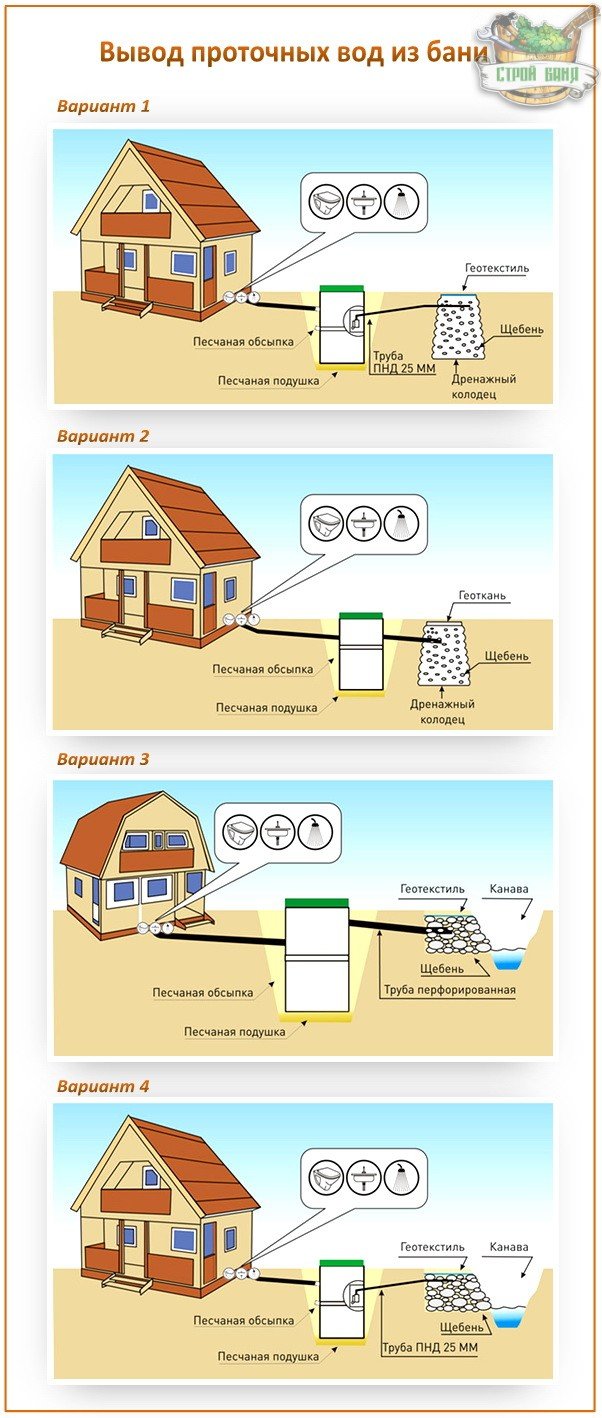
Further drainage of wastewater is carried out using one of the following systems:
- natural filtration;
- drain hole;
- drain well;
- soil under the building (pit);
- sewerage system.
Natural filtration
Technologically, the system is quite complex. It is used when the volume of wastewater is large enough, but not more than 250 liters, or when it contains solid elements. The drainage system consists of a container of any shape and a system of pipes extending from it over the entire area.

Requirements for the container: waterproof; the volume should be three times the water consumption per day. Periodically, the septic tank must be cleared of sediment. A sewer truck is used for this, so there must be access to the tank.
Drain pit
Used if groundwater is deep. The required volume is determined by the number of bathhouse visitors. For 3 people, a drainage pit capacity of approximately 70-75 liters is sufficient. The optimal location is approximately 2 meters from the bathhouse. The edges are strengthened with brick or stone, then the material for filtration is filled in - in the lower part of the pit there is usually crushed stone, expanded clay or brick fragments, in the upper part there is sand. Another simple way is to bury metal or plastic barrel with a pre-knocked bottom and holes made in the walls.

Drain well
A sealed container into which wastewater is discharged. After filling, the sewage disposal machine pumps out. The simplest, maintenance-free and inexpensive system. It is done at a distance of about 5 meters from the bathhouse.

Ground under construction
A pit dug directly under the floor of a washing or steam room in a bathhouse. Its bottom must be filled with filtering material - expanded clay, crushed stone, etc. The principle of natural filtration of wastewater is used. Can be used when their volume is small.
The sewerage system provides for the disposal of wastewater into an existing sewer system or into a special septic tank.
During the construction of a bathhouse Special attention attention should be paid to proper organization of the water drainage system. If everything is done correctly, fungus will never appear in the sauna and there will be no unpleasant odors. And the building itself will last much longer.
Floors in the bathhouse - selecting a suitable base
Russian bathhouse or sauna on your own suburban area- the dream of many people. Bringing it to life is not that difficult. It is enough to understand all the features of the construction and arrangement of the steam room, in particular, the rules for organizing drainage in it. This issue needs to be given increased attention. If you don't organize efficient drain waste water from the sauna, within a couple of years after the start of operation, its foundation, floor base and lower parts of the walls will become unusable. Naturally, very soon all these problems will cause the destruction of the building.
It’s really possible to do the drain in the bathhouse with your own hands, but first we need to deal with everything existing options drainage system, select optimal system, and only after that start arranging the drain. The first issue to be resolved is related to the type of flooring in the steam room. They can be done:
- concrete;
- wooden.
A concrete floor is ideal for a permanent sauna, in which water treatments are taken throughout the year. Such a base consists of several successive layers. Compacted gravel comes first, then concrete mortar, vapor barrier gasket, heat insulator (it is best to use polystyrene foam boards). The insulation is covered with polyethylene, which acts as a water protector. Another layer of concrete is laid on it. The entire structure is secured with a reinforced cement screed. In the end concrete base lined with tiles (ceramics) or other finishing materials.
A wooden floor is much faster and easier to build. It is installed in bathhouses used exclusively in the warm season. The costs for wooden foundations are significantly less than for concrete ones. But there is one problem. Even with careful processing of wood special. compositions, after some time it will begin to deteriorate under the influence of moisture and high temperature. After 5–6 years of operation, such a floor will have to be completely re-laid. This should be kept in mind when choosing the type of base for your bath.
Wooden floors are structurally divided into non-leaking and leaking. The first of these are always laid on a pre-made concrete screed (it must have a certain slope). Non-leaking structures are prone to rotting, since after using the steam room they take quite a long time to dry. From this point of view, leaky floors are more convenient to use. They are simply laid on the joists without rigid attachment to the latter. The boards are laid with small (about 5 mm) gaps. It is through them that water is removed from the surface of the flooring. At any time, such a floor can be removed, taken outside under the hot sun and dried.
If you plan to build a leaky foundation, you should make a pit (preferably sealed) under the sauna and connect a pipe to it, through which the drainage will be carried out.
Wastewater disposal systems - pros and cons during operation
Having figured out the type of flooring, we move on to selecting a suitable drainage system. There are several options for arranging a drain:
- soil filtration technique;
- installation of a drainage well;
- pit.
The choice of a particular system depends on the geometric parameters and frequency of use of the bathhouse, the presence or absence of a centralized sewerage system on the site, the depth to which the soil freezes, and directly the type of soil available. If a person plans to go to his own sauna with two or three friends a couple of times a week, there is no particular need to organize a complex drain (for example, ground filtration). In such situations, you can get by at low cost by building a simple pit or well for waste water. If the bathhouse becomes permanent place gathering a large number of hot steam lovers, you will have to take care of arranging a more sophisticated and efficient system.
On clay-type soils, it is best to make a drainage hole. Used water will flow into it from the bathhouse through pipes and then be pumped out. For sandy and similar soils, systems in the form of drainage wells are more suitable. We also take into account the most important requirement - the pipes through which water will be drained must be laid below the freezing level of the soil. If we install them above the specified level, in severe frosts they will freeze, and we will not be able to fully use the private bathhouse.
Let's talk about the pros and cons different systems plum. And then we’ll find out exactly how each of them is mounted. Let's start with the simplest system - a pit. It is essentially a hole that is dug under the floor base of the steam room. A layer of filter material is placed at the bottom of the pit. Water passes through it, is purified, and then gradually seeps into the soil. The pit does not require pipes or any other communications to operate. Its arrangement takes a minimum of time. These are definitely advantages. But this solution also has disadvantages. Firstly, a pit cannot be made on soils that do not absorb water well. Secondly, it cannot be installed in saunas with a foundation in the form monolithic slab. Thirdly, even a deep pit is characterized by an objectively low throughput potential.
It won't be much more expensive to install a drainage well. This is understood as a sealed tank for collecting wastewater, buried in the ground. When it is full, the owner of the bathhouse calls a sewer truck. She pumps out the water. Any summer resident will make a drainage system, spending a minimum of effort on the work. Here you just need to choose the right place to install the tank. It should be installed on the lowest plot of land. No special maintenance is required for the drain well. The disadvantages of the system are the need to regularly call special equipment to pump out water and to arrange fairly wide access routes to the tank. The sewer truck will not pass along the narrow path.

A drainage well is a deep and wide hole that is filled with a layer of filter element. This may include furnace slag, small pieces of bricks, crushed stone, construction sand. Digging a hole is easy. Cover it with filtrate too. But here's to serving drainage system not at all easy. The wastewater is not pumped out of it. They go into the ground. In this case, at least once every 5-6 months you need to completely change the filter layer and clean the well. Such an operation requires considerable labor costs, which negates all the advantages of the system.
We will consider the advantages and disadvantages of the ground filtration method below. And we’ll immediately describe how exactly such a system is made professional builders. She is considered the most effective option drainage of wastewater from private saunas.
Soil filtration - how effective and durable?
The method of soil wastewater treatment requires the installation of a complete sewer system. It includes pipes for collecting and draining water and a special septic tank. The latter plays the role of a distribution well and at the same time a settling tank. Some craftsmen assemble the septic tank on their own, but more often they buy it ready-made in specialized stores. The advantages of the system are high-quality purification of heavily polluted waters, completely autonomous operation, no need to call equipment to pump out the well. Disadvantages - a huge amount of land (very labor-intensive) work, considerable cost of used Supplies and equipment, the need to allocate a large area for the installation of a septic tank.
A step-by-step guide to setting up a ground filtration system is provided below. First, we decide on the location of the septic tank. We bury it 150–250 cm into the soil. Then we connect the sewer pipe to the installed container. We remind you! It should be laid below the freezing mark of the ground. After this, we prepare perforated drainage pipes (the so-called drains). We select their cross-section and length taking into account the volume of wastewater. In most cases, plastic products with a cross-section of 110 cm are used as drains. You can also use other pipes by drilling a number of holes in them.
Length of one drainage pipe It is undesirable to take more than 25 m. The pipes are laid in trenches about 1 m wide (minimum 50 cm). The distance between individual drains must be maintained at least 150 cm. The system installation process itself looks like this:
- 1. We draw up a diagram for laying drains. We dig a trench with a slope of about 1.5°, checking its accuracy with a building level.
- 2. If the soil is sandy, we make a cushion of gravel and sand at the bottom of the trench (the thickness of each layer is 10 cm), and then lay geotextiles on top. For clay soils the procedure is similar. But in this case there is no need to use geotextile material. It is allowed not to make a pillow on loams. In this case, the pipes must be wrapped in geotextiles. In this way we will reduce the risk of siltation of the system.
- 3. Lay the prepared drains. At their end we install a half-meter (slightly more) pipe for ventilation.
- 4. Fill the drains with 10 cm of gravel. Fill the trench to the top with a layer of soil.
- 5. Cover the ventilation outlet. pipes with a protective cap. It will prevent leaves and debris from entering the ventilation duct.
The soil drainage filtration system is ready! At proper arrangement it will serve trouble-free for at least 15 years. But after a specified period of time, you will have to change the cushion under the drains, since it will gradually silt up during the operation of the sewer.
Making a pit - a simple and quick operation
As noted, drainage from small, rarely used baths can be organized using a pit. The diagram of its device is as follows:
- 1. We dig a hole under the future floor base of the steam room.
- 2. We fill our mini-pit with a layer of crushed stone, expanded clay or broken brick.
- 3. Pour sand on top.
- 4. We install wooden logs on top of the pit with the filter pad made.
- 5. We lay the plank flooring on the mounted supporting elements. As you remember, we install lumber not closely, but with gaps.
Boards can be nailed to the joists. But it’s better not to do this in order to be able to periodically remove the flooring and dry it outside.

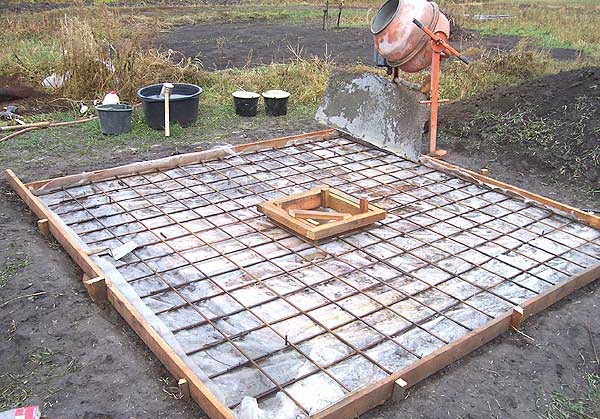
Some craftsmen make an improved pit. It serves as a collector for wastewater, which, after reaching a given level, goes into the sewer. This pit option is also quite simple to construct. We dig a cubic hole under the floor. We take the length of the ribs of such a pit to be at least 50 cm. We protect the walls and bottom of the pit from moisture. The easiest and most reliable way is to fill them concrete mixture. Although you can use any roll waterproofing material, for example, roofing felt.
Next, at a height of approximately 10 cm from the floor base, we bring the pipe to the pit. We take it outside the building on a slope (otherwise the drains will not be able to leave the pit by gravity). We install a water seal. It is a device that prevents unpleasant sewer odors from entering the steam room. The simplest water seal is a metal plate installed at a slight angle. Its lower end should be about 5 centimeters away from the bottom of the pit. The shutter can also be made from an ordinary rubber ball. It should be secured above the pit (directly above the drain). When the tank is empty, the ball covers the pipe, and when the tank is filled, it floats up and the water flows freely through the pipe.
Building a drain well - a practical option
Drain pit is rightfully considered the most in a rational way organizing drainage from the bathhouse. We need to dig a hole and install a metal or plastic tank in it. This option does not require serious expenditure of effort. But the durability of the drain structure is not very great. Therefore, home craftsmen prefer other methods of arranging such a system. They make pits from reinforced concrete rings or line the walls of the well with bricks. In this case, the structure becomes more reliable, due to which its service life is significantly increased.
Working with reinforced concrete products is difficult. And here brickwork It’s quite possible for any self-taught master to do it. Let us describe the last option for organizing the drain step by step:
- 1. We choose a place for a well, remembering that it is always located at the lowest point of the land plot. In addition, we need to immediately take care of arranging the access to the drainage pit for the machine pumping out the wastewater.
- 2. We dig a hole of the planned size. It is recommended to make it rectangular or square. Then the volume earthworks it will be smaller. We make sure that the walls of the pit are smooth and dense (we do not allow soil to fall off them).
- 3. We make the bottom of the pit with a slope, directing it towards the hatch.
- 4. Pour a 15-centimeter layer of sand into the hole and tamp it down. Pour concrete mortar on top. It is allowed to install a finished slab (reinforced concrete) on the bottom. Due to this, it is possible to reduce the time required for the work, since you do not have to wait several weeks for the concrete solution to completely harden.
Now we begin laying the walls of our drain structure. We carry out the operation using new or used red brick. We make the masonry 25–30 cm thick. We install the bricks with an offset of half a stone. We fix the products with a composition made up of sand, clay and water. We install a pipe in one of the walls for the wastewater entering the well.
Brick is a permeable material. Therefore, the masonry needs to be additionally sealed. We use any bitumen mastic. We apply it strictly according to the manufacturer's recommendations. After waterproofing the walls, we install a ceiling on the well. It must be more hole(on each side) by 25–30 cm. It is advisable to make the ceiling from reinforced concrete. This design has a considerable weight, but is distinguished by its durability and unique strength.
The process of installing the ceiling is as follows: we assemble the formwork, fill it with concrete (layer - about 7 cm), install metal reinforcement, and add another concrete layer on top. We are waiting for the ceiling to harden. After the concrete has crystallized, we install a hatch in the center of the slab. Let's take it plastic film. We cover the flooded floor with it and fill it with soil. Only the hatch remains on the surface of the earth. Through it, wastewater will be pumped out from the brick tank after the tank is filled to a critical level.
Drainage structure - how to do it?
A drainage well is made exclusively in areas where groundwater flows very deeply. If they are located high, the structure we are interested in will not be able to perform its function. It will begin to fill up groundwater, and the drainage from the bathhouse will simply have nowhere to collect. The drainage well should be dug 2–2.5 m from the walls of the building. If, the risk of subsidence or wetting of the foundation will increase. With a smaller distance between the wall of the building and the pit, we will not be able to organize the required slopes to ensure gravity flow of water.
By selecting appropriate place, we dig a cylindrical hole in the ground. Theoretically, the well can have any other shape. But practice shows that cylindrical pits are much less likely to need repair work. In addition, they mark a uniform distribution of loads on the walls. We can choose any depth and size of the well. For large and actively visited baths, the parameters of the well, of course, should be more impressive than for saunas that their owners use only from time to time.

- Laying walls with brick or wild stone. Important! We lay the products with small gaps. They are needed to naturally remove moisture.
- Installing containers made of metal or plastic. Before installing it in a hole in the tank, you need to make holes on the sides and cut off the bottom.
- Stacking a few old ones car tires Each other.
- Installation of slate sheets. This option is suitable for wells in the shape of a rectangle or square.
We fill the reinforced pit with crushed stone, broken brick or expanded clay, making a cushion 10–15 cm high. Then we cover it with sand (the thickness is similar). We dig a trench to the well from the sauna (don’t forget about the slope, optimally if it is 1 cm for every meter). We put a drain pipe into it. We put the last one into the drainage hole. After this, you need to install a cover on the well. It is better to make it metal and always removable. After all, we will have to regularly maintain the drainage pit, changing the filter layer in it and cleaning it. All that remains is to cover the lid with polyethylene and fill the structure with soil.
Choose suitable option sewerage for the bathhouse and do all the work ourselves. Guided by the instructions given, we will easily set up a truly effective wastewater disposal system.


