The toilet is a place that a person simply cannot do without, but in order to use the toilet comfortably and comfortably, it is important to properly care for it, clean and disinfect it. Tired of buying cleaning products every week that only last for a few days? A dispenser would be an appropriate solution here.
Instructions on how to make a dispenser with your own hands
In order to make a dispenser with your own hands you will need:
- plastic bottle,
- cleaning tablets
Prepare the usual plastic bottle volume 1.5 liters. Using a knife or scissors, cut off the top of the bottle, marking approximately 15 cm from the cork. When cutting the bottle, it is important to calculate the size depending on the barrel; when the device is immersed, the bottle cap should be slightly above the water level in the barrel; when flushed, it should hang as if in the air.
Screw the bottle cap loosely so that water can seep in and out. Drain the water from the barrel while you work and turn off the tap so that it does not flow inside. Hang the prepared sawn edge inside the tank.
Take a piece of loose foam rubber and cut it so that you can neatly and evenly place it in the edge of the bottle. In this case, the upper edge of the foam rubber should be at the water level at the moment when the barrel is filled or slightly above it.
Glue a small weight (any heavy weight) to the foam rubber metal object) or screw several large screws into the bottom. This is necessary so that the sponge does not float up, but is located inside the edge, in the water column.
Purchase toilet cleaning tablets. Place one of them on the foam. Close the tank, unscrew the water supply tap and make the first flush, at which you will simply see clean water. But already with the second and subsequent washes, foam and freshness will be visible, as if you just placed the tablet in the barrel as usual.
However, the tablet will not dissolve as quickly as it does when placed at the bottom of the barrel in water; it can extend its effect up to two weeks, and the solution that is released when the tablet is soaked will completely saturate the foam rubber and thereby create an additional supply of saturated solution inside edge of the bottle and, accordingly, inside the flush barrel.
You can put several tablets into such a homemade dispenser at once, without worrying that they will quickly disappear and you will have to buy new ones.
Homemade floats, made by a fisherman to suit his own needs, which are the result of experience gained through the practice of fishing, are distinguished not only by their originality and uniqueness, but also bring indescribable pleasure to its owner through the direct manufacturing process. After all, the soul invested in this production subsequently brings a lot of unforgettable and vivid impressions from the fishing session, in which homemade fishing floats play a primary role, bringing the mystery of the biting process into a visual show.
Making floats with your own hands, knowing the essence of how the accessory works and imagining the conditions that will exist on a pond in reality is not so difficult and expensive. Fortunately today in our Everyday life There are many materials suitable for making a high-quality product, and you don’t need a specific tool for this job. Suitable arsenal technical means found in every household.
About the manufacturing processes of bite alarms under various conditions fishing from all kinds of available means and information will be presented to the fisherman that will help solve the problem of obtaining an effective fishing accessory and will give pleasure to the fisherman when using it rational decision.
Looking around, the inquisitive mind of the fisherman will immediately identify a lot of materials suitable for performing work on making a float at home. For those just starting their steps into fishing skills, it will also be no secret that the properties suitable options for production they must have high buoyancy qualities, low density of the substance and relatively low, preferably its complete absence, water absorption.
Important! The main float materials include foam blanks, a feather from the wing of any waterfowl, reed and wood, including one of its varieties, balsa, which is most suitable for the role of an alarm.

From products used in household needs All kinds of plastic tubes can be used for floats, for example, an empty rod ballpoint pen or a candy holder such as a lollipop, a medical disposable syringe, a wine stopper, and even a container from used plastic shoe covers.
To give the blanks an attractive look, you need to stock up acrylic paints V bright colors, sometimes instead of paint, nail polish can also be used. Have steel wire available, preferably alloyed stainless steels in diameter no more than 1.5 mm, and quick-setting waterproof glue. Toothpicks or thin bamboo sticks, which can be obtained from a discarded kitchen table napkin or rug, would be useful.
Most of the above options for blanks do not even require a special purchase from the fisherman, because they are either a by-product when consuming the main product or container packaging and a banal bottle cap. Therefore, making floats at home will not require large material costs, but will only require free time, imagination and the desire of the fisherman to engage in this exciting and interesting activity.
How to make a float

Having decided on the material component of the work, the fisherman must prepare some simple tools. To complete the work you will need:
- electric drill or screwdriver;
- a set of small diameter drills ranging from 1 to 3 mm;
- sharpened stationery and pocket knives;
- pliers;
- needle file set;
- fine sandpaper;
- hacksaw for metal;
- vice;
- awl;
- measuring tool, preferably a caliper;
- small chisels;
- scriber, which can replace a pencil.
It would also be useful, before planning to make a homemade float, to have a model, sample or sketch in the form of a sketch of the final product. After all, knowing the clearly stated final goal easier to achieve required parameters and the operating characteristics of the simulated alarm and get exactly the product that can cover the required fishing conditions. Further on in our article, we will talk in more detail about the most popular types of floats that you can make yourself at home.
How to make a feather float
The feather version of a fishing alarm is one of the oldest ways to provide a fishing rod with a float. For the product you need to get feathers from the wings of a large waterfowl. Most often, domestic geese and ducks become reliable suppliers of these products, but wild ones will not be an exception.

Make a float out of goose feather Taking into account the painting operation, it can be done in about one hour. A large fly feather of a goose is cleaned of the fan and side fluff, leaving only the shaft and quill for use, which will be the body of the future signaling device.
Important! The fan is in no way torn off by hand, but is cut with a razor or a sharp knife against its direction of growth. Otherwise, the hole in the hollow eye will fill with water, and the product will completely lose its buoyancy.
After trimming the fluff, its smallest fibers are removed with fire by running a lit match or lighter along the length of the feather. Next, the workpiece is painted from the thick end with bright paint, which will clearly stand out in the water; scarlet and light green colors best satisfy this requirement. As a rule, the product itself, the length of which usually remains in sizes from 12 to 15 cm, is painted exactly in half, leaving the lower part in a natural white color scheme.
Now, the almost finished product remains to be equipped with two nipple rubber rings for fastening to the fishing line, weighed to determine the exact weight, to carry out marking, setting a number on the body of the accessory, which will help you navigate easier when making further loading during installation.
Plastic tube float
A homemade float from a plastic tube can be constructed in literally twenty minutes. The easiest way to use the blank is to take a cocktail drinking straw with a diameter of about 5 mm. To make a simple but effective stick-type float, you will need a piece of tube 15 cm long. The main construction operation is soldering the ends of the tube, which is done in several stages by heating, melting and then compressing the fused plastic with pliers.

The tube is sealed at both ends, one of which is cut off, making the end even, like a cylinder; this part will be the top of the accessory. The other end of the tube is made flat and a hole is pierced in the center to thread it onto the fishing line from the equipment; this will be the lower part of the alarm. If necessary, the tube is painted in a color that is attractive to the eye and is equipped, as in the case of a goose feather, with a rubber fastening ring.
How to make a float from foam plastic
This type of manufacturing is more labor-intensive and requires skill in handling and compliance with safety precautions when working with an electric drill. Before you start making a foam float, a rectangular blank is cut out of a piece of material using a knife, which is threaded along the central axis onto a wooden toothpick and secured into a chuck. electric drill. Next, the drill is used as a lathe, clamping its body in a vice and turning on the chuck in automatic mode. Using a belt of sanding paper attached to a rotating piece of polystyrene foam, the desired shape of the alarm body in terms of diameter and configuration is formed. Grinding of the foam blank material occurs due to an increase in the pressing force of the abrasive material or a change in the number of the stone fraction on the sandpaper.

Important! For final polishing, use paper with as little abrasive as possible, bringing the foam planes to a smooth, pore-free surface.
Having turned the required shape, the workpiece is removed from the mounting wooden axis and, using waterproof glue, an antenna and keel are glued from pre-selected material options, which can be either wood or plastic tubes various diameters. In particular, using a plastic tube as an antenna, you can make a luminous float by inserting a chemical firefly into the hole of the tube from above, which helps to control the equipment in the dark.
All that remains is to reduce the diameters of the tube and the firefly into a suitable backlash-free interface. The foam body of the alarm itself is painted in different colors, exactly along the border of the maximum diameter, covering the upper part with catchy paint, and painting the lower part in colors that do not arouse the suspicion of fish. You can use either nipple rings to match the diameters of the antenna and keel of the alarm, or by placing a special wire fastening loop in the body of the accessory.
To do this, a thin wire, 0.5 mm in diameter, is twisted, leaving a ring at one end, and at the other end of the wire, the ends twisted into a braid over a length of at least 5 mm. The twist is glued into foam plastic into the upper part of the alarm, soaking everything with the same moisture-resistant glue.
Homemade fishing float from a wine cork
A cork float is made using a technique similar to processing foam blanks, using an electric drill or screwdriver as the main device for grinding the configuration required for the float. The only difference is in the composition of the material itself, where cork is a more capricious substance in its structure.
Important! It is more difficult to form holes in cork due to its increased fragility, and also to bring the surface to a perfectly smooth state, since the material has high porosity compared to foam plastic.
The final finishing is carried out manually, scrupulously monitoring the grinding of each deep pore and subsequently, before final painting, covering the body of the accessory with special varnishes that hide microcracks and pores, preventing further penetration of water into the body of the alarm.

When preparing holes for the keel and antenna, it is recommended to pierce them step by step with a thin awl, drilling together to required diameter. This is especially true for the option of working when forming a float from a champagne cork, which is characterized by the high fragility of the material structure. A cork float, as well as a polystyrene foam version of the alarm, can be easily made to fit all possible luminous floats for night fishing by inserting a fluorescent element into the antenna.
DIY wooden float
A float made of feathers and wood is considered one of the most environmentally friendly and natural options signaling devices. But working with wood to form the body of any float will require a significant investment of time and certain carpentry skills from the fisherman.
Important! Hardwoods and, in particular, oak and larch are selected for wooden floats.
The first stage of production includes cutting using a hacksaw wooden blank in the form of a parallelepiped of a certain size. Next, the parallelepiped is drilled through along the central axis and placed on a metal rod, the ends of which are secured in two oppositely located and rigidly fixed drill bodies. One drill is placed in the neutral position of rotating the chuck without turning on the electricity, and the second should become a drive for rotating the workpiece.
After launching this impromptu lathe from wood using a file or sandpaper form float bodies of any configuration. Last operation There will be a final polishing of the surface with the finest sandpaper. After polishing the sample, to avoid water absorption, it is coated with waterproof varnish and allowed to dry completely at room temperature. The formed body is equipped with an antenna made of plastic or thin wire, gluing into the hole from which the metal pin originally inserted for operation in the machine is removed.
A wire keel is glued into the lower part of the float body, or a wire ring is mounted to make a sliding float. Now you can proceed to painting the alarm and marking the accessory after control weighing.
Homemade reed float
This technique is suitable for making an extraordinary float right in field conditions fishing. After all, it is rare that a body of water is not the place where reed grows.

Important! For work, select a smooth and dense reed stem without burrs or cracks and cut it so that the length of the future float is approximately 15 cm.
The lower part of the workpiece is ground into a cone, which reduces bite resistance, and a seven-centimeter metal antenna can be inserted into the upper part. The homemade product is painted from the top in a color that is noticeable to the fisherman and is equipped with two nipple rubber bands for attaching to the fishing line.
Match float
The match float must have a certain mass and have high aerodynamic properties. For its production, a main body made from foam plastic or a wooden blank is selected and equipped with a massive antenna and a weight with a ring. The easiest way to assemble the antenna is from four cotton sticks, freed from cotton wool and tied with a polyurethane cambric, which, when heated with a hairdryer, tightly compresses the plastic sticks into a rigid structure.

The top of the antenna is equipped with a foam or cork boss, connecting them to each other using waterproof glue. The antenna itself is glued into the hole in the housing. A weight with a fastening ring is mounted on the lower part of the body. The easiest way is to make a load from a tin cone with a pin for fastening in its blunt part and a soldered fastening ring at the sharp end of the figure. After assembling the structure together, the accessory is covered with bright paint or nail polish.
Homemade water-filling float from a container for shoe covers
A fairly sensitive float with the ability to change its mass can be made from a container for shoe covers, having previously selected a twist-up box of the desired color in order to subsequently eliminate the operation of painting the product. A winding ring is mounted at the bottom of the container to secure the structure to the fishing line. This can be done either with an awl or with a small-diameter drill. A hole is drilled in the upper part of the container to match the diameter of the antenna.
Important! After installing the fastening ring and antenna, the holes are hermetically sealed with glue or silicone, preventing spontaneous accumulation of water inside the container.
All that remains is to paint the antenna bright color and directly on the reservoir, by collecting water or installing a lead weight, achieve the alarm load required for fishing conditions.
Homemade float for long casting
A heavy and long-range float for fishing in the current is constructed on the basis of an elongated cone-shaped body, which is made of dense extruded polystyrene foam. A long, up to 20 cm, antenna made of bamboo cane is glued into the upper part of the workpiece, equipping the top with a bright foam ball-shaped boss, strung with glue, on the tip of the element’s axis. The lower part of the cone is cut off to make it possible to drill a hole into the depth of the material for subsequent installation of the load. The load is prepared from a lead stick. Solder a winding ring to its lower part to attach the accessory to the cord of the tackle. Depending on the thickness and length of the load, the required mass is selected, which will form the main performance characteristics of the finished accessory. The weight is mounted into the foam body using moisture-resistant glue. After the glued elements of the product have dried, it is painted and tested, testing for range and strength in real conditions of a reservoir.
How to make an underwater float
This type of signaling device, which is radically different in operating principle, is most easily made from extruded foam plastic, turning the workpiece into a ball or oval shape. An important criterion production is polishing the surface of the product, which is carried out manually, using the finest type of abrasive sandpaper.

The polished form is drilled through with a millimeter drill along the entire body, shifting from the central axis to one of the edges of the workpiece.
Important! A rubber or polyurethane nipple is glued into the hole exits onto the surface of the foam mold, which will prevent the hard nylon line from cutting through the soft foam.
Manufactured using this method underwater floats painted scarlet with acrylic paint.
How to make a sports float
A float for current and standing water in a sports design will require a more careful approach to production. To do this, the fisherman will have to acquire expensive materials for blanks and the highest quality paints for coloring the finished product. Every little detail in sport fishing affects the final result, so the elements to be glued are additionally checked for strength and visible glue deposits are sanded with a file and sandpaper. Surface polishing is carried out to perfect condition and when painting, do not allow smudges and uneven application of paint layers. In terms of their design and production principle, sports versions of float alarms do not differ from amateur homemade ones.
Making a tube for floats

You can make a tube for floats with your own hands from polyethylene pipes and, in particular, sewer pipes with a diameter of 50 or 100 mm. Before manufacturing the container, the dimensions of the floats for storing which it will be intended are determined. By the number of accessory units and longest length One of them with a margin of one and a half, two centimeters is cut into a piece of tube. One of its parts must have a factory socket, which is plugged with a shaped part in the form of a plug, placed on glue for immobility. The tube cover is made of a coupling with a plug glued into it. For ease of opening the tube is removed from the coupling sealing gum. For massive float collections, a 100 mm pipe is used; for smaller floats, a diameter of 50 mm is suitable.
Important! Sewage pipe It is lightweight and does not undergo compression, which guarantees complete safety of the float collection and ease of movement.
For single options for storing floats or protecting delicate models from breakage, you can use drill cases in which they are sold in construction stores. The cases are made of lightweight and often transparent plastic, which allows you to decide on the type of accessory you need at the moment without opening the container. Tight fitting of the two parts of the case guarantees both water resistance and spontaneous opening of the tube.
Any fisherman who takes fishing seriously always has a marker float. It is needed to indicate the fishing location and to make accurate casts, especially when fishing on a feeder. This float is installed in places where fish are baited or in places where there are significant differences in depth. In other words, using a marker float you can mark a promising place on a pond.
But its functions do not end there. Using a marker float, it is possible to determine the bottom topography, as well as its nature: sandy, rocky, hard or muddy. You can buy it, or you can make it yourself at home.

It can be made from scrap materials or unnecessary items, which can be easily found in the garage or workshop of any fishing enthusiast. To do this, you can use the following available parts:
- Used syringe.
- Marker.
- Plastic tube from a drill or auger.
- Plastic barrel from Kinder Surprise.
- Another suitable object, with positive buoyancy.
The manufacturing technology is the same, regardless of what item or material is used. This is due to the fact that their purpose is the same. It is enough to study the process of making such a float using any one object and it can then be made from any other object or material.
As a basis, you can take a drill tube, which has two plugs, one of which has a ring for fastening. If the design of the ring is not satisfactory, then the plastic ring can be cut off and a carabiner installed in its place. On the other side of the tube you need to install a stabilizer in the form of a dart feather. By the way, this is exactly the plumage that will suit in this case. If the float is assembled correctly, you can get this sample:

If the manufacturing principle is clear, then you can safely start making a marker float from any other item.

You can also make an excellent marker float from an unnecessary syringe, and it is much easier to make than from a drill tube. In order not to waste time once again describing its manufacture, it is better to watch the corresponding video. As they say, it’s better to see once than to read a hundred times, especially since an experienced fisherman talks about it, focusing his story on the intricacies of its manufacture.
Video “How to make a marker float from a syringe”
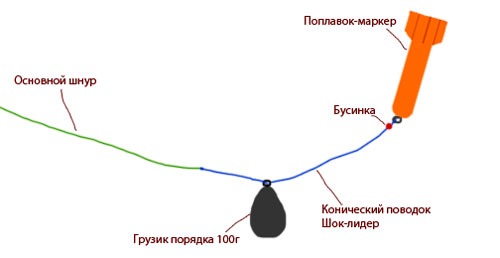
To install a marker float, first put a sliding weight weighing from 50 to 100 g on the fishing line. The weight of the load depends on the nature of the reservoir and the presence of a current. The load must be such that the float cannot hold it in the water column. The float itself is attached directly to the edge of the fishing line.
The float also acts as a stopper, preventing the load from flying off the fishing line. And now, the most important thing is how such tackle is used.
How to use a marker float
First you need to decide on the purpose of the marker float, as well as the functions it performs. And they can be as follows:
- A marker float will help you not to lose a promising place in the water area of a reservoir or a place where bait was thrown.
- Find out how deep the reservoir is in a particular place.
- Determine the nature of the bottom of the reservoir.
As a rule, a marker float is cast using a regular fishing rod or carried on a boat to the required distance along with bait. It is very important that the bait is delivered to the fishing point with a certain accuracy, and not scattered large area. This is where a marker float will help, which will be a guide there where you should throw portions of bait. Thus, a pinpoint spot of bait will be formed, which will make fishing more effective.
The depth of the reservoir is determined as follows: a marker float is thrown, during casting it will be in close proximity to the load. Once in the water, the load will begin to fall down. When the load sinks to the bottom, and you can always feel this, you need to start releasing the line so that the float floats to the surface of the water. The amount of fishing line removed will indicate the depth of the reservoir in the place where the load is located. Naturally, before retrieving the fishing line, you need to remember how many rings of fishing line have gone. You can do it differently: after the float appears on the surface of the water, start winding the fishing line until the float drops to the load. In this case, you also need to count how many revolutions the coil made.
With this float you can find holes, as well as depth changes, edges and rifts. As far as we know, large fish are found precisely in such areas of the reservoir that can safely be called promising.
Such a float, or rather tackle, will help determine the nature of the bottom. To do this, the load is simply dragged along the bottom. If the bottom is hard and clean, then the load will pass without much resistance, but if the bottom is muddy, then the load will get stuck in the mud, and you will have to pull it with a certain effort. If the bottom is rocky, then a kind of tapping on the stones will be heard, and the load itself will move jerkily. Naturally, in order to learn how to use a weight to determine the nature of the bottom, it will take a lot of training, because this is a delicate matter.

A marker float, with a certain approach to fishing itself, can be an indispensable thing, especially when traveling to unfamiliar bodies of water. Yes, you will have to spend a lot of precious time on manipulations, but the result will not take long to arrive.
Experienced fishermen are well aware that when they go fishing, they should immediately start looking for a promising place. You can’t just catch fish anywhere in a pond. Therefore, searching for edges, holes, and riffles is the primary task of an angler arriving at an unfamiliar body of water. It’s good if you have a boat and an echo sounder, then the task is simplified very much. And if fishing is carried out from the shore, then you should always take a marker float and a powerful fishing rod.
Despite the abundance of floats in fishing stores, amateur fishing masters continue to make homemade models. They differ in appearance, material and load capacity. Making a sensitive float with your own hands is not difficult. It is enough to decide on the type of product, select suitable materials and consistently perform all operations.
A DIY float can be used in different fishing conditions. Depending on the scope of use, appropriate materials should be selected.
- You can fish in the coastal zone with the lightest models weighing 0.2-0.8 g. Thanks to the low weight, it is possible to hunt fish species such as roach, rudd and crucian carp.
- For fishing in the current, a medium-weight float (0.8-2.5 g) is required. Equipment with such a signaling device can easily be cast to 20-30 m, where large fish such as bream, ide, and chub live.
- A heavy float weighing from 3 to 10 g allows you to perform ultra-long casting. Such models have a voluminous body, and flight characteristics reach 50 m. The antenna will be clearly visible from afar due to its large size. Such large representatives of ichthyofauna as carp, grass carp and silver carp will be interested in the bait.
Materials for production
If earlier fishermen were limited in materials, today the choice is quite large. Some of the materials are suitable for making a body, while others are better used as an antenna.
- You can create a floating body using:
- polystyrene foam;
- wine or cognac corks;
- medical syringe;
- balsa;
- wood
- The following may be suitable for the role of an antenna:
- waterfowl feather (from geese or ducks);
- cane;
- plastic tube.
To create a bite alarm, you may need various household materials:
- waterproof glue will help hold it together individual elements into one whole;
- wire 0.5-1.0 mm thick is needed for making rings and loops;
- acrylic paints will give the float individuality and good visibility;
- toothpicks will help process the body of the float.
For comfortable and fast work, you should have some tools on hand.
- The easiest way to make precise and even holes is with an electric drill and a drill set. In some cases it is more convenient to work with an awl.
- Chisel and sharp knife will allow you to remove excess pieces of material when creating a fishing masterpiece.
- Using a file or sandpaper, you can give the float precise shapes and perfect smoothness.
- The easiest way to hold the material or tool being processed is in a vice.
- A ruler or caliper will help control the accuracy of production.
Technology for making a float from wine cork or polystyrene foam
To make a float with increased load capacity, it is necessary to form the body. It can be shaped like a ball, an olive, or a drop.
Minimal modification is needed when making a float from wine cork. It has a cylindrical body, which remains to be slightly modified and polished.

- A carabiner with a swivel or a wire loop is attached to the bottom of the antenna. All that remains is to decorate the body and antenna with paint or nail polish.

Photo 3. Cut off the rod tube. it turned out to be a sliding float.

Photo 4. Color the product.
Making a goose feather float
Every fishing enthusiast has several goose floats in his box. They often help out when fish bites are cautious and unnoticeable. Before making a float from a goose feather, you should properly prepare the material.
- To collect feathers, it is better to go to a pond that is favored by geese or ducks. You can take 5-10 feathers with you, different in color and length. You should not start any processing on the shore. It's better to do everything at home.
- With help stationery knife it is necessary to cut off the fluff on both sides.
Attention! The sharp blade of the knife should be guided in the direction of the fibers. This way you will be able to get rid of fluff without breaking the seal of the feather.
- The remaining fluff can be removed using fire. To do this, it’s easier to use a lighter and walk the flame along the body several times. Fire will also help straighten a crooked feather.
- Next, you need to coat the attachment points of the fibers with colorless varnish to seal microscopic holes and cracks.
- The upper part of the feather is painted red or orange.
- Knowing how to make a feather float, it is important to securely attach it to the fishing line. To do this, two cambrics from a tube from a dropper are placed on the feather. Alternatively, a thin wire loop can be made at the bottom end of the float.
- Increasing the weight and carrying capacity of a goose float is quite simple. It is necessary to make a body from foam, balsa or cork. Then measure the thickness of the feather with a caliper and make through hole using a drill. Its diameter should be 0.1-1.0 mm thinner than the thickness of the pen. The antenna is inserted inside and fixed with glue.
Making a long-range float
For ultra-long casting of equipment, you can create a float with a weight.
- You can make an antenna from two plastic tubes. A tube 1.5 mm thick should be installed on top, suitable for the bottom plastic product with a diameter of 3 mm. Alternatively, bamboo or reed can be used.
- The body is made of polystyrene foam. Body height is 40-70 mm, diameter at the top is 15 mm, at the bottom it narrows to 10 mm.
- A hole 4-6 mm deep and 2.5 mm thick is made in the lower part of the body. A lead load is mounted in the hole, which is fixed with glue. It can be cast to the appropriate thickness by first installing a wire loop.
- A wire ring for fishing line is attached to the upper part of the body.
- The antenna is assembled with the body using waterproof glue. The final step will be to paint the float.
A fan of float fishing should have a rich set of bite alarms. Some floats are convenient to use when fishing short in calm weather. Other models will help deliver bait over long distances, allowing you to catch trophy fish.
But with the latter, not everything is so simple. For the sports fisherman correct position- this is a barely noticeable, up to 5 mm, tip of the antenna above the water. Among amateurs, some surround the float before the antenna begins, others leave a third of the body of the float. The “industrialists” have their own fishing technology. Sometimes it happens that you hang a pellet with a weight corresponding to what is written, and the float completely goes under the water. Usually the float is loaded at home in a jar of water, but when you throw the equipment into the reservoir, it turns out that the loading was incorrect, and you have to bring it to fruition on the shore.
This problem can be avoided if floats are made not with a constant, but with a variable load capacity.
To do this, you will need plastic syringes with a volume of 2 to 10 ml, depending on what fishing rods you will place them on (photo 1). For catching bleak, small ones are suitable, but for pike, naturally, larger ones are needed.
We take the rod out of the cylinder, cut off the round pressure stop, and carefully cut off the tetrahedral reinforcement on the piston. We wrap a small wire loop on the lower part with electrical tape to pass the fishing line through. We also cut off the rim of the cylinder.
Instead of a syringe needle, insert an antenna. Suitable material for her - cocktail straws, used gel and regular pen refills, etc. plastic tubes of suitable diameters. You can attach the tube by cutting the needle, onto its base, or simply onto the needle without cutting. To prevent the tube from slipping from the base of the needle and not allowing water to pass through, I fix it with a piece of heat-shrinkable tubing: I heat it over a candle flame, holding it with both hands, and for even shrinkage I constantly scroll over the fire.
Two important points
FIRST. The antenna should be sealed and adhere well to the base of the needle. To do this, seal the opposite end liquid nails pressing the tip into the glue. An easier way is to melt it over a fire.
SECOND. Sitting tightly on the syringe, the antenna should be removable.
Otherwise, you will not be able to press the rod in or out: the air inside will not allow this to happen. And you will again have a float with a constant load capacity. But the goal was to make a float with variable load capacity.
If the conversion technology is followed, a 3 ml syringe turns into a float with a variable load capacity from 1 to 3.5 g.
The final touch - coloring the antenna in desired color. As a result, you get excellent equipment almost free of charge (photo 2).
Seasonal menu
October is a paradise for spinners. Accordingly, from this perspective we will consider the prospects for fishing in mid-autumn.
Pike. It leaves the coastal zone and hunts at depth, in holes. It will covet a “big piece”, so try to present it with large spoons or voluminous wobblers.
Perch. Very active. It even attacks large pike baits that it cannot swallow. Preferences are wobblers from 5 to 7 cm, the same spinners and spinners with petals No. 2-4.
Zander. It is excellently caught both with spinning rods and bottom tackle. It moves in a flock, and if you fish with a spinning rod, use light-colored twisters: from white to light green.

GREAT DIGNITY float with variable load capacity - no need to select a sinker for the float. It is enough to move the piston inside the cylinder in one direction or another and adjust the volume of the float to the weight of the load. Even when replacing the float, there is no need to pick up lead pellets again; just move the piston.


