Not long ago on construction markets finishing material appeared for interior walls, which can give the room an aesthetic modern look and straighten it out at once minor defects. At the same time, the cladding process will not be difficult and even a beginner will be able to do it.
Liquids are a type decorative plaster. This is a new milestone in design and renovation. They are practical and versatile, and include many advantages. The powder mixture is presented in a wide range with a rich palette.
An assortment for every taste, with a wide variety of decorative additives, such as:
- stone chips;
- glitter;
- beads;
- wood shavings;
- color.
Wall decoration with liquid wallpaper: advantages and features
 If we compare this type facing material with roll competitors, the former have a number positive points. Eg:
- ease of preparation of the material. There is no need to roll out paper sheets throughout the room, measure and cut to height;
- the main component is cellulose fiber, which is natural and therefore environmentally friendly;
- ease of work process. There is no need to hire a master; you can actually handle the task on your own;
- seamless, even result that does not require pattern selection;
- “breathable” material due to its vapor-permeable qualities;
- good thermal conductivity and sound insulation;
- preparation of the base does not require the elimination of minor defects;
- easy replacement of the damaged area, just remove the damaged fragment stationery knife and apply a new solution to the cleaned area;
- easy and quick removal of the facing coating with water;
- the possibility of using the wallpaper plaster in question for a second time.
The main disadvantage is the high price of this coating. Also, due to its reduced moisture resistance, the coating is not suitable for finishing a kitchen or bathroom without additional processing.
Wall preparation: requirements
 Before applying finishing coating, you need to prepare the base.
If this is not done, the result will be of poor quality and short-lived.
The preparatory stage includes several operations:
- if there is old cladding, it must be removed;
- clean the wall, get rid of residual glue and peeling plaster;
- Cover the base with 3 layers of primer.

Before applying a new coat of primer, the previous one must be completely dry.
- apply gypsum putty on the base surface;
- make sure that there are no noticeable irregularities;
- use a hammer or a special hatchet to roughen the base for better adhesion of the material;
- cover the base with white water-based paint several layers.
For better adhesion, PVA glue is added to the paint.
What is the do-it-yourself application technology?
Decorative plaster is applied manual method: with a spatula, trowel or roller, depending on certain conditions and the personal convenience of the master. Large areas it is advisable to fill with wallpaper using mechanical method, namely with the use of a special-purpose gun, the so-called hopper.
How to glue correctly: step-by-step instructions
 to finishing, arm yourself with special tools, mix the powder correctly and adhere to proven application techniques - the path to a successful and high-quality repair result.
Tools for work
Currently, the process of covering a wall with decorative plaster is simplified by a variety of special work accessories. Some tools are simply irreplaceable, while others can be completely dispensed with. Below is the main inventory:
- large capacity for mixing the composition;
- plexiglass spatula or of stainless steel for applying finishing coating to the surface;
- special corner spatulas are used when filling corner areas. Some craftsmen still believe that it is more convenient to handle such places with your fingers.
- a metal spatula of small width (8-10 cm) for applying the solution to the main tool;
- trowel - an alternative to a spatula, it is a flat device with a handle in the middle;
- special roller - an alternative to a spatula and trowel;
- a transparent grater for grouting the resulting result, eliminating bulges, and giving an even effect;
- The hopper gun will save time and is suitable for tiling large rooms.
Application: all methods
 Before starting work, you must prepare the material in accordance with the instructions. Dry powder is mixed with clean water in the required consistency (on average, 5 liters of water are added to one package).
The mixture is poured into a container and water is gradually poured in, while the mass is thoroughly mixed by hand until a homogeneous composition is obtained. As a result, the solution turns out like thick sour cream.
Before pouring the powder into the container, it is recommended to shake the bag with the contents.
For better mixing, the mixture should be diluted with water one pack at a time. Further ready solution should be left to “ripen” for 20-40 minutes.
After preparing the decorative solution, use a smooth spatula at a slight angle, 10-15 degrees, and apply it to the surface with smooth hand movements. This procedure can also be performed with a trowel or roller. The layer thickness should not exceed 2-3 mm.
The work cannot be left for tomorrow or another day, since different drying times can cause seams to appear.
After applying the material, it is important to pay attention to the evenness of the result. If there are lumps, remove them with a moistened grater when the composition has set but has not yet dried.
It is practiced to use different powders color range. They are mixed and combined. Creative owners will be able to use a thick solution to create an interesting design on the wall. To do this, before application, the sketch is transferred with a pencil to the base surface, then painted over with the composition.
When using a hopper, it is worth considering that not all types of dry mix are suitable for this. It is necessary to spray the composition carefully, without long delays in one area.
You need to apply the solution to one area first, and then smoothly move to another. Decorative finishing dries in 1-3 days.
Is it possible to paint
 If desired, you can update the appearance and change the ones lined with solutions of dry mixtures by painting them with a roller with a fur attachment. This procedure can be repeated unlimited amount once. Special types Paints for this type of coating cannot be found, so paints are used:
- water-based;
- acrylic;
- latex;
- silicone.
If you follow certain rules, decorative plaster will not deteriorate as a result of painting. Updating the interior will not require large financial investments and will not take much time. The work will seem quite easy.
Possible disadvantages include that after applying the paint, the surface will already be hard, the patterns will become invisible. In addition, it is no longer possible to remove the decorative cladding with plain water.
 For long service life, the wall surface is coated acrylic varnish. After this, the contaminated areas of the wall are cleaned with a damp sponge.
If the wall has not been varnished after finishing, it should absolutely not be washed with water. In this case, you need to use a vacuum cleaner. You can restore the damaged area by removing the damaged fragment. It is necessary to soak it in water and apply it again to its original place.
How long do they last?
The decorative material has good wear resistance and durability. Subject to the conditions of application, operation and maintenance, the cladding will last for years.
High-quality finishing of a room with solutions from dry mixtures is wonderful design solution. Even if you lack skills, repairs will not seem labor-intensive, but will certainly please the owners. The ability to mix colors, supplement the composition with various inclusions and create unique images gives freedom to imagination and interesting ideas.
Useful video
Some people confuse liquid wallpaper with decorative plaster, which is due to a similar application technique and appearance. But the difference between these two materials is significant - their composition is completely different, because plaster contains sand and cement, and wallpaper contains silk, cellulose, cotton fibers and glue as a binder. Several methods have been developed for gluing liquid wallpaper, any of them is suitable for use at home.
Advantages and disadvantages of liquid wallpaper
Liquid wallpaper is an excellent option for interior decoration. The result will be unusual and very attractive in appearance. They are a dry composition, which is sold in bags and diluted with water according to the instructions. The resulting semi-liquid mixture is applied using a spatula, ultimately creating decorative coating without seams or joints.
On the wall, liquid wallpaper does not look the same, because they come in different compositions:
- silk – have a pleasant “matte” shine, reminiscent of the soft shine of silk;
- cellulose – non-gloss coating based on cellulose;
- cotton – non-shiny, made of cotton.
Silk coating, due to the presence of artificial silk fibers, is considered the most durable and durable. Liquid wallpaper can be white or grayish, intended for adding coloring additives with your own hands. This material is also sold in painted form, and the range of shades is quite large. Wallpaper with the addition of sparkles, gold and silver threads and other decor looks more expensive.
This type of coating has many advantages:
- Correction of surface defects and ease of operation. To glue such material, it is not necessary to repair small holes, irregularities and chips. The plastic mass penetrates inside and removes them like putty. Applying wallpaper is easy, even a beginner can do it. The master can work alone, no assistant is required. If the mixture gets on the floor or furniture, it is quickly washed off with water.
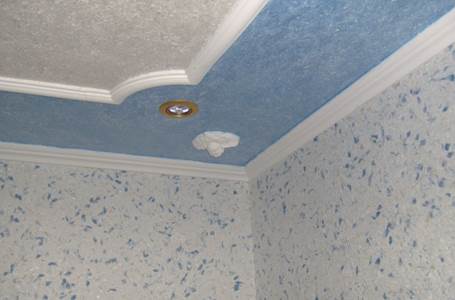
- Versatility. Application of liquid wallpaper is possible not only on the wall, but also on the ceiling. This coating is ideal for a bedroom, corridor, living room, office, nursery, and will fit into most interior styles. Using liquid wallpaper you can even make original drawing or a complex picture.
- Reliability and excellent performance properties. The wallpaper is not subject to shrinkage, cracks do not appear on it, and it is pleasant and warm to the touch. This material provides excellent sound insulation, is fireproof, and repels dust due to its antistatic properties.
- Opportunity to find inexpensive solution. Cost depending on manufacturer square meter coverage may vary and range from 50 to 500 rubles. For example, the price of material in the “economy” category from Silk Plaster is 270 rubles per package (54 rubles per square meter), a pack of liquid wallpaper in the “Prestige” category is 1,400.
- Variation in layer thickness. If necessary, the material can be applied in a layer of 5-6 mm to hide surface defects. If the base is smooth, a layer of 2 mm is enough, which seriously reduces repair costs.
- Safety. Liquid wallpaper does not contain a single harmful component, it is diluted with ordinary water, does not pose a risk to human or animal health, does not harm the environment, and can be used in hospitals and child care institutions. The material has no odor.
Working with liquid wallpaper is not dirty or dusty. At any stage of installation, you can open the window; this will not damage the coating, unlike conventional wallpaper. If any area is uneven, you can spray it with water from a spray bottle, remove the soaked material and apply the same portion again. It happens that after finishing there is a little diluted wallpaper left. They can be preserved, because the shelf life of the material is almost unlimited.
Liquid wallpaper also has disadvantages. They are not suitable for wet areas: bathroom, kitchen. However, if the room is flooded with water, the coating will remain unchanged. The main thing is not to touch it until it is completely dry. Other disadvantages of liquid wallpaper:
- sunburn, risk of yellow spots appearing under the influence of ultraviolet radiation;
- impossibility of washing - only dry cleaning with a brush or vacuum cleaner is allowed;
- poor grip smooth surfaces(Fibreboard, wood with varnish, paint, glass), can only be applied to rough materials (stone, plasterboard, plaster, untreated wooden surface, OSB plate);
- large time costs for installation.
How to glue liquid wallpaper: technology
The process of working with liquid wallpaper can be divided into three stages: preparing the base, preparing the mass and the actual application. To correctly perform each of them, you must follow the instructions described below.
Required tools and materials
Before starting work, you need to prepare a certain set of materials and tools that will be required for applying liquid wallpaper:
- the decorative coating itself in the required quantity;
- putty (if the walls have significant unevenness);
- primer (it is advisable to buy acrylic-based products with deep penetration);
- white water-based paint (needed if the walls are dark and the layer of wallpaper is thin);
- narrow and wide spatulas;
- roller;
- brush for paint and primer;
- container for mixing wallpaper;
- spray gun (spray gun);
- special plastic grater-stroker.
As for the grater, it is better to prepare a transparent one: through it you can see whether the surface is well leveled. This tool has a narrowed blade, which is very convenient when applying liquid wallpaper.
Surface preparation
The method of preparing the base is selected depending on the type of old coating. It is a mistake to assume that the material will hide absolutely all defects; preparatory measures are required in any case.
Working with old or plastered walls
Usually, liquid wallpaper is applied to walls that have already been finished many times. Therefore, step-by-step surface preparation will look like this:
- If there is wallpaper or other covering on the wall, it must be removed completely, without any residue. The canvases are sprayed with water and removed, the whitewash is scraped off with a spatula, the paint is removed in the same way, which is especially important, because the liquid mass does not adhere well to smooth substrates and literally slides off them.
- Inspect the wall for the quality of the plaster. When there are cracks, defects, areas of crumbling, you cannot apply a layer of wallpaper. You need to go over the weak areas with a hammer and chisel so that they crack and remove them. If the quality of the walls is unsatisfactory or there are serious differences in level, it is necessary to carry out a complete finishing. If there are minor defects, they can be left untouched.
- Wait a day after puttying, then finally level the wall by sanding with a block of sandpaper or a granular mesh. Minor scratches, the roughness is not touched, it is only important to bring out the main plane. Afterwards, clean the walls from dust using a vacuum cleaner.
- Apply primer deep penetration. Saturate the wall even layer, excluding drips, while corners and other difficult areas are treated most thoroughly. After drying, apply a second coat of primer. If the substrate is too porous, a third coat may be required.
- Dark walls are painted white. Otherwise, the rough finish will show through from under the liquid wallpaper, and its aesthetics may suffer greatly.
GCR surfaces
Drywall is often used to level walls, and its surface can be finished with liquid “sheets”. The most difficult areas here are the joints, because the wallpaper layer can crack in the area of the plasterboard seam. To prevent this from happening, you need to treat all seams with reinforced tape, and cover the protruding heads of nails and screws with putty.
Another problem is possible when working with drywall. On top it is covered with ordinary cardboard, and the paper strongly absorbs water. As a result, compression or swelling may appear in some places on the wallpaper. If residents decide to change the decoration in the future, it will be removed along with top layer GCR, which will cause damage to the entire slab. Therefore the base needs to be covered thin layer putty and then prime once. It is recommended to perform the same actions for OSB boards and other wooden coverings.
Preparing the mixture
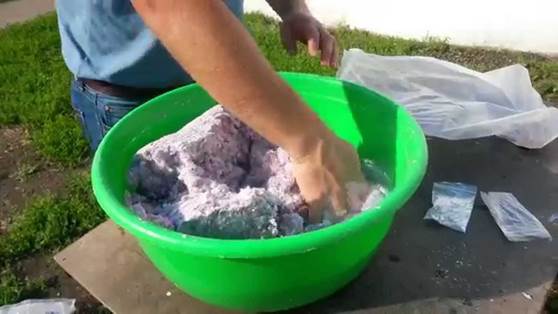
Since most types of liquid wallpaper require infusion for a long time, the preparation of the mixture must be started in advance. The process will depend on the composition of the wallpaper and its configuration. Many brands produce sets consisting of dry glue, a base (silk, cotton, cellulose) and decorative additives. Other companies produce fully mixed formulations, to which you only need to add water. In the first case, you first need to combine the contents of three packages with each other and mix well in a large container.
The procedure for preparing the “paste” for installing wallpaper is as follows:
- Pour the dry mixture into any container. Fluff the powder well so that there are no lumps. Additional additives that are not included in the kit should be added not to the dry mass, but to the water. Otherwise, there is a risk of their uneven distribution.
- Measure out the amount of water indicated on the wallpaper packaging. Pour in liquid room temperature into the second container, then pour the mixture there (only one packet). It is strictly forbidden to mix 2 packages of wallpaper with each other or take half the package: the result may be of poor quality due to improper proportions.
- Mix the mixture well with your hands, wearing gloves in advance (you can do without them, since liquid wallpaper does not contain hazardous substances). You should not use a drill or mixer, as long fibers will begin to break.
- Leave the mixture covered for 6-12 hours or for the period specified by the manufacturer. During this period, the fibers will soften, and the glue will bind them together. Before applying, make sure again that there are no lumps in the wallpaper by mixing it well.
If you need to make several portions of material at the same time, each of them is prepared separately, and only after infusion they are mixed into a single mass. The remaining mixture from one wall can be introduced into the general solution. Usually a standard pack is enough for 5-6 square meters of wall, although consumption is often higher due to minor surface irregularities.
Application of liquid wallpaper
The application technology is simple, it is practically no different from puttying with building mixtures.
Manual method
Novice craftsmen most often use this method of installing a liquid coating. For this purpose you will need 1 or 2 spatulas. A portion of the solution is scooped up by hand or with the first spatula, placed on the second tool and applied to the wall. Then grind the mass into a layer of 2-4 mm. Continue working in small sections, connecting them together. If the solution is thick and difficult to apply, you can add a little water to it.
As one square meter of wall is filled, take a grater, moisten it with water and level the entire area again. This is required to avoid the appearance of lumps, pits, and furrows. Then they continue to work further until the entire wall or room is covered. In the corners, level the wallpaper in the direction from the corner.
Application with a gun
Typically this method is used to process large areas of walls or ceilings. Unfortunately, not all types of liquid wallpaper are suitable for this type of application; some will have to be applied manually in any case. You need to find a mark on the packaging about the possibility of mechanized wall covering. If a special Hopper gun is used, it is necessary to install operating pressure, equal to 3-4 atmospheres. You should not use guns whose productivity is less than 210-250 l/m.
Consistency of the mixture for this method Application should resemble thick sour cream, so it can be diluted a little with water. During work you cannot:
- stay in one place;
- join wet and dry coatings;
- skip sections;
- move jerkily.
Before installing the wallpaper, it is important to install a bright spotlight, the beam of which will be directed directly at the wall. This will help eliminate the appearance of irregularities, areas of greater or lesser thickness, and unfilled areas.
Roller application
Covering walls with liquid wallpaper using a spatula usually takes a very long time. To speed up the process, you can try working with a roller. It should have coarse short hairs collected in groups. The width of the tool is approximately 15 cm. In extreme cases, a short-pile fur roller or hard foam roller will do.
The wallpaper is diluted to the consistency of medium thick sour cream. Afterwards, apply a little mass to the wall with your hand or a spatula, distribute it with a roller, carefully ironing each area. You cannot pour too much water, otherwise the composition will slide off the wall. If the base is level, the work goes quickly, and the layer turns out to be the same over the entire area. Finished wall will be a little rough. If you are not satisfied with this effect, you can lightly spray the coating with a spray bottle and then carefully go over it with a trowel to smooth it out.
Patterns and original ideas
Some people prefer not simply applying liquid wallpaper, but using creative approach. There are a number of interesting design techniques, which can be used to decorate walls with the following material:
- emphasizing individual zones in the room: ledges, niches, one wall, columns, arches, panels;
- creating a “panel” and framing it in a frame of moldings;
- laying out a colored pattern on a certain part of the wall or on its entire surface.
The most unusual method of decorating a wall with liquid wallpaper is to paint small objects or entire paintings. Drawing can be done using the following techniques:
- Acrylic paints, felt-tip pens on a dry white surface. The method requires artistic skills, is quite labor-intensive, does not allow drawing clear lines, and the drawing will be blurry.
- Filling out stencils. You can apply ready-made templates to the wall, making a repeating pattern, or make one large drawing. To evenly paint the entire thickness of the material, you will have to be patient.
- By spreading wallpaper of different shades onto wall fragments. First, the drawing is made with a pencil directly on the base, then using a small spatula the contours are filled with liquid wallpaper.
- Applying wallpaper with a special roller. There are shaped rollers on sale with an already embossed pattern, which you can quickly use to create a unique ornament on the wall. The result is a monochromatic coating with a textured repeating pattern.
Most often, pictures with plant themes are used: branches with leaves, large flowers, landscapes. Drawing butterflies, Egyptian patterns, geometric shapes, curls, waves, and children's images is also popular. Light stylized paintings will not overload the interior, but will become an interesting accent of the room. Beginners are not recommended to plan on making complex designs; it is better to try small ones, using 1-2 colors, no more.
How to store leftover liquid wallpaper
Usually, after finishing work, some of the finished raw materials remain. You can store it for several years, so you definitely shouldn’t throw it away: the mass will be useful for possible adjustments or replacement of the contaminated area. The raw materials must be completely dried, leaving the container open. Place the dry powder in a bag, close it tightly, and store it in a dry place until needed.
Surface restoration
It happens that during use, stains of grease and dirt appear on the wall covering. Since the wallpaper cannot be washed, you will have to adjust the surface:
- take the rest of the dry mixture;
- dilute warm water to a paste-like consistency;
- let soften for 12 hours, covered;
- moisten the problem area with water (brush, spray);
- separate a piece of wallpaper from the wall with a spatula;
- treat the “hole” with a primer;
- moisten the edges;
- carefully apply the mixture, making a “patch” and adjusting the material to the joints;
- It is good to level the area to the level of the main coating.
To make caring for liquid wallpaper easier, you can use furniture varnish by applying it directly to the wall in 2-3 layers. After drying thoroughly, this finish can be washed and wiped damp cloth- it won't harm her. The varnish reduces the vapor permeability of the walls, but gives the room an original, beautiful view and significantly extends the service life of liquid wallpaper.
Nowadays, finishing material such as liquid wallpaper is very popular. Their use replaces the labor-intensive process of gluing conventional paper sheets. Such wallpaper is practical, environmentally friendly, and easy to apply to walls. Thanks to their specific qualities, they can be used to create various patterns and level surfaces, which gives the room a stylish, neat and attractive look. True, not everyone knows what this finishing coating is, what its properties, advantages and disadvantages are, as well as how to glue liquid wallpaper.
What is liquid wallpaper?
Liquid wallpaper is a universal plastic material whose structure resembles sawdust. It consists of cellulose, silk or cotton fibers, glue, dyes, and acrylic components. It is sold dry in bags (diluted with water) or as a ready-made mixture.
This material has antistatic properties: it does not attract dust and does not absorb odors. You can use such wallpaper in any room. Applied to surface liquid coating It looks like paint, and when dry it forms a layer very similar to a beautiful, soft and warm fabric covering. There are several types that differ in their texture. Finishing with liquid wallpaper is carried out on previously prepared walls.
Material advantages
The finishing does not cause allergies, has the ability to breathe, and has sound and heat insulation. This material is not afraid of shrinkage. It can be used for wall decoration in new apartment immediately after moving in.

Liquid wallpaper is applied to concrete, metal, wood, plasterboard, and painted surfaces. To be repaired. It is very easy to replace and repair a certain area.
Flaws
Liquid wallpaper has many advantages, but it also has two disadvantages:
- the first is the high price of the material;
- second - the coating is easily washed off with water.
Gluing or in the bathroom can only be done with subsequent finishing with colorless varnish.
Preparing the walls
Surface preparation is a simple stage of work that must be done before gluing liquid wallpaper. You can do the preparation yourself.
The walls of the room should be cleaned first. sandpaper from mold and dust. Metal heads of nails and screws need to be painted over with white enamel and cracks repaired. If the surfaces are uneven and have different colors, they must be soaked in FG solution and coated with white water-based paint.
Walls made of plasterboard sheets must be completely sanded and covered with a water emulsion so that when applying wallpaper the gypsum putty does not get wet. For moisture resistance in putty mixture PVA glue is added in a ratio of 3:1. Wooden, as well as fiberboard surfaces, must be treated with oil paint or impregnated with FG, followed by water-based painting to avoid deformation when applying the liquid composition.
It is best to use it to prepare walls. With its help you can level surfaces, improve the adhesion of wallpaper to the surface, and reduce mixture consumption. After the soil layer has dried, it is carried out directly wall decoration liquid wallpaper.
Preparing the mixture

Pour warm water into the prepared container and add the dry mixture into it in small portions, while stirring with a whisk until the consistency of thick sour cream is formed. The resulting solution is liquid wallpaper. The technology stipulates that after kneading they should stand for 15-20 minutes.
Then the solution must be thoroughly mixed again. Large particles (lumps) must be removed. When it is planned to apply liquid wallpaper, the required amount is prepared immediately for all surfaces of the room in order to ensure a uniform shade. The entire solution must be used in one go.
Surface application
How to work with liquid wallpaper and what will be needed when decorating walls? To apply and level the mixture on the surface, you should have: a spatula, a knurling roller, and a colorless varnish.
Liquid wallpaper, the technology of which is not particularly difficult, but requires care and precision, should be glued at a temperature of +10 ºС. The finishing material is applied in two ways: by spraying using a special gun or manually by smoothing.
Using a spatula, take a little of the prepared solution and distribute it over the wall so that there are no bald spots, bulges or voids underneath. After leveling it, a second portion of the mixture is applied to the surface, and so on until the work is completed. It is necessary to carefully ensure that each layer of wallpaper has a smooth transition.

It is very easy to eliminate defects on them. To do this, you need to moisten them with water in that place, remove them with a spatula, and then fill this area with the mixture and level it. You can correct and wet the wallpaper only three times, after which it will be unsuitable for use. The applied layer of solution should be 1-3 mm thick. Depending on the temperature and humidity in the room, the material dries from 1 to 3 days. Only after complete drying is it covered with colorless varnish.
Expert advice on how to glue liquid wallpaper: when spreading the solution on the wall, do not overdo it. To get a textured surface, do not press them too hard. You also can’t under-squeeze, as the layer may become thick and will fall off.
Many people are interested in the question of how to work with liquid wallpaper when creating drawings. This universal material, which has plastic qualities, which can easily be combined to create various geometric patterns, shapes, flowers, stripes of any shade and configuration. It all depends on your imagination. The relief texture is made with a special knurling roller. To make a drawing, make a stencil and mark the surface. Take the prepared mixture with the desired color and apply it to the wall, carefully smoothing the edges. After drying, make the next color section of the drawing. Make sure the layer thickness is the same.
The technology of the material allows you to work with unplastered surfaces. How to glue liquid wallpaper to brickwork? Such walls are covered in two stages. First, the seams are filled with a compound, and after they have completely dried, a decorative layer is applied.
Precautionary measures
For high-quality coating application, you must follow some rules:

Storage of liquid wallpaper
If you have any unused solution left, do not rush to throw it away. It may be useful in the future when restoring a damaged surface area.
Place the diluted mixture in a container with a tight-fitting lid and place in a cool place or refrigerator. Or wait until liquid composition dry, and put the dry mixture in plastic bag.
Liquid wallpaper has rapidly burst onto the market finishing materials and also quickly won the hearts of millions of housewives around the world. They are amazingly beautiful, practical and environmentally friendly. They are easy to glue, if, of course, this word can be applied to the method of applying liquid wallpaper to walls, they are easy to care for. In general, this material deserves a huge number of praises addressed to it. However, many are afraid to mess with liquid wallpaper. And why all? Because they know little about them, much less know how to glue liquid wallpaper. But everything is much simpler than it might seem.
What is liquid wallpaper?
Before you learn how to properly glue liquid wallpaper, you should take a closer look at its composition, properties, advantages and disadvantages.
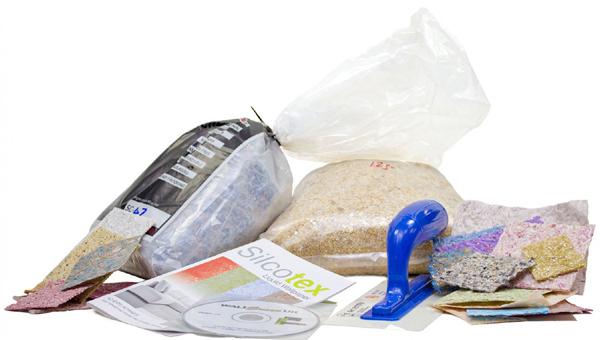
Liquid wallpaper is a plastic material with a structure very similar to flakes or sawdust. It is sold in transparent plastic bags weighing from 1 kilogram. The composition of such finishing material includes natural cellulose or cotton fibers, acrylic components, adhesive composition and dyes. In addition, other “ingredients” can be found in the packaging: glitter, mica, silk fibers, quartz chips, gold and silver threads.
After drying, the composition turns into something reminiscent of hard foam in its texture: the surface of the walls is just as rough, soft and warm.


There are several types of liquid wallpaper, and they do not have any special differences, except that from the thickness of the finished layer one can conclude what type of material was used in the repair. Some are thin and smooth, having a dense but not too textured surface, others are voluminous with clearly visible “dents” - more like fabric.
Advantages of liquid wallpaper
- Since liquid wallpaper contains only natural ingredients that have a neutral electric charge, they have excellent antistatic properties. What does it mean? This means that such wallpaper will not turn into a dust collector and will create a favorable atmosphere in the room.
- Liquid wallpaper is universal. They can be used to decorate the living room, bedroom, children's room, kitchen, hallway and even bathroom.
- This finishing material perfectly hides minor wall defects, cracks, crevices in the contact areas of baseboards, trim, frames, switches and sockets. In addition, they do not have seams, which means that the surface of the walls will always look perfectly smooth in any weather.
- You can use liquid wallpaper to decorate the walls of new apartments and not be afraid of shrinkage. They do not deform, which allows you not to wait 3-4 years for the house to “settle”, but to immediately begin a full-fledged renovation.
- Liquid wallpaper can be glued to almost all surfaces: concrete, drywall, wood, putty, plaster, fiberboard, plywood, MDF, paint and even metal.
- Such wallpapers are easily exposed cosmetic repairs: they do not need to be torn entirely off the wall; it is enough to soak the damaged or contaminated area with water and remove the mixture with a spatula. Apply a new one in place of the old coating, smooth it out and the wall will again delight you with beauty and impeccability.
- Liquid wallpaper breathes, it provides heat and sound insulation properties to your walls; in general, this material is ideal from all points of view.
Disadvantages of liquid wallpaper
Unfortunately, such a wonderful coating also has disadvantages, however, there are only two of them, and even those can be classified as insignificant.
Liquid wallpaper is quickly washed off with water, so if you decide to decorate your bathroom with it or want to periodically wipe it with a damp cloth (to maintain cleanliness), you will have to protect the surface of the walls with colorless varnish. The beauty of the finish will be preserved, but the effect of “breathing” walls will disappear forever.
And the second drawback is the high price, but speaking globally, beauty costs much more than 200 rubles per kilogram, so you can safely cross off the cost of liquid wallpaper from the list of vices.
How to properly glue liquid wallpaper?
Preparing the walls
Naturally, you need to start with preparing the walls. To do this, remove the remnants of old wallpaper and paint, and if there is any on the surface of the walls metal objects(nail heads, bolts, etc.) paint them with white enamel or water-based emulsion.

If the walls have an intense color, then it is better to get rid of it using special primers, enamel, oil paint or water-based paint white. In old houses, such as Stalin or Khrushchev, the walls are not perfectly even and it is generally unclear what they are made of, so they will need to be impregnated with FG solution or ordinary impregnation. After this, the surface of the walls must be painted over with water-based paint in two layers - this will protect against the appearance of yellow spots - the insidious companions of old apartments.
The drywall will have to be puttied completely, not just the joints. For what? It’s just that after the liquid wallpaper dries, the white stripes of putty will become noticeable. In addition, you will need to additionally cover the walls with water-based emulsion, since putties are not waterproof and can get wet during the application of liquid wallpaper. If you use gypsum putty, then you can add PVA glue to the paint in a ratio of 3:1 - this will strengthen the surface of the wall and prevent it from absorbing moisture.
Wooden surfaces can also absorb moisture, so before applying liquid wallpaper to them, make sure that they are not too thin (the thinner the sheet, the more it will deform). To protect such surfaces, either Oil paint, or FG in 2-3 layers, followed by painting with water-based emulsion.
Preparing the mixture
Pour warm water into a suitable container and gradually (in small portions) add the dry composition to the container, while stirring the solution with a drill mixer. As a result, you should get a mixture with a consistency similar to thick, thick sour cream. It is better to remove all large unmixed particles - when applied to the walls, these lumps will create difficulties for you.

After kneading, the solution should be left alone for 15-20 minutes, and then mixed again with the same construction mixer. To achieve a uniform shade, prepare a mixture of several packages and knead required amount material in advance, since the entire prepared surface will need to be covered in one go. Not in two days, but in one!
Applying liquid wallpaper to walls
If you don’t know how to glue liquid wallpaper, a video about this process will help you understand all its intricacies. And after watching, be sure to read our instructions.
So, to work you will need:
- large container for diluting dry mixture
- spatula or roller for leveling wallpaper
- spray bottle - if possible
- knurling roller with textured relief - if you want to give the surface a certain texture
- colorless finishing varnish
Take a little mixture and spread it over the surface of the wall using a spatula or roller. The wallpaper should tightly cover the base; there should be no bald spots, voids or bulges. Having finished with the first section and the first portion of the mixture, move on to the second, just make sure that there are no special boundaries between adjacent already rolled sections - they should smoothly flow into each other.


If you don’t like something (a lump has formed, an unevenness, a bald spot), then you can wet the wallpaper a little and remove the defective area, and then fill it again with the mixture and smooth it out. Just don’t get too carried away with adjustments - you can wet the wallpaper already applied to the walls no more than 3 times.
If you have a special hopper gun for applying liquid wallpaper, then the speed of applying the composition will increase several times, but such a device is quite expensive. It can be rented if the time of the event repair work you have limited. The rental price is approximately 300-400 rubles, but you will also have to take a compressor for the gun, which will create pressure inside the device. In this case, the rental cost will increase to 600-700 rubles per day.

In general, applying liquid wallpaper to walls is not a complicated process, but it requires care and attention. This coating dries from 12 hours to 3 days, depending on the level of humidity and temperature in the room. Covering the wallpaper with colorless varnish only needs to dry completely, otherwise the coating may become deformed.
Liquid wallpaper is a universal finishing material with which you can create interesting interior solutions. They combine perfectly with each other, allowing you to realize your wildest fantasies: stripes and flowers, geometric figures and ornaments. Creating and showing your creative abilities is not a problem with them.


And if you are still afraid to use a new one modern type finishing materials, then in vain, because creating comfort in an apartment with the help of liquid wallpaper is easy and simple.
Liquid wallpaper is a material that is one of the types of decorative plaster. The mixture contains cellulose fibers. Silk fibers are added to some types as additives. To add color saturation, liquid wallpaper contains dyes and various fillers, such as glitter. To ensure that wallpaper can be easily hung on the wall, one of the components is KMS glue. This glue is already familiar to many, as it can be used to glue roll wallpaper.
It is because of the structure that this material received its name - liquid wallpaper. But if you analyze the gluing technique, they are close to decorative plasters.
Based on their composition, wallpapers are divided into the following types:
- based on silk;
- cellulose based;
- combined base: silk with cellulose.
Silk liquids are shown in the photo:

The most reliable and longest-lasting wallpaper material is silk-based.
Tools used to apply the mixture to the walls: trowel and grater.
The advantage of liquid wallpaper
Let's take a closer look at liquid wallpaper and start with the positive characteristics:
Important! Liquid wallpaper has few disadvantages, but they still exist. They are very afraid of water. Therefore, in rooms where it is necessary to wash the walls, liquid wallpaper should not be used.
By watching the video below you can learn how to choose the right liquid wallpaper and paste it on the walls:
Surface preparation
Before gluing wallpaper on the walls, you must carefully prepare the surface. If they are able to hide minor roughness, then stains, especially darker ones, may appear. This material is diluted with water, and it can become a solvent for various contaminants on the surface that will be visible after the wallpaper has completely dried. Surface preparation consists of several important steps. The type of walls is determined, and only then their preparation begins.

Important! At the surface preparation stage, you should not skimp on the primer. It is thanks to this procedure that the strength and durability of liquid wallpaper can be ensured.
Preparing the mixture
The wallpaper mixture must be prepared in advance. This process must take at least 12 hours. All components of the mixture are already well mixed and packed in plastic bags. Shake the bag well and pour the contents into plastic dishes. Mix thoroughly again, do not press the mixture too hard or crumple it. The amount of water to be added must be specified in the instructions. On the picture - First stage kneading wallpaper.

Important! First, water is poured into the container, and then the dry mixture of wallpaper is gradually poured.
Each package must be kneaded separately. It is strictly forbidden to knead only part of the package. In such cases, the proportion is violated, and the structure wallpaper material will be different. After water is added, the mixture must be kneaded with your hands, as in the photo.
It is unacceptable to do this process using a mixer. In this case, all the components that make up the wallpaper material may become deformed. In principle, you should ensure that the metal does not come into contact with the mixture. After the kneading process, when the components are completely saturated, it is best to put it in a plastic bag, close it tightly and leave for a long time (12 hours).
The video provides instructions for diluting the components and then gluing liquid wallpaper:
Applying wallpaper to walls
Let's begin the process of wallpapering the walls. To do this, take it out of the bag or container with your hands. a small amount of prepared mass, place it on a trowel and distribute it on the wall. The layer thickness should be about 3 mm. Apply in small sections, gradually spreading centimeter by centimeter. After a certain part of the mass has been applied to the wall, smoothing should be done using a grater. This process is shown in the photo.

Let's consider the main points in applying wallpaper material to the surface:
- When smoothing the wallpaper, the fibers will lie in the direction of the grater. Therefore, it is necessary to move the grater in different directions. It is best to carry out circular movements;
- if general form will be separated by a pattern or columns, then to give symmetry, apply liquid wallpaper in opposite directions. Proceed in the same way with a grater;
All described processes can be viewed in the video:


How to prepare walls and hang liquid wallpaper yourself is shown in the video:
Liquid wallpaper can be glued to any surface. At proper preparation walls and the material itself - you can carry out all the gluing work yourself, and the result of the work will be extremely positive.


