When working with plasterboard sheets, three types of frames are most often installed:
- on the ceiling,
- on the walls,
- for the partition.
A frame made from a plasterboard profile must have structural strength and high load-bearing capacity. In this article we will look at how to correctly assemble a frame for drywall - general technological recommendations.
Installation of a metal profile structure under plasterboard on the ceiling
Let us conditionally divide this task into several stages:
- Marking future fixtures on the ceiling;
- Installation of metal profiles;
- Fixing drywall sheets on the assembled structure;
- Finishing operations and installation procedure for lighting sources.
According to the drawn up installation plan, we will start assembling the frame by marking the fasteners.
Marking begins by drawing a line of the future ceiling level on each wall. It must be strictly horizontal and closed.
The horizontality of the line is achieved by using a long building level during the marking process. IN ideal the line returns to the same place where it began and closes.
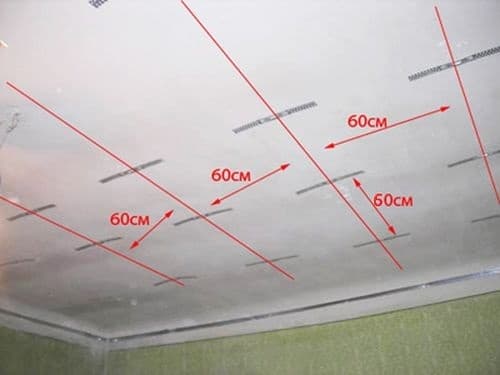
The following are the mounting locations for direct-type hangers. When marking the ceiling is completed, a grid with square cells measuring 60 by 60 cm should form on it.
There is an exceptional point - at the edges of the room, similar cell sizes may not be possible, then their size is purposefully reduced.
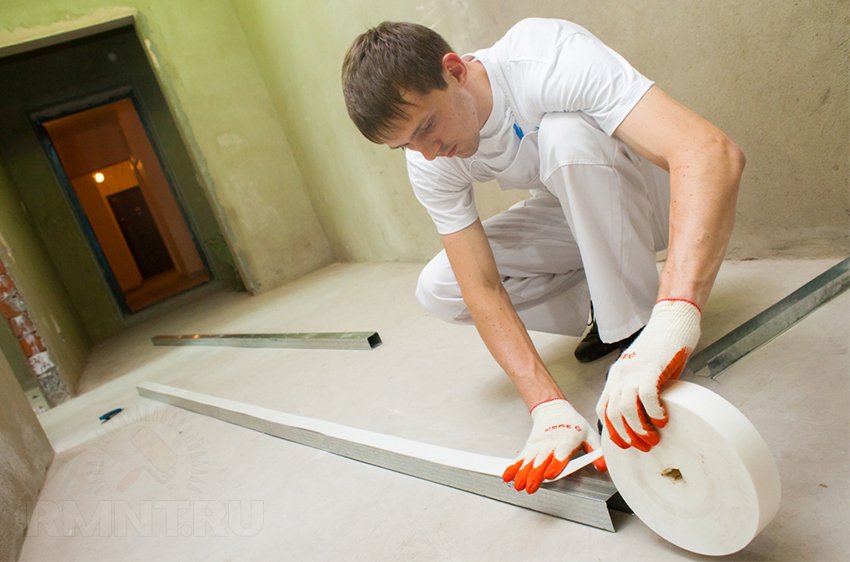
The frame made of metal profiles for plasterboard begins to be assembled by securing the guides - PN. The most commonly used PN format is 27×27. As the installation of the structure progresses, the profiles are glued with a special sealing tape on the side in contact with the wall.
At the corners of the room, profiles are attached, the length of which is at least a meter. The standard length is 3 meters. If it is fastened without preliminary cutting, then it must be fastened in at least four places.
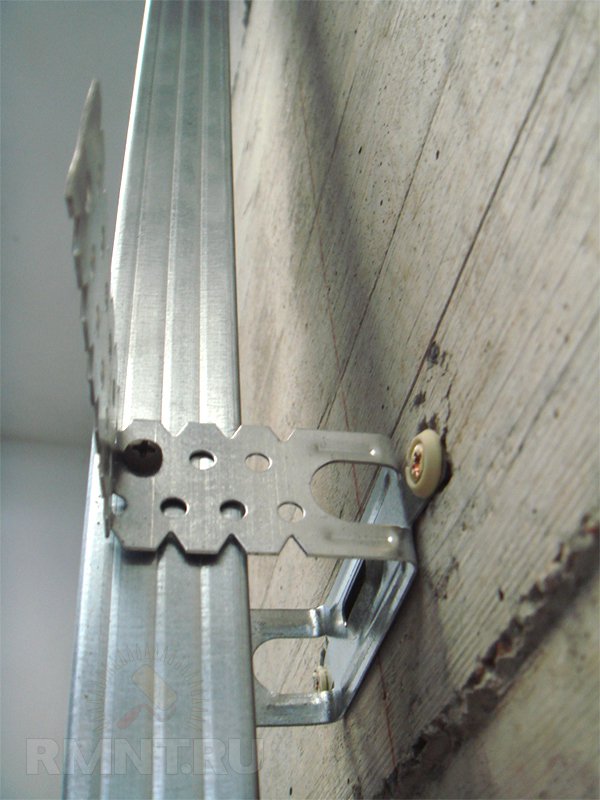
To guarantee strong fastening of the guide profile to the wall, dowel-nails with a mushroom-shaped head are used. It is preferable not to hammer them in, but to screw in the dowel itself first, and then the screw.
The next step, when erecting a frame for plasterboard on the ceiling, is the installation of P-type hangers. They are fastened according to markings in increments of 0.8-1.0 meters.
As for the means of fastening, they use plastic dowels and screws. When concrete walls and the weight of the structure, metal dowels are used. In those places where there is a joining of individual profiles, install 2 hangers on each side of the joint.
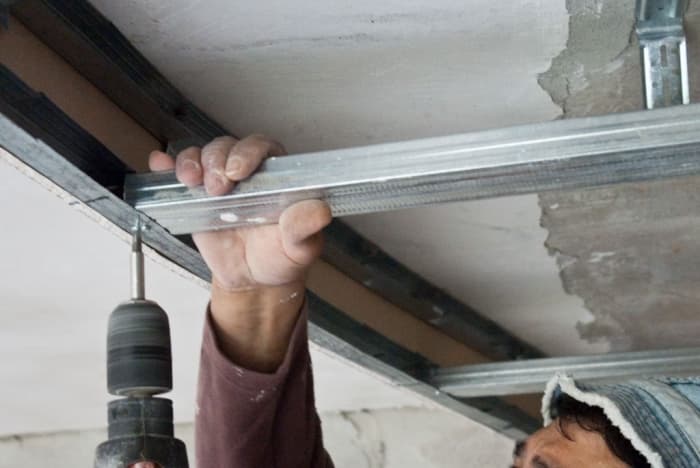
Installation of a ceiling profile begins with fastening the profiles from wall to wall. Next, a transverse metal profile is attached. This creates a cross type of connection.
Each ceiling profile is installed in a PN previously fixed to the wall. During the installation process, a horizontal level is set and the ceiling profile is attached to a U-type suspension. To fasten the structural parts, metal screws are used on each side.
If we look in general and do not take into account certain specific operations such as creating special insulating layers in the frame, then we can say that its preparation is completed at this stage. Next, the sheets of drywall themselves are attached.
Frame for plasterboard on the wall: general technology of work
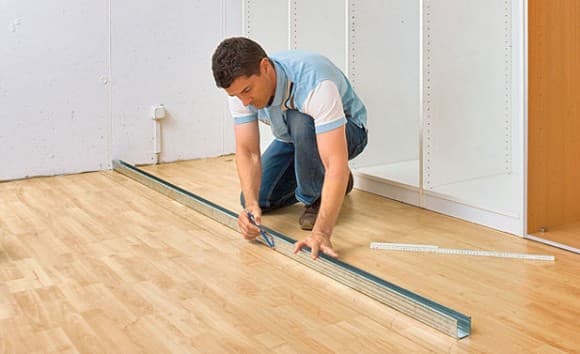
The first step is to determine where the wall has the largest protrusion.
It is at this point that a line is drawn on the floor surface using a paint cord. This line acts as a boundary for the UD profile, or rather for its internal part.
Once the line is ready, it must be transferred to the ceiling using a level and the same paint cord. This way we get the markings for installing UD profiles.
The above-mentioned profile is fastened with self-tapping screws and dowels. Installation is carried out around the perimeter.
The choice of the type of screws and dowels is made according to the instructions, which are often supplied with the profiles.
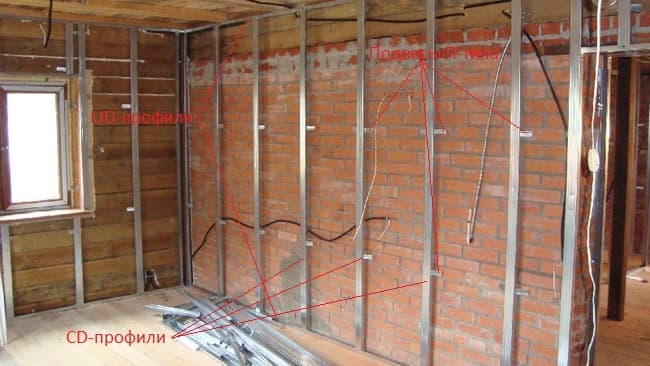
The next step is marking the positions of the vertical profiles. According to the recommendations, they should be located at a distance of about 30 cm. Each of the marked lines should coincide with the axis of the metal profile.
In this way, the number of profiles is equal to 4 per sheet of drywall. This gives strength to the structure.
Having vertical lines - marks, P-type hangers can be easily screwed in increments of about 60 cm for further securing CD profiles to them.
The final step is cutting the CD profiles to the required length and inserting them into the upper and lower UD-type metal profiles. Vertical UDs play the role of load-bearing structural elements. The curvature of the installation of structural elements is controlled by the building level.
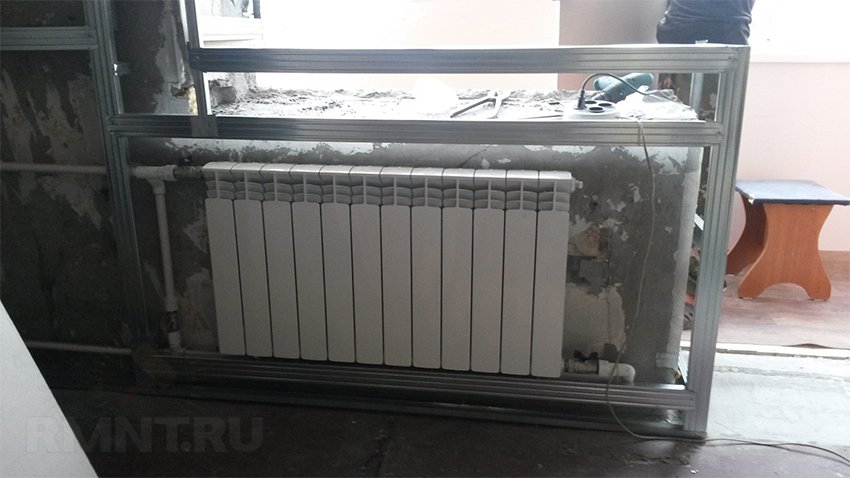
Installation of a partition frame under plasterboard
The cycle of operations begins with choosing the location for erecting the partition in the room. Once the place has been chosen, two marks are marked on opposite walls, along which we will draw a line up to the ceiling.
To ensure that the lines drawn are strictly vertical, use a level. We connect vertical lines along the ceiling and floor, thus obtaining a rectangular marking.
Upon completion of marking of the future partition, fastening of the guide profiles begins. They are attached to the ceiling and floor.
As for profiles for walls, both the same guides and rack-mount ones can be used. Which one you choose is not critical.
Each of the fixed profiles must be glued with sealing tape.
This applies to those adjacent to structures load-bearing type. This tape strengthens the partition structure and increases sound insulation.
The doorway is created by placing profiles and further strengthening them. A frequently used combination is two rack profiles that are inserted into each other, however this option not applicable to all types of metal profiles.
In the second case, a block is inserted inside the profile itself.
The heavier the planned door, the thicker the profile used.
The doorway should be made with a margin relative to the width of the door. For doors 90 cm wide, the margin left should be about 9 cm. The length of the doors is one centimeter less than the height of the room.
To correctly assemble the partition frame, use the following rule: the rack profile is installed in such a way that the stiffening rib is directed in the direction from which the fastening of the plasterboard sheets will begin.
This is due to the fact that the sheets are initially attached to the rib itself, and only then to the rest of the profile. To make it clearer: if the plasterboard lining is carried out from left to right, then the ribs should look towards the left wall.
How door profiles fixed, a jumper from a guide-type profile is installed between them. This jumper is initially made slightly longer than the width of the opening (about 20 cm), since ears are then made from the protruding parts, which are folded onto the side profiles.
Don't forget to screw in the fastening screws inside the opening.
For greater rigidity, two more profiles are added vertically, starting from the lintel. The distance between these two profiles should be about 40 cm.
Upon completion of the creation of the partition doorway, we install all the remaining vertical substations also in increments of 40 cm. Upon completion of this stage, you can begin attaching the plasterboard sheets.
Thus, we looked at how to make a frame for drywall for different types designs. The installation algorithm is simple, it only requires care and accuracy.
Drywall has become such a popular material that no renovation can be done without it. It doesn't matter if you need to make a shelf, suspended ceiling, cladding a wall, installing a partition, door arch, niche - the basis of each structure will be a frame made of metal profiles under plasterboard.
Note!
Such strips are made from thin, durable steel or aluminum plates.
They have a wide range of uses and are indispensable when assembling interior decorative elements.
The profiles provide optimal rigidity to gypsum plasterboard structures without making them overly heavy.
Classification

Before creating a frame for plasterboard from a metal profile, let's understand the classification.
Profile types
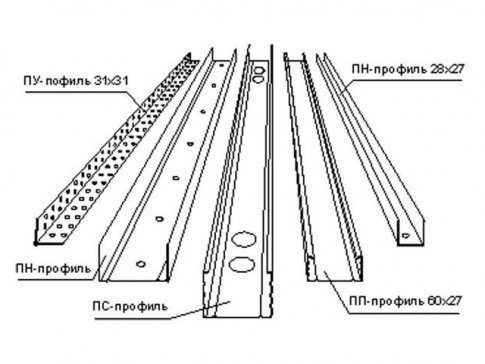
At the moment there are five main types of metal profiles for gypsum plasterboards.
- Guides (marking – PN or UW). Standard depth- 40 mm, width - 50, 75 and 100 mm. Such strips are the basis for fixing ceiling or rack crossbars.
- Ceiling guides (PNP or UD). They have similar functions and are necessary for installing the sheathing plasterboard ceilings. Attached along the perimeter of the walls.
- Ceiling (PP or CD). They are fixed to base ceiling anchor clamps or hangers, forming the lathing itself.
- Rackmount (PS or CW). They are used to assemble the base for partitions and walls made of gypsum plasterboard. Fixed in guide rails.
- Corner (PU). Their purpose is to strengthen and align the corners of the structure.
Counting required quantity planks, remember that they have two standard sizes - 3 and 4 meters.
Fastenings
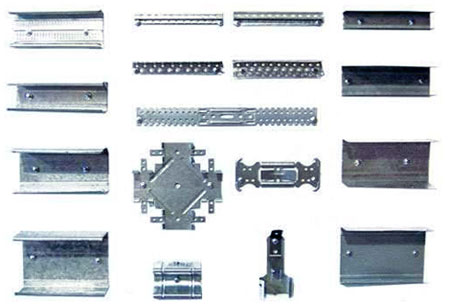
- crab connectors are needed for cross perpendicular fastenings;
- extension cords;
- anchor clamps;
- straight hangers;
- two-level connectors.
Assembling the sheathing
When making a frame for drywall from a profile, the first step is calculation and marking.
Surface preparation

- The first of the lines must be beaten along the floor, along the wall.
- Determine the distance from the marking to the wall, focusing on the width of the guide strips and the distance required for laying engineering and communication systems.
- When working, take into account the degree of evenness of the walls.
- Next, the line needs to be transferred to the ceiling. To do this, use a plumb line. It will be enough to mark 3 points: at the corners of the wall and in its center.
- Now these marks need to be connected with a line; it will indicate the location of the upper slats.
Frame installation

Mounting PN rails
Instructions for assembling the sheathing with your own hands:
- Fix the lower slats to the floor, the upper ones to the ceiling. The pitch between fastening elements should be 0.8-1 m.
- Make markings for PP profiles. For this purpose, draw several vertical lines on the wall. Set them aside from any of the adjacent walls, at a distance of 60 cm (half the width of a standard gypsum board sheet). Why is this so? Three strips are mounted under a solid sheet: two at its edges, one in the middle. If a piece of material with a width of less than 50 cm is installed, there is no need to install an intermediate rail.
- After marking the intermediate strips, you can begin installing direct hangers. When a frame is assembled from plasterboard profiles, the hangers are fastened using dowels in increments of 100-150 cm.
Note!
Before you start installing the PP slats, cut them by 0.5 cm, you will be able to easily insert them into the PN slats.
- Align the ceiling profiles along the marked line and screw them to the guides using self-tapping screws equipped with press washers. Fix these slats to the hangers with protruding plates that can be bent inward and fastened to the profiles with screws. (See also article)

Installing jumpers
- To give the structure additional rigidity, mount horizontally located jumpers from PN strips. They must be placed along the edges of the gypsum board sheets.
Summing up
Now you know about the intricacies of assembling the sheathing and how to cover the profile frame with plasterboard. In order to more accurately understand the technological and practical issue, our website provides detailed photo and video instructions in which you will find the necessary information on this issue. Good luck!
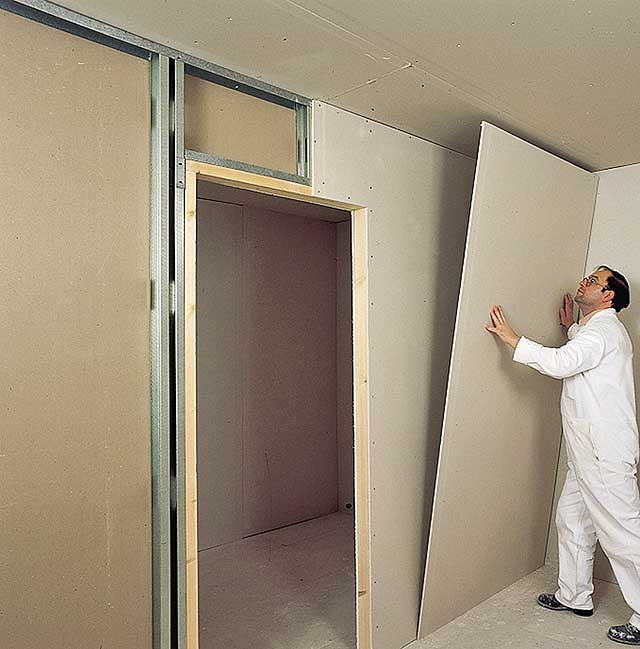
Wall and ceiling cladding is not only budget-friendly, but also extremely convenient option. That is why many craftsmen prefer this material. And in order for such cladding to be perfectly smooth, they use a trick - a frame made of metal profiles. With this approach, the technology for performing work changes and becomes somewhat more complicated, but appearance the room becomes whole and correct.
Metal frame for drywall
First, it’s worth understanding what a metal frame is and why it is needed for drywall. This is the supporting structure to which the cladding material will be attached.
Metal profiles have quite a lot of advantages:
- Strength;
- Reliability of the design;
- Ability to withstand heavy weight;
- Capable of long-term use.

The important point is that a wall covered with plasterboard (GCR) with a metal frame becomes absolutely flat, even if the differences were significant.
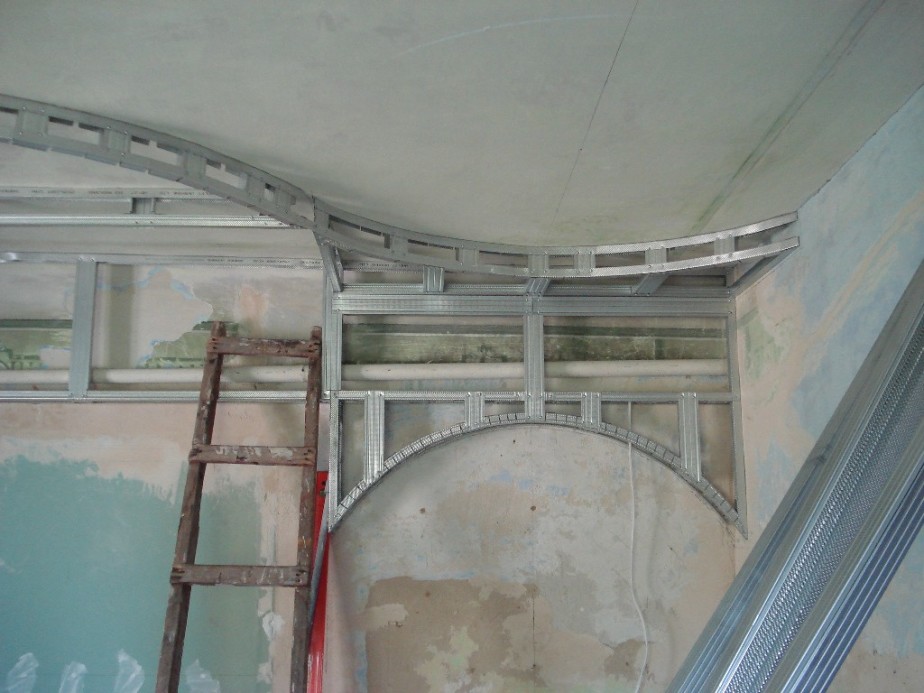
Exactly because of this reason plasterboard sheets and are the leader among cladding materials. Thanks to its properties and a properly constructed frame, you can build interesting structures on the ceiling. For example, multi-level and non-standard shapes/sizes.
In addition, such a cladding device helps make doorways unusual. For example, in the form of an arch.
How to avoid mistakes when constructing a metal frame for gypsum boards
When installing the frame and cladding, various unforeseen situations may arise.
Here is a list of the most common errors:
- Fastening a sheet of drywall with the wrong side;
- Incorrect fastening of sheets;
- Incorrect choice of the profile itself;
- Incorrect installation of the frame base;
- Lack of suspensions, leading to damage to the frame;
- Incorrect cutting;
- Alignment of bent parts of the profile.
Fixing the sheet on the wrong side can affect not only further finishing work, such as painting. For example, if installed incorrectly, it will deteriorate much faster.

But incorrect distribution of sheets during installation will lead to the appearance of cracks at the joints, as well as deformation of the profile due to incorrect distribution of loads. Another big mistake is using ceiling profiles for wall cladding. This is possible, but there is no need to talk about durability.
Failure to comply with the metal profile installation technology is one of the reasons for damaged structures. A poorly or incorrectly fastened profile will most likely fall off. It’s especially scary if this happens to the ceiling.
In the absence of such important detail, like suspensions, cracks will inevitably form. In addition, then the installation diagram will be disrupted, which also affects the strength.
Unbending the profile is an extremely thankless task. Rigidity decreases and the profile becomes deformed. This reduces the strength to zero. Therefore, it is very important to follow the installation technology so that the structure lasts a long time.
Construction of a metal frame for drywall
It is worth noting that if you plan to cover both the ceiling and walls, then installation must begin from the ceiling. Then it will be difficult, especially when doing the repairs yourself. At points of additional load (chandelier, shelf, large picture), experts recommend reinforcing the frame with additional profiles and fasteners.
Then you need to decide what type of metal profile will be needed to build the frame:
- PU (angular profile for strengthening corners);
- PP (ceiling profile to which the gypsum board is attached to the ceiling);
- PNP (ceiling guide profile that will be attached to the wall);
- PS (rack-mount profile, that is, vertical, used for wall cladding);
- PN (guide profile for walls, which must be attached to the ceiling and floor).
Sometimes a profile is required long length. Therefore, a coupling, that is, a PCB connector, is used to connect two metal parts. And to regulate the intersection of profiles, crabs are used: they strengthen the frame by connecting metal parts. Direct hangers are attached to walls or ceilings, and then bent along the lines that are on the product. A metal profile is inserted into the resulting connector. And the hangers themselves are mounted using hardware.
Wall cladding with plasterboard on a metal frame
To cover a wall with sheets of plasterboard and install a metal frame, you will need materials and tools.
Here is the list:
- Directly gypsum board;
- Profiles;
- Direct hangers;
- Dowels and screws;
- Drill or hammer drill;
- Screwdriver or screwdriver;
- Adhesive paper tape;
- Tape measure and pencil;
- Construction level.

The first step is to make markings for the hangers, which should be located at a distance of 80 cm from each other. It is necessary to select the most protruding part of the wall, and calculate from there. The profile on the walls should be located in meter increments. The profiles are fastened with crabs, self-tapping screws and self-tapping screws. You can hide insulation, wires and communications in the resulting box.
Drywall must be cut to size. It is then secured using self-tapping screws. The seams need to be taped with paper tape. You can use tape in the form of a grid, but experts recommend using self-adhesive paper tape.
Then apply thin layer putty at the joints, and you can also use it to hide some of the recesses if the sheet was slightly deformed during installation. The seams are processed sandpaper, and then the walls can be further finished. Sealing and processing of seams must be carried out at a temperature not lower than ten degrees above zero. During installation, it is necessary that the humidity is normal and there are absolutely no drafts.
The metal frame can withstand almost any finishing material, even decoration with bas-reliefs. True, it is better to use polyurethane products.
“Dry” wall covering with plasterboard is as common as wallpapering. Indeed, at such a pace of progress and quality of alignment, the assembly load-bearing base cannot help but have difficulties. And they exist, so today we will reveal the secrets of assembling wall profile frames.
Consideration of the work of the wall frame
Before you begin assembling a substructure for wall cladding, you should make sure that your understanding of the functions is complete and correct. profile frame. It is assembled from PN and PS type profiles of different sizes. For false walls without high operational load with one layer of cladding, a 60 mm kit is used, consisting of CD-60 and UD-27 profiles as rack and guide elements, respectively. Such a wall is self-supporting, but nothing more: no attachments such as cabinets, shelves or a TV should not be attached directly to the frame or sheets.
False walls with internal insulation, two- and three-layer sheathing with sheets and an additional load-bearing function are assembled on a frame from the same profile sizes that are used in the building plasterboard partitions. These are PS+PN sets 50 and 100 mm. Let's summarize: the width of the profile used determines the mass of the wall and cladding in particular, and sets the required load-bearing capacity.
To others the most important parameter The wall frame is determined by its frequency, expressed by the pitch of the rack elements. The more often they are installed, the greater the rigidity of the wall and the higher its resistance to pressure and impact. For single-layer sheathing, a step of 40 cm is used due to the fact that one sheet can be pressed through relatively easily. The two-layer cladding is denser, so the strut spacing can be increased to 60 cm.
It is not entirely clear why to reduce the number of attachment points for double-layer sheathing, because it weighs more than single-layer sheathing, and therefore requires more bearing capacity frame. However, the strength of profiles of standard size 50 and larger (and others are not used in multi-layer sheathing) is quite enough to hold up to four layers of drywall.

If you do not understand the point of covering with several layers of gypsum plasterboard, most likely you are not aware of the relationship between the characteristics of the walls. The additional layer increases the insulation from structural and air noise doubled, allows laying up to 50 mm additional insulation and significantly reduces the thermal conductivity of the skin itself. The combination of these factors makes multi-layer cladding a very popular solution, which has been adopted by almost all conscientious contractors.
Installation of guide profiles
Assembling the frame of any wall begins with determining its main plane. If the wall has niches, the main plane is the one that has largest area. This plane is quite easily projected onto the floor and ceiling with two base lines, from which all further readings will be made. Once these lines are defined and marked, they should be checked to ensure they are consistent with the overall geometry of the room and necessary changes made if necessary. For convenience, you can also make adjustments for the thickness of the sheathing layer and the preferred finishing material so that the markings accurately indicate the installation line of the guide profiles.

They, as the name suggests, determine the direction of the rack elements. For attaching guide profiles to concrete foundations plastic dowels for quick installation are used with a pitch of 35–40 mm or steel dowel-nails for direct installation. Attachment to wooden structures, shell rock or foam concrete is done with hardened self-tapping screws 50–120 mm long, depending on the density of the material. The fastening pitch can also be reduced to increase the rigidity of fixation.

To compensate for structural noise, thermal expansion and shifts during building settlement, a layer of damping material is laid between the guide profile and the load-bearing surface. Special self-adhesive tapes made of medium-density polyethylene foam can be relatively easily replaced with self-cut strips of insulation made of the same material and glued to regular PVA.
Structural insulation from the floor is carried out in one layer, and from the ceiling - in two or three. In total there should be approximately one layer for every meter of wall height. The fastening of the ceiling profile is not done rigidly, so that the frame guide can “walk” in height in the range of 2–3 mm.
Walking around openings and corners
The plane of the frame can be disturbed by niches, window and door openings. In these places, the linear configuration of the guides changes to correctly bypass the junctions.
IN doorways the guide profile is raised to form a rectangular opening in the sheathing. Its dimensions either exactly correspond to the installation dimensions door block, or determine the dawn of the slopes.

Window openings can be bypassed in two ways. The opening “to the floor” is designed in the same way as a door, however, it is preferable to install window sills in parallel with the assembly of the frame. This is done to break the vertical guides. Thus, the lower part of the niche is made with strictly rectangular edges, and the upper part has the required angle for installing slopes (2–3°).
It is more convenient to assemble simple closed niches after installing the main plane of the frame. Usually rack elements they are simply skipped at their locations, but if the niche continues to the floor, the guide profile on it must be torn and moved to the wall to the depth of the niche. In this case, additional external and internal corners, in which the profiles are tightly adjacent to each other to form a common clearance (the edges are cut at 45°). The reason for this is the following: it is impossible to reliably know in advance how exactly the framework will be implemented relief wall, which means that the rack elements must be able to be installed in all possible positions.
Assembling the load-bearing wall structure
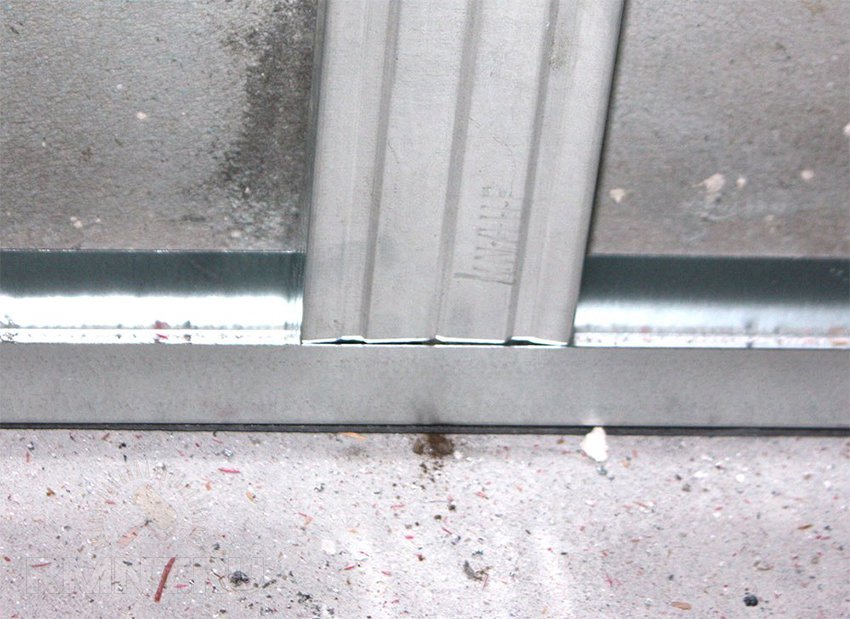
Rack profiles are inserted into the cavity of the guide profiles, the length of which is 15 mm less than the distance between the internal shelves of the guide system at each specific installation location. This gap is necessary to make it easier to insert the rack into the guides at an angle and to compensate for linear deformations.
For maximum performance, it is important to adhere to a specific installation sequence. First, all rack profiles are installed without any fastening. Next, straight hangers are fixed to the wall with a pitch recommended for the type of wall (30–60 cm), attachment points are marked, the profile is moved to the side and the wall is conveniently drilled with a hammer drill.

The racks return to their previous position according to the marks prudently marked on the guide profile. The profile is fastened with two notches or self-tapping screws in the lower part, but on top it must remain fully movable. To ensure that the racks exactly correspond to the installation step of the sheets and do not tilt, jumpers for joining are installed in advance vertical elements one row. If the frame uses the CD-60 kit, the jumpers are cut to 340 mm long, inserted between the posts and attached to them with halves of a regular crab. In this case, it is enough to install the first, basic rack vertically; the rest only need cursory control.

If the frame is made with a standard size of 50 or 100 mm, the jumpers are made with a guide profile. Its edges are trimmed along the outer flanges and bent to different sides. The workpiece is inserted with one curved edge into the cavity of the rack, the other edge is placed on the adjacent rack. If the sheathing posts are oriented with the central flange to the sheathing, which occurs in non-insulated walls, the edges of the lintels must be bent in one direction so that side faces were flat. The header is simply inserted between the shelves and secured to them along adjacent flat surfaces.

Please note that cutting the jumpers with “tongues” is strictly not recommended: the heads of the screws are normally pressed into the drywall, but the plate, especially from the central flange of the rack profile, will certainly form a bump on the surface of the sheathing.
To bypass vertical angles There are a number of simple rules:
- External corners with a standard size of 50 mm and above are assembled from two guide profiles inserted towards each other.
- The same corners from CD-60 are formed sequentially: first one side is sheathed, then a profile is attached to the sheet outlet and the adjacent sheet is sewn.
- All internal corners are also assembled sequentially: first the wall is sewn up, then the second corner insert is inserted and secured, and the adjacent wall is sewn up.
Additional frame fastening and completion of assembly
At the end of the installation, the plane of the rack profiles must be carefully aligned. Often for this purpose an additional rail (or a pair of them) is used, with which the racks are twisted together to be brought into common plane. The rail is telescopic and consists of two guide profiles nested inside each other.
After temporary connection, the edges of the straight hangers are folded back, attached to the posts and folded back, after which the additional slats are removed. Sections of the frame adjacent to niches and openings also need strengthening. In these places, horizontal crossbars are added at intervals of half a meter to prevent pushing through areas that are potentially susceptible to destruction.
The construction material having smooth surface, in many cases, it is ideally suited for leveling walls or ceilings before “finishing” cladding. Sometimes another method of bringing them into proper condition either creates great inconvenience and requires significant effort (plus increased time), or is not practical from an economic point of view. In addition, carrying out a number of works is simply impossible without certain practical skills. Any person can handle the installation of drywall sheets (GKL).
They are fastened in two ways - by gluing and laying on the sheathing, which is usually done more often. The question involuntarily arises of how to make a frame for drywall. This is a little more complicated and longer than just gluing it. Therefore, it is worth understanding in what situations installation should be done this way.
- Firstly, when the surface being treated has bumps or bulges that cannot be removed (height differences of more than ± 2 cm).
- Secondly, if this surface is subject to insulation.
- Thirdly, in the case of further laying of any communications routes (telephony, Internet, and so on) provided for by the project.
- Fourthly, to hide pipes and other lines running along the walls.
Before you start making a frame for drywall, you need to decide on the material. Traditionally gathered wooden sheathing, from prepared (impregnated) slats. However, this design has significant disadvantages:
- wood is susceptible to rotting;
- Considering that it is the gypsum board sheets that will be attached, and for all their advantages they have low fracture strength, the outer part of all slats must lie strictly in the same plane, that is, the surface of the frame must be absolutely flat. It is unlikely that it will be possible to find such a number of identical blanks;
- and, probably, the most important thing is that over time the wood “leads” (from changes in humidity and temperature). This means that the sheets will begin to “warp”.
It is for these reasons that it is recommended to use metal profiles. They are available for sale. The peculiarity of installation is that they can be mounted either on the wall or installed on special hangers, which allows you to assemble the sheathing on any uneven surface. Let's consider the last, more convenient option.
How to make a frame for drywall yourself
Frame marking
It’s more convenient to start it from the floor, and then project the line onto the ceiling. You need to choose the most “convex” place on the wall (as close to the corner of the room as possible) and attach the profile to it. Mark a point on the floor along its end ( outside). The same must be done near the opposite corner. A line is drawn through these 2 points, indicating the boundary along which all slats will be aligned.
It is also necessary to take into account the thickness of the selected insulation products (mats, sheets, slabs).
The same line is drawn on the ceiling. This is not difficult to do. You need to take a plumb line, raise it to the ceiling and mark the place where the weight will be located above the first previously marked point on the floor (or above the line). The second one is found in the same way, and then the “upper boundary” is drawn along which the frame for the drywall will be aligned.
It is necessary to make a small indentation at the corners of the room, since it is impossible to install the suspension close to the adjacent wall. It is necessary to take into account the thickness of the gypsum board sheets, which will “converge” in this place. Plus – correction for uneven surfaces.
Along the marked lines (on the floor and ceiling), guide rails are mounted to which the vertical posts will be connected. The strength of such an assembly will depend on the reliability of their fixation. The distance between hardware is based on the base material. If the surface is, for example, wooden, cellular concrete, then fasteners need to be installed more often.

Depending on what material was purchased for surface insulation, the interval between the racks is selected. It is also necessary to consider how it will be installed. If these are foam boards that are glued to the wall (and often additionally secured with special dowels), then to make a frame for drywall, only vertical posts along the entire wall are enough.
When insulating with slabs mineral wool To accommodate them, it will be necessary to equip the appropriate cells. Therefore, it will be necessary to install horizontal slats in accordance with the dimensions of the products.
This method is also attractive because any communications can be placed behind this structure, since the distance from the wall to the outer “cut” of the sheathing is completely arbitrary and is selected depending on the installation conditions. However, the useful volume of the room is somewhat reduced, which also needs to be taken into account.
Video frame made from a profile for plasterboard
Lathing for gypsum boards
When choosing profiles for a frame for drywall, you need to take into account that galvanized products are lighter, and they can be cut with metal scissors.
The interval between adjacent slats must be selected so that the joint of the sheets is on the outer surface of the profile. In addition, it is necessary to focus on the weight of the cladding material. Therefore it is implied " A complex approach» to this issue (dimensions of insulation, gypsum board, weight of finishing coating).
Preparing walls for the frame
You should not limit yourself to just cleaning them from “garbage” and old fasteners (nails, screws, staples). Any gap or bad joint is not only additional heat loss, but also a place where condensation will accumulate over time. By the way, various insects often “settle” there. Therefore, all such base defects must be eliminated.
In addition, it is advisable to impregnate the wall (ceiling) material with antifungal compounds, and wooden surfaces– and fire retardants. And finally - perform priming. Only in this case can we consider that the preparation has been completed efficiently and in full.
Profile fastener
It is advisable to use only elements that are resistant to corrosion. There are products on sale, for example, with a special coating.


