Not only experienced, but also many novice craftsmen know that interior partitions, suspended ceilings, arches or false walls are mounted on a pre-fabricated frame made of a profile for plasterboard. However, novice craftsmen often have many questions related specifically to the installation or assembly of individual frame components made of metal profiles for plasterboard.
Main components when installing a plasterboard ceiling
The metal frame for plasterboard on the ceiling is mounted from two types of profiles: guide and load-bearing. The guide profile is attached to the wall using expansion anchors. Holes are pre-drilled in the profile through which they are drilled into the wall. Typically, the step between anchors is 40-50 cm. If the ceiling structure is complex and the total load is significant, then the step between anchors is reduced to 30 cm.
Load-bearing ceiling profiles are placed parallel to each other in such a way that the plasterboard sheet is attached to at least three profiles. When assembling a frame for plasterboard from a metal profile, the supporting profiles are inserted to the full depth into the guides and installed with 1-2 metal screws.

Considering that plasterboard sheets have significant weight, the supporting profiles should not bend. To do this, each supporting profile in increments of 50-60 cm is tied to ceiling slab ceilings using perforated hangers. Installation of hangers on the floor slab is carried out using expansion anchors, and those hanging down metal plates hangers are secured with self-tapping screws to the vertical shelves of the load-bearing ceiling profile.
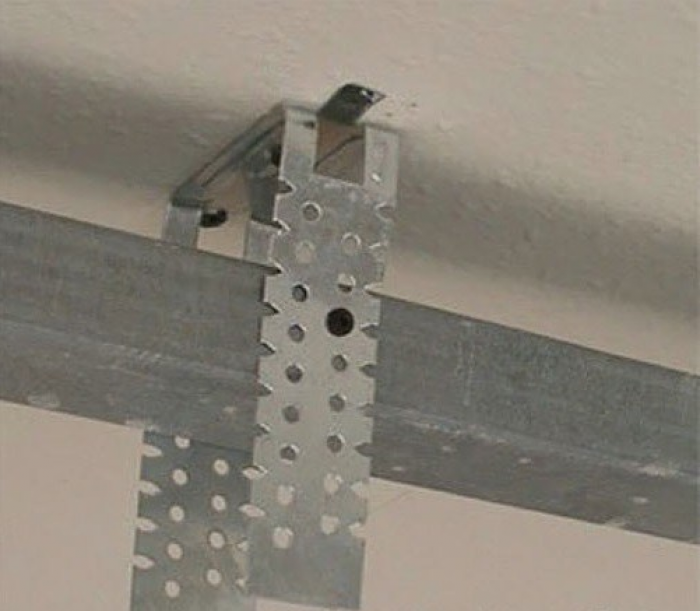
Jumpers made of the same material are mounted transversely to the entire parallel load-bearing profiles. As a result, the frame for plasterboard on the ceiling visually resembles a cage with regular squares or rectangles. To secure the jumper between two entire profiles, use a connecting element - a crab. The standard crab is a four-sided cross-shaped plate, which is placed on top of the horizontal profiles being connected and fixed with self-tapping screws. 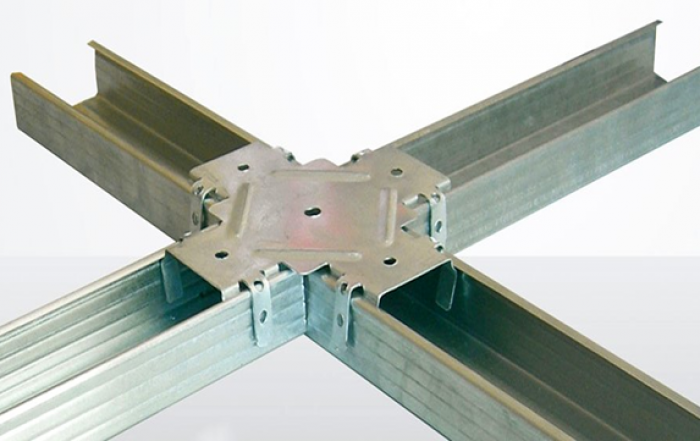
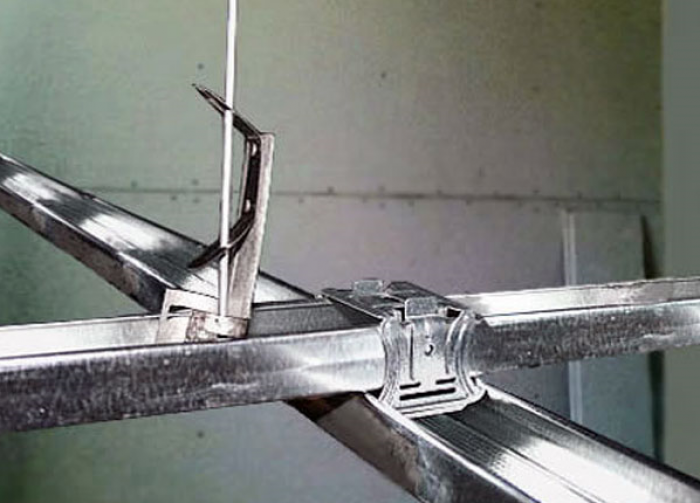
If the total area of the ceiling is small, then instead of connecting crabs, it is possible to mount jumpers to parallel solid profiles directly using the provided wings. To do this, the lintel is made 12-15 cm longer than the opening for it. After this, cuts are made at both ends of the jumper and bent into different sides her wings. Installation is carried out by fastening the wing and the adjacent profile with a self-tapping screw.

If the frame is installed under plasterboard for two-level ceiling, then it often becomes necessary to connect intersecting profiles not in a single horizontal plane, but in steps. For such a connection there is a two-level crab. The two-level crab is located above the uppermost profile and is attached to its shelves with self-tapping screws. The lower profile is fixed by the crab due to its spacer ears.
It often happens that the length of the room exceeds the length of the supporting profile. In this case, two load-bearing metal profiles are joined together using an internal connecting plate. The plate is placed to the middle of the profile and attached to its side shelves with self-tapping screws, after which a second profile is put on the other end of the plate and fixed in the same way.

It is also worth mentioning the longitudinal method of merging profiles. It is mainly used in manufacturing. Where the partition will be installed door frame, rack profiles are reinforced.
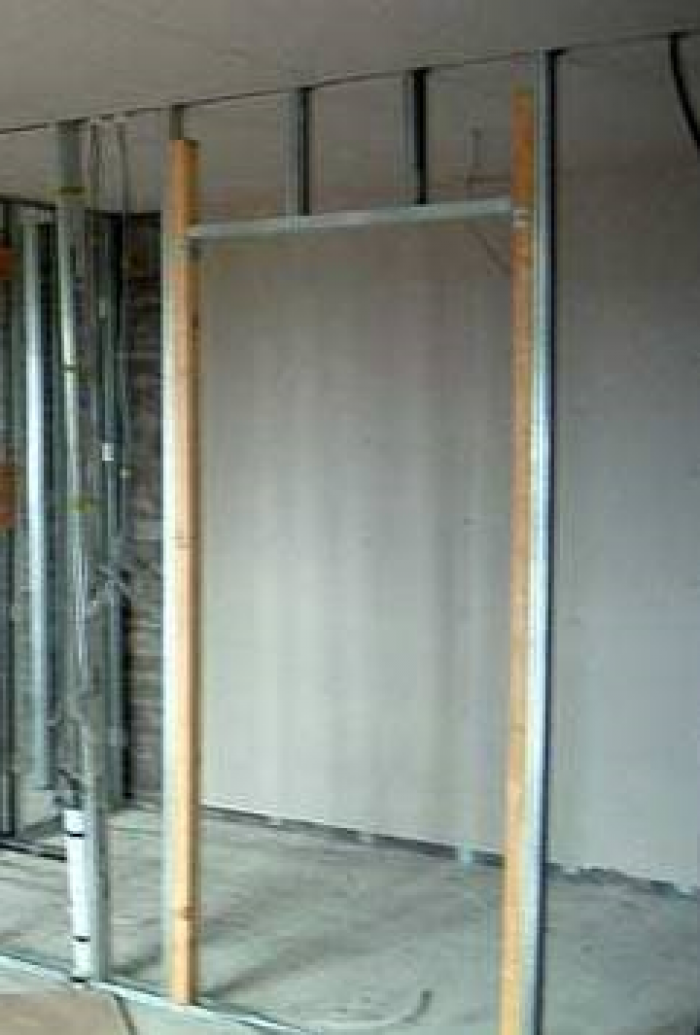
This stand is made from two different profiles. The load-bearing wall profile is inserted into the guide floor profile and self-tapping screws are tightened on both sides of the shelves in increments of 30 cm. 
This assembled element is suitable if the total weight of the door is small. If the door is heavy, then the vertical post is reinforced with wooden beams.
Methods for installing metal profiles
The main components and how to assemble a frame from a plasterboard profile were discussed above. Now let's talk directly about the methods of fastening profiles and their components. There are three main ways to connect profiles.
- Self-tapping screws for metal;
- Notch (notch);
- Aluminum rivets.
Metal screws are used with a sharp tip and frequent threads. The length of the screws is 9.5-11 mm, width 3.5 mm. The screw slot must be cross-shaped. To screw in the self-tapping screw, use a screwdriver with a cross-shaped bit installed in the chuck. In principle, it is possible to tighten a self-tapping screw manually using a figured screwdriver, but for a large volume of work this method is unproductive.

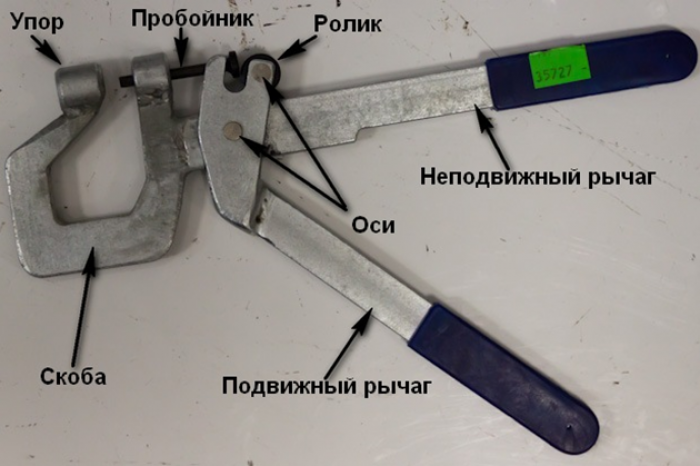
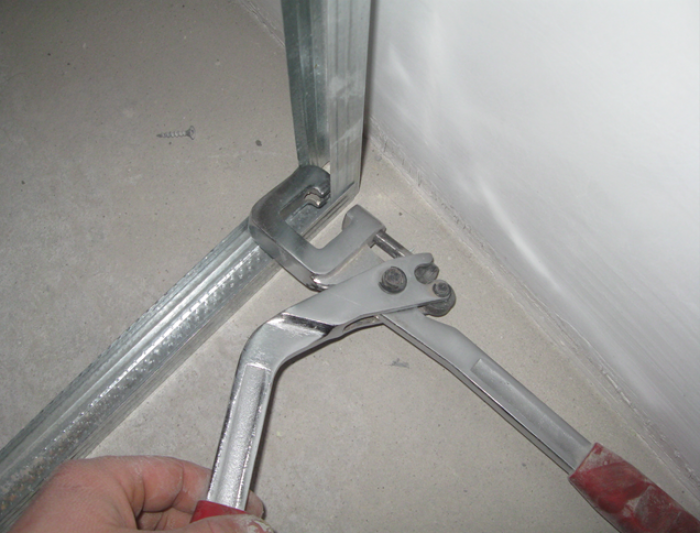
The method of fastening profiles by perforation does not require any Supplies. This method connection is that with the help of a cutter, several breakdowns are made at the installation point. When installing with a cutter, one profile must fit into another profile. That is, overhead installation cannot be done in any way.
The method of connecting profiles for gypsum boards using aluminum rivets is the least common method. For example, when the question arises of how to make a plasterboard frame for a two-level asymmetrical ceiling. The point is that in order to collect such complex design, you have to use a lot of homemade or purchased arched profiles. Considering that the arched profile has less bearing capacity than a conventional supporting profile, its installation should be carried out with a more reliable installation.
Connection method aluminum rivets can be considered the most reliable. However, due to the high cost of rivets and the large number of them required, this method is used when it is truly impossible to perform the installation in any other way. In a standard situation, installation is carried out using self-tapping screws or a cutter.
To form robust construction made of plasterboard, you need to know how to properly secure the profile, because this will be the “backbone” of the entire product. You will also need knowledge of extensions, interconnecting profiles and fastening options. The problem of fastening can be solved in different ways depending on the type of device - for wall cladding, creating a frame for partitions, or lining a ceiling. The profile itself for plasterboard on a large scale acts as a universal structure, which can be assembled and shaped for any project.
Types of profiles for drywall
There are 6 main markings for metal structures, used under plasterboard sheathing:
In turn, each of these types comes in different varieties in size and other parameters, which allows you to choose an option for any task of any complexity.
Installation rules depending on type
When working on installing guides, the frame is cut for required dimensions partitions. You should start implementing the fastening from the floor and then move to the ceiling. It is recommended not to forget about the sealing self-adhesive tape, which is glued at the points of contact between the profile and the mating surfaces - this will increase sound insulation. Fastening to the base surface is realized using dowels. The step is 1 m, but not less than 3 dowels for each frame part.


Installation work on vertical or rack elements not that complicated. Vertical profiles are inserted into structures already fixed to the floor and ceiling. Installation is also possible at the joints of sheets and in doorways. One element should be secured in the middle between the connecting structures.
They are located from each other at a distance of 1.2 m - the width of the plasterboard sheet itself. For greater accuracy, it is recommended to maintain a distance between vertical type profiles of up to 0.4 m. For reinforcement, use wooden blocks with a cross section of 40 by 50 or 40 by 40. It is especially important to reinforce doorways, which will facilitate the subsequent installation of doors.
![]()
Ceiling can be used to create suspended ceilings, arched and other curved structures, wall frames and cladding, paired with the UD-27 guide. To give the necessary rigidity and ease of installation, notches are applied to the base, 3 grooves are applied to the side sections, and the screw is screwed in for centering. Fastening is realized using special hangers - straight and with a clamp. For direct fastening, it is carried out using screws; the version with a clamp requires bending the edges of the profile into the middle to provide a reliable stop.
It is very important to secure the beacon guides correctly - they will largely influence the final result of plastering. First you need to measure the height of the room and cut the required volume of the profile. In increments of 100-150 cm, at a distance of 10 cm from the corners, vertical markings are applied using a level. In increments of about 50 cm along the marked lines you need to apply plaster mortar- the same one that will then be taken for final alignment.
The corner profile allows you to protect the ends of the partitions from all kinds of damage during mechanical operation. The shelves are located at an angle of 85 degrees to each other, which provides reliable fixation to the partitions. There are holes 5 mm in diameter, filled with putty during installation. Knauf drywall due to its flexibility and unique properties allows it to be successfully used without the need to form complex frames.
What tools will you need?
To properly fasten the frame and install plasterboards, you will need the following tools:
- A hammer drill to make holes in the wall.
- Drill-driver for drilling holes in metal and wood, screwing in (and in some cases unscrewing) self-tapping screws.
- A cutter that allows you to firmly and quickly connect profiles.
- Needle roller - quickly and evenly pierces the surface of the slabs.
- A small plane for finishing ends.
- Disc cutter for cutting drywall into thin strips and making preparatory markings.
- Hole saw for drywall - making holes for lighting fixtures.
- Knife-saw - cutting sheets and curly processing.
- Utility knife for drywall.
- A metal ruler and tape measure for measurements, and a level of at least 1 meter.
Not all tools from this list may be required, but only some in accordance with the task at hand.
Features of mounting to the ceiling and wall
 Any installation technology involves the use of specialized fastening profiles, such as ceiling, rack, as well as wall and guides. For ceiling and wall mounting preparatory stage is the selection of tools and evaluation work surface. Next, the selection of fasteners is carried out. In all cases, it is necessary to take careful measurements using a tape measure and create floor markings.
For ceiling installation, it is still more practical to make markings along the floor and then transfer the measurements to the ceiling. The marking of the walls is carried out in a similar way as for the ceiling. Next comes the stage of attaching the hangers and profile. To strengthen the base, you can make an additional connection using crab fasteners and pieces of profile specially cut for this. Then, after installing the frame and checking the result obtained, installation is carried out plasterboard sheets. Afterwards, you can achieve a perfectly even smoothness using putty, and after that you can safely carry out finishing wallpaper or painting.
The profile for plasterboard is used for the manufacture of frame structures from this material. They are usually made of galvanized metal with a thickness of 0.5-0.8 mm. The length of the profiles can vary from 2 to 5 m, depending on the manufacturer.
Main types of profiles for drywall
Profiles for drywall are divided into two main types: guides and rack-mount (load-bearing). In addition, there are special types metal profiles.
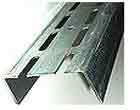
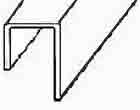
The guide profile is used mainly to secure the perimeter of the frame of plasterboard structures. In addition, it can be used to construct various jumpers and connect frame elements. Its cross-section is U-shaped, but the ends of the side shelves are not bent inward. Its back may have two stiffening ribs and holes with a diameter of 8 mm for fastening it with dowels.
The rack (bearing) profile is used for mounting sheets of drywall on them and is attached to the guides. It is usually made in the form of a U-shaped profile, which has a back and two side shelves located at an angle of 90° to it. The edges of the shelves are also curved inward. There are three grooves along the back: in the middle - indicating the joint location of the gypsum board, and the side grooves - to facilitate screwing in the screws. Usually its length is 3 or 4 m, but can be from 2 to 5 m. Its marking indicates: the type of profile, the width of the back and shelf.
Special profile types
In addition to the above, special types of metal profiles for drywall are manufactured: corner, reinforced for doorways, racks and guides for partitions, arched, hat “omega”, L-, Z- and L-shaped profiles.
Profiles for partitions – guides and racks differ from conventional ones in that they can have a greater metal thickness (up to 0.8 mm) and have big sizes(width of the back and side shelves). The width of the back of the rack profile for partitions can be 50-100 mm, and the width of the side shelves - 50 mm. The partition guide has shelves 40 mm wide and a backrest 50-100 mm wide. Rack-mounted ones usually have holes with a diameter of 33 mm in the backs for routing wiring inside the partitions.
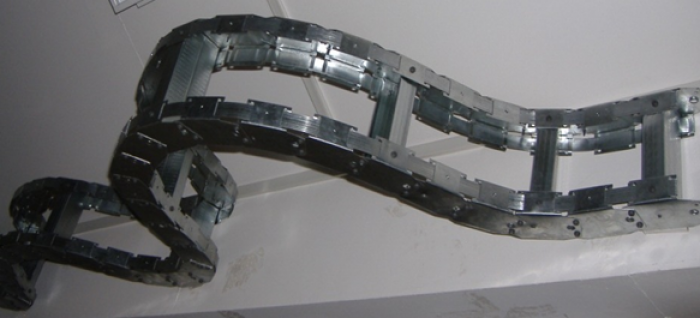
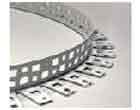
Arched profile used to create curved surfaces of arches or other plasterboard structures.
Corner profile (corner) designed for reinforcing right angles (usually external) plasterboard structures. It serves to protect these corners from mechanical influences and also makes them smooth. As a rule, it consists of two perforated shelves 25x25 mm, which are located at an angle of 85° to one another. Perforation serves for reliable adhesion to adhesive or putty. Such corners are made of galvanized iron or aluminum. In addition, they are made of plastic. There are also plastic arched corners that can repeat the most complex shapes edges of plasterboard structures.
Special hat profile “omega” serves during installation ceiling systems and false walls. Its height can be from 0.5 to 2 cm.
L-shaped - used for installation of round and elliptical ceilings;
Z-shaped - often used for installation multi-level ceilings made of plasterboard, it comes in different widths and heights.
G- shaped - used for installation of plasterboard on monolithic reinforced concrete ceilings.
The choice of a metal profile for plasterboard must be made based on the type of structure that you are going to build from plasterboard, its required strength, as well as the quality and flowability of it itself, which may vary depending on the manufacturer.
Characteristics of some types of profiles
 CD-60- used for constructing structural frames when lining walls and ceilings with plasterboard, as well as when installing plasterboard partitions.
 UD-27- guide, used in the form of guides for CD-60 profiles during installation when installing frames for plasterboard.
 Profiles for partitions CW-50, 75, 100- used as rack-mount installations interior partitions from plasterboard. They are mounted together with a guide corresponding to their size - UW-50 - 100. Their required size is selected in accordance with the height and thickness of the future partition, the features of its design (one- or two-layer) and the requirements for sound insulation.
 UW-50- a guide profile for rack profiles when constructing frames for plasterboard structures and installing lintels in frames.
UW-75, 100 used as guides for rack profiles when installing plasterboard partitions.
 Reinforced profile UA-50.3– made of thick steel and intended to strengthen doorways of plasterboard structures. Its width can be 50, 75 and 100 mm.
Corners
 Perforated aluminum corner- intended for reinforcing the outer corners of plasterboard structures to protect them from mechanical influences.
 Plaster corner- intended for protecting and leveling external corners when plastering internal or external walls.
 L-shaped profile, trimming (rail for ends) for gypsum board 12.5 mm - used to protect the edges of gypsum boards during the construction of plasterboard structures.
 Arched plastic corner– designed for reinforcing and leveling corners before applying putty in the manufacture of plasterboard arches, curved surfaces or gypsum plasterboard structures of complex shape.
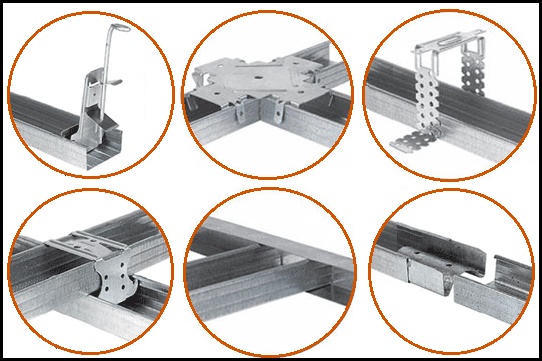
Connecting elements
Connecting elements are used to reliably connect profiles to each other and to supporting structures in the manufacture of plasterboard frames. Nowadays there is a wide variety of such connecting elements on sale. Below are the characteristics and purposes of the main ones that are used most often.
 Direct universal suspension P-125. Designed for attaching ceiling profiles to ceilings or other load-bearing structures. Attached to the base with an anchor (on reinforced concrete ceilings) or a dowel (on the wall).
 Longitudinal connector CD 60- used for joining plasterboard profiles type CD 60 when installing frames.
 Cross or in other words – “crab”- designed for connecting sections of the ceiling profile CD 60/27 with the main one when installing the frame suspended ceiling from plasterboard.
 Cross connector CD 60- used for fastening sections of the CD 60/27 ceiling profile to the main ones when installing the frame of suspended ceilings.
 Corner connector T CD 60- used to assemble a single-layer, cross ceiling structure from profiles.
 Suspension T rotational (rotary) With spring element, are used to connect the CD 60 profile to the fastening rods.
 Spring suspension (butterfly)– it is used for suspended ceiling frames made from plasterboard profiles.
 Rod with hook L- used for installation of suspended ceilings, can be length: 250, 500 and 1000 mm.
 Rod suspension with clamp and hook L– also used when installing a frame for a suspended ceiling made of profiles. Allow, if necessary, to easily adjust the length of the rod using a clamp. Can be length: 250 and 500 mm.
Rules for working with metal profiles
When performing work using metal profiles for drywall, you must adhere to the following rules:
- It is better to cut galvanized profiles with metal scissors rather than with a grinder, since when cutting the latter, the zinc layer may be damaged and the metal may rust in this place.
- Increasing their length by extension is undesirable and is possible only in extreme cases, since these connections will be a weak point and during further installation can lead to distortions or breaks of the frame in these places.
- Self-tapping screws for connecting frame elements must have a fine thread (“metal-like”), reaching all the way to the head.
- Before attaching the guide profiles for partitions to the wall or ceiling, it is necessary to stick a special insulating tape on their backs or treat them with a sealant - to improve adhesion to surfaces and increase the sound insulation of the partitions.


