The wizard will show you a selection interesting ideas on using an angle grinder, which will help expand the functionality of the tool and make it more convenient. See a selection of 5 options and choose what you can do based on your experience.
1. The screen shows a saw blade. This is not a factory production. This homemade product has two clamps - horizontal and vertical. Thanks to the duo of clamps, not a single part will come out of place - be it a corner or a pipe. In addition, there is a movable stop for serial cutting of parts of a certain length. An excellent device that is easy to assemble by hand.
2. Grinder may not be visually beautiful, but no one demanded that from him. The idea is reliability and practicality. The most interesting thing is that it was not used for making homemade products. welding machine. In other words, not a single part is welded. Everything is bolted together, which makes assembly easier.
3. You can make a home mini sawmill from an old table. Attention! A fragment of this video shows an unfinished machine or was removed from it protective cover. In addition to this and others, there are also questions about gloves. Watch safety precautions when working on a sawmill.
Using the power regulator you can change the speed of this homemade product. The grinder is attached under the table in three places. Thereby eliminating any vibration of the disk. But note, this is just an idea, not a finished unit. When making such a homemade product, take care first of all about safety. It is necessary to close the unused part of the disk. For convenience, expand the table and install guides. 
3. A modest option for cutting molded products. This homemade product with guides can cut metal at 90 degrees, 45 degrees. The guides themselves are removable. This makes it easier to transport and store the saw. In this homemade product, two options for returning the cutting disk to its original position are used simultaneously. This is a counterweight in the form of a dumbbell and a spring. You can only use one of them to choose from.

4. There is another idea - to do milling machine from Bulgarian. You can not only cut on it, but also make selections. You will cut metal not with a milling cutter, but with a milling disc. The grinder is easy to attach. She twists her pen through the corner that runs along the table. If the option seems simple, then you can develop the idea and come up with something of your own. 
5. If you were sawing large-diameter pipes, you were faced with the problem of sawing the metal in one plunge, since the angle grinder gearbox always prevents you from doing this. A homemade product will help solve the problem. In addition to the assembly saw or pendulum saw, the stand with furniture casters helps to support and fix the pipe. At the same time, making a small cut thanks to the rollers, it is easy to twist and cut along the entire diameter. 
zen.yandex.ru
From angle grinders, craftsmen make various devices that expand the functionality of the angle grinder and simplify the work.
And making them is not difficult at all. 
Stand for grinder
Useful when you need to make many different sections.
The simplest option is to weld two guides from a rectangular pipe to a metal base.
Make a handle from the same pipe to which to attach the grinder. On the base you can make a guide from a corner for cutting workpieces at a certain angle. 
Photo: AVTO CLASS (youtube.com) Some craftsmen make similar racks from blocks and plywood. The design is simple and reliable. 
Grinding device
Can be used for removing rust, removing paint from walls, polishing, etc.
The advantage of this homemade product is that the surface is always processed at the same angle and with the same force, without leaving any indentations. 
A circular saw
A simple device for even cutting of wood and sheet metal.
For wood, specialized saw blades with three teeth (do not install blades from a regular circular saw). 
Compass for cutting circles
Made from metal plate and a pin, which is attached to the hole in the center of the circle. 
Belt grinder
The movement of the tape is given by a wooden cylinder, inside of which a nut is glued for installation on the angle grinder shaft.
The device itself consists of two square pipes different sizes. A spring is inserted inside the larger pipe, with the help of which the tape is tensioned. 
Grinder
TO wooden base The angle grinder is fastened with a bolt, the rear part is installed in a fastening made of a block, and can additionally be secured with a clamp. Used for sharpening tools and grinding various surfaces. 
What can be made from an angle grinder: 14 homemade products
zen.yandex.ru
There are crazy ideas for an angle grinder, like using it as a lawnmower. You can also use it to build a quadcopter, ride a bike, pump water, and many other useless but extremely exciting things. We will look at those options for using an angle grinder that are really useful and sometimes help get out of a situation where there is a lack of specialized power tools.
1. It happens that you need to cut a sheet of iron evenly. With the help of this device it is easy to do this by aligning it with a ruler. 
2. You don’t always have a sharpener on hand for threading drills. But with the help of an angle grinder this can also be done.

3. Now let's move on to cutting the wood. You can quickly make a simple device out of wood that turns an angle grinder into something like a circular saw.

4. A more capital device is metal. More like a real circular saw.

5. This is a wall chaser. “Russian Technician” has a separate section about it with drawings.

6. With a special cutter you can do wood carving.

7. Or you can attach a chisel for wood carving.

8. For processing metal surfaces There is also a special device with a felt roller.

9. Drill chuck for an angle grinder – original. You can install not only a drill, but also a large number of different attachments.

10. Only an extreme person can decide to do this. Don't try this again.

11. At the speed at which the grinder works, you run the risk of sharpening the knife by half in one moment.

12. This device makes it easy to polish metal railings

13. Perhaps this device is intended for sharpening something. In any case, there are doubts about the functionality of this mechanism. It is very doubtful that the tape will not slip on the shafts.

14. It looks beautiful, but also raises serious doubts about performance, functionality and a more or less acceptable resource.

Corner Grinder, simply “grinder”, has three main areas of use.
- Cutting hard materials;
- Grinding with abrasives;
- Cleaning surfaces with brushes.
Technology means retention angle grinder by hand during work.
However, for convenience and expanding the capabilities of the tool, many devices have been invented. Let's carry out short review:
Tripod for angle grinder

Industrial tripods for mounting angle grinders. Allows you to make from an ordinary grinder cutting machine
This mini machine solves the main problem when working with an angle grinder: if you hold the tool with both hands, it is extremely difficult to fix the workpiece. IN in this case, an angle grinder with a cutting disc is operated with one hand, and the other can be used to hold and move the piece of metal being cut.
Moreover, the tripod allows you to install correct angle cutting, and the disk moves strictly vertically. The work is done efficiently and safely.
Craftsmen have long learned to make accessories for grinders for cutting metal and other solid compact workpieces on their own.
The beds are assembled from metal profile, car shock absorbers, or even plywood. A well-made machine is no less reliable and safe than a factory one.

IMPORTANT! When working with any machine - factory or homemade, you must remember correct position protective casing.
If your structure is strong enough and provides operator protection, you can use a tripod for sawing wood. The main thing to remember is safety.
In this case, main reason injuries - an uncontrollable grinder that escapes from the hands when the disc gets jammed in the wood has been eliminated. But the disc itself can still cause injury.

Homemade tripod for mounting an angle grinder.
Therefore, when manufacturing such a device, it is better to make the switch non-fixed. For example, in the form of a foot pedal. Then you can instantly turn off the power if the device gets out of control.
When there is no need to work with wood, but only need to cut a large amount metal blanks– there are more simple options.

Such a mount can be made in an hour, and the ease of use will increase by an order of magnitude. If you know how your hands “fall off” after cutting fifty pegs from metal corner– this design is for you.
Clamp for grinder
The second most popular way to add convenience when working with an angle grinder is to fix the tool motionless on a workbench or in a vice.
The advantage of homemade products is that at any time the tool can be removed from the device for use according to direct purpose. The shaft of the grinder is brought out into the hole of the workbench, a chuck for milling heads is put on it - and you can process wood that is not too hard.
Sometimes when performing repairs or construction work A situation arises when equipment breaks down, and it is not possible to buy new or repair it. In this case, the master needs to know how to make from existing tools at low cost necessary tool. In this article we will look at what you can use to make an angle grinder with your own hands.
If an angle grinder (angle grinder or angle grinder) fails, it can be made from a drill. Please note that there are several ways to convert one instrument to another. The least expensive and less labor-intensive would be to use special device– adapter.
The adapter is an adapter that is made in the form of a rod. On one side it can be clamped into the drill chuck, and on the other side a cutting disc is secured using washers.

If it is not possible to buy an adapter, you can disassemble the faulty angle grinder with your own hands and dismantle the spindle.

You can also buy it at a repair shop or turn an adapter on a machine from a familiar turner. By clamping the adapter in the drill chuck, we get a functional angle grinder.

TO design flaws It can be attributed to the fact that such a “grinder” can only be used with strict adherence to safety precautions. It can cut metal no thicker than 5 mm. In addition, since the drill’s shaft rotation speed is significantly lower than that of an angle grinder (3,000 versus 11,000 rpm), the efficiency of metal processing in this case is much lower.
TO merits Such modernization can include:
- quick conversion of one device to another;
- using the tool in places inaccessible to factory-made angle grinders.
When using a drill as a cutting device, you must keep in mind that the drill shaft rotates in both directions. Therefore, when cutting metal or other work, it is necessary to monitor the direction of rotation. The cutting blade should only rotate clockwise.
There is another way to remake it. But it is more expensive; to implement it, they purchase a special nozzle, which has a gearbox. The original gearbox is removed from the drill, and an attachment is installed in its place. The result is a good grinder made from a drill - almost a complete analogue of a faulty tool.

However, the cost of such a nozzle is quite high, and modernization takes a lot of time. Therefore, it is better to immediately purchase an inexpensive angle grinder.
All options presented are intended only for emergency solution to the problem. If you need to use the drill for its intended purpose in the future, you will have to spend a lot of time restoring it.
Converting a chainsaw into an angle grinder
Sometimes it becomes necessary to cut off a pipe or corrugated sheet in a place where there is no electricity. For this, a chainsaw grinder is used, which can be easily converted using purchased console.

It consists of:
- drive pulley or drum;
- protective casing;
- belt drive and a set of keys and studs.
For installation of this device for a chainsaw you need:
- remove the bar and chain;
- empty the oil tank and remove the clutch drum;
- mount the device pulley on the drive shaft of the drive sprocket;
- secure the protective device and install the belt drive;
- install the cutting disc - and the mechanism is ready to work.

The main advantage of the design is that it can be used in places where there is no electricity. When working with such a machine, extreme caution must be taken, since the chainsaw has a higher torque than a standard angle grinder. In this case, the risk of cutting blade destruction increases.
If you don’t have a drill or chainsaw at hand, but you need to cut materials, you can make an angle grinder from a screwdriver. The algorithm for its modernization is almost the same as for making an angle grinder from a drill. The main element of the design will be the acquired nozzle - adapter or the spindle of a faulty angle grinder.
TO merits Such a power tool can be attributed to the rapid transformation of the mechanism and the possibility of use away from the electrical network. The homemade product can be used in cramped conditions where a standard angle grinder is not suitable due to its large size.

Main shortcomings homemade device can be called:
- small resource battery(when using a cordless screwdriver);
- low rotation speed of the cutting disc - about 700 rpm;
- insufficient power of the electrical device.
Such a mechanism can only be used as a low-power angle grinder. With its help you can cut metal with a thickness of no more than 1.5 mm or a 20*20 corner. They can cut reinforcement with a diameter of less than 8 mm. Use a screwdriver as a full-fledged cutting tool will not work.
Mini grinder made from improvised means
This device is suitable for those who does modeling— they often have to cut parts from hard materials. It is impossible to use standard angle grinders in this case: it is necessary to cut very small elements. For this work you need to make a mini grinder. It is made from small electric motor. It could be from a faulty VCR, printer, or children's toy. Such a device is powered by a cell phone charger, USB input, battery or several batteries.
The hardest part is making it yourself cutting element . The disc is made from the thinnest cutting wheel. The diameter is chosen independently, according to the conditions of use.
Sometimes the cutting wheel is made from an ordinary drink cork.
The manufacture of the device begins with processing the handle - attaching the motor to it. A collet clamp is mounted on the axle. Take the prepared circle and secure it with washers on the M6 screw. It turns out to be a kind of nozzle, which is fastened with a collet clamp.

The tool is ready for use. The motorized mechanism can be used without a handle if you need to trim parts inside the model.

You can watch how to make the device in this video:
Anyone wishing to make a device should know that homemade grinder doesn't answer safety requirements. If there is no urgent need, it is better not to risk your health, and sometimes even your life.
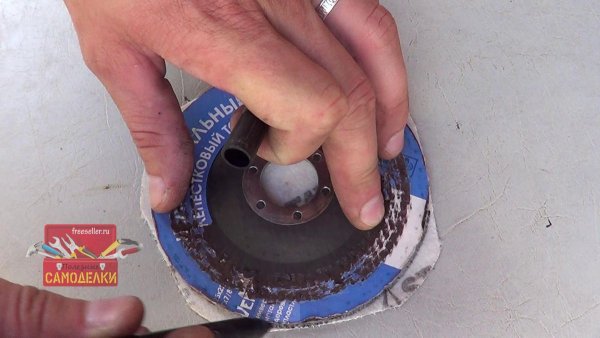
Hello to all DIY lovers! In his Everyday life One way or another, we use various power tools, and in particular an angle grinder. This is a very versatile tool, because in addition to cutting discs, you can also install grinding machines on it. The service life of such grinding discs quite small, they wear out very quickly, but their outermost part wears out the fastest, and it’s the most convenient for sanding or cleaning. Therefore, after the outermost part of the disk has worn off, do not rush to throw it away. This disc you can give a second, or even a third life.
Restoring a grinding disc for an angle grinder
As we can see in the photo above, the edge of the disk is very worn and the quality of grinding has deteriorated, and in order to restore it, you need to take an electric sharpener and simultaneously run the sharpener and the disk to grind off the worn part.

This procedure can be performed up to two times on one disk, I checked it personally. After this, the quality of grinding increases.


But if the petals of the grinding disc have fallen off, as in the photo below, then you shouldn’t throw away such a disc either.

The first step is to independently separate all the remaining petals from the disk and clean the base.

Next, take a regular piece sandpaper(WARNING! Do not use sandpaper on paper based, only on a rag, since paper cannot withstand high speeds)
, apply the disk, trace it and cut it out with scissors.


After that, we make a hole in the middle, apply the emery wheel to the grinding disc and place it on the angle grinder.

After this, you can clean it completely calmly. necessary details and the quality will not be inferior to a regular grinding disc.

Manufacturing of grinding discs for bur machines
Also, in addition to angle grinders, we quite often use a drill with small cutting discs, but the quality of such small discs is very poor, they break even from the slightest blow, so you can make such small discs from a broken large one. Just apply a small disk, trace it, cut it out with metal scissors, make a hole in the center and you can use it.


From one broken disk you can get up to 10 small pieces, depending on the size and quality and strength they will be much better. These discs can be used to saw off fairly thick metal and will wear out less.
From time to time there is a need to measure the length of a curved line. For example, when working with a pipe bender, or when making decorative elements("curls") for cold forging, the material must be cut to a certain length to make the part. How can you find out this length?))) So you have to estimate approximately, cut off with a margin, and then, after production, cut off and throw away the excess... So the idea arose to acquire a curvimeter.
There are a lot of descriptions on the Internet of the simplest such device, which does not even have any scale. The essence of its work is that the impeller does not rotate freely on the axis, but is screwed onto the axis through a thread. The master turns the wheel all the way, and then rolls it along the curved line on the sketch of the part. In this case, the wheel turns away along the thread a certain number of revolutions. It is enough to turn the device over and roll the wheel all the way along the ruler or tape measure - at the point at which it again turns all the way and you need to take the readings. This will be the length of our curved line.
This is the kind of curvimeter I decided to assemble... I decided, I decided, but I couldn’t get around to it... And so, while at my construction site, I decided to make one from leftover building materials garden bench. I drew a sketch... And again, before using a pipe bender, it would be good for me to know the length of the segment profile pipe, so as not to cut off the excess... I thought... And I decided to assemble the curvimeter first... Construction is, of course, not a workshop, but everything necessary was available... And the device is primitive - you can use it knee" to collect.)))))
So what I needed:
1. Clamping nut from an angle grinder.
2. The handle is from her.
3. M14 stud trim.
4. Nut M14 (2 pcs.)
5. Cut a metal strip 25 by 4 mm.
I long ago decided to use a grinder nut as an impeller - this is a ready-made wheel with a thread inside! I also decided to take a “grinder” handle - there’s no point in “hand-cranking” something yourself if you have one ready-made solutions! Besides, I have enough of this stuff - in the workshop there is a box with the remains of power tools! From time to time, these remnants act as “donors”, only.... The nuts and handles do not break (in angle grinders, the rotor and gearbox usually fail), which is why a lot of them have accumulated. So, “from a black sheep - at least a tuft of wool!”)))))
But this box is in the workshop. I’m at a construction site... And therefore, without further ado, I dismantled one of my grinders!


Then I’ll complete it! Fortunately, the elements are the same as standard!!!
So, there is a wheel!

As you know, the threads on the spindles of all angle grinders are the same - M14. Therefore, you need to use a stud with such a thread as an axis. I used this pin in the manufacture of the carriage and vice of my cutting machine, so I had scraps.
To make the bracket in which the stud axle will be attached, I used a 25 mm strip, a scrap of which I found in my “scrap metal”.

I cut off about 20 cm and bent it, leaving the middle part about 6 cm long. (Based on the length of the hairpin. It would be good to do this in a vice, but the vice was left in the workshop... Therefore, I slightly sawed it with a grinder and bent it with a hammer, using a sledgehammer as an anvil... (So what!... But “now”, not “later”...))). The result is a bracket like this:

Having marked three centimeters from the "back", I drilled holes in each of the "horns" with a diameter of 14 mm, using a drill and a step drill:


On the “back” I drilled a hole with a diameter of 8 mm for attaching the handle (All handles of small “grinders” have an M8 screw. The exception is “Bosch” grinders, the handles of which have an M10 thread).


I still worked with the same step drill. (It’s a handy thing, I’ll tell you... And drill household drill You can have a huge diameter, and you won’t break it, no matter how hard you try!)))). True, there are also disadvantages - the material is no thicker than 5mm, and it is difficult to sharpen....

All. You can start assembling.
Initially I thought of just welding the stud to the bracket. “Drip” on both sides, and that’s all... But, during the assembly process, I noticed that during a full stroke my curvimeter travels a little more than three meters. (It turned out so “round” by chance))). Therefore, I decided to secure the stud in the bracket with nuts. Then it will be possible to adjust the length of the full stroke precisely! It’s unlikely that I will ever measure anything longer than 3m, but... what if?!))). Let there be this option - you roll all the way, turn it over, and roll further, knowing that you turned it over exactly at three meters.
On each side it was necessary to screw two nuts - one inside the bracket, and the second to tighten outside....
The design turned out to be very cumbersome (M14 nuts are not very small))). And I decided to just cut two nuts in half. (I don’t know what had a greater influence - the bulkiness of the design, or the fact that I only had three in stock... One was missing!))))
Since, as I already said, I didn’t have a vice nearby either, I decided to use a pin. I screwed the nut a little, a couple of turns, and tightened it a second time. Then I marked it halfway, using my eye as a caliper and my fingernail as a thicknesser)))):

And he sawed it in half, holding the hairpin with nuts with one hand and the grinder with the other. Sorry, I didn’t have a third hand for the camera)))):


All!!! The curvimeter is ready;


