Such a simple and simple tool at first glance, like an anvil, is a mandatory attribute of any blacksmith. Without it, it is impossible to carry out even the most simple actions related to .
At the same time, the purchase of this device is not mandatory, because any craftsman can make an anvil with his own hands.
Anvils are the most important tool that allows you to perform various blacksmithing works related to hot forging of metal. This item workshop is quite specific, but it is simply irreplaceable in the case of professional production of forged products.
Such a tool may vary depending on the type of problem being solved. It can have a variety of structural elements, sizes and shapes. There are mainly two types of forging anvils: one-horned and two-horned.
The first version of the device is in greatest demand. Horn is used in the formation of bends metal products in figured forging.

What does the anvil consist of?
The sides allow you to make bends at right angles. The surface of the device itself is smooth and even, and also ground and hardened. This is the working part.
It contains two holes, square and round shape, used in case of execution additional operations with products and when maintaining tools.
Based on weight, anvils are divided into small, medium and large. The best option is the heaviest models weighing 95 kg or more. Such devices allow you to work with large workpieces.
At home, such a tool is not one of the most necessary. However, its presence allows you to easily align various products, such as nails, wire or sheet metal.
Naturally, use for domestic purposes does not require the mandatory purchase of such a tool. However, if necessary, a homemade anvil can be made. It will easily allow you to perform all the simplest functions that are required of it.
Of course, to produce a high-quality figured product at homemade version extremely difficult. In this case, it is better to pay attention to professional models. But for all other needs, hand tool will be the best choice.
Anvil elements
A blacksmith's anvil is a mandatory attribute of his workshop. With its help, a whole series of technological operations with metal. This tool is used for forging, giving metal the required shape, hardening, etc.
This item is made of durable alloy steel, and its weight can exceed 300 kilograms, especially if we're talking about about a stationary blacksmith anvil.
It must be stable and durable, as it bears significant loads. on the anvil results in a smooth, clear sound. A dull ringing indicates the presence of cracks or voids in the instrument.
As noted earlier, there are one-horned and two-horned models. Why does the anvil have this shape? The point is this: the horn allows you to make bends with the necessary curvature, and the flat surface serves to do the main work.

Anvil mounting diagram.
The main elements of the device include:
- shank;
- recess for forming holes;
- holes for installing tools and other forging equipment on the anvil;
- face;
- shoe;
- platform for cutting metal.
The protrusion on the side of the instrument is called a horn. Its shape varies depending on its purpose. In one-horned models it is cone-shaped. Used in forming metal bends and rolling out rounded parts.
The second horn is used in bending products at angles less than normal and is made in the shape of a truncated cone.
A face is a flat surface. It is on it that the main operations are performed.
The classic type of anvil always has holes. One of them is square - used as a tool holder, for example, a hammer. It is usually located at the end of the device. The second is round, fixes the wire when curling it, and is located near the horn.
The anvil should absorb the impulse from a blow to the front part. For these purposes, the device is installed on a durable wooden or sand cushion.
It is important that the face is positioned strictly horizontally. This will allow you to do the work with the highest quality.
Many people are interested in the question of how to set the anvil in height. The height of the anvil from the floor is correct if the hammer strikes the casing horizontally. In addition, it is important that the blacksmith does not have to make additional efforts to adjust the blow, bend down or lift the tool too high.
Types and types of anvils
Types of anvils, their shape and weight can vary significantly.
They are divided into several categories according to the above criteria, namely:
- hornless – massive instruments with a large weight, the value of which is in the range of 96 – 210 kg;
- one-horned - have only one cone-shaped horn, their weight varies from 70 to 210 kg;
- two-horned anvil - a device weighing from 100 to 270 kg;
- single-horned cantilever;
- shperaks are mini anvils weighing up to thirty kilograms.
The choice of anvil is made based on the work that is planned to be performed. Heavier models are perfect for working with large and massive workpieces. Simple, lighter options with one horn a good choice in working with small-sized structures.
Lightweight models are suitable for minor works Houses. If you need to make any homemade product, there is no better option.
An important criterion is the type of work performed. Here you should decide which option is better: a two-horned or one-horned model. In addition, anvils may have additional elements, for example, a vice that allows you to do work alone.
It is worth paying attention to the presence of holes used to place hammers and sledgehammers.
Shperaks, small in size and weight, are widely used in jewelry. In this area, products do not require serious impact processing, so they need an appropriate tool.

Drawing of an anvil for making it yourself.
Quite often, devices for performing jewelry work are made according to individual order. They have various functional elements necessary to solve certain problems.
Sometimes one anvil may not be enough. In large workshops, it is advisable to have two options for devices: one stationary and the other portable.
Don't forget about correct installation. The quality of work directly depends on this. Despite everything this device It is quite heavy and should be installed with due care.
Falling and tipping over are common problems caused by improper installation. In addition, the stand must fulfill its direct functions: in addition to securely fixing the device, it must be able to absorb hammer blows.
A wooden block is the most commonly used type of stand. Its diameter usually ranges from 500 to 600 mm. Hard woods are used. These include oak, birch, ash, etc.
The installation height is determined by the height of the master. To wooden stand did not create additional unnecessary vibrations; it was buried in a hole more than half a meter deep. The bottom of the pit is compacted with a sand lining.
It is important that the chair is installed horizontally. This parameter can be easily checked using a level.
If buying an anvil is not affordable, then it can be replaced homemade device. It can be made, for example, from a rail, channel or I-beam.
Such devices made with my own hands, will last for decades. However, you should not think that they can fully replace the real one, professional tool. Hand anvils will not produce the same quality work as production models.
In this case, it is important to understand: the factory version produced using casting technology will significantly better than homemade ones. Its design contains all the necessary components with a hardened surface.
In addition, in this model the horn has the correct shape, necessary, for example, in skillful figured forging. The factory model will last quite a long time.
Making an anvil with your own hands
The design of the anvil is quite simple. Its manufacture by hand does not require drawings, special skills or special tools and equipment. By by and large the device is monolithic device with a special shape and planes that meet certain requirements.
Currently available in specialty stores forging equipment presented quite widely. There you can choose any tool, including an anvil, from a huge assortment of varieties. So does it make sense to make this device yourself?
When answering this question, you need to decide for what tasks the tool will be used. IN professional production, definitely, you should choose a factory model. Its advantages include compliance with all necessary standards, as well as manufacturing features using casting technology.
Such an instrument is highly hard, has regularly shaped horns and perfectly straight side edges.
However, the price for good model quite high, especially in the case of large-sized options. However, there is no alternative to such devices; making them by hand is definitely not possible, because the weight of a forge anvil can reach 300 kilograms.
But in homework A small, lightweight anvil is perfect. You can just do it yourself. The described option is unlikely to have a negative impact on the quality of work.
One of the arguments in favor handmade fixture is the fact that high demands are placed on anvils. For example, the edges of the device must be strictly straight and undeformed.
 During constant use of the tool, quite often the edges become uneven. Of course, everything depends on the type of material used by the master in his work. Nevertheless, this defect must be eliminated. There are two ways to correct such a defect: buy a new device or repair the old one.
Naturally, repairs will cost less than purchase. It should be noted that restoring a hand-made anvil is a simpler task. So this is a great opportunity to save money once again.
Now we can safely move on to the question of how to make an anvil for forging metal? Bring any standard sizes or the drawings are meaningless. There are a large number of different options for this equipment. Everyone can choose what will suit best way.
The main goal is to understand and master manufacturing technology. The master will decide all other points himself, especially since on the Internet you can easily find various photographs of anvils and use them as a template when creating the most optimal option such a forging device.
First of all, the issue related to installation should be resolved. When stationary option, as noted earlier, a solid stump should be used. But in the case of a portable model, a metal frame welded from corners is used.
Do not forget that it needs to be resistant to serious shock loads. This problem is solved by installing additional ribs in the frame, providing increased rigidity.
Although, of course, there are other methods to strengthen the structure. It all depends on the ingenuity of the master and his preferences.
If the base for the anvil is a stump, then it should be tightened with metal rings. Simply burying part of the base of a tree in the ground is not the most good idea. Even if properly treated with antiseptics, it will begin to deteriorate over time.
Suitable for use as a base metal barrel, placed in a hole. Sand should first be poured into the barrel. The amount of sand depends on the preference of the blacksmith. As for the wood, it is selected from strong species. Which has already been mentioned earlier.
Installation of the device on the base is implemented in several ways. The most reliable option is fastening using metal brackets. They must be secured between the side surfaces of the hemp and the tool.
A similar installation method can be implemented using fittings. It must be bent into an “G” shape and welded to the base. Then, when the device is installed on the stump, the reinforcement is driven into its sides. As a result, any possibility of the device falling on your feet is eliminated.
This type of fastening will be very effective. The forging device will be securely connected to the base and will not lose grip even after a long period of use.
The second option is simpler. It consists in drilling holes in the sole. Bolts are subsequently inserted into them and screwed directly into the stump. The disadvantage of this method is the loosening of the tool after impacts. To avoid having to tighten the bolts from time to time, it is better to use staples.
According to industrial technology Forging anvils are made of 35L alloy steel. At home, an anvil is usually made from a rail or channel. One of the sides of the selected material will be used as a base.
Homemade anvils - 5 photos.
A handmade rail anvil will last a very long time. It is perfect for almost any household needs or a small workshop.
It is worth noting one nuance; making such a forging tool from a channel is not the best the best option. On the one hand, it is simpler and more convenient to process. However, its strength characteristics are not high. As a result, the service life of the device will be short.
You can make a horn from an elongated part of the rail, treating it accordingly. However, you will have to spend not only a lot of effort, but also Supplies, For example, angle grinder disks. Much easier this problem can be solved by welding this part to a ready-made tool. Don't forget about the insert that is welded.
Thus, it can be noted that the most the best material manufacturing is the rail. Characteristics of this material meet all the requirements, and it is quite cheap, perhaps the master already has it on his farm.
Replacement for a full-fledged factory device manual option will not, but in case of small volumes of work it will become excellent choice. It is important that during manufacturing no special skills, specialized tools or any drawings are needed.
Materials you will need:
- a piece of rail up to three hundred millimeters long;
- profile pipe;
- stump.
The necessary tools are a grinder and welding, depending on the type of structure.
Finally, after all the manufacturing work has been completed, the instrument can be given a nice final look through painting.
As you can see, to cope with the manufacture of such a simple, but very important tool within the power of every person. This does not require the use of specialized equipment and no special skills are required. In addition, the materials used to create such a device are not so difficult to obtain.
The only problem may be the processing of the rail, in particular its grinding. The material from which it is made is highly durable, so you will have to spend a lot of disks on processing.
However, the result is worth it, because the end result is a reliable and durable anvil made by yourself. She, without any doubt, can become the pride of the workshop.
Bottom line
The blacksmith's anvil is one of the most important and indispensable tools in the workshop of a true professional. It allows you to forge metal, give it the required form, perform hardening and other technological operations.
Nevertheless, for home needs it is not necessary to buy an expensive factory model, because you can make it from a rail with your own hands.
The anvil is made of rails. Why her? Because it's cheap and cheerful. Such an anvil will not be a full-fledged replacement for a large blacksmith's, but it will cope with a small amount of work by a non-professional.
I am sure that you will be able to imagine it well and, if necessary, make it. Everything is banal and simple, but many often miss one simple thing, which, it seems to me, is simply necessary for an anvil - a square stop for equipment. This is what I paid attention to in my video!
Materials needed to make an anvil:
- rail section length - 250mm;
- profile pipe 30x30 - 100mm;
- stump - its length should be such that it is convenient to work with the anvil while standing;
- smooth reinforcement for fixing in a stump, with a diameter of 8mm - 1200mm.
Tools needed to make an anvil:
- Bulgarian;
- welding.
Briefly about how it happened:

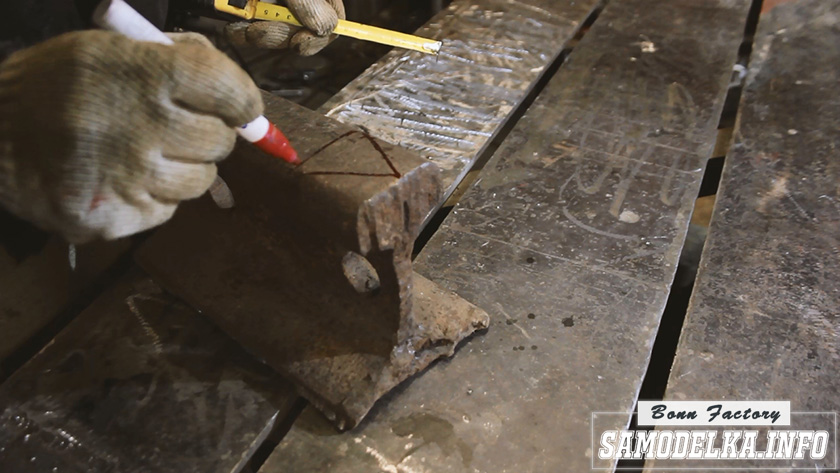
In fact, making an anvil is a simple matter and does not require a ruler, but in order for it not to be a mess and pleasing to the eye, it is still worth starting with markings.
First we mark our future horn. I chose the side of the rail that was closer to the hole in order to work less with the grinder.
Having marked and cut out the horn, I replaced the cutting wheel with a grinding wheel and set about straightening the face of the anvil.
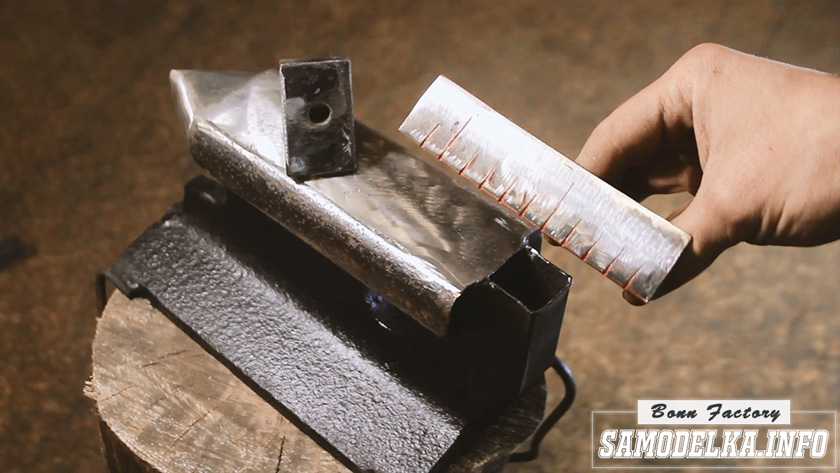
And this is where people often stop. All! It is ready, you can straighten the nails on it. But doing anything else will simply be inconvenient. So we go ahead and weld our profiled square tube to the back of the anvil.

Why square and not round? For the convenience of securing equipment in it. After all, we will be knocking on an anvil and our devices must hold securely. Square shape profile will allow us to achieve this. For the same reason (working with a hammer), we must secure the anvil just as well. After all, even this small piece of rail weighs enough to damage our legs when, due to the lack of fastening, it flops right on our leg...
Here I also chose a not new method - I sawed the reinforcement 300mm long, bent it like an L and welded it on 4 sides. Later, when installed in a stump, we will drive our “letters” into the tree.

All that remains is to slightly tint the base of the anvil so that it takes on its final appearance. Place it on a stump and hammer our hooks into it. It is not necessary to drive the reinforcement all the way in right away. It needs to be driven in until it seems to you that the anvil is quite stable. The remaining amount of tension can be used later when the anvil begins to loosen.
Equipment.
In the video I showed a couple of simplest and useful options. You will probably come up with more options, or you can wait for mine. I'll be working on them soon and will be happy to share them with you!
- platform for making holes. For example, under rivets.
- ruler. So that your forgings are the same and fit together. For example, for forging pliers, without which a blacksmith’s work is simply impossible
You can see all the most interesting things about working on an anvil in the video. I tried to make it short, informative and enjoyable to watch.
Subscribe to my channel: https://www.youtube.com/c/bonnfactory
It is known that the main tool needed to set up a blacksmith shop is an anvil. It can be useful not only to professional blacksmiths, but also to ordinary blacksmithing enthusiasts, people who love to create. The anvil looks simple and rather primitive, but it costs a lot. Not all blacksmith lovers decide to buy it for occasional use, so in such a situation a homemade anvil can help out.
What materials are needed?
The workpiece is made from crane (preferably brand KR 120 or KR 140) or railway rails. It is inexpensive, but is massive enough to make a high-quality and stable instrument.
If the size of the product is not critical, because... small-sized workpieces will be processed, then a metal channel (180x70 mm) can be used for the anvil, but mechanical strength the final product will be much inferior to the version made from rails.
Since the anvil requires a stable base, the following is used under it:
- frame welded from metal corner,
- wooden stump (the most affordable and cheap option),
- box with sand (allows you to remove vibrations when the hammer hits the workpiece).
The second option is considered more successful if the tool is installed somewhere in the yard.
Manufacturing stages
First you need to select the required section of the rail; its base will become the main part of the future base for forging; this place will take on the bulk of the workload.
The choice of the side of the rail for the anvil surface depends on the future work. If you do not need a very wide surface, then a narrow top of the rail will do, but at the same time the anvil itself will be very stable and durable, because The rail head (wide lower part) is subjected to special heat treatment at the factory.


Some craftsmen make one more detail - a horn, it gives the anvil good performance characteristics, but requires a lot of time and effort to produce. To create a horn, the sole of the rail is sharpened on one side using a grinder (a 125 mm grinder and a 125x6 mm circle are suitable) and a file. The end of the horn is not made sharp, but slightly blunt.
After shaping the anvil, the surface is ground using a grinder disc (grit size 40). If you scrape the surface with a regular grinder disc before grinding, then the process will go much faster and easier.
Anvil installation

The next stage of creation is installation of the product on a solid base. To install this element, you need a solid wooden block or stump that is resistant to shock and vibration.
In order to attach the finished product to the stump, you will need a steel channel (the wider, the better). The result is a fairly strong, stable structure. The channel is attached using screws, the diameter of which is 12-14 mm and the length is 150 mm. Screws are taken from stock by length, because during the forging process impacts can cause them to be pulled out of the machine.
For products of small size and weight, it is possible to weld the base from a metal corner, an example is shown in the photograph.
Reading time ≈ 4 minutes
Even without practical experience, you can make an anvil with your own hands. To do this, just follow our step-by-step instructions.
Anyone can make an anvil from a rail." House master» using available tools. Let’s say right away that it is impossible to compare a self-made anvil with a full-fledged analogue. However, it is perfect for tapping small workpieces, bending a rod at a certain angle or flattening it, as well as similar small household work.
List of required tools and materials

The anvil is made by hand from the following materials and tools:
- A piece of rail. The exact length depends on your preference. However, it is not recommended to take a piece less than 30 centimeters long;
- A ruler and a marker capable of marking metal (you can also use a stroke);
- Hammer, level and file for metal;
- Lamp or lantern;
- Grinder and grinder.
How to make an anvil with your own hands using all this? According to the following instructions.
Important! Decommissioned crane rail Anyone can do. But if possible, use KR-140. It is made from more durable metal in accordance with GOST 4121 and has a number of design advantages. For example, a wider neck, which will provide the anvil with greater stability during further forging work. But keep in mind that the KR-140 does not have holes; you will have to make them yourself.
Step-by-step instructions for making an anvil from a rail

Prepare the work site. Place a piece of rail on the table, mark it with a marker and ruler as follows:
- Measure 40% of the total length of the rails, draw a line;
- Measure half the width of the rail, make a mark;
- Connect the lines and the mark so that you form a triangle or the so-called “anvil horn” on the rail site.

If you still have questions about the correct marking of the workpiece, look at the photos and videos on our website.

Secure the future blacksmith's anvil in a metal vice. Turn on the grinder and cut the horn according to the marking lines.
Important! When working with power tools, be extremely careful. The metal vice must be securely fastened to the table surface. The work table should not be loose. To protect your own health, wear a welding mask, protective apron and gloves.

After making deep cuts with a grinder, take a hammer. It will help you speed up the process: use it to beat off the left and right edges of the metal triangle. Be prepared for the edges to be uneven - there is nothing wrong with that, we will process them later.

Take the rail out of the vice, turn it on its side so that the broken triangle is “looking” at you. Use a marker to mark lines leading from the edge of the rail to the inner hole (closest to you). Beat them off with a hammer.


Stepping back an inch from each raw “back” end, draw lines with a marker. Your task is to mark the “tail” of the anvil. Use a grinder to make cuts on the metal, then beat the metal into pieces with a hammer. The "tail" is the functional part of the tool. But since we are creating a home, and not a professional, anvil, whether to carry it out or not is only your desire.


Processing the metal surface of the anvil
Use a sanding wheel to remove any traces of rust from the metal pad. After processing, the metal surface of the future metal anvil should be smooth and even.


After using a power tool, use a hand metal file. The surface should be treated with compounds that protect the metal from rust. You can purchase them at any specialized store.


Perform final grinding of the workpiece surface. Sand the metal with a fine grit wheel again. Perform the grinding process as many times as necessary to obtain a perfectly smooth, horizontal surface of the anvil.

Important! To ensure the evenness of the workpiece surface, use a level. Remember that if the surface of the anvil is uneven, the parts processed on it in the future will also have defects.
In order to make sure, using a level, that the surface is really perfectly smooth and even, look at it from the side “into the light” using a lamp or a regular flashlight. If there are no glimpses of light and there are no gaps between the level and the surface of the workpiece, the work has been successfully completed.
“From the master class presented by the author, you will learn how to make an excellent anvil for your workshop from a piece of 30 cm rails. At the very least, every self-respecting craftsman is simply obliged to have in his workshop, small size anvil for processing metal by cold or hot forging. Because today the topic of blacksmithing and the manufacture of all kinds of forged objects and tools is becoming very popular, which is quite well appreciated among lovers of handmade work.
The anvil can of course be purchased at hardware store, but the price probably won’t please you)) So, there is a great option to make it yourself from a small piece of rail, which will require a gas cutter and an angle grinder. Initially, the contour is marked, and then the final shape of the anvil is cut out with a cutter, and the cutting areas are polished with a grinder. You can also burn holes in the lower part for subsequent attachment of the base to the block.
So, let's take a closer look at the whole process.
Materials
- rail
- block of wood
- wood screws
- graver
- washer
Tools
- cutting torch
- grinder angle grinder
- drill
- wrench
- bus saw
- hammer
The process of creating an anvil from a rail.
An anvil is a supporting forging tool that is designed for hot and cold forging metal by plastic deformation. The anvil is the main and main tool in blacksmithing; it has a large mass and is fixed motionless on a base in the form of a wooden block.
First of all, it is necessary to consider the presented drawings of the anvil. 

 Well, we’ve completely figured out the purpose, and now let’s move on directly to the process of making the anvil itself. The author takes a blank 30 cm long.
  And with the help of a gas cutter he gives it the required shape.
  Please note that there is also a hole in the middle. The nose part is sharpened in the form of a horn.
  Using a grinder, the master grinds the surface and removes metal deposits and rust.
  This is exactly what happens.
  Working surface It turned out perfectly even and smooth that you can see your reflection.
  The anvil is ready, now it needs to be installed stationary on the stump and secured with bolts.
  The plane is attached to the block with 3 bolts on each side.
  This anvil also has design feature, and this is the presence of a resonator that dampens the ringing from a hammer hitting an anvil, and it is also made of rails and screwed to a block of wood in a vertical position.
  That's all, the anvil made from rails is ready for its subsequent use. Now the author can forge small metal products in his garage, and simply straighten metal when cold or straighten nails; in general, a very necessary tool for a craftsman. If you liked the material, then we invite you to join our group.


