This item furniture - one of the most versatile in use. The table can be a dining room, a utility table, or installed in a living room, on a veranda, on a property, in a workshop, and so on. In a word, it is impossible to do without it. But many people are not satisfied with purchased products in terms of a number of parameters - size, design features, form or for any other reason.
Considering that wood is relatively easy to cut and sand, making a table from it according to your own drawing, with your own hands, is not a problem for a good owner. And it will come out much cheaper. Plus - satisfaction from such work.
Room
Ideally, this is an extension, a barn, an empty garage, although a small area under a canopy will do. Working with wood on the site, under open air- means completely dependent on the vagaries of the weather. If there are “square meters” suitable for making furniture, then you should worry about high-quality ventilation. Natural is sometimes not enough (besides, it depends on changes in wind direction and pressure), and a hood is installed.

Arguments that if you use protective equipment, you can work in closed space, do not stand up to any criticism. Wood dust will immediately settle on everything, including the sample with which some action is being performed. Neither an accurate cut along the line nor high-quality surface treatment of the wood (not to mention the impregnation and finishing coating with paint and varnish) will be possible.
One cannot ignore the fact that many preparations used for wood processing contain toxic components. For example, varnishes, paints, impregnations: if they are not natural, then harmful fumes are guaranteed.
Tools
Their set depends on the extent to which it is planned to “ennoble” a simple wood structure, what shape it will be given, and a number of other nuances. If the master does not lay claim to the elegance of a wooden table and does not aim to achieve its originality, then an ordinary carpenter’s set will be enough.

For more “delicate” work in the process of making a table of unusual shapes, external design special devices will be needed.
El/jigsaw. It will not be possible to make an inclined vertical cut with a regular saw, maintaining the angle exactly. The canvas will begin to “play”, and therefore the quality of work will be extremely low. The electric jigsaw is universal in use, and also gives high accuracy cutting wood or making cuts in it.


Many of the listed devices can be rented if making furniture is not a hobby, but a necessity.
Impregnating and other compositions
Rot protection:
- Recycling machine oil is an effective, and also free, remedy. But not for dining tables.
- Flaxseed oil. A natural and effective product that penetrates deeply into the wood structure and protects it from mold and mildew. The downside is the high cost. But if the table is intended for eating, this is a great option. The drug has no color, therefore, after processing lumber, it does not leave any traces in the form of darkening, stains, or streaks, unlike processing.
- Water-polymer emulsion. It is characterized by long-lasting action and safety for health.
- Acrylic varnishes. They have practically supplanted their predecessors in the “NC” category, since they are harmless and in many respects better than compounds that are diluted with solvents.
- PVA, bone glue and a number of others. More detailed information about joinery compositions -.

To decorate a tree:
- Clear varnishes are used not only to protect the material from moisture. With their help, you can preserve the texture of the wood and shade it.
- Stains.
- Varnishes with a coloring effect (tinting).
- Paints (but only for wood!).
- Putties.
Using colorless varnish and pigments, you can make a coloring composition of any shade. It is enough just to correctly determine the proportion of components. This is easy to do by experimenting with mixing and applying a sample to a discarded board. This will allow you to choose an acceptable tone. It is more than advisable, since it is not always possible to purchase exactly what you need on the market.
Fasteners
It is better to ignore all advice on assembling a wooden table using nails (the reasoning is simple, quick and cheap). The reasons are as follows:
- The nail easily pricks dry wood (and this is exactly what is used; more on that below).
- It is quite difficult to direct its leg correctly (strictly vertically). In some cases, it is even more difficult to redo your mistake.
- A tree, even the most protected from rot, succumbs to it over time. The maintainability of a table knocked down with nails is extremely low. Practice shows that it is rarely possible to remove such fasteners without damaging adjacent structural parts. As a result, instead of the planned replacement of one element, 2–3 will have to be changed.
- When assembling a wooden table, if glue alone is not enough, you should use only self-tapping screws.
- Sometimes its individual parts (at joints) require reinforcement. Strengthening the strength with hardware with a thicker and longer leg is impractical. The reason is the same - the likelihood of the tree splitting. For these purposes, metal strips, brackets, and corners are used.

Features of choosing wood
Some people focus on the cost of lumber, others care about the wood’s resistance to rot, and for others, its texture. What can you recommend to a novice furniture maker? Do not use the same type of wood for a table unless it is intended to be installed somewhere in a utility room or garage. This is exactly what many novice “craftsmen” do, selecting the same type of boards and bars from what is left from construction or renovation and gathering dust in the barn.
When making a wooden table for a living space, veranda, etc., you need to take into account the properties of individual species. Naturally, if you do not have sufficient experience in assembling furniture, you should pay attention to cheaper wood. The first table (chair, stool) in your life is just a kind of training in making and gaining experience.
Tabletop. Here, strength and minimal moisture absorption come first. It is on this part of the table that something constantly spills. The optimal choice is pine, larch, oak (although the latter is more expensive). Thickness – at least 3 cm.If the size of the countertop is small, then you can use wood-based slab products (OSV, OSV and the like). But only with lamination to prevent the material from swelling when liquid gets on the table surface. For example, chipboard.

Low-grade lumber is not used in the furniture industry. This is not economically feasible, since pre-treatment of wood increases the production cycle time. But when making something, wood of lower grades, substandard wood is just right. The same pallets left over after using stacks of foam blocks or bricks.
And not just because it is free or relatively cheap. Many of the disadvantages of such wood can be turned into advantages with the right approach. For example, after coating with colorless varnish, the tabletop acquires a unique, original look.

The main thing is that the boards do not have obvious defects in the form of rot, cracks, falling knots and wormholes.
If pine is chosen for the tabletop (this also applies to many other conifers), then you need to pay attention to the location of the annual rings. These arches are called humps. The cuts of the boards show how they are oriented, and this is taken into account when laying them in a row. Samples obtained by tangential cutting are arranged alternatingly (one top down, the next one up); radial cutting - the same (with arcs in the same direction). The nuance is insignificant, but compliance with this recommendation eliminates the risk of warping and splitting of the boards.

For furniture, if you think about its durability, you should take only dry lumber. As wood shrinks, it will become deformed; This is a natural process, and its consequences in the form of twisting, warping, and bending are inevitable. Such a table will quickly become warped, and you will have to repair it. And here you need to decide whether to purchase highly dry wood or rid it of moisture yourself. The first option is simpler, but such a tree is more expensive. The second one will cost less, but there are a number of purely technical difficulties.
- Firstly, it is necessary to ensure stable temperature regime at the place where the workpieces are stored. Changes in its value will lead to uneven evaporation of moisture, which will negatively affect the strength of the tree.
- Secondly, good ventilation must be organized.
- Thirdly, and perhaps this is the most unpleasant moment - you will have to wait up to about six months, depending on the initial moisture content of the tree. But this is not a guarantee that the result will be as expected; Even this requires practice.
This once again confirms the idea that when starting to make furniture from wood for the first time, you should focus on simple table for household needs from cheap lumber, without pretensions to its sophistication and originality of design. For example, for a barn, garage and the like.
Options and patterns of wooden tables
It should immediately be noted that any work related to design and self-assembly is a creative process. There are no stereotypes in this matter, so you can only take the model you like as a basis, and everything else - linear parameters, shape, manufacturing specifics - depends on the purpose of the product and your own imagination. Here are just a few examples of what wooden tables can be like. For example, for summer cottages For small utility rooms, you should choose structures whose geometry can be easily changed - folding, camping, hanging, garden, level, and so on.
Tables that are intended to be used for eating, playing, or as coffee tables for installation in living rooms for their intended purpose are made stationary, that is, of unchangeable dimensions. These assemblies are more “solid”, since all articulated parts are rigidly fixed; no hinge joints.


Features of assembling wooden tables
If a person undertakes to make something, it means that he knows how to use tools, read blueprints and work with lumber. Such a home craftsman does not need to be taught the basics of carpentry. But it would be worth noting a number of nuances when making a wooden table. These notes will only help in the process.
Let's start with the types of connections. There are quite a few of them, but for a table that you assemble with your own hands, the ones listed below are quite enough.
On the dowels
In this case, the parts are fastened by placing them on an adhesive composition (Fig. 1 – 3).

The nuance is that to make the “cylinders” that are inserted into pre-drilled “channels”, a tree of a denser structure than the table elements is taken. This is what ensures the strength of the connections. Before installing them, chamfers are removed from the edges of the dowels and holes.
These round sticks are available for sale in any furniture showroom in several sizes. Grind them out, even having carpentry machine- an irrational waste of time. It is not recommended to purchase plastic dowels for the table; they are used for detachable connections. For example, frame furniture (walls, multi-level shelving, etc.).
You should not use nails to fix table elements (Fig. 4). Metal and wood differ in the degree of thermal expansion. Such a connection will not last long - it will begin to “shatter”, especially if the table is intended to be installed on the territory or in an unheated room.
On the kings
It is advisable to make such connections if the table either has to be disassembled periodically, or without this it is impossible to move it through the doorway. Although not all drawers require dismantling the structure. The most commonly used options are shown in the figures.


Bolted
Such connections are used mainly for garden furniture or those installed in extensions; for utility tables. An example is shown in the figure.

The nuance of working with fasteners
In order for the self-tapping screw to be easily screwed in and “go” in the desired direction, a hole is first made at the point of its installation using a drill with a diameter slightly smaller than the fastener leg. The main thing is to maintain the coincidence of the axial lines, that is, to prevent skew. In this case, to “plant” the screw, you can do without a screwdriver.

Features of wood processing
Everyone knows that a plane is used first, an abrasive with a large grain, and then a fine one. But sometimes it turns out that the last stage, polishing, has to be done many times. Much depends on the type of wood and the degree of drying. After applying the first layer of varnish, the fibers may “stand up”. Nothing wrong with that. You should wait for the workpiece to dry and repeat its processing with abrasive. The work is painstaking and takes time. But it is precisely this method that can bring “problem” wood to ideal “smoothness.”
To eliminate the risk of injury to a person, all edges and corners of the table should be slightly rounded.
Features of external decoration
- Minor defects in the form of cracks and chips are eliminated with putty.
- Once sanding is complete, all wood dust must be removed. IN in this case An ordinary household vacuum cleaner with an appropriate attachment will help out. It is recommended that after such cleaning, wipe the entire table with a slightly damp cloth, let it dry and repeat removing any remaining dust. After this, you can safely start applying stain or varnish - there will be no “pellets” on the wood.
- You can add originality to the table not only with the help of curly cutouts, an unusual shape of the table top or legs, or a combination of textures different breeds and so on. One of the good options is artistic painting.
And finally. Work on self-production something made of wood (the same table) - just First stage mastering the skill of “designer-assembler”. Having developed technologies and techniques on wood and acquired the necessary skills, it is enough to simply switch to other materials - metal, plastic, glass. So the benefits of a wooden table made even according to the simplest drawing (besides the pleasure of work and money saved) are obvious - time not wasted.
This type of useful furniture such as DIY wooden table It's not just a way to save money or show off your carpentry skills to others. First of all, such a homemade item is an opportunity to make a thing that is ideally suited for the tasks assigned to it in terms of size, configuration, material and strength. And, if everything is done according to the instructions and recommendations of the craftsmen, then making a new table will not be much more difficult than assembling a ready-made one brought in a box from the store.
How to make a wooden table with your own hands
Before disassembling specific items and recommendations for how to make a wooden table with your own hands, it is worth deciding whether you need to get a wooden product as a result and what exactly its design will be. This texture is ideal for, because the naturalness and environmental friendliness of wood fits perfectly with the dacha concept.
But even in city apartments, especially in those whose design is in Provence, rustic, and Scandinavian styles, small wooden tables that look like they have been deliberately aged fit perfectly. Yes, and loft or others modern varieties they cannot do without a wooden texture, however, it is more likely that the main material there may be wooden pallets. This type of furniture is more likely to be referred to as furniture, since its assembly resembles the assembly of a construction set. If you want just such a coffee table, then keep in mind that the pallets must first be dried well (so that they do not change their shape, they will not “sink” after one season of use), bring all the boards to an absolutely even shape using a power tool, and only after that paint. Therefore, think about whether you can spend the same efforts on making even a small DIY wooden table, video with a master class for which you will find on the Internet, but it will be durable furniture that will probably not go out of fashion for a long time and will serve its owner faithfully.
DIY wooden garden table
In most cases, we need advice on creating exactly DIY garden table made of wood. There are a huge number of tasks for this piece of furniture; we can safely say that there are never enough tables in a dacha. Therefore, a dining table, a kitchen table, and a picnic table, round, for a gazebo or folding, with which you can sit on the terrace or on the river bank while fishing. And for each option there are individual tips for creating.

However, there is also general recommendations that you can keep in mind when creating DIY wooden table, photo which you see in our article today. This applies to the selection of wood, for example. It is believed that a countertop, especially one that sits outdoors, should be a hardwood such as oak or walnut, but today with the availability of many quality protective equipment and varnishes, you can easily use pine boards, which are much cheaper in price and, with proper processing, they will last you a very long time. If you want to practice cutting complex elements or creating carvings, then choose soft woods such as linden, but be prepared for scratches or dents if used too hard.

The second important general point in creation is the choice of a suitable configuration for it. You may want to pay attention to finished projects DIY wooden table, drawings which are included, including in our article. They already have dimensions indicated, but this should be treated only as a recommendation. After all, what’s good about independent work is that you have the right to make your own decision on size and shape. It is according to the number of members of your family that you can choose the width and length of the tabletop, and the shape is selected according to the height or parameters of the terrace, gazebo, inside which the furniture will stand. The standards are considered to be a height of 75-85 centimeters and a rectangular tabletop of 120x70 centimeters.

Based on all of the above, the first stage can be called creating a drawing on which you will not only mark all the necessary dimensions, but also make an approximate cutting of the parts that you will need for assembly. You can use the illustrations as an example DIY wooden table, drawings, photos which you see above. The diagrams indicate the sequence of actions that must be followed to make the product stable. In general, the stability of the legs and the evenness of the surface of the tabletop are two prerequisites for such a table. For evenness, you must maintain the exact dimensions of the length of the legs and trim their lower surfaces well. The finished product can even be checked using a level to see if it will stand in the correct plane. But regarding sustainability there is various ways. For some, this is achieved with the help of a different number of legs, that is, not the classic four in all corners of the rectangle, but three or just one, strictly in the center. If there are four legs, then they are additionally equipped with stiffening ribs, supports and jumpers between each other. By the way, it is very convenient to place your feet on such supports while eating; this can be called another pleasant bonus.
DIY wooden tables and chairs
Set DIY wooden table and chairs made, will be an excellent option for filling summer terrace, where you can have lunch and dinner in the fresh air. Even if there is a canopy or roof over the set, timely care and processing of the wood before starting work is still very important. The boards should not have any unevenness, knots, or holes; they should be completely dry, so that later you do not get deformation during use, because there will be plenty of humidity in the surrounding space. It would also be a good solution to make the tabletop and the top of chairs or benches not solid, but with gaps between the boards, which will allow rainwater to drain from the surface without stagnating.

You can see one option in the photo. For this, boards are taken; they should not be too thick, since on such surfaces the deformation of the surface may be stronger, but not thin, so that fairly heavy pots or other utensils can be placed on the surface. If you cannot afford to make the entire product using hard, valuable wood, you can combine it by making the tabletop itself durable and resistant to damage. The model we offer you is made on four points of support, so it is perfect for a stationary table that is fixed in one place. For fastening, metal pipes are used, which are buried in the ground and, if necessary, concreted.

First, the boards are knocked together, using special self-tapping screws, since ordinary metal nails can lead to damage to the material. The assembly takes place on two boards, which are located below; everything else needs to be screwed onto them. After this, the surface must be processed using a manual or electric plane; of course, if you use an electric one, it will save you much more time. The boards that will create the frame of the table top, as well as the timber for the legs, are cleaned in the same way. Final sanding with sandpaper is carried out after the product has been assembled. You can trim the edge using a router either on a ready-made, assembled tabletop or on boards; you just need to mark the boundaries if you want to repeat the rounded shape, as in our example.


In another example, the step-by-step production of which you see above, the tabletop is literally assembled using scraps of boards that were previously used in repairs or construction. In this case, it is very important that their thickness be the same, because they will be assembled at the ends. An interesting visual effect is provided by the assembly technology, because the boards are literally strung on metal pins and additionally glued. Then the legs are nailed to the surface, made at an angle of 45 degrees.

DIY wooden gazebo table
If we highlight the models that are the most complex and require special attention, then among them wooden gazebo table. With your own hands it is not so difficult to make, but it is very important to correctly calculate its dimensions and fit it into the existing space of the gazebo as efficiently as possible. When we, after all, care more about its functionality than about any decorative properties. In the case of a gazebo, a place that attracts special attention from guests, you need to take care of the visual decoration of the tabletop. Both carving and interesting design using saw cuts would be appropriate here.

As for the shape, you need to be guided by the shape of the building itself, inside which the furniture will stand. That is, in a rounded gazebo, a square or round tabletop will not only look ugly, but also the space will be used extremely irrationally. That is, most often they use a simple rule - in a round gazebo they put a round table, in a hexagonal one - a hexagonal one, in a spacious and wide rectangular one - a rectangular one.
DIY round table made of wood

Since the round gazebo is the most popular type, we can say that exactly DIY round table made of wood and is the #1 model that DIYers want to make. The particular difficulty that distinguishes this particular shape is cutting out the shape; you must not spoil the material and try to ensure that you get a perfect circle.

For those who doubt their abilities and the levelness of their hands, we can recommend a compromise option - buy a round ready-made tabletop and make furniture based on it. For a round top, it would be important to use a tripod system, which is shown in the photo above. First, a base is created, three boards are connected to each other, and legs are nailed to them. The last stage The tabletop is secured to the self-tapping screw in the center.
A dacha is, of course, the place where you want to take a break from the bustle of the city, to breathe Fresh air and just drink fragrant herbal tea on the veranda at a table you made for your garden with your own hands. Such a table will not only add a special charm to such a simple ceremony, but will also become a source of pride for you and your loved ones.
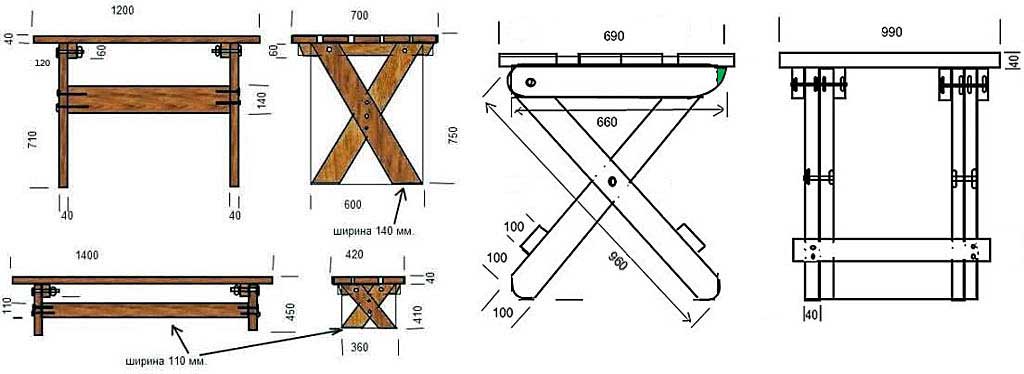
Option 1. Table with legs
When choosing materials for a table, first of all you should pay attention to the quality of the wood - not all wood is suitable for use. Conifers, such as spruce and pine, are pliable and easy to work with, but such material without proper treatment is more flammable, and the resins released can ruin the tablecloth.


Hardwoods (aspen, oak, ash) are more advantageous; products made from them are strong, durable and have an attractive appearance.
| Wood type | Brinell hardness) | Density (kg/m3) | Stability | Color trends |
|---|---|---|---|---|
| Birch | 3,0 | 600 | average | the color becomes deeper |
| Larch | 2,6 | 500 | good | takes on shades of gray |
| European oak | 3,7 | 700 | good | the color becomes deeper |
| 4,0 | 700 | average | light to straw, yellowish brown | |
| Pear | 3,3 | 680 | average | blushes |
| Cherry | 3,0 | 580 | good | from light pink to deep reddish hue |

Materials and tools
For interior design of dachas and country houses Long narrow ones are more acceptable, allowing you to move around the room unhindered. This should be taken into account when preparing everything necessary for work and designing the table itself.
For the table, it is preferable to use a board with a thickness of at least 30 mm. This thickness will ensure the strength of the table and the ability to withstand heavy loads. The optimal length ranges from 150-200 cm. You can purchase two ready-made wooden panels measuring 30-2000 mm.

Balusters or wooden beams for legs. Curly balusters will give your homemade table an industrial chic and luxurious look. And to make legs from timber, you need to choose boards with a minimum cross-section of 50x50 mm. Comfortable height The table is provided with a leg height of approximately 73-75 cm.

Other materials and tools.
- Boards 20 mm thick and 8-10 cm wide for the tabletop frame.
- Wood putty.
- Screwdriver and screws for 30 and 50 mm.
- Sandpaper of various grits, as well as a holder.
- Clamps for fixing legs and table top.
- Electric drill.
- Sander.
- Building level.
- Square.
- Tape measure or centimeter.
- Marker.
- Glue.
Prices for various types of construction timber
Construction timber
Manufacturing stages

When preparing materials, all boards and beams are processed with a plane, sander or coarse sandpaper to remove unevenness, remnants of cut knots, and clean out cracks. The boards must be even and smooth, so they are sanded on all sides, including the ends, edges and corners.
If it is intended to be manufactured as a solid panel without gaps, then it is better to purchase tongue-and-groove materials - this will create a stronger adhesion of the single sheet and save time on adjusting the elements. Chamfers are cut from the edges of the beams for the legs.

Assembling the frame for the tabletop
The frame helps to enhance the strength and stability of the table; its dimensions depend entirely on the parameters of the tabletop, but there are several general rules: both the length and width of the frame should be less countertop by 30-25 cm.
Video - DIY garden table


The frame itself is assembled from 4 boards that form the outer frame, and 6 internal transverse strips. The boards are installed on the edge at a right angle using a square and tightened with 50 mm self-tapping screws. The joints are pre-coated with glue (PVA or wood glue). To prevent the boards from splitting, you can drill guide holes in them and only then screw in the screws.


Along the length of the frame, markings are made for the transverse strips, and guides are drilled. It is very important that the cross members are strictly perpendicular to both sides of the frame frame. The ends of the transverse strips are coated with glue, and the entire structure is fixed with self-tapping screws. Make sure that the screw heads do not protrude, but are completely “recessed” into the wood.

 Table frame (production option)
 The tabletop boards are connected, aligned with a tape measure and laid face down on the floor; a frame is placed on top so that the transverse planks lie tightly on the tabletop. Guides for self-tapping screws are drilled into the planks, and all elements are tightened with 30 mm screws. There are 5-6 screws for each cross board.
Assembling the table legs


The tabletop is placed on a workbench or several stools for subsequent installation of legs. The table leg is fixed in the corner of the frame with clamps, and guides for self-tapping screws are drilled into the frame.


Before attaching the leg, glue is applied to the end of the block - this will protect the table from loosening and will contribute to greater strength. It is recommended to fix the leg on each side with four screws, but if desired, you can additionally use metal corners. Round balusters are fixed with long self-tapping screws on the front side of the table, and square balusters are fixed with corner fasteners.
Prices for popular models of screwdrivers
Screwdrivers
Finishing
After installing the legs, the table is turned over and placed on the floor. Depending on the design of the table, the corners are sawed off along the radius with a jigsaw or the end is completely rounded. You can cut chamfers from the edges of the tabletop and sand everything thoroughly.

If necessary, scratches and cracks resulting from work are repaired using wood. It is better not to touch the screw heads so that the structure can be tightened.

After the final sanding, all dust and shavings are removed from the table, and the product itself is covered with stain or several layers of varnish.


Tables with elements of decoupage decor or single painting look beautiful and unusual. But there’s no point in hiding the beauty of natural wood under a layer of paint; modern varnishes and impregnations will do the job necessary work to protect the product from moisture.

Video - Table with legs for a summer house
Option 2. Tree stump table
An unusual and non-standard way to arrange a personal space is to create interior items from natural materials. When landscaping an area, trees that are old or that threaten buildings are often cut down. If your dacha has or had just such a tree, then you definitely won’t have any problems finding a suitable stump. If the idea came spontaneously, then you can look for the desired stump in clearings, in the nearest forest, or ask the owners of neighboring plots.

Materials and tools
To make such a fantasy table from a stump you will need very little:
- wood for the tabletop, the recommended thickness of the tabletop is from 20 mm, when choosing boards you need to adhere to the rule “the larger the tabletop, the larger the cut of the board”;
- stump. For the work you will need a dried stump of any type of tree, the main thing is that the wood is intact, not damp or rotten. If the tree was cut down recently, the stump needs to be dried thoroughly. And it is better to do this by placing the stump in a warm, dry room or outdoors in sunny weather. It must be remembered that several weeks is not enough time for proper drying. As a rule, the entire process takes at least two months. You can determine the condition of the wood by the ease of removing the bark - if the bark comes off without effort, then you can start working;
- wood varnish on water based natural shade or transparent. It is this composition that will best emphasize the texture and advantages of natural wood;
- sandpaper of various grains and holder;
- plane or sander;
- chisel;
- building level;
- roulette;
- hammer and nails;
- screwdriver and screws;
- abrasive fiber.
Manufacturing stages

Stage 1.
The dried blank of the future table must be cleared of bark. A chisel or chisel will be useful for this step. The bark must be removed with extreme caution and precision so as not to damage the wood and prevent cracks and splits from appearing. Any soft or rotten areas should also be removed.


Stage 2.
After the bark has been removed, the stump must be leveled relative to the horizontal plane. To do this, use a level to prepare a flat surface, and install the base of the future table on it.
If curvature is observed, the imperfections are eliminated using a plane. At the same stage of work, excessively large rhizomes of the stump and all unnecessary parts are sawed off with a hacksaw, the sections from which are then sanded.

Stage 3.
The leveled stump is ground with a disk sander, especially its horizontal parts. The sides of the stump are also sanded, and hard-to-reach places are treated with coarse sandpaper. This is a rather labor-intensive process that requires a significant amount of time.

Stage 4.
Cracks and depressions in the barrel must be cleaned of dirt and debris using a chisel, then sandpaper folded in half (with the working layer facing outward) should be carefully processed from the inside. Remains of wood dust are cleaned with a brush or a construction vacuum cleaner.
Stage 5.


To prevent the stump from rotting and ensure air circulation between the table and the floor, furniture legs can be attached to the base from below. The presence of legs will make moving the table more convenient.
You can choose any legs: metal, furniture wheels or special rubberized stands. It is best to attach them using self-tapping screws to the base of the stump; the number is chosen arbitrarily, based on the size of the table.

Stage 6.
After installing the legs, we proceed to sheathing the top of the stump. To do this, we put two parallel strips perpendicularly on the sidewalls, and two more rows of holders on top - a total of 6 strips, fastened together with nails. This will be the frame for the tabletop.
Stage 7.

We fasten the prepared tabletop boards from below with transverse strips. The shape of the tabletop can be very diverse: round, rectangular, with rounded corners. A table option with a round or oval tabletop looks more advantageous.

To give this shape, you can use homemade device from thread, pencil and nail: the end of the thread is tied around a pencil, and the tip of the nail is placed in the middle of the tabletop, outlining a circle with a selected radius, after which all excess is sawed off, and the edges and surface of the tabletop are processed with a grinding machine.


Stage 8.
Holes and defects in the boards can be decorated with finely chopped shiny stones, filling them with varnish and after drying, sanding them again to smooth the surface.
The finished tabletop is fixed from below to the sheathing with holders on nails or self-tapping screws selected to size.

The finished table is varnished in several layers. After applying the first layer, the product is thoroughly dried and processed with fine-grained sandpaper. This will prevent the varnish from peeling off, and subsequent layers will lay down more evenly.


After removing the dust, apply the second and subsequent layers of varnish without grouting. If desired, after drying, the last layer can be treated with abrasive fiber - this will remove excess shine and give the surface a matte finish.

Such a creative table will decorate any veranda, especially if surrounded by green bushes or flower beds.


Prices for paints and varnishes
paints and varnishes
Video - DIY garden table made from a stump
Beech is quite often used by furniture manufacturers, as it is a hard wood that is quite ductile and durable. In terms of strength, beech is not inferior to oak. Compared to oak, beech is cheaper. The color of such wood can range from reddish-brown to pinkish-yellow.

- has high decorative qualities;
- dries quickly;
- easy to process.
- afraid of humidity;
- poorly polished.
Oak is a hard wood with great strength. The natural color of oak ranges from yellowish-white to tan with a slight tint of gray or green. Oak has a number of other advantages - it is very easy to use, easy to glue, practically does not rot and has a beautiful appearance.

- despite the high viscosity of wood, it is processed quite well;
- bends easily;
- resistant to rotting;
- lends itself well to artificial aging techniques.
- price;
Ash wood is harder than oak. The color of the wood is light and gently golden. Most often it is used in the manufacture of bent and carved furniture or as veneer.

- bends well after steaming;
- cracks little when dried;
- When bleached, it acquires an unusual shade of gray hair.
- in humid conditions, wood is quickly damaged by wormholes;
- poorly polished.
Aspen is a deciduous tree. It belongs to the Poplar genus. This is a very large tree, it grows up to 30 meters in height and can easily reach a thickness of 1 meter. Since it grows very quickly, it produces a lot of wood.

- very high moisture resistance;
- the ability to retain heat, but not give it away;
- bactericidal (you can put such furniture in a children's room without fear that it will cause harm).
- not very presentable appearance;
- the possibility of darkening, both partially and completely;
- You should be wary that the product may begin to rot from the inside.
Pine is a soft wood that is most often used in the manufacture of frames for upholstered or cabinet furniture. The main advantage of this type of wood is its high resistance to rot, humidity and temperature changes. In addition, pine is one of the most common and affordable materials.

- ease of processing;
- easy to glue;
- a pleasant medicinal smell that releases phytoncides.
- Easily scratched and damaged.
The interior of any home will be decorated with handmade crafts. Not the most difficult option for individual creativity is a home table made of wood. It's easy to create a design yourself. Here the flight of imagination is unlimited, but you need to start by choosing the design, purpose and design features that you plan to implement. At the very beginning, you need to create drawings and drawings from which you can assemble the finished table.


Drawings and diagrams
Initially, work out each element in detail, especially decorative additions, if they are planned. This is exactly the case when decoration will not be superfluous. It is best to draw the drawing in accordance with the actual dimensions by selecting the appropriate scale on paper.


The type of table can be very diverse, from a regular desk to a children's massage table. It is also possible to make a table for a bathhouse with your own hands. One of the easiest to make is a corner table.


It’s not so difficult to create a small transformer or a book-table. It takes up little space in the room and is functional in many situations. Sliding design will help save some space. Very suitable for home construction a table will do for carpentry. And, of course, a table on the veranda, where you can gather the whole family for evening tea.


Decor
Decorating will greatly improve the appearance. Almost any table design can be decorated with carved legs, especially if you decide to implement the project in a rustic style. The addition of tabletop decor with lighting from LED lamps. A glowing table in the corner of the living room will add warmth to a cold winter night. There can be an endless number of options, but the main thing is not to overdo it and not overdo it with decorations.


Style and design
There are no restrictions or strict boundaries for your own creativity. The easiest way to do original item- perform it in the “antique” style. This is the most common and not too difficult craft to perform. Imitation of antiquity will decorate almost any interior.


Design homemade table Ideally, it should fit organically into the interior of the room in which it is planned to be used. Possible various shapes and artistic solutions. Wood products allow you to experiment with geometry.


To learn how to make an unusual table, watch the following video.
Form


Such a table can have different angles and will not lose any functionality. Each side of such a structure can be secured permanent places for family members. Smaller sides are for children. Larger sides are for adults.


Material
Wood is convenient to use in any condition. Recycling wooden structures is also quite suitable. It's great to use old boards. Many breeds only get better over time.


It is no secret that centuries-old floors made from valuable species are sometimes used to make musical instruments. When reusing, be sure to remove the top layer, which will give the final product a neater appearance. Products made from such material, without exaggeration, will last forever.
Combination of dissimilar materials
Combinations of wood and metal look original. The massive surface of the table will be decorated with iron, and ideally cast iron, legs. The combination of oak and cast iron will achieve excellent result. Heavy cast iron goes perfectly with oak or ash.
The combination of solid African rocks and metal structures will be unique. The result will amaze anyone, even the most demanding connoisseur.


Glass and wood go together perfectly
Graceful wooden stand will be the best decoration for glass table. Modern fastening devices will ensure reliable jointing of these materials. The round shape of the final product with this combination is the most optimal solution.


You can combine different materials
It is quite possible for a lighter concrete base install a wooden or glass top coffee table. Quite modern solution, which will add a light industrial touch to your interior design. A combination of glass and concrete, as well as pine additions, will look great.


How can you use natural stone?
Quite an elegant combination if done in moderation. Do not overload the table structure with too heavy elements. Try to find a suitable base made of natural stone. The design of the wooden top will be dictated by the stone itself. Place a solid wooden surface on it and you'll have a table like no other.

Beautiful examples and options
With your own hands it is quite possible to make very beautiful, original things that will look no worse than those made by famous masters. Homemade items will always be your pride and a topic of discussion among your friends.


What can you make yourself?
Almost any table can be used by each of us. This simple household item does not require special knowledge or special professional skills. We start making wood products at school, during labor lessons. Therefore, a simple wooden design of a laptop table will be quite feasible. And chairs and a bench for country house You can also make it yourself.


You can come up with your own design for home crafts. Folding table will not constantly occupy living space. It can combine several functions. From a place for changing a baby, to a work surface for home crafts.


A wide field for creativity will be provided by a combination of wood and other materials. Don't be afraid to experiment. Connect dissimilar objects together and you will achieve amazing results. Even if you decide to combine rarely combined elements, don't be afraid to try. Any ideas can be realized.


How to make a table?
Home design should start with a small coffee table. The design can be quite simple. A work surface can be purchased at a hardware supermarket.

Best fit laminated pine. Glued solids are less susceptible to deformation due to changes in humidity and temperature changes. It’s most convenient to pick up the legs for your craft there.


Desk
It is better to assemble it from ready-made wooden panels - a completely reasonable start to home crafts. Ready elements or whole blocks are easiest to order with delivery on a website that sells components for such work. Here you can find all the necessary accessories. All that remains is to spend a little time on assembly. Additional processing and adjustment will not be too difficult, the main thing is that you will gain the necessary experience for further creativity.

Kitchen table
It's not that difficult to make your own kitchen utensils. You can start small kitchen table from pine. Legs are easiest to buy ready-made, pine is the most a budget option. It is easier to select the working surface to fit the planned dimensions. All that remains is, literally, to put the table on its feet.

Kitchen set

Assemble the kit kitchen furniture Anyone can make a wave according to their own drawings. You need certain skills to install opening doors, but this simple science can be learned by watching several videos on the Internet.


Required Tools
You can start with a small set. A hammer, a plane, a chisel, a wood saw, nails and screws can be found in every home. You will also need a ruler and a pencil. If you can purchase additional power tools, be sure to do so.

An electric plane at home or a jigsaw will be useful for the following crafts. There must be such a tool good quality. It will last for many years, even if you don't use it every day.

Special tool
To achieve high quality, it is better to use special equipment with an electric drive. The acquisition costs will not be significant, and you will have the opportunity to move on to more complex projects in the future.

What can you purchase in addition to your existing electric drill:
electric jigsaw - will allow you to make high-quality cuts of any materials;
electric planer - will make the surface of the wood perfectly smooth;
circular saw - will provide longitudinal or cross cutting of industrial quality;
mechanical device for milling work - it will process the edges of your craft with an intricate pattern and help you cut it out decorative elements on wooden surface;
a machine for sanding work - will make finishing a wooden surface a simple and enjoyable task that does not require much effort.


It is best to purchase a combination power tool that combines several different functions in one device. This will reduce costs and allow you to implement many design ideas. By the way, homemade electric drill can be supplemented with various attachments, which will expand its capabilities.

Accessories
If you decide to go to a craft store, stock up on everything you need right away. For your craft, you will need additional components to securely fasten the wooden parts together. The simplest steel corners will make the structure more reliable in operation. Don't skimp on additional decorative elements. They will not be superfluous, but will only decorate the appearance.

Ready-made kits that can be purchased in the store will add greater elegance to wooden crafts. A homemade desk for a child will look very nice if you use metal legs from any ready-made furniture set. It’s easy to make a bedside table for it yourself from the same standard kits. Handles and fittings can be picked up in the same store.


Fastening wooden structures
The ancient technology of wood joints without iron nails and glue is almost lost. But there’s no harm in trying. Fit all wooden joints with minimal gaps, drill holes with a diameter of six to eight millimeters in the joints and drive a dried wooden tenon into it.
If all wooden parts are excessively dried before assembly, then over time they will gain the required amount of moisture and increase their size. The connection will become quite strong, and the swollen wooden tenon will give additional strength.

Traditional mounting options
The simplest and most reliable option is to drive a screw into the tree. Now they make special self-tapping screws for wooden joints, which, unlike a regular screw, do not require a precise hole to be screwed in. If the thickness of the connection is not very large, then you can do without additional holes. The wood screw will do everything on its own, especially if you use an electric screwdriver. This connection will last quite a long time without glue.

Why do you need glue?
To give a wooden structure additional strength, it is best to glue the articulated surfaces. You need a little glue, but the result will be excellent when combined with screws or nails, glued wooden connection will remain durable for many years. It is best to use water-based glue. There are many varieties of reliable wood glue available.

How to make an original home table?
It’s not that difficult to create crafts of your own design. The material can be found in any forest.
It will come out of solid wood unique craft. But this will require a little work. The ideal option is the base of a large tree, the diameter of which is more than eighty centimeters in circumference. If you can use part of the root system, you will have a reliable base for the table and no additional legs will be needed.
You need to understand that it will not be easy to deliver such a workpiece from the forest, but the result will pay off all the work; such a table cannot be compared with anything.


Table for a summer cottage
Outdoor table for suburban area You definitely need to do it yourself. The ideal material is the same log brought from the forest. It is convenient to make the base from birch logs of small diameter. They need to be dug into the ground about fifty centimeters.

Then level their tops by sawing off any excess wood. The working surface can be made from a log of large transverse diameter, sawing it lengthwise. The flat part will be the surface of the outdoor table.

All outdoor additional buildings are best made of wood. This one is natural natural material It tolerates moisture, heat and frost very well. It is also better to make a bench for your summer cottage yourself from the same wooden components. Homemade bench It will look natural next to your handmade table.
Why is it better to use solid wood?
The structure of wood is such that its durability directly depends on how intact its integrity is. Therefore, since ancient times, solid logs have been used to build houses. With minimal processing, when the integral structure is preserved as much as possible, wooden structures can last hundreds of years without collapsing or changing their shape.

What can be made from solid wood?
First you need to be patient. Cutting down a tree and delivering it to your home is not the most difficult task. It is important to properly prepare the material for subsequent processing.

Preparing a wooden blank
It is imperative to rid the tree of excess moisture. If you can’t agree to do this at a woodworking plant that has special drying equipment, then it is quite possible to dry it at home.
Log harvesting is usually done in the spring, when the trunk has not begun to absorb moisture from the soil, that is, before the thaw. Usually this is the month of March. Natural drying lasts from several months to a year, depending on the type of wood.

Why is it important to use only dry material?
A raw tree will definitely crack as soon as the bark is removed, unless, of course, this is planned by your design idea. Some breeds change shape greatly if not dried properly.

Dry wood should be well cleaned and sanded; a light layer of textured varnish or stain would not hurt to give the product more texture. If the diameter of the circle is large enough, and part of the root system has become a reliable support, then the table is almost ready. The top part must be sanded well and varnished. So the ideal design for a laptop is ready.

Dimensions
If you want to make a large dining table from solid log, you will have to work a little and use a chainsaw to make a longitudinal cut in the middle of the trunk. You will get two almost identical halves. If the width of one part is a meter or more, and the length is at least one and a half meters, then the base for dining table has already. You can leave the bottom semicircular or even it out by cutting off the semicircular bottom.
All that remains is to build reliable legs and treat the table surface in any convenient way. It is not necessary to make the table absolutely flat, especially if valuable types of wood were used. Moderate irregularities will give the craft additional charm.

How to use the second half of the log?
A little extra effort, and a strong bench for the table is ready. If the width of the log is sufficient, you can get two strong benches on both sides of the table. It is best to connect them rigidly in general design, or make two separate strong seats for several people. The bench, of course, will have to be leveled and all irregularities removed. Ideally, sand it well and cover it with varnish or stain.

Colors
Do not be too zealous in painting wooden products. If you decide to enhance the natural color, then coffee tones are best for any breed. It is optimal to use water-based varnishes and paints. They are less toxic and interact well with wood.
It is perfectly acceptable to use undyed materials with natural colors. Cast iron without additional coating and wood of natural color will become an original decorative solution that does not require additional color shades.

Raw aluminum and dark woods combine very well. The natural silver color and dark oak texture look very original. Elements with natural colors are well suited for additional decoration.
But components made of iron, unless, of course, it is stainless steel, need to be painted in any case. Even if your table with iron legs will always be indoors, the metal must be coated with any coloring compound. Iron corrodes even in dry and warm rooms and requires painting.
Wood coloring
When using planed wood products outdoors, painting is required not only for decorative purposes. A good coating will protect the wood and extend its life. In this case, special compounds for external work are used. The color scheme can be any. The most acceptable are the same dark coffee shades.

Useful little things
- The wisest thing is to take your time. Any work requires thoughtfulness and precision in execution. Don't set yourself any deadlines. Do work when you are in the mood.
- If something doesn’t work out, put the craft aside and come back to it after a while. Such work will only be a joy, and you will achieve good results.
- Don't take on a complex project right away, start with simple work. It is necessary to gain some experience for subsequent more complex crafts. Using power tools will make your work easier. Be sure to follow all safety precautions when working with any tool used for wood processing.

- Even a small splinter can become a problem if you do not pay attention to it in time. Follow safety regulations. Always wear glasses when working with wood products, especially if machining is involved.
- If you have little experience, but you want to make at least a wooden table in your own home with your own hands, start by going to the building materials supermarket. There you will find everything you need for individual creativity. Design solutions will be suggested by the materials themselves.
- To start, use wooden blanks, requiring minimal post-processing.
- Carry out all work in a spacious room. Small workshop in the country - perfect option. Painting should be carried out in a well-ventilated area, even if low-toxic compounds are used. Observe all required drying times for glued and painted parts.
Advantages and disadvantages
Handmade crafts do not always look perfect. But don't be upset about it. Minor flaws will be compensated by absolute satisfaction from the work done personally. Such disadvantages can be attributed rather to advantages. An industrial product will not retain the warmth of your hands.
Let's sort it out practical advice, which facilitate the process of assembling a table with your own hands and help achieve best results. The construction of a country house is divided into several stages. A serious step is the arrangement of the dacha. Furniture plays an important role in the comfort zone. A wooden table complements the overall interior and improves the functionality of the room. But buying one may not always be successful, so we suggest considering a homemade option. It can be placed outdoors or in the house. Such furniture plays an important role in the arrangement.
As building materials we use either pallets or wooden boards. An unforgettable requirement for the material is the absence of moisture. With sufficient funds and desire, new boards will be very effective in construction. The quality and long service life of any furniture depends on the quality of the purchased materials for its assembly; how well they are treated before use. After a successful purchase necessary materials, and in this case these are wooden boards, put them in rows and leave them to ventilate. The longer this type of material sits and ventilates, the better it will serve in the future.
Any furniture is primarily made only from dry wood.
As mentioned above, tables are suitable for a variety of places and serve as a complementary element of furniture literally anywhere. Individual manufacturing methods are selected for each table. For example, you set out to decorate a gazebo with a wooden table. And this is quite convenient and correct, since spending time in a gazebo without a table in the summer is somehow uncomfortable. Just homemade furniture won’t hurt. It is not necessary to glue the boards together during the work. It is enough to secure it using special fasteners. This approach greatly simplifies the manufacture of outdoor countertops. Or you can purchase them on the website https://stone-fortress.ru/. Firstly, you don't spend a lot of time assembling. Secondly, it is quite possible to replace glue with other effective means, which means financial costs will be reduced.
Pallets like wooden parts, are very distinguishable by color. Accordingly, you visually decorate the table the way you want. Pallets have side parts. They are used as a frame. However, before this, the material needs to be sanded properly. It is worth considering that all the material will not be used up. The remaining planks can serve as fastening elements of the countertop. The fastening point is in the area of the board joints. To join the board you only need two self-tapping screws. For the last solid one - one.
The sides and two boards will be used to build the frame. We secure the frame parts to the end using self-tapping screws. The frame does not need to be attached with self-tapping screws, just gluing it on is enough. Since the screws are long, we drill separate holes.
Our table will soon be released. All that remains is to turn it over and start sanding. Use coarse-grit sandpaper at first, and fine-grit sandpaper later. The next step is to install the legs. To do this you will need four boards with absolutely same size. If necessary, of course, you will have to adjust the wooden boards in order to achieve an overall positive result. In this case, grinding is also an integral part of the work. Then each leg needs to be screwed on. To do this, you will need two self-tapping screws, which are important to be positioned diagonally from each other. Installing a jumper will help ensure maximum stability. The distance between the floor and the jumpers should be at least 10 cm. When everything is fixed, we begin to drill holes for the screws. This way we will secure the material so that it does not crack.
Now you have a complete design. Naturally, it doesn’t hurt to decorate it somehow. For example, start with painting. Of course, the first time a hard pile will appear. There is no need to be afraid, it is in the order of things. We take up the sandpaper again and begin to sand the surface until it becomes smooth. This amount of work will definitely create dust. Accordingly, you will have to get rid of it. Then we take up the varnish again and cover the surface with it. You may need to sand a third time, since the varnish will not lie flat the first time. In general, it all depends on the type of wood. So it’s better not to neglect unnecessary sanding, but to ensure that your wooden product looks beautiful. Having completed all the necessary procedures listed above, we get a beautiful wooden table made by ourselves.
We will accept the option of making it from a newer material if you do not want visible traces of nails to remain or the boards will be frightening due to their heterogeneity. The tabletop is made in a variety of shapes: rectangular, square and round. The result depends on your personal preferences.
Table made from leftover materials
Sometimes it happens that at the time of construction or the next renovation of a dacha, extra boards of various types remain. Instead of throwing them away, it is better to use this remaining material for more significant tasks. Make the same table. To do this, we select pine boards that will go on the frame (thickness 25 mm, width 50 mm). For the legs, we will leave planks 15 mm thick and 50 mm wide. As for the size of the frame, everything is purely at your personal discretion. This table is well suited for the veranda. And since this room is not large, it is advised to make it narrow (60 cm width, 140 cm length, height 80 cm). Of course, if family members are not tall, it is quite acceptable to play with the size of the tabletop.
Next you need to assemble the frame and secure the boards that act as legs. It is necessary to cut two boards 140 cm long. The width parameters are 60 cm. You need to subtract twice the thickness of the used board - 5 cm. That is, the used bars should be 55 cm. Now fold the frame by twisting the screws. How the bars were folded, everything needs to be double-checked. The diagonal arrangement of the bars is worthy of attention. If something doesn’t add up, you should definitely pass it on, since the design of the tabletop itself will suffer in the future.
Cut four boards and secure them inside the frame (80 cm long). Use four screws for each board. The bottom shelf can become a complementary element to the tabletop. To equip it, attach a crossbar in the middle of the two legs. It will serve as a frame for the future shelf. The work is done in a similar way with other pairs of legs. In addition to the fact that the shelf will provide more convenience, two jumpers significantly increase the level of rigidity of the structure as a whole. The fastening of the jumpers should be done strictly at a right angle (check with a special square).
Now the frame is ready, all that remains is to check it. If the structure is made correctly, the frame does not wobble. All that remains is to polish it. Next comes the assembly work. You may have boards of different colors left. Why not put them to good use. For example, arrange the boards on the surface in such a way that they alternate in color.
The last stage of making the tabletop involves fastening the boards with nails. We secure the shelf from below with nails or self-tapping screws. Again, you need to polish the assembled product. And finally all that remains is to paint. But it happens that you made a mistake with the choice of varnish or paint. So what should we do then? If you want to change the appearance, you will have to re-sand the surface. Next you need to start painting again with a new color.
Table with glued surface
The difference between the previous options is that the legs of this design go in the letter “L”. They are assembled from boards of the same width and thickness (20 mm thickness). Since the volume of the legs here is larger than the previous ones, more screws will be required (5 pieces). You need to drill holes with a diameter of 1-2 mm in advance (the hole should be smaller than the diameter of the screw itself). The second time you need to drill a hole with a larger diameter. It is intended for the screw head, which is then covered with a furniture plug. In other cases, it is preferable to choose a furniture-colored rod.
Another great idea is furniture putty. Add wood dust to the mixture you will use to putty (take the leftover sanding). When the putty dries, traces of holes will be difficult to find.
Working on the legs
When assembling the legs, you need to carefully ensure that the angle is 90 degrees. If there is no pattern, use ordinary timber. To join two boards, coat one and the other with wood glue. Install the screws in the required places. When the glue dries, coat each leg with varnish. But before that, don’t forget to sand it.
Assembling the tabletop
As the legs are done, the turn goes to the top of the table. The tabletop is made of boards of equal thickness. Choose the sizes you want. Boards can be of different widths. It is important to maintain an organic appearance. It is important that the side parts of the boards align smoothly with each other without gaps. Side part We also lubricate the boards with glue. Next, lay them flat on the surface.
To avoid possible gaps, tighten the boards with clamps. Leave the table surface overnight. After a day has passed, remove the clamps - the tabletop is already ready. As before, sand the surface and smooth out the edges. Using a jigsaw or saw, start trimming. Sometimes a grinder is also used, but in this way it is difficult to ensure an even line. And now the sanding stages are over, and you get a completely flat tabletop with a diligent appearance.
Glued board tabletop
Using the above method, make a round, oval or any other shaped tabletop. Of course, you can achieve evenness of the cut tabletop if you draw in advance the lines along which its shape is cut out. Frames can give an attractive look, but it’s better to make them with your own hands. Take a thin strip and sand it. Fasten according to the perimeter of the tabletop. Finishing nails and glue are suitable for fastening (first of all, you need to treat the planks with glue). The glue will dry, and the plank will need to be sanded at the joints.
There is no table without legs
The tabletop is ready, which means it remains to put the table on its feet. To attach the legs to the main part of the table, you will need a frame made of boards. It is attached to the back with glue. But this is not enough, because you need to secure it from above using confirmations. First, you need to drill holes on the tabletop with a diameter for the hat. And then mask them off like you did the previous holes. Now the table frame is firmly secured, begin attaching the legs. The connection point must be inside the frame. For fastening we use ordinary self-tapping screws. The table is ready!
Table and benches in the garden
When making tables and benches, boards of different sizes can be used. To connect the benches to the table, 16 cm studs are used (in addition to them, washers and nuts). Other connecting fasteners - no longer than 80 mm. So, each part of the garden table is installed on its own Right place. Then use a drill to drill through holes. And then, as you yourself already understood, it’s time for the washers and nuts.
When tightening nuts and washers, it is better to use a wrench. Thanks to this approach, in winter you can easily unwind the structure and take it to a warehouse, garage, shed or any other place for storing similar things.
Each board should be carefully sanded and trimmed. To fasten the three boards that are intended for seats, you need to cut short bars. We cut each of them at 45 degrees. The first step is to start assembling exactly that part of the structure that is located below. We take one large board (160 cm in size) and attach small bars to it. At the moment of joining, they should be fastened in the middle of one large one. Now we add legs to this structure (fasten with nails). Add short boards again. All these elements need to be tightened with studs, bolts and nuts. This creates a support unit that secures the seat from below.
All that remains is to attach the boards for the seats. By the way, if this design is intended for the street, it is not at all necessary to create a narrow gap between the boards. At least 5 mm is sufficient. The planks are attached to sawn supports. We have formed two shops. It wouldn’t hurt to secure them with four 160 cm long boards. To secure all four legs, use 2 pins for each leg. Install them either at the same level or diagonally.
Table for kindergarten
The principle of assembling the table is completely different from previous options. The tabletop is supported on boards that are cut at 52 degrees on the sides. The sawn supports must be positioned in such a way that the legs for the table can fit between them. Secure them with finishing nails. If you do not want to allow the caps to be clearly visible, drive them deeper. Simply coat the surface with a special lubricant as a mask.
The table legs here are not standard, but look like crosspieces. To assemble them, take two boards and cross them in such a way that at the bottom the gap between the objects is 65 cm. In the middle of the boards, leave a mark for crossing the boards. The mark is drawn in the shape of a square and half the thickness of the board itself. The same thing needs to be done on the other board. We get two materials of the same plane. The joining process takes place using four nails. The second pair of legs is made by analogy.
Now we have to assemble the table as a whole. First of all, the most important thing is to secure two pairs of legs into the main structure on which the benches are placed. We place the legs parallel to each other in the middle. Naturally, they need to be secured with pins so that they do not fly off in the future. The tabletop is attached using a similar method. Once the studs are screwed in, start sanding and painting. Paint the structure in any color that suits you. In addition to this design, those options that involve a separate table from the benches are also acceptable. The structure is assembled in a similar way. Of course, except for the seats.
Making a wooden table with your own hands, as it turned out, is not so difficult. There are moments that require utmost attention to some things during manufacture. If you follow the above recommendations, your table will turn out perfect. Choice good materials and competent performance of the work will be ensured by the product for a long time services. The design will impress with its functionality and decent appearance.
Video: DIY wooden table
Photo gallery: DIY table


