A washing machine has long been an integral attribute in any family. The automatic machine confidently replaced all the old models. However, by definition it is installed permanently and requires connection to communications. It is advisable to entrust the connection of the washing machine to the water supply and sewerage to a specialist, especially if he has an official license to work with equipment of the selected brand. However, this is not always possible, and there is not always a desire to part with a decent amount of money that the master demands for his work. So it’s not useless to know how to make the connection yourself and what to consider when doing so.
The first step towards installing the machine. You must select a location before ordering in store and delivery. You should even choose a model after you know exactly where it will be placed.
For many, such a question seems strange, because there is no logical place to find a place other than the bathtub, but this is far from The best decision. In bathroom high humidity moreover, constantly, in addition to posting electrical sockets in the bathroom is undesirable, and pulling the cable outside the bathroom is pointless for two reasons:
- Extending the existing cable or using extension cords will void the manufacturer's warranty. Even a careful replacement of the power cable will be identified by the service and will be grounds for denial of warranty service.
- Even if you have a high-quality and correct grounding and connect it to the washing machine in a humid environment, this will not save you from shock from static electricity and capacitive currents. Not only is this dangerous to life, it will also affect the functioning of the “brains” of the device itself, microcircuits and some other elements.
If possible, the bathroom is excluded from the list of candidates for installing an automatic washing machine.
The kitchen is the optimal place in all respects. There is access to water supply and sewerage, it is possible to adequately distance the machine from other elements of the furnishings and power it from one of the sockets, which in the kitchen should hang on separate machines in the distribution panel.
There is one more place where the machine will be very comfortable. If there is a utility room next to the bathroom or if there is a place in the corridor that can be allocated for installation and hidden behind a false wall, then it will even better cuisine. Humidity is low, and access to water supply and sewerage is easy to provide. In addition to this, the problem associated with the kitchen goes away - it is no longer possible to get the machine dirty while cooking.
Having determined the optimal location, the permissible dimensions are measured, which can be used to guide the choice of a specific model.
Grounding and electrical network
For washing machine, in fact, like any other equipment in the house, grounding is necessary. This is the only way to protect yourself from electric shocks and guarantee normal operation for the entire service life. Naturally, if there is no grounding, then the warranty is void, so you will have to pay a lot of money out of your own pocket for any problems or breakdowns.
So, even before purchasing a machine, you should take care of carrying out general grounding and installing sockets with a third grounded contact. This is not as difficult to do as it seems, even in an apartment building.
The washing machine is also connected to a separate machine in the electrical panel.
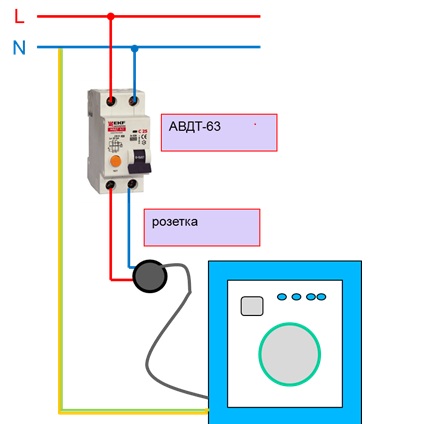
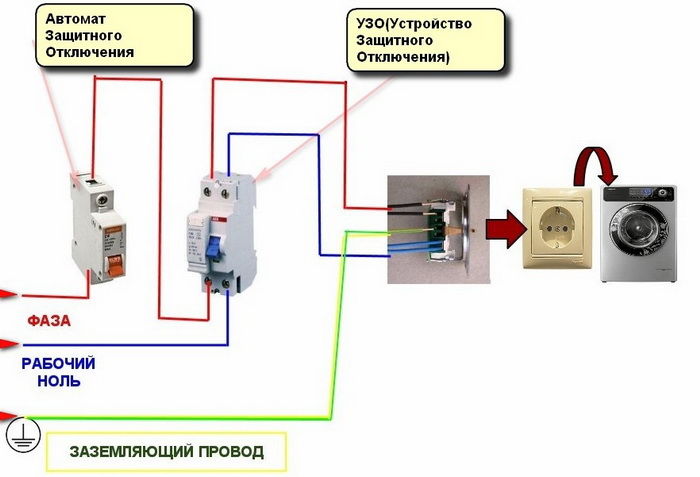
Electrical connection diagram
What is needed to connect the machine
The automatic machine is installed on a solid, level base that can withstand vibrations during operation. To this place you need to bring:
- Nutrition. A grounded socket located above the machine or to the side of it, to prevent moisture from getting into it even in an emergency.
- Sewerage. Sewage drain supplied separately or using the existing input. It is optimal to directly connect the drain to the sewer system, but draining into a sink, bathtub or toilet using a hose and special fasteners is allowed.
- Water pipes. Cold water is definitely connected, and in many models hot water is connected, for which a flexible hose is used. Since the length of the hose is limited, if necessary, pipes are laid from the entrance to the apartment or house to the installation site.
For each of the three points there are a number of nuances and connection options.
Connection to sewerage
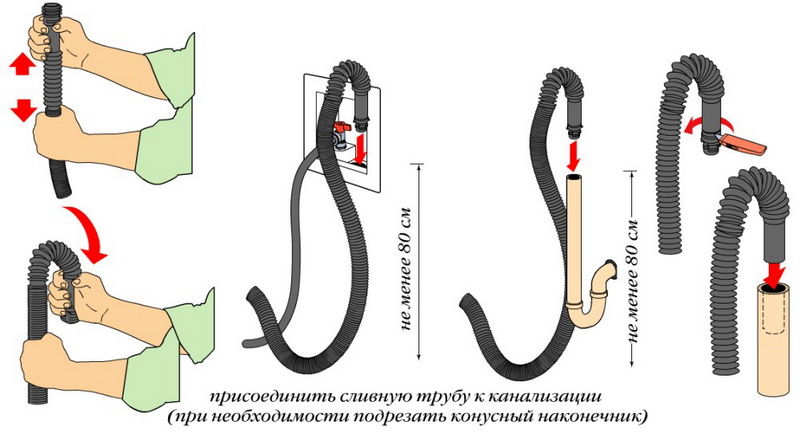
To connect to the drainage system, the machine has a standard flexible hose, which must be connected to the outlet on the device itself and the other end connected to the sewer. A rubber or rubberized elbow, bent at 90 degrees, is used to connect to the machine and is equipped with a clamp to seal the connection.
There are three options for connecting to the sewer:
- Drain into a sink, bathtub or toilet, securing the hose with a special hook.
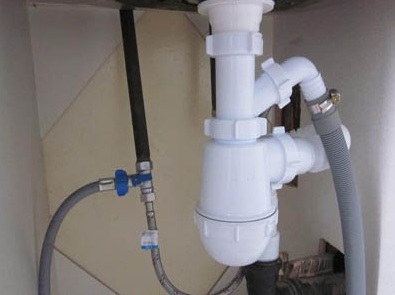
- Connecting a sink in a bathroom or kitchen to a siphon using a siphon that has a special outlet for this.
- Supply a separate branch to the machine with a sewer pipe and connect using a tee with a sealing collar.
Draining into a sink or bathtub is sufficient, but requires constant attention from the user. Each time before washing, the hose must be secured and constantly ensure that it does not come off the mount. In the event of any troubles, this threatens flooding and unpleasant communication with the flooded neighbors below. The machine comes with a special curved fastener. It allows you to snap and secure the hose into a hook for attaching to the edge of the bathtub.
To connect to the sink siphon, it must already have a corresponding outlet. It should be located between the drain hole and the elbow. Buy and install a new siphon on the sink, and then the connection will be the easiest. It is enough to insert the hose from the machine, which already has a rubber seal for this, into the outlet on the siphon.
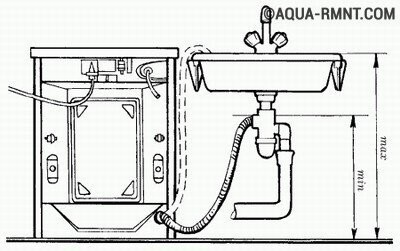
Particular attention should be paid to laying the hose. All machines have a special hook on the body at a strictly defined level. Usually this is a height of at least 80 cm from the floor. The hose eventually takes the shape of a loop or zigzag. This prevents odors and sewage waste from entering the drum.
If you can’t attach the hose to the standard mount, for example, it doesn’t reach the sewer a little, then you will need to twist the loop yourself before connecting the hose to the siphon, so that the loop itself is higher than the point of entry into the sewer. Just don’t fasten the hose tightly to the wall.
The third option is determined to be the most optimal. For this purpose, a separate sewer pipe is connected to the machine. If the branch runs independently and, apart from the washing machine, no waste from other sources enters it, then the pipe diameter is chosen to be 40 mm. When using the line together with a machine and, for example, a sink, a 60 (80) mm pipe will be required.
A pipe inclination of 1-2 degrees should be maintained along its entire length. The pipe outlet itself should end in a pipe with an inserted rubber cuff, the outlet hole of which corresponds to the diameter of the hose from the machine. The outlet is located at a level of 40-50 cm from the floor, depending on the manufacturer’s requirements. The instructions indicate the permissible lifting height of the loop and the outlet end of the pipe.
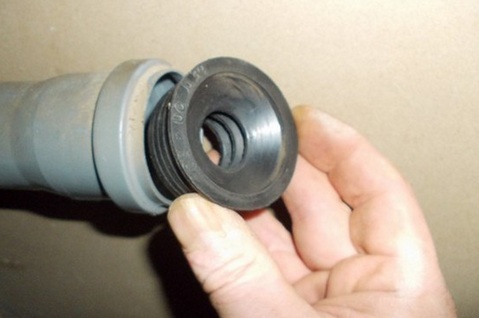
Drain cuff
Connecting the water supply
At a minimum, it is necessary to connect cold water, however, many models of washing machines are designed to also connect hot water to save the life of heating elements and speed up the washing process.
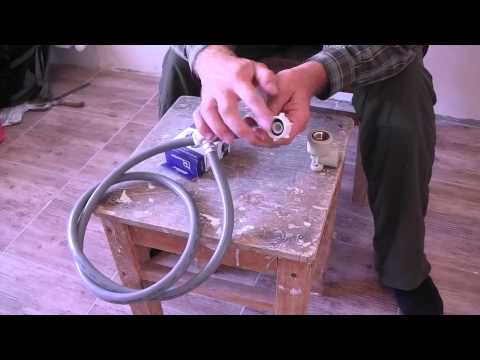
To supply water, a flexible hose is used, with two American-type movable threaded connections at the ends. Moreover, it is quite difficult to confuse which end to insert where. The end for connecting to the machine is bent into an elbow at an angle of 90 degrees, while the other is straight. Technically they are equivalent, but for compact installation The machine uses an elbow to prevent the hose from resting against the wall behind the machine.
There are three options for connecting to the water supply:
- Connection to the faucet in the sink or bathroom during washing.
- Installing a tee at the connection point of the flexible hose from the toilet cistern or sink faucet and connecting the hose from the machine through the shut-off valve.
- Inserting a tee into a pipe laid nearby or connecting a separate water line.
The simplest and at the same time inconvenient option is to connect the washing machine hose to the faucet in the sink or bathroom. Before each wash, you must manually connect the hose to the faucet. To do this, use a rubber cuff or threaded connection instead of an aerator on the mixer body.
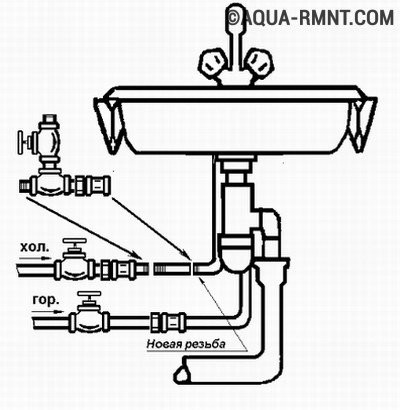
The second option is optimal for connecting a washing machine yourself. Not required additional equipment or skills. Simply disconnect the flexible hose going to the toilet tank or sink faucet from the fitting on the water supply pipe and insert a tee between them. Shut-off valves and a valve must be installed at the outlet of the tee, and the washing machine hose is already connected to it.
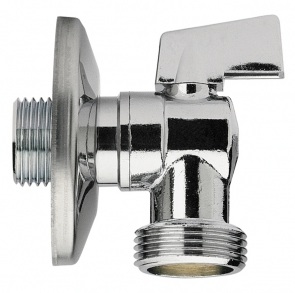
Water tap
The third option is ideal for a permanent connection and the only one possible if installed in a storage room or away from laid water supply pipes. If the pipe is laid near the machine, then it is necessary to cut in a tee and connect the shut-off valves and the hose from the machine to it.
For steel pipes, connection is provided using a crimp coupling. A rubber seal with a slot in the center is placed on the pipe. A clamp with clamping bolts and a built-in outlet is put on top. The outlet should be positioned above the hole in the rubber gasket. After clamping the clamp with bolts, it is enough to drill a hole in water pipe directly through the outlet and connect the valve and hose. All work is carried out only after closing the valve at the cold and hot water inlet.
For metal-plastic, the pipe is cut and a tee fitting is inserted. The pipes are clamped into American fittings and screwed to the tee using rubber seals.
The last option involves supplying pipes to the installation site of the machine.
- Select the nearest location for laying water pipes. At this point, cut a tee in accordance with the pipeline material.
- From the additional outlet of the tee, lead the pipe to the installation site of the machine and secure the outlet with an external thread at the end. Similar fittings and nozzles are available for both polypropylene and metal-plastic. For a steel pipe, it is enough to cut the thread.
- Connect the valve, sealing the connection with FUM tape or rubber (paranite) gaskets, and connect the hose from the machine to the valve.
If the machine has two inputs for cold and hot water, and only cold water needs to be connected, then it should be connected to both inputs, preventing the machine from operating with one plugged input. To do this, attach an elbow to the hot inlet and a tee to the cold inlet. Connect the elbow to one of the tee terminals, and to the free one - a water supply hose.
There are special hoses on sale with a ready-made “Y”-shaped connection for easily connecting cold water to two inlets on the machine.
Final stage
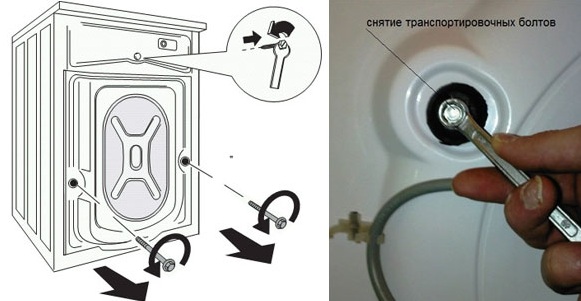
To prevent damage to important parts, especially the drum and counterweight, during transportation, locking boots are used. First of all, make sure that they are removed from the machine according to the instructions. There are usually 2-4 of them on the back side and one or two on top or on the front edge.
Before starting the washing machine, make sure there are no leaks at the connections. To do this, when the device is disconnected from the network, apply tap water and open the valves along the entire route. There should be no leaks at any connection point.
If everything is normal, then the machine turns on in the mode of filling the tank with water and then switches to the drain mode. This is how the drain into the sewer works.
Now there are no problems with choosing and purchasing automatic washing machines, but the same cannot be said about installing them. Not every man is ready to do all the installation work on his own. However, you don’t want to spend extra money on the services of a specialist, given that professionals charge dearly for their work. In this case, you will have to personally understand the theory and understand how to connect washing machine independently in practice to sewerage and water supply. You will have to tinker with the electrical wiring, and also replace the electrical outlet if it is not grounded. All connections and connections must be secure to prevent leakage. Installation work can be carried out different ways, from which everyone chooses the most convenient and practical.
This video clearly demonstrates how to properly connect a washing machine to the water supply system and sewer network.
Choosing a reliable place to install a household appliance
In a standard city apartment, you won’t really get confused when choosing suitable place for stationary placement of an automatic washing machine. Usually they choose from three options - kitchen, bathroom, toilet, if the bathroom is separate. Moreover, only top-loading models, which have compact dimensions, can be placed in the toilet.
Important! When choosing a place, do not forget that installed equipment there must be a free approach. After all, washing machines are used quite intensively, especially in families with small children.
It is best to install the machine on a concrete base. This will reduce vibration of the device to a minimum during operating mode. With the help of twist-out legs, they ensure a level position for the machine, both horizontally and vertically.
We carry out proper unpacking
Manufacturers carefully package complex household equipment, such as a washing machine, to prevent damage to the product during transportation. Therefore, before starting installation work The device is freed from its original packaging, and then the bolts that specifically secure the tank are removed. The manufacturer supplies the device with plugs used to close the resulting holes. Bolts removed from the machine must be stored and used for their intended purpose during transportation of the equipment.
![]()
Removing shipping bolts and installing plugs
The procedure for removing shipping parts is specified in full detail in the text of the instructions, which are necessarily attached to each household appliance by the manufacturer. When purchasing imported equipment, make sure that the instructions are translated into Russian. If you carefully follow the diagram in the buyer's manual, you will be able to connect the washing machine without any problems.
Important! Please remember that it is strictly prohibited to turn on equipment with shipping bolts. If this is allowed, then breakdown of important technical components of the household appliance is inevitable. Moreover, the consequences can be catastrophic, to the point that repairs will not help. In this case, you cannot count on a warranty, because the cause of damage will be related to installation errors.
Connecting the washing machine to the water supply
The washing machine can only be operated if there is an uninterrupted supply of cold water. Each washing mode requires water at a certain temperature. Therefore, the incoming cold water is heated automatically.
Do-it-yourself connection of the washing machine to the central water supply is done using the inlet hose supplied with the technical product. If the length of this hose is not sufficient, then you can purchase a longer copy at any store specializing in the sale of building materials.
Inserting a tap into the water supply system to connect a washing machine
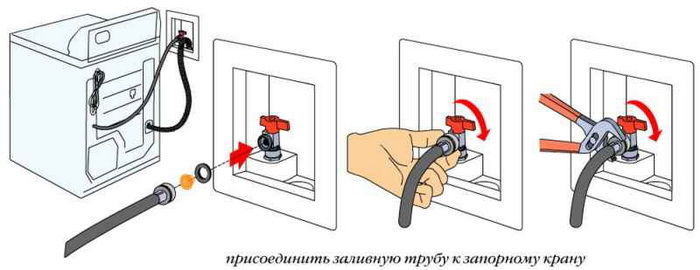
There is a special hole on the back panel of the automatic machine to connect the inlet hose. The second end of the hose must be connected to the water pipe and this can be done in several ways.
- The easiest way to connect is if the system has a separate tap specifically designed for this purpose. You will need an adapter whose thread will match the threads of the tap and inlet hose. Both threaded connections must be carefully sealed to eliminate the possibility of leakage.
- If the water supply system in a house or apartment is made of metal pipes, then to connect it you will have to install a tap. Buying ball valve, equipped with two outlets, as well as a clamp (bandage). To drill a hole in a pipe, you must first turn off the water. Then a bandage with a seal is put on the resulting hole and the tap is screwed in. An inlet hose is connected to the free outlet of the ball valve.
- You can independently connect the washing machine to the water supply using a pass-through ball valve with three terminals. When choosing faucets, you should not skimp on quality. It is better to give preference brass taps. If the machine is placed in a toilet, then the connection point is used to connect cold water cistern and a hose.
Important! When performing work, do not twist the inlet hose or “break” it. Seal threaded connections carried out with a rubber gasket or a special elastic plumbing tape.
We ensure the drainage of waste water into the sewer system
Many owners don’t really think about how to connect the washing machine drain to the sewer system. Simply secure the drain hose using the special plastic hook included in the kit to the edge of the bathtub or sink. If the machine is in the toilet, then the drain hose is simply lowered into the toilet. This method, although simple, is not very convenient. Plumbing fixtures quickly become dirty from the water drained after washing. Yes, and it is difficult to use them for their intended purpose. You can't avoid a flood if you forget about placement drain hose.
Methods for draining waste water from a washing machine
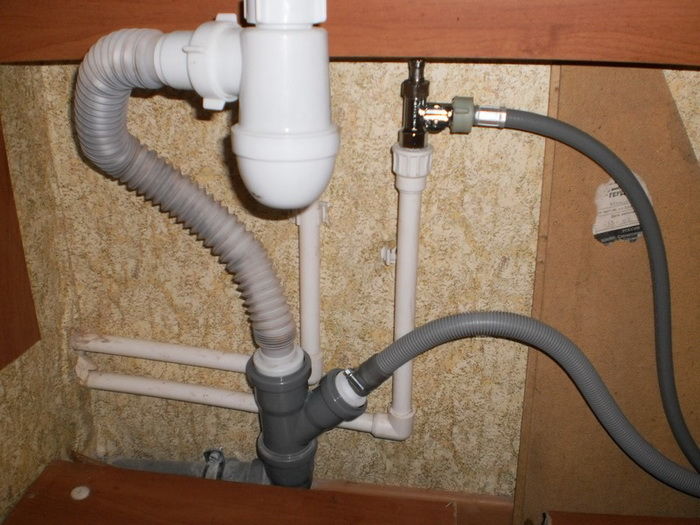
It is much safer and more practical to connect the washing machine drain through a special siphon, which looks like a plastic elbow with an outlet. It is on this outlet that the tip of the drain hose is put on.
Important! The outlet must be located above the curved section of the knee, which will ensure connection with the atmosphere. It is forbidden to connect the drain directly to the sewer system, since the tightness of the connection will create a “siphon” effect. In this case, the machine simultaneously pumps water and drains it. There is also an unpleasant odor inside the washing machine.
How to properly connect equipment to the electrical network?
You can’t joke with electricity, as mistakes made when connecting the machine can cost the owners their lives. Therefore, it is better to invite an experienced electrician to perform electrical installation work. The specialist will determine the power and cross-section of the supply wires and select a cable of the appropriate brand. Install a Euro socket with a grounding contact and a residual current device. It is not recommended to use tees and extensions, as this may cause a fire.
Therefore, you can connect the washing machine to the sewer and water supply with your own hands, since this work does not require special knowledge. Entrust everything else to a qualified electrician so as not to worry about the health of your loved ones.
Electricity, water supply and sewerage - for normal operation of the equipment, the washing machine must be correctly connected to each of these three networks. You can do some of the work yourself, and entrust others to professionals.
It is quite possible to correctly connect the washing machine to the sewerage system, electricity and water supply with your own hands. Watch the video of the process on our website, and you can do most of the activities yourself.
Choosing a location for installing the washing machine

Before connecting the washing machine, decide best place its installation. Optimal options:
- Kitchen;
- Bathroom;
- Toilet;
- Any other room, for example, a storage room. But subject to the possibility of installing electricity, sewerage and water supply there.
Equipment preparation
To ensure that the washing machine does not break down immediately after connection, remove the bolts and other fasteners from it in advance for transportation. For example, for delivery safety, the equipment drum is bolted. In working condition, you will only see springs on it.
Unscrew the bolts from the back of the equipment, cover the holes with plastic plugs. Make sure that there are no defects on the intake and drain hoses (kinks, holes, etc.).
Installation and connection of the washing machine. Video instruction.
First, let's find out how to connect the washing machine drain to sewer system. There are several options:
1. When normal operation communications, through the siphon of the kitchen sink or bathroom. At a height of 70-80 cm from the floor, secure the drain hose using a special clamp (located on the back of the unit body). Insert the hose end into the siphon and secure it to the mounting nuts.
Important! Siphon installation - the best choice for connecting equipment to the sewer system. It will not let unpleasant odors and sewer water back into the car.
In the presence of check valve at the drain of the unit, you can choose both this and the option below.
2. Pipe insertion through the adapter. Shut off the access of sewer water to the system. Using a core bit, drill a hole in the pipe with a drill required sizes. Place the adapter on the pipe and tighten using bolts or clamps.
If you will not install the machine immediately after tapping, cover the outlet with a plug. To connect the drain hose, you will need a sealing collar. If you still have questions, the washing machine connection diagram will tell you the correct sequence of events.
Connection to water supply
You can also connect the washing machine to the water supply yourself. Moreover, all equipment is usually supplied complete with necessary elements: No additional purchase of fittings or flexible hose is required. But sometimes the hose is not long enough, and then you can:
- Select a permanent installation;
- You can use a longer rubber hose by simply purchasing it at the store.
In the latter case, connecting the washing machine to the water supply system involves connecting the pipe on the equipment to the water intake point through a new hose. Each side of the hose has rubber seal. The main points of the procedure are as follows:
- Do not lay the rubber tube where it may be mechanically damaged;
- Do not allow tension on the element. Otherwise, the vibrating machine may deform the hose;
- Make sure connections are tight and secure.
How to properly connect a washing machine permanently? The process is similar to the above, but requires the use of polypropylene or metal pipes.
Important! If you use steel pipe, rust particles may clog the important nodes equipment. If possible, buy a plastic pipe.
Installation and connection of the washing machine. Instructions
Let us note once again that you should resort to a stationary method of connecting to a water supply only if it is impossible to use a flexible hose.
Important connection points:
- To ensure that the water supply can be stopped in the future, use a ball valve to connect;
- To protect internal components from clogging, use a small coarse filter. It should be installed before entering the machine;
- To connect water, use a tee of the main pipeline or ready-made bends.
Electrical connection
If you haven't worked with electricity before, seek professional help. The cost of specialist services is low. On the other hand, if you connect the unit to electricity incorrectly, the consequences can be very dire.
If you are also going to do this work personally, keep in mind:
- The distribution board must be grounded. Since in most cases the machine is installed in rooms where it is avoided high humidity impossible. The minimum tire size is 3 mm. You can use a three-wire outlet;
- If the unit will be located in the kitchen, connect it to the stove socket - this is more convenient;
- The extension cord (if necessary in its use) must have grounding contacts. If possible, connect structures using a separate wire coming from the meter that fixes the circuit breaker. If you do not have a separate wire, purchase a portable RCD.
Do-it-yourself connections of the washing machine to water and sewerage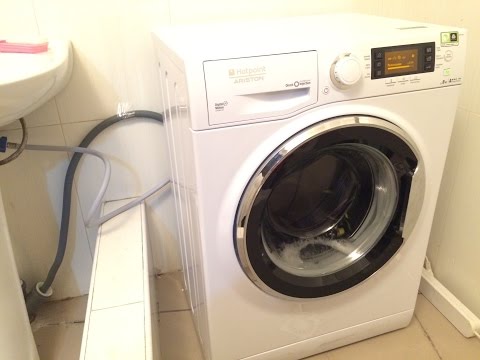
Important! Avoid experiments and grounding connections to gas pipelines and/or heating equipment. Otherwise, you risk not only the safety of your equipment, but also your own health.
Final stage
After you have connected all communications, conduct a “test drive” of the equipment. Carefully monitor not only the operation of the machine, but also whether it makes any extraneous sounds, leaks, or vibrates too much. Noticed any irregularities? Contact professionals, they will be able to find and fix problems.
An important condition uninterrupted operation household appliances is correct connection and installation. Connecting a washing machine can be divided into three main stages: connecting to the water supply system, connecting to the sewerage system and to electricity. Can this work be trusted? home handyman? By following the instructions and following all the recommendations, you can connect yourself, saving significant money.
The washing machine is most often installed in the bathroom or kitchen, sometimes in the hallway. Bolts, bars, brackets and fasteners that secure rotating parts during transportation must be removed. The holes remaining in the place of the removed bolts are closed with plugs. You will find out that the bolts have not been removed after turning on the machine, which will twitch violently, make noise and even jump, moving from the position in which it was installed.
The transport bolts are located on back wall cars
You will find out about the missing bolts after turning on the machine, which will twitch violently, make noise and even jump, moving from the position in which it was installed. The reason for this “behavior” may also be an incorrect installation.
The base under the device must be solid, level and monolithic. If the floor is wooden and the boards sag, vibrations will occur. Stability is also ensured by the legs, which can be adjusted so that the position of the machine is rigid, without the slightest swaying.
You can save money by connecting your washing machine to the water supply and sewerage system. But what if the installation instructions are in Chinese, and you’ve never made anything more serious than a paper airplane in your life? Experts from the publication will tell you all about installing a washing machine with your own hands and without scandals with neighbors.
What should you think about before purchasing?
- Question No. 1: is the warranty on equipment still valid? self-connection?
Answer: The warranty does not apply if self-installation a breakdown occurred. There is no need to worry if the connection is done by yourself, but according to all the rules.
- Question No. 2: can all washing machines be connected independently?
Answer: not all, but in the table below you can see the most popular models that you can actually connect yourself.
| Model | Description |
|---|---|
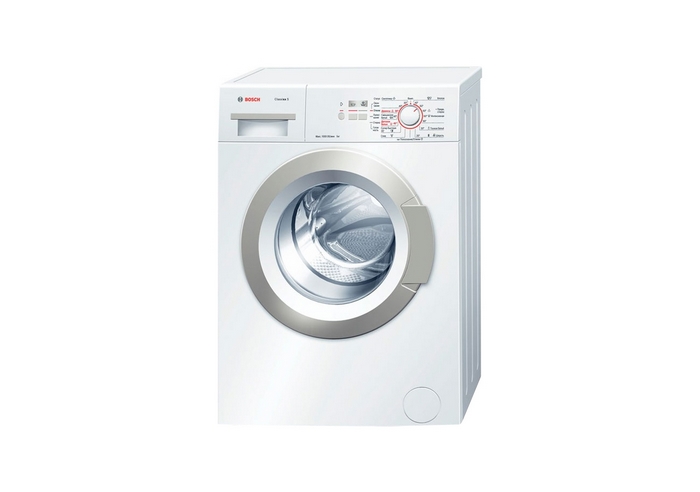 |
Bosch WLG 20060 |
| AEG L 56106 TL | |
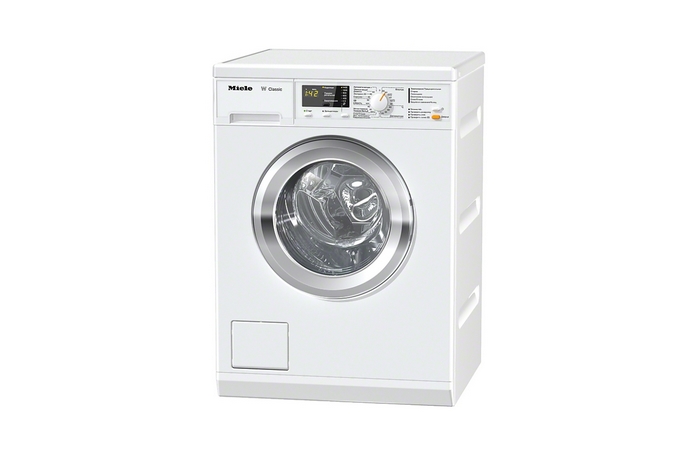 |
Miele WDA 101 W |
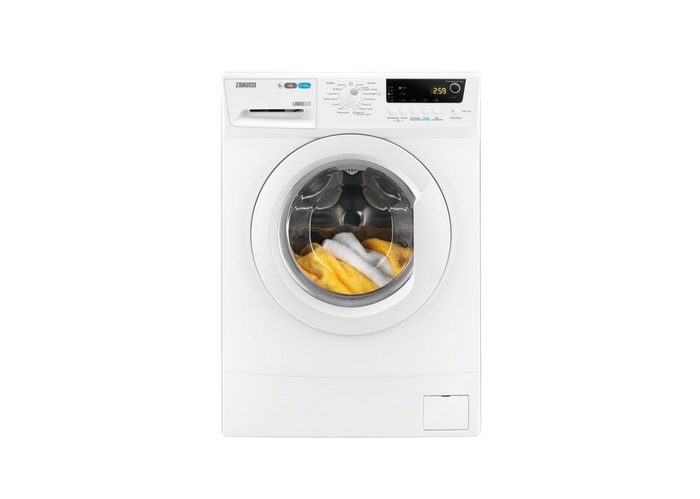 |
Zanussi ZWSG 7101 V |
 |
Hotpoint-Ariston VMSL 501 B |
 |
Candy Aquamatic 2D1140-07 |
 |
Indesit EWSC 51051 B |
 |
BEKO WKB 61031 PTYA |
 |
Samsung WF60F1R2F2W |
 |
LG F-12U2HFNA |
 |
Whirlpool AWS 71212 |
 |
Electrolux EWF 1408 WDL |
- Question No. 3: what if you come across an unlucky consultant in the store! What is important to know before buying a new car?
Answer: you need to take care in advance:
- about location;
- whether it will be visible or built-in;
- model with or without Aquastop;
- automatic or semi-automatic model;
- with vertical loading or horizontal.
- Question No. 4: what is Aquastop?
Answer: Aquastop is a safety system that protects the machine from leaks. Aquastop is a double inlet hose with a knob filled with a special powder. If the main hose bursts, then first of all the water gets into the knob, and a special powder prevents the flood.
For the second time, after the leakage protection system has been activated, the hose is not used and must be disposed of.
- Question No. 5: what if my machine doesn’t have such a system?
Answer: you can buy a hose with the Aquastop system at any hardware store.
The difference between an automatic machine and a semi-automatic machine
- Question #6: What is the difference between an automatic and a semi-automatic?
Answer: the difference is in the minimal human participation in the washing process. All you need to do is put in the laundry, don’t forget to add the detergent, select and set the required operating mode. After finishing washing, all that remains is to remove clean and dry laundry from the drum.
- Question No. 7: does the machine have any disadvantages?
Advantages of the machine
- minimal participation in the washing process;
- direct connection to the water supply - automatic flow of water into the machine;
- independent water heating;
- the rinse and spin modes are automatically set by the program;
- repairs will cost less.
Disadvantages of the machine
- laundry takes longer to wash than in a semi-automatic machine;
- large dimensions;
- consume more electricity and water;
- price.
- periodic failure of electronics, which is quite expensive in monetary terms;
- It is impossible to interfere with the washing process and control the final result.
- Question No. 8: what if you take a semi-automatic?
Pros of a semi-automatic
- small-sized equipment;
- mobility and ergonomics;
- capacity up to 7 kg of dry laundry;
- the presence of running water is not essential;
- washes clothes faster than an automatic model;
- saving electricity and water;
- price.
Disadvantages of a semi-automatic
- it is necessary to control the entire washing process from timing to draining the water;
- manual water filling;
- it is necessary to independently control the spin and rinse mode each time;
- repairs will cost more.
Answer: a semi-automatic machine requires human participation in the washing process:
water heated to desired temperature, you need to pour it yourself (and drain it too);
The washing time is also determined independently, based on the instructions.
- Question No. 9: what types of semi-automatic machines are there?
- activator, which are a tank with an activator at the bottom;
- drum, which do not require additional effort in rearranging the laundry. They wash and spin clothes in the same drum compartment.
Modern semi-automatic machines consume less electricity and allow you to control the washing process and quality.
Horizontal or vertical loading?
- Question No. 10: which machine is right for me?
Answer: A top loading machine would be appropriate in the room. small sizes. Mobility and ergonomics are the main advantages of the “vertical”: it can be easily moved from place to place, and the lid, which opens upward, saves space.
- Question No. 11: they say that vertical machines are weakly stable. This is true?
Answer: no, modern models have all the control functions included in electronic system controls - auto balancing, laying out laundry before spinning. The latest models of washing machines, if they vibrate, do so within normal limits.
If we compare specifications models, then they are completely identical in terms of washing class, and in the number of revolutions during the spin process, and in terms of service life.
- Question No. 12: what if it’s repaired?
Answer: vertical technology is more expensive, which is explained by the close arrangement of parts to each other - the arrangement of elements in a small device is very dense.
- Question number 13: so where to put the washing machine?
Answer: the best option There will be a place in the house where it can be connected to water supply and sewerage - in the kitchen or in the bathroom. The priorities here are the size of the room and the possibility of drainage equipment.
- Question No. 14: is it possible to connect the machine to wooden house on a wooden floor? And if this house is old?
Answer: Washing machine manufacturers strongly recommend placing it on a durable concrete base to prevent shifts from place.
- Question #15: I looked at my unstable wooden floor and got upset. Are there really no options?
Answer: If the floor is new and durable, then there should be no cause for concern. Just adjust the horizontal level, and if necessary, tighten the legs, connect to communications and you can start using it.
- Question No. 16: great, but my floor is old!
Answer: then you will have to work. You can concrete the part of the floor where the machine will stand. For this you will need the following materials: chipboard, timber, boards, hexagon furniture screws, tape measure, pencil, hammer, drill, a circular saw, Sander, building level.
Step 2 - In our project, the dimensions are designed for 2 washing machines (150x64 cm) Step 3 - You need to screw the crossbars to the guides furniture screws under the hexagon, drilling small recesses in advance so that the head of the screws is below the surface- Question No. 17: How to install and connect a machine in a private house or country house?
Answer: if the house has running water and sewerage, it’s as easy as shelling pears. The process of connecting a washing machine at the dacha is shown in the following video:
- Question No. 18: I live in a dormitory and my neighbors do not agree to install a washing machine! How to fight?
Answer: this will require the consent of local authorities for the reconstruction and redevelopment of residential premises. After consideration, the issue may be resolved in one direction or another, but you will definitely have to run around and worry.
- Question No. 19: I bought a car, I live in Khrushchev. How and where to place it?
Answer: there are several options:
IMPORTANT! If installation is carried out on laminate, remember that the machine may begin to leak over time and the laminate will actively swell at the seams. A transparent silicone mat will save you from troubles and will not allow the machine to “jump” when washing.
Connecting the washing machine drain
- Question No. 20: what are the rules for connecting the drain? Without what installation of the machine drain to sewer pipe impossible?
Answer: first of all, for draining into the sewer, it is important to install a drain hose, which ensures that water drains from the machine into the sewer pipes. Correct installation drain hose is possible without inviting a specialist.
Connecting the washing machine to the sewer
- Question No. 21: can you tell me more about how to connect the washing machine to the sewer?
Answer: you can connect:
Photo 4 - Connecting the washing machine directly to the bathtubThe method of throwing a drain hose over the edge of a bathtub or sink is unsafe. Therefore, it is better to consider more acceptable and safe options, such as connecting directly to the sewer, using special equipment.
To avoid mistakes and ensure correct connection, you must first study the entire sequence of the connection process.
When connecting to a siphon, even if you have to tinker with it a little, the connection is tight, with a low probability of water leakage and no unpleasant odors, especially when connected to a drain pipe.
Photo 8 - Connecting the drain hose directly from the washing machine to the sewerConnection height is important point when connected via a siphon. The drain must be higher than 60 cm above the level of the lower drain of the machine, and the storage elbow of the siphon must be located below the connection.
The main thing is that the end of the drainage hose enters the sewer at least 50 cm from the floor.
Visual connection process:
Connecting the washing machine to the water supply
- Question No. 22: what hoses are needed to connect the machine to the water supply and sewerage?
Answer: flexible hoses with a diameter of ¾ inch ( optimal sizes hoses).
The washing machine is connected directly to the water supply using a special hose, which along its entire length should be in a free and not tense state.
If the included hose for supplying water to the machine is too short, replace it with a longer one. Connecting the inlet hose to the unit is not difficult, but cutting it into the pipeline will be more difficult.
Photo 10 - Connecting the drain hose to the siphonIt’s great if the water supply system has a special tap with convenient location. Then you only need an adapter for joining the threaded connections of the hose and faucet, which should be sealed to avoid leaks.
IMPORTANT! Quite often, special tees with an outlet and a tap are used. Mounted in front of the flexible hose directed towards the mixer cold water or to the toilet cistern.
To summarize, depending on the availability of a water supply or mixer, you can connect the equipment using:
- fitting - a special metal tee, suitable for connecting the unit to metal-plastic pipes;
- tee tap - is a three-hole splitter;
- crimp coupling – suitable for connecting to plastic and metal pipes, as well as when access to the mixer is difficult.
In most cases, the size of the coupling for connecting the hose is 15 cm.
- Question No. 23: You can connect the washing machine to both cold and hot water simultaneously?
Answer: there are models with the ability to connect to both cold and hot water. But if your machine does not offer this option, then you should not connect it to hot water, since the service life of the inlet hose is reduced significantly due to rapid wear.
IMPORTANT! When working with polypropylene, experience and special tools are required, so if you are not confident in your abilities, it is better to invite a specialist.
- Question No. 24: such a mess during installation! How to hide all wires during installation?
Answer: a hidden connection of the machine to the water supply and sewerage system, when all the connections, hoses, and wires are located either under the bathtub or behind pieces of furniture, allows free access to the washing machine.
Photo 12 - Hidden connection of the machine to the water supply: 1. make holes in the wall; 2. put communications in them to connect the washing machine Photo 13 - Alternative: you can hide all communications in niches or cabinetsWhen connecting to the water supply yourself, it will be useful to familiarize yourself with:
Connection without water supply
- Question No. 25: what should those who live permanently in a dacha or in a village with a complete lack of running water do?
Answer: we recommend a mechanical version of the washing machine. If this option does not suit you, you can adapt to the machine. For example, you can pour water into the powder tray manually. The main thing is to fill the tank so that the level sensor works.
IMPORTANT! Double profit: in summer the station will be useful for irrigation, in winter it will be used to supply water to the house.
With each cycle, the machine will turn off and wait for the next portion of water, which is problematic. The best option it turns out pumping station. The main thing is to provide the necessary pressure for the washing machine to operate.
Connecting the washing machine to electricity
- Question No. 26: I’m not an electrician, but my hands are itching to connect the washing machine to the power supply myself! What do you need to know?
Answer: It is vital to begin the process only if you have knowledge and experience in the field.
The majority of the work involves connecting the wires.
Photo 14 - Recommended distance between sockets and washing machineIt is important to clearly know which wire to use when connecting to the network. For example,
IMPORTANT! Don't forget to use safety devices.
- Question No. 27: I don’t understand how much power my washing machine has?
Answer: most washing machines have a small one. You can view the indicators on the back panel of the device. Information is also contained in the attached instructions (in the technical specifications).
The connection power of washing units is 2.2 kW/h (10 A).
- Question No. 28: I heard something about grounding, but I don’t quite understand why it’s needed?
Answer: The connection process also includes grounding the machine. Without grounding, you will always be at risk. You cannot use grounding of the grounding wire instead of grounding (attention!) - this is very dangerous.
Photo 16 - To connect a washing machine with grounding, you must use a three-wire wire (phase, neutral, ground). Not all apartments have a grounding loop. It is very difficult to carry out grounding yourself, especially if the work is carried out in multi-storey building. The connection diagram remains the same, but the plug from the washing machine will need to be inserted into the mainsThe safest option would be to connect the washing machine using a separate cable connected to the panel in the entrance.
It is advisable to install a European socket with a grounding contact, preferably with ceramic fittings. A special socket with a higher protection class (wet conditions) is usually installed in the bathroom.
- Question No. 29: what kind of machines are needed?
Answer: it would be correct to install residual current devices (RCDs).
- Question No. 30: what is prohibited when grounding?
- connect the body of the machine to the water supply and heating pipes (i.e. ground);
- make a jumper between the zero and the ground contact in the socket.
IMPORTANT! The more built-in wires and devices there are when connecting, the less chance they have of coming into contact with moisture.
Correct installation of the washing machine
- Question #31: I don't have time to read the whole article, but I'm ambitious and ready to install!
Answer: if you follow the installation rules and make the connection step by step, you can guarantee the correct connection of the machine. The installation and connection instructions should be your reference book at this time.
Sequence of operations:
- open the packaging, remove the shipping parts;
- inspect the equipment;
- choose a location for installation (usually in the bathroom);
- set by level;
- connect the drain hose;
- connect to water supply, sewerage, electrical network;
- test.
- Question No. 32: how do I know that I did everything right?
Answer: the main signs of a correct connection:
- no leaks during the washing process;
- enough speed dial tank;
- translational movement of the drum;
- after collecting water for 6-7 minutes, the water begins to heat up;
- absence extraneous sounds after connection;
- high-quality work of draining and spinning.
From time to time, you should study the rules and regulations that will help extend the life of the machine, since improper loading of laundry will completely negate all efforts to connect.
Secrets for installing the washing machine:
Installing a washing machine in the bathroom
- Question No. 33: What installation options are there in a small bathroom?
Answer: First, some important tips:
- the machine should not clutter the room;
- the location must be safe;
- do not install it close to a bathtub or washbasin: exposure to moisture can damage the electronics;
- position equipment in such a way as to reduce the risk of mechanical damage;
- the machine is not a shelf, so there is no need to place various objects on its surface;
- install equipment closer to communication lines so that connection to the water supply, sewerage, and electrical networks is convenient and safe.
Secondly, location options:
- under the sink, which saves space and rational use space (it is necessary to cover the surface of the machine as much as possible and prevent water from entering);
- opposite the sink, if the entrance to the room is opposite the bath;
- in the corner of the room if you are planning a shower instead of a bath;
- in a niche (by combining the bathroom and the corridor);
- into the niche behind the toilet from above;
- under the tabletop.
The location depends on the type of machine - whether it will be front-loading, or vertical, with legs or without legs.
Under the bathroom sink
- Question No. 34: if there is very little space in the bathroom, can you install the machine under the sink?
Answer: you can, for this there are “water lily” sinks that are designed specifically for installation above a washing machine. They are characterized by a non-standard location of the drainage system to the sink. Installing the sink and machine is not particularly difficult. You will have to tinker with connecting the washing machine drain to the sink siphon, but as a result you will save space.
Installing a washing machine in the kitchen
- Question No. 35: To connect and operate the machine in the kitchen, do you need installation documents?
Answer: There are no restrictions on the installation of washing machines. But this does not mean that you can cause inconvenience to your neighbors, so you need to correctly connect the drainage from the machine to sewer riser to avoid misunderstandings.
- Question No. 36: a bulky machine does not fit into general interior. What do you advise?
Answer: you can place the machine in kitchen set under the tabletop.
The washing machine will fit perfectly into an Ikea kitchen, which can always be closed with a front door of a suitable design.
You can hide the machine by installing it in a pencil case in the kitchen - this way it won’t take up much space.
Connecting to a kitchen faucet
- Question No. 37: why connect the machine to the mixer tap?
Answer: this is necessary if the kitchen has already been renovated, and the cold water connection points for appliances are not provided. There is only one connection option left - through a mixer, and there is no point in discussing whether this is correct or not.
IMPORTANT! The adapter and hose extending from the mixer will not look very good, even if you choose “prettier” adapters. Because of the adapter, the mixer will begin to protrude strongly, which is even dangerous.
- Question No. 38: the pipes under the mixer were initially laid out unevenly, but during the installation process the curvature was compensated with the help of eccentrics. Will the curvature come out again?
Answer: yes, when additional taps and extension adapters are installed. As a result, you will have to come up with something new so that the crooked connection does not allow water to pass through and withstand pressure.
But the relative simplicity of this connection is a plus. There is no need to break tiles, crawl under the bathtub or sink, or damage pipes, since the connection is quick, convenient and simple.


