When performing carpentry and plumbing work, an appropriate tool is usually used, designed to perform specific tasks. However, there are situations when it is much more convenient and easier to use special machines. They allow you to optimize the process and save time during the same type of work. Therefore, questions about how to make a drilling machine from a drill very often arise among modern craftsmen.
Necessity or luxury
First of all, it is worth saying that using such a device is very convenient when making holes in small horizontal planes. It almost completely eliminates the drill from backlash, which inevitably occurs when handmade. Even a small drilling machine from a drill significantly increases the accuracy of the hole made, minimally reducing the error. Also, such equipment greatly saves time and effort if frequent use or monotonous work is required.
Almost all enterprises where plumbing work is performed are equipped with such units. The fact is that studies conducted in the field of occupational safety have shown an increase in productivity and quality when using them. Some of them even purchase a magnetic drilling machine to optimize production on large surfaces without the use of expensive equipment.
Why drill?
Currently, there are a lot of designs for creating such equipment at home. However, most experts recommend making a drilling machine from a drill. This is due to the fact that this tool already contains all the necessary components and assemblies, and they do not have to be purchased separately. In this case, the fixation on the structure is carried out so that the drill can be easily removed for independent work. As a result, we do not lose a tool that we can use ourselves.

In order to create a drilling machine from a drill with your own hands, you need to purchase the tool itself. It is selected in accordance with the parameters that it will have to have finished device. At the same time, experts advise paying attention to products that have their own slight play. Otherwise, the advisability of using it for work is called into question. You may also need:
- Guides. They use systems used in furniture production, or metal strips.
- Bed. Most often it is made from a metal plate or wooden box, on which magnets or ballast are attached for weighting.
- Fasteners When making a drilling machine from a drill with your own hands, you immediately select couplings or clamps suitable for fixing a specific tool.
- Wood or metal structures - depending on what material is to be processed.
- The spring required to implement the reverse motion.
- If a drilling machine with a magnetic sole is created, then the magnets themselves will be needed.
Tool
IN in this case the selection of the tool used depends on the material for creating the frame. However, it is immediately worth noting that a corner for measuring the connection of elements at 90 degrees will be necessary in any case. Even a mini-drilling machine requires great precision during its manufacture, since this will subsequently affect the quality of the holes produced.

First of all, you need to decide on the design of the final product and the material for its manufacture. However, there is no need to come up with too complex technical solutions or expensive units. A typical drawing of a drill press from a drill is quite simple. It involves creating a strong and stable frame on which a vertical tripod with a movable carriage is mounted. Considering this, Special attention it is worth paying attention to the implementation of moving the drill in vertical plane, although the use of ready-made guides greatly simplifies this process. If you use the stand of a microscope, photographic enlarger or press as a frame, then the drawing will be based on their base, and the entire manufacturing process is greatly simplified.

Stand and tripod
Even a mini drill press needs a stable base. It should not only support the entire structure, but can be equipped various elements for fixing tools or other devices. When thinking about the design of a drilling machine, it is worth listening to the advice of experts. Many craftsmen recommend creating these devices from wood. Therefore, for the bed they use wooden frame in the form of a small box. There are seats on it for installing a vice or other structures. If the product is planned to be used on large surfaces, then the frame is made of a solid plate with a hole for a drill. This way you can implement the principle of drilling through.
Almost any drilling machine device involves installing a vertical tripod at an angle of 90 degrees to the bed. Therefore, it is very important to use accurate measuring tool. You also need to securely fix the tripod using additional mounts in the form of corners.
If the work involves drilling holes at a certain angle, then you can make certain devices in advance that will be mounted on the frame. Most often, in such cases, ready-made ball vices with an adjustable angle of inclination are used.

Creating a Motion Mechanism
When making a homemade drilling machine from a drill, special attention must be paid to this stage. The fact is that the vertical stroke should be soft, without distortions, play or displacement. Taking this into account, professional craftsmen recommend using ready-made guides that can be taken from other devices. You can also use systems made to pull out drawers in cabinet furniture. They are quite reliable and can withstand heavy loads.
The guides are installed directly on the tripod or special strips attached to it. In this work, it is very important to use a measuring tool, since these elements must also be positioned at an angle of 90 degrees with respect to the frame and parallel to each other. Even small distortions or displacements should not be allowed.
The second part of the guides is fixed to a special carriage, where the drill itself will be installed. It is made of wood and adjusted to the dimensions of the original instrument. A small handle is also attached to the carriage, with which the operator will control the moving process.
To implement the return movement and facilitate control of the movement of the carriage, a spring is installed on the machine. One end of it is fixed at the top of the tripod, and the other is mounted on a movable mechanism. In this case, they immediately check the level of its tension, which, if necessary, can be changed by cutting the turns or stretching them. However, this adjustment is best done under load, which means it is performed only after fixing the drill on the carriage. Some craftsmen recommend making the spring removable so that it can be removed after work. This way it will not stretch and weaken.

Fixing the drill
Typically, instructions on how to make a drill press from a drill recommend creating special fastening systems that end up being very difficult to work with. However, if the tool is selected correctly, it can be fixed using ordinary plumbing clamps used to create connections between hoses and pipes. In this case, you will need to make certain changes to the shape of the carriage or even slightly adjust the drill body.
It is very important that the tool is clamped tightly and moves in the clamp. Therefore, even at the stage of manufacturing the carriage, it is left with practically no free space, being structurally limited on all sides. In fact, the carriage itself is a kind of bed for the drill, in which it will sit very tightly. Additional elements are needed only for reliable fixation. This approach will greatly simplify the design and allow you to quickly remove the tool if necessary.

Taking into account the material presented above, we can conclude that a drilling machine from a drill can be made independently and without large financial costs. In this case, the final product will be maximally adapted to the performance of specific technical tasks and will be able to satisfy the relevant needs of the end user. However, it is worth considering the fact that factory designs usually have less error and are able to perform precision work with minimum tolerance. Therefore, such devices are usually suitable for private use or in small workshops where high-precision holes are not required.

9 Famous Women Who Have Fallen in Love with Women Showing interest in people other than the opposite sex is not unusual. You are unlikely to be able to surprise or shock anyone if you admit it.

15 Cancer Symptoms Women Most Often Ignore Many signs of cancer are similar to symptoms of other diseases or conditions, which is why they are often ignored. Pay attention to your body. If you notice.

How to look younger: the best haircuts for those over 30, 40, 50, 60 Girls in their 20s don’t worry about the shape and length of their hair. It seems that youth is created for experiments with appearance and daring curls. However, already last.

What is it like to be a virgin at 30? I wonder what it’s like for women who didn’t have sex until almost middle age.

These 10 little things a man always notices in a woman Do you think your man doesn’t understand anything about female psychology? This is wrong. Not a single little thing can be hidden from the gaze of a partner who loves you. And here are 10 things.

Our ancestors slept differently than we do. What are we doing wrong? It's hard to believe, but scientists and many historians are inclined to believe that modern man sleeps completely differently than his ancient ancestors. Initially.
We make our own circular saw and other machines from a drill
Sometimes there is a need to cut a fairly hard board into several planks. It’s impossible to do this kind of work manually, and it’s unprofitable to buy a factory-made circular saw just for a single case. There is a very simple solution - it is done small size circular from conventional drill.

Design
It is better to make the machine small in size so that it can be put away on a shelf when its presence is no longer needed. Its design is extremely simple:
- base made of a thick board or piece of chipboard;
- working surface;
- racks;
- shaft with circular saw;
- electric drive in the form of a drill.

We make the base from a 30 mm thick chipboard sheet; it is enough to cut out a piece measuring 300x250 mm. For desktop We choose a sheet of duralumin 4 mm thick - it is quite rigid and light, so as not to weigh down the entire structure. We make a hole in the right place for circular saw measuring approximately 160x10 mm.
The holder for the drill itself can be made independently - that’s all required dimensions and drawings are available on the Internet, but a similar design for a shaft with a saw can be purchased in a store or at a clothing market. The bearing for the shaft must be selected dustproof- when the homemade machine is working, there will be a lot of small waste in the form of wood dust.
A circular saw from a drill is assembled according to the standard scheme: first, all parts are fixed to the base, then the work table is mounted and the drill is connected.
Security measures
When working on any machine, you must strictly follow the following rules:
- the place of upcoming work must be cleared of unnecessary materials and tools;
- workpieces are fed smoothly without jerking or distortion, so as not to jam cutting tool;
- the plane of rotation of the circular saw must be limited from above by a special protective casing ;
- the machine must be kept clean and put away after each use;
- if the mini-sawmill is not used for a long time, then that’s it metal parts lubricate machine oil.
This small machine can cut more than just wooden boards. If you install special cutters on it, you can process parts made of brass and other non-ferrous metals, plastic or propylene.

Other homemade machines
Many users are interested in what else can be done using improvised tools from a drill with their own hands? There are many answers - home craftsmen are already making various homemade products from drills in garage workshops. A drill is a universal tool, so with a certain skill and imagination you can make whatever your heart desires.
- Sharpener. you just need to buy some emery in the form of a circle and make a special holder in which the drill is attached.
- Drillingmachine- there are special holders for vertical drilling or stands.
- Turningmachine small size for wood processing.
- Mini drill for various needs of the home handyman.
- To mow the grass around your garden plot without any problems, you can do it yourself drill trimmer .
- Grinder from a drill It’s done quickly, just buy specific attachments.
- Garage car repair technicians install original winches to replace engines based on old, very powerful tools.
- Gardeners make holes for planting young trees using homemade drill bit .
- When pouring the foundation for a utility room in the private sector, some users use homemade vibrator. made from a drill to quickly compact a concrete structure.
Original devices
The list of homemade products can be continued endlessly, but we’d rather talk in more detail about some homemade machines that can be made from any model of drill.
A drill made from a drill is not a fantasy, but a real and quite universal machine, assembled independently. The main thing is that you need to order from Chinese engineers (if you couldn’t find it in your city) flexible shaft from a standard medical unit. As a result, a drill appears in your arsenal, which can be used for engraving work or drill holes using special burs in small parts or structures that cannot be reached with a standard drill.

Lathe
A woodworking or lathe for home can easily be made using a drill. The tool must be secured with special clamps quite rigidly and inserted into a chuck of a special design holder with several sharp pins that keep the workpiece from turning. The center of the rear holder (headstock) and the homemade front clamp lathe must be located on the same axis. Precision is necessary to prevent runout as the workpiece rotates. After installing the part, tailstock It is firmly fixed with a special clamp.
The third element of the machine is handyman as wooden block, on which a chisel or other tool for processing the workpiece will rest.

Important! When working on a lathe, do not forget about safety, be sure to wear safety glasses, and the sleeves of clothing should fit tightly around your forearms.
Turning processing machine wooden blanks will work properly if the drill has a built-in electronic speed controller. Using the trial method, you establish the optimal rotation mode for efficient processing wood Using such a woodworking device, you can make unique products for household needs: for example, a rolling pin or pestle with a mortar, a candlestick or a prefabricated candelabra.

An original winch based on an old but powerful drill will become an indispensable assistant on the farm, especially for those users who live in own home and there is personal plot. A simple situation: you decided to install a larger container in your summer shower, but raising it to such a height alone is problematic. Using a winch, this can be done in a few minutes. You just need to first calculate the weight of the container and the spindle speed.
According to garage craftsmen, a homemade winch can easily lift the engine from a passenger car. Watch the video if you don't take my word for it:
Experts advise using homemade device, setting the drill to the most minimum speed. This design can move objects with different masses, because craftsmen even make winches based on an ordinary car starter.
How to make a drilling machine with your own hands
It is advisable to make a drilling machine with your own hands in situations where in a home workshop or garage there will be a need to drill holes in parts of various configurations, as well as those made of different materials. It should be noted that such a device allows you to produce holes with a fairly high level of quality.

One of the options for a homemade drilling machine
When you need a homemade drilling machine
In production or repair enterprises, where the drilling operation is considered the most common, it is used to perform it. special device, models of which may have different functionality. So, it can be a compact desktop drilling machine, characterized by a simple design, or equipment equipped with several working spindles and numerical control.

Basic design elements of a homemade machine
To drill holes in various materials, which is done in a home workshop or garage, you can use homemade equipment. Naturally, for use at home you need a simple device that can be made from components and materials found in almost any garage or home workshop.
And in this article we will not leave unanswered the question of how to make a drilling machine at home, while spending a minimum of money. The drawings and experience of many craftsmen who have already walked this path will help us with this.
The need for such mini drilling equipment for metal, wood or plastic most often arises among those who are accustomed to independently performing various renovation work in your house or apartment. Also, quite often radio amateurs are puzzled by the construction of miniature drilling machines.
It would seem that a conventional drill can be used to perform such an operation, but such a tool is not always able to provide the required quality and accuracy of drilling operations. Homemade drilling machine. In addition to its compactness, it has another important quality: it can be used to install drills of various types.

Simple mini drilling machine for small jobs
Drilling machine from a conventional drill
To make a small but functional drilling machine for your home workshop, you do not need to purchase special materials and components. The design of such a convenient and useful desktop device contains the following components:
- the base, which is also called the bed;
- a mechanism that ensures rotation of the working tool (a conventional drill can be used as such a mechanism);
- device for providing supply;
- a vertical stand on which the rotation mechanism is fixed.

Diagram of a homemade machine from a drill
The stand on which the drill will be mounted can be made from a sheet of chipboard. This material is quite capable of supporting the weight of such a device. The bed of such a mini-machine should be more massive, since it protects the entire structure from vibrations, which can negatively affect both the quality and accuracy of the resulting hole, and the comfort of work.
As the material for the frame of such a drilling and adding machine, you can use a regular furniture board, the thickness of which is more than 2 cm. It is most convenient to use the base of an old photographic enlarger for this, slightly modifying its design. Sometimes an old microscope is used, but this is a rather rare option, since such a unit will not be large enough and its use will be limited.

Drilling machine from a school microscope
The quality and accuracy that a homemade drilling machine will provide depends primarily on how correctly and reliably the connection of its base and vertical stand is made. Important elements Such a micro machine consists of two guides along which the block with the drill attached to it will move. Such guides are best made from two strips of steel, which must be securely screwed to the rack using screws.
When making the block, it is advisable to use steel clamps that will securely fix the drill on it. In addition, in order to avoid unwanted vibration processes when drilling, a thick rubber gasket must be installed at the junction of the block and the drill.
After this, you need to make a feed mechanism for such a mini machine, which should ensure the movement of the electric drill in the vertical direction. The manufacturing schemes for such a mechanism may be different, but it traditionally contains in its design a lever and a spring, which is attached at one end to the stand, and at the other to the block with the drill. This spring gives the feed mechanism greater rigidity.
A drilling machine made from a drill, which is not planned to be removed from it, can be made more convenient to use if you disassemble the original switch of the drill and mount a separate button on the frame of the mini equipment. This button will always be at your fingertips and will allow you to quickly turn the device on and off. As you can see, it’s not at all difficult to make a drilling machine from a drill; all you need to do is read these instructions carefully or watch the training videos in this article.
An example of a drill machine in more detail
As an example, let's look in more detail at one of the options for a homemade drilling machine made from a drill. collected at home.

Do-it-yourself drilling machine from a drill
Manufacturing a machine using an asynchronous motor
The absence of an extra electric drill in the household is not a reason to abandon the idea of making a drilling machine with your own hands. Any electric motor can be used to drive the rotation mechanism of such equipment. Such engines, which were previously installed on various techniques, will probably be found in the garage or workshop of any home craftsman.
Asynchronous motors, which are equipped with washing machines, are best suited for making a mini drilling machine. If you have such a motor, you can confidently use it to make home drilling equipment. Making drilling equipment with such an engine at home is somewhat more difficult than using a drill, but the power of such a machine will be much higher.
Given the fact that an induction motor weighs more than a conventional drill, you will need a stronger base and stand to accommodate the feed mechanism.
In order for such a mini drilling and attachment machine to vibrate less during operation, it is necessary to install the motor on a powerful base and place it as close to the stand as possible. But here it is important to maintain the correct distance, since the convenience of installing the belt drive depends on it, due to which the rotation from the motor will be transmitted to the drilling head.
In order for you to make such a machine at home, you will need the following structural elements:
- gear;
- a hexagon on which the pulley will be placed;
- two bearings;
- two tubes, one of which must have an internal thread;
- clamping ring, which must be made of durable steel.
The hexagon also connects to a metal tube, bearing and clamping ring. Such a connection must be very reliable so that the resulting assembly does not collapse during operation.
Drilling machine with asynchronous motor
The mechanism necessary to ensure the feed of the tool in such a mini machine must consist of a tube on which cuts are first made, and a gear. The tube will move due to the connection of its teeth with these cuts. An axle with a hexagon is then pressed into this tube, the height of which must correspond to the amount of the required tool feed.
Example of a drilling machine with an asynchronous motor
Let's consider one of the very serious options for a homemade drilling machine with an asynchronous motor, which was clearly not made by a beginner. Few home craftsmen would dare to take on such a project, but if, as they say, the urge comes, then nothing is impossible.

Difficult to manufacture homemade machine with an asynchronous motor
It is quite obvious that it is quite difficult to manufacture such a machine, and then it is even more difficult to ensure the accuracy of its operation. That's why the best option is to use an electric drill to make a home drilling machine.
Finally, we suggest watching a couple more videos in which craftsmen demonstrate their homemade drilling machines. These videos once again prove that it is always possible to assemble the necessary equipment with your own hands, although sometimes it is not easy.
Homemade drilling machine from a drill
It does not always make sense or expediency to buy a factory-made drilling machine. You can make a vertical drilling machine from a drill with your own hands. To do this you will need a drill and materials to make a stand. Such equipment is recommended for use in home workshops or garages, when drilling is not the main operation or is performed quite rarely and the accuracy of the hole can be neglected.
To speed up the process, just buy a specialized stand for a drill at a tool store. The result is something like a household level vertical drilling machine, which is not inferior in drilling accuracy to machines for home workshops.
The photo shows factory-made drill stands. They can be purchased at any online tool store at prices starting from $200.


The article is intended to give you ideas on how to make a drilling machine yourself from a drill, so we do not give a clear algorithm for its manufacture, because it is made from scrap materials: some craftsmen will have it, others will not. Therefore, we give basic ideas, and everyone will apply their own constructive solutions and make your own vertical homemade drilling machine.
If you are not looking for easy ways, then we will make a homemade stand. The stand can be made of wood or metal. Wood will be cheaper and easier to manufacture, but durability will suffer.


Metal ones are more complex, but have an incomparably longer service life and strength characteristics. The choice of stand material also depends on the workpieces being processed: when constantly drilling metal, it is better to make a metal one.


Machine assembly
Metal racks are assembled from corners for the carriage, square pipe 50x50 for the stand and 10x10 for the drill bracket, strip for the base and lugs. The base and bracket are welded, after which all elements are assembled and bolted together. It is recommended to make several brackets with different adapters (clamping rings) for different types drills. The carriage moves along the rod using a steel cable wound around the handle drum. To ensure that the carriage does not have any play and does not fall down under its own weight, it is drilled, threaded and a bolt (or several bolts) is tightened. This selects the backlash between the carriage and the stand of the future drilling machine. The handle for moving the carriage is made from rolled products with a diameter of 6 - 8 mm.
Having several brackets with different clamping rings allows you to flexibly select drills and process almost any material.
In the future, home-made equipment can be upgraded and modified, for example, by marking or installing a scale that will indicate the length of movement of the carriage. This helps when drilling blind holes.
There are several mounting methods:
- several clamps;
- on a metal bracket in the hole under the neck of the drill.
Video of a design version of a drill on a wooden stand.
The easiest way to make a homemade drilling structure at home
A homemade drilling machine made from a drill will never replace a factory one and will always be inferior in build quality and drilling accuracy. The main advantage of homemade is low price, the ability to drill holes when the factory machine is not available for one reason or another.
You may also be interested in the following articles:
 Homemade drilling machine from a steering rack
  Choosing a drilling machine
  Lathes from a drill How to make a homemade four-sided lathe
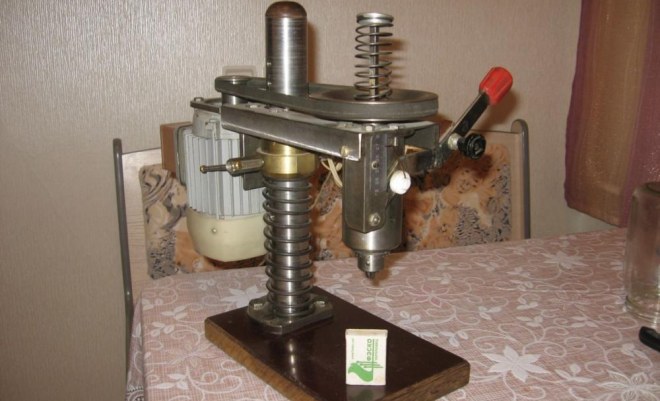
Do-it-yourself drilling machine from a drill

Dear visitors to the site “Visiting Samodelkin,” from the material presented by the author, you will learn how you can independently make a budget drilling machine from an ordinary electric drill.
Every craftsman would like to have such a machine in his household, because in comparison with factory analogues it will cost tens of times less, and if all the spare parts and components are available, then it will be completely free.
The author of this machine is Igor Stasyuk, for which he Thank you very much, shared step-by-step photographs of the assembly of the machine with the people. The design is quite interesting and at the same time simple. Corners and 4 legs are welded onto a base made of a 3 mm sheet of metal; a 500 mm rod made of professional pipe is welded onto this plate. square section, the slider is made of 2 corners welded into a pipe and placed on a lifting column with a gap so that the slider can move up and down along the column. The lifting mechanism is driven by a cable stretched from the top point to the bottom, and on the slider the cable makes several turns.
So, let's take a closer look at what exactly the author needed to assemble the machine? And also the whole step-by-step process.
Materials
1. sheet metal 3 mm
2. fittings
3. corner
4. cable
5. drill
6. vice for workpieces
7. bolts, nuts, washers, engravers
8. drill clamp
9. paint
10. professional square pipe
11. drill
Tools
1. welding machine
2. grinder (angle grinder)
3. drill
4. file
5. vise
6. clamp
7. caliper
8. ruler
9. corner
10. level
11. sandpaper
12. brush
13. hacksaw for metal
14. emery
The process of creating a drilling machine from a drill.
And so, first of all, the author makes the base of the machine from sheet metal 3 mm, cuts out the workpiece using a grinder (angle grinder) and welds 2 corners and 4 legs from a steel rod or fittings into the lower part. The length of the legs should be the same so that there is no distortion of the frame.

The corners and legs are welded on.

Making a slider! Take 2 corners and apply them to a professional square-section pipe that will serve as a lifting column and tighten them with a clamp.

It is tacked along the edges by welding in order to simply attach it for now, and only then specifically weld the normal seam.

This is actually how the preparation turned out.

The lifting column is made from professional square-section pipe 500 mm long.

A bracket with a movable shaft is welded onto the slider body, onto which the cable turns will be made.

IN drilled hole thread is cut.

The handles of the lifting mechanism are made of reinforcement.

There is a head on the shaft that will serve as the base for the handles.

And so, 3 handles are welded on for the convenience of raising and lowering the drill through the mechanism.

Installed on a lifting column.

A loop like this is made at the end of the cable.

Attention! The cable is attached at the bottom using a loop, then several turns are made on the shaft and tension is applied in the upper part of the lifting column.

I hope the lifting principle is clear and without explanation)


A square pipe is welded onto the corner.


This is actually the mount for the electric drill.

Then the drill is installed and secured with a clamp of bolts and nuts.

Now let's go back to the lifting mechanism again.

At the top of the lifting column, a nut is welded and a bolt is screwed into it, a cable is attached to the bolt itself, and when the bolt is tightened and unscrewed, the cable is tensioned to the optimal level.

It is advisable to pre-lubricate the moving components with grease or lithol.


These small vises can be purchased at hardware store in the tools section.

All parts were polished by the master using sandpaper and then painted.


And now the vice is screwed into its rightful place. And now the Author is already drilling holes in the wooden handles for the machine.

Installation of wooden heads on handles.

In fact, our master turned out to be such a wonderful machine.

Do more creativity, improve yourself, create and success will definitely come to you.
This concludes the article. Thank you very much for your attention!
Come visit more often, don't miss out on new items in the world of homemade products!
The article is presented for informational purposes only!
", and serious things related to needlework can be a little complicated 🙂, then today we have an easy article called "" - where we will talk about how you can use such the right tool not only for its intended purpose.
Unconventional use of a drill in no way implies a violation of the rules from the article “Safety precautions during repairs”. That is, in this article we do not encourage you to use a drill as a drill, grinder or lathe. Most of today's tips could be classified in the "Recipes" section - if adapting a drill did not imply some - absolutely minimal - needlework. Well, plus other methods that have nothing to do with recipes - but also...
And the first way to use a drill in a non-traditional way is to use a drill as a mixer.
The idea is very simple: instead of a drill, a mixer stirrer is inserted. And then everything is as usual: mix the mixer, turn on the drill - and go!
But it happens that there is no stirrer from the mixer. And you need a mixer. Then, instead of a mixer, you can use a regular whisk to beat eggs:

Of course, a situation is possible when the whisk is also unavailable. In this case, a fork will help!

However, it happens that there is no fork at hand. But you still need a mixer. In this case, ordinary scissors will help you! Just insert them instead of a drill - and the mixer is ready. Scissors can be inserted like this:

And the scissors can be inserted like this:

In general, the use of a drill as a mixer can be seen in the video:
Here's a good, unconventional way to use a drill. However, a problem that can arise is that splashes of what is being whipped get on the drill and your hands - and this can be unpleasant. In this case, you can use splash protection like this:

The next non-traditional use for a drill is a “pencil sharpener.”
Do you ever end up with a lot of pencils that need sharpening? It’s unlikely 🙂 But if anything, this method of unconventional use of a drill is for you.

It's very simple - instead of a drill, a pencil sharpener is inserted into the drill. The trick is to make the pencil hole rotate coaxially with the drill so you can sharpen as many pencils as you want in one sitting. This method is also good if you need to sharpen a lot of aspen stakes :)
Electric meat grinder from a drill
You can use a drill to make an electric meat grinder. To do this, we disassemble the meat grinder and take out the shaft:

We insert a metal bolt without a head into the shaft or directly into the drill. This results in an electric meat grinder:

Works great and grinds minced meat:

To prove this, here is a video about the operation of an electric meat grinder:
vyFqgKqrZVM
As you can see, everything is simple!
The following are just a few unconventional ways to use a drill.
A drill can be used to rewind threads. To rewind thread from a large spool to a small spool, you will need a drill. Secure the drill. Use a drill or long screw to attach the coils.

Using a drill, you can twist wire (or weave ropes):

And finally, the drill can be used as an ice cream licking device:

As you can see, there are many options for how to use a drill in an unconventional way.

The first electric motor was invented in 1834 by the Russian scientist B.S. Jacobi. Over the next 30 years, work tools began to appear based on an electric motor. The first drill began working in 1868 in the office of the American dentist D. Green. Modern look I purchased the instrument in 1916, when mechanics Black and Dekker designed the body in the form of a pistol with a button in place of the trigger.
What is a drill usually used for?
The main purpose of an electric drill is to drill various materials. Calculations of technical indicators when designing new models are carried out based precisely on this task.
During operation, the electric motor rotates the chuck with the drill clamped in it. The speed of movement is regulated using a special rheostat controlled by a start button. The direction of movement can be changed by switching the reverse lever. The function of changing the direction of rotation will help if the drill jams at the exit from the material. In addition, with special attachments, the drill can be used as a screwdriver - tighten and unscrew screws.
The multifunctionality of the tool is provided for by its design.
Drills often have two or more speeds. This is achieved using a gearbox connecting the engine to the working shaft. Changing the gear ratio of the gearbox leads to a change in the rotation speed and power of the working tool.
Video: drill - a look from the inside
Power tools in this category usually have two main operating modes. Standard drilling mode and hammer drilling. Normal mode is used during plumbing and carpentry work. Impact drilling is designed for making holes in stone walls, concrete and brick.
The impact mechanism of the drill consists of two coaxially located ratchets, which, when interacting, give the working shaft additional translational motion. In this case, special drills with carbide tips are used at the end of the working part. The impact force of such a mechanism depends on the external pressure on the drill. In order for drilling to proceed quickly, a force of 10–15 kg must be applied to the body.
Preparing for work
The readiness of the drill for operation is determined by the following conditions:
- the device is connected to an outlet (for drills powered by an electrical network);
- the battery is charged and installed in the compartment (for cordless tools);
- a drill is installed in the chuck.
Attention! To make the hole smooth, the cutting edge of the drill must be sharpened. Take a new drill or sharpen an old one using a whetstone.
You can press the start button to check the power. If the cartridge rotates quickly, then the motor is supplied electricity and the tool is ready for use. If the chuck of a cordless drill spins slowly, the battery is discharged - it needs to be charged.
How to insert a drill correctly?
To correctly insert the drill into the chuck, you need to know the following. The hole intended for clamping the tool is no more than 2 cm deep. The deeper the drill is set, the more securely it will hold in the chuck. There are two types of chuck clamping mechanisms:
- manual, tightened by hand;
- key, wrapped with a key.
IN last years household models of drills are equipped with a manual (quick-release) chuck - it is simpler in design and quicker to operate.
To install the drill in the chuck you need to follow these steps:
- Turn the cartridge counterclockwise. The jaws should move apart to a distance slightly larger than the diameter of the drill.
- Insert the drill bit between the jaws until it stops.
- Smoothly turn the chuck clockwise, making sure that the drill is clamped evenly on all sides.
- Tighten the jaws by hand or with a wrench.
Attention! Before drilling, turn on the drill and look at the drill bit. A correctly installed tool does not hit and looks like a smooth line.
Video: how to insert a drill and secure it
When fixing the drill in the chuck, considerable force can be applied, especially if the drill has a large diameter. It should be remembered that you will then have to do the reverse operation to remove the drill or replace it with another one. When clamping the drill, look for the “golden mean”: fasten the drill securely, but so that it can be removed from the chuck without any problems. The required effort is easily determined after a little practice - muscle memory kicks in.
How to remove a drill from a chuck?
Before removing the drill, make sure that the drill is unplugged from the outlet and ensure that you do not accidentally press the start button of the cordless tool. The drill should be pulled out only after the rotation of the chuck has completely stopped.
Attention! Never brake the chuck with your hands, as this may cause injury.
If the drill is equipped with a keyless chuck, the steps to remove the drill are as follows:
- Remove your finger from the start button.
- Wait until the rotation of the chuck has completely stopped.
- Grasp the cartridge by the base with one hand. With your other hand, turn it counterclockwise.
- When the jaws of the chuck have moved far enough apart, remove the drill.
- Carefully place the drill on the table, making sure that it does not roll away.
If the drill is equipped with a keyed chuck, do the following:
- Turn off the drill and wait for the chuck to stop.
- Insert the key into the chuck hole.
- Turn the key counterclockwise so that it moves the cartridge.
- Unscrew the chuck by hand so that the jaws release the drill.
- Remove the drill from the chuck.
- Place the key in the hole on the wire so it doesn't get lost.
Video: how to change a drill
How to use a drill correctly?
Drill - powerful electric tool, which is a source of danger. The basic rules for working safely with a drill are as follows:
- Before starting work, securely secure the workpiece in a vice or clamps. Do not hold the part in your hands.
- Firmly secure the drill or accessory in the chuck. Tighten the cartridge by hand or tighten it with a wrench. Be sure to remove the key from the hole in the socket.
- When working with hard and massive materials, hold the power tool with both hands.
- Do not press too hard on the drill body to prevent the drill from jamming. Reduce the pressure on the drill exiting the workpiece.
- Use personal protective equipment: glasses, respirator, gloves.
- Switch modes and change tools only after the chuck has completely stopped.
- Sweep away chips only with a brush.
How to make a vertical or horizontal hole
To make a vertical or horizontal hole, you need to follow these steps:
- Mark the location for the hole.
- Install a drill of the required diameter into the chuck.
- Bring the tool and set the drill to the mark.
- Smoothly start the engine and press on the drill body.
- When the hole is ready, remove the drill without turning off the motor.
- Release the start button and wait for the cartridge to stop.
- Place the drill on a flat surface.
Attention! You cannot be distracted from work until the hole is completely ready.
How to make a hole perpendicular to the surface or at an angle
If you need to make a hole perpendicular to the surface, you can use a protractor or square. Home craftsmen have figured out how to drill a hole at a 90-degree angle to a surface without a protractor. An old CD is placed on the surface of the workpiece. The drill is aligned so that the visible part of the drill coincides with its reflection in the “mirror” of the disk. In this case, the hole will be made strictly perpendicular to the surface.
 When the drill is perpendicular to the surface, the line of the drill matches its reflection in the CD
If you want the hole to go at an angle to the surface, you need to secure the workpiece at this angle. The most accurate holes will come out if you use a special stand-clamp for a drill.
 Angle stand secures drill at an angle
How to drill metal
Drilling metal surfaces has its own characteristics. First of all, you need to choose a drill designed for these purposes. A wood or stone drill bit is not suitable for metal, stainless steel or cast iron. These drills differ not only in the grade of steel, but also in the sharpening angle of the cutting edge.
When working, there is no need to rotate the drill at high speed; the drill will slide along the surface without catching the material. The optimal speed when drilling metal is low, when the naked eye can see how thin chips are formed. The pressure on the drill can be significant, but within reasonable limits so that the drill does not break. When drilling steel and cast iron, it is recommended to lubricate the drill with machine oil for cooling.
To ensure that the drill catches on solid material, it is recommended to make a recess at the drilling point with a plumber's core. The drill will not move to the side.
How to drill concrete
When drilling concrete, stone or brick, a lot of dust is released, and small fragments can fly out from under the drill. It is necessary to use a respirator to protect the respiratory system and goggles to protect the eyes.
Advice. You can reduce the amount of dust by moistening the workpiece or drilling site with water.
If you need to drill concrete, then the best option would be to use drills equipped with a pobedit tip at the end. These drills do the job best and can be sharpened periodically as needed.
The impact mode is included in the design of the drill for drilling stone objects. You need to use the shock mode carefully. If you are drilling into tiles, you should not turn it on, as the impact will inevitably lead to cracking of the ceramics. The same can be said about hollow brick - it is dense, but fragile.
Attention! When drilling stone and concrete, the drill becomes very hot. Before replacing the tool, wait until it has cooled down to avoid burns.
How to drill wood
Wood is a soft and easy-to-drill material that can be easily processed and sanded. When drilling wooden products, it is recommended to use special wood drills.
It is best to start work with markings, marking the location for the hole with a pencil. Next, resting the end of the drill on the intended point, turn on the maximum rotation speed and smoothly immerse the drill into the wood. If the hole is deep, from time to time you need to pull the rotating drill to the surface so that it can free itself from the chips.
Often in modern life you may be faced with the need to make a hole in plastic. Basically, plastic is drilled in the same way as wood, since it is a soft material. Some synthetic materials(for example, ebonite, textolite, caprolon) have great hardness. To process such plastics, it is better to use drills designed for metal.
How to make a groove in a wooden board
If you need to make a groove in a wooden board, you can do this with an electric drill.
 The groove in the board is made with an electric drill
To make a groove, you need to do the following steps:
- Take a wood drill whose diameter corresponds to the width of the future groove.
- Mark holes along the groove so that their centers are at a distance of half the diameter of the drill.
- Drill all holes to a depth of 2–3 mm - this way the drill will not lead away.
- Drill all holes all the way through.
- Use a file to remove the jumpers (if any remain) and smooth out any irregularities.
Brick - pretty soft material, so its drilling can be done with a conventional electric drill with an impact function.
 A simple drill can drill through brick
Drilling a brick wall is done as follows:
- Mark the location of the future hole with a pencil or marker.
- Place a core or old drill on the mark.
- Apply 2-3 blows with a hammer so that a depression remains on the brick - then the drill will not move away.
- Place the drill in the drill and turn on the impact mode.
- Drill a hole by gently pressing the tool.
Note. If the finished hole needs to be more than 10 mm, it is recommended to first drill the hole with a drill of a smaller diameter - 6–8 mm, and then drill it to the desired diameter.
Video: drilling a brick wall
Basic drill malfunctions and ways to eliminate them
No matter how perfect the technology, sooner or later, there comes a time when the technological resource is exhausted, and one or another part requires replacement.
An electric drill is no exception. Here is a list of possible, most common problems:
- Motor malfunction (power supply is OK, but the motor does not rotate).
- Wear or burning of the carbon brushes (the brushes spark strongly when the device is operating).
- Failure of the engine support bearings (the hum of the motor is heard, but there is no rotation, or the cartridge rotates intermittently, with a grinding noise).
In addition, the reasons for the unstable operation of the electric drill may be related to the integrity of the power cord or a stuck start button. Such problems can be solved by replacing the cable and preventatively cleaning the button from debris and dust.
To repair a drill at home, you will need many special tools, including electrical ones. If they are not there, it is cheaper to send the drill to a service center for repairs. Replacing carbon brushes is within the capabilities of a home craftsman. In all new drill models, the designers have provided quick access to the brush attachment point and easy replacement.
 The brushes are hidden under a cover above the engine commutator.
Drill attachments and their installation
In addition to drilling holes, an electric drill is capable of performing many other diverse operations. For this purpose, various attachments have been developed and produced, with which you can grind, polish, cut or sharpen. All attachments are attached to the drill chuck, just like a regular drill.
Polishing attachment
Designed for polishing surfaces using abrasive materials. This could be sandpaper or felt base, onto which GOI paste is applied. The attachment is a rotating flat surface that is used to process the material being sanded.
 Replaceable sheets of sandpaper are attached with Velcro
Attachments for rough cleaning of materials
Wire attachments (brush brushes) are used to clean metal surfaces (for example, pipes). They are a cylinder on the surface of which there are rigid bristles made of metal wire. They are produced with bristles of different hardness, ranging from thin wire to pieces of cable.
 The bristles of the brushes are made of galvanized wire
Cricket attachment
The attachment, called a “cricket,” turns the drill into metal nibblers.
 The nozzle is clamped into the drill chuck - metal scissors are ready
Using a “cricket” you can cut holes in metal sheets up to 1.6 mm thick. The nozzle has proven itself very well in roofing works when it is necessary to adjust and cut metal sheets of a given shape.
Video: metal scissor attachment “Cricket”
Nozzle - file
A nozzle made of abrasive material can significantly facilitate work when performing work on sharpening parts, fitting grooves and holes. Available in a wide range of sharpening stones of various shapes and sizes. Among the nozzles there are conical, cylindrical, flat, spherical stones.
 Despite their miniature size, the attachments are very effective in their work.
Milling attachments
Drill attachments designed for milling work on wood or plastic are also called cutters. With their help, you can make a groove, groove, recess of specified dimensions.
 Balls are available in different shapes and sizes
According to their shape and purpose, cutters are divided into:
- cylindrical;
- disk;
- end and end;
- shaped.
The type of cutter is selected for a specific task in accordance with the density of the material and the power of the electric drill.
Other attachments
For cutting materials
There is an attachment that can be used to cut wood, metal or plastic. The principle of operation of its mechanism is similar to the device electric jigsaw. The kit includes a set of files with various shapes and number of teeth. This attachment can easily cope with cutting wooden board up to 20 mm thick, as well as chipboard or plywood. For cutting more massive workpieces, it is still better to use a jigsaw.
For drilling large holes
Available for drilling large diameter holes special devices and tools that can be used as accessories for an electric drill. To make large holes use:
- crowns - steel cylinders with teeth or coating - for wood, stone or tiles;
- feather drills - metal plates with a center and two blades - for wood and plywood;
- beam drills - long pins with spiral grooves - for drilling thick wooden beams;
- Forstner drills - a specially shaped tool with numerous cutting edges - for precise and clean holes in wood.
For tightening fasteners
Drill attachments designed for screwing in screws, bolts and nuts have become widespread and widely used. Their diversity is comparable only to the huge range of products that exists in the world of fasteners. With these attachments, provided that the speed range of the drill includes low-speed modes, the electric drill turns into a full-fledged screwdriver or impact wrench.
 Set of attachments for screwing screws and nuts
Drill mixer
It is also impossible to ignore such useful practical function electric drills, as well as using it as a mixer when mixing paints, plaster and other mixtures.
Using a special mixing whisk, you can successfully add the desired shade to paint at home or stir wallpaper glue. In addition, light building mixtures plaster or putty can also be mixed using a drill.
It should be remembered that excessive overloads on the drill can damage the main mechanism of the tool - the electric motor. It is not recommended to use a drill as a mixer when mixing heavy concrete mixtures. There are special concrete mixers and mixers for this purpose.
Attention! If the drill body is hot and the motor is humming strainedly, you should stop and give the device time to cool down.
Drilling machine
The drill can be used as a drilling machine. Drilling workpieces will be much more convenient. Stores sell ready-made stands with a drill clamp, feed lever and vice.
 Drill stand turns a household tool into a drilling machine
You can make a drilling machine from an electric drill with your own hands. Such a machine consists of a bed, a vertical stand, a rotation mechanism and a feeder. Despite the simplicity of the design, the machine significantly increases the accuracy of processing parts.
Video: do-it-yourself drilling machine from a drill
Among the numerous attachments for electric drills produced by industry, there are also such “exotic” specimens as a pump attachment for pumping liquids or a special attachment for plucking feathers poultry. IN Everyday life they are not as often in demand as carpentry and locksmith tool, which is used in almost every home.
An electric drill can save you money and energy. For home and occasional work, you do not need to buy several professional machines. Special attachments will make the tool universal: drilling and cutting, grinding and turning, kneading and chiseling - that’s not all. full list operations available for the drill. To make work a joy, you must follow safety rules
“From the material presented by the author, you will learn how you can independently make a budget drilling machine from an ordinary electric drill.
Every craftsman would like to have such a machine in his household, because in comparison with factory analogues it will cost tens of times less, and if all the spare parts and components are available, then it will be completely free.
The author of this machine is Igor Stasyuk, for which I thank him very much, he shared step-by-step photographs of the assembly of the machine with the people. The design is quite interesting and at the same time simple. Corners and 4 legs are welded onto a base made of a 3 mm sheet of metal, a 500 mm rod from a square section professional pipe is welded onto this plate, the slider is made of 2 corners welded into a pipe and placed on the lifting column with a gap so that the slider can move upward along the column and down. The lifting mechanism is driven by a cable stretched from the top point to the bottom, and on the slider the cable makes several turns.
So, let's take a closer look at what exactly the author needed to assemble the machine? And also the whole step-by-step process.
Materials
1. sheet metal 3 mm
2. fittings
3. corner
4. cable
5. drill
6. vice for workpieces
7. bolts, nuts, washers, engravers
8. drill clamp
9. paint
10. professional square pipe
11. drill
Tools
1. welding machine
2. grinder (angle grinder)
3. drill
4. file
5. vise
6. clamp
7. caliper
8. ruler
9. corner
10. level
11. sandpaper
12. brush
13. hacksaw for metal
14. emery
The process of creating a drilling machine from a drill.
And so, first of all, the author makes the base of the machine from 3 mm sheet metal, cuts the workpiece using a grinder (angle grinder), and welds 2 corners and 4 legs from a steel rod or fittings into the lower part. The length of the legs should be the same so that there is no distortion of the frame.
The corners and legs are welded on.
Making a slider! Take 2 corners and apply them to a professional square-section pipe that will serve as a lifting column and tighten them with a clamp.
It is tacked along the edges by welding in order to simply attach it for now, and only then specifically weld the normal seam.
This is actually how the preparation turned out.
The lifting column is made from professional square-section pipe 500 mm long.
A bracket with a movable shaft is welded onto the slider body, onto which the cable turns will be made.
The drilled hole is threaded.
The handles of the lifting mechanism are made of reinforcement.
There is a head on the shaft that will serve as the base for the handles.
And so, 3 handles are welded on for the convenience of raising and lowering the drill through the mechanism.
Installed on a lifting column.
A loop like this is made at the end of the cable.
I hope the lifting principle is clear and without explanation)
A square pipe is welded onto the corner.
This is actually the mount for the electric drill.
Then the drill is installed and secured with a clamp of bolts and nuts.
Now let's go back to the lifting mechanism again.
At the top of the lifting column, a nut is welded and a bolt is screwed into it, a cable is attached to the bolt itself, and when the bolt is tightened and unscrewed, the cable is tensioned to the optimal level.
It is advisable to pre-lubricate the moving components with grease or lithol.
These small vices can be purchased at a hardware store in the tools section.
All parts were sanded by the master using sandpaper and then painted.
The home workshop, regardless of whether it is located in the garage or on the loggia, is gradually filled with a variety of tools.
Of course, a home craftsman wants to have a full set of equipment that allows him to make any part. However, you have to constantly look for compromises between your “wants” and the real family budget.
Therefore, if you have time and skill, you can make quite complex tools yourself, having basic units. An ordinary electric drill (screwdriver) usually becomes such a universal donor.
Here are some examples of what can be done using it:
- full-fledged drilling machine;
- sharpener (including with abrasive discs);
- stationary grinder;
- bench router;
- lathe.
Let's take a closer look at the last point.

Regardless of the size, this unit consists of a mandatory set of components:
- An electric motor with a gearbox or speed controller: the whole complex is called a headstock.
- Spindle, plan washer, or chuck for the workpiece being processed.
- A holder for cutters, or a support platform if the cutting tool is held by hand.
- Support axis for the workpiece (the so-called tailstock). With its help, the free end of the workpiece is attached, if it is long enough.
All these elements are located on the bed or attached directly to the workbench table top.
Each of these units can either be purchased inexpensively or made independently. The exception is the power plant. It should not just be an electric motor with a power supply. It must provide reliable fixation of the workpiece (the ability to attach a spindle), and must have a speed controller.
You need to buy it, or significantly upgrade the existing engine from an old household device (vacuum cleaner, washing machine, etc.) However, if we're talking about For a simple unit, which mainly processes wooden blanks, you can get by with a ready-made power tool.
In fact, a drill or a fast-moving screwdriver is always at hand. Almost 100% of the tools are equipped with a speed controller and also have reverse (which can be useful when processing workpieces). All that remains is to solve a simple task: securely secure the tool to the frame or workbench.
A simple drill holder is not always suitable. Firstly, it does not hold the unit securely enough. Secondly, this device is usually attached to the edge of the table, which is not very convenient for a lathe.

In addition, all structural elements must be centered and adjusted in height relative to each other. Therefore, it is better to make each unit, including the drill mount, yourself.
Practical examples of a homemade lathe, taking into account the recommendations outlined above
Let's start with the simplest option, which can be made in one weekend with virtually no financial costs (you already have a drill, its cost is not taken into account).
A set of blanks in the illustration: the tool itself, several wooden blanks, fasteners.

The most crucial moment is the alignment of the drill shaft with the support tip of the improvised tailstock. Therefore, we take measurements with an accuracy of up to a millimeter.
Since the machine will not be very large, we place it on a bed made of thick plywood. The holder for the drill neck is also cut out of plywood, and the clamping clamp is not necessary. A fixing screw will be sufficient. We place the nodes on the bed:

A spindle is not required: thin workpieces can be clamped in a standard drill chuck, and for larger parts an improvised washer can be made.
On such a machine you can easily process wooden blanks, as well as workpieces from composite materials: textolite, etc.

Using similar materials(only thick textolite is better than durable multi-layer plywood), you can make a machine that is more complex in terms of settings.
The drill itself is fixed not only in the neck area, but is also supported by an additional bracket. This will avoid vibrations, especially when high load or asymmetrical workpiece.
Advice: Given the low rigidity homemade design, it is necessary to prepare the blank as much as possible in terms of axial symmetry.
Taking into account the possibility of precise adjustment of components to a specific drill, it is possible to perform the fastening as gentle as possible for the tool itself. For example, ventilation openings should not be covered.

The support for the incisors (even if they are held in the hands) is movable. And both horizontally and vertically. During processing, the blank becomes thinner, and the supporting surface can be moved closer to the part.
The tailstock is not vertically adjustable, this is logical. And horizontally, rough adjustments are made (the support is moved), and fine adjustments are made using a screw.
The main principle of any such design is that you do not permanently lose the power tool itself. That is, the drill can be dismantled at any time and used for its intended purpose.
Bottom line
The complexity of the design is adjusted according to the tasks to be performed. It can be made so strong and precise that it will allow even soft metals to be processed. In any case, we are guided by the principle of expediency.
If the limit of complexity of the workpieces is cylindrical door handles, you can simplify the machine to an ordinary clamp that presses the drill body to the table.

A block as a support platform, and a chisel instead of a cutter.


