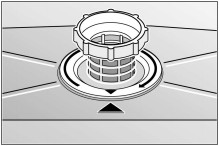
The device for washing dirty cutlery has a rather long history - since the invention in 1849 of the first unit that worked under the influence of muscular force ( manual drive), to modern high-tech devices. Popularity of this device for washing dishes, has long been recognized throughout the world (in Western Europe And North America More than 80 percent of kitchens are equipped with dishwashers) and is growing in our country (Russia). For this reason, we decided to devote our article to an automatic dishwasher with a review of it technical characteristics and capabilities, energy consumption classes, advantages and disadvantages. As an example, we have chosen the device famous manufacturer household appliances and home equipment German company Bosch.
How the dishwasher works
Briefly describe how it works automatic machine Bosch brand (as well as any other manufacturer), you can do it as follows.
Preparation. Dirty dishes are loaded into containers specially designed for this purpose, varying in size. Detergent for washing cutlery is poured into the machine's boxes. After this, the washing program is selected and the machine starts working. These are the only operations that the user of this device performs manually, except, of course, for removing cleanly washed and dried dishes from the device. All subsequent operations are performed by the device automatically. These include:
- Soaking dishes;
- Directly washing it;
- Rinse process;
- Drying clean cutlery.
Classification of dishwashing equipment
The devices are divided into the following categories:
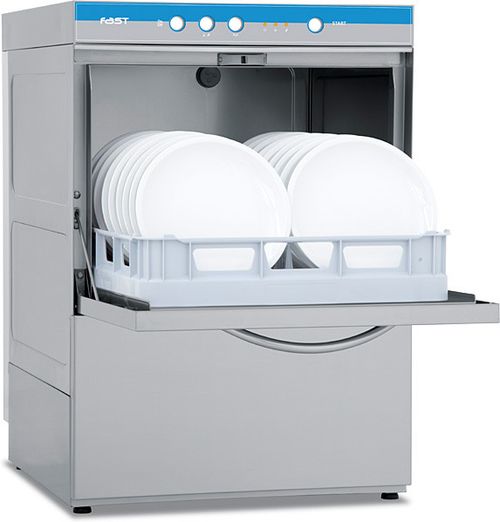
- Industrial dishwashers;
- Machines for household use.
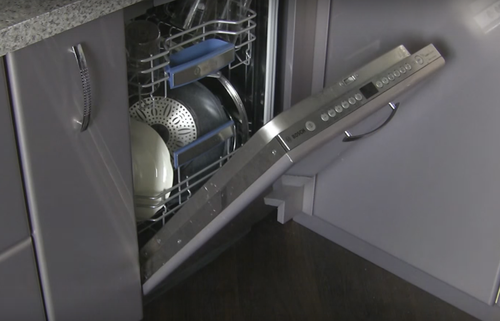
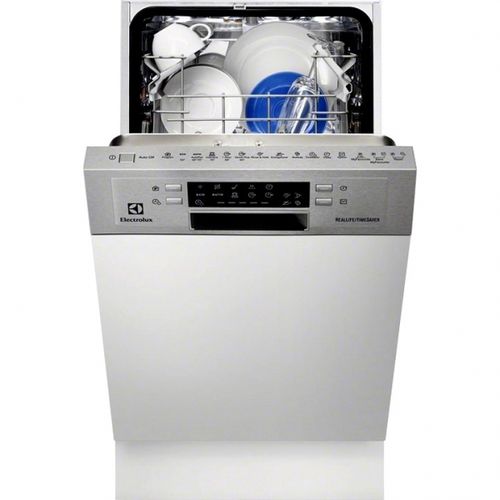
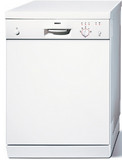
- Floor units with a width of more than 45 centimeters. Photo;
- Also floor-standing, but narrow (built-in) devices, up to 45 cm wide. Photo;
- Small devices for desktop installation. Photo.
Also, dishwashing machines are distinguished according to the following characteristics:
- Capacity of the washing compartment;
- Dimensions in height and width;
- Operating modes;
- Energy class dishwashers;
- Noise produced during operation of the unit;
- Economical energy and water consumption;
- Time spent washing dishes;
- And other less important parameters.
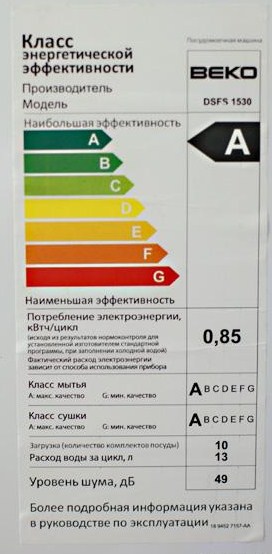
Energy efficiency classes of Bosch dishwashers
This indicator (energy efficiency) is one of the main ones when designating the belonging of household appliances to the premium and economy classes. This not entirely literary and technical thing looks quite funny. correct definition, but fully explaining the difference between one class and another, the definition is - the better the economy, the higher the premium. That is, the fewer dishes washing machine Bosch (another brand) consumes electricity, liquid (water), detergents and other Supplies, the higher its class in general, and energy efficiency in particular.

Premium class machines are designated in their labeling by the Latin letter A, where energy efficiency is indicated by the pluses A++. It should be noted that letter A indicates not only the amount of electricity saved, but also a number of other technical parameters, inherent only in the premium class:
- Dishwasher washing class;
- Drying class;
- Location of assembly of this device.
Thus, for Bosch dishwashing utensils, A is a clear indication that this equipment was manufactured in Germany and not in other countries where Bosch has production facilities (China, Poland, Turkey, etc.).
There is no doubt that due to such high economic and technical indicators, category A devices are much more expensive than economy class dishwashers. But, taking into account the quality of workmanship (assembly), low cost of energy carriers, water and related materials (detergent compositions, means for the prevention of the device itself) during its subsequent operation after purchase, for people who know how to count money, buying an A+ class dishwasher + the Bosch brand does not look overly expensive.
Economy class dishwashers
Without a doubt, this technique is inferior in some of its characteristics to premium class machines. But mainly this relates to the availability of individual functions and options, and the location of technical assembly. That is, a dishwasher marked A++ can be produced in Poland, but not have another drying or washing class, which automatically transfers it to the economy category. At the same time, equipment of this class can fulfill its purpose no worse than similar ones, but standing at a higher level. But we know very well that the presence in the device of many additional features is not always in demand, but the difference in cost has a significant effect.

Other letter and number markings for dishwashers
Any of the models of the named equipment has a rather long row of markings and looks something like this: SPS40RU, where:
- S – a machine designed for washing dishes;
- P – width (45 cm) of the second generation, the first is designated R;
- S – separately installed device (not built-in);
- 40 – the machine uses a standard set of programs and functions. Devices with additional connected functions and options have values starting with the numbers 5 or 6;
- E – price category. IN in this case inferior. Bosch has five of them. E to U;
- RU – the country for which equipment of this type was produced.
As an additional feature, there are well-known markings indicating the country where the device was assembled.
Have you decided to buy kitchen appliances? We'll tell you how to do it correctly. The marking of a dishwasher is a hidden designation of the capabilities and functions of the equipment. To choose the best PMM, learn to decipher these symbols, then you won’t need any instructions.
In the article we will analyze in detail each letter in the Siemens and Bosch codes.
PMMs of these brands are the most popular on the Russian market today. Since both lines are produced by the same concern, the meaning of the markings for these companies is similar. Therefore, we have combined the designations for the Bosch and Siemens brands.
Let's look at the decryption Bosch models SPS40E12RU. The first word always means the brand of the product, for example “Bosch” or “Siemens”. Next comes the first letter S - it always means the type of equipment. The manufacturer indicates that this is not a washing machine, but a dishwasher.
The following symbol indicates the type of dishwasher, as well as the production time:
- P is a narrow device, body width up to 45 cm. These are built-in models of the latest generation (the most modern).
- R are also narrow PMMs, but of the first generation.
- G - free-standing devices 60 cm wide, previous generation. Considered standard.
- M - conventional PMM with dimensions of 60 cm - second generation.
- B is the latest model with a non-standard case height of 85 cm.
- K is a type of non-standard machines that are suitable for desktop installation.
The third symbol in the dishwasher article number will indicate the type of installation:
- S (Solo) is a free-standing appliance that is placed in the kitchen without being built-in.
- I (Integriert) - partially built-in PMM. Its panel remains open and is not completely hidden behind the headset.
- V (Vollintegriert) - completely built into a cabinet or niche in the kitchen. Often has special fastenings for hanging the facade door.
- U (Unterbau) - the machine is completely installed in furniture and has its own metal facade.
Main programs
When studying the technical characteristics of a Bosch or Siemens dishwasher, the user pays attention to the number of functions. The standard set of programs includes from 4 to 6 main modes. You can find out by to the following notation, where the number 4, 5, 6 or 8 is indicated: SPS40E12RU.
PMM equipment
For availability additional technologies indicates the following symbol: SPS40E12RU. For example, the number 8 will tell the user that the design includes a VarioDrawer basket, which can move up and down and be adjusted in size. Number 9 - the same technology is present, only the sound insulation is better.
Categories
- E - lower or “junior” class. Accordingly, the cost of equipment is minimal.
- N - beginner or above intermediate.
- M - middle class.
- T - upper or highest price category.
- U - elite, premium class.
Do not confuse price classes with designations of consumed resources. Typically, such markings are glued to the body of the machine, which indicates how much PMM consumes energy, consumes water and produces noise.
The penultimate two digits do not provide information to the user. Therefore, let us dwell in more detail on the last two notations.
Place of production
Where is the equipment made? This question worries many buyers. Now you have the opportunity to find out the truth from the manufacturer, and not from a consultant in the store.
Last two letters indicate where the car will be sold. For example, the designation RU says that dishwashers were produced for Russian consumers, and EU - for European consumers.
Additionally, on the packaging or panel of the equipment you can see markings that indicate the place of production:
- SAS, SLX, SLF - made in Germany.
- SAE, SOR, SFX - made in Poland.
- SFO - originally from Turkey.
- SLM - made in China.
- SOT - made in France.
Important! The decoding is relevant for models released after 2006.
Dishwasher instructions
BOSCH SGS 43E72 EU, SGS 44E02 EU, SRS 43E12 EU, SRS 43E52 EU, SRS 43E62 EU, SRS 53E42 EU
Dear visitors. To avoid clutter of materials and for ease of navigation through the instructions for household appliances We have adapted the instructions for related dishwasher models. For differences in technical characteristics, we have made notes for individual models. If you do not see a special note in the differences separately for the model of your dishwasher, this means that the instructions fully correspond to the model of dishwasher you are interested in.
BOSCH SGS 43E72 EU, SGS 44E02 EU
Designations:
= Important
= Note
=
Warning
Content
1. Technique instructions security
2. Getting to know the car
3. Device for lowering water hardness
6. Dishes
7. Detergent
8. Program overview
9. Washing dishes
10. Additional functions *
11. Maintenance and care
12. troubleshooting
13. When to contactto the service department
14. Disposal
1. Safety instructions
And
Upon delivery
Immediately upon receipt, check the condition of the packaging and the dishwasher itself for transport damage. Never put a damaged machine into operation. In this case, you should contactwith the supplier of your machine.
Please hand over the packaging for recycling to a special collection point.
During installation
Install and connect the machine according to the instructions given in the installation instructions.
During installation, the dishwasher must be disconnected from the mains.
Ensure that the home electrical protective conductor system is installed according to regulations.
The parameters of the network to which the machine is connected must correspond to the data given on the nameplate of the machine.
If the dishwasher will be built into a tall cabinet, it must be secured properly and additionally at the back.
For flush-mounted or built-in dishwashers, install only under the work plate connecting one Kitchen Cabinet with another and firmly screwed to them. This is the only way to guarantee the stability of the machine.
The dishwasher must be installed so that the power plug can be easily inserted and removed from the socket.
Some models are designed in such a way that the plastic casing of the water connection element contains electric valve, and conductors for
electrical connections. Please do not cut this hose or lower the plastic cover
in water.
Warning
If the device is not installed in a niche, and therefore access to the side wall remains, then the area around door hinges must be lined on the side for safety reasons. (Danger of injury)
Cladding panels These are special accessories and can be purchased from the After-sales Service or a specialist store.
During daily use
Warning
Knives and others kitchen utensils with sharp ends should be placed in the cutlery basket with the points facing down or in the utensil basket in a horizontal position.
This dishwasher must only be usedV household and only for one purpose: for washing dishes used for household needs.
You cannot sit or stand on an open car door. Otherwise the machine may tip over.
In the case of free-standing dishwashers Do not forget that if the baskets are overloaded with dishes, they may tip over.
The water from the dishwasher should not be drunk.
Never add solvents to dishwashing water. Otherwise, there is a risk of explosion.
The machine door should be opened very carefully while the program is running.Possible risk of splashing out hot water from the car.
To avoid, for example, tripping over an open dishwasher door, it should only be opened long enough to load the dishwasher.and unloading dishes.
Follow the safety instructions and correct use, givenon the packaging of dishwashing and rinsing products.
If the house has de
T And
If your car has a child safety lock, it must be used. You will find an exact description of the lock at the end of the instructions, on the cover.
Do not allow children to play with the machine or use it independently.
Hold detergent and rinse aid out of the reach of children. Since they can lead to chemical burns of the mouth, pharynx and mucous membranes of the eyes or suffocation.
Keep children away from an open dishwasher as there may be detergent residue in the dishwasher.
If the dishwasher is located high up, be careful not to accidentally crush children under the door when opening and closing the dishwasher door.to the cabinet below.
If a malfunction occurs
Machine repairs and any other manipulations may only be performed by a qualified specialist. To do this, the machine must be disconnected from the network. Remove the plug from the outlet (just do not pull the power cord!) or turn off the fuse. Close water tap.
When disposing
To avoid accidents, immediately render old household appliances unusable.
Dispose of your dishwasher in accordance with applicable regulations.
Warning
A child could climb into the appliance and become trapped inside (Changing Hazard) or other hazard. Therefore, you should: disconnect the power cord, cut and remove network cable. Damage the door latch so much that the door no longer locks
Before washing dishes for the first time
Before leaving the factory, your dishwasher has been subjected to various tests. To remove the water remaining in the machine after testing, you should wash it for the first time without dishes at the highest water temperature. To do this, load the machine with special salt, rinse aid and detergent through the loading openings provided for them.
2. Getting to know the car
You will find pictures showing the control panel and internal equipment of the dishwasher at the beginning of the instructions in the cover. In the text you will find footnotes regarding individual items.
Control Panel
![]()
1 Main switch
2 Car door opener key
3 Program selection knob (recessed*)
4 Additional functions*
5 Indication “Check water supply”
6 Indication of program execution progress
7 End of program indication
8
9
Indication of the need to add special salt
*on some models
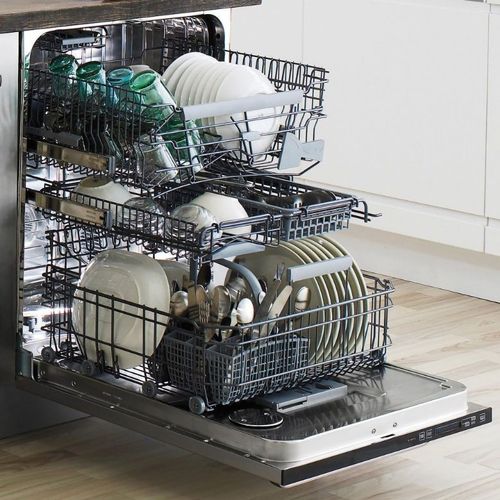
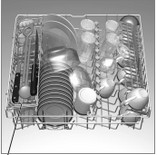
Dishwasher interior

20
Upper basket
21 additional cutlery basket for the upper basket *
22 Top sprinkler
23 Bookcase *
24 Lower sprinkler
25 Float switch**
26 Lower basket
27 Container for loading special salt
28 Filters
29 Cutlery basket
30 Rinse aid container
31 Dishwashing detergent compartment
32 Retainer
33
Nameplate
*On some models
** The float switch is necessary to ensure that too much water does not flow into the machine.
Maintenance, installation and dismantling of the circuit breaker must be carried out only by service specialists.
What you should buy in advance:
Salt for water softening,
Detergent,
Rinse aid. Use only dishes that can be washed in a dishwasher.
3. Device for reducing water hardness
For achievement good results When washing, the washing machine should be supplied with soft, almost calcium-free water.
Otherwise, scale will accumulate on the dishes and on the inside walls of the machine. Tap water, the calcium hardness of which exceeds the permissible hardness value must be cleaned of calcium salts before it is used in a washing machine.
Water softening is carried out using special salt, which is poured into a device for reducing water hardness built into the washing machine. Device setup and required amount salts depend entirely on the degree of hardness tap water.
Device setup
The first thing you should do is find out the hardness value of your tap water. The water management department or service center will help you with this.
You can determine the setting value from the water hardness table.
Close the door
3 , located in the position of the clock handat noon, to the left, counterclockwise, to the next fixed position.
Turn on the machine by pressing the main switch 1 and without releasing it for minutes. 3 seconds. Indicator 9 flashes and the lights above the and symbols light up. (Water hardness is set to 2 at the factory).
To change the setting: turn the program selection knob 3 . You can select one of the values from 0 to 3 depending on the hardness of the water you use. If the lights above the symbols are lit, and End, this means that the maximum permissible water hardness value has been set. If you now set an even higher value, the lights go out and the hardness value is set to 0 (none of the lights are lit).
1 . The set value is now stored in the machine's memory.
Water hardness table 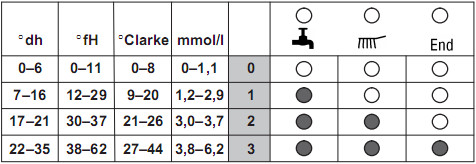
To protect against corrosion, salt should always be added immediately before turning on the machine. In this way, it is possible to achieve that the salt solution that has overflowed is immediately washed off, and rust does not appear around the salt container.
Open the screw cap of the salt container 27 .
Before you enter the carfor the first time, fill the salt container with approximately 1 liter of water.
After that add as much salt (but not cookery) so that the storage container is filled to the brim(max. 1.5 kg). During the salt loading process, water is displaced and poured out of the container.

Indication "Add salt to soften water" 9 on the panel will first light up and go out only when the salt concentration in the water is high enough.
At the set water hardness value "ABOUT" There is no need to add salt, since it is not consumed during operation of the machine, and the indication of the need to add salt is turned off.
Warning
In a container for special salt To soften the water, detergent should never get in
remedy. Otherwise, the water hardness reduction device will be damaged.
Indication of the need to add salt
As soon as the indication of the need to add special salt lights up on the control panel 9 , immediately before the next dishwashing, add salt.
Depending on how often you use your dishwasher and the water hardness setting, it may take many months before you need to add salt to regenerate your water softener.
Rinse aid is used to keep dishes stain-free and glasses clear.
Only use rinse aid designed for household dishwashers.
Open the lid of the rinse aid container 30 . To do this, press on the marking on the cover ( 1 ) and at the same time lift the cover by grasping its protrusion ( 2 ).
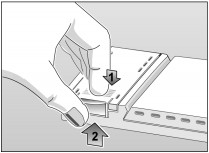
Carefully pour rinse aid all the way to the edge of the fill hole.

- The lid should be closed so that you can hear it click into place.
Any rinse aid that has overflowed should be collected with a cloth to prevent too much foam from forming the next time you wash the dishes.
Adjusting the amount of rinse aid delivered
The amount of rinse aid supplied to the machine when washing dishes can be infinitely adjusted. At the factory, the regulator is set to the value 4 .
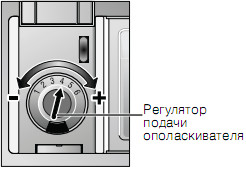
Indication of the need to add rinse aid
When on the control panel 8 If the rinse aid low indicator lights up, the rinse aid must be refilled.
6. Dishes
Not suitable for machine washing:
Wooden cutlery and crockery,
Thin glasses with paintings, antique dishes and dishes with decoration(when washing such dishes in a machine decorative design may get hurt)
Plastic dishes, “sensitive” to hot water,
Copper and tin utensils.
Dishes stained with ash, wax, grease or paint.
Items that are completely saturated with water, such as sponges and towels.
Painted glasses, aluminum and silverware may become discolored or tarnished when washed in a machine. Dishes made from certain types of glass (for example, crystal) may, due to frequent washing the car becomes cloudy.
In the future, please only buy dishes that are marked as dishwasher safe.
Damage to glass and porcelain dishes
Causes:
Fragile types of glass and porcelain,
Unsuitable chemical composition detergent,
Incorrect water temperature and washing program duration.
Use only glass and porcelain that is specified by the manufacturer to be dishwasher safe.
Use detergents whose packaging states that they do not corrode the surface of the dishes,
Choose a short wash program with low water temperature.
To avoid damage glassware and cutlery should be removed from the machine as soon as possible after the end of the program.
Placement of dishes
Dishes should be cleaned of large food debris, such as bones and fruit seeds, but should not be rinsed under running water. Rinse it first
V running water no need.
Place the dishes in the machine in such a way that:
She stood steady and could not topple over,
All containers were positioned with the opening downwards,
Convex or concave dishes stood at an angle so that water could drain from them,
Both spray arms could rotate freely.
Very small dishes should not be washed in the dishwasher as they may fall out of the trays.
Taking out dishes
To avoid dripping from the dishes in the upper tray onto the dishes in the lower tray, it is recommended to first remove the dishes from the lower tray and only then disassemble the upper tray.
Cups and glasses
Upper basket for dishes 20
Placement of pots
Lower basket for dishes, with shelf 26
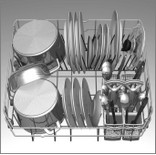
Cutlery
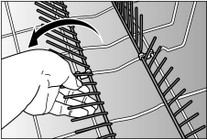
Cutlery should always be placed, without sorting, with the concave side down. This will make it easier for the water jet to reach individual forks and spoons. To avoid injury, please place long, sharp utensils and knives on the shelf (available on some dishwasher models) or on the knife rack (supplied as an accessory).
Basket folding bars (on some models)
In order to place pots and bowls more efficiently, the rods can be folded back.
Shelf (on some models)
In some models, lean glasses with stems and tall glasses against the edge of the shelf, but not against the dishes.
Long cutlery such as spoons, salad tongs, ladle or knives also have a place on the shelf where they will not interfere with the rotation of the spray arms. The shelf can be expanded or removed again if desired.
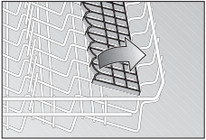
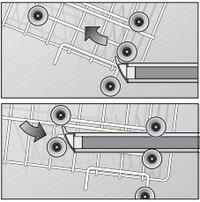
Basket height adjustment (on some models)
The upper dish basket can be moved higher or lower if necessary, depending on where you need it more space for tall dishes: in the upper or lower baskets.
Pull the top basket towards you.

Remove the basket and then reinsert it into the machine so that the top and bottom rollers fit into the guides.
7. Detergent
You can use commercially available liquid and powder branded dishwasher detergents or these products compressed into tablets (but not hand dishwashing detergent!).
Using phosphate-free detergents in hard water can quickly lead to stains on dishes and container walls. white plaque. This problem will help to solve large quantity detergent.
Whether the product is suitable for washing silverware is indicated on its packaging.
Cell with detergent dispenser
The markings in the detergent compartment will help you load the required amount of detergent:
bottom line: 15 ml
middle line: 25 ml
filling to the brim: 40 ml
If the detergent compartment 31
is still closed, to open it, press the latch 32
.
Load into compartment 31
dishwashing liquid.
Dosage: Refer to the manufacturer's instructions on the detergent packaging.
Important note
Since dishwashing detergents produced by different manufacturers, pressed into tablet form, dissolve at different rates, it may happen that when choosing a short dishwashing program, these detergents do not have time to fully demonstrate their cleaning properties. Therefore, powdered dishwashing detergents are more suitable for short programs.
In the Intensive Wash program (available on some models), it is enough to add only one tablet of detergent.
When using powdered detergents, it is possible that you will have to additionally sprinkle a little powder on the machine door.
If your dishes are only slightly dirty, then in most cases it is recommended to load less
amount of detergent than what is given in the instructions.
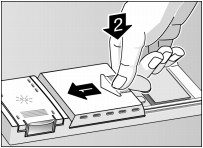
Close the detergent container. For this:
1. close the lid of the container,
2. press it until you hear a click.
If you use detergent compressed in the form of tablets, then read on the packaging of the product where you should put these tablets (in the basket with cutlery,
into a container for the product, etc.). Make sure that the lid of the detergent container is tightly closed when using tablets.
ATTENTION! IMPORTANT INFORMATION ON USING COMBINED DETERGENTS
When using so-called combination detergents, which make the use of rinse aid or salt unnecessary, please observe the following instructions:
Some products with added rinse aid are only most effective in certain programs.
For devices with automatic programs, this kind of means in most cases does not give the desired result.
Products that make the use of regenerating salt unnecessary can only be used in water with a certain hardness.
Before using these types of combination products, carefully read the instructions for use of these products or the information on the packaging!
If in doubt, contact the detergent manufacturer, especially if:
At the end of the program the dishes remain very wet.
Limescale deposits form.
8. Program overview
This list contains the maximum possible number of programs.
Programs. available in your dishwasher can be found on the machine's service panel.
Program selection
Taking into account the type of dishes and their quantity, as well as the condition of food residues, you can use the program overview to accurately select the appropriate washing program.
9. Washing dishes
If the machine is not fully loaded, then in most cases you should select a less intensive program than the one indicated in the instructions.
Program settings
Program parameters (duration, water and electricity consumption) can be found in Brief instructions. They were determined during operation of the machine in normal conditions. Because of
Various quantities of dishes,
Fluctuations in temperature supplied to water machine,
Various water pressure,
Temperatures environment,
Network voltage values
And due to the tolerances of such parameters as, for example, temperature, amount of water, etc., due to the design features of the machine, the actual program parameters may differ significantly from the theoretical ones.
Water consumption values were determined for a given water hardness value of two.
Turning on the dishwasher
Close the door.
Open the water tap completely.
Turn the program selection knob 3
Turn on the machine using the main switch 1 .
The program progress indicator lights up 6
, the program starts automatically.
End of the program
The program is considered completed if the program progress indicator goes out 6
and the program end indicator lights up 7
. If the “Wash only in the upper basket” function has been activated (not available on all models), it is switched off at the end of the program.
Open the car door.
Once cooled, unload the dishes from the machine.
At the end of the program, you can either turn off the machine or run the same or another program again.
Turning off the dishwasher
A few minutes after the end of the program:
Turn off the machine using the main switch 1 . End of program indication 7 will go out.
Close the water tap. (not available if the Aqua-Stop system is installed).The program selection knob does not need to be moved.
Once the cookware has cooled, remove it from the machine.
To unload the dishes at the end of the program, please open the machine door completely and do not leave it leaning. Since it is possible that the steam still escaping from the machine can damage the countertop made of material that is sensitive to water.
Interrupting a program
Press the main switch 1 .
The indicator light will go out. If hot water is supplied to the machine from the water supply or if the water in the machine has already heated up and the door of the machine was then opened, then it should first be leaned against for a few minutes and only then closed tightly.
Otherwise, the door may spring back due to the rapid expansion of water vapor inside the machine.
To continue the program, you must press the main switch again.
Final interruption of the program (Reset)
Only when the main switch is pressed:turn the program selection knob and set it to position Reset.
The program runs for approximately one minute.
When finished, turn off the machine using the main switch. 1
.
To restart the machine, turn the program selection knob 3 and install it opposite the program you need.
Turn on the machine using the main switch 1
.
The program starts automatically.
Changing programs
Within 2 minutes after the start of the program, it can still be replaced with a new one. If a new program was set later, the phase of the first program that has started (for example, the main wash) will be completed to the end.
Important note
If the dishwasher is disconnected from the power supply during operation, for example, as a result of switching off or a power failure, then all settings remain in the machine’s memory. As soon as voltage is applied, the machine will automatically start working further.
10. Additional features *
*On some models, set using buttons to select additional functions 4
.
Soaking *
Additional program "Soak" carried out before the main washing program. When running this program, pots, bowls, etc. in the lower basket are soaked and pre-rinsed. If you want to soak the dishes, press the button before starting the washing program "Soak". In this case, it is recommended to add approximately 5 g of detergent to the container located in the machine door.
Shortening time *
By pressing the key "Shortening Time" Drying phases and washing times are shortened. Due to the shorter time, the results of the rinsing and drying processes are slightly worse.
If you have very few dishes to wash (for example, only glasses, cups and plates), then you can connect the function. When connecting this additional function water, electricity and time are saved. For washing small quantity For dishes, please load the compartment with slightly less detergent than for a fully loaded dishwasher.
Extra dry*
After pressing the key "Extra dry" The final rinse of the dishes will be carried out in all programs at elevated temperature, which improves the drying result. (Be careful not to damage cookware that is not particularly resistant to hot water at elevated temperatures.)
11. Maintenance and care
Regular inspection and maintenance of your dishwasher will help you avoid problems. This will save you money and nerves.
General condition of the machine
Check for grease and scale deposits on the rocker arms.
If you find such deposits, then:
Load detergent into the designated compartment. Start the empty machine by selecting the dishwashing program with highest temperature heating water.
When cleaning your dishwasher, use only cleaning products specifically designed for this purpose.
The door gasket should be wiped regularly with a damp cloth.
Never use steam cleaners to clean your dishwasher. The machine manufacturer does not accept any liability for any malfunctions that may otherwise occur.
Regularly wet wipe the front panel of the machine and the control panel; All you need is water and a little dishwashing detergent by hand.
It is best to avoid using rough sponges or abrasive cleaners as both of these cleaning agents may leave scratches on the surface of the machine.
Attention!Never use other chlorine-containing household cleaning products! This is dangerous to your health!
Special salt and rinse aid
Watch for indications that these products need to be added. 9
And 8
. If necessary, add salt and/or rinse aid.
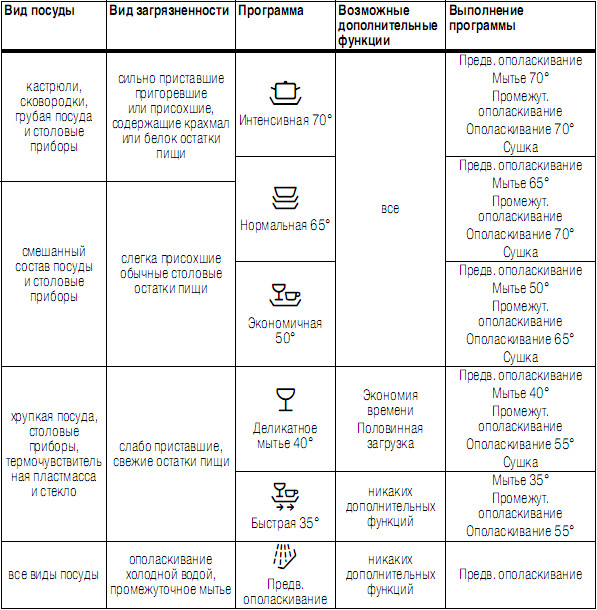
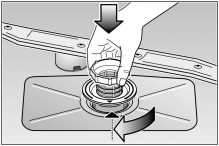
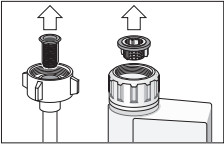
Filters
Contaminants deposited on filters 28 , can lead to clogging.
After each dishwashing, check the condition of the filters.
Unscrew the sieve cylinder and remove both filters. The filters are firmly connected to each other and cannot be disassembled into individual components.
Remove large dirtand rinse the filters in running water.
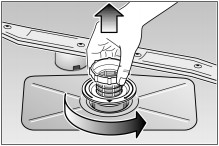
Assembly:
Place the filters in place and secure them with a sieve cylinder.
Sprinklers
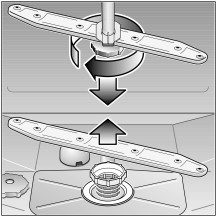
Sprinkler holes and bearings 22 And 24 may become clogged with scale and other contaminants carried by water. Therefore, the following measures must be taken:
Constantly check whether the openings of the sprinklers are clogged with food debris,
Bottom spray arm if necessary 24 remove through the top
Top sprinkler 22 unscrew it
Rinse both sprinklers under running water,
Put the sprinklers back on and fix or screw firmly.
Sewage pump(on some models)
Large food residues in the rinse water that the filters were unable to retain may become blocked.
sewer pump. Then the water is not pumped out and stands above the filter. In this case:
Press the main switch 1
,
- if necessary, bail out the water,
Remove the filters 28 ,
Remove the pump cover,
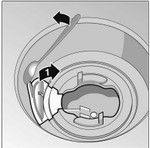
Check if there are any foreign objects inside, and if found, remove them,
Set again to place the cover,
Insert the filters and screw them on.
12. Troubleshooting
How to fix minor problems yourself
As experience shows, you can fix most of the malfunctions that arise every day during the operation of the machine yourself, without calling the service department. This way, firstly, you will avoid unnecessary expenses, and secondly, the washing machine will be at your disposal again. The recommendations below will help you find the cause of the malfunction.
Problems
Attention
Do not forget: repairs to the machine should only be carried out by a qualified specialist. If there is a need to replace any part, please ensure that only original spare parts are used. As a result of unqualified repairs or the use of non-original spare parts, it is possible that the user will suffer significant material damage and his life may be in danger.
...when turned on
The machine does not start working.
The fuse is bad.
Plug is not plugged into the socket.
The car door is not completely closed.
The water tap is not open.
The filter in the water supply hose is clogged.
Turn off the dishwasher and unplug it from the outlet. Close the water tap. After this, clean the filter located in the supply hose connection element. Finally, plug the machine back in, turn on the water tap, and turn on the dishwasher.
Problems with the car itself
The lower spray arm is difficult to turn.
The spray arm is blocked by small dishes or food debris.
The lid on the detergent container does not close.
The measuring container is full.
The closing mechanism does not work due to adhering detergent residues.
After starting the machine, the control lights flash.
No program selected.
At the end of washing the dishes, the indicator lights do not go out.
The car is still on.
Residue of detergent is stuck to the walls of the detergent container.
When adding the detergent, the walls of the container were wet (the detergent should only be poured into a dry container).
The “Check water supply” indicator lights up 5.
The water tap is closed.
The water was turned off.
The filter in the supply hose is clogged.
The supply hose is kinked.
At the end of the program, water remains in the machine.
Drain hose clogged or bent.
Evacuation pump waste water blocked.
The filters are clogged.
The program is not finished yet. Wait for it to finish.
Execute the function "Reset".
For built-in dishwashers, the door does not open/close correctly.
The panel attached to the car door is not heavy enough. It is necessary to adhere to the panel weight givenrefer to the installation instructions included in the package.
The door spring tension is not adjusted correctly. Adjust it as described under point 26 in the supplied installation instructions.
Washing problems
Unusually strong foaming.
Instead of rinse aid, the machine was filled with hand dishwashing detergent.
Detergent spilled past the special compartment when washing dishes can contribute to the formation of excessive foam, so it should be removed with a cloth.
The machine stops during the washing process.
The power was turned off.
The water was turned off.
Execute the function "RESET".
When the machine is running, knocking sounds are heard.
The spray arm hits the dishes.
The machine makes a knocking noise when running.
The dishes in the machine are not positioned correctly.
Impact sounds can be heard from the filling valves.
These noises are relatedwith the installation of a water supply system, which does not have any effect on the operation of the machine. It is impossible to eliminate these noises.
...on dishes
Dried food remains are visible on the dishes here and there..
The dishes were not positioned correctly, so the water jets could not reach their surface.
The dish basket was overflowing.
Elements of dishes were superimposed on each other.
A program that does not wash dishes too intensively has been selected.
The rocker arms could not rotate freely, as the dishes prevented this.
The holes in the rocker arms are clogged with food debris.
Filters are clogged.
Filters are not inserted correctly.
The pump for draining contaminated water is blocked.
Change in color of plastic utensils.
Too little dishwashing detergent was loaded.
There are white spots here and there on the dishes, and a milky coating on the glasses.
Too little dishwashing detergent was loaded.


